display MITSUBISHI L200 2018 (in English) Workshop Manual
[x] Cancel search | Manufacturer: MITSUBISHI, Model Year: 2018, Model line: L200, Model: MITSUBISHI L200 2018Pages: 466, PDF Size: 28.42 MB
Page 235 of 466
Folder Random Playback
Press the 5RDM key during playback of the
tracks in the folder in a random order.
Play all tracks in folders on the disc in a ran-
dom order.
NOTEl Pressing again will cancel.
Search Tracks
Search folders and files, and select a track.
1. Press the SEL•PWR•VOL key.
2. Turn the SEL•PWR•VOL key to select
the folder.
3. Press the SEL•PWR•VOL key.
Files within the selected folder are dis-
played.
4. Turn the SEL•PWR•VOL key to select
the file.
5. Press the SEL•PWR•VOL key.
This plays the selected file (track).
NOTEl While the folder is selected, press the key to cancel track search mode.NOTElIf there is no operation for 10 seconds after
selecting the folder, then track search mode
will be cancelled.
l While the file is selected, press the
key
to return to the previous operation.
l While the file is selected, hold down
the
key to cancel track search mode.
l Disc operations such as selecting a track will
cancel track search mode.
Listen to an iPod*
E00738001420
By connecting commercially-available iPod/iPhone devices to this product, you can play
tracks on these through the product.
CAUTIONl Do not leave the iPod/iPhone unattended in
the vehicle.
l Never hold these devices in your hand to op-
erate while driving, as this is dangerous.
l No indemnification for data loss resulting
when the iPod/iPhone is connected to the product will be possible.
l Depending on how the devices are handled,
audio files being damaged or lost, therefore it is recommended that data be backed up.NOTEl Depending on the generation, model, or soft-
ware version of the iPod/iPhone, playback
on this product may not be possible. (→P. 7-18 ) Additionally, playback as explained in
this document may not be possible.
l Usage of iPod/iPhone hardware with the lat-
est software version is recommended.
l Regarding how to connect the iPod/iPhone,
refer to “How to connect an iPod” on page
7-97.
l When connecting the iPod/iPhone, use a
commercially-available iPod connection ca-
ble.
l Set up the device in order that no unsafe ac-
tions, such as plugging in the connection ca-ble are taken while driving.
l When inserting and removing the iPod/
iPhone, for safety’s sake first stop the vehi- cle.
l Depending on the status of the iPod/iPhone,
it may take some time until the device is rec- ognized, or playback starts.
l Depending on the iPod/iPhone, the button
functions on the product may not operatewhile the iPod/iPhone is connected.
l iPod/iPhone specifications and settings may
mean that connection is not possible, or re- sult in differences in operation or display.
l Depending on audio data in the iPod/iPhone,
track information may not be displayed cor- rectly.
l Depending on the status of the vehicle and
device, the iPod/iPhone may not be played after starting the engine.
Listen to an iPod*
7-31OKTE18E1For pleasant driving7
Page 236 of 466
NOTElData containing copyright information may
not be played back.
l It is recommended that the iPod/iPhone
equaliser settings be set to flat.
l Operate the iPod/iPhone while connected to
this product.
l If an iPod/iPhone does not operate correctly,
then remove the iPod/iPhone from the prod-
uct, reset, then reconnect.
Play iPod
Press the MEDIA key to set the USB (iPod)
as the source.
The selected source is indicated on the dis- play.
Select the Track (File)
Press the key or key to select the
track.
This enables selection of the next or previous
track.
Fast Forward or Rewind
Hold down the key or key.
Fast forward/rewind is possible.
Switch Playback Mode
Repeat playback and shuffle playback are
possible.
Repeat Playback (RPT)
Press the 4RPT key.
Repeat playback of the track currently being
played.
NOTEl Pressing again will cancel.
Shuffle Playback (RDM)
Press the 5RDM key.
Play tracks in the category currently being played in a random order.
NOTEl Pressing the 5RDM key two times will can-
cel.
Album Shuffle Playback
Press the 5RDM key during playback of the
album in a random order.
Play the album in a random order (tracks in
any order on the album).
NOTEl Pressing again will cancel.
Search Tracks
Search categories or track names, and select a
track. 1. Press the SEL•PWR•VOL key.
2. Turn the SEL•PWR•VOL key to select
the category.
3. Press the SEL•PWR•VOL key. Catego-
ries or tracks within the selected catego-
ry are displayed.
4. Turn the SEL•PWR•VOL key to select
the category or track.
5. Press the SEL•PWR•VOL key. Repeat steps 1 to 4, and search fortracks.
Select the track, and press the
SEL•PWR•VOL key to play.
NOTEl While the category (1 st
level) is selected,
press the key to cancel track search
mode.
l If there is no operation for 10 seconds after
selecting the category, then track search
mode will be cancelled.
l While the track is selected, press the
key
to return to the previous operation.
Listen to an iPod*
7-32OKTE18E1For pleasant driving7
Page 237 of 466
NOTElWhile the track is selected, hold down the key to cancel track search mode.
l iPod operations such as selecting a track will
cancel track search mode.Listen to Audio Files on a
USB Device* E00736501434
By connecting commercially-available USB
devices such as USB memory to this product, you can play audio files on these through the
product.
CAUTIONl Do not leave the USB device unattended in
the vehicle.
l Never hold these devices in your hand to op-
erate while driving, as this is dangerous.
l Do not use hard discs, card readers, or mem-
ory readers, as damage may occur to these or
to the data contained therein. If these are er- roneously connected, then turn the ignition
switch to the “LOCK” position or put the operation mode in OFF, then remove.
l Because of the risk of data loss, it is recom-
mended that files be backed up.
l No guarantee is made as regards damage to
the USB device, nor regarding loss or dam-
age to data contained therein.CAUTIONl Depending on how the devices are handled,
audio files being damaged or lost, therefore
it is recommended that data be backed up.NOTEl Digital audio players that support the mass
storage class specifications can be connec- ted.
l Regarding how to connect USB devices, re-
fer to “How to connect a USB memory de-vice” on page 7-96.
l When connecting a USB device, use a con-
nection cable. Failure to use a connection ca-
ble when connecting may place undue load
on, or damage the USB connector.
l Set up the device in order that no unsafe ac-
tions, such as plugging in the connection ca-ble are taken while driving.
l When inserting and removing the USB de-
vice, for safety’s sake first stop the vehicle.
l Do not insert other than audio devices into
the USB port. Damage to the device or equipment may result.
l Depending on the status of the USB device,
it may take some time until the device is rec- ognized, or playback starts.
l Depending on the USB device, the button
functions on the product may not operatewhile the USB device is connected.
l USB device specifications and settings may
mean that connection is not possible, or re- sult in differences in operation or display.NOTEl Depending on audio data in the USB device,
track information may not be displayed cor-
rectly.
l Depending on the status of the vehicle and
device, the iPod/iPhone may not be played after starting the engine.
l Data containing copyright information may
not be played back.
l This product can play MP3, WMA, and
AAC format audio files.
l Depending on the type of USB device, usage
may not be possible, or functions that can beused may be restricted.
l The recommended file system for USB
memory is FAT32.
l The maximum supported capacity for USB
memory is 32GB.
l Operate the USB device containing recorded
audio files while connected to this product.
Playback of Audio Files on a
USB Device
Press the MEDIA key to set
USB as the source. The selected source is in- dicated on the display.
Select the Track (File)
Press the key or key to select the
track.
Listen to Audio Files on a USB Device*
7-33OKTE18E1For pleasant driving7
Page 239 of 466
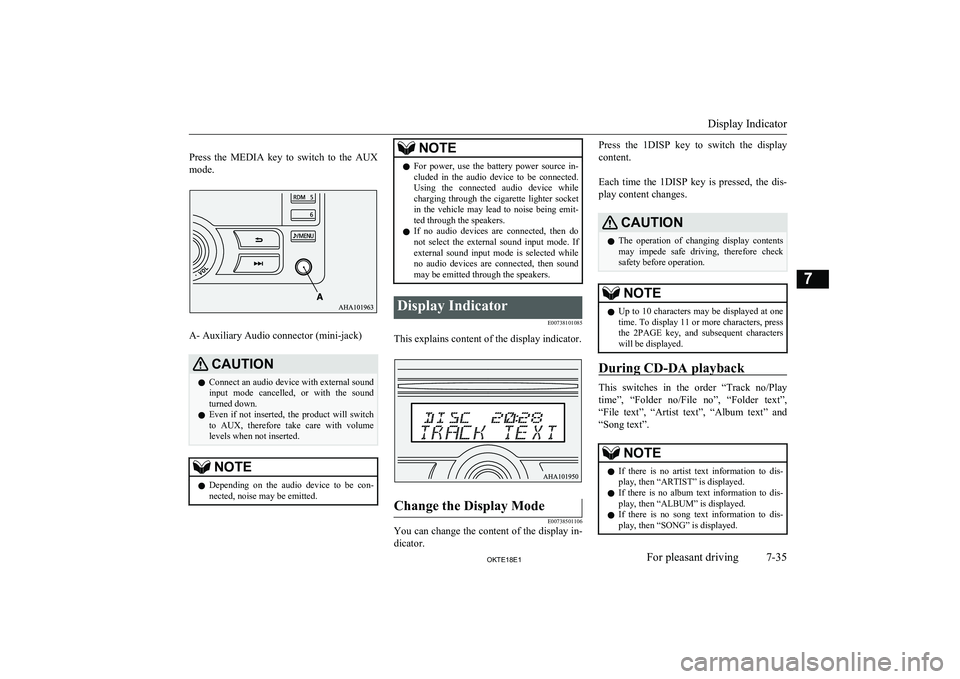
Press the MEDIA key to switch to the AUX
mode.
A- Auxiliary Audio connector (mini-jack)
CAUTIONl Connect an audio device with external sound
input mode cancelled, or with the soundturned down.
l Even if not inserted, the product will switch
to AUX, therefore take care with volume
levels when not inserted.NOTEl Depending on the audio device to be con-
nected, noise may be emitted.NOTEl For power, use the battery power source in-
cluded in the audio device to be connected.
Using the connected audio device while charging through the cigarette lighter socket
in the vehicle may lead to noise being emit- ted through the speakers.
l If no audio devices are connected, then do
not select the external sound input mode. If external sound input mode is selected while
no audio devices are connected, then sound
may be emitted through the speakers.Display Indicator
E00738101085
This explains content of the display indicator.
Change the Display Mode
E00738501106
You can change the content of the display in-dicator.
Press the 1DISP key to switch the display
content.
Each time the 1DISP key is pressed, the dis- play content changes.CAUTIONl The operation of changing display contents
may impede safe driving, therefore check safety before operation.NOTEl Up to 10 characters may be displayed at one
time. To display 11 or more characters, pressthe 2PAGE key, and subsequent characters will be displayed.
During CD-DA playback
This switches in the order “Track no/Play
time”, “Folder no/File no”, “Folder text”, “File text”, “Artist text”, “Album text” and
“Song text”.
NOTEl If there is no artist text information to dis-
play, then “ARTIST” is displayed.
l If there is no album text information to dis-
play, then “ALBUM” is displayed.
l If there is no song text information to dis-
play, then “SONG” is displayed.
Display Indicator
7-35OKTE18E1For pleasant driving7
Page 240 of 466
During MP3/WMA/AAC Play-
back
This switches in the order “Track no/Play
time”, “Folder no/File no”, “Folder text”, “File text”, “Artist text”, “Album text” and
“Song text”.
NOTEl If there is no artist text information to dis-
play, then “ARTIST” is displayed.
l If there is no album text information to dis-
play, then “ALBUM” is displayed.
l If there is no song text information to dis-
play, then “SONG” is displayed.During iPod Playback
E00738901054
During other than Podcast playback, this
switches in the order “Track No. + playtime”,“Artist text”, “Album text” and “Song text”.
During Podcast playback, this switches in the order “Track No. + playtime”, “Podcast
name”, “Episode name” and “Release date”.
NOTEl If there is no artist text information to dis-
play, then “ARTIST” is displayed.
l If there is no album text information to dis-
play, then “ALBUM” is displayed.NOTEl If there is no song text information to dis-
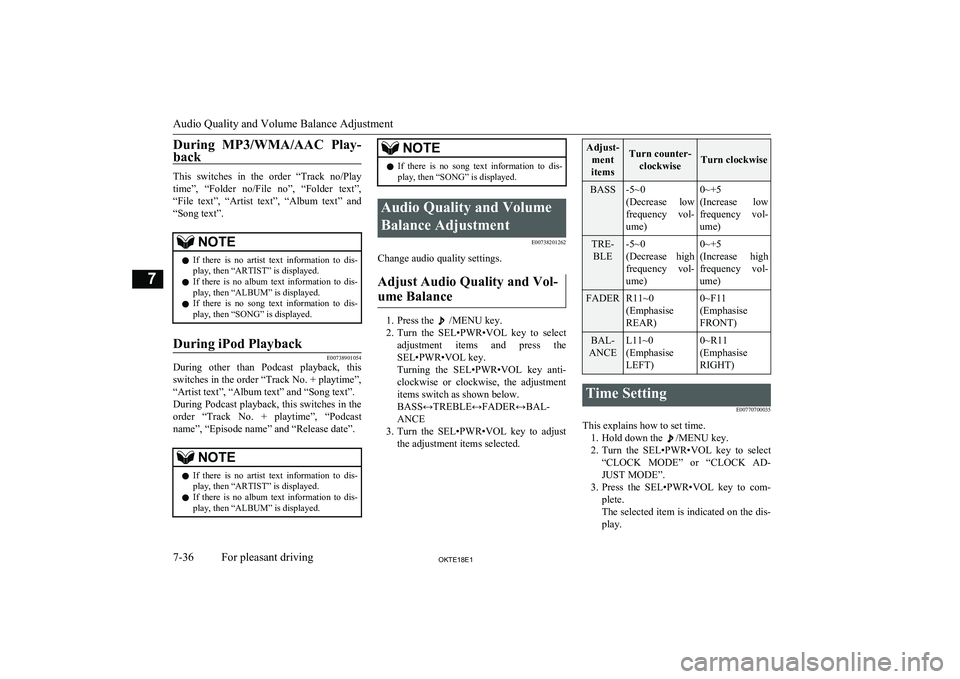
play, then “SONG” is displayed.Audio Quality and Volume
Balance Adjustment E00738201262
Change audio quality settings.
Adjust Audio Quality and Vol-ume Balance
1. Press the /MENU key.
2. Turn the SEL•PWR•VOL key to select
adjustment items and press the
SEL•PWR•VOL key.
Turning the SEL•PWR•VOL key anti- clockwise or clockwise, the adjustment
items switch as shown below.
BASS↔TREBLE↔FADER↔BAL-
ANCE
3. Turn the SEL•PWR•VOL key to adjust
the adjustment items selected.
Adjust-
ment
itemsTurn counter- clockwiseTurn clockwise
BASS-5~0
(Decrease low
frequency vol-
ume)0~+5
(Increase low frequency vol-
ume)TRE- BLE-5~0
(Decrease high
frequency vol-
ume)0~+5
(Increase high
frequency vol-
ume)FADERR11~0
(Emphasise
REAR)0~F11
(Emphasise
FRONT)BAL-
ANCEL11~0
(Emphasise
LEFT)0~R11
(Emphasise
RIGHT)Time Setting
E00770700035
This explains how to set time.1. Hold down the
/MENU key.
2. Turn the SEL•PWR•VOL key to select
“CLOCK MODE” or “CLOCK AD-
JUST MODE”.
3. Press the SEL•PWR•VOL key to com-
plete.
The selected item is indicated on the dis-
play.
Audio Quality and Volume Balance Adjustment
7-36OKTE18E1For pleasant driving7
Page 241 of 466
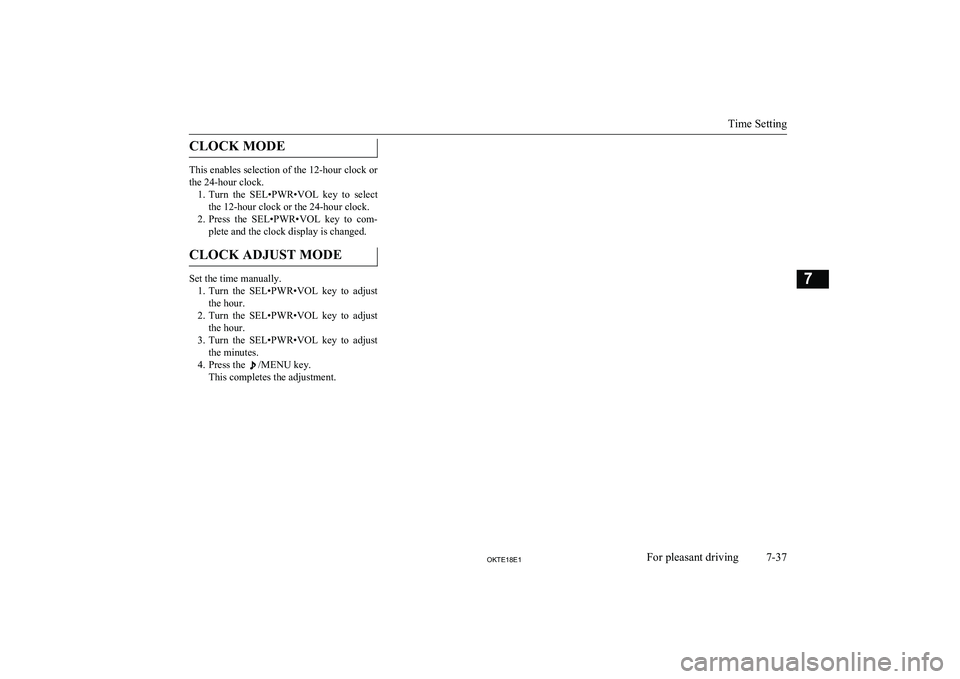
CLOCK MODE
This enables selection of the 12-hour clock or
the 24-hour clock. 1. Turn the SEL•PWR•VOL key to select
the 12-hour clock or the 24-hour clock.
2. Press the SEL•PWR•VOL key to com-
plete and the clock display is changed.
CLOCK ADJUST MODE
Set the time manually. 1. Turn the SEL•PWR•VOL key to adjust
the hour.
2. Turn the SEL•PWR•VOL key to adjust
the hour.
3. Turn the SEL•PWR•VOL key to adjust
the minutes.
4. Press the
/MENU key.
This completes the adjustment.
Time Setting
7-37OKTE18E1For pleasant driving7
Page 242 of 466
TroubleshootingE00738401222
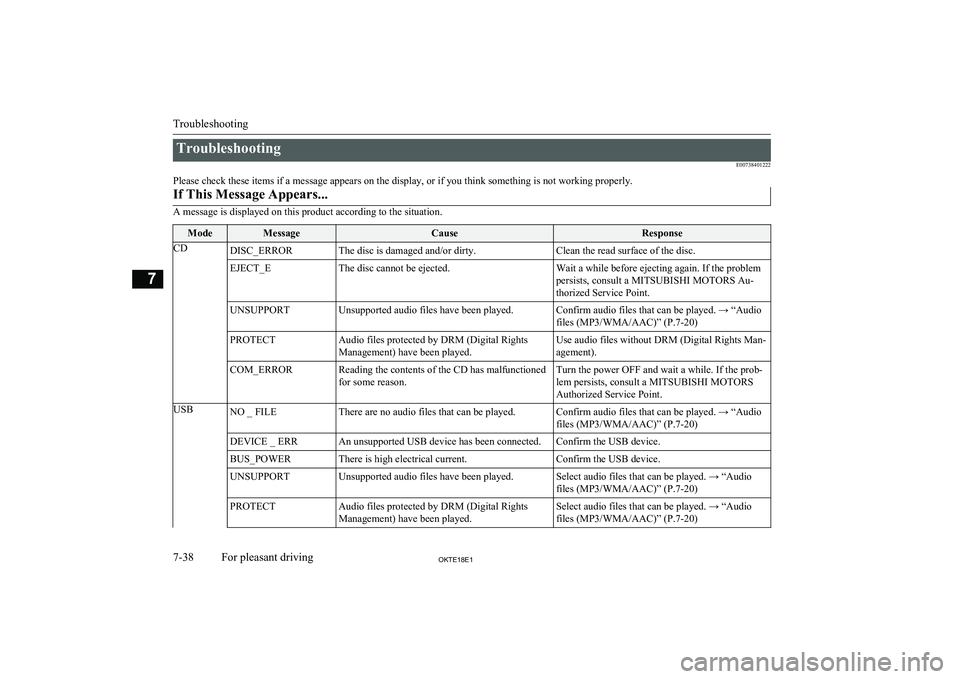
Please check these items if a message appears on the display, or if you think something is not working properly.If This Message Appears...
A message is displayed on this product according to the situation.
ModeMessageCauseResponseCDDISC_ERRORThe disc is damaged and/or dirty.Clean the read surface of the disc.EJECT_EThe disc cannot be ejected.Wait a while before ejecting again. If the problem
persists, consult a MITSUBISHI MOTORS Au-
thorized Service Point.UNSUPPORTUnsupported audio files have been played.Confirm audio files that can be played. → “Audio files (MP3/WMA/AAC)” (P.7-20)PROTECTAudio files protected by DRM (Digital Rights
Management) have been played.Use audio files without DRM (Digital Rights Man-
agement).COM_ERRORReading the contents of the CD has malfunctioned
for some reason.Turn the power OFF and wait a while. If the prob- lem persists, consult a MITSUBISHI MOTORS Authorized Service Point.USBNO _ FILEThere are no audio files that can be played.Confirm audio files that can be played. → “Audiofiles (MP3/WMA/AAC)” (P.7-20)DEVICE _ ERRAn unsupported USB device has been connected.Confirm the USB device.BUS_POWERThere is high electrical current.Confirm the USB device.UNSUPPORTUnsupported audio files have been played.Select audio files that can be played. → “Audio
files (MP3/WMA/AAC)” (P.7-20)PROTECTAudio files protected by DRM (Digital Rights
Management) have been played.Select audio files that can be played. → “Audio files (MP3/WMA/AAC)” (P.7-20)
Troubleshooting
7-38OKTE18E1For pleasant driving7
Page 247 of 466
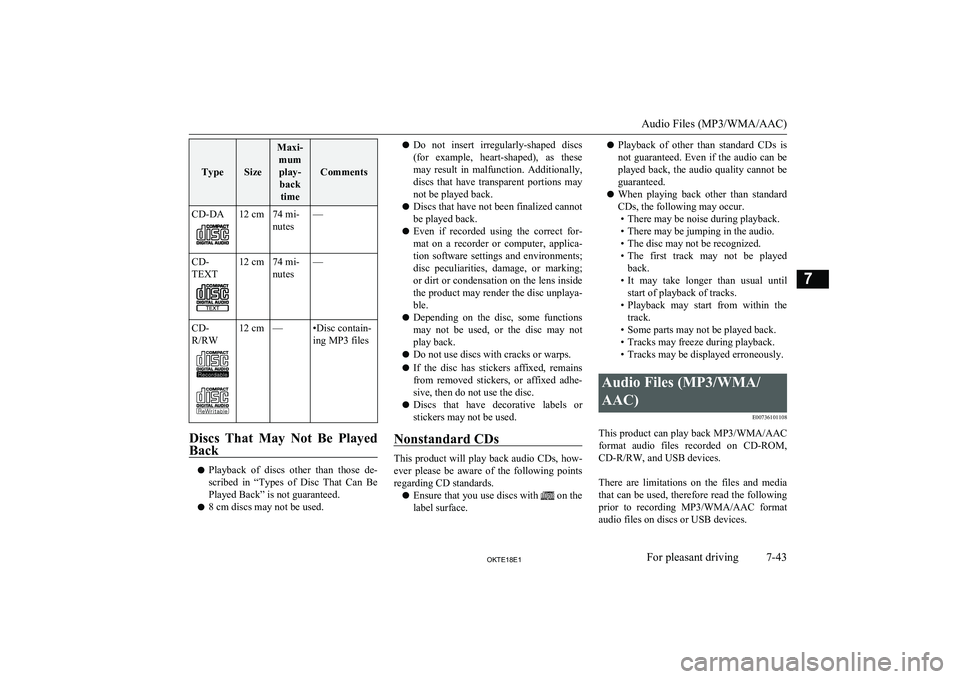
TypeSize
Maxi-mumplay- back time
Comments
CD-DA12 cm74 mi-
nutes—CD-
TEXT12 cm74 mi-
nutes—CD-
R/RW12 cm—•Disc contain-
ing MP3 files
Discs That May Not Be Played
Back
l Playback of discs other than those de-
scribed in “Types of Disc That Can Be
Played Back” is not guaranteed.
l 8 cm discs may not be used.
lDo not insert irregularly-shaped discs
(for example, heart-shaped), as these may result in malfunction. Additionally,
discs that have transparent portions may
not be played back.
l Discs that have not been finalized cannot
be played back.
l Even if recorded using the correct for-
mat on a recorder or computer, applica- tion software settings and environments;
disc peculiarities, damage, or marking; or dirt or condensation on the lens inside
the product may render the disc unplaya-
ble.
l Depending on the disc, some functions
may not be used, or the disc may not play back.
l Do not use discs with cracks or warps.
l If the disc has stickers affixed, remains
from removed stickers, or affixed adhe- sive, then do not use the disc.
l Discs that have decorative labels or
stickers may not be used.
Nonstandard CDs
This product will play back audio CDs, how-
ever please be aware of the following points regarding CD standards.
l Ensure that you use discs with
on the
label surface.
l Playback of other than standard CDs is
not guaranteed. Even if the audio can be played back, the audio quality cannot be
guaranteed.
l When playing back other than standard
CDs, the following may occur. • There may be noise during playback.
• There may be jumping in the audio.
• The disc may not be recognized.
• The first track may not be played
back.
• It may take longer than usual until
start of playback of tracks.
• Playback may start from within the
track.
• Some parts may not be played back.
• Tracks may freeze during playback.
• Tracks may be displayed erroneously.Audio Files (MP3/WMA/
AAC) E00736101108
This product can play back MP3/WMA/AAC
format audio files recorded on CD-ROM,
CD-R/RW, and USB devices.
There are limitations on the files and media that can be used, therefore read the following
prior to recording MP3/WMA/AAC format audio files on discs or USB devices.
Audio Files (MP3/WMA/AAC)
7-43OKTE18E1For pleasant driving7
Page 248 of 466
Additionally, ensure you read the user man-
uals for your CD-R/RW drive and the writing
software, and ensure these are used correctly. If the MP3/WMA/AAC format audio files in- cludes title information or other data, then
this can be displayed.CAUTIONl CD-ROM
and CD-R/RW media can only
play back MP3 format audio files.
l Actions such as copying audio CDs or files
and either distributing these to others for free or for charge, or uploading files via the Internet or other means to servers is an in-
fringement of the law.
l Do not append the file extensions “.mp3”,
“.wma”, or “.m4a”, to other than
MP3/WMA/AAC format files. Playing back
discs with these types of files recorded upon
them may cause the files to be incorrectly
identified for playback, which may lead to loud noise, resulting in speaker damage or
accident.NOTEl Depending on the condition of the disc re-
corder or recording software used, correct
playback may not be possible. In these ca- ses, refer to the user manual for your product or software.NOTEl Depending on your computer’s operating
system, version, software, or settings, filesmay not have a file extension appended. In these cases, append the file extensions
“.mp3”, “.wma”, or “.m4a” when copying
the files.
l Files larger than 2GB in size cannot be
played back.Data Formats That Can Be
Played Back
E00736200027
Data formats that can be played on discs
(CD-ROM, CD-R/RW ) and USB devices dif-
fer.
Data formatDISCUSB deviceMP3WMAXAACXFolder Structure
E00736300031
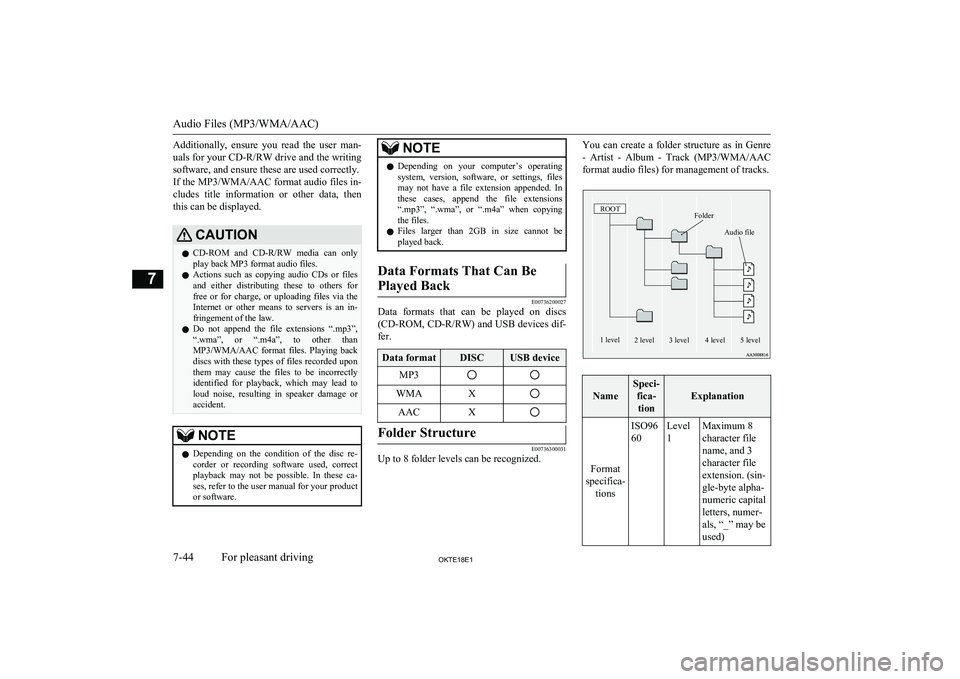
Up to 8 folder levels can be recognized.
You can create a folder structure as in Genre
- Artist - Album - Track (MP3/WMA/AAC
format audio files) for management of tracks.FolderROOTAudio file1 level2 level3 level4 level5 level
Name
Speci- fica-tion
Explanation
Format
specifica- tions
ISO96
60Level
1Maximum 8
character file
name, and 3
character file
extension. (sin-
gle-byte alpha-
numeric capital
letters, numer-
als, “_” may be
used)
Audio Files (MP3/WMA/AAC)
7-44OKTE18E1For pleasant driving7
Page 249 of 466
Name
Speci-fica-tion
ExplanationFormat
specifica- tionsISO96
60 ex-
tensionJolietFiles names up
to a maximum 64 characters
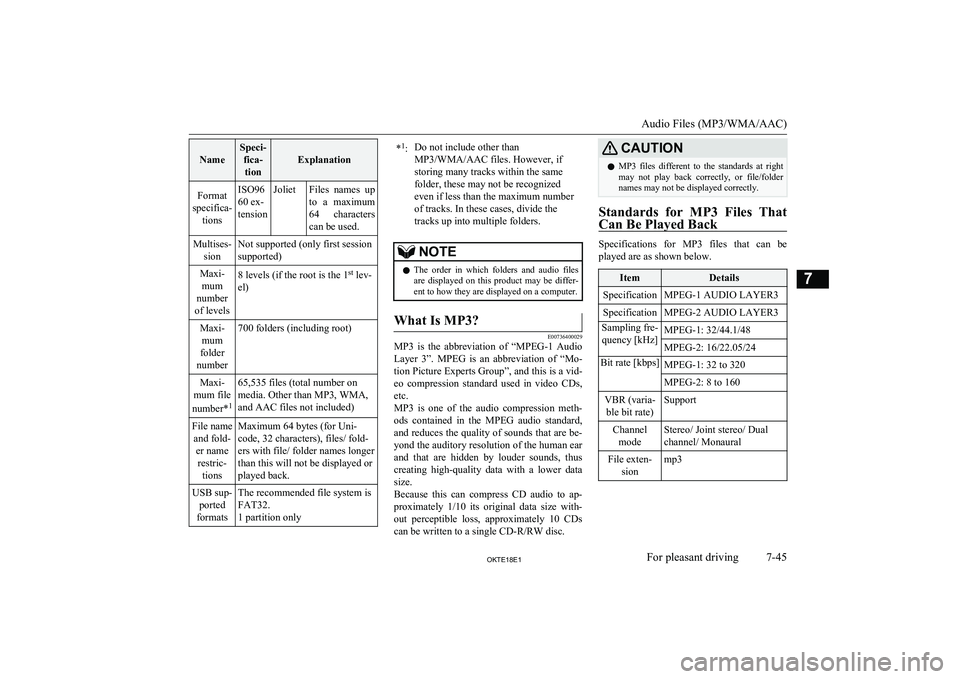
can be used.Multises- sionNot supported (only first session
supported)Maxi- mum
number
of levels8 levels (if the root is the 1 st
lev-
el)Maxi- mum
folder
number700 folders (including root)Maxi-
mum file
number* 165,535 files (total number on
media. Other than MP3, WMA,
and AAC files not included)File name and fold- er namerestric- tionsMaximum 64 bytes (for Uni-
code, 32 characters), files/ fold-
ers with file/ folder names longer
than this will not be displayed or
played back.USB sup- ported
formatsThe recommended file system is
FAT32.
1 partition only* 1
:Do not include other than
MP3/WMA/AAC files. However, if
storing many tracks within the same
folder, these may not be recognized
even if less than the maximum number
of tracks. In these cases, divide the
tracks up into multiple folders.NOTEl The order in which folders and audio files
are displayed on this product may be differ-ent to how they are displayed on a computer.What Is MP3?
E00736400029
MP3 is the abbreviation of “MPEG-1 Audio
Layer 3”. MPEG is an abbreviation of “Mo-tion Picture Experts Group”, and this is a vid-
eo compression standard used in video CDs, etc.
MP3 is one of the audio compression meth-
ods contained in the MPEG audio standard,
and reduces the quality of sounds that are be- yond the auditory resolution of the human ear
and that are hidden by louder sounds, thus
creating high-quality data with a lower data
size.
Because this can compress CD audio to ap- proximately 1/10 its original data size with-
out perceptible loss, approximately 10 CDs can be written to a single CD-R/RW disc.
CAUTIONl MP3 files different to the standards at right
may not play back correctly, or file/folder names may not be displayed correctly.
Standards for MP3 Files That
Can Be Played Back
Specifications for MP3 files that can be
played are as shown below.
ItemDetailsSpecificationMPEG-1 AUDIO LAYER3SpecificationMPEG-2 AUDIO LAYER3Sampling fre- quency [kHz]MPEG-1: 32/44.1/48MPEG-2: 16/22.05/24Bit rate [kbps]MPEG-1: 32 to 320MPEG-2: 8 to 160VBR (varia- ble bit rate)SupportChannel modeStereo/ Joint stereo/ Dual
channel/ MonauralFile exten- sionmp3
Audio Files (MP3/WMA/AAC)
7-45OKTE18E1For pleasant driving7