MITSUBISHI MIRAGE 2019 Owner's Manual (in English)
Manufacturer: MITSUBISHI, Model Year: 2019, Model line: MIRAGE, Model: MITSUBISHI MIRAGE 2019Pages: 16, PDF Size: 0.91 MB
Page 1 of 16

1
Thank you for buying a Mitsubishi MIrage. There’s no doubt you’ve already realized how well
your car drives on the open road. What you may not know is all the great\
features that help
your car perform the way it does. In the pages ahead we’re going to run through the basics
and prepare you for the road.
We hope you will visit the Mitsubishi Owner’s site where we store the\
latest Mitsubishi news
and special offers. Here you can also keep track of your car’s warran\
ty and servicing needs,
get Roadside Assistance Information and tap into other owner-centric det\
ails. Just log on to
HTTPS://WWW.MITSUBISHICARS.COM/OWNERS.
Some of the information contained in this booklet may not be correct due\
to product changes which may
have occurred after the time it was published. Mitsubishi Motors North A\
merica, Inc. reserves the right to
make changes at any time, without notice, to prices, color, materials, specification and models.
TABLE OF CONTENTS
Outside Driver's Side .......... Page 4
Steering Wheel Controls ....... Page 5
Steering Column Controls ...... Page 7
Instrument Cluster ...........Page 8
Instrument Panel ............Page 9
Center Console & Panel ....... Page 10
Emergency Roadside
Assistance App ............. Page 14
FAQ’s ..................... Page 15
Page 2 of 16
2
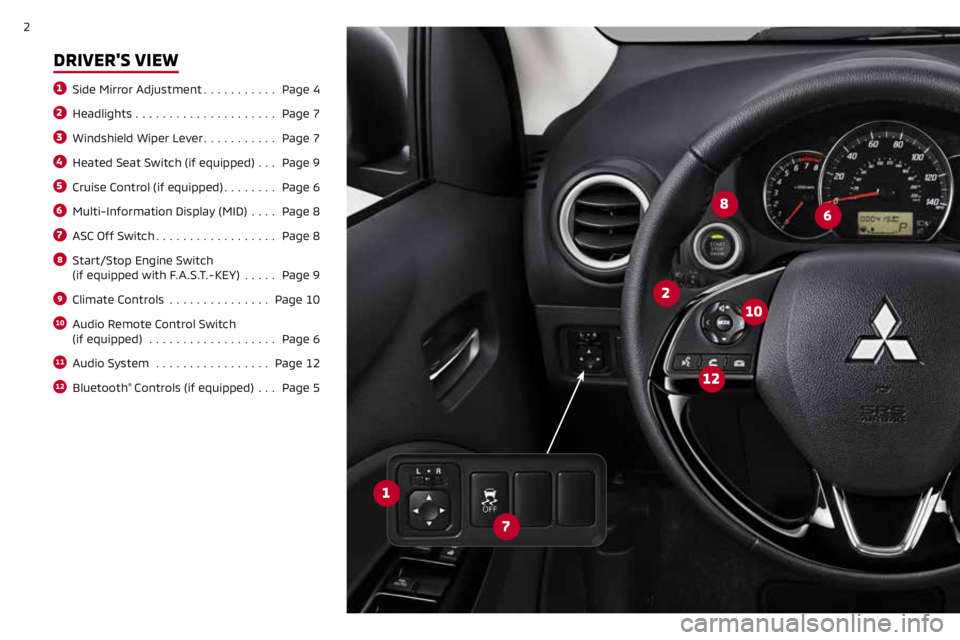
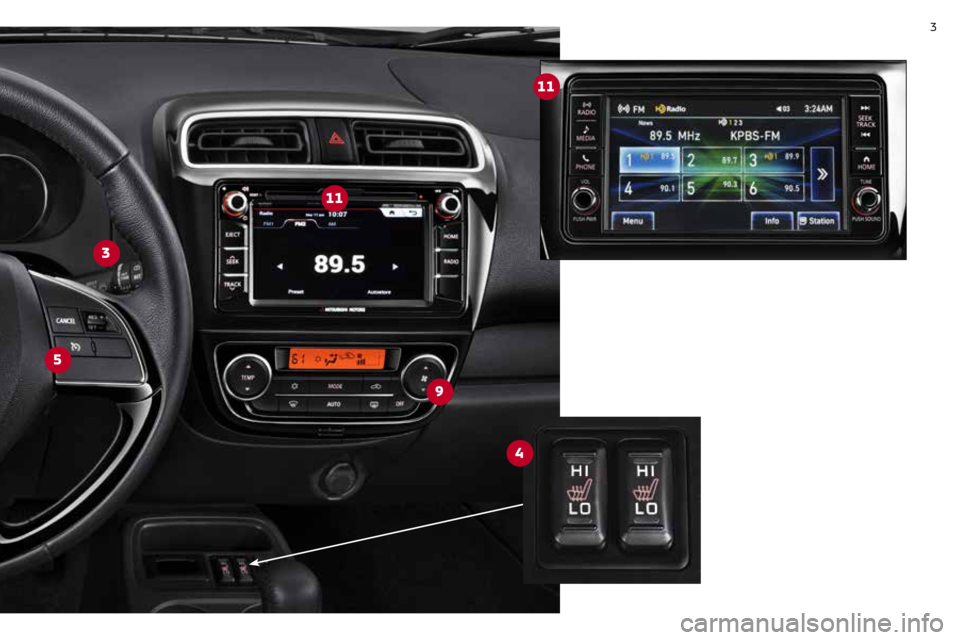
DRIVER'S VIEW
1 Side Mirror Adjustment ........... Page 4
2 Headlights ..................... Page 7
3 Windshield Wiper Lever ........... Page 7
4 Heated Seat Switch (if equipped) ...Page 9
5 Cruise Control (if equipped) ........ Page 6
6 Multi-Information Display (MID) ....Page 8
7 ASC Off Switch .................. Page 8
8 Start/Stop Engine Switch
(if equipped with F.A.S.T.-KEY) .....Page 9
9 Climate Controls ............... Page 10
10 Audio Remote Control Switch
(if equipped) ................... Page 6
11 Audio System ................. Page 12
12 Bluetooth® Controls (if equipped) ...Page 512
8
10
6
2
7
1
Page 3 of 16
3
5
3
11
11
9
4
Page 4 of 16
4OUTSIDE DRIVER'S SIDE
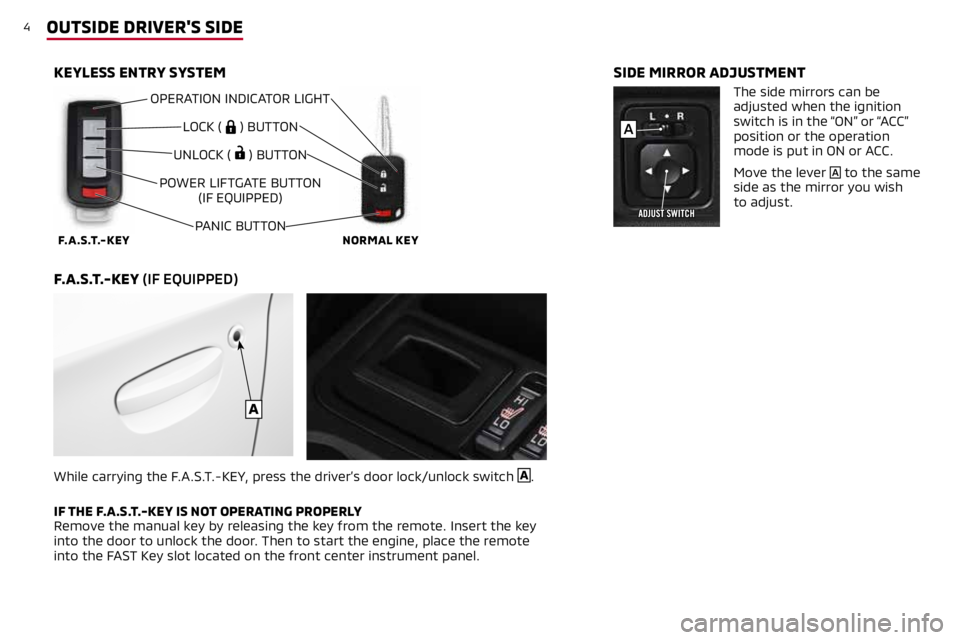
KEYLESS ENTRY SYSTEM
F.A.S.T.-KEY (IF EQUIPPED)
While carrying the F.A.S.T.-KEY, press the driver’s door lock/unlock switch A.
IF THE F.A.S.T.-KEY IS NOT OPERATING PROPERLY
Remove the manual key by releasing the key from the remote. Insert the key
into the door to unlock the door. Then to start the engine, place the remote
into the FAST Key slot located on the front center instrument panel.
F.A.S.T.-KEYNORMAL KEY
OPERATION INDICATOR LIGHT
LOCK (
) BUTTON
UNLOCK (
) BUTTON
POWER LIFTGATE BUTTON (IF EQUIPPED)
PANIC BUTTON
A
SIDE MIRROR ADJUSTMENT
The side mirrors can be
adjusted when the ignition
switch is in the “ON” or “ACC”
position or the operation
mode is put in ON or ACC.
Move the lever
A to the same
side as the mirror you wish
to adjust.
A
Page 5 of 16

5STEERING WHEEL CONTROLS
To Register a Bluetooth® Device:
1. Press the HOME key
2. Touch SETTING, then BLUETOOTH
3. Touch the NEW DEVICES
(IF NO BLUETOOTH
® DEVICES ARE REGISTERED, STEP 3 IS
NOT REQUIRED)
• If the Bluetooth
® device is permitted to pair then it will allow
the connection to be made.
• Supports Ver. 2.1 + EDR
• Supported profiles: Bluetooth
® Audio A2DP(V1.1),
AVRCP(V1.3); Hands-free HFP(v1.5); Phonebook transfer
PBAP(v1.0)
When Bluetooth
® is connected, 3 icons will display – the
antenna level (1 to 6), battery, Bluetooth® connected (shown
on the HOME screen).
BLUETOOTH® INFORMATION
BLUETOOTH® CONTROLS
For a list of compatible Bluetooth® devices, please go to
http://www.mitsubishicars.com/owners
A - SPEECH BUTTON
(IF EQUIPPED)
Change to voice recognition
B - PICK-UP BUTTON
Answer an incoming call
C - HANG-UP BUTTON
End a call or voice recognition
Bluetooth is a registered trademark of Bluetooth SIG, Inc.
1. Press the HOME key
2. Touch SETTING, then BLUETOOTH
3.
Touch the NEW DEVICES. If the Bluetooth
® device is permitted to
pair then the SDA system will allow the connection to be made.
4. Go to your phone settings to confirm pairing
If you have paired multiple Bluetooth
® devices with your SDA
system, the Bluetooth® device that connected last will be selected
and will automatically connect when it is detected.
TO SELECT A DIFFERENT DEVICE:
1. Press the HOME key
2. Touch SETTING, then BLUETOOTH
3. Touch the PAIRED DEVICES
4. Touch the “device name” to connect
5. This will complete the selection of the Bluetooth
® device
BLUETOOTH® PAIRING
ABC
Page 6 of 16
6STEERING WHEEL CONTROLS
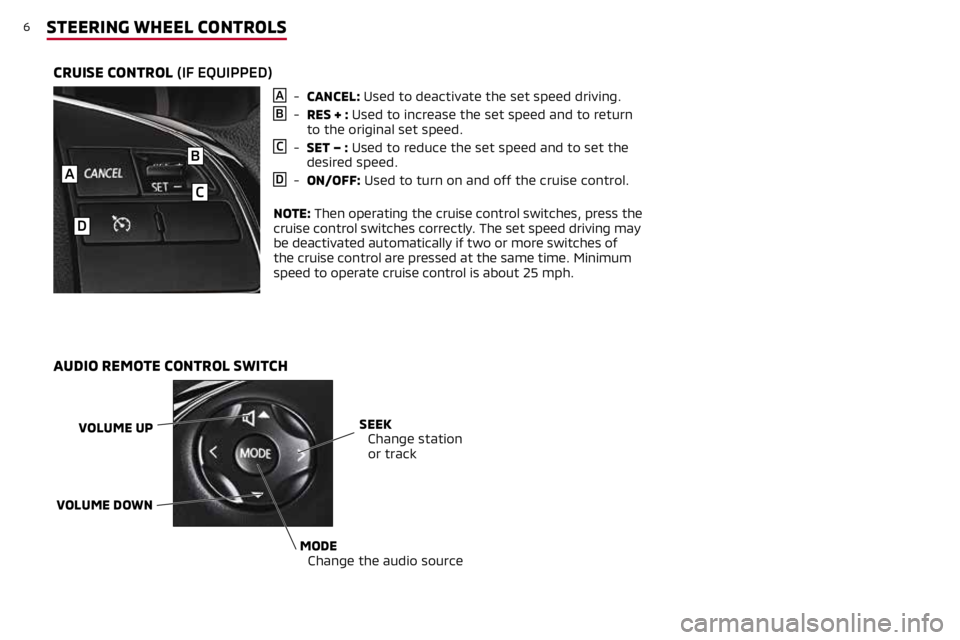
A - CANCEL: Used to deactivate the set speed driving.
B - RES + : Used to increase the set speed and to return
to the original set speed.
C - SET – : Used to reduce the set speed and to set the
desired speed.
D - ON/OFF: Used to turn on and off the cruise control.
NOTE: Then operating the cruise control switches, press the
cruise control switches correctly. The set speed driving may
be deactivated automatically if two or more switches of
the cruise control are pressed at the same time. Minimum
speed to operate cruise control is about 25 mph.
CRUISE CONTROL (IF EQUIPPED)
B
C
D
A
AUDIO REMOTE CONTROL SWITCH
VOLUME UP
VOLUME DOWNSEEK
Change station
or track
MODE
Change the audio source
Page 7 of 16
7STEERING COLUMN CONTROLS
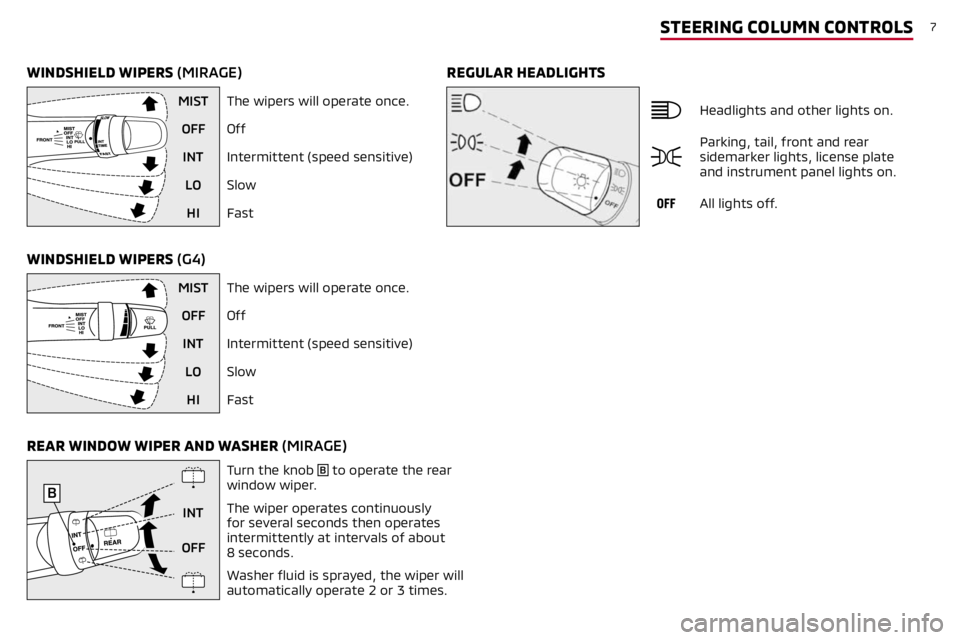
REGULAR HEADLIGHTS
WINDSHIELD WIPERS (MIRAGE)
WINDSHIELD WIPERS (G4)
Headlights and other lights on.
Parking, tail, front and rear
sidemarker lights, license plate
and instrument panel lights on.
All lights off.
MIST
The wipers will operate once.
OFF Off
INT Intermittent (speed sensitive)
LO Slow
HI Fast
MIST The wipers will operate once.
OFF Off
INT Intermittent (speed sensitive)
LO Slow
HI Fast
REAR WINDOW WIPER AND WASHER (MIRAGE)
Turn the knob B to operate the rear
window wiper.
INT The wiper operates continuously
for several seconds then operates
intermittently at intervals of about
8 seconds.
OFF
Washer fluid is sprayed, the wiper will
automatically operate 2 or 3 times.
B
Page 8 of 16
8INSTRUMENT CLUSTER
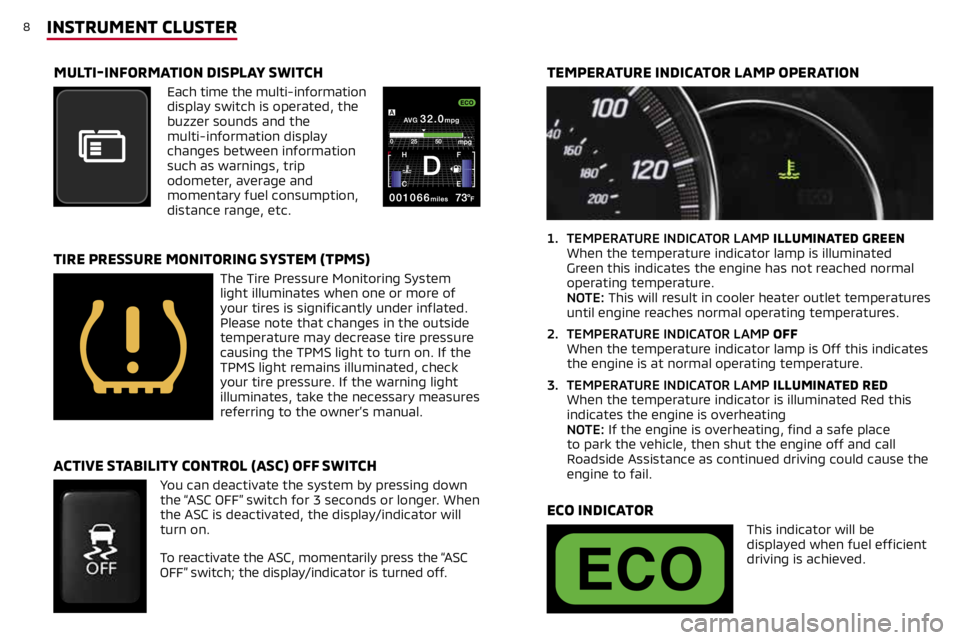
1. TEMPERATURE INDICATOR LAMP ILLUMINATED GREEN
When the temperature indicator lamp is illuminated
Green this indicates the engine has not reached normal
operating temperature.
NOTE: This will result in cooler heater outlet temperatures
until engine reaches normal operating temperatures.
2. TEMPERATURE INDICATOR LAMP OFF
When the temperature indicator lamp is Off this indicates
the engine is at normal operating temperature.
3. TEMPERATURE INDICATOR LAMP ILLUMINATED RED
When the temperature indicator is illuminated Red this
indicates the engine is overheating
NOTE: If the engine is overheating, find a safe place
to park the vehicle, then shut the engine off and call
Roadside Assistance as continued driving could cause the
engine to fail.
TEMPERATURE INDICATOR LAMP OPERATION
MULTI-INFORMATION DISPLAY SWITCH
Each time the multi-information
display switch is operated, the
buzzer sounds and the
multi-information display
changes between information
such as warnings, trip
odometer, average and
momentary fuel consumption,
distance range, etc.
TIRE PRESSURE MONITORING SYSTEM (TPMS)
The Tire Pressure Monitoring System
light illuminates when one or more of
your tires is significantly under inflated.
Please note that changes in the outside
temperature may decrease tire pressure
causing the TPMS light to turn on. If the
TPMS light remains illuminated, check
your tire pressure. If the warning light
illuminates, take the necessary measures
referring to the owner’s manual.
ECO INDICATOR
This indicator will be
displayed when fuel efficient
driving is achieved.
You can deactivate the system by pressing down
the “ASC OFF” switch for 3 seconds or longer. When
the ASC is deactivated, the display/indicator will
turn on.
To reactivate the ASC, momentarily press the “ASC
OFF” switch; the display/indicator is turned off.
ACTIVE STABILITY CONTROL (ASC) OFF SWITCH
Page 9 of 16
9INSTRUMENT PANEL
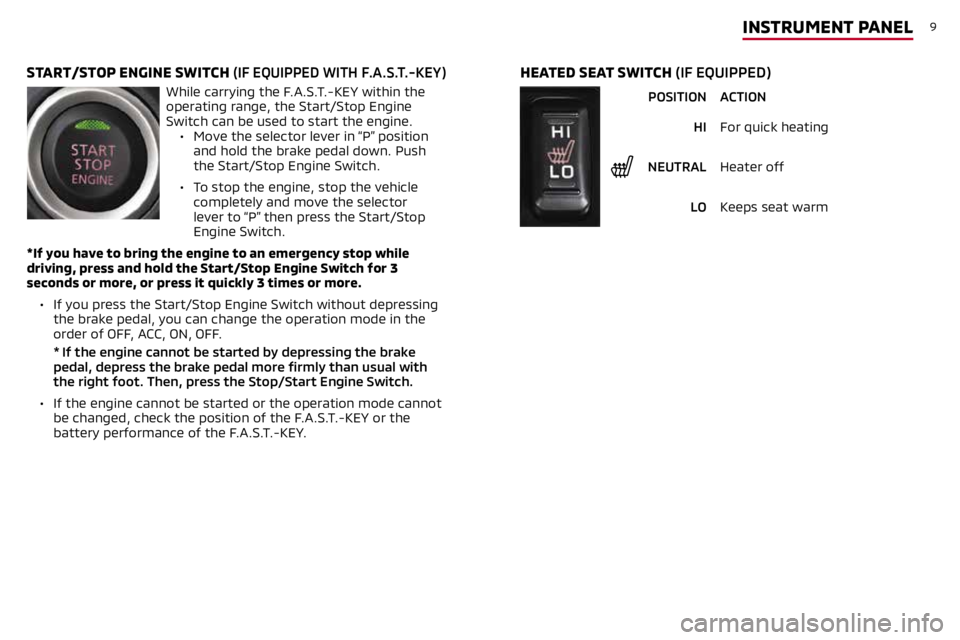
START/STOP ENGINE SWITCH (IF EQUIPPED WITH F.A.S.T.-KEY)
While carrying the F.A.S.T.-KEY within the
operating range, the Start/Stop Engine
Switch can be used to start the engine. • Move the selector lever in “P” position
and hold the brake pedal down. Push
the Start/Stop Engine Switch.
• To stop the engine, stop the vehicle
completely and move the selector
lever to “P” then press the Start/Stop
Engine Switch.
*If you have to bring the engine to an emergency stop while
driving, press and hold the Start/Stop Engine Switch for 3
seconds or more, or press it quickly 3 times or more.
• If you press the Start/Stop Engine Switch without depressing
the brake pedal, you can change the operation mode in the
order of OFF, ACC, ON, OFF.
* If the engine cannot be started by depressing the brake
pedal, depress the brake pedal more firmly than usual with
the right foot. Then, press the Stop/Start Engine Switch.
• If the engine cannot be started or the operation mode cannot
be changed, check the position of the F.A.S.T.-KEY or the
battery performance of the F.A.S.T.-KEY.
HEATED SEAT SWITCH (IF EQUIPPED)
POSITION ACTION
HI For quick heating
NEUTRAL Heater off
LO Keeps seat warm
Page 10 of 16
10CENTER CONSOLE & PANEL
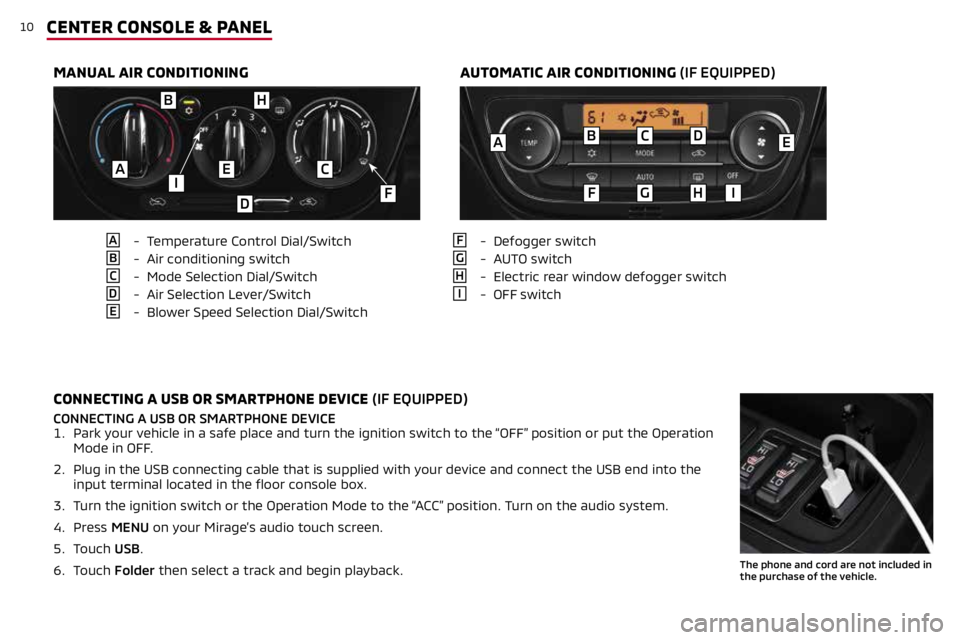
MANUAL AIR CONDITIONINGAUTOMATIC AIR CONDITIONING (IF EQUIPPED)
A - Temperature Control Dial/Switch
B - Air conditioning switch
C - Mode Selection Dial/Switch
D - Air Selection Lever/Switch
E - Blower Speed Selection Dial/Switch
F - Defogger switch
G - AUTO switch
H - Electric rear window defogger switch
I - OFF switch
CONNECTING A USB OR SMARTPHONE DEVICE (IF EQUIPPED)
CONNECTING A USB OR SMARTPHONE DEVICE
1. Park your vehicle in a safe place and turn the ignition switch to the “OFF” position or put the Operation
Mode in OFF.
2. Plug in the USB connecting cable that is supplied with your device and connect the USB end into the
input terminal located in the floor console box.
3. Turn the ignition switch or the Operation Mode to the “ACC” position. Turn on the audio system.
4. Press MENU on your Mirage’s audio touch screen.
5. Touch USB.
6. Touch Folder then select a track and begin playback.
The phone and cord are not included in
the purchase of the vehicle.
B
F
C
G
D
HI
AE
BH
EAC
D
IF