display MITSUBISHI OUTLANDER PHEV 2014 Owner's Manual (in English)
[x] Cancel search | Manufacturer: MITSUBISHI, Model Year: 2014, Model line: OUTLANDER PHEV, Model: MITSUBISHI OUTLANDER PHEV 2014Pages: 442, PDF Size: 19.04 MB
Page 308 of 442
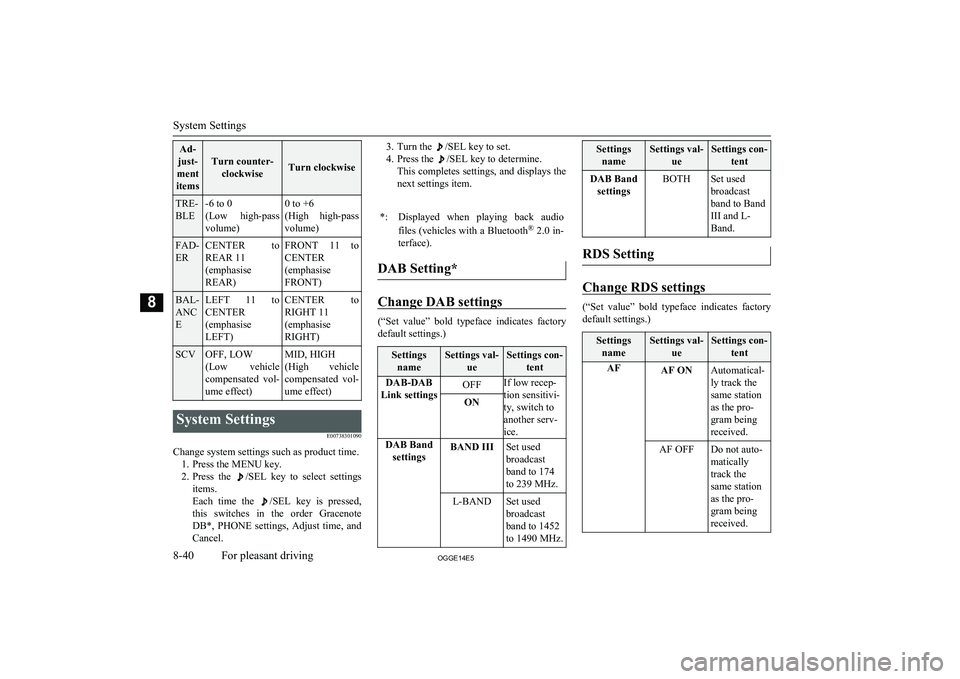
Ad-
just-
ment
items
Turn counter- clockwiseTurn clockwise
TRE-
BLE-6 to 0
(Low high-pass
volume)0 to +6
(High high-pass
volume)FAD-
ERCENTER to REAR 11
(emphasise
REAR)FRONT 11 to
CENTER
(emphasise
FRONT)BAL-
ANC
ELEFT 11 to CENTER
(emphasise
LEFT)CENTER to
RIGHT 11
(emphasise
RIGHT)SCVOFF, LOW
(Low vehicle
compensated vol- ume effect)MID, HIGH
(High vehicle
compensated vol-
ume effect)System Settings
E00738301090
Change system settings such as product time.1. Press the MENU key.
2. Press the
/SEL key to select settings
items.
Each time the
/SEL key is pressed,
this switches in the order Gracenote
DB*, PHONE settings, Adjust time, and Cancel.
3. Turn the /SEL key to set.
4. Press the
/SEL key to determine.
This completes settings, and displays the
next settings item.
*:Displayed when playing back audio
files (vehicles with a Bluetooth ®
2.0 in-
terface).
DAB Setting*
Change DAB settings
(“Set value” bold typeface indicates factory
default settings.)
Settings
nameSettings val- ueSettings con-tentDAB-DAB
Link settingsOFFIf low recep-
tion sensitivi-
ty, switch to
another serv-
ice.ONDAB Band settingsBAND IIISet used
broadcast
band to 174
to 239 MHz.L-BANDSet used
broadcast
band to 1452
to 1490 MHz.Settings nameSettings val- ueSettings con-tentDAB BandsettingsBOTHSet used
broadcast
band to Band
III and L-
Band.
RDS Setting
Change RDS settings
(“Set value” bold typeface indicates factory
default settings.)
Settings
nameSettings val- ueSettings con-tentAFAF ONAutomatical-
ly track the
same station
as the pro-
gram being
received.AF OFFDo not auto-
matically
track the
same station
as the pro-
gram being
received.
System Settings
8-40OGGE14E5For pleasant driving8
Page 310 of 442
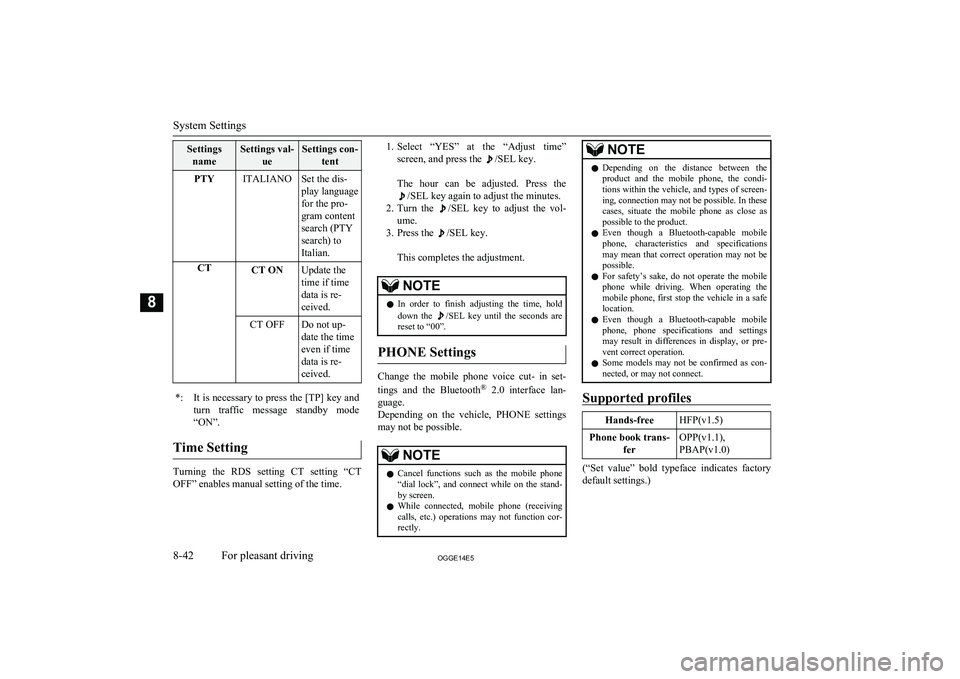
SettingsnameSettings val- ueSettings con-tentPTYITALIANOSet the dis-
play language
for the pro-
gram content
search (PTY
search) to
Italian.CTCT ONUpdate the
time if time
data is re-
ceived.CT OFFDo not up-
date the time
even if time
data is re-
ceived.*:It is necessary to press the [TP] key and
turn traffic message standby mode “ON”.
Time Setting
Turning the RDS setting CT setting “CT
OFF” enables manual setting of the time.
1. Select “YES” at the “Adjust time”
screen, and press the
/SEL key.
The hour can be adjusted. Press the
/SEL key again to adjust the minutes.
2. Turn the
/SEL key to adjust the vol-
ume.
3. Press the
/SEL key.
This completes the adjustment.
NOTEl In order to finish adjusting the time, hold
down the /SEL key until the seconds are
reset to “00”.
PHONE Settings
Change the mobile phone voice cut- in set-
tings and the Bluetooth ®
2.0 interface lan-
guage.
Depending on the vehicle, PHONE settings
may not be possible.
NOTEl Cancel functions such as the mobile phone
“dial lock”, and connect while on the stand- by screen.
l While connected, mobile phone (receiving
calls, etc.) operations may not function cor- rectly.NOTEl Depending on the distance between the
product and the mobile phone, the condi- tions within the vehicle, and types of screen-ing, connection may not be possible. In thesecases, situate the mobile phone as close as possible to the product.
l Even though a Bluetooth-capable mobile
phone, characteristics and specifications
may mean that correct operation may not be possible.
l For safety’s sake, do not operate the mobile
phone while driving. When operating the mobile phone, first stop the vehicle in a safe location.
l Even though a Bluetooth-capable mobile
phone, phone specifications and settings may result in differences in display, or pre-vent correct operation.
l Some models may not be confirmed as con-
nected, or may not connect.
Supported profiles
Hands-freeHFP(v1.5)Phone book trans-
ferOPP(v1.1),
PBAP(v1.0)
(“Set value” bold typeface indicates factory
default settings.)
System Settings
8-42OGGE14E5For pleasant driving8
Page 311 of 442
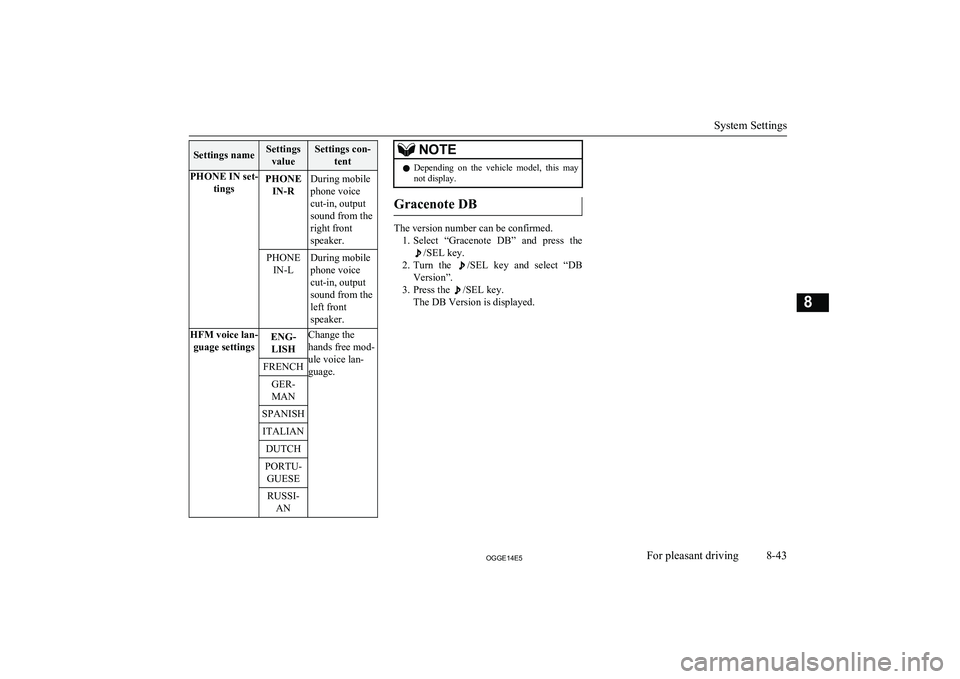
Settings nameSettingsvalueSettings con- tentPHONE IN set- tingsPHONEIN-RDuring mobile
phone voice
cut-in, output
sound from the
right front
speaker.PHONE IN-LDuring mobile
phone voice
cut-in, output
sound from the
left front
speaker.HFM voice lan- guage settingsENG-LISHChange the
hands free mod-
ule voice lan-
guage.FRENCHGER-
MANSPANISHITALIANDUTCHPORTU- GUESERUSSI- ANNOTEl Depending on the vehicle model, this may
not display.
Gracenote DB
The version number can be confirmed.
1. Select “Gracenote DB” and press the
/SEL key.
2. Turn the
/SEL key and select “DB
Version”.
3. Press the
/SEL key.
The DB Version is displayed.
System Settings
8-43OGGE14E5For pleasant driving8
Page 312 of 442
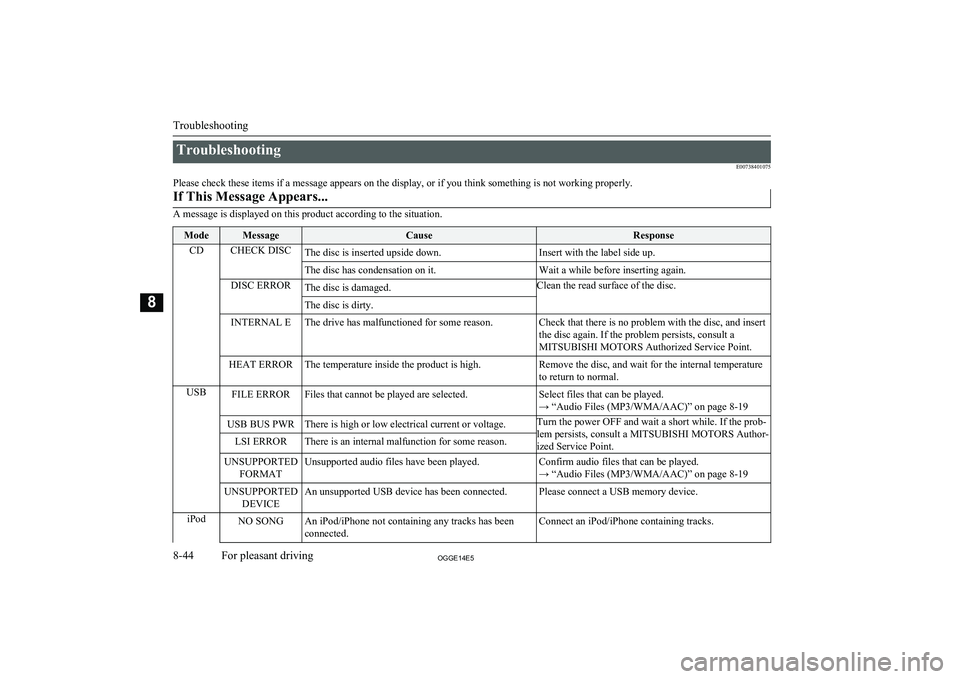
TroubleshootingE00738401075
Please check these items if a message appears on the display, or if you think something is not working properly.If This Message Appears...
A message is displayed on this product according to the situation.
ModeMessageCauseResponseCDCHECK DISCThe disc is inserted upside down.Insert with the label side up.The disc has condensation on it.Wait a while before inserting again.DISC ERRORThe disc is damaged.Clean the read surface of the disc.The disc is dirty.INTERNAL EThe drive has malfunctioned for some reason.Check that there is no problem with the disc, and insert
the disc again. If the problem persists, consult a
MITSUBISHI MOTORS Authorized Service Point.HEAT ERRORThe temperature inside the product is high.Remove the disc, and wait for the internal temperature
to return to normal.USBFILE ERRORFiles that cannot be played are selected.Select files that can be played.
→ “Audio Files (MP3/WMA/AAC)” on page 8-19USB BUS PWRThere is high or low electrical current or voltage.Turn the power OFF and wait a short while. If the prob-
lem persists, consult a MITSUBISHI MOTORS Author- ized Service Point.LSI ERRORThere is an internal malfunction for some reason.UNSUPPORTED FORMATUnsupported audio files have been played.Confirm audio files that can be played.
→ “Audio Files (MP3/WMA/AAC)” on page 8-19UNSUPPORTED DEVICEAn unsupported USB device has been connected.Please connect a USB memory device.iPodNO SONGAn iPod/iPhone not containing any tracks has beenconnected.Connect an iPod/iPhone containing tracks.
Troubleshooting
8-44OGGE14E5For pleasant driving8
Page 317 of 442
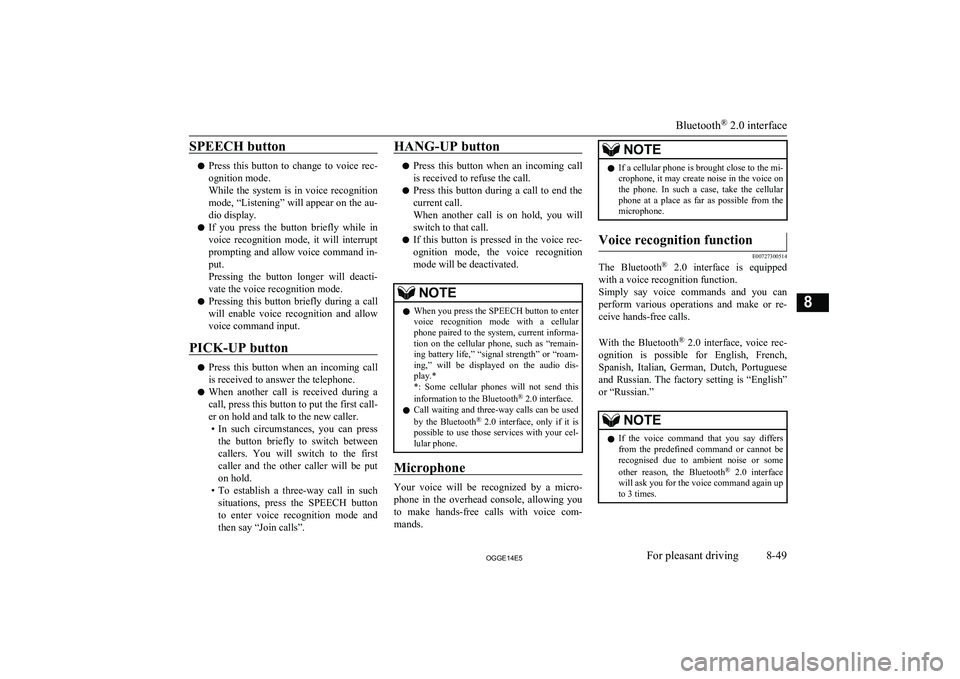
SPEECH button
lPress this button to change to voice rec-
ognition mode.
While the system is in voice recognition
mode, “Listening” will appear on the au- dio display.
l If you press the button briefly while in
voice recognition mode, it will interrupt prompting and allow voice command in-
put.
Pressing the button longer will deacti-
vate the voice recognition mode.
l Pressing this button briefly during a call
will enable voice recognition and allow voice command input.
PICK-UP button
l Press this button when an incoming call
is received to answer the telephone.
l When another call is received during a
call, press this button to put the first call-
er on hold and talk to the new caller. • In such circumstances, you can press
the button briefly to switch between
callers. You will switch to the first
caller and the other caller will be put on hold.
• To establish a three-way call in such
situations, press the SPEECH button
to enter voice recognition mode and then say “Join calls”.
HANG-UP button
l Press this button when an incoming call
is received to refuse the call.
l Press this button during a call to end the
current call.
When another call is on hold, you will switch to that call.
l If this button is pressed in the voice rec-
ognition mode, the voice recognition
mode will be deactivated.
NOTEl When you press the SPEECH button to enter
voice recognition mode with a cellular
phone paired to the system, current informa- tion on the cellular phone, such as “remain- ing battery life,” “signal strength” or “roam-
ing,” will be displayed on the audio dis-
play.*
*: Some cellular phones will not send this
information to the Bluetooth ®
2.0 interface.
l Call waiting and three-way calls can be used
by the Bluetooth ®
2.0 interface, only if it is
possible to use those services with your cel- lular phone.
Microphone
Your voice will be recognized by a micro-
phone in the overhead console, allowing you to make hands-free calls with voice com-
mands.
NOTEl If a cellular phone is brought close to the mi-
crophone, it may create noise in the voice on
the phone. In such a case, take the cellular phone at a place as far as possible from the
microphone.Voice recognition function
E00727300514
The Bluetooth ®
2.0 interface is equipped
with a voice recognition function.
Simply say voice commands and you can
perform various operations and make or re- ceive hands-free calls.
With the Bluetooth ®
2.0 interface, voice rec-
ognition is possible for English, French,
Spanish, Italian, German, Dutch, Portuguese and Russian. The factory setting is “English” or “Russian.”
NOTEl If the voice command that you say differs
from the predefined command or cannot be recognised due to ambient noise or some
other reason, the Bluetooth ®
2.0 interface
will ask you for the voice command again up
to 3 times.
Bluetooth ®
2.0 interface
8-49OGGE14E5For pleasant driving8
Page 325 of 442
Operating a music player con-nected via Bluetooth ®
E00761001156
For the operation of a music player connected
via Bluetooth ®
, refer to “Listen to Bluetooth
Audio” on page 8-35. On vehicles equipped
with MITSUBISHI Multi-Communication
System (MMCS) or DISPLAY AUDIO, refer to separate owner’s manual.
How to make or receive hands-
free calls
E00761100059
You can make or receive hands-free calls us-
ing a Bluetooth ®
compatible cellular phone
connected to the Bluetooth ®
2.0 interface.
You can also use the phone books in the
Bluetooth ®
2.0 interface to make calls with-
out dialling telephone numbers.
“To make a call” on page 8-57
“SEND function” on page 8-58
“Receiving calls” on page 8-58
“MUTE function” on page 8-59
“Switching between hands-free mode and
private mode” on page 8-59
NOTEl The hands-free calls might not be operated
correctly when it makes calling or receiving
by operating the cellular phone directly.To make a call
E00761200148
You can make a call in the following 3 ways
using the Bluetooth ®
2.0 interface:
Making a call by saying a telephone number,
making a call using the Bluetooth ®
2.0 inter-
face’s phone book, and making a call by re-
dialing.
Making a call by using the telephone num-
ber
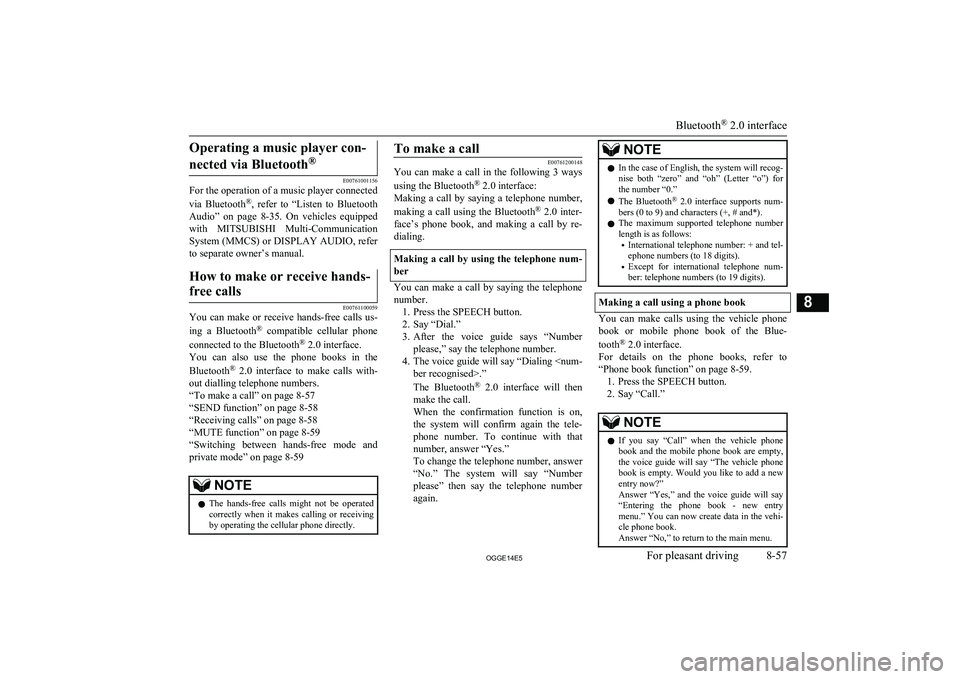
You can make a call by saying the telephone number. 1. Press the SPEECH button.
2. Say “Dial.”
3. After the voice guide says “Number
please,” say the telephone number.
4. The voice guide will say “Dialing
The Bluetooth ®
2.0 interface will then
make the call.
When the confirmation function is on, the system will confirm again the tele- phone number. To continue with that
number, answer “Yes.”
To change the telephone number, answer
“No.” The system will say “Number please” then say the telephone number
again.
NOTEl In the case of English, the system will recog-
nise both “zero” and “oh” (Letter “o”) for the number “0.”
l The Bluetooth ®
2.0 interface supports num-
bers (0 to 9) and characters (+, # and*).
l The maximum supported telephone number
length is as follows:
• International telephone number: + and tel-
ephone numbers (to 18 digits).
• Except for international telephone num-
ber: telephone numbers (to 19 digits).
Making a call using a phone book
You can make calls using the vehicle phone
book or mobile phone book of the Blue-
tooth ®
2.0 interface.
For details on the phone books, refer to
“Phone book function” on page 8-59. 1. Press the SPEECH button.
2. Say “Call.”
NOTEl If you say “Call” when the vehicle phone
book and the mobile phone book are empty, the voice guide will say “The vehicle phone book is empty. Would you like to add a new
entry now?”
Answer “Yes,” and the voice guide will say “Entering the phone book - new entry
menu.” You can now create data in the vehi- cle phone book.
Answer “No,” to return to the main menu.
Bluetooth ®
2.0 interface
8-57OGGE14E5For pleasant driving8
Page 336 of 442
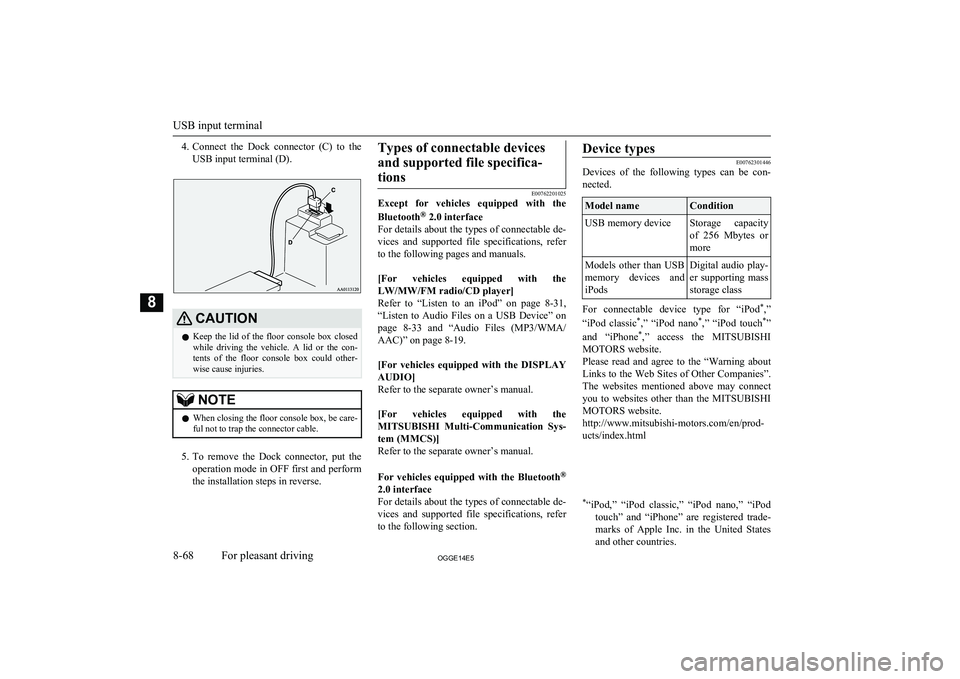
4.Connect the Dock connector (C) to the
USB input terminal (D).CAUTIONl Keep the lid of the floor console box closed
while driving the vehicle. A lid or the con- tents of the floor console box could other-
wise cause injuries.NOTEl When closing the floor console box, be care-
ful not to trap the connector cable.
5. To remove the Dock connector, put the
operation mode in OFF first and perform the installation steps in reverse.
Types of connectable devices
and supported file specifica-tions
E00762201025
Except for vehicles equipped with the
Bluetooth ®
2.0 interface
For details about the types of connectable de- vices and supported file specifications, referto the following pages and manuals.
[For vehicles equipped with the LW/MW/FM radio/CD player]
Refer to “Listen to an iPod” on page 8-31,
“Listen to Audio Files on a USB Device” on page 8-33 and “Audio Files (MP3/WMA/
AAC)” on page 8-19.
[For vehicles equipped with the DISPLAY
AUDIO]
Refer to the separate owner’s manual.
[For vehicles equipped with the MITSUBISHI Multi-Communication Sys-
tem (MMCS)]
Refer to the separate owner’s manual.
For vehicles equipped with the Bluetooth ®
2.0 interface
For details about the types of connectable de- vices and supported file specifications, referto the following section.
Device types
E00762301446
Devices of the following types can be con-
nected.
Model nameConditionUSB memory deviceStorage capacity
of 256 Mbytes or
moreModels other than USB memory devices andiPodsDigital audio play-
er supporting mass
storage class
For connectable device type for “iPod *
,”
“iPod classic *
,” “iPod nano *
,” “iPod touch *
”
and “iPhone *
,” access the MITSUBISHI
MOTORS website.
Please read and agree to the “Warning about Links to the Web Sites of Other Companies”.
The websites mentioned above may connect you to websites other than the MITSUBISHI
MOTORS website.
http://www.mitsubishi-motors.com/en/prod-
ucts/index.html
* “iPod,” “iPod classic,” “iPod nano,” “iPod
touch” and “iPhone” are registered trade-marks of Apple Inc. in the United States
and other countries.
USB input terminal
8-68OGGE14E5For pleasant driving8
Page 350 of 442
CAUTIONlTake care not to get the jumper cable caught
in the cooling fan or other rotating part in
the engine compartment.NOTEl If the jumper cable is connected to any posi-
tion other than the appointed position, it
could cause damage to the vehicle.
7. Start the engine in the vehicle which has
the booster battery, let the engine idle a
few minutes, then start the Plug-in Hy- brid EV system in your vehicle.
8. Check that the ready indicator illumi-
nates. If the ready indicator does not il- luminate, contact a MITSUBISHI
MOTORS Authorized Service Point.
9. When the ready indicator illuminates,
disconnect the jumper cables in the re-
verse order of connection.
10. Check that the select position can be
shifted to all positions other than the “P”(PARK) position.
11. Have the auxiliary battery inspected by
your nearest MITSUBISHI MOTORS
Authorized Service Point.
CAUTIONl Your vehicle is equipped with an exclusive
auxiliary battery. Even if the battery type is the same, the battery may not be correctly
installed in your vehicle. When replacing the auxiliary battery, request a MITSUBISHI
MOTORS Authorized Service Point to do
so.Engine overheating
E00800603745
When the engine is overheating, the informa-tion screen in the multi information display
will be interrupted and the engine coolant
temperature warning display will appear.
If this occurs, take the following corrective measures: 1. Stop the vehicle in a safe place.
2. Check whether steam is coming from the
engine compartment.
[If steam does not come from the engine
compartment]
With the Plug-in Hybrid EV system still starting, raise the bonnet to ventilate the
engine compartment.
[If steam is coming from the engine
compartment]
Stop the Plug-in Hybrid EV system, and
when the steam stops, raise the bonnet to
ventilate the engine compartment. Re-
start the Plug-in Hybrid EV system.WARNINGl Do not open the bonnet while steam is
coming from the engine compartment. It could cause steam or hot water to spurt
out, causing burns. Hot water could spurt out even when there is no steam coming
out, and some parts will be very hot. Be
very careful when opening the bonnet.
l Be careful of hot steam, which could be
blowing off the reserve tank cap.
l Do not attempt to remove the radiator
cap while the engine is hot.
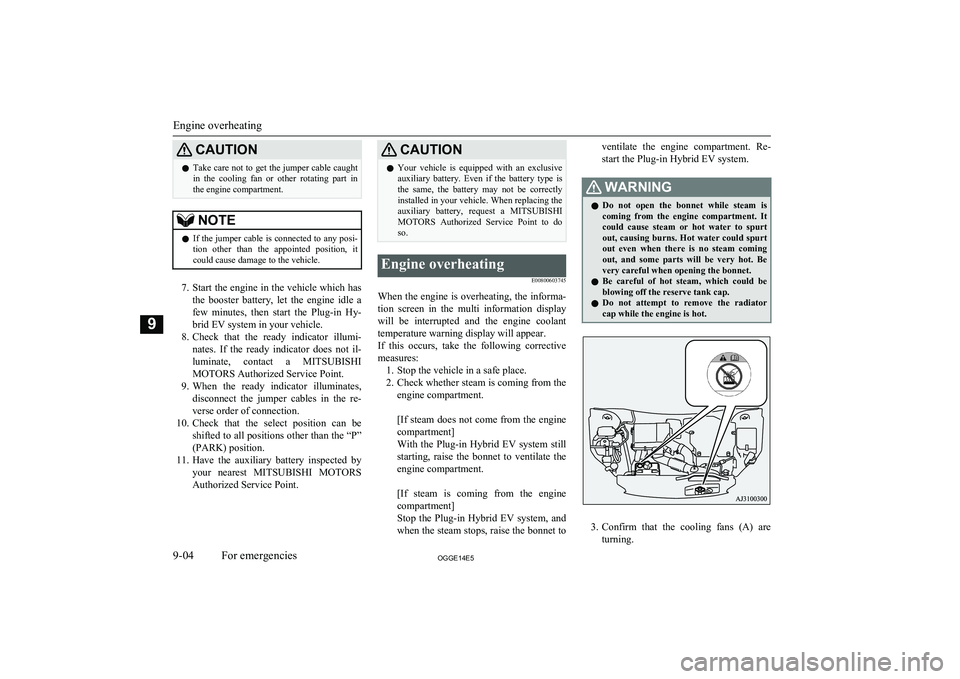
3. Confirm that the cooling fans (A) are
turning.
Engine overheating
9-04OGGE14E5For emergencies9
Page 381 of 442
NOTElIf this does not close the bonnet, release it
from a slightly higher position.
l Do not press down firmly on the bonnet as
doing so could damage it.
l For vehicles equipped with the security
alarm system, if you drive with the bonnet left open, a warning display is displayed on the information screen in the multi informa-tion display.Engine oil
E01000404068
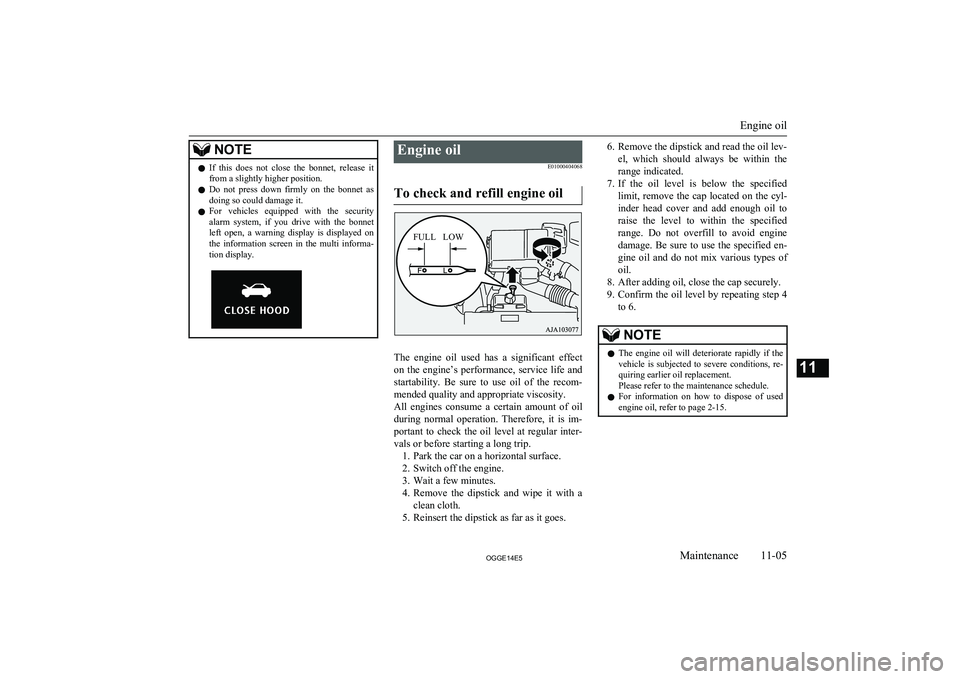
To check and refill engine oil
The engine oil used has a significant effect on the engine’s performance, service life and
startability. Be sure to use oil of the recom- mended quality and appropriate viscosity.
All engines consume a certain amount of oil during normal operation. Therefore, it is im-portant to check the oil level at regular inter-
vals or before starting a long trip. 1. Park the car on a horizontal surface.
2. Switch off the engine.
3. Wait a few minutes.
4. Remove the dipstick and wipe it with a
clean cloth.
5. Reinsert the dipstick as far as it goes.
6. Remove the dipstick and read the oil lev-
el, which should always be within the
range indicated.
7. If the oil level is below the specified
limit, remove the cap located on the cyl-inder head cover and add enough oil to
raise the level to within the specified
range. Do not overfill to avoid engine
damage. Be sure to use the specified en- gine oil and do not mix various types of
oil.
8. After adding oil, close the cap securely.
9. Confirm the oil level by repeating step 4
to 6.NOTEl The engine oil will deteriorate rapidly if the
vehicle is subjected to severe conditions, re-
quiring earlier oil replacement.
Please refer to the maintenance schedule.
l For information on how to dispose of used
engine oil, refer to page 2-15.
Engine oil
11-05OGGE14E5Maintenance11 FULL LOW
Page 422 of 442
Electric tailgate..................................................4-20
Electric window control.................................... 4-33
Electrical Parking switch...................................7-14
Electronic immobilizer (Anti-theft starting system)................................................ 4-03
Emergency starting............................................9-02
Emergency stop signal system.......................... 7-27
Engine specifications.......................................12-06
Engine Coolant..............................................11-06,12-10
Number....................................................... 12-03
Oil............................................................... 11-05
Oil and oil filter........................................... 12-10
Overheating................................................... 9-04
Specifications.............................................. 12-06
Used engine oils safety instructions and disposal information............................. 2-15
Exterior and interior lamp operation............... 11-15
F
Fluid capacities and lubricants........................ 12-10
Fluid Automatic transmission fluid...................... 12-10
Brake fluid........................................ 11-08,12-10
Clutch fluid................................................. 12-10
CVT fluid.................................................... 12-10
Engine coolant.................................. 11-06,12-10
Plug-in hybrid EV system coolant.............. 11-06
Washer fluid..................................... 11-08,12-10
Forward Collision Mitigation System (FCM)... 7-55
Front fog lamp indication lamp......................... 6-42
Front fog lamps Bulb capacity.............................................. 11-23
Replacement................................................ 11-27
Switch........................................................... 6-52
Front room lamp................................................ 8-72
Bulb capacity.............................................. 11-24
Front seats......................................................... 5-03
Front turn-signal lamps Bulb capacity.............................................. 11-23
Replacement................................................ 11-27
Fuel consumption............................................ 12-09
Fuel Filling the fuel tank....................................... 2-12Fuel selection................................................ 2-12Modification/alterations to the electrical systems......................................... 2-14
Tank capacity................................................ 2-13
Fuses................................................................ 11-16
Fusible links.................................................... 11-16
G
General maintenance....................................... 11-15
General vehicle data........................................ 12-04
Genuine parts.....................................................2-15
Glove box lamp Bulb capacity.............................................. 11-24
H
Hazard warning flasher switch.......................... 6-50
Hazard warning indication lamps......................6-41
Head restraints................................................... 5-05
Headlamp levelling switch................................ 6-49
Headlamp washer switch...................................6-58
Headlamps Bulb capacity.............................................. 11-23
Headlamp flasher.......................................... 6-47Replacement..................................... 11-24,11-25Switch........................................................... 6-45
Heated mirror.................................................... 7-08
Heated seats....................................................... 5-04
Heating.............................................................. 8-14
High-mounted stop lamp................................. 11-23
Hill start assist................................................... 7-26
Hinges and latches lubrication........................ 11-16
Horn switch....................................................... 6-60
I
If the vehicle breaks down................................ 9-02
Indication lamps................................................ 6-41
Information screen display................................ 6-44
Inside rear-view mirror......................................7-05
Inside tailgate release........................................ 4-26
Inspection and maintenance following rough road operation........................................ 7-20
Instruments........................................................ 6-02
Interior lamps.................................................... 8-72
J
Jack.................................................................... 9-06Storage.......................................................... 9-06
Jump starting (Emergency starting).................. 9-02
K
Keyless entry system......................................... 4-03
Keyless operation system.................................. 4-06
Alphabetical index
13- 2 OGGE14E5Alphabetical index