Service MITSUBISHI OUTLANDER PHEV 2017 Owner's Manual (in English)
[x] Cancel search | Manufacturer: MITSUBISHI, Model Year: 2017, Model line: OUTLANDER PHEV, Model: MITSUBISHI OUTLANDER PHEV 2017Pages: 548, PDF Size: 25.5 MB
Page 350 of 548
Important operation tips forthe air conditioner E00708302287
l Park the vehicle in the shade.
Parking in the hot sun will make the ve-
hicle inside extremely hot, and it will re-
quire more time to cool the interior.
If it is necessary to park in the sun, open
the windows for the first few minutes of air conditioning operation to expel the
hot air.
l Close the windows when the air condi-
tioner is in use. The entry of outside air
through open windows will reduce the cooling efficiency.
l Too much cooling is not good for the
health. Keep the difference between the
vehicle interior temperature and outside
temperature at 5 to 6 °C.
l When operating the system, make sure
the air intake, which is located in front
of the windscreen, is free of obstructions such as leaves and snow. Leaves collec- ted in the air-intake plenum may reduce
air flow and plug the plenum water
drains.
l Too much cooling/heating can affect the
EV cruising range, so maintain an appro-
priate temperature to extend the EV
cruising range.Air conditioning system refrig-
erant and lubricant recommen-dations
If the air conditioner seems less effective than usual, the cause might be a refrigerant leak.
We recommend you to have the system in-
spected.
[Except for vehicles for Russia]
The air conditioning system in your vehicle
must be charged with the refrigerant
HFO-1234yf and the lubricant POE
MA68EV.
[Vehicles for Russia]
The air conditioning system in your vehicle must be charged with the refrigerant
HFC-134a and the lubricant POE MA68EV.
Use of any other refrigerant or lubricant will cause severe damage which will result in the
need to replace your vehicle’s entire air con- ditioning system. The release of refrigerantinto the atmosphere is not recommended.
We recommend you to recover and recycle
the refrigerant for reuse.
During a long period of disuse
The air conditioner should be operated for at
least five minutes each week, even in cold
weather. This is to prevent the compressor from seizing and to maintain the air condi-
tioner in the best operating condition.
Air purifier
E00708400718
An air filter has been incorporated into thisair conditioner so that dirt and dust are
cleaned from the air.
Replace the air filter periodically as its ability
to clean the air will be reduced as it collects pollen and dirt. For the maintenance interval,
refer to the “SERVICE BOOKLET”.
NOTEl Operation in certain conditions such as driv-
ing on a dusty road and frequent use of the air conditioner can lead to reduction of serv-
ice life of the filter. When you feel that the air flow is lower than normal or when the
windscreen or windows start to fog up easi- ly, replace the air filter.
We recommend you to have it checked.
Important operation tips for the air conditioner
8-13OGGE17E1For pleasant driving8
Page 360 of 548
Important Points on Safetyfor the Customer E00737000035
This product features a number of pictorial indications as well as points concerning han-
dling so that you can use the product correct-
ly and in a safe manner, as well as prevent in-
jury or damage to yourself, other users, or
property.WARNINGl The driver should not pay close attention
to the display while driving.
This may prevent the driver looking where they are going, and cause an acci-
dent.
l The driver should not perform complica-
ted operations while driving.
Performing complicated operations while driving may prevent the driver looking
where they are going, and cause an acci- dent.
Therefore stop the vehicle in a safe loca- tion before performing such operations.
l Do not use during malfunctions, such as
when no sound is audible.
This may lead to accident, fire, or electric shock.
l Ensure water or other foreign objects do
not enter the product.
This may lead to smoking, fire, electric shock, or malfunction.WARNINGl Do not insert foreign objects into the disc
slot.
This may lead to fire, electric shock, or malfunction.
l In the event of abnormalities occurring
when foreign objects or water enter the
product, resulting in smoke or a strange
smell, immediately stop using the product, and consult a MITSUBISHI MOTORS
Authorized Service Point.
Continuing to use the product may result in accident, fire, or electric shock.
l Do not disassemble or modify the prod-
uct.
This may lead to malfunction, fire, or
electric shock.
l During thunderstorms, do not touch the
antenna or the front panel.
This may lead to electrical shock from lightning.CAUTIONl Do not block ventilation holes or heat sinks
on the product.
Blocking ventilation holes or heat sinks may prevent heat from escaping from within theproduct, leading to fire or malfunction.CAUTIONl Do not turn the volume up to the extent that
you cannot hear sounds from outside the ve-
hicle while driving.
Driving without being able to hear sounds from outside the vehicle may result in an ac-
cident.
l Do not insert your hand or fingers into the
disc slot.
This may result in injury.Operation Keys
E00737100023Turn the Power ON/ OFF
E00737201089
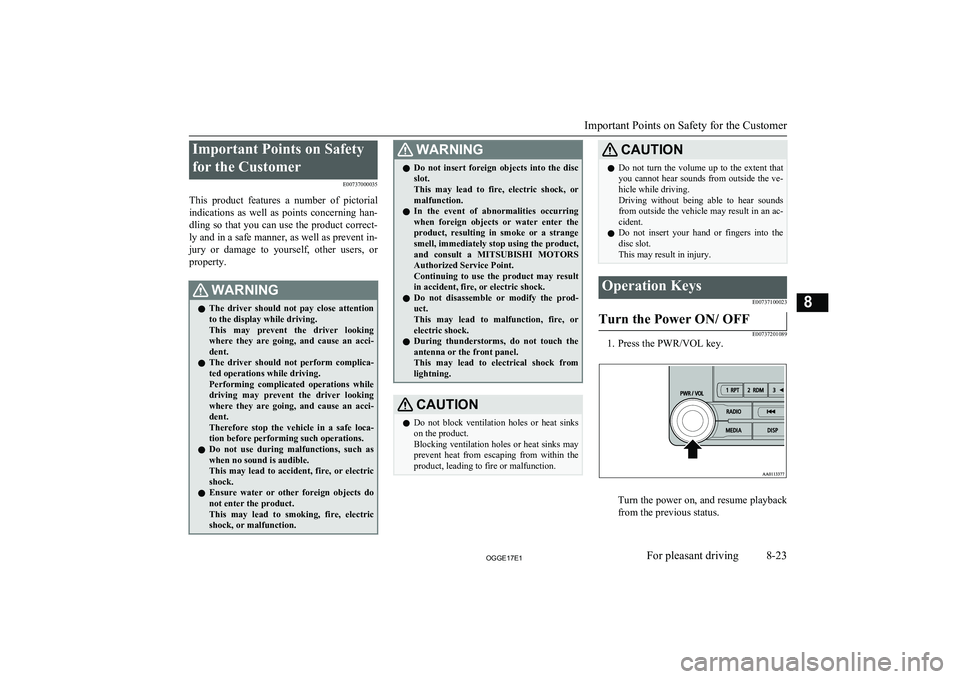
1. Press the PWR/VOL key.
Turn the power on, and resume playback
from the previous status.
Important Points on Safety for the Customer
8-23OGGE17E1For pleasant driving8
Page 363 of 548
14- 6 key
Return during audio track search, and
stop Bluetooth Audio *
.
For radio, use as preset key 6.15- key/ key
For audio, select audio track/file; for ra-
dio, perform automatic station selection
or ensemble/service station selection.16- MENU key Switch to Menu mode.
17-
/SEL key
Adjust audio quality and select items.
For radio, manually select stations.
* Requires a separately-purchased Bluetooth- capable audio device in equipment by type (vehicles with a Bluetooth ®
2.0 interface).Steering wheel audio remote
control switches
E00737601517
1- Volume up/down switch Adjust audio functions and the mobile
phone function volume.
2-
button, button
Select CD and other audio source tracks
and radio stations.
Hold down to skip up and down through tracks.
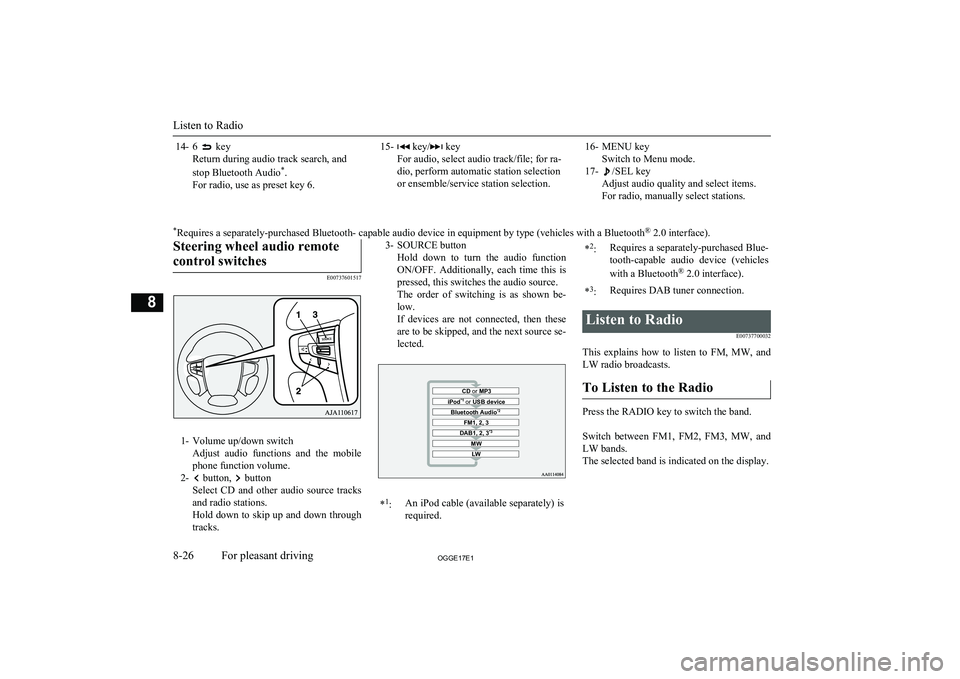
3- SOURCE button
Hold down to turn the audio functionON/OFF. Additionally, each time this is
pressed, this switches the audio source.
The order of switching is as shown be- low.
If devices are not connected, then these are to be skipped, and the next source se-lected.CD or MP3MWLWDAB1, 2, 3 *3FM1, 2, 3Bluetooth Audio *2iPod*1
or USB device*1
:An iPod cable (available separately) is
required.* 2
:Requires a separately-purchased Blue-
tooth-capable audio device (vehicles
with a Bluetooth ®
2.0 interface).*3
:Requires DAB tuner connection.Listen to Radio
E00737700032
This explains how to listen to FM, MW, and
LW radio broadcasts.
To Listen to the Radio
Press the RADIO key to switch the band.
Switch between FM1, FM2, FM3, MW, and LW bands.
The selected band is indicated on the display.
Listen to Radio
8-26OGGE17E1For pleasant driving8
Page 365 of 548
To listen to DAB
1.Press the RADIO key to switch the
band.
Switch between DAB1, DAB2, and DAB3 bands.
The selected band is indicated on the
display.
NOTEl This switches in the order FM1, FM2, FM3,
DAB1, DAB2, DAB3, MW, and LW.
Select a Service
1. Hold down the key or the key.
Receives the lead services of the ensem-
bles that can be received.
2. Press the
key or the key to select
the service.
key
(hold down)Automatically receives low-
er lead services within en-
sembles that can be received. key
(hold down)Automatically receives high-
er lead services within en-
sembles that can be received. keySwitches to lower services. keySwitches to higher services.NOTEl Going to the first service or last service
within the ensemble switches to the next en-
semble.
Register the Service
Register the service in advance, and select
this at a later time. 1. Tune in to the service to register.
2. Hold down any of the keys from the
1RPT key to the 6
key.
A “Beep” sounds, and the preset key is registered.
NOTEl If a preset key that already has a service reg-
istered is selected, then this is overwrittenwith the new preset.
l Pressing the preset key will select the previ-
ously registered service.
Search for a Service
Search for ensembles and services that can be
received. 1. Turn the
/SEL key to select the en-
semble.
2. Press the
/SEL key.
The service name within the selected en-
semble is displayed.
3. Turn the /SEL key to select the serv-
ice.
4. Press the
/SEL key.
Receive the selected service.
NOTEl If the text information for the service name
cannot be obtained, then nothing is dis-
played.
l If there is no operation for 10 seconds, then
service search mode will be cancelled.
PTY Search
Select PTY (program content), and automati-
cally scan for services. 1. Press the PTY/SCAN key. This switches to the PTY selection
mode.
2. Turn the
/SEL key to select PTY.
3. Press the
key or key.
This starts PTY search.
keyLower PTY search starts. keyHigher PTY search starts.
Listen to DAB*
8-28OGGE17E1For pleasant driving8
Page 378 of 548
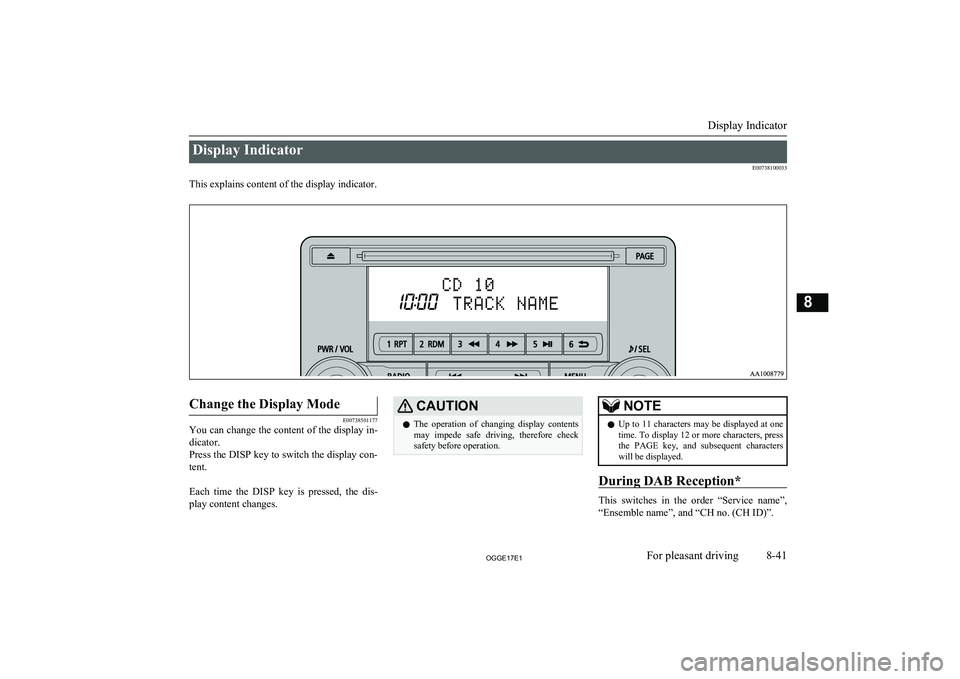
Display IndicatorE00738100033
This explains content of the display indicator.
Change the Display Mode
E00738501177
You can change the content of the display in-
dicator.
Press the DISP key to switch the display con- tent.
Each time the DISP key is pressed, the dis- play content changes.
CAUTIONl The operation of changing display contents
may impede safe driving, therefore check safety before operation.NOTEl Up to 11 characters may be displayed at one
time. To display 12 or more characters, pressthe PAGE key, and subsequent characters will be displayed.
During DAB Reception*
This switches in the order “Service name”,
“Ensemble name”, and “CH no. (CH ID)”.
Display Indicator
8-41OGGE17E1For pleasant driving8
Page 379 of 548
NOTElIf the text information for the service name
and ensemble name cannot be obtained, then
nothing is displayed.
During CD-DA playback
This switches in the order “Disc title”,
“Track title”, and “Operating status”.
NOTEl If there is no text information to display,
then “NO TITLE” is displayed.
During MP3/WMA/AAC Play-
back
This switches in the order “Folder title”,
“File title”, and “Operating status”.
NOTEl If there is no text information to display,
then “NO TITLE” is displayed.
Display the ID3tag
Hold down the DISP key.
This switches the ID3tag display.
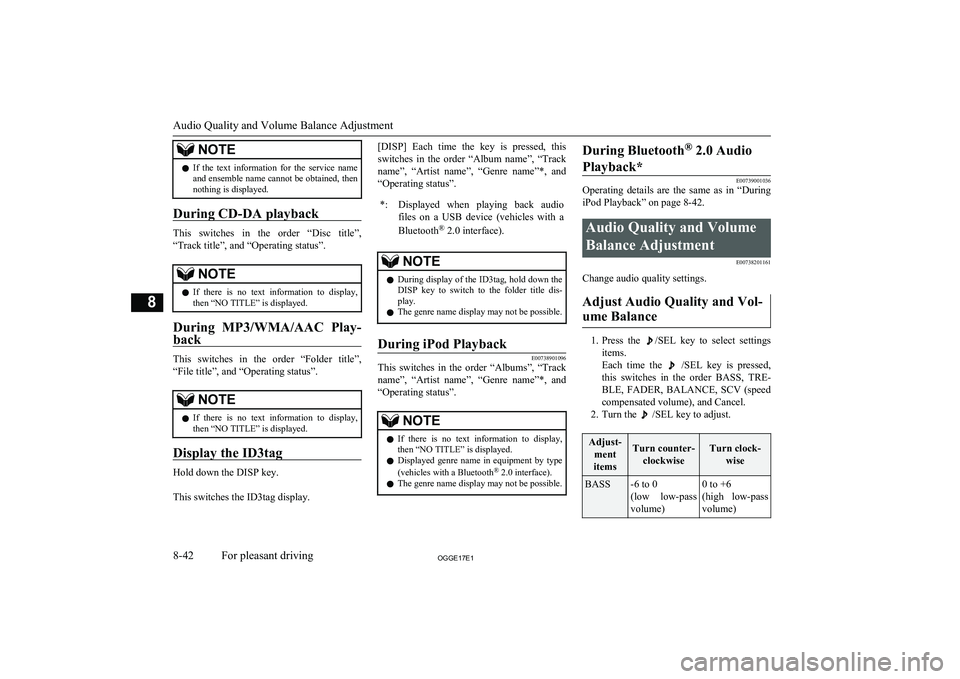
[DISP] Each time the key is pressed, this
switches in the order “Album name”, “Track name”, “Artist name”, “Genre name”*, and “Operating status”.*:Displayed when playing back audio
files on a USB device (vehicles with a
Bluetooth ®
2.0 interface).NOTEl During display of the ID3tag, hold down the
DISP key to switch to the folder title dis- play.
l The genre name display may not be possible.During iPod Playback
E00738901096
This switches in the order “Albums”, “Track
name”, “Artist name”, “Genre name”*, and
“Operating status”.
NOTEl If there is no text information to display,
then “NO TITLE” is displayed.
l Displayed genre name in equipment by type
(vehicles with a Bluetooth ®
2.0 interface).
l The genre name display may not be possible.During Bluetooth ®
2.0 Audio
Playback*
E00739001036
Operating details are the same as in “During
iPod Playback” on page 8-42.
Audio Quality and Volume
Balance Adjustment E00738201161
Change audio quality settings.
Adjust Audio Quality and Vol-ume Balance
1. Press the /SEL key to select settings
items.
Each time the
/SEL key is pressed,
this switches in the order BASS, TRE-
BLE, FADER, BALANCE, SCV (speed
compensated volume), and Cancel.
2. Turn the
/SEL key to adjust.
Adjust-
ment
itemsTurn counter- clockwiseTurn clock- wiseBASS-6 to 0
(low low-pass volume)0 to +6
(high low-pass volume)
Audio Quality and Volume Balance Adjustment
8-42OGGE17E1For pleasant driving8
Page 384 of 548
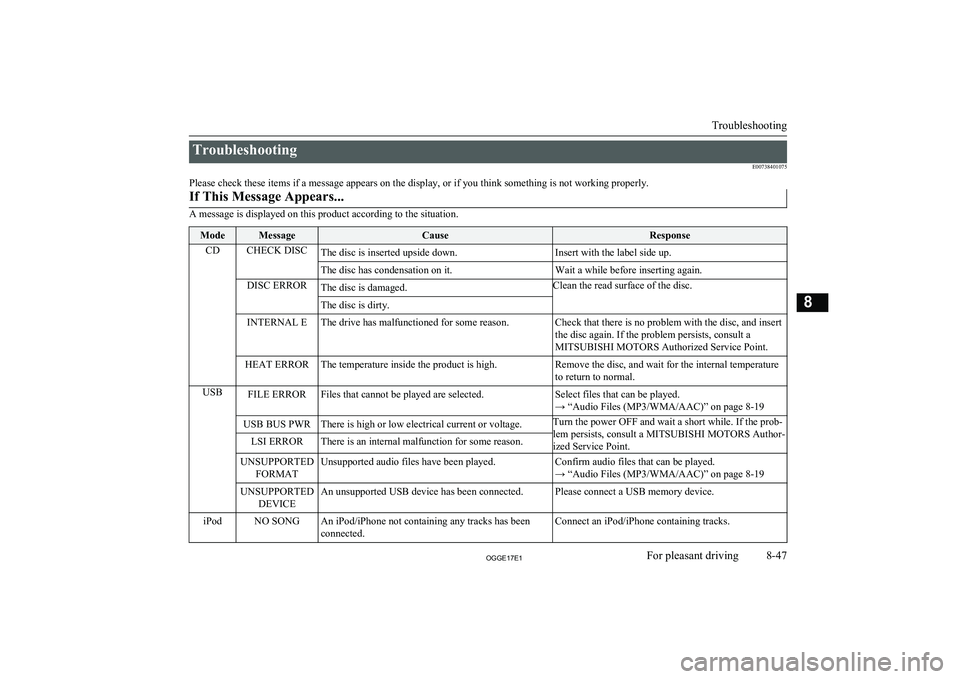
TroubleshootingE00738401075
Please check these items if a message appears on the display, or if you think something is not working properly.If This Message Appears...
A message is displayed on this product according to the situation.
ModeMessageCauseResponseCDCHECK DISCThe disc is inserted upside down.Insert with the label side up.The disc has condensation on it.Wait a while before inserting again.DISC ERRORThe disc is damaged.Clean the read surface of the disc.The disc is dirty.INTERNAL EThe drive has malfunctioned for some reason.Check that there is no problem with the disc, and insert
the disc again. If the problem persists, consult a
MITSUBISHI MOTORS Authorized Service Point.HEAT ERRORThe temperature inside the product is high.Remove the disc, and wait for the internal temperature
to return to normal.USBFILE ERRORFiles that cannot be played are selected.Select files that can be played.
→ “Audio Files (MP3/WMA/AAC)” on page 8-19USB BUS PWRThere is high or low electrical current or voltage.Turn the power OFF and wait a short while. If the prob-
lem persists, consult a MITSUBISHI MOTORS Author- ized Service Point.LSI ERRORThere is an internal malfunction for some reason.UNSUPPORTED FORMATUnsupported audio files have been played.Confirm audio files that can be played.
→ “Audio Files (MP3/WMA/AAC)” on page 8-19UNSUPPORTED DEVICEAn unsupported USB device has been connected.Please connect a USB memory device.iPodNO SONGAn iPod/iPhone not containing any tracks has been
connected.Connect an iPod/iPhone containing tracks.
Troubleshooting
8-47OGGE17E1For pleasant driving8
Page 385 of 548
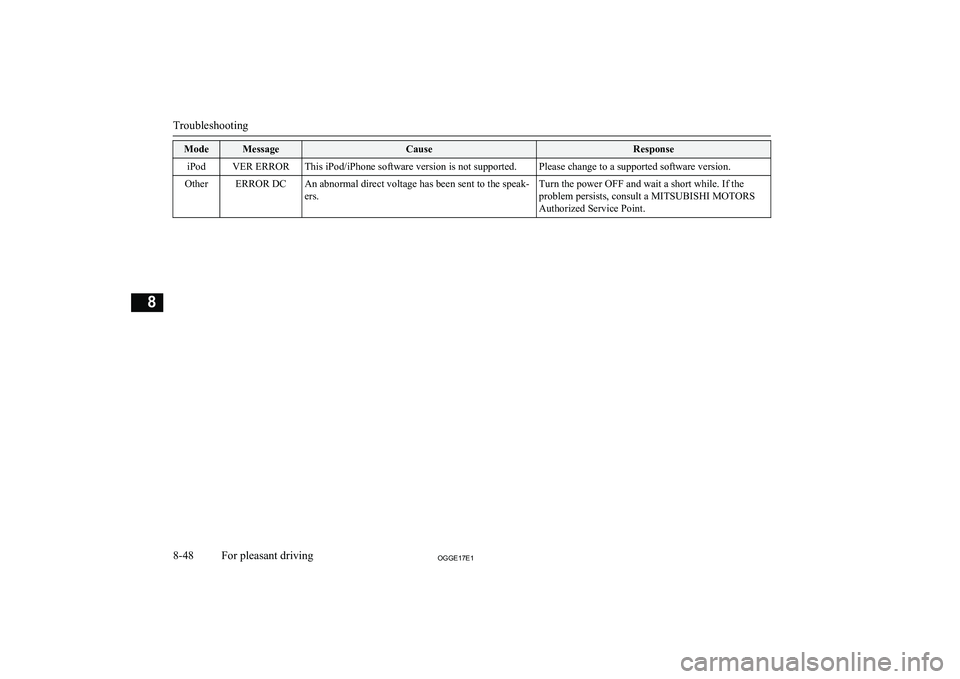
ModeMessageCauseResponseiPodVER ERRORThis iPod/iPhone software version is not supported.Please change to a supported software version.OtherERROR DCAn abnormal direct voltage has been sent to the speak-
ers.Turn the power OFF and wait a short while. If the
problem persists, consult a MITSUBISHI MOTORS Authorized Service Point.
Troubleshooting
8-48OGGE17E1For pleasant driving8
Page 388 of 548
NOTElIf the operation mode is left in ACC, the ac-
cessory power will automatically turn off af-ter a certain period of time and you will no
longer be able to use the Bluetooth ®
2.0 in-
terface. The accessory power comes on again if the power switch is operated.
Refer to “ACC power auto-cutout function”
on page 7-13.
l The Bluetooth ®
2.0 interface cannot be used
if the Bluetooth ®
device has a flat battery or
the device power is turned off.
l Hands-free calls will not be possible if your
phone does not have service available.
l If you place the Bluetooth ®
device in the
luggage compartment, you may not be able
to use the Bluetooth ®
2.0 interface.
l Some Bluetooth ®
devices are not compatible
with the Bluetooth ®
2.0 interface.
l You can confirm the Link System software
version by pressing the HANG-UP button 3
times (press and hold 2 times and then press briefly) within 10 seconds.
l For details on the Bluetooth ®
2.0 interface,
you can see them by accessing the MITSUBISHI MOTORS website.
Please read and agree on the “Warning about
Links to the Web Sites of Other Companies”
because it connects to other than MITSUBISHI MOTORS website.
http://www.mitsubishi-motors.com/en/prod-
ucts/index.htmlNOTEl Software updates by cellular phone/digital
audio device manufacturers may change/
alter device connectivity.
l For vehicles equipped with the ERA-GLO-
NASS, the Bluetooth ®
2.0 interface cannot
be used while an emergency call is activated.
Steering control switch and microphone
® p. 8-51
Voice recognition function ® p. 8-52
Useful voice commands ® p. 8-53
Speaker enrollment function ® p. 8-55
Connecting the Bluetooth® 2.0 interface and Bluetooth® device ® p. 8-56
Operating a music player connected via Blue-
tooth® ® p. 8-61
How to make or receive hands-free calls ® p. 8-61
Phone book function ® p. 8-64
Steering control switch and mi-
crophone
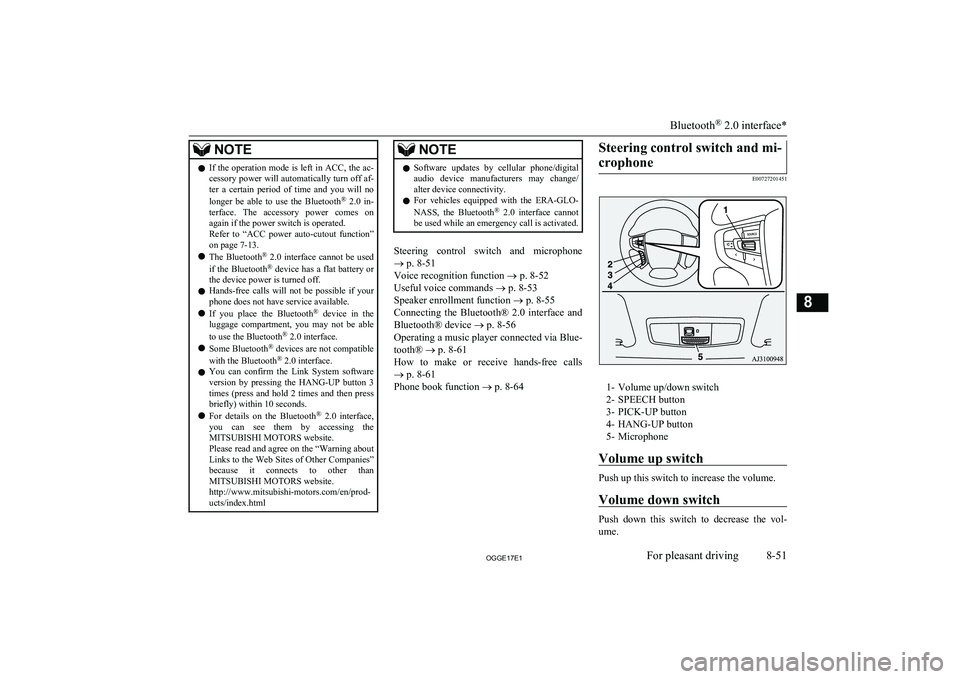
E00727201451
1- Volume up/down switch2- SPEECH button
3- PICK-UP button
4- HANG-UP button
5- Microphone
Volume up switch
Push up this switch to increase the volume.
Volume down switch
Push down this switch to decrease the vol- ume.
Bluetooth ®
2.0 interface*
8-51OGGE17E1For pleasant driving8
Page 389 of 548
SPEECH button
lPress this button to change to voice rec-
ognition mode.
While the system is in voice recognition
mode, “Listening” will appear on the au- dio display.
l If you press the button briefly while in
voice recognition mode, it will interrupt prompting and allow voice command in-
put.
Pressing the button longer will deacti-
vate the voice recognition mode.
l Pressing this button briefly during a call
will enable voice recognition and allow voice command input.
PICK-UP button
l Press this button when an incoming call
is received to answer the telephone.
l When another call is received during a
call, press this button to put the first call-
er on hold and talk to the new caller. • In such circumstances, you can press
the button briefly to switch between
callers. You will switch to the first
caller and the other caller will be put on hold.
• To establish a three-way call in such
situations, press the SPEECH button
to enter voice recognition mode and then say “Join calls”.
HANG-UP button
l Press this button when an incoming call
is received to refuse the call.
l Press this button during a call to end the
current call.
When another call is on hold, you will switch to that call.
l If this button is pressed in the voice rec-
ognition mode, the voice recognition
mode will be deactivated.
NOTEl When you press the SPEECH button to enter
voice recognition mode with a cellular
phone paired to the system, current informa- tion on the cellular phone, such as “remain- ing battery life,” “signal strength” or “roam-
ing,” will be displayed on the audio dis-
play.*
*: Some cellular phones will not send this
information to the Bluetooth ®
2.0 interface.
l Call waiting and three-way calls can be used
by the Bluetooth ®
2.0 interface, only if it is
possible to use those services with your cel- lular phone.
Microphone
Your voice will be recognized by a micro-
phone in the overhead console, allowing you to make hands-free calls with voice com-
mands.
NOTEl If a cellular phone is brought close to the mi-
crophone, it may create noise in the voice on
the phone. In such a case, take the cellular phone at a place as far as possible from the
microphone.Voice recognition function
E00727300514
The Bluetooth ®
2.0 interface is equipped
with a voice recognition function.
Simply say voice commands and you can
perform various operations and make or re- ceive hands-free calls.
With the Bluetooth ®
2.0 interface, voice rec-
ognition is possible for English, French,
Spanish, Italian, German, Dutch, Portuguese and Russian. The factory setting is “English” or “Russian.”
NOTEl If the voice command that you say differs
from the predefined command or cannot be recognised due to ambient noise or some
other reason, the Bluetooth ®
2.0 interface
will ask you for the voice command again up
to 3 times.
Bluetooth ®
2.0 interface*
8-52OGGE17E1For pleasant driving8