side light MITSUBISHI SHOGUN 2003 (in English) User Guide
[x] Cancel search | Manufacturer: MITSUBISHI, Model Year: 2003, Model line: SHOGUN, Model: MITSUBISHI SHOGUN 2003Pages: 392, PDF Size: 14.34 MB
Page 221 of 392
For pleasant driving
UKW/MW/LW electronic tuning radio
with tape player ............................................................ 6- 2
UKW/MW/LW electronic tuning radio
with CD player .............................................................. 6-17
CD (Compact-Disc) player ................................................ 6-30
How to set CD autochanger ............................................. 6-31
Audio system anti-theft feature ....................................... 6-32
Antenna .............................................................................. 6-35
Ventilators .......................................................................... 6-35
Front heater / Manual air conditioning ........................... 6-36
Front automatic air conditioning ..................................... 6-43
Rear heater/Rear air conditioning ................................... 6-52
Air purifier .......................................................................... 6-55
Sun visors ......................................................................... 6-56
Vanity mirror ...................................................................... 6-58
Cigarette lighter................................................................. 6-59
Ashtray ............................................................................... 6-60
Accessory socket.............................................................. 6-61
Accessory boxes............................................................... 6-62
Glove box .......................................................................... 6-63
Luggage floor box ............................................................. 6-66
Side box ............................................................................ 6-67
Installation position for warning triangle ....................... 6-67
Luggage hooks.................................................................. 6-68
Tonneau cover rail ............................................................ 6-68
Rear shelf ........................................................................... 6-69
Div:
Out put date:
Page 236 of 392
To listen to a CD1. Press the CD button (3), and the CD
mode will be selected, starting play-
back.
NOTE
If the system is equipped with a CD
autochanger, press the DISC button (5), to
select the another disc. Every time theside of the DISC button is pressed, the next
disc is selected. Every time the
side of
the button is pressed, changeover to the
previous disc is made.
2. To adjust the volume and tone, refer to
the section“How to adjust the volume”
and“How to adjust the tone”on page
6-4.
3. To stop the CD, turn off the power by
pressing the PWR switch (1) or make a
changeover to the other mode by press-
ing the TAPE button (4) or U/M/L but-
ton (2).
4. For information concerning the han-
dling of compact discs, refer to the sec-
tion“Handling of compact discs”on
page 6-33.
To find the start of a desired trackThe start of each track on a disc can be
found by using the
or
button (6 or
7).
Track up:
Press the
button (7) the number of
tracks to skip over.
The frequency-display window will dis-
play the track number thus selected.
Track down:
Press thebutton (6) the number of
tracks to skip over.
The frequency-display window will dis-
play the track number thus selected.
How to repeat the same trackYou can repeatedly listen to the same track
by pressing the RPT button (9).
Press the RPT button, and the RPT indi-
cator (14) will come on.
To release, press the button again.
To change the order of tracks
played back (For CD player)Press the RDM button (10), and the RDM
indicator (15) will light and tracks for play-
back will be randomly selected.
To release, press the button again.To change the order of discs played
back (For CD autochanger)Press the RDM button (10), and the RDM
indicator (15) will light and random tracks
for playback will be selected randomly from
all discs loaded into the autochanger.
To release, press the button again.How to use the SCAN buttonUse the SCAN button (8) to search for a
particular track, etc. When this button is
pressed, the first 10 seconds of each track
on the disc will be played.
The disc will advance at fast-forward speed
between each 10-second played in this
way, press the SCAN button (8) again, that
track will then be played from its begin-
ning. After completion of this scanning of
tracks, the disc will begin ordinary play.
For pleasant driving
6-16Div:
Out put date:
Page 250 of 392
To change the order of tracks
played back (For CD player)Press the RDM button (11), and the RDM
indicator (16) will light and will be ran-
domly selected, tracks for playback. To
release, press the button again.To change the order of discs
played back (For CD autochanger)Press the RDM button (11), and the RDM
indicator (16) will light and tracks for play-
back will be selected randomly from all
discs loaded into the changer.
To release, press the button again.How to use the SCAN buttonUse the SCAN button (9) to search for a
particular track, etc. When this button is
pressed, the first 10 seconds of each track
on the disc will be played.
The disc will advance at fast-forward speed
between each 10-second play. When a
track you want to listen to is played in this
way, press the SCAN button again, that
track will then be played from its begin-
ning. After completion of this scanning of
tracks, the disc will begin ordinary play.
H11C004A
CD (Compact-Disc) player*
EH11C-Fe
The CD player can be used when the igni-
tion switch is in either the“ON”or“ACC”
position.
NOTE
(1) The CD player can be used when the
PWR (on-off) switch, which is on the
radio is off.
(2) To listen to the CD player while the
engine is stopped, turn the ignition
switch to the“ACC”position.
(3) When a disc is inserted, the CD player
will automatically begin playing and the
radio or tape player will be switched off.(4) Use the radio controls to adjust the vol-
ume, tone and left/right sound bal-
ance.
(5) When a cellular phone is used inside
the vehicle, noise may be produced
from the audio equipment. This does
not mean that something is wrong with
the audio equipment. In such a case,
use the cellular phone at a place as far
as possible from the audio equip-
ment.
(6) Do not oil any part of the player and do
not insert any object other than com-
pact discs into the slot, or the CD
player may be damaged.
(7) In case of misuse (entry of a foreign
object or water, generation of smoke or
odor, etc.), immediately stop the opera-
tion and have the audio system
checked at an authorized MITSUB-
ISHI dealer. Never try to repair it by
yourself. Avoid continuous usage with-
out inspection by a qualified person.
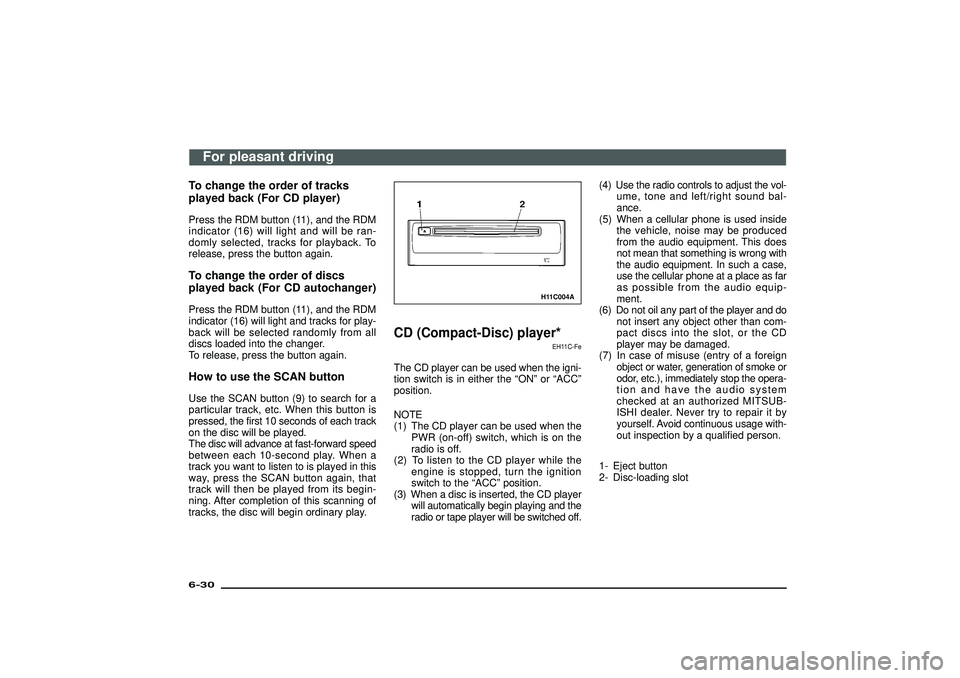
1- Eject button
2- Disc-loading slot
For pleasant driving
6-30Div:
Out put date:
Page 257 of 392
H23A254A
RHDNOTE
On an air conditioned vehicle, the cool air
from the ventilators may appear as a mist.
This is due to moist air being suddenly
cooled by the air conditioning. This will clear
after a few moments.
CAUTION
(1) When using the air condition-
ing, the idling speed may slightly
increase as the air condition-
ing compressor is switched
on/off automatically. Especially
for vehicles with an automatic
transmission, while the vehicle
is stationary, fully depress the
brake pedal to prevent the
vehicle from creeping.
CAUTION
(2) On 3500 models, if a problem is
detected in the air conditioning
compressor, the air condition-
ing operation indicator lamp
blinks. Stop the vehicle in a safe
place, turn off the engine, then
restart the engine. If the air con-
ditioning operation indicator
lamp does not blink, there is no
problem. If it does blink, have it
checked at an authorized MIT-
SUBISHI dealer.
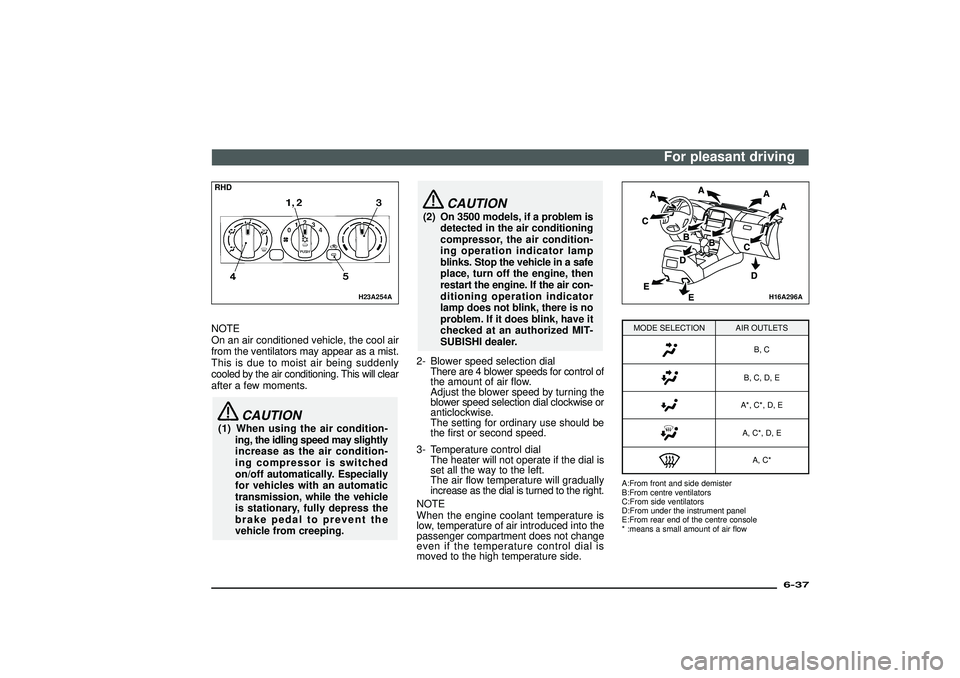
2- Blower speed selection dial
There are 4 blower speeds for control of
the amount of air flow.
Adjust the blower speed by turning the
blower speed selection dial clockwise or
anticlockwise.
The setting for ordinary use should be
the first or second speed.
3- Temperature control dial
The heater will not operate if the dial is
set all the way to the left.
The air flow temperature will gradually
increase as the dial is turned to the right.
NOTE
When the engine coolant temperature is
low, temperature of air introduced into the
passenger compartment does not change
even if the temperature control dial is
moved to the high temperature side.
H16A296A
MODE SELECTION AIR OUTLETS
B, CB, C, D, EA*, C*, D, EA, C*, D, EA, C*
A:From front and side demister
B:From centre ventilators
C:From side ventilators
D:From under the instrument panel
E:From rear end of the centre console
* :means a small amount of air flow
For pleasant driving
6-37
Div:
Out put date:
Page 259 of 392
H03B063A
RHD
H03C060A
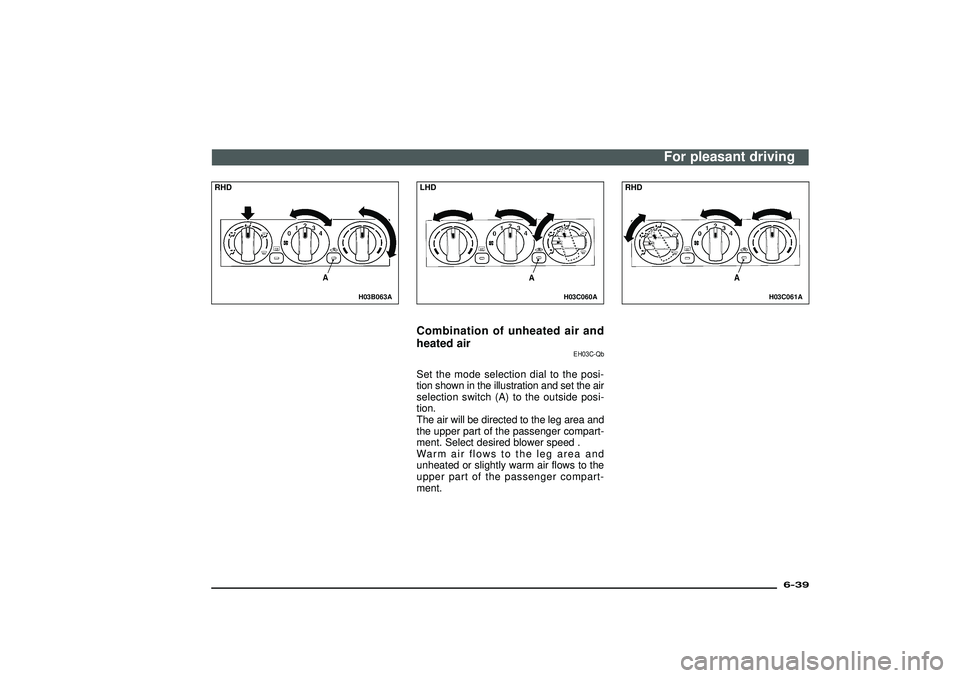
LHDCombination of unheated air and
heated air
EH03C-Qb
Set the mode selection dial to the posi-
tion shown in the illustration and set the air
selection switch (A) to the outside posi-
tion.
The air will be directed to the leg area and
the upper part of the passenger compart-
ment. Select desired blower speed .
Warm air flows to the leg area and
unheated or slightly warm air flows to the
upper part of the passenger compart-
ment.
H03C061A
RHD
For pleasant driving
6-39
Div:
Out put date:
Page 262 of 392
H04F071A
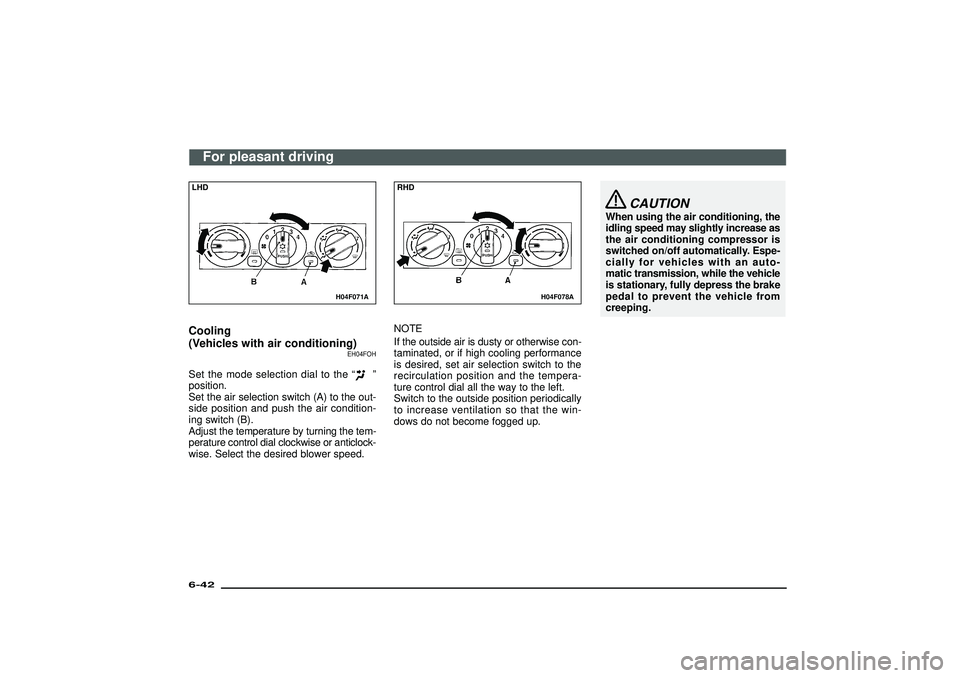
LHDCooling
(Vehicles with air conditioning)
EH04FOH
Set the mode selection dial to the“
”
position.
Set the air selection switch (A) to the out-
side position and push the air condition-
ing switch (B).
Adjust the temperature by turning the tem-
perature control dial clockwise or anticlock-
wise. Select the desired blower speed.
H04F078A
RHDNOTE
If the outside air is dusty or otherwise con-
taminated, or if high cooling performance
is desired, set air selection switch to the
recirculation position and the tempera-
ture control dial all the way to the left.
Switch to the outside position periodically
to increase ventilation so that the win-
dows do not become fogged up.
CAUTION
When using the air conditioning, the
idling speed may slightly increase as
the air conditioning compressor is
switched on/off automatically. Espe-
cially for vehicles with an auto-
matic transmission, while the vehicle
is stationary, fully depress the brake
pedal to prevent the vehicle from
creeping.
For pleasant driving
6-42Div:
Out put date:
Page 263 of 392
H14A059A
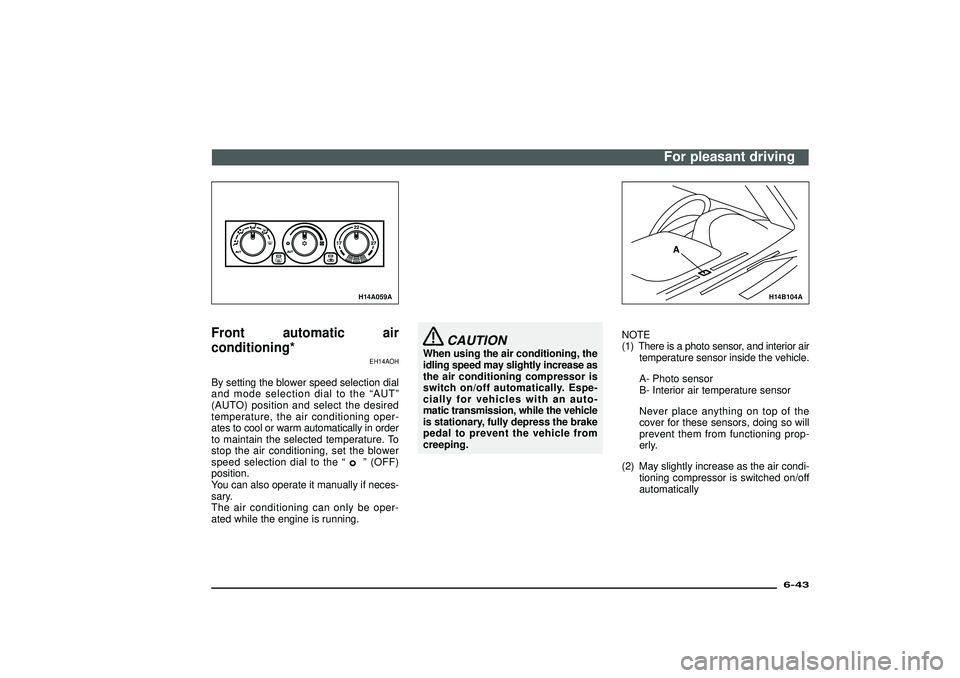
Front automatic air
conditioning*
EH14AOH
By setting the blower speed selection dial
and mode selection dial to the“AUT”
(AUTO) position and select the desired
temperature, the air conditioning oper-
ates to cool or warm automatically in order
to maintain the selected temperature. To
stop the air conditioning, set the blower
speed selection dial to the“
”(OFF)
position.
You can also operate it manually if neces-
sary.
The air conditioning can only be oper-
ated while the engine is running.
CAUTION
When using the air conditioning, the
idling speed may slightly increase as
the air conditioning compressor is
switch on/off automatically. Espe-
cially for vehicles with an auto-
matic transmission, while the vehicle
is stationary, fully depress the brake
pedal to prevent the vehicle from
creeping.
H14B104A
NOTE
(1) There is a photo sensor, and interior air
temperature sensor inside the vehicle.
A- Photo sensor
B- Interior air temperature sensor
Never place anything on top of the
cover for these sensors, doing so will
prevent them from functioning prop-
erly.
(2) May slightly increase as the air condi-
tioning compressor is switched on/off
automatically
For pleasant driving
6-43
Div:
Out put date:
Page 270 of 392
CAUTION
(1) When using the air condition-
ing, the idling speed may slightly
increase as the air condition-
ing compressor is switched
on/off automatically. Especially
for vehicles with an automatic
transmission, while the vehicle
is stationary, fully depress the
brake pedal to prevent the
vehicle from creeping.
(2) On 3500 models, if a problem is
detected in the air conditioning
compressor, the air condition-
ing operation indicator lamp
blinks. Stop the vehicle in a safe
place, turn off the engine, then
restart the engine. If the air con-
ditioning operation indicator
lamp does not blink, there is no
problem. If it does blink, have it
checked at an authorized MIT-
SUBISHI dealer.
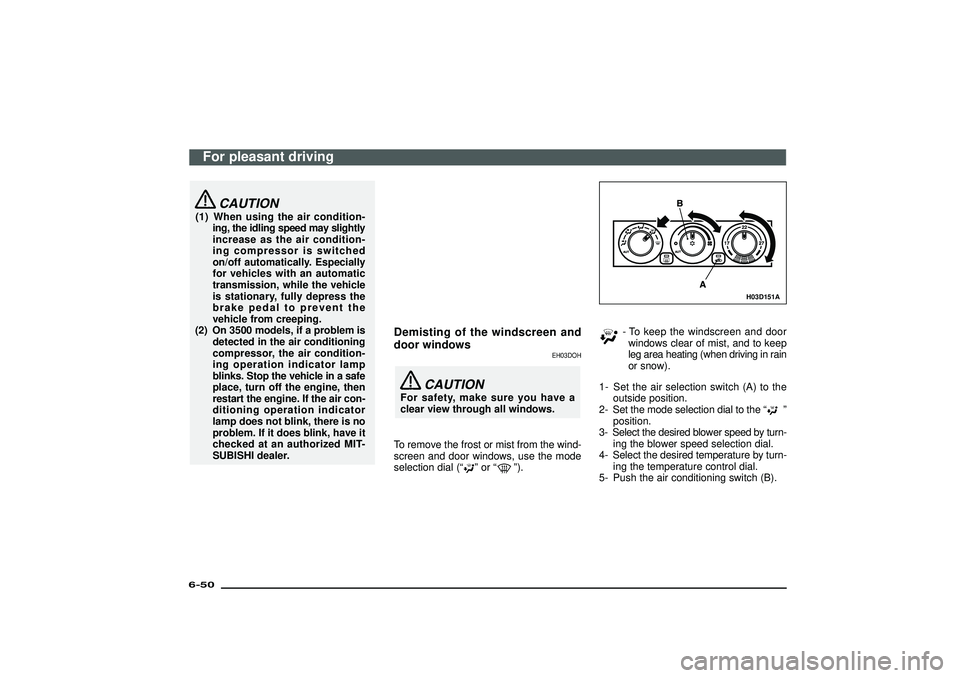
Demisting of the windscreen and
door windows
EH03DOH
CAUTION
For safety, make sure you have a
clear view through all windows.
To remove the frost or mist from the wind-
screen and door windows, use the mode
selection dial (“
”or“
”).
H03D151A
- To keep the windscreen and door
windows clear of mist, and to keep
leg area heating (when driving in rain
or snow).
1- Set the air selection switch (A) to the
outside position.
2- Set the mode selection dial to the“
”
position.
3- Select the desired blower speed by turn-
ing the blower speed selection dial.
4- Select the desired temperature by turn-
ing the temperature control dial.
5- Push the air conditioning switch (B).
For pleasant driving
6-50Div:
Out put date:
Page 271 of 392
H03D152A
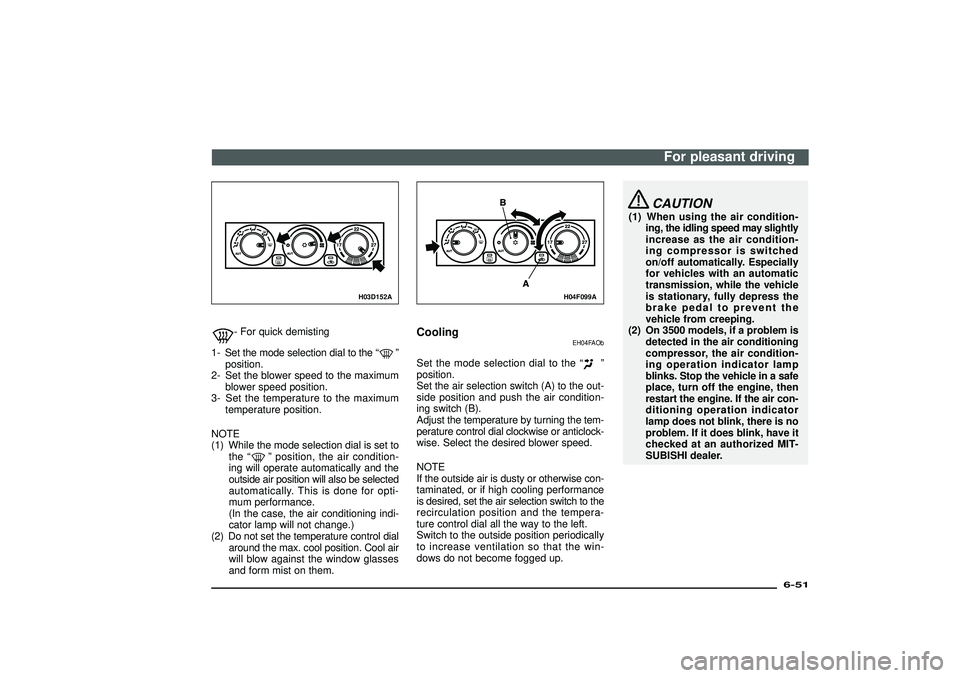
- For quick demisting
1- Set the mode selection dial to the“
”
position.
2- Set the blower speed to the maximum
blower speed position.
3- Set the temperature to the maximum
temperature position.
NOTE
(1) While the mode selection dial is set to
the“
”position, the air condition-
ing will operate automatically and the
outside air position will also be selected
automatically. This is done for opti-
mum performance.
(In the case, the air conditioning indi-
cator lamp will not change.)
(2) Do not set the temperature control dial
around the max. cool position. Cool air
will blow against the window glasses
and form mist on them.
H04F099A
Cooling
EH04FAOb
Set the mode selection dial to the“
”
position.
Set the air selection switch (A) to the out-
side position and push the air condition-
ing switch (B).
Adjust the temperature by turning the tem-
perature control dial clockwise or anticlock-
wise. Select the desired blower speed.
NOTE
If the outside air is dusty or otherwise con-
taminated, or if high cooling performance
is desired, set the air selection switch to the
recirculation position and the tempera-
ture control dial all the way to the left.
Switch to the outside position periodically
to increase ventilation so that the win-
dows do not become fogged up.
CAUTION
(1) When using the air condition-
ing, the idling speed may slightly
increase as the air condition-
ing compressor is switched
on/off automatically. Especially
for vehicles with an automatic
transmission, while the vehicle
is stationary, fully depress the
brake pedal to prevent the
vehicle from creeping.
(2) On 3500 models, if a problem is
detected in the air conditioning
compressor, the air condition-
ing operation indicator lamp
blinks. Stop the vehicle in a safe
place, turn off the engine, then
restart the engine. If the air con-
ditioning operation indicator
lamp does not blink, there is no
problem. If it does blink, have it
checked at an authorized MIT-
SUBISHI dealer.
For pleasant driving
6-51
Div:
Out put date:
Page 277 of 392
G11A018A
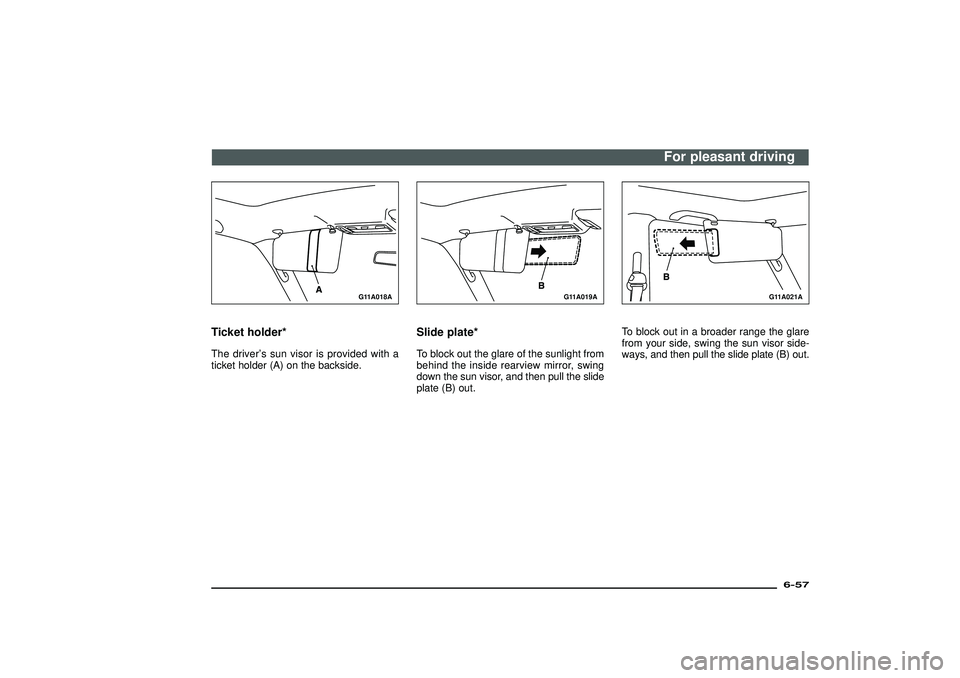
Ticket holder*The driver’s sun visor is provided with a
ticket holder (A) on the backside.
G11A019A
Slide plate*To block out the glare of the sunlight from
behind the inside rearview mirror, swing
down the sun visor, and then pull the slide
plate (B) out.
G11A021A
To block out in a broader range the glare
from your side, swing the sun visor side-
ways, and then pull the slide plate (B) out.
For pleasant driving
6-57
Div:
Out put date: