ESP NISSAN ARMADA 2015 1.G Quick Reference Guide
[x] Cancel search | Manufacturer: NISSAN, Model Year: 2015, Model line: ARMADA, Model: NISSAN ARMADA 2015 1.GPages: 28, PDF Size: 1.9 MB
Page 7 of 28

5
NISSAN INTELLIGENT KEY® SYSTEM (if so equipped)
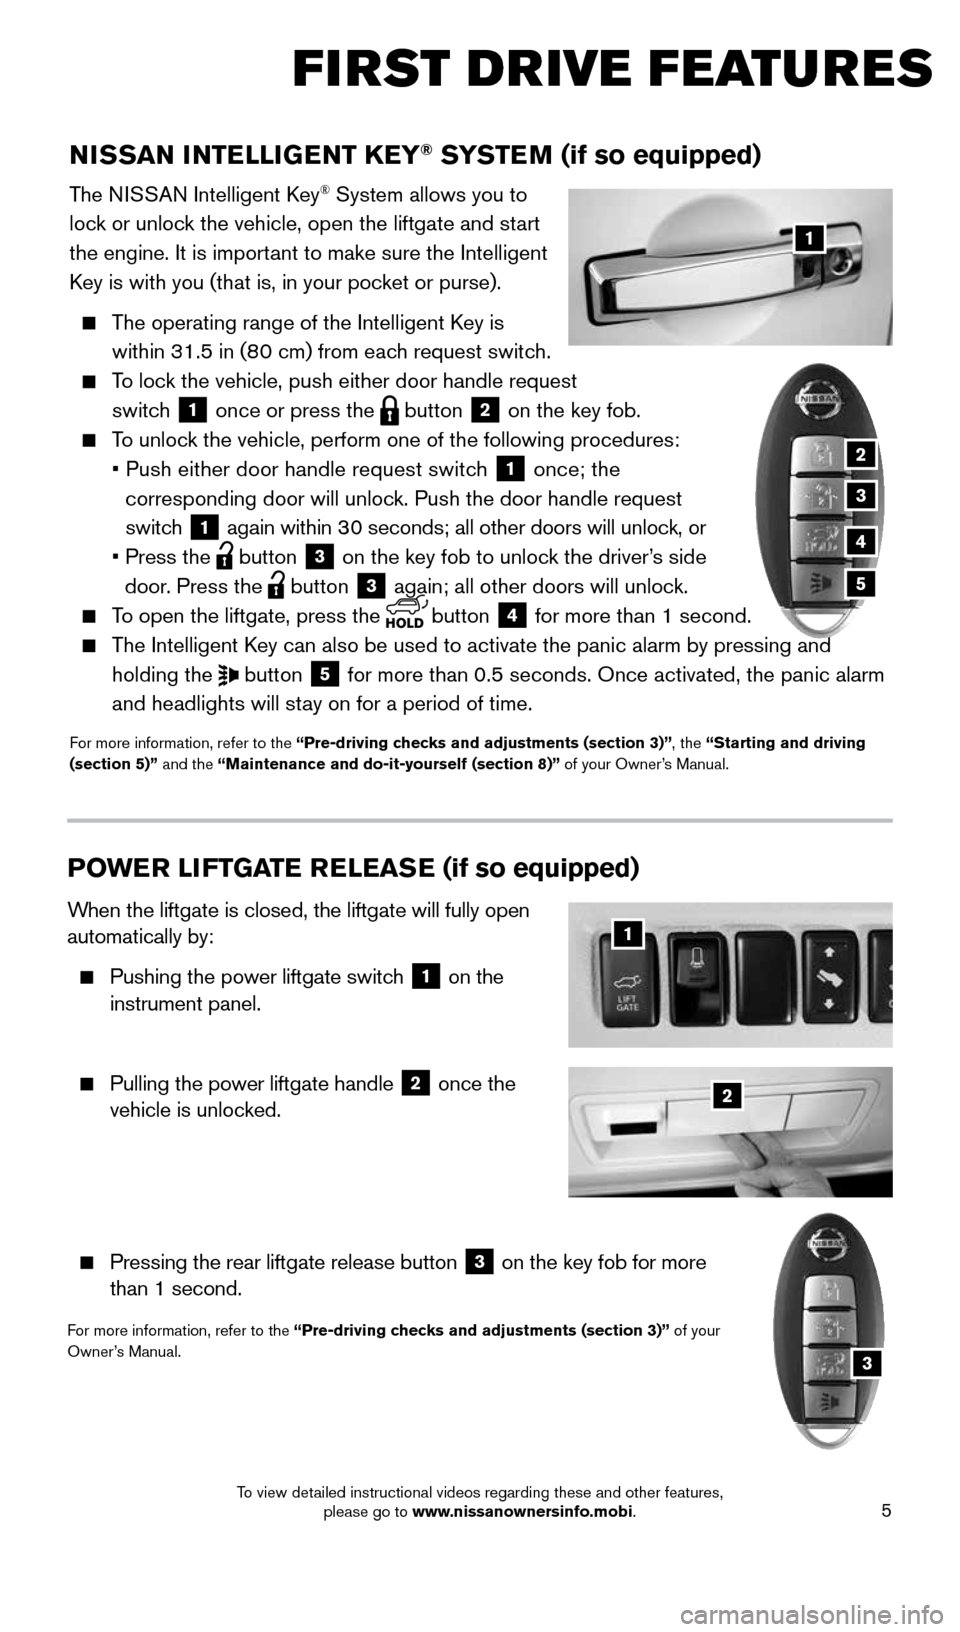
The NISSAN Intelligent Key® System allows you to
lock or unlock the vehicle, open the liftgate and start
the engine. It is important to make sure the Intelligent
Key is with you (that is, in your pocket or purse).
The operating range of the Intelligent Key is
within 31.5 in (80 cm) from each request switch.
To lock the vehicle, push either door handle request
switch
1 once or press the
button
2 on the key fob.
To unlock the vehicle, perform one of the following procedures:
• Push either door handle request switch
1 once; the
corresponding door will unlock. Push the door handle request
switch
1 again within 30 seconds; all other doors will unlock, or
• Press the
button
3 on the key fob to unlock the driver’s side
door. Press the button 3 again; all other doors will unlock.
To open the liftgate, press the
button
4 for more than 1 second.
The Intelligent Key can also be used to activate the panic alarm by pressing and
holding the
button
5 for more than 0.5 seconds. Once activated, the panic alarm
and headlights will stay on for a period of time.
For more information, refer to the “Pre-driving checks and adjustments (section 3)”, the “Starting and driving
(section 5)” and the “Maintenance and do-it-yourself (section 8)” of your Owner’s Manual.
1
FIRST DRIVE FEATURES
2
3
4
5
POWE R LI FTGATE R E LEAS E (if so equipped)
When the liftgate is closed, the liftgate will fully open
automatically by:
Pushing the power liftgate switch
1 on the
instrument panel.
Pulling the power liftgate handle
2 once the
vehicle is unlocked.
Pressing the rear liftgate release button
3 on the key fob for more
than 1 second.
For more information, refer to the “Pre-driving checks and adjustments (section 3)” of your
Owner’s Manual.
2
1
3
1904705_15c_Armada_QRG_072315.indd 57/23/15 8:58 AM
To view detailed instructional videos regarding these and other features, please go to www.nissanownersinfo.mobi.
Page 14 of 28

12
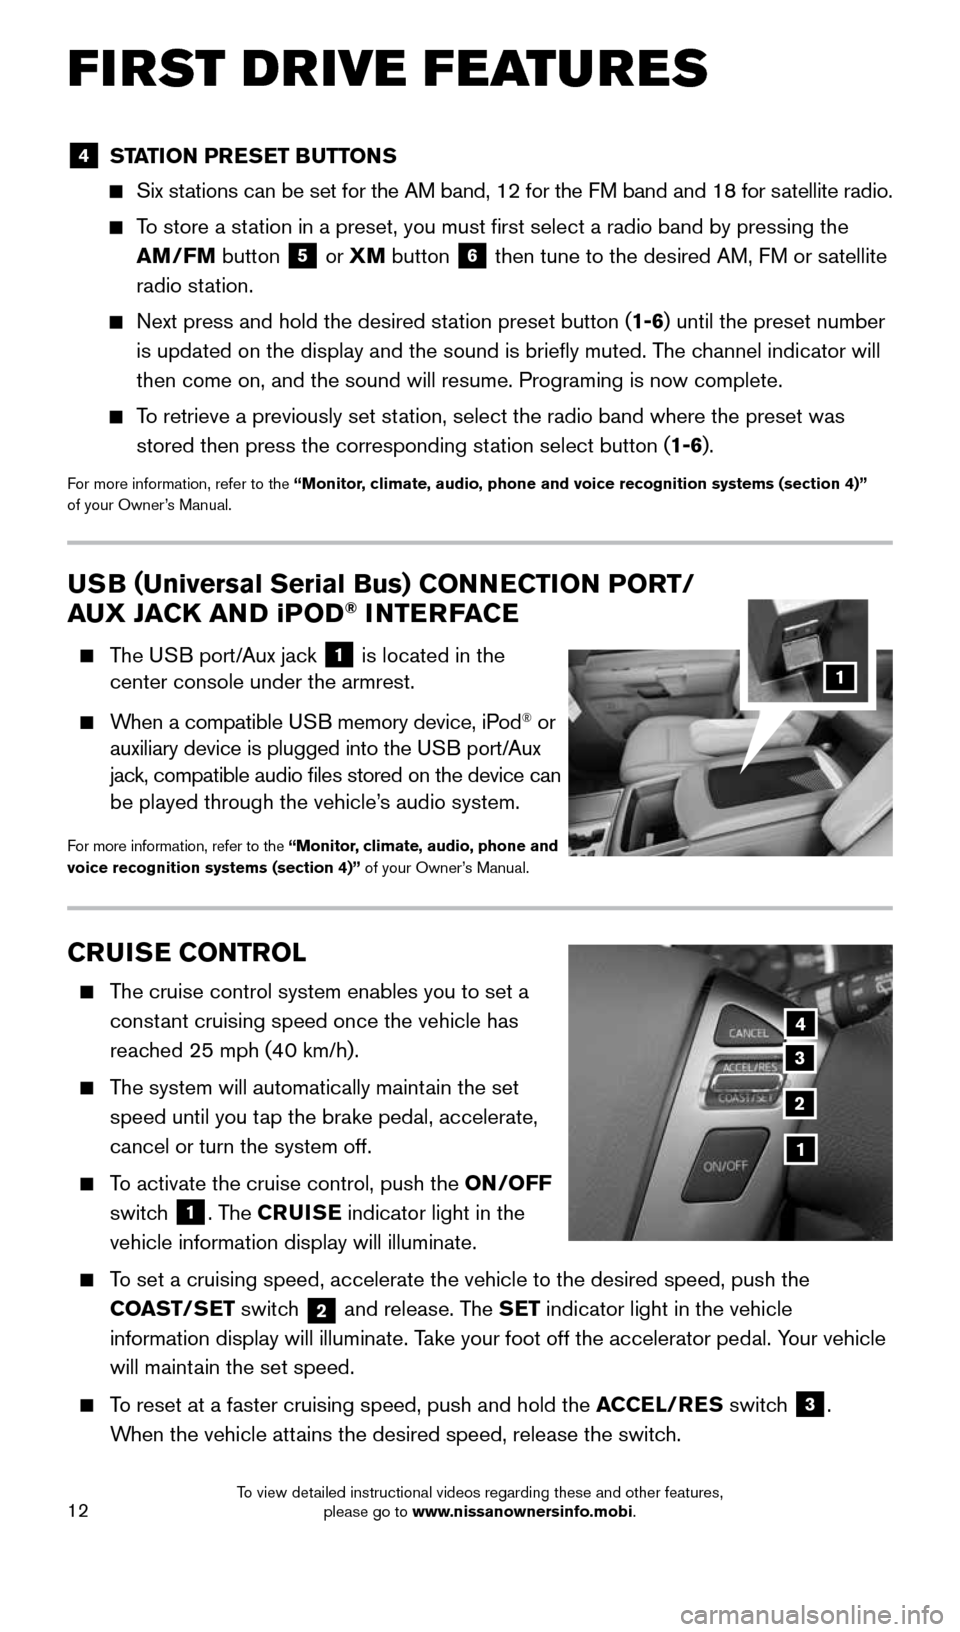
CRUISE CONTROL
The cruise control system enables you to set a
constant cruising speed once the vehicle has
reached 25 mph (40 km/h).
The system will automatically maintain the set
speed until you tap the brake pedal, accelerate,
cancel or turn the system off.
To activate the cruise control, push the ON/OFF
switch
1. The CRUISE indicator light in the
vehicle information display will illuminate.
To set a cruising speed, accelerate the vehicle to the desired speed, pus\
h the
COAST/SET switch
2 and release. The SET indicator light in the vehicle
information display will illuminate. Take your foot off the accelerator pedal. Your vehicle
will maintain the set speed.
To reset at a faster cruising speed, push and hold the ACCEL/RES switch
3.
When the vehicle attains the desired speed, release the switch.
4
3
2
1
USB ( Universal Serial Bus) CONNECTION PORT/
AUX JACK AND iPOD® INTERFACE
The USB port/Aux jack
1 is located in the
center console under the armrest.
When a compatible USB memory device, iPod® or
auxiliary device is plugged into the USB port/Aux
jack, compatible audio files stored on the device can
be played through the vehicle’s audio system.
For more information, refer to the “Monitor, climate, audio, phone and
voice recognition systems (section 4)” of your Owner’s Manual.
1
4 STATION PRESET BUTTONS
Six stations can be set for the AM band, 12 for the FM band and 18 for satellite radio.
To store a station in a preset, you must first select a radio band by pressing the \
AM/FM button
5 or XM
button
6 then tune to the desired AM, FM or satellite
radio station.
Next press and hold the desired station preset button (1-6) until the preset number
is updated on the display and the sound is briefly muted. The channel indicator will
then come on, and the sound will resume. Programing is now complete.
To retrieve a previously set station, select the radio band where the preset was
stored then press the corresponding station select button (1-6).
For more information, refer to the “Monitor, climate, audio, phone and voice recognition systems (section 4)”
of your Owner’s Manual.
FIRST DRIVE FEATURES
1904705_15c_Armada_QRG_072315.indd 127/23/15 8:58 AM
To view detailed instructional videos regarding these and other features, please go to www.nissanownersinfo.mobi.
Page 24 of 28

22
SYSTEM GUIDE
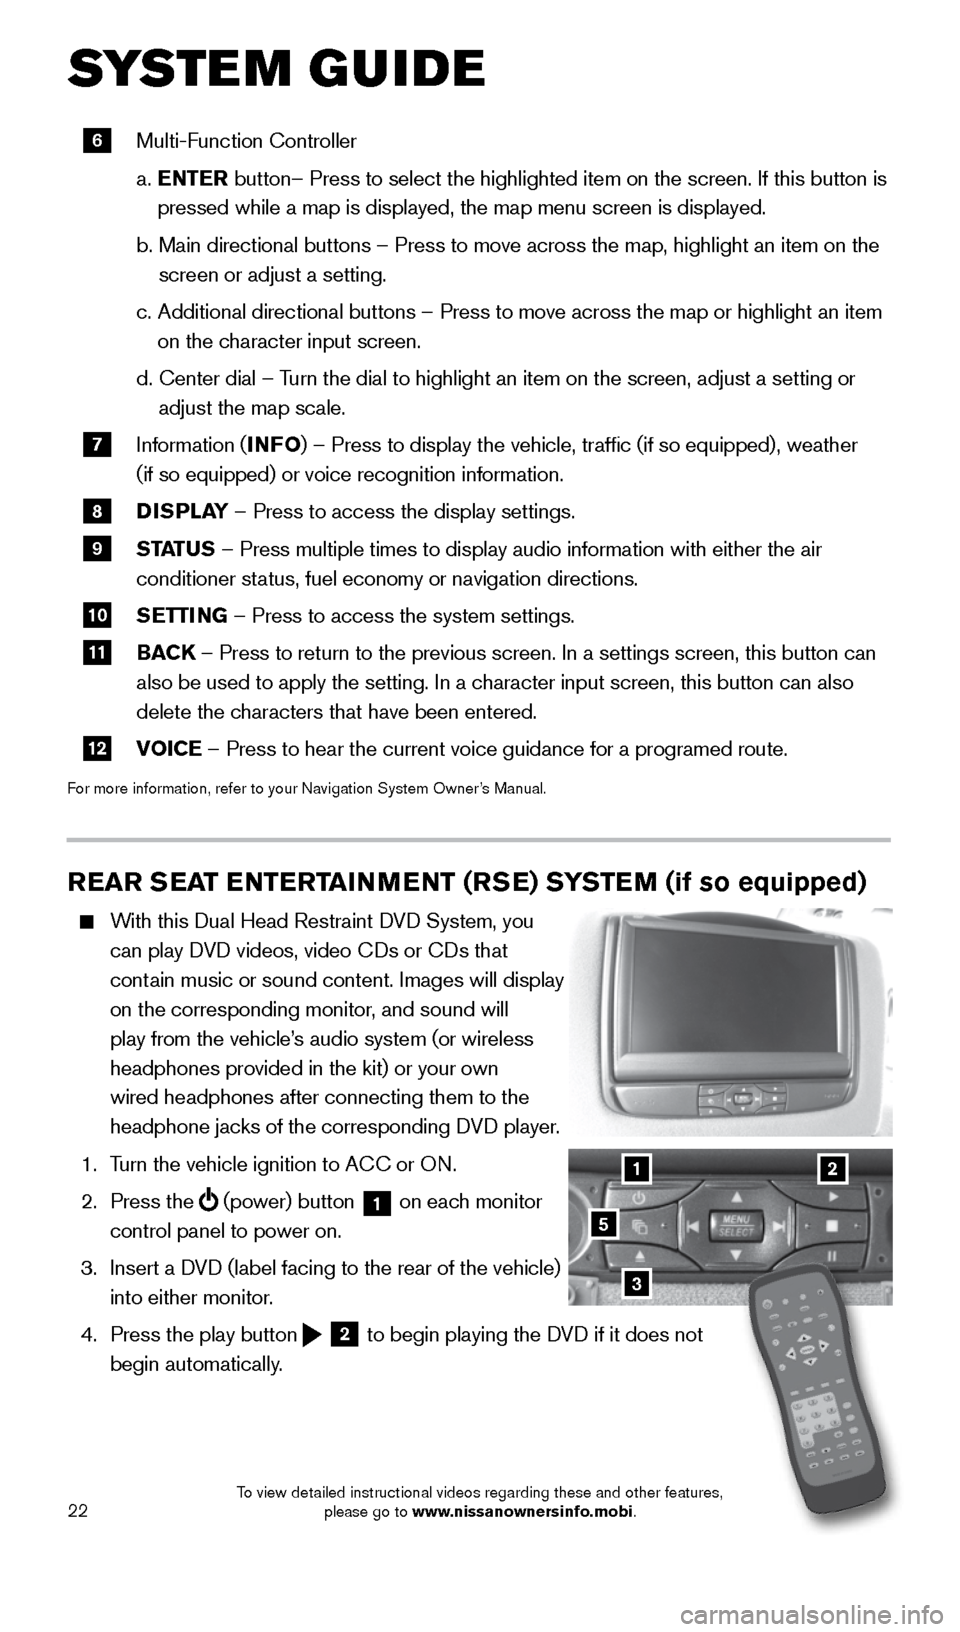
REAR SEAT ENTERTAINMENT (RSE) SYSTEM (if so equipped)
With this Dual Head Restraint DVD System, you
can play DVD videos, video CDs or CDs that
contain music or sound content. Images will display
on the corresponding monitor, and sound will
play from the vehicle’s audio system (or wireless
headphones provided in the kit) or your own
wired headphones after connecting them to the
headphone jacks of the corresponding DVD player.
1. Turn the vehicle ignition to ACC or ON.
2. Press the
(power) button 1 on each monitor
control panel to power on.
3. Insert a DVD (label facing to the rear of the vehicle)
into either monitor.
4. Press the play button
2 to begin playing the DVD if it does not
begin automatically.
3
21
5
6 Multi-Function Controller
a. ENTER button– Press to select the highlighted item on the screen. If this b\
utton is
pressed while a map is displayed, the map menu screen is displayed.
b. Main directional buttons – Press to move across the map, highlight an\
item on the
screen or adjust a setting.
c. Additional directional buttons – Press to move across the map or high\
light an item
on the character input screen.
d. Center dial
– Turn the dial to highlight an item on the screen, adjust a setting or
adjust the map scale.
7 Information (INFO
) – Press to display the vehicle, traffic (if so equipped), weat\
her
(if so equipped) or voice recognition information.
8 DISPLAY
– Press to access the display settings.
9 STATUS – Press multiple times to display audio information with either the \
air
conditioner status, fuel economy or navigation directions.
10 SETTING – Press to access the system settings.
11 BACK
– Press to return to the previous screen. In a settings screen, this\
button can
also be used to apply the setting. In a character input screen, this button can also
delete the characters that have been entered.
12 VOICE – Press to hear the current voice guidance for a programed route.
For more information, refer to your Navigation System Owner’s Manual.
1904705_15c_Armada_QRG_072315.indd 227/23/15 8:59 AM
To view detailed instructional videos regarding these and other features, please go to www.nissanownersinfo.mobi.
Page 25 of 28

23
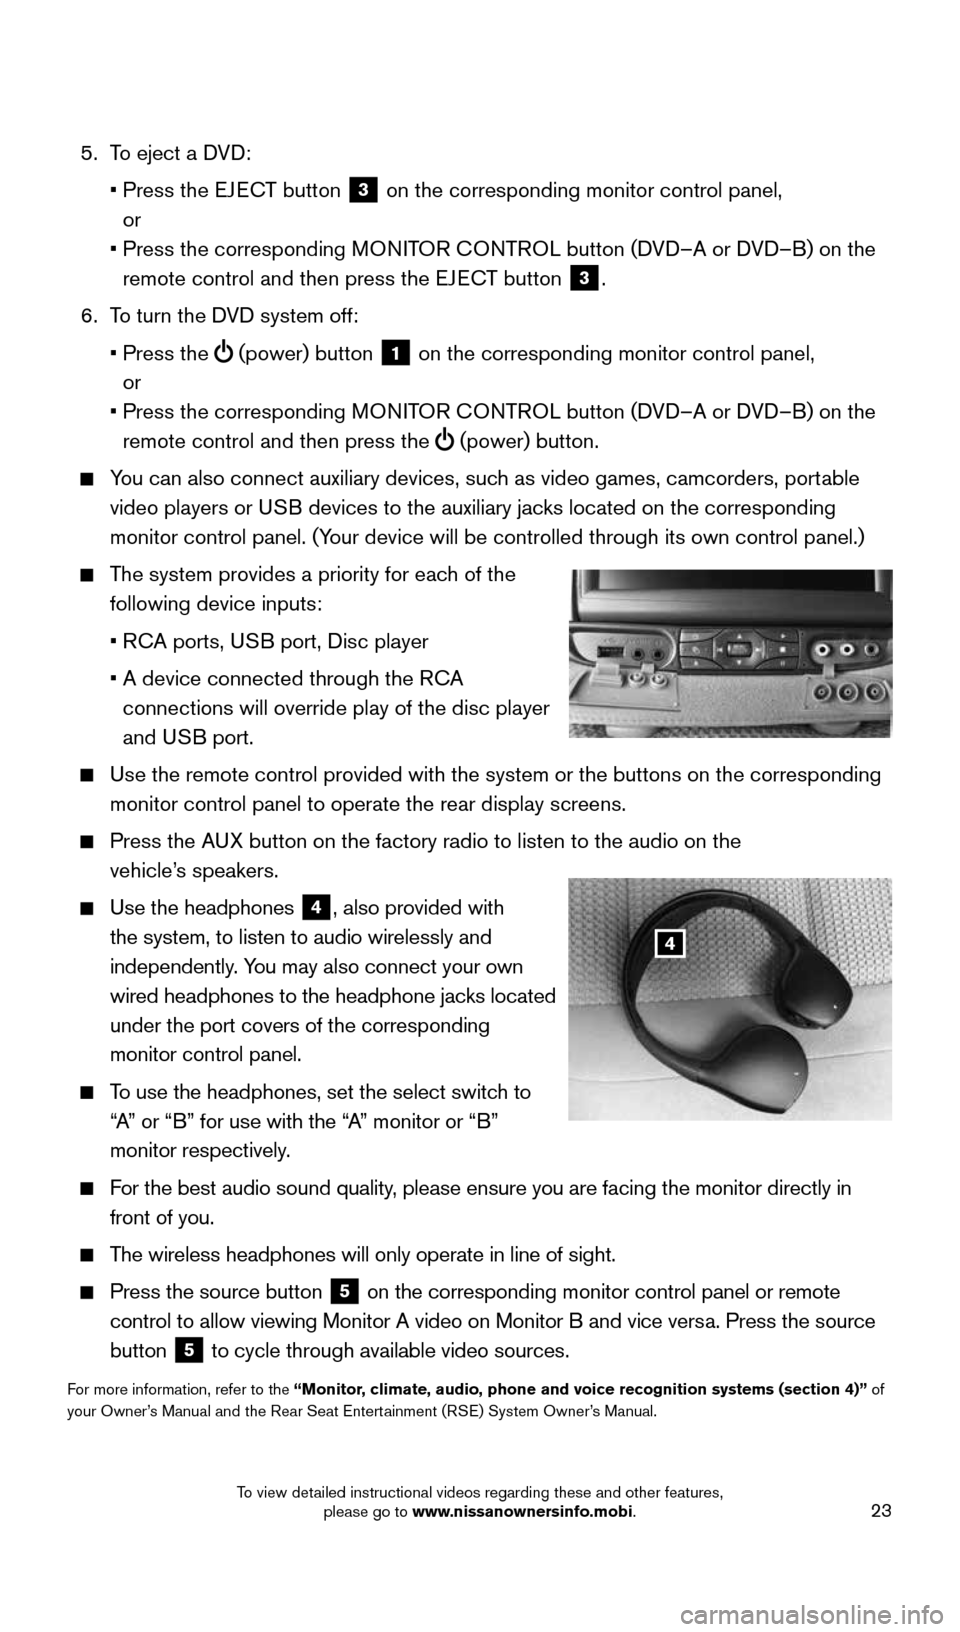
5. To eject a DVD:
• Press the EJECT button
3 on the corresponding monitor control panel,
or
• Press the corresponding MONITOR CONTROL button (DVD–A or DVD–B) on the
remote control and then press the EJECT button
3.
6. To turn the DVD system off:
• Press the
(power) button 1 on the corresponding monitor control panel,
or
• Press the corresponding MONITOR CONTROL button (DVD–A or DVD–B) on the
remote control and then press the
(power) button.
You can also connect auxiliary devices, such as video games, camcorders, portable
video players or USB devices to the auxiliary jacks
located on the corresponding
monitor control panel. (Your device will be controlled through its own control panel.)
The system provides a priority for each of the
following device inputs:
• RCA ports, USB port, Disc player
• A device connected through the RCA
connections will override play of the disc player
and USB port.
Use the remote control
provided with the system or the buttons on the corresponding
monitor control panel to operate the rear display screens.
Press the AUX button on the factory radio to listen to the audio on the
vehicle’s speakers.
Use the headphones
4, also provided with
the system, to listen to audio wirelessly and
independently. You may also connect your own
wired headphones to the headphone jacks located
under the port covers of the corresponding
monitor control panel.
To use the headphones, set the select switch to
“A” or “B” for use with the “A” monitor or “B”
monitor respectively.
For the best audio sound quality, please ensure you are facing the monitor directly in
front of you.
The wireless headphones will only operate in line of sight.
Press the source button 5 on the corresponding monitor control panel or remote
control to allow viewing Monitor A video on Monitor B and vice versa. Press the source
button
5 to cycle through available video sources.
For more information, refer to the “Monitor, climate, audio, phone and voice recognition systems (section 4)” of
your Owner’s Manual and the Rear Seat Entertainment (RSE) System Owner’s Manual.
4
1904705_15c_Armada_QRG_072315.indd 237/23/15 8:59 AM
To view detailed instructional videos regarding these and other features, please go to www.nissanownersinfo.mobi.
Page 28 of 28

Nissan, the Nissan Brand Symbol, Z and
Nissan model names are Nissan trademarks.
© 2015 Nissan North America, Inc.
QR
15EA TA60U2Printing: August 2015 (28)
To view detailed instructional videos,
go to www.nissanownersinfo.mobi/2015/armada
or snap this barcode with an appropriate barcode reader.
This Quick Reference Guide is intended to provide an overview of some of the unique features of your new vehicle. Please see
your Owner’s Manual for important safety information and system operation limitations. Features and equipment in your vehicle
may vary depending on model, trim level, options selected, order, date of production, region or availability. Therefore, you may find
information about features or equipment that are not included or installed on your vehicle.
All information, specifications and illustrations in this Quick Reference Guide are those in effect at the time of printing.
NISSAN reserves the right to change specifications, performance, design or component suppliers witho\
ut notice and without
obligation. From time to time, NISSAN may update or revise this Quick Reference Guide to provide owners with the most
accurate information currently available. Please carefully read and retain with this Quick Reference Guide all revision updates sent
to you by NISSAN to ensure you have access to accurate and up-to-date information reg\
arding your vehicle. Current versions
of vehicle Quick Reference Guides, Owner’s Manuals and any updates can also be found in the Owner section of the \
NISSAN
website at https://owners.nissanusa.com/nowners/navigation/manualsGuide . If you have questions concerning any
information in your Owner’s Manual, contact NISSAN Consumer Affairs. See the NISSAN CUSTOMER CARE PROGRAM page
in the Owner’s Manual for contact information.
Helpful Resources
Below is a list of helpful resources that can be used to learn
more about the vehicle’s systems and feature operations.
Vehicle Owner’s Manual
Navigation System Owner’s Manual (if so equipped)
Printed Quick Reference Guide (this document)
www.NissanUSA.com/bluetooth
www.NissanUSA.com/connect
www.youtube.com/user/NissanUSA
Nissan Consumer Affairs: 1-800-647-7261
Electronic Quick Reference Guide
(Use Quick Response (QR) code or URL below.)
Nissan Quick Guide (available in the iPhone® App
Store or Android® Google® Play Store for download
to your smartphone)
1904705_15c_Armada_QRG_072315.indd 27/23/15 8:58 AM