open hood NISSAN ARMADA 2019 Owner´s Manual
[x] Cancel search | Manufacturer: NISSAN, Model Year: 2019, Model line: ARMADA, Model: NISSAN ARMADA 2019Pages: 536, PDF Size: 2.56 MB
Page 124 of 536
2-30Instruments and controls
.UNIT
Select this submenu to choose the
unit.
. EFFECTS
Select this submenu to turn on and off
the needle sweep function when
starting the engine.
7. Warning check
SKIP:
Push the
switchto move to the
warning check mode.
Push the
switchto select other
menus.
DETAIL:
This item is available only when a warning
is displayed.
Select this menu to see the details of
warnings.SIC2133
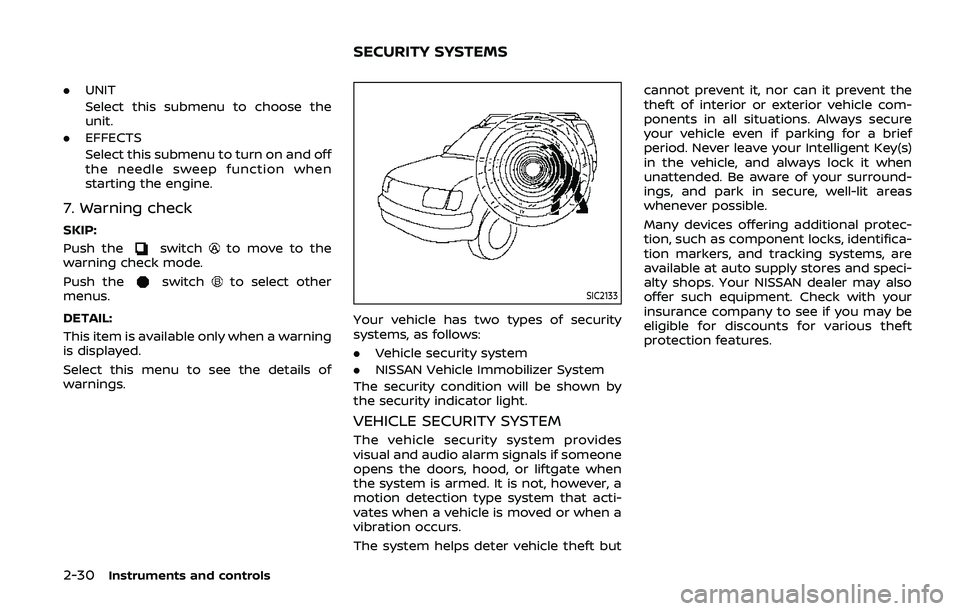
Your vehicle has two types of security
systems, as follows:
. Vehicle security system
. NISSAN Vehicle Immobilizer System
The security condition will be shown by
the security indicator light.
VEHICLE SECURITY SYSTEM
The vehicle security system provides
visual and audio alarm signals if someone
opens the doors, hood, or liftgate when
the system is armed. It is not, however, a
motion detection type system that acti-
vates when a vehicle is moved or when a
vibration occurs.
The system helps deter vehicle theft but cannot prevent it, nor can it prevent the
theft of interior or exterior vehicle com-
ponents in all situations. Always secure
your vehicle even if parking for a brief
period. Never leave your Intelligent Key(s)
in the vehicle, and always lock it when
unattended. Be aware of your surround-
ings, and park in secure, well-lit areas
whenever possible.
Many devices offering additional protec-
tion, such as component locks, identifica-
tion markers, and tracking systems, are
available at auto supply stores and speci-
alty shops. Your NISSAN dealer may also
offer such equipment. Check with your
insurance company to see if you may be
eligible for discounts for various theft
protection features.
SECURITY SYSTEMS
Page 125 of 536
SIC2045
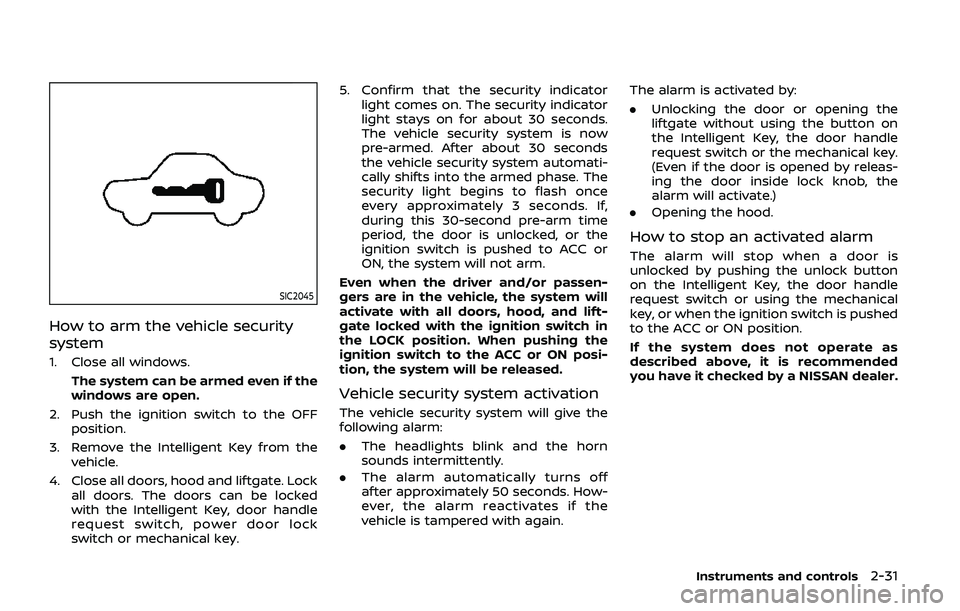
How to arm the vehicle security
system
1. Close all windows.The system can be armed even if the
windows are open.
2. Push the ignition switch to the OFF position.
3. Remove the Intelligent Key from the vehicle.
4. Close all doors, hood and liftgate. Lock all doors. The doors can be locked
with the Intelligent Key, door handle
request switch, power door lock
switch or mechanical key. 5. Confirm that the security indicator
light comes on. The security indicator
light stays on for about 30 seconds.
The vehicle security system is now
pre-armed. After about 30 seconds
the vehicle security system automati-
cally shifts into the armed phase. The
security light begins to flash once
every approximately 3 seconds. If,
during this 30-second pre-arm time
period, the door is unlocked, or the
ignition switch is pushed to ACC or
ON, the system will not arm.
Even when the driver and/or passen-
gers are in the vehicle, the system will
activate with all doors, hood, and lift-
gate locked with the ignition switch in
the LOCK position. When pushing the
ignition switch to the ACC or ON posi-
tion, the system will be released.
Vehicle security system activation
The vehicle security system will give the
following alarm:
. The headlights blink and the horn
sounds intermittently.
. The alarm automatically turns off
after approximately 50 seconds. How-
ever, the alarm reactivates if the
vehicle is tampered with again. The alarm is activated by:
.
Unlocking the door or opening the
liftgate without using the button on
the Intelligent Key, the door handle
request switch or the mechanical key.
(Even if the door is opened by releas-
ing the door inside lock knob, the
alarm will activate.)
. Opening the hood.
How to stop an activated alarm
The alarm will stop when a door is
unlocked by pushing the unlock button
on the Intelligent Key, the door handle
request switch or using the mechanical
key, or when the ignition switch is pushed
to the ACC or ON position.
If the system does not operate as
described above, it is recommended
you have it checked by a NISSAN dealer.
Instruments and controls2-31
Page 175 of 536
3 Pre-driving checks and adjustments
Keys ........................................................................\
................................. 3-2Intelligent Key ........................................................................\
... 3-2
Valet hand-off ........................................................................\
... 3-4
Doors ........................................................................\
.............................. 3-4 Locking with mechanical key ...................................... 3-4
Opening and closing windows with the
mechanical key ........................................................................\
3-5
Locking with inside lock knob ..................................... 3-5
Locking with power door lock switch ................... 3-5
Automatic door locks ......................................................... 3-6
Child safety rear door lock ........................................... 3-6
Intelligent Key system .............................................................. 3-7 Intelligent Key operating range ................................. 3-9
Door locks/unlocks precaution .................................. 3-9
Intelligent Key operation .............................................. 3-10
Battery saver system ....................................................... 3-12
Warning signals .................................................................... 3-12
Troubleshooting guide ................................................... 3-13
Remote keyless entry system ......................................... 3-15 How to use remote keyless entry system ...... 3-16
Remote engine start (if so equipped) ....................... 3-19 Remote engine start operating range ............... 3-19
Remote starting the engine ....................................... 3-19
Extending engine run time ......................................... 3-20 Canceling a remote engine start ........................ 3-20
Conditions the remote engine start will
not work ........................................................................\
.......... 3-20
Hood ........................................................................\
............................ 3-21
Liftgate ........................................................................\
...................... 3-22 Operating manual liftgate ......................................... 3-22
Operating power liftgate (if so equipped) ...... 3-22
Auto closure ........................................................................\
3-25
Liftgate release lever ..................................................... 3-26
Fuel-filler door ........................................................................\
..... 3-26
Opening the fuel-filler door ...................................... 3-26
Fuel-filler cap ....................................................................... 3-27
Tilt/telescopic steering ........................................................ 3-29
Electric operation ............................................................. 3-30
Sun visors ........................................................................\
................ 3-30
Mirrors ........................................................................\
........................ 3-31
Inside mirror ........................................................................\
. 3-31
Outside mirrors .................................................................. 3-38
Vanity mirror ........................................................................\
3-40
Automatic drive positioner (if so equipped) ........ 3-40
Entry/exit function .......................................................... 3-40
Memory storage ................................................................ 3-41
Setting memory function ........................................... 3-42
System operation ............................................................. 3-42
Page 194 of 536
3-20Pre-driving checks and adjustments
3. Within 5 seconds push and hold theremote engine startbutton until
the turn signal lights flash and the tail
lights illuminate. If the vehicle is not
within view, push and hold the remote
engine start
button for at least 2
seconds.
The following events will occur when the
engine starts:
. The front parking lights will turn on
and remain on as long as the engine is
running.
. The doors will be locked and the air
conditioner system may turn on.
. The engine will continue to run for
about 10 minutes. Repeat the steps to
extend the time for an additional 10
minutes. See “Extending engine run
time” (P.3-20).
Depress and hold the brake pedal, then
place the ignition switch in the ON posi-
tion before driving. For further instruc-
tions, see “Driving the vehicle” (P.5-17).
EXTENDING ENGINE RUN TIME
The remote engine start function can be
extended one time by performing the
steps listed in “Remote starting the en-
gine” (P.3-19). Run time will be calculated
as follows:
. The first 10 minute run time will start
when the remote engine start func- tion is performed.
. The second 10 minutes will start im-
mediately when the remote engine
start function is performed. For exam-
ple, if the engine has been running for
5 minutes, and 10 minutes are added,
the engine will run for a total of 15
minutes.
. Extending engine run time will count
towards the two remote engine start
limit.
A maximum of two remote engine starts,
or a single start with an extension, are
allowed between ignition cycles.
The ignition switch must be cycled to the
ON position and then back to the OFF
position before the remote engine start
procedure can be used again.
CANCELING A REMOTE ENGINE
START
To cancel a remote engine start, perform
one of the following:
. Aim the Intelligent Key at the vehicle
and push and hold the remote engine
start
button until the front park-
ing lights turn off.
. Turn on the hazard indicator flashers.
. Cycle the ignition switch ON and then
OFF. .
The extended engine run time has
expired.
. The first 10 minute timer has expired.
. The engine hood has been opened.
. The shift lever is moved out of the P
(Park) position.
. The theft alarm sounds due to illegal
entry into the vehicle.
. The ignition switch is pushed without
an Intelligent Key in the vehicle.
. The ignition switch is pushed with an
Intelligent Key in the vehicle but the
brake pedal is not depressed.
CONDITIONS THE REMOTE ENGINE
START WILL NOT WORK
The remote engine start will not operate
if any of the following conditions are
present:
.The ignition switch is placed in the ON
position.
. The hood is not securely closed.
. The hazard indicator flashers are on.
. The engine is still running. The engine
must be completely stopped. Wait at
least 6 seconds if the engine goes
from running to off. This is not applic-
able when extending engine run time.
. The remote engine start
button is
not pushed and held for at least 2
seconds.
Page 195 of 536
.The remote engine startbutton is
not pushed and held within 5 seconds
of pushing the “LOCK”
button.
. The brake pedal is depressed.
. The doors are not closed and locked.
. The liftgate is open.
. The Intelligent Key system warning
light remains on in the vehicle infor-
mation display.
. An Intelligent Key is left inside the
vehicle.
. The theft alarm sounds due to illegal
entry into the vehicle.
. Two remote engine starts, or a single
remote engine start with an exten-
sion, have already been used.
. The shift lever is not in the P (Park)
position.
The remote engine start may display a
warning or indicator in the vehicle infor-
mation display. For an explanation of the
warning or indicator, see “Operational
indicators” (P.2-23).
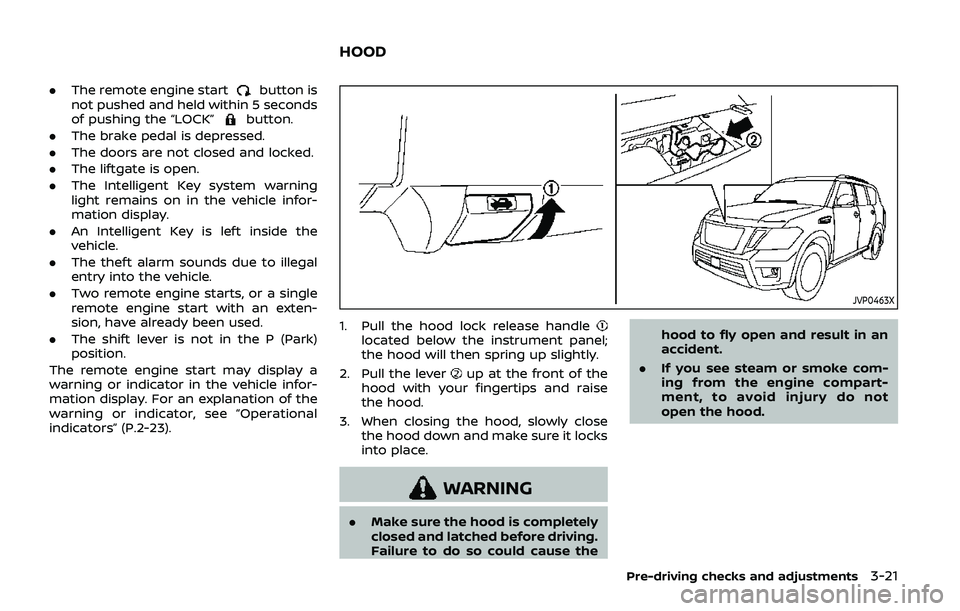
JVP0463X
1. Pull the hood lock release handlelocated below the instrument panel;
the hood will then spring up slightly.
2. Pull the lever
up at the front of the
hood with your fingertips and raise
the hood.
3. When closing the hood, slowly close the hood down and make sure it locks
into place.
WARNING
.Make sure the hood is completely
closed and latched before driving.
Failure to do so could cause the hood to fly open and result in an
accident.
. If you see steam or smoke com-
ing from the engine compart-
ment, to avoid injury do not
open the hood.
Pre-driving checks and adjustments3-21
HOOD
Page 401 of 536
For four-wheel drive
If you install snow tires, they must also be
the same size, brand, construction and
tread pattern on all four wheels.
SPECIAL WINTER EQUIPMENT
It is recommended that the following
items be carried in the vehicle during
winter:
.A scraper and stiff-bristled brush to
remove ice and snow from the win-
dows and wiper blades.
. A sturdy, flat board to be placed under
the jack to give it firm support.
. A shovel to dig the vehicle out of
snowdrifts.
. Extra window washer fluid to refill the
reservoir tank.
DRIVING ON SNOW OR ICE
WARNING
.Wet ice (32°F, 0°C and freezing
rain), very cold snow or ice can be
slick and very hard to drive on.
The vehicle will have much less
traction or “grip” under these
conditions. Try to avoid driving
on wet ice until the road is salted
or sanded. .
Whatever the condition, drive
with caution. Accelerate and slow
down with care. If accelerating or
downshifting too fast, the drive
wheels will lose even more trac-
tion.
. Allow more stopping distance
under these conditions. Braking
should be started sooner than on
dry pavement.
. Allow greater following distances
on slippery roads.
. Watch for slippery spots (glare
ice). These may appear on an
otherwise clear road in shaded
areas. If a patch of ice is seen
ahead, brake before reaching it.
Try not to brake while on the ice,
and avoid any sudden steering
maneuvers.
. Do not use the cruise control on
slippery roads.
. Snow can trap dangerous ex-
haust gases under your vehicle.
Keep snow clear of the exhaust
pipe and from around your vehi-
cle.
ENGINE BLOCK HEATER (if so
equipped)
Engine block heaters are used to assist in
cold temperature starting.
The engine block heater should be used
when the outside temperature is 20°F
(−7°C) or lower.
To use the engine block heater
1. Turn the engine off.
2. Open the hood and unwrap the en-
gine block heater cord.
3. Plug the engine block heater cord into a grounded 3-wire, 3-pronged exten-
sion cord.
4. Plug the extension cord into a Ground Fault Interrupt (GFI) protected,
grounded 110-volt AC (VAC) outlet.
5. The engine block heater must be plugged in for at least 2 - 4 hours,
depending on outside temperatures,
to properly warm the engine coolant.
Use an appropriate timer to turn the
engine block heater on.
6. Before starting the engine, unplug and properly store the cord to keep it
away from moving parts.
Starting and driving5-141
Page 416 of 536
6-14In case of emergency
8. After starting your engine, carefullydisconnect the negative cable and
then the positive cable (
???).
9. Replace the vent caps (if so equipped). Be sure to dispose of the cloth used to
cover the vent holes as it may be
contaminated with corrosive acid.
10. Put the battery cover on. Do not attempt to start the engine by
pushing.CAUTION
.
Automatic transmission models
cannot be push-started or tow-
started. Attempting to do so may
cause transmission damage.
. Three way catalyst equipped
models should not be started by
pushing since the three way cat-
alyst may be damaged.
. Never try to start the vehicle by
towing it; when the engine starts,
the forward surge could cause
the vehicle to collide with the
tow vehicle.
CAUTION
.Do not continue to drive if your
vehicle overheats. Doing so could
cause engine damage or a vehicle
fire.
. To avoid the danger of being
scalded, never remove the radia-
tor cap or coolant reservoir cap
while the engine is still hot. When
the radiator cap or coolant reser-
voir cap is removed, pressurized
hot water will spurt out, possibly
causing serious injury.
. Do not open the hood if steam is
coming out.
If your vehicle is overheating (indicated by
an extremely high temperature gauge
reading), or if you feel a lack of engine
power, detect abnormal noise, etc., take
the following steps:
1. Move the vehicle safely off the road, apply the parking brake and move the
shift lever to the P (Park) position.
Do not stop the engine.
2. Turn off the heater and air condi- tioner. Open all the windows, move
the heater or air conditioner tempera-
ture control to maximum hot and fan
PUSH STARTING IF YOUR VEHICLE OVERHEATS
Page 417 of 536
control to high speed.
3. If engine overheating is caused by climbing a long hill on a hot day, run
the engine at a fast idle (approxi-
mately 1,500 rpm) until the tempera-
ture gauge indication returns to
normal.
4. Get out of the vehicle. Look and listen for steam or coolant escaping from
the radiator before opening the hood.
(If steam or coolant is escaping, turn
off the engine.) Do not open the hood
further until no steam or coolant can
be seen.
5. Open the engine hood.
WARNING
If steam or water is coming from the
engine, stand clear to prevent get-
ting burned.
6. Visually check drive belts for damage or looseness. Also check if the cooling
fan is running. The radiator hoses and
radiator should not leak water. If cool-
ant is leaking or the cooling fan does
not run, stop the engine.
WARNING
Be careful not to allow your hands,
hair, jewelry or clothing to come into
contact with, or get caught in, engine
belts or the engine cooling fan. The
engine cooling fan can start at any
time.
7. After the engine cools down, check the coolant level in the reservoir tank
with the engine running. Add coolant
to the reservoir tank if necessary. Have
your vehicle repaired. It is recom-
mended you visit a NISSAN dealer for
this service.
In case of emergency6-15
Page 428 of 536
7-2Appearance and care
In order to maintain the appearance of
your vehicle, it is important to take proper
care of it.
To protect the paint surface, wash your
vehicle as soon as you can:
.after a rainfall to prevent possible
damage from acid rain
. after driving on coastal roads
. when contaminants such as soot, bird
droppings, tree sap, metal particles or
bugs get on the paint surface
. when dust or mud builds up on the
surface
Whenever possible, store or park your
vehicle inside a garage or in a covered
area.
When it is necessary to park outside, park
in a shady area or protect the vehicle with
a body cover.
Be careful not to scratch the paint
surface when putting on or removing
the body cover.
WASHING
Wash dirt off the vehicle with a wet
sponge and plenty of water. Clean the
vehicle thoroughly using a mild soap, a
special vehicle soap or general purpose
dishwashing liquid mixed with clean, lu-
kewarm (never hot) water.
CAUTION
. Do not use car washes that use
acid in the detergent. Some car
washes, especially brushless
ones, use some acid for cleaning.
The acid may react with some
plastic vehicle components, caus-
ing them to crack. This could
affect their appearance, and also
could cause them not to function
properly. Always check with your
car wash to confirm that acid is
not used.
. Do not wash the vehicle with
strong household soap, strong
chemical detergents, gasoline or
solvents.
. Do not wash the vehicle in direct
sunlight or while the vehicle body
is hot, as the surface may become
water-spotted.
. Avoid using tight-napped or
rough cloths, such as washing
mitts. Care must be taken when
removing caked-on dirt or other
foreign substances so the paint
surface is not scratched or da-
maged. .
Lock all doors before going
through automatic car wash.
Locking doors helps prevent
fuel-filler door from opening and
becoming damaged.
Rinse the vehicle again with plenty of
clean water.
Inside flanges, seams and folds on the
doors, hatches and hood are particularly
vulnerable to the effects of road salt.
Therefore, these areas must be regularly
cleaned. Make sure that the drain holes in
the lower edge of the door are open.
Spray water under the body and in the
wheel wells to loosen the dirt and wash
away road salt.
Avoid leaving water spots on the paint
surface by using a damp chamois to dry
the vehicle.
WAXING
Regular waxing protects the paint surface
and helps retain new vehicle appearance.
Polishing is recommended to remove
built-up wax residue and to avoid a
weathered appearance before reapplying
wax.
A NISSAN dealer can assist you in choos-
ing the proper product.
CLEANING EXTERIOR
Page 450 of 536
8-16Do-it-yourself
CLEANING
If your windshield is not clear after using
the windshield washer or if a wiper blade
chatters when running, wax or other
material may be on the blade or wind-
shield.
Clean the outside of the windshield with a
washer solution or a mild detergent. Your
windshield is clean if beads do not form
when rinsing with clear water.
Clean each blade by wiping it with a cloth
soaked in a washer solution or a mild
detergent. Then rinse the blade with clear
water. If your windshield is still not clear
after cleaning the blades and using the
wiper, replace the blades.
Worn windshield wiper blades can da-
mage the windshield and impair driver
vision.
When a washer nozzle is clogged
It is recommended you see a NISSAN
dealer if a washer nozzle is clogged or
any malfunction occurs. Do not attempt
to clean the nozzle using a needle or a
pin. Doing so may damage the nozzle.
SDI2048
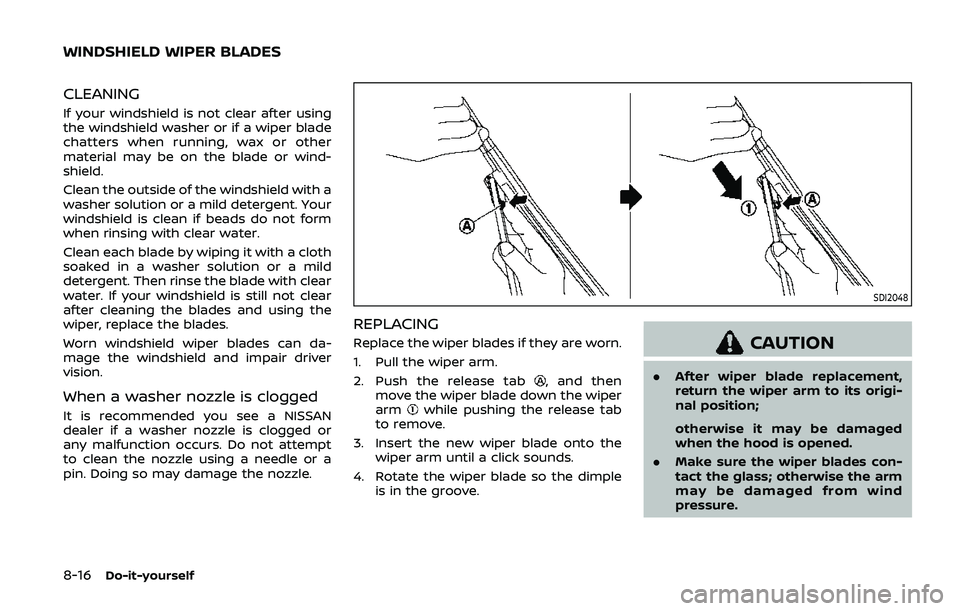
REPLACING
Replace the wiper blades if they are worn.
1. Pull the wiper arm.
2. Push the release tab
, and then
move the wiper blade down the wiper
arm
while pushing the release tab
to remove.
3. Insert the new wiper blade onto the wiper arm until a click sounds.
4. Rotate the wiper blade so the dimple is in the groove.
CAUTION
.After wiper blade replacement,
return the wiper arm to its origi-
nal position;
otherwise it may be damaged
when the hood is opened.
. Make sure the wiper blades con-
tact the glass; otherwise the arm
may be damaged from wind
pressure.
WINDSHIELD WIPER BLADES