reset NISSAN CUBE 2010 3.G User Guide
[x] Cancel search | Manufacturer: NISSAN, Model Year: 2010, Model line: CUBE, Model: NISSAN CUBE 2010 3.GPages: 329, PDF Size: 2.86 MB
Page 167 of 329
Black plate (171,1)
Model "Z12-D" EDITED: 2009/ 9/ 17
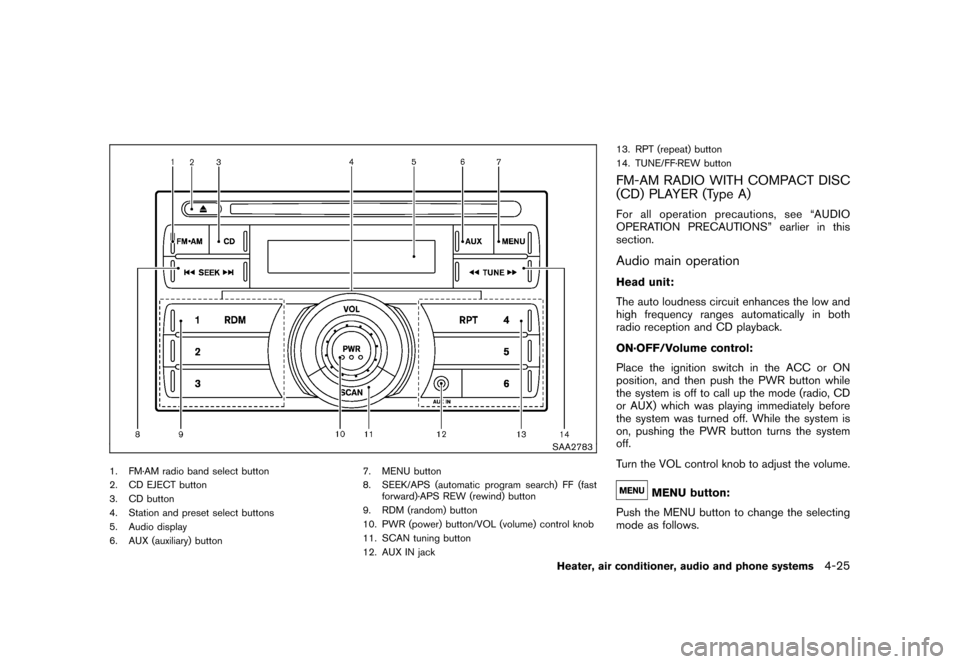
SAA2783
1. FM·AM radio band select button
2. CD EJECT button
3. CD button
4. Station and preset select buttons
5. Audio display
6. AUX (auxiliary) button7. MENU button
8. SEEK/APS (automatic program search) FF (fast
forward)·APS REW (rewind) button
9. RDM (random) button
10. PWR (power) button/VOL (volume) control knob
11. SCAN tuning button
12. AUX IN jack 13. RPT (repeat) button
14. TUNE/FF·REW button
FM-AM RADIO WITH COMPACT DISC
(CD) PLAYER (Type A)For all operation precautions, see “AUDIO
OPERATION PRECAUTIONS” earlier in this
section.Audio main operationHead unit:
The auto loudness circuit enhances the low and
high frequency ranges automatically in both
radio reception and CD playback.
ON·OFF/Volume control:
Place the ignition switch in the ACC or ON
position, and then push the PWR button while
the system is off to call up the mode (radio, CD
or AUX) which was playing immediately before
the system was turned off. While the system is
on, pushing the PWR button turns the system
off.
Turn the VOL control knob to adjust the volume.
MENU button:
Push the MENU button to change the selecting
mode as follows.
Heater, air conditioner, audio and phone systems
4-25
Page 168 of 329
Black plate (172,1)
Model "Z12-D" EDITED: 2009/ 9/ 17
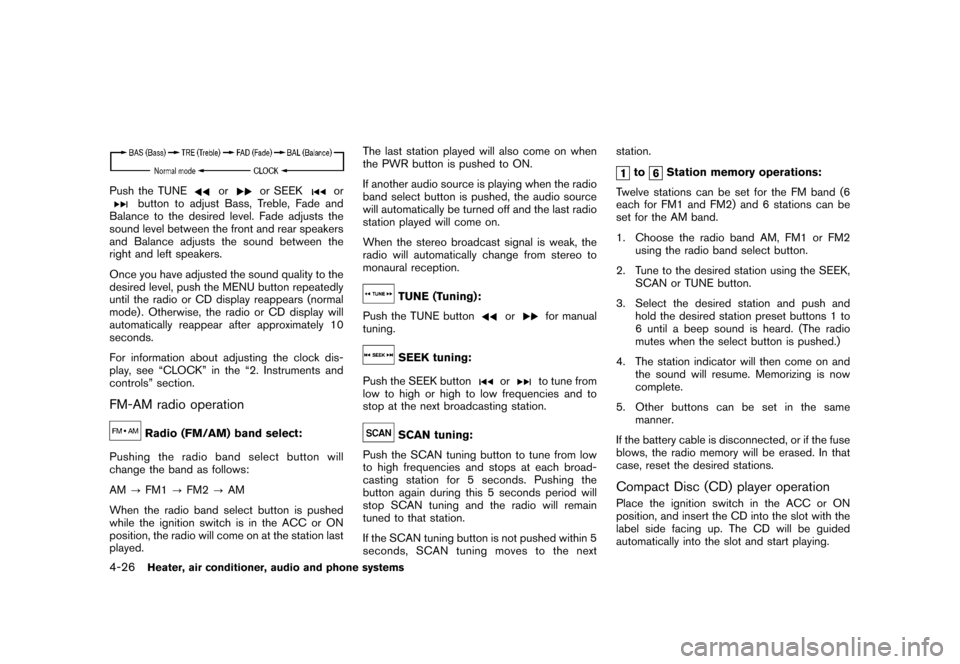
Push the TUNE
or
or SEEK
or
button to adjust Bass, Treble, Fade and
Balance to the desired level. Fade adjusts the
sound level between the front and rear speakers
and Balance adjusts the sound between the
right and left speakers.
Once you have adjusted the sound quality to the
desired level, push the MENU button repeatedly
until the radio or CD display reappears (normal
mode) . Otherwise, the radio or CD display will
automatically reappear after approximately 10
seconds.
For information about adjusting the clock dis-
play, see “CLOCK” in the “2. Instruments and
controls” section.
FM-AM radio operation
Radio (FM/AM) band select:
Pushing the radio band select button will
change the band as follows:
AM ?FM1 ?FM2 ?AM
When the radio band select button is pushed
while the ignition switch is in the ACC or ON
position, the radio will come on at the station last
played. The last station played will also come on when
the PWR button is pushed to ON.
If another audio source is playing when the radio
band select button is pushed, the audio source
will automatically be turned off and the last radio
station played will come on.
When the stereo broadcast signal is weak, the
radio will automatically change from stereo to
monaural reception.
TUNE (Tuning):
Push the TUNE button
or
for manual
tuning.
SEEK tuning:
Push the SEEK button
or
to tune from
low to high or high to low frequencies and to
stop at the next broadcasting station.
SCAN tuning:
Push the SCAN tuning button to tune from low
to high frequencies and stops at each broad-
casting station for 5 seconds. Pushing the
button again during this 5 seconds period will
stop SCAN tuning and the radio will remain
tuned to that station.
If the SCAN tuning button is not pushed within 5
seconds, SCAN tuning moves to the next station.
to
Station memory operations:
Twelve stations can be set for the FM band (6
each for FM1 and FM2) and 6 stations can be
set for the AM band.
1. Choose the radio band AM, FM1 or FM2 using the radio band select button.
2. Tune to the desired station using the SEEK, SCAN or TUNE button.
3. Select the desired station and push and hold the desired station preset buttons 1 to
6 until a beep sound is heard. (The radio
mutes when the select button is pushed.)
4. The station indicator will then come on and the sound will resume. Memorizing is now
complete.
5. Other buttons can be set in the same manner.
If the battery cable is disconnected, or if the fuse
blows, the radio memory will be erased. In that
case, reset the desired stations.
Compact Disc (CD) player operationPlace the ignition switch in the ACC or ON
position, and insert the CD into the slot with the
label side facing up. The CD will be guided
automatically into the slot and start playing.
4-26
Heater, air conditioner, audio and phone systems
Page 171 of 329
Black plate (175,1)
Model "Z12-D" EDITED: 2009/ 9/ 17
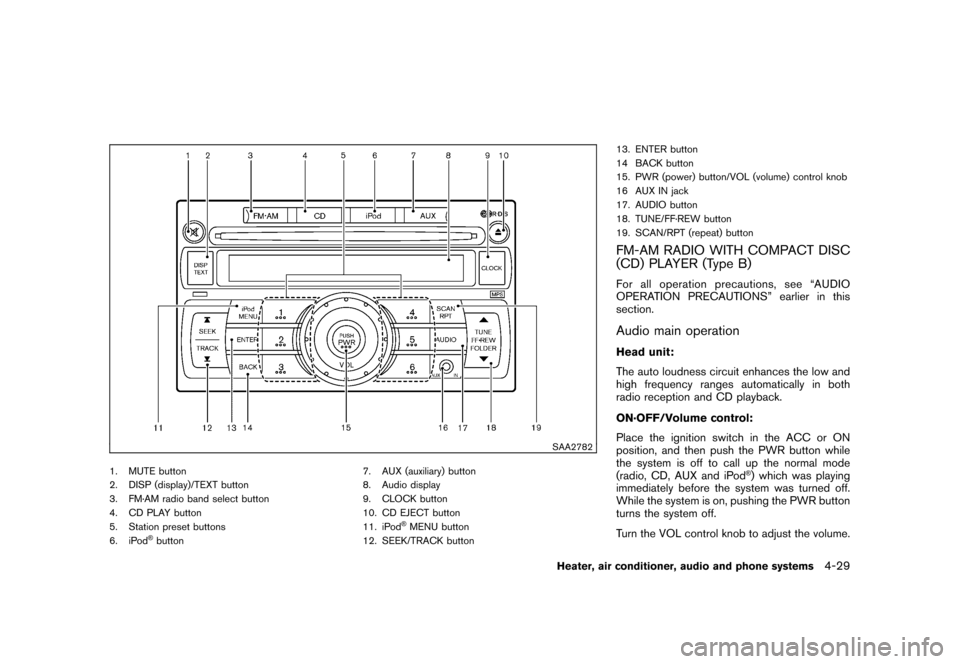
SAA2782
1. MUTE button
2. DISP (display)/TEXT button
3. FM·AM radio band select button
4. CD PLAY button
5. Station preset buttons
6. iPod
®button7. AUX (auxiliary) button
8. Audio display
9. CLOCK button
10. CD EJECT button
11. iPod
®MENU button
12. SEEK/TRACK button 13. ENTER button
14 BACK button
15. PWR (power) button/VOL (volume) control knob
16 AUX IN jack
17. AUDIO button
18. TUNE/FF·REW button
19. SCAN/RPT (repeat) button
FM-AM RADIO WITH COMPACT DISC
(CD) PLAYER (Type B)For all operation precautions, see “AUDIO
OPERATION PRECAUTIONS” earlier in this
section.Audio main operationHead unit:
The auto loudness circuit enhances the low and
high frequency ranges automatically in both
radio reception and CD playback.
ON·OFF/Volume control:
Place the ignition switch in the ACC or ON
position, and then push the PWR button while
the system is off to call up the normal mode
(radio, CD, AUX and iPod
®) which was playing
immediately before the system was turned off.
While the system is on, pushing the PWR button
turns the system off.
Turn the VOL control knob to adjust the volume.
Heater, air conditioner, audio and phone systems
4-29
Page 173 of 329

Black plate (177,1)
Model "Z12-D" EDITED: 2009/ 9/ 17
2. Tune to the desired station using the SEEK,SCAN or TUNE button.
3. Push and hold the desired radio station preset button
to
until a beep sound is
heard. (The radio mutes when the radio
station preset button is pushed.)
4. The station indicator will then come on and the sound will resume. Memorizing is now
complete.
5. Other buttons can be set in the same manner.
If the battery cable is disconnected, or if the fuse
opens, the radio memory will be erased. In that
case, reset the desired stations.
Radio Data System (RDS):
RDS stands for Radio Data System, and is a
data information service transmitted by some
radio stations on the FM band (not AM band)
encoded within a regular radio broadcast.
Currently, most RDS stations are in large cities,
but many stations are now considering broad-
casting RDS data.
RDS can display:
. Station call sign, such as “WHFR 98.3”.
. Station name, such as “The Groove”.
. Music or programming type such as “Clas- sical”, “Country” or “Rock”.
. Traffic reports about delays or construction.
If the station broadcasts RDS information, the
RDS icon is displayed.
RADIO DISPLAY change:
When the DISP button is pushed during the FM
radio mode, the radio display will change in the
following order.
FM radio:
Frequency ↔PS/PTY
In the FM radio mode, pressing the DISP button
will switch the frequency display to the PTY
display (if available) , and if the DISP button is
not pushed again within 5 seconds, it will
automatically switch to the PS display. If PTY
is not available, pressing the DISP button will
only switch between the frequency display and
the PS display.
Compact Disc (CD) player operationPlace the ignition switch in the ACC or ON
position, and insert the CD into the slot with the
label side facing up. The CD will be guided
automatically into the slot and start playing.
After loading the disc, the number of tracks on
the disc will appear on the display. If the radio is already operating, it will auto-
matically turn off and the CD will play.
If the system has been turned off while the CD
was playing, pushing the PWR button will start
the CD.
Do not use 3.1 in (8 cm) discs.
CD PLAY:
When the CD button is pushed with the system
off and the CD loaded, the system will turn on
and the CD will start to play.
When the CD button is pushed with the CD
loaded and the radio playing, the radio will
automatically be turned off and the CD will start
to play.CD play information:
When the DISP button is pushed for less than
1.5 seconds while the CD is being played, the
disc information display will change as follows:
CD:
Heater, air conditioner, audio and phone systems
4-31
Page 177 of 329
Black plate (181,1)
Model "Z12-D" EDITED: 2009/ 9/ 17
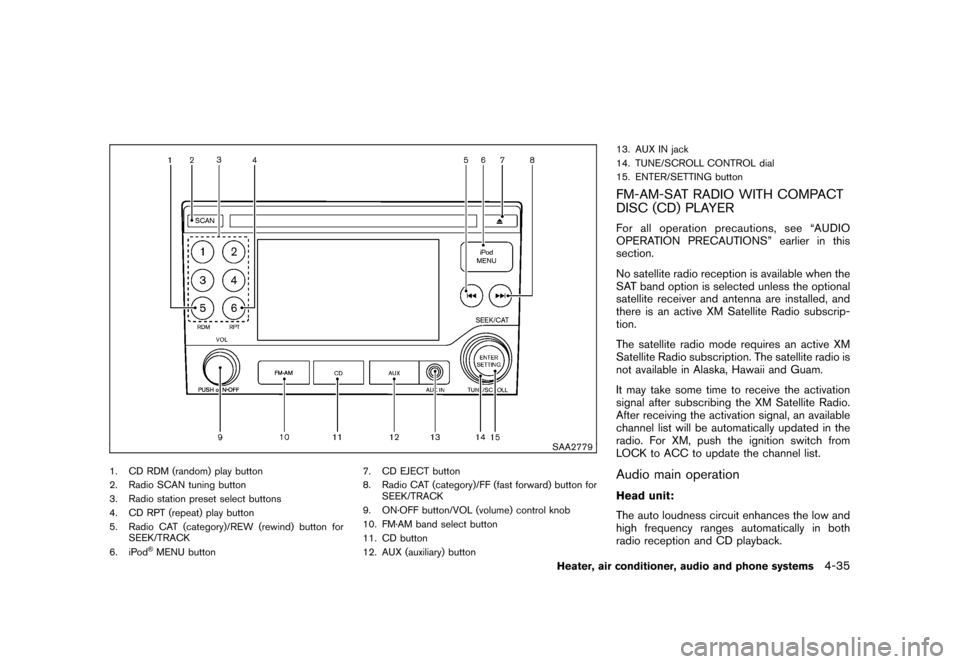
SAA2779
1. CD RDM (random) play button
2. Radio SCAN tuning button
3. Radio station preset select buttons
4. CD RPT (repeat) play button
5. Radio CAT (category)/REW (rewind) button forSEEK/TRACK
6. iPod
®MENU button 7. CD EJECT button
8. Radio CAT (category)/FF (fast forward) button for
SEEK/TRACK
9. ON·OFF button/VOL (volume) control knob
10. FM·AM band select button
11. CD button
12. AUX (auxiliary) button 13. AUX IN jack
14. TUNE/SCROLL CONTROL dial
15. ENTER/SETTING button
FM-AM-SAT RADIO WITH COMPACT
DISC (CD) PLAYERFor all operation precautions, see “AUDIO
OPERATION PRECAUTIONS” earlier in this
section.
No satellite radio reception is available when the
SAT band option is selected unless the optional
satellite receiver and antenna are installed, and
there is an active XM Satellite Radio subscrip-
tion.
The satellite radio mode requires an active XM
Satellite Radio subscription. The satellite radio is
not available in Alaska, Hawaii and Guam.
It may take some time to receive the activation
signal after subscribing the XM Satellite Radio.
After receiving the activation signal, an available
channel list will be automatically updated in the
radio. For XM, push the ignition switch from
LOCK to ACC to update the channel list.Audio main operationHead unit:
The auto loudness circuit enhances the low and
high frequency ranges automatically in both
radio reception and CD playback.
Heater, air conditioner, audio and phone systems
4-35
Page 179 of 329

Black plate (183,1)
Model "Z12-D" EDITED: 2009/ 9/ 17
SEEK tuning/CATEGORY
(CAT):
. For AM and FM radio
Push the SEEK button
or
to tune
from low to high or high to low frequencies
and to stop at the next broadcasting station.
. For XM Satellite Radio
Push the SEEK button
or
to tune
to the first channel of the next or previous
category.
SCAN tuning:
Push the SCAN tuning button to tune from low
to high frequencies and stop at each broad-
casting station/channel for 5 seconds. Pushing
the button again during this 5 seconds period
will stop SCAN tuning and the radio will remain
tuned to that station/channel.
If the SCAN tuning button is not pushed within 5
seconds, SCAN tuning moves to the next
station/channel.
*1
to
*6
Station memory operations:
12 stations/channels can be set for the FM band
(6 each for FM1 and FM2) , 12 for XM radio (6
each for XM1 and XM2) and 6 stations can be
set for the AM band. 1. Choose the radio band using the radio band
select button.
2. Tune to the desired station/channel using the SEEK/CAT, SCAN button or the radio
TUNE dial.
3. Push and hold the desired station preset button
*1
to*6
until the radio mutes.
4. The station indicator will then come on and the sound will resume. Memorizing is now
complete.
5. Other buttons can be set in the same manner.
If the battery cable is disconnected, or if the fuse
opens, the radio memory will be erased. In that
case, reset the desired stations/channels.
Compact Disc (CD) player operationPush the ignition switch to the ACC or ON
position and insert the Compact Disc (CD) into
the slot with the label side facing up. The CD will
be guided automatically into the slot and start
playing.
After loading the CD, the number of tracks on
the CD and the play time will appear on the
display.
If the radio is already operating, it will auto-
matically turn off and the CD will play. If the system has been turned off while the CD
was playing, pushing the ON·OFF button will
start the CD.
Do not use 3.1 in (8 cm) discs.
PLAY:
When the CD button is pushed with the system
off and the CD loaded, the system will turn on
and the CD will start to play.
When the CD button is pushed with the CD
loaded and the radio playing, the radio will
automatically be turned off and the CD will start
to play.
Next/Previous Track and Fast
Forward/Rewind:
When the(fast forward) or
(rewind)
button is pushed for more than 1.5 seconds
while the CD is being played, the CD will play
while fast forwarding or rewinding. When the
button is released, the CD will return to normal
play speed.
When the
or
button is pushed for less
than 1.5 seconds while the CD is being played,
the next track or the beginning of the current
track on the CD will be played.
Heater, air conditioner, audio and phone systems
4-37
Page 184 of 329
Black plate (188,1)
Model "Z12-D" EDITED: 2009/ 9/ 17
AM, FM, CD, AUX, iPod
®(if so equipped) and
SAT (if so equipped)
If no CD is loaded or AUX and/or iPod
®are not
connected, the CD, AUX and/or iPod®modes
will be skipped.
VOLUME control switchPush up or down the VOLUME control switch to
increase or decrease the volume.
Tuning switch
Memory change (radio):
Push the tuning switch for less than 1.5 seconds
to change the next or previous radio preset.
SEEK tuning (radio):
Push the tuning switch for more than 1.5
seconds to seek the next or previous radio
station.
APS (Automatic Program Search) FF, APS
REW (CD and iPod
®):
Push the tuning switch for less than 1.5 seconds
to return to the beginning of the present
program or skip to the next program. Push
several times to skip back or skip through
programs.
This system searches for the blank intervals
between selections. If there is a blank interval within one program or there is no interval
between programs, the system may not stop in
the desired or expected location.
FOLDER change (CD with MP3 or WMA):
Push the tuning switch for more than 1.5
seconds to change the folders (if there are any
folders) .
ANTENNA
CAUTION
.
To avoid damaging or deforming the
antenna, be sure to fold down (if so
equipped) or remove the antenna
under the following conditions.
— The vehicle enters a garage with
a low ceiling.
— The vehicle is covered with a car cover.
. Be sure that antenna is removed
before the vehicle enters an auto-
matic car wash.
. Always properly tighten the antenna
rod during installation. Otherwise,
the antenna rod may break during
vehicle operation.
4-42
Heater, air conditioner, audio and phone systems
Page 194 of 329
Black plate (198,1)
Model "Z12-D" EDITED: 2009/ 9/ 17
the cellular phone when privacy is desired.
The system announces, “Transfer call. Call
transferred to privacy mode.” The system
then ends the VR session.
To reconnect a call from the cellular phone
to the Bluetooth
®Hands-Free Phone sys-
tem, push thebutton.
. “Mute” — Use the Mute command to mute
your voice so the other party cannot hear it.
Use the mute command again to unmute
your voice.
NOTE:
If a call is ended or the cellular phone
network connection is lost while the Mute
feature is on, the Mute feature will be reset
to “off” for the next call so the other party
can hear your voice.
Phonebook (phones without automatic
phonebook download function)“Transfer Entry”
*A
Use the Transfer Entry command to store a new
name in the system.
When prompted by the system, say the name
you would like to give the new entry.
For example, say: “Mary.”
If the name is too long or too short, the system
tells you, then prompts you for a name again.
Also, if the name sounds too much like a name
already stored, the system tells you, then
prompts you for a name again.
The system will ask you to transfer a phone
number stored in the cellular phone’s memory.
To enter a phone number by voice command:
For example, say: “five five five one two one
two.” See “How to say numbers” earlier in this
section for more information.
To transfer a phone number stored in the cellular
phone’s memory:
Say: “Transfer entry.” The system acknowledges
the command and asks you to initiate the
transfer from the phone handset. The new
contact phone number will be transferred from
the cellular phone via the Bluetooth
®commu- nication link.
The transfer procedure varies according to each
cellular phone. See the cellular phone Owner’s
Manual for details. You can also visit www.
nissanusa.com/bluetooth for instructions on
transferring phone numbers from NISSAN re-
commended cellular phones.
The system repeats the number and prompts
you for the next command. When you have
finished entering numbers or transferring an
entry, choose “Store.”
The system confirms the name, location and
number.
“Delete Entry”
*B
Use the Delete Entry command to delete one
entry from the phonebook. After the system
acknowledges a command, say the name to
delete or say “List Names” to choose an entry.
“List Names”
*C
Use the List Names command to hear all the
names in the phonebook. The system recites the
phonebook entries but does not include the
actual phone numbers. When playback of the
list is complete, the system returns to the main
menu.
Playback of the list can be stopped at any time
by pushing the
button on the steering
4-52
Heater, air conditioner, audio and phone systems
Page 204 of 329
Black plate (208,1)
Model "Z12-D" EDITED: 2009/ 9/ 17
alternate tires and wheels allow the TPMS to
continue to function properly.Additional information.The TPMS does not monitor the tire
pressure of the spare tire.
. The TPMS will activate only when the
vehicle is driven at speeds above 16 MPH
(25 km/h) . Also, this system may not detect
a sudden drop in tire pressure (for example a
flat tire while driving) .
. The low tire pressure warning light does not
automatically turn off when the tire pressure
is adjusted. After the tire is inflated to the
recommended pressure, the vehicle must be
driven at speeds above 16 MPH (25 km/h)
to activate the TPMS and turn off the low tire
pressure warning light. Use a tire pressure
gauge to check the tire pressure.
. Tire pressure rises and falls depending on
the heat caused by the vehicle’s operation
and the outside temperature. Low outside
temperature can lower the temperature of
the air inside the tire which can cause a
lower tire inflation pressure. This may cause
the low tire pressure warning light to
illuminate. If the warning light illuminates in
low ambient temperature, check the tire
pressure for all four tires.
For additional information, see “Low tire pres- sure warning light” in the “2. Instruments and
controls” section and “TIRE PRESSURE MON-
ITORING SYSTEM (TPMS)” in the “6. In case of
emergency” section.
WARNING
.
If the low tire pressure warning light
illuminates while driving, avoid sud-
den steering maneuvers or abrupt
braking, reduce vehicle speed, pull
off the road to a safe location and
stop the vehicle as soon as possi-
ble. Driving with under-inflated tires
may permanently damage the tires
and increase the likelihood of tire
failure. Serious vehicle damage
could occur and may lead to an
accident and could result in serious
personal injury. Check the tire pres-
sure for all four tires. Adjust the tire
pressure to the recommended COLD
tire pressure shown on the Tire and
Loading Information label to turn
the low tire pressure warning light
OFF. If you have a flat tire, replace it
with a spare tire as soon as possi-
ble. (See “FLAT TIRE” in the “6. In
case of emergency” section for
changing a flat tire.) .
When a spare tire is mounted or a
wheel is replaced, the TPMS will not
function and the low tire pressure
warning light will flash for approxi-
mately 1 minute. The light will
remain on after 1 minute. Contact
your NISSAN dealer as soon as
possible for tire replacement and/
or system resetting.
. Replacing tires with those not ori-
ginally specified by NISSAN could
affect the proper operation of the
TPMS.
. Do not inject any tire liquid or
aerosol tire sealant into the tires,
as this may cause a malfunction of
the tire pressure sensors.
CAUTION
.The TPMS may not function properly
when the wheels are equipped with
tire chains or the wheels are buried
in snow.
. Do not place metalized film or any
metal parts (antenna, etc.) on the
windows. This may cause poor re-
ception of the signals from the tire
5-4
Starting and driving
Page 221 of 329
Black plate (225,1)
Model "Z12-D" EDITED: 2009/ 9/ 17
.on slippery roads (rain, snow, ice,
etc.)
. in very windy areas
Doing so could cause a loss of vehicle
control and result in an accident.
CAUTION
On Manual Transmission (MT) models,
do not shift into N (Neutral) without
depressing the clutch pedal when the
cruise control is set. Should this occur,
depress the clutch pedal and turn the
MAIN switch off immediately. Failure to
do so may cause engine damage.
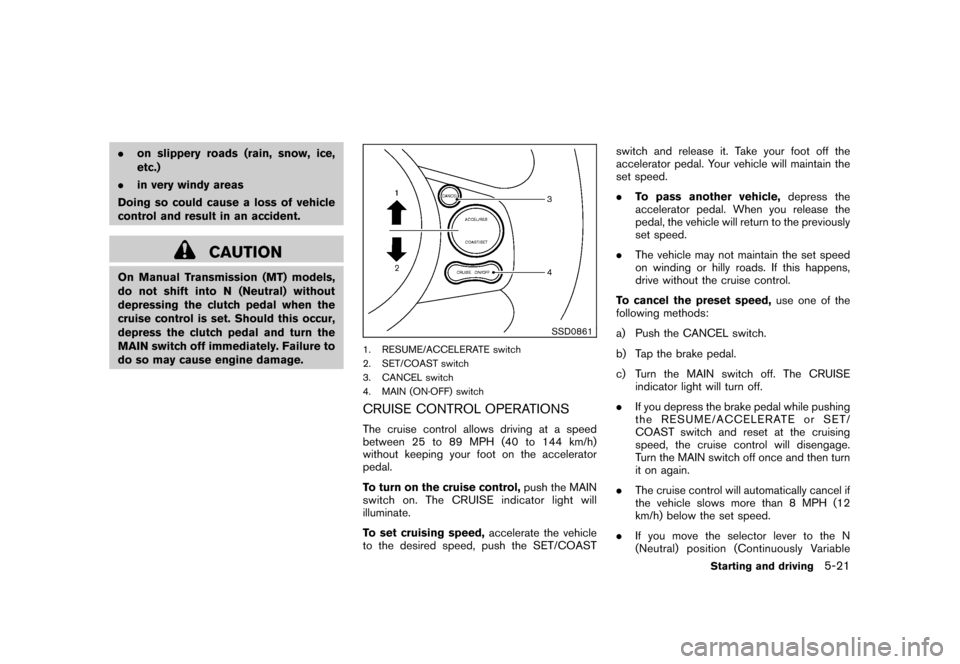
SSD0861
1. RESUME/ACCELERATE switch
2. SET/COAST switch
3. CANCEL switch
4. MAIN (ON·OFF) switchCRUISE CONTROL OPERATIONSThe cruise control allows driving at a speed
between 25 to 89 MPH (40 to 144 km/h)
without keeping your foot on the accelerator
pedal.
To turn on the cruise control, push the MAIN
switch on. The CRUISE indicator light will
illuminate.
To set cruising speed, accelerate the vehicle
to the desired speed, push the SET/COAST switch and release it. Take your foot off the
accelerator pedal. Your vehicle will maintain the
set speed.
.
To pass another vehicle, depress the
accelerator pedal. When you release the
pedal, the vehicle will return to the previously
set speed.
. The vehicle may not maintain the set speed
on winding or hilly roads. If this happens,
drive without the cruise control.
To cancel the preset speed, use one of the
following methods:
a) Push the CANCEL switch.
b) Tap the brake pedal.
c) Turn the MAIN switch off. The CRUISE indicator light will turn off.
. If you depress the brake pedal while pushing
the RESUME/ACCELERATE or SET/
COAST switch and reset at the cruising
speed, the cruise control will disengage.
Turn the MAIN switch off once and then turn
it on again.
. The cruise control will automatically cancel if
the vehicle slows more than 8 MPH (12
km/h) below the set speed.
. If you move the selector lever to the N
(Neutral) position (Continuously Variable
Starting and driving
5-21