NISSAN LATIO 2010 Service Repair Manual
Manufacturer: NISSAN, Model Year: 2010, Model line: LATIO, Model: NISSAN LATIO 2010Pages: 3745, PDF Size: 73.67 MB
Page 521 of 3745
BL-12
< SERVICE INFORMATION >
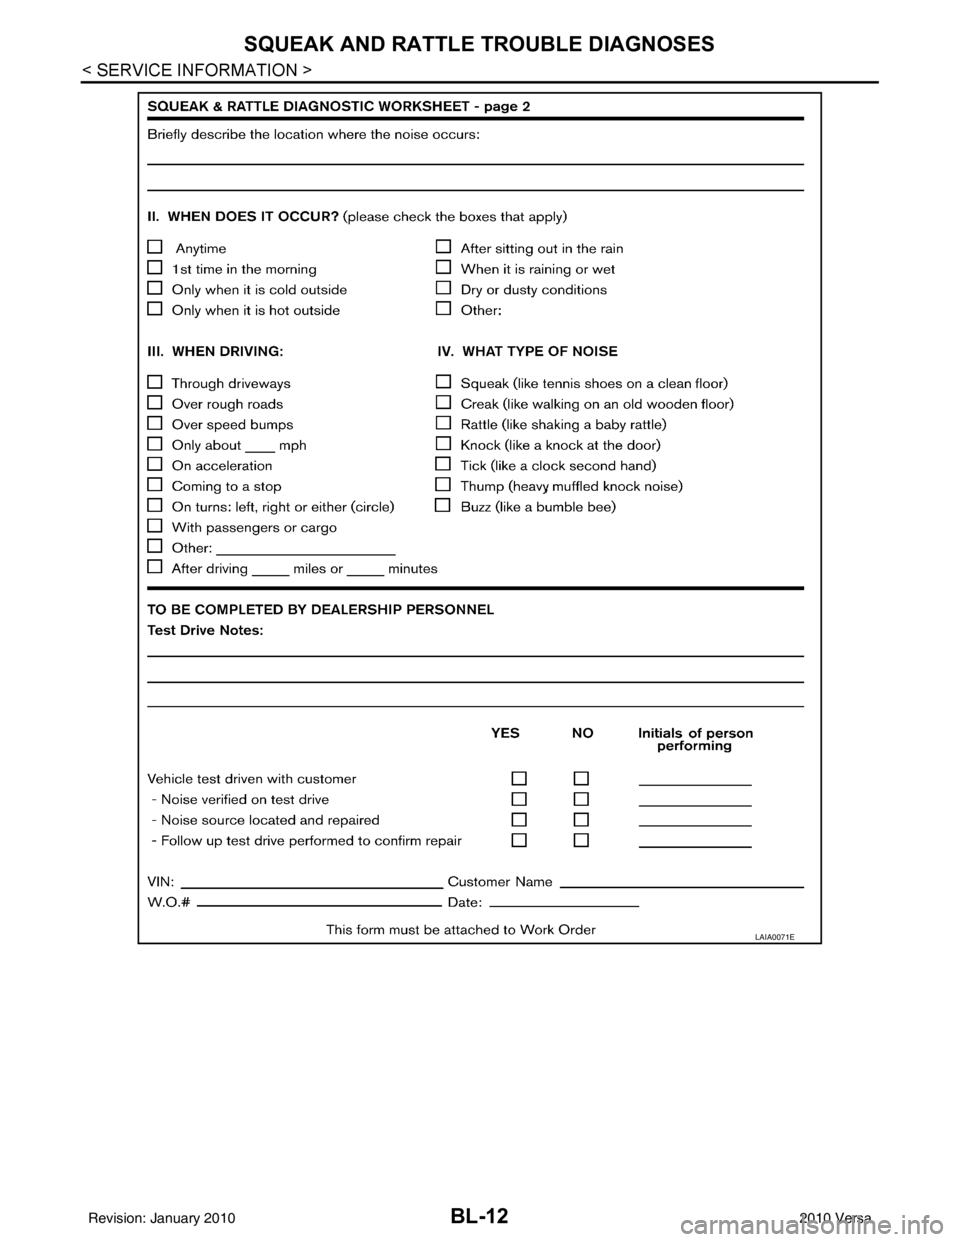
SQUEAK AND RATTLE TROUBLE DIAGNOSES
LAIA0071E
Revision: January 20102010 Versa
Page 522 of 3745
HOODBL-13
< SERVICE INFORMATION >
C
DE
F
G H
J
K L
M A
B
BL
N
O P
HOOD
Fitting AdjustmentINFOID:0000000005396547
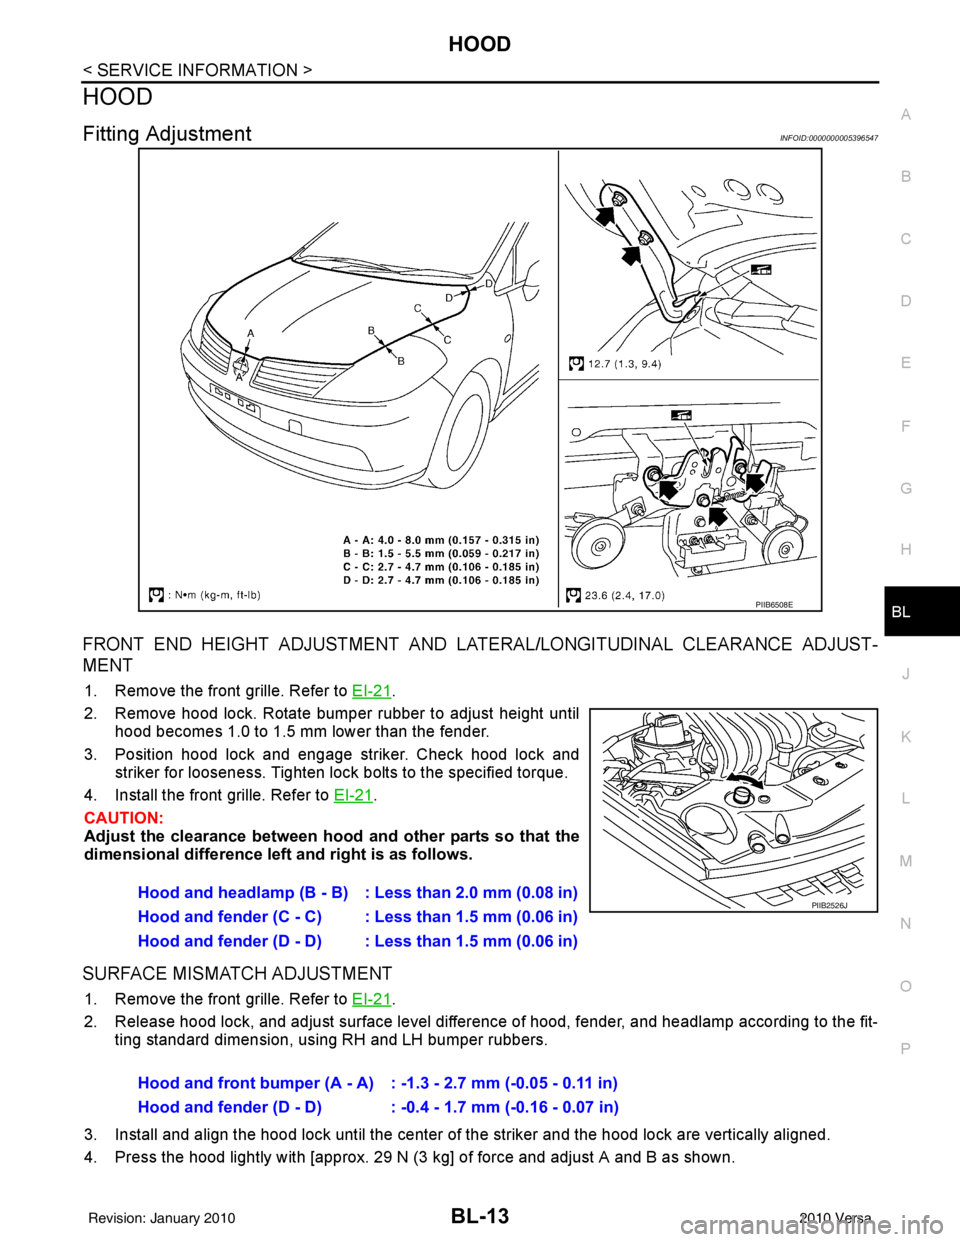
FRONT END HEIGHT ADJUSTMENT AND LA TERAL/LONGITUDINAL CLEARANCE ADJUST-
MENT
1. Remove the front grille. Refer to EI-21.
2. Remove hood lock. Rotate bumper rubber to adjust height until hood becomes 1.0 to 1.5 mm lower than the fender.
3. Position hood lock and engage striker. Check hood lock and striker for looseness. Tighten lock bolts to the specified torque.
4. Install the front grille. Refer to EI-21
.
CAUTION:
Adjust the clearance between hood and other parts so that the
dimensional difference left and right is as follows.
SURFACE MISMATCH ADJUSTMENT
1. Remove the front grille. Refer to EI-21.
2. Release hood lock, and adjust surface level difference of hood, fender, and headlamp according to the fit- ting standard dimension, using RH and LH bumper rubbers.
3. Install and align the hood lock until the center of the striker and the hood lock are vertically aligned.
4. Press the hood lightly with [approx. 29 N (3 kg] of force and adjust A and B as shown.
PIIB6508E
Hood and headlamp (B - B) : Less than 2.0 mm (0.08 in)
Hood and fender (C - C) : Less than 1.5 mm (0.06 in)
Hood and fender (D - D) : Less than 1.5 mm (0.06 in)PIIB2526J
Hood and front bumper (A - A) : -1.3 - 2.7 mm (-0.05 - 0.11 in)
Hood and fender (D - D) : -0.4 - 1.7 mm (-0.16 - 0.07 in)
Revision: January 20102010 Versa
Page 523 of 3745
BL-14
< SERVICE INFORMATION >
HOOD
5. After adjustment tighten lock bolts to the specified torque.
6. Install the front grille. Refer to EI-21
.
Removal and InstallationINFOID:0000000005396548
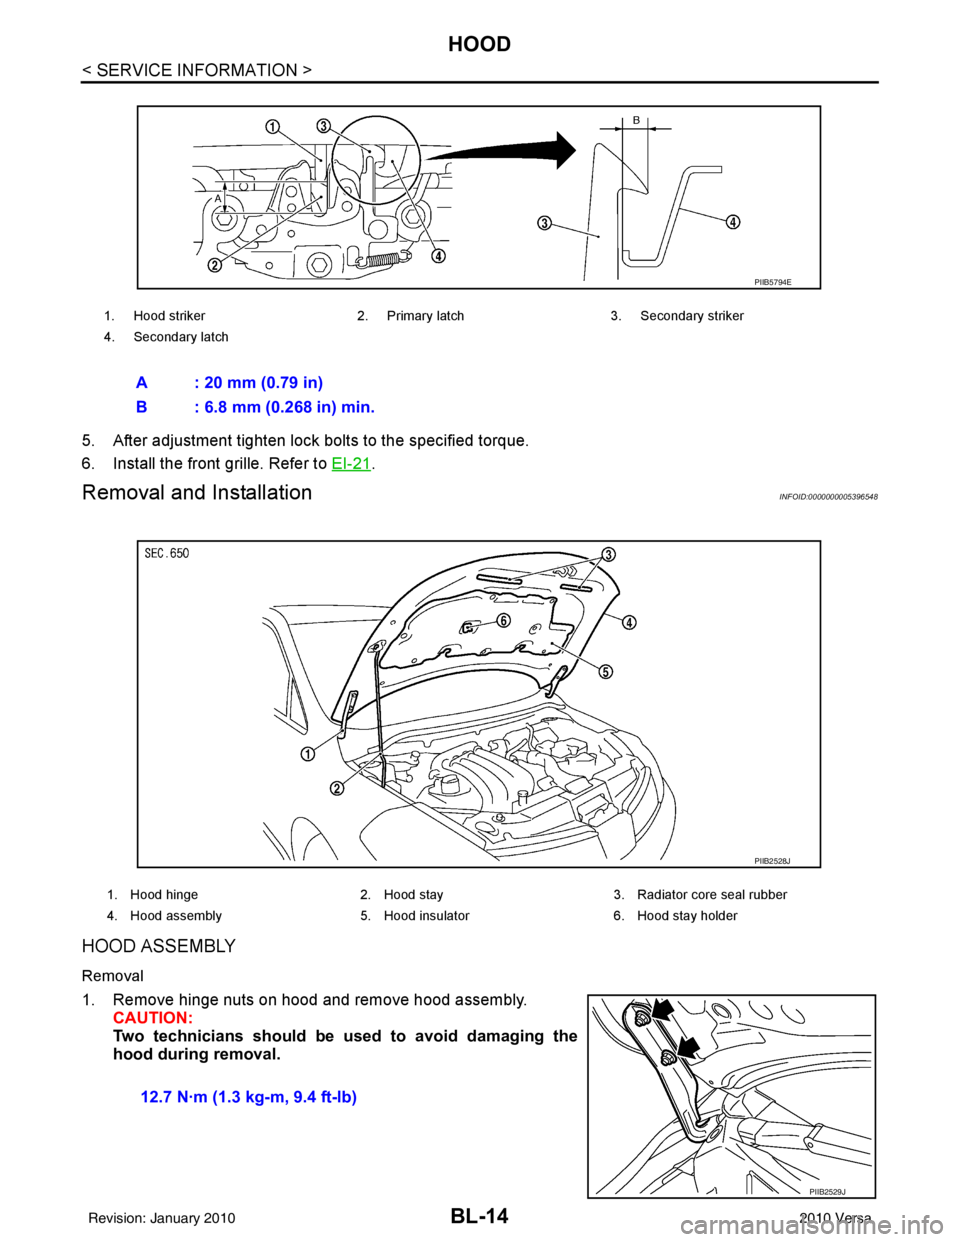
HOOD ASSEMBLY
Removal
1. Remove hinge nuts on hood and remove hood assembly.
CAUTION:
Two technicians should be used to avoid damaging the
hood during removal.
1. Hood striker 2. Primary latch 3. Secondary striker
4. Secondary latch
A : 20 mm (0.79 in)
B : 6.8 mm (0.268 in) min.
PIIB5794E
1. Hood hinge 2. Hood stay3. Radiator core seal rubber
4. Hood assembly 5. Hood insulator 6. Hood stay holder
PIIB2528J
12.7 N·m (1.3 kg-m, 9.4 ft-lb)
PIIB2529J
Revision: January 20102010 Versa
Page 524 of 3745
HOODBL-15
< SERVICE INFORMATION >
C
DE
F
G H
J
K L
M A
B
BL
N
O P
Installation
Installation is in the reverse order of removal.
CAUTION:
• Before installing hood hinge, apply anticorrosive
agent onto the surfaces that make contact with the
vehicle body.
• After installing, perform hood fitting adjustment. Refer to BL-13, "
Fitting Adjustment".
HOOD HINGE
Removal
1. Remove hood assembly. Refer to BL-14, "Removal and Installation".
2. Remove front fender. Refer to BL-21, "
Removal and Installation".
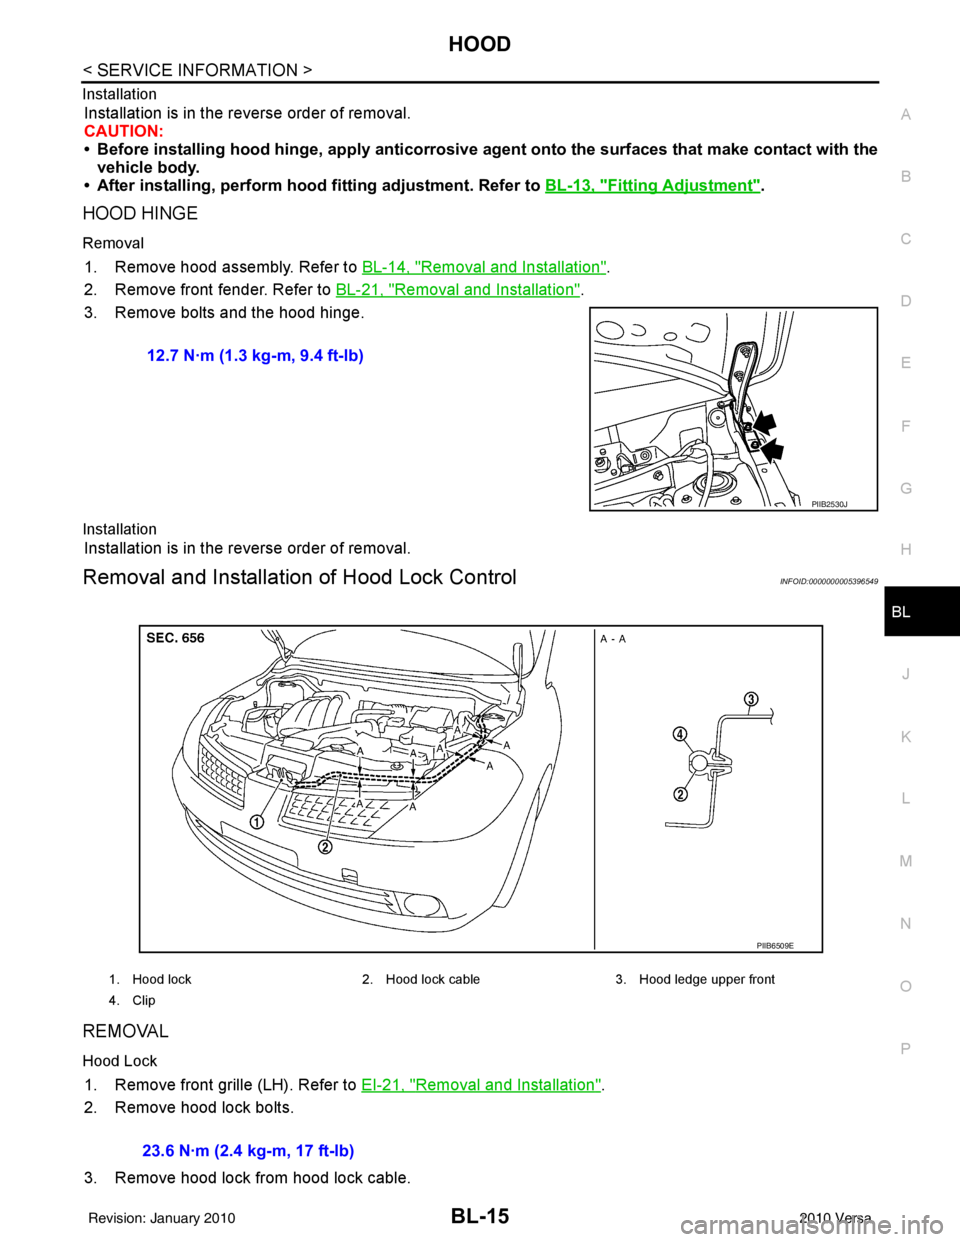
3. Remove bolts and the hood hinge.
Installation
Installation is in the reverse order of removal.
Removal and Installation of Hood Lock ControlINFOID:0000000005396549
REMOVAL
Hood Lock
1. Remove front grille (LH). Refer to EI-21, "Removal and Installation".
2. Remove hood lock bolts.
3. Remove hood lock from hood lock cable. 12.7 N·m (1.3 kg-m, 9.4 ft-lb)
PIIB2530J
1. Hood lock
2. Hood lock cable 3. Hood ledge upper front
4. Clip
PIIB6509E
23.6 N·m (2.4 kg-m, 17 ft-lb)
Revision: January 20102010 Versa
Page 525 of 3745
BL-16
< SERVICE INFORMATION >
HOOD
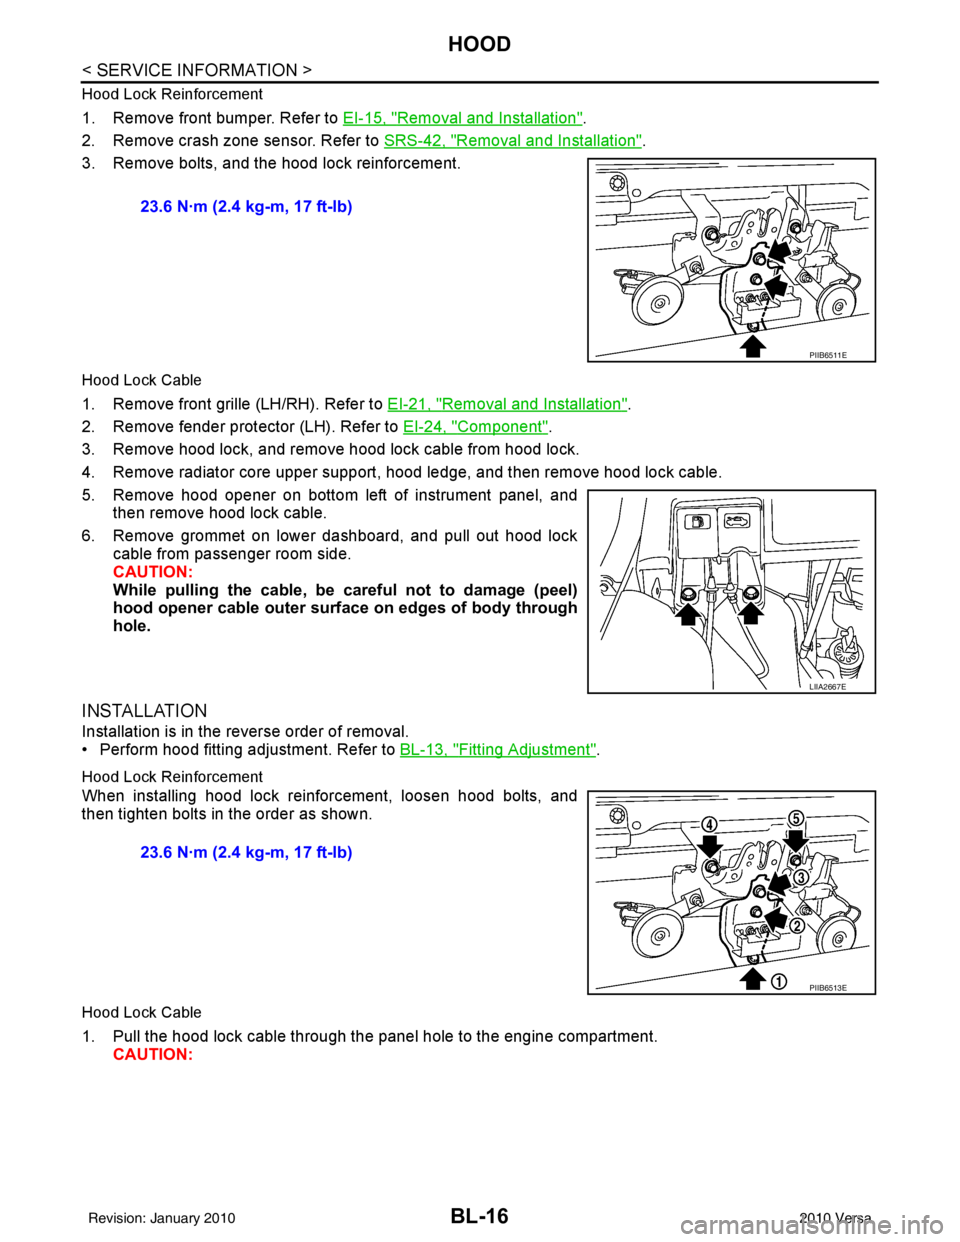
Hood Lock Reinforcement
1. Remove front bumper. Refer to EI-15, "Removal and Installation".
2. Remove crash zone sensor. Refer to SRS-42, "
Removal and Installation".
3. Remove bolts, and the hood lock reinforcement.
Hood Lock Cable
1. Remove front grille (LH/RH). Refer to EI-21, "Removal and Installation".
2. Remove fender protector (LH). Refer to EI-24, "
Component".
3. Remove hood lock, and remove hood lock cable from hood lock.
4. Remove radiator core upper support, hood ledge, and then remove hood lock cable.
5. Remove hood opener on bottom left of instrument panel, and then remove hood lock cable.
6. Remove grommet on lower dashboard, and pull out hood lock cable from passenger room side.
CAUTION:
While pulling the cable, be car eful not to damage (peel)
hood opener cable outer surface on edges of body through
hole.
INSTALLATION
Installation is in the reverse order of removal.
• Perform hood fitting adjustment. Refer to BL-13, "
Fitting Adjustment".
Hood Lock Reinforcement
When installing hood lock reinforcement, loosen hood bolts, and
then tighten bolts in the order as shown.
Hood Lock Cable
1. Pull the hood lock cable through the panel hole to the engine compartment. CAUTION: 23.6 N·m (2.4 kg-m, 17 ft-lb)
PIIB6511E
LIIA2667E
23.6 N·m (2.4 kg-m, 17 ft-lb)
PIIB6513E
Revision: January 20102010 Versa
Page 526 of 3745
HOODBL-17
< SERVICE INFORMATION >
C
DE
F
G H
J
K L
M A
B
BL
N
O P
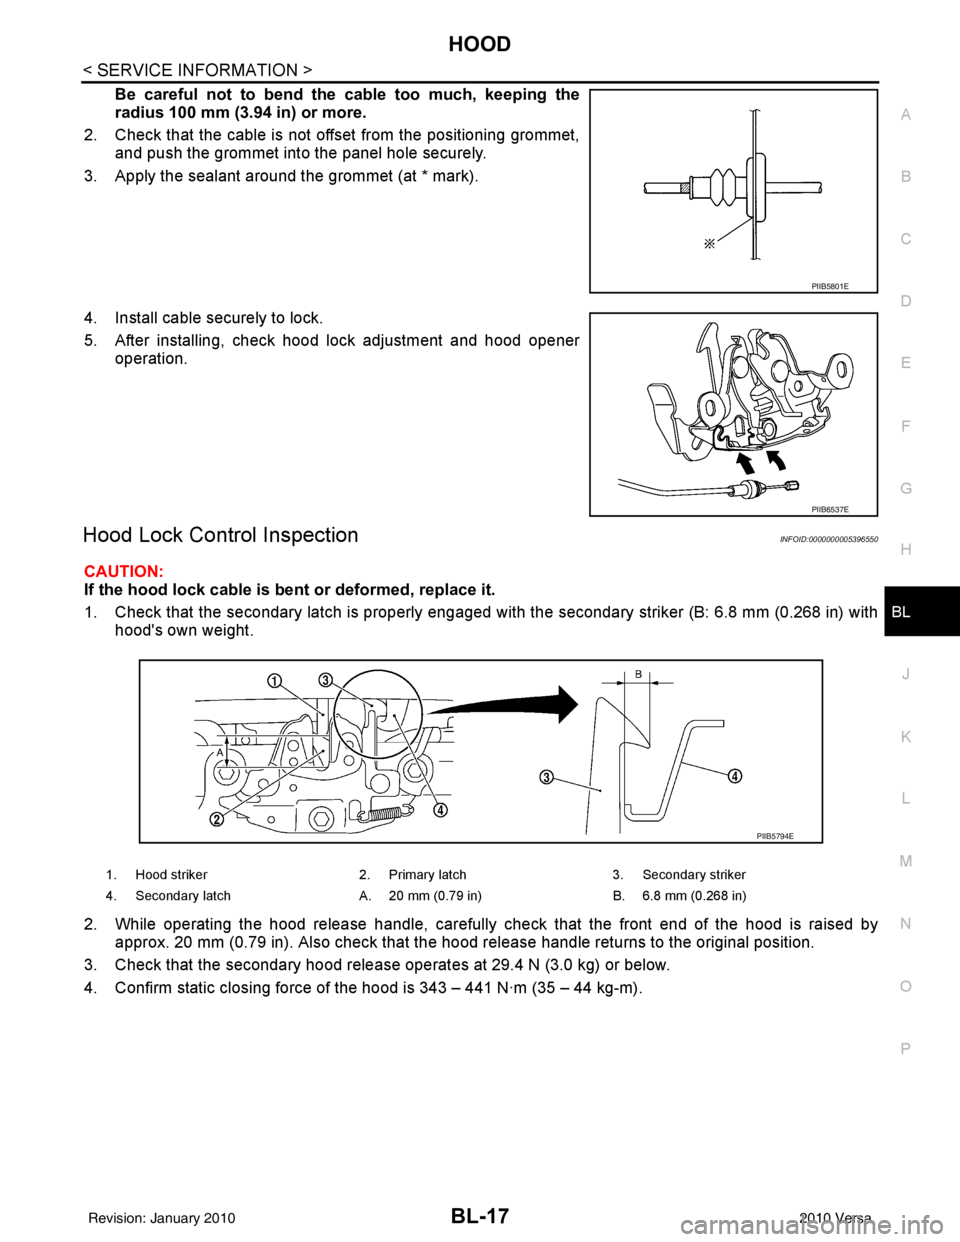
Be careful not to bend the cable too much, keeping the
radius 100 mm (3.94 in) or more.
2. Check that the cable is not of fset from the positioning grommet,
and push the grommet into the panel hole securely.
3. Apply the sealant around the grommet (at * mark).
4. Install cable securely to lock.
5. After installing, check hood lock adjustment and hood opener operation.
Hood Lock Control InspectionINFOID:0000000005396550
CAUTION:
If the hood lock cable is bent or deformed, replace it.
1. Check that the secondary latch is properly engaged with the secondary striker (B: 6.8 mm (0.268 in) with
hood's own weight.
2. While operating the hood release handle, carefully check that the front end of the hood is raised by
approx. 20 mm (0.79 in). Also check that the hood release handle returns to the original position.
3. Check that the secondary hood release operates at 29.4 N (3.0 kg) or below.
4. Confirm static closing force of the hood is 343 – 441 N·m (35 – 44 kg-m).
PIIB5801E
PIIB6537E
1. Hood striker 2. Primary latch 3. Secondary striker
4. Secondary latch A. 20 mm (0.79 in) B. 6.8 mm (0.268 in)
PIIB5794E
Revision: January 20102010 Versa
Page 527 of 3745
BL-18
< SERVICE INFORMATION >
HOOD
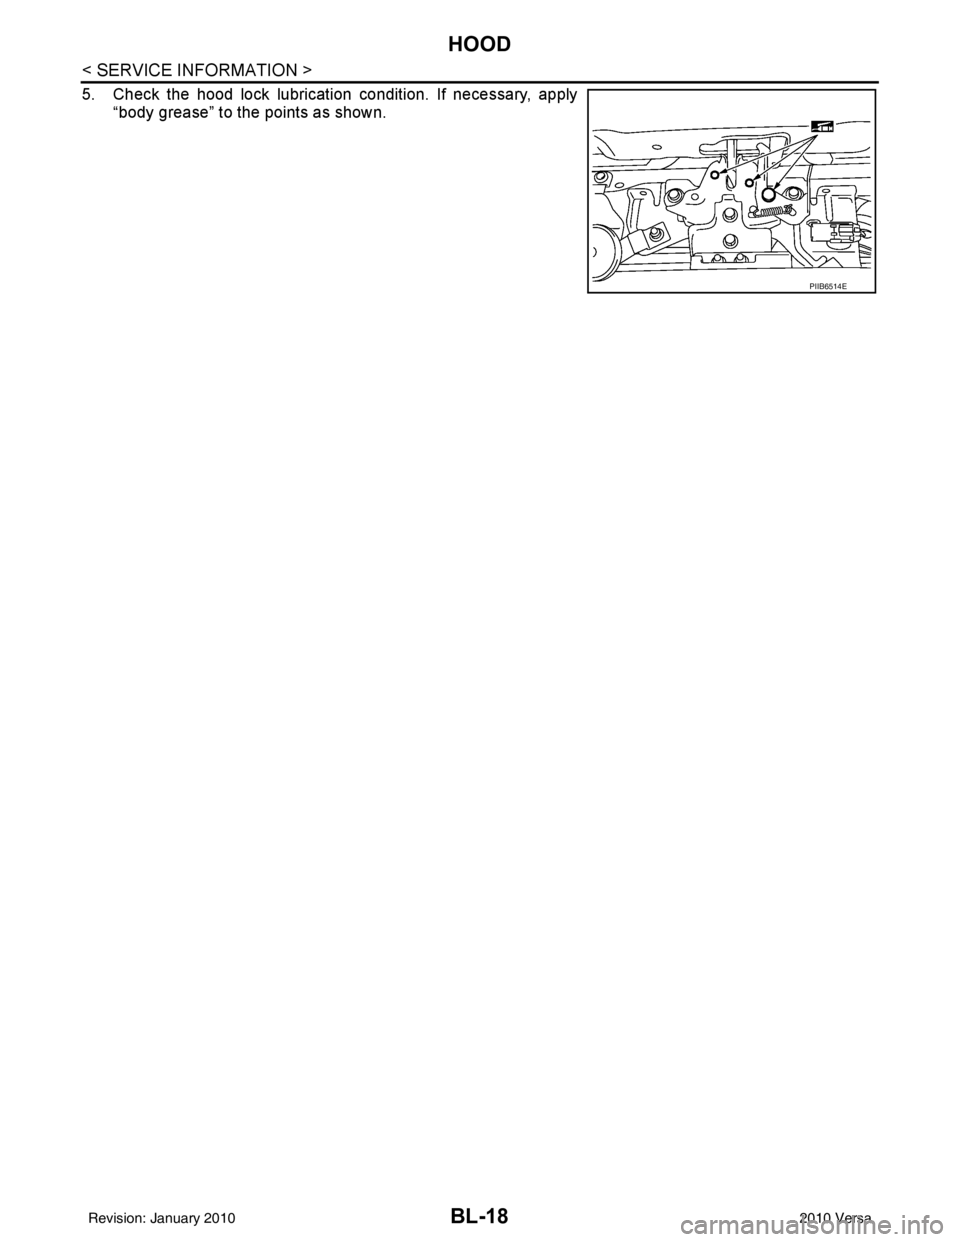
5. Check the hood lock lubrication condition. If necessary, apply“body grease” to the points as shown.
PIIB6514E
Revision: January 20102010 Versa
Page 528 of 3745
RADIATOR CORE SUPPORTBL-19
< SERVICE INFORMATION >
C
DE
F
G H
J
K L
M A
B
BL
N
O P
RADIATOR CORE SUPPORT
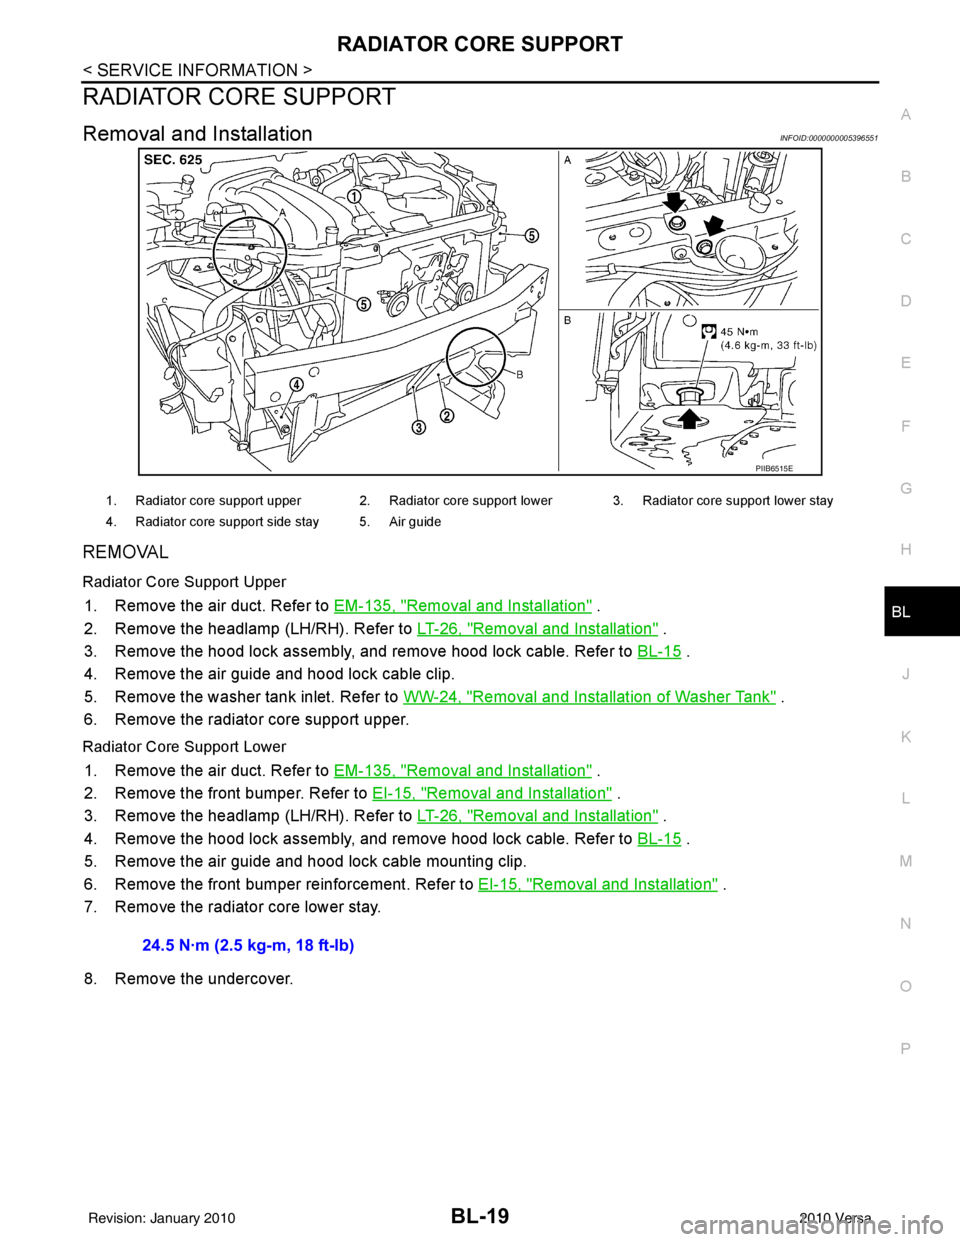
Removal and InstallationINFOID:0000000005396551
REMOVAL
Radiator Core Support Upper
1. Remove the air duct. Refer to EM-135, "Removal and Installation" .
2. Remove the headlamp (LH/RH). Refer to LT-26, "
Removal and Installation" .
3. Remove the hood lock assembly, and remove hood lock cable. Refer to BL-15
.
4. Remove the air guide and hood lock cable clip.
5. Remove the washer tank inlet. Refer to WW-24, "
Removal and Installation of Washer Tank" .
6. Remove the radiator core support upper.
Radiator Core Support Lower
1. Remove the air duct. Refer to EM-135, "Removal and Installation" .
2. Remove the front bumper. Refer to EI-15, "
Removal and Installation" .
3. Remove the headlamp (LH/RH). Refer to LT-26, "
Removal and Installation" .
4. Remove the hood lock assembly, and remove hood lock cable. Refer to BL-15
.
5. Remove the air guide and hood lock cable mounting clip.
6. Remove the front bumper reinforcement. Refer to EI-15, "
Removal and Installation" .
7. Remove the radiator core lower stay.
8. Remove the undercover.
PIIB6515E
1. Radiator core support upper 2. Radiator core support lower 3. Radiator core support lower stay
4. Radiator core support side stay 5. Air guide
24.5 N·m (2.5 kg-m, 18 ft-lb)
Revision: January 20102010 Versa
Page 529 of 3745
BL-20
< SERVICE INFORMATION >
RADIATOR CORE SUPPORT
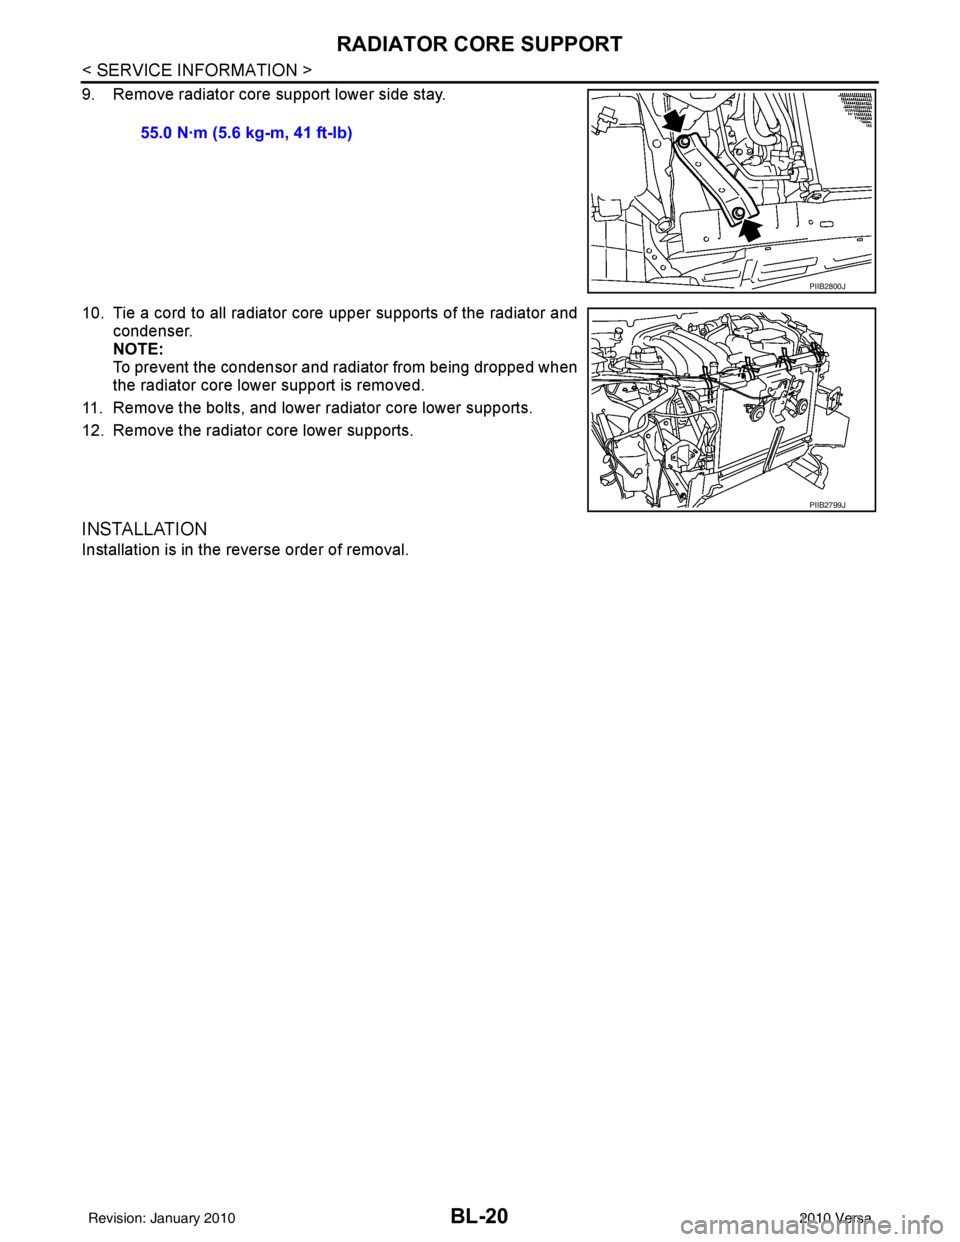
9. Remove radiator core support lower side stay.
10. Tie a cord to all radiator core upper supports of the radiator andcondenser.
NOTE:
To prevent the condensor and radiator from being dropped when
the radiator core lower support is removed.
11. Remove the bolts, and lower radiator core lower supports.
12. Remove the radiator core lower supports.
INSTALLATION
Installation is in the reverse order of removal. 55.0 N·m (5.6 kg-m, 41 ft-lb)
PIIB2800J
PIIB2799J
Revision: January 20102010 Versa
Page 530 of 3745
FRONT FENDERBL-21
< SERVICE INFORMATION >
C
DE
F
G H
J
K L
M A
B
BL
N
O P
FRONT FENDER
Removal and InstallationINFOID:0000000005396552
REMOVAL
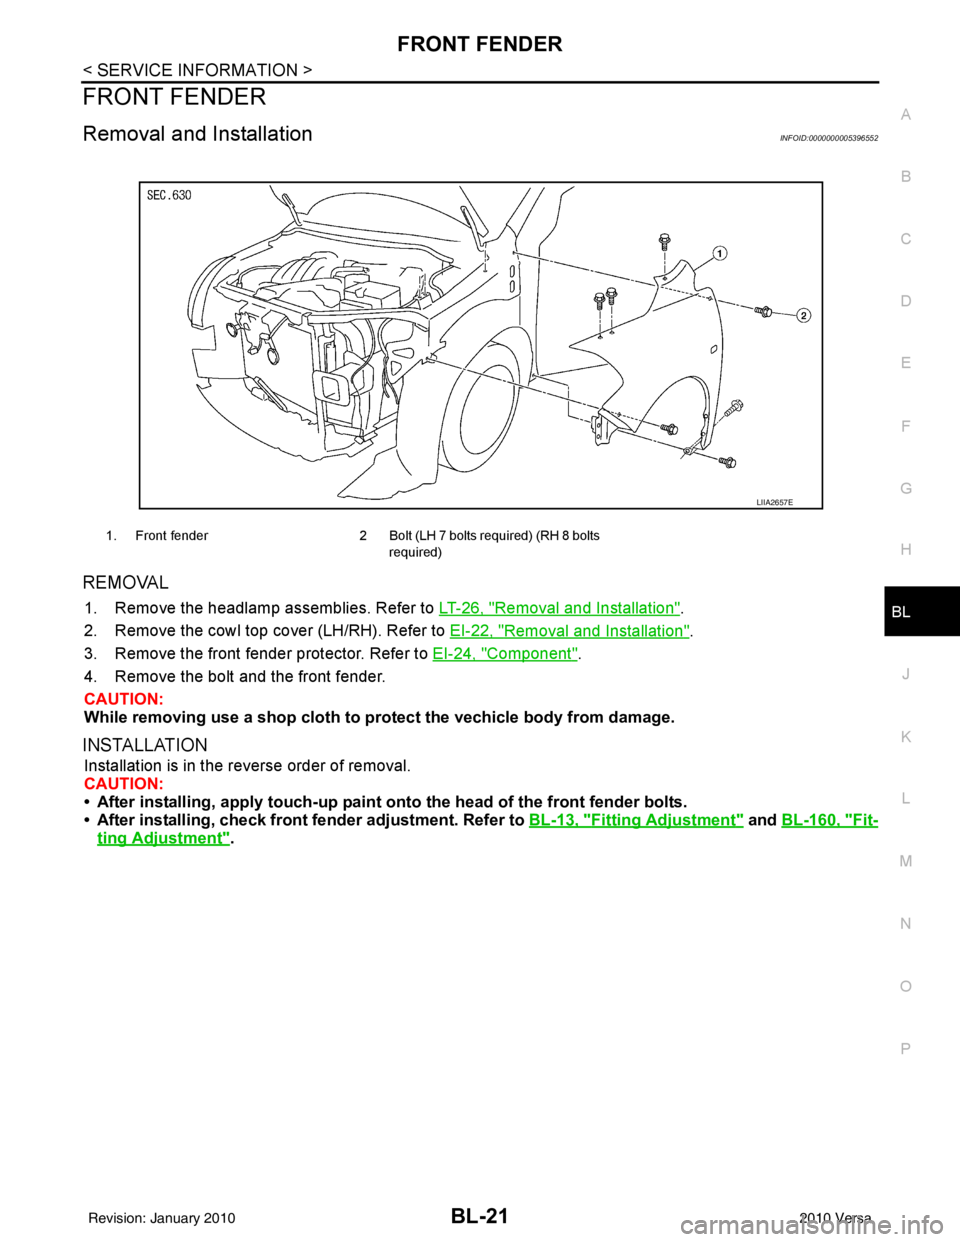
1. Remove the headlamp assemblies. Refer to LT-26, "Removal and Installation".
2. Remove the cowl top cover (LH/RH). Refer to EI-22, "
Removal and Installation".
3. Remove the front fender protector. Refer to EI-24, "
Component".
4. Remove the bolt and the front fender.
CAUTION:
While removing use a shop cloth to pr otect the vechicle body from damage.
INSTALLATION
Installation is in the reverse order of removal.
CAUTION:
• After installing, apply touch-up paint on to the head of the front fender bolts.
• After installing, check front fender adjustment. Refer to BL-13, "
Fitting Adjustment" and BL-160, "Fit-
ting Adjustment".
1. Front fender 2 Bolt (LH 7 bolts required) (RH 8 bolts
required)
LIIA2657E
Revision: January 20102010 Versa