light NISSAN MAXIMA 2017 A36 / 8.G Nissan Connect Navigation Manual
[x] Cancel search | Manufacturer: NISSAN, Model Year: 2017, Model line: MAXIMA, Model: NISSAN MAXIMA 2017 A36 / 8.GPages: 243, PDF Size: 1.72 MB
Page 182 of 243

6. Navigation
legend provided herein, the Contracting Officer,
federal government agency, or any federal official
must notify HERE prior to seeking additional or
alternative rights in the Data.
HOW TO HANDLE THE SD CARD
When handling the SD card, please be careful
and adhere to the following instructions:. Always follow the instructions described in
this manual and in the handbook attached to
the SD card when using an SD card in this
device.
. Do not handle an SD card with wet hands.
Doing so may cause electric shock or a
malfunction.
. Do not allow hands or metal objects to
contact the terminal area of SD cards.
. Do not place SD cards on the instrument
panel, on any place with direct sunlight or in
moist circumstances. Doing so may damage
or deform the SD card.
. Do not use any conventional cleaner, ben-
zine, thinner or antistatic spray.
. Do not use SD cards in any place where
static electricity or electric noise adversely
affects SD cards. This may cause data
corruption or data loss. .
SD card optimization must not be performed.
. Always place the SD card in its storage case
when not in use.
. If an SD card is disposed of when it is not
used, it is recommended not only to delete
the stored data but also to physically break
the card.
6-74
Page 205 of 243
![NISSAN MAXIMA 2017 A36 / 8.G Nissan Connect Navigation Manual VOICE RECOGNITION SETTINGS
The voice recognition settings can be changed.
1. Touch [Setting] on the Launch Bar.
2. Touch [Voice Recognition].
3. Touch the item you would like to set.
Available setting NISSAN MAXIMA 2017 A36 / 8.G Nissan Connect Navigation Manual VOICE RECOGNITION SETTINGS
The voice recognition settings can be changed.
1. Touch [Setting] on the Launch Bar.
2. Touch [Voice Recognition].
3. Touch the item you would like to set.
Available setting](/img/5/539/w960_539-204.png)
VOICE RECOGNITION SETTINGS
The voice recognition settings can be changed.
1. Touch [Setting] on the Launch Bar.
2. Touch [Voice Recognition].
3. Touch the item you would like to set.
Available settings. [Minimize Voice Feedback]:
Turns the minimize voice feedback function
on/off. When this item is turned on, short and
minimized voice feedback will be provided.
. [Audio device setting]:
Select an audio device to be operated via the
Voice Recognition system from the audio
devices connected to the USB connection
ports. A device with an indicator light
illuminated can be operated with the Voice
Recognition system.
7. Voice recognition
7-23
Page 209 of 243

SYSTEM UNIT
LIQUID CRYSTAL DISPLAY
Symptom Possible cause Possible solution
The screen is too dark. The cabin temperature is too low. Wait until the cabin temperature becomes moderate.
Screen brightness is set to the maximum darkness. Adjust the brightness setting of the screen.
“Display settings” (page 2-19)
The screen is too bright. Screen brightness is set to the maximum brightness. Adjust the brightness setting of the screen.
“Display settings” (page 2-19)
A small black spot or a small bright spot appears on
the screen. This is a typical phenomenon for liquid crystal
displays.This is not a malfunction.
A dot or stripe pattern appears on the screen. Electromagnetic waves that are generated from neon billboards, high voltage electric power cables, ham
radios or other radio devices equipped to other
vehicles may adversely affect the screen.This is not a malfunction.
Image lag appears on the screen. This is a typical phenomenon for liquid crystal
displays. This is not a malfunction.
Image motion displayed on the screen is slow. The cabin temperature is less than 50 8F (108C). Wait until the cabin temperature rises to within 508F
(108C) and 1228F (508C).
When looking at the screen from an angle, the screen
lightens or darkens. This is a typical phenomenon for liquid crystal
displays.Adjust the brightness setting of the screen.
“Display settings” (page 2-19)
8. Troubleshooting guide
8-3
Page 212 of 243

8. Troubleshooting guide
Functional
SymptomPossible cause Possible solution
Keep losing my local stations. The digital coverage is slightly less than the analog
signal coverage. Verify correct operation on another station. This is
expected behavior.
Shadowing (urban/terrain) can cause reduced digital
coverage. Verify correct operation on another station.
Some data fields are blank. Text information is sent at the broadcaster’s discre-
tion. Verify correct operation on another station. Report
station issues.
Text information is truncated / appears to be more
available. The display is limited to a fixed number of characters
and more data is being sent than can be shown.This is an intended behavior.
AM reception changes at night. AM stations are required by the government (FCC) to
lower their power at night. This is not a malfunction.
8-6
Page 224 of 243

8. Troubleshooting guide
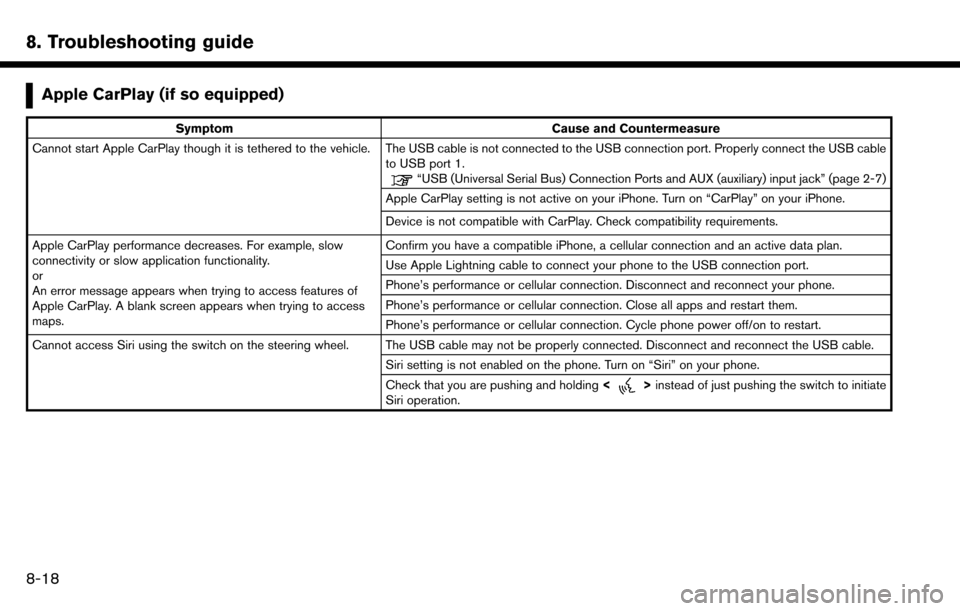
Apple CarPlay (if so equipped)
SymptomCause and Countermeasure
Cannot start Apple CarPlay though it is tethered to the vehicle. The USB cable is not connected to the USB connection port. Properly connect the USB cable to USB port 1.
“USB (Universal Serial Bus) Connection Ports and AUX (auxiliary) input jack” (page 2-7)
Apple CarPlay setting is not active on your iPhone. Turn on “CarPlay” on your iPhone.
Device is not compatible with CarPlay. Check compatibility requirements.
Apple CarPlay performance decreases. For example, slow
connectivity or slow application functionality.
or
An error message appears when trying to access features of
Apple CarPlay. A blank screen appears when trying to access
maps. Confirm you have a compatible iPhone, a cellular connection and an active data plan.
Use Apple Lightning cable to connect your phone to the USB connection port.
Phone’s performance or cellular connection. Disconnect and reconnect your phone.
Phone’s performance or cellular connection. Close all apps and restart them.
Phone’s performance or cellular connection. Cycle phone power off/on to restart.
Cannot access Siri using the switch on the steering wheel. The USB cable may not be properly connected. Disconnect and reconnect the USB cable. Siri setting is not enabled on the phone. Turn on “Siri” on your phone.
Check that you are pushing and holding<
>instead of just pushing the switch to initiate
Siri operation.
8-18
Page 226 of 243

8. Troubleshooting guide
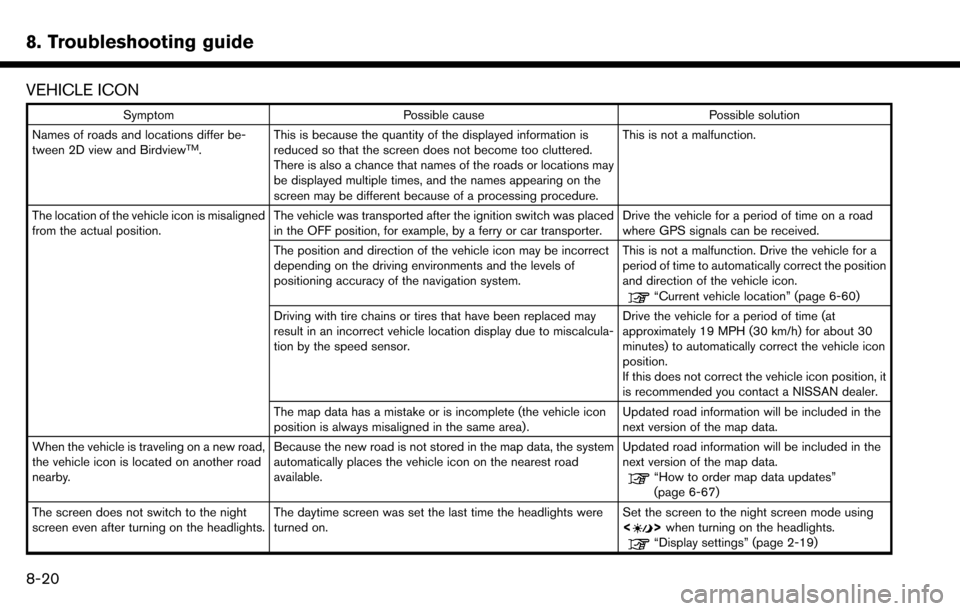
VEHICLE ICON
SymptomPossible cause Possible solution
Names of roads and locations differ be-
tween 2D view and Birdview
TM. This is because the quantity of the displayed information is
reduced so that the screen does not become too cluttered.
There is also a chance that names of the roads or locations may
be displayed multiple times, and the names appearing on the
screen may be different because of a processing procedure. This is not a malfunction.
The location of the vehicle icon is misaligned
from the actual position. The vehicle was transported after the ignition switch was placed
in the OFF position, for example, by a ferry or car transporter. Drive the vehicle for a period of time on a road
where GPS signals can be received.
The position and direction of the vehicle icon may be incorrect
depending on the driving environments and the levels of
positioning accuracy of the navigation system. This is not a malfunction. Drive the vehicle for a
period of time to automatically correct the position
and direction of the vehicle icon.
“Current vehicle location” (page 6-60)
Driving with tire chains or tires that have been replaced may
result in an incorrect vehicle location display due to miscalcula-
tion by the speed sensor. Drive the vehicle for a period of time (at
approximately 19 MPH (30 km/h) for about 30
minutes) to automatically correct the vehicle icon
position.
If this does not correct the vehicle icon position, it
is recommended you contact a NISSAN dealer.
The map data has a mistake or is incomplete (the vehicle icon
position is always misaligned in the same area). Updated road information will be included in the
next version of the map data.
When the vehicle is traveling on a new road,
the vehicle icon is located on another road
nearby. Because the new road is not stored in the map data, the system
automatically places the vehicle icon on the nearest road
available. Updated road information will be included in the
next version of the map data.
“How to order map data updates”
(page 6-67)
The screen does not switch to the night
screen even after turning on the headlights. The daytime screen was set the last time the headlights were
turned on. Set the screen to the night screen mode using
<
>
when turning on the headlights.“Display settings” (page 2-19)
8-20