NISSAN PATROL 2000 Electronic Repair Manual
Manufacturer: NISSAN, Model Year: 2000, Model line: PATROL, Model: NISSAN PATROL 2000Pages: 1033, PDF Size: 30.71 MB
Page 811 of 1033

Calculation of piston to piston pin clearance
Piston pin clearance = Piston pin hole inner diameter þ Piston pin
outer diameter
Standard: þ0.003 (Tightening clearance) to 0.012 mm
(þ0.0001 to 0.0005 in)
If out of specifications, replace piston and piston pin assembly.
PISTON RING SIDE CLEARANCE
+Using feeler gauge, measure clearance between piston ring
and piston ring groove.
Unit: mm (in)
Standard Limit
Top ring 0.05 - 0.07 (0.0020 - 0.0028) 0.5 (0.020)
Second ring 0.04 - 0.08 (0.0016 - 0.0031) 0.3 (0.012)
Oil ring 0.02 - 0.06 (0.0008 - 0.0024) 0.15 (0.0059)
+Align top ring and external surface of piston. Measure lower
side clearance of top ring with top ring pressed onto upper
side of ring groove.
+If side clearance exceeds the limit, replace piston ring.
+Check clearance again. If side clearance still exceeds the
limit, replace piston.
PISTON RING END GAP
+Check that cylinder bore diameter is within specifications.
Refer to EM-1075, ªPISTON TO CYLINDER BORE CLEAR-
ANCEº.
+Using piston, press piston ring to cylinder mid point, and
measure end gap.
Unit: mm (in)
Standard Limit
Top ring 0.3 - 0.45 (0.0118 - 0.0177)
1.5 (0.059) Second ring 0.5 - 0.65 (0.0197 - 0.0256)
Oil ring 0.25 - 0.45 (0.0098 - 0.0177)
FEM099
FEM100
FEM101
CYLINDER BLOCKZD
Inspection (Cont'd)
EM-1073
Page 812 of 1033
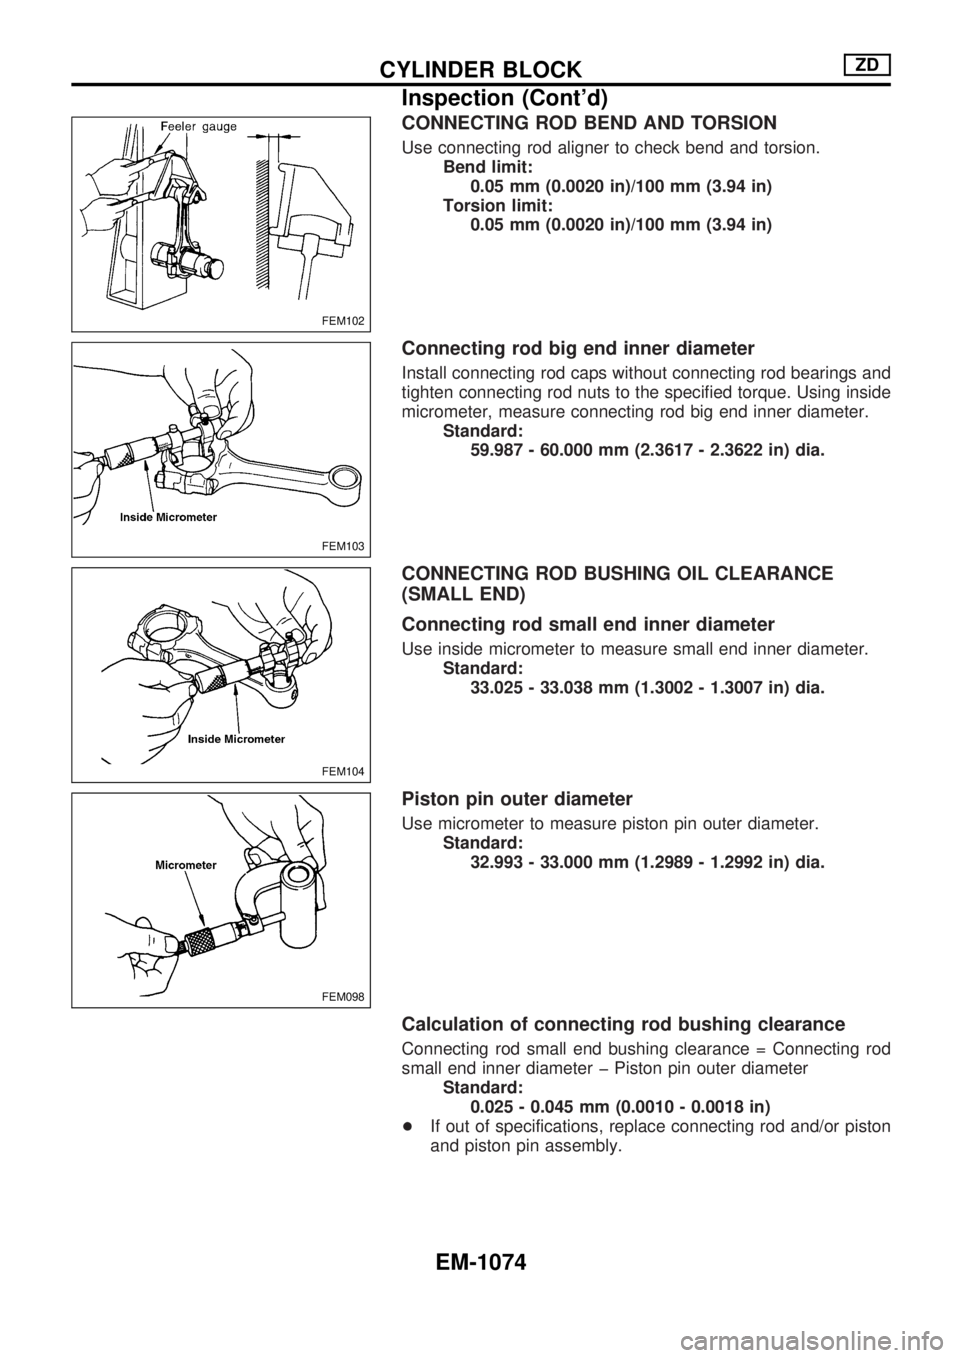
CONNECTING ROD BEND AND TORSION
Use connecting rod aligner to check bend and torsion.
Bend limit:
0.05 mm (0.0020 in)/100 mm (3.94 in)
Torsion limit:
0.05 mm (0.0020 in)/100 mm (3.94 in)
Connecting rod big end inner diameter
Install connecting rod caps without connecting rod bearings and
tighten connecting rod nuts to the specified torque. Using inside
micrometer, measure connecting rod big end inner diameter.
Standard:
59.987 - 60.000 mm (2.3617 - 2.3622 in) dia.
CONNECTING ROD BUSHING OIL CLEARANCE
(SMALL END)
Connecting rod small end inner diameter
Use inside micrometer to measure small end inner diameter.
Standard:
33.025 - 33.038 mm (1.3002 - 1.3007 in) dia.
Piston pin outer diameter
Use micrometer to measure piston pin outer diameter.
Standard:
32.993 - 33.000 mm (1.2989 - 1.2992 in) dia.
Calculation of connecting rod bushing clearance
Connecting rod small end bushing clearance = Connecting rod
small end inner diameter þ Piston pin outer diameter
Standard:
0.025 - 0.045 mm (0.0010 - 0.0018 in)
+If out of specifications, replace connecting rod and/or piston
and piston pin assembly.
FEM102
FEM103
FEM104
FEM098
CYLINDER BLOCKZD
Inspection (Cont'd)
EM-1074
Page 813 of 1033
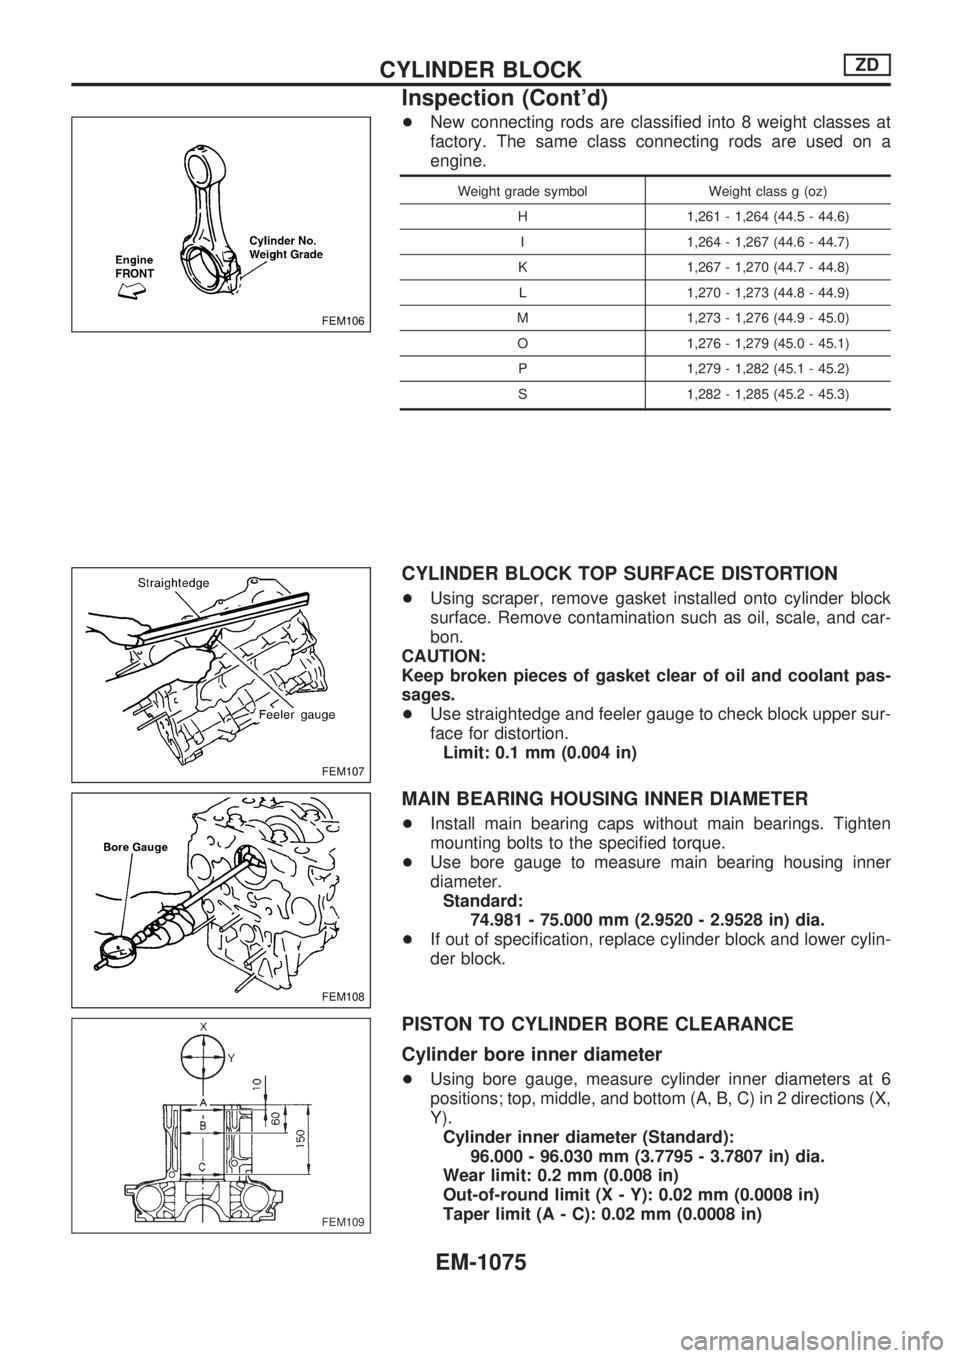
+New connecting rods are classified into 8 weight classes at
factory. The same class connecting rods are used on a
engine.
Weight grade symbol Weight class g (oz)
H 1,261 - 1,264 (44.5 - 44.6)
I 1,264 - 1,267 (44.6 - 44.7)
K 1,267 - 1,270 (44.7 - 44.8)
L 1,270 - 1,273 (44.8 - 44.9)
M 1,273 - 1,276 (44.9 - 45.0)
O 1,276 - 1,279 (45.0 - 45.1)
P 1,279 - 1,282 (45.1 - 45.2)
S 1,282 - 1,285 (45.2 - 45.3)
CYLINDER BLOCK TOP SURFACE DISTORTION
+Using scraper, remove gasket installed onto cylinder block
surface. Remove contamination such as oil, scale, and car-
bon.
CAUTION:
Keep broken pieces of gasket clear of oil and coolant pas-
sages.
+Use straightedge and feeler gauge to check block upper sur-
face for distortion.
Limit: 0.1 mm (0.004 in)
MAIN BEARING HOUSING INNER DIAMETER
+Install main bearing caps without main bearings. Tighten
mounting bolts to the specified torque.
+Use bore gauge to measure main bearing housing inner
diameter.
Standard:
74.981 - 75.000 mm (2.9520 - 2.9528 in) dia.
+If out of specification, replace cylinder block and lower cylin-
der block.
PISTON TO CYLINDER BORE CLEARANCE
Cylinder bore inner diameter
+Using bore gauge, measure cylinder inner diameters at 6
positions; top, middle, and bottom (A, B, C) in 2 directions (X,
Y).
Cylinder inner diameter (Standard):
96.000 - 96.030 mm (3.7795 - 3.7807 in) dia.
Wear limit: 0.2 mm (0.008 in)
Out-of-round limit (X - Y): 0.02 mm (0.0008 in)
Taper limit (A - C): 0.02 mm (0.0008 in)
FEM106
FEM107
FEM108
FEM109
CYLINDER BLOCKZD
Inspection (Cont'd)
EM-1075
Page 814 of 1033
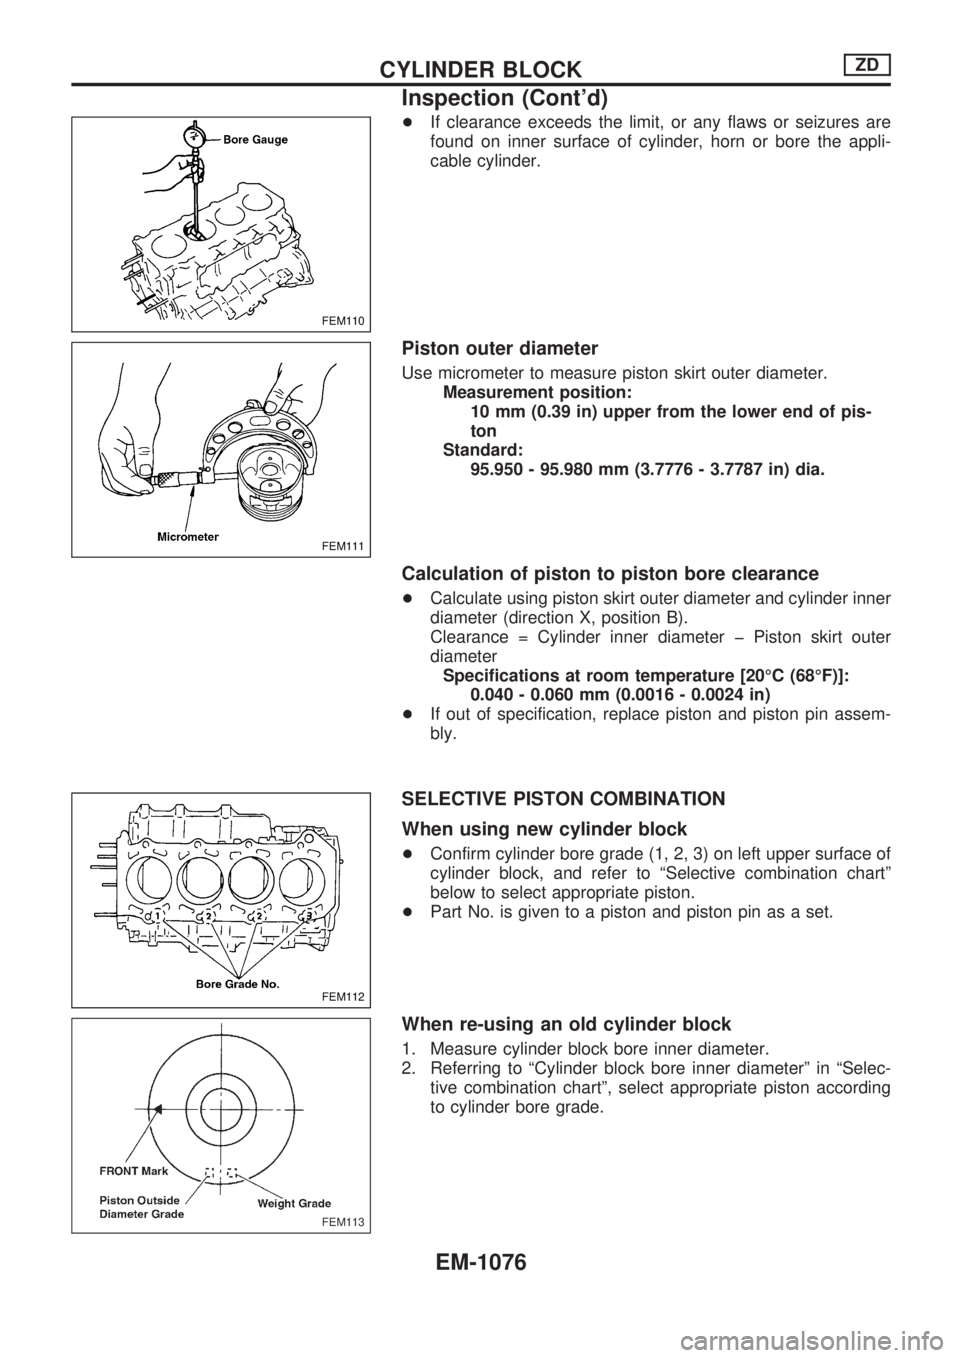
+If clearance exceeds the limit, or any flaws or seizures are
found on inner surface of cylinder, horn or bore the appli-
cable cylinder.
Piston outer diameter
Use micrometer to measure piston skirt outer diameter.
Measurement position:
10 mm (0.39 in) upper from the lower end of pis-
ton
Standard:
95.950 - 95.980 mm (3.7776 - 3.7787 in) dia.
Calculation of piston to piston bore clearance
+Calculate using piston skirt outer diameter and cylinder inner
diameter (direction X, position B).
Clearance = Cylinder inner diameter þ Piston skirt outer
diameter
Specifications at room temperature [20ÉC (68ÉF)]:
0.040 - 0.060 mm (0.0016 - 0.0024 in)
+If out of specification, replace piston and piston pin assem-
bly.
SELECTIVE PISTON COMBINATION
When using new cylinder block
+Confirm cylinder bore grade (1, 2, 3) on left upper surface of
cylinder block, and refer to ªSelective combination chartº
below to select appropriate piston.
+Part No. is given to a piston and piston pin as a set.
When re-using an old cylinder block
1. Measure cylinder block bore inner diameter.
2. Referring to ªCylinder block bore inner diameterº in ªSelec-
tive combination chartº, select appropriate piston according
to cylinder bore grade.
FEM110
FEM111
FEM112
FEM113
CYLINDER BLOCKZD
Inspection (Cont'd)
EM-1076
Page 815 of 1033
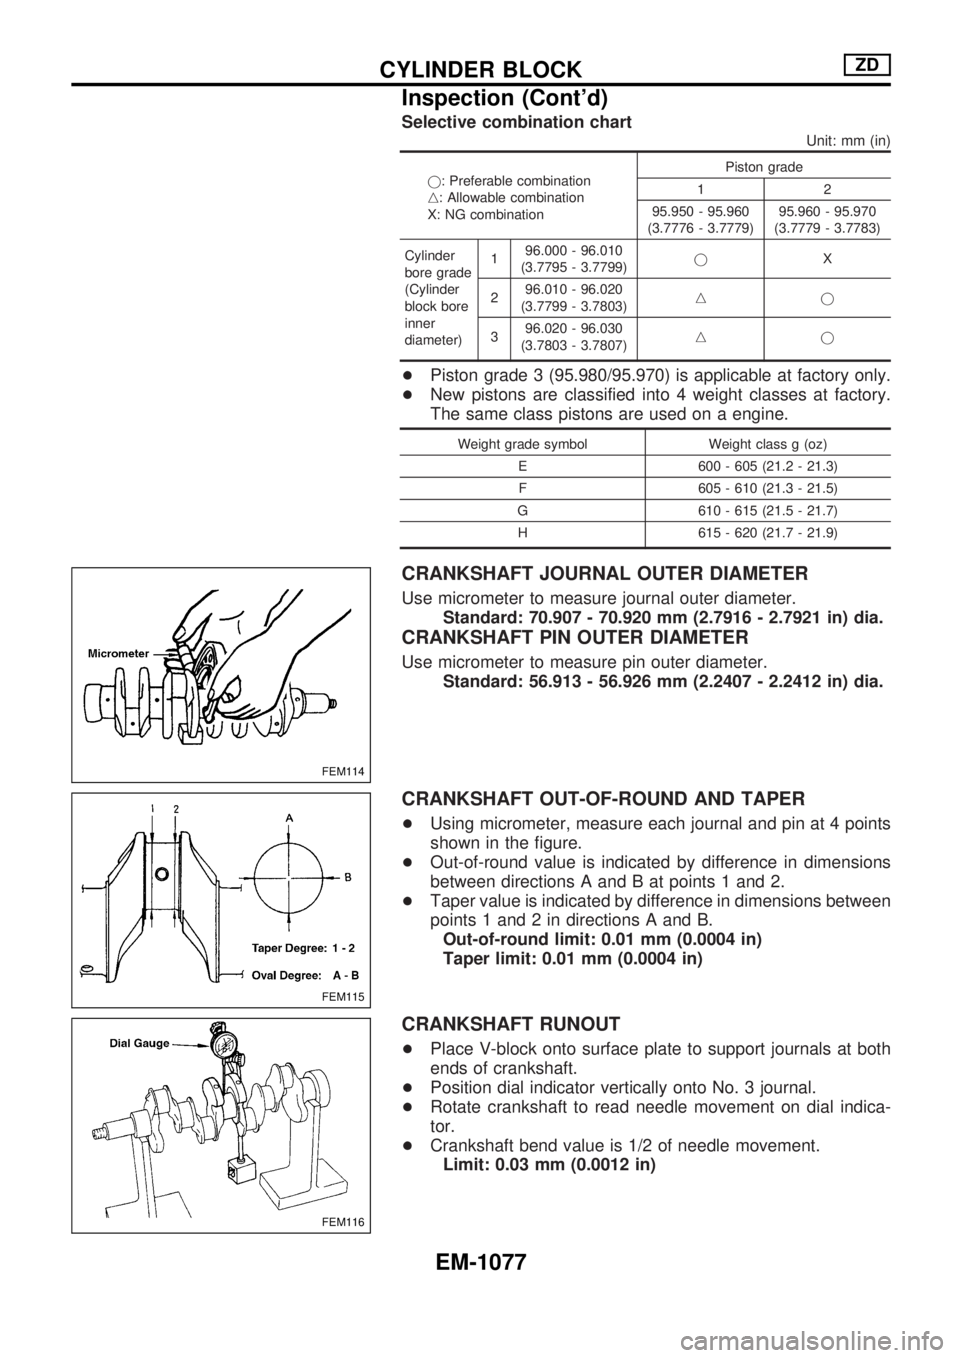
Selective combination chart
Unit: mm (in)
j: Preferable combination
n: Allowable combination
X: NG combinationPiston grade
12
95.950 - 95.960
(3.7776 - 3.7779)95.960 - 95.970
(3.7779 - 3.7783)
Cylinder
bore grade
(Cylinder
block bore
inner
diameter)196.000 - 96.010
(3.7795 - 3.7799)jX
296.010 - 96.020
(3.7799 - 3.7803)nj
396.020 - 96.030
(3.7803 - 3.7807)nj
+Piston grade 3 (95.980/95.970) is applicable at factory only.
+New pistons are classified into 4 weight classes at factory.
The same class pistons are used on a engine.
Weight grade symbol Weight class g (oz)
E 600 - 605 (21.2 - 21.3)
F 605 - 610 (21.3 - 21.5)
G 610 - 615 (21.5 - 21.7)
H 615 - 620 (21.7 - 21.9)
CRANKSHAFT JOURNAL OUTER DIAMETER
Use micrometer to measure journal outer diameter.
Standard: 70.907 - 70.920 mm (2.7916 - 2.7921 in) dia.
CRANKSHAFT PIN OUTER DIAMETER
Use micrometer to measure pin outer diameter.
Standard: 56.913 - 56.926 mm (2.2407 - 2.2412 in) dia.
CRANKSHAFT OUT-OF-ROUND AND TAPER
+Using micrometer, measure each journal and pin at 4 points
shown in the figure.
+Out-of-round value is indicated by difference in dimensions
between directions A and B at points 1 and 2.
+Taper value is indicated by difference in dimensions between
points 1 and 2 in directions A and B.
Out-of-round limit: 0.01 mm (0.0004 in)
Taper limit: 0.01 mm (0.0004 in)
CRANKSHAFT RUNOUT
+Place V-block onto surface plate to support journals at both
ends of crankshaft.
+Position dial indicator vertically onto No. 3 journal.
+Rotate crankshaft to read needle movement on dial indica-
tor.
+Crankshaft bend value is 1/2 of needle movement.
Limit: 0.03 mm (0.0012 in)
FEM114
FEM115
FEM116
CYLINDER BLOCKZD
Inspection (Cont'd)
EM-1077
Page 816 of 1033
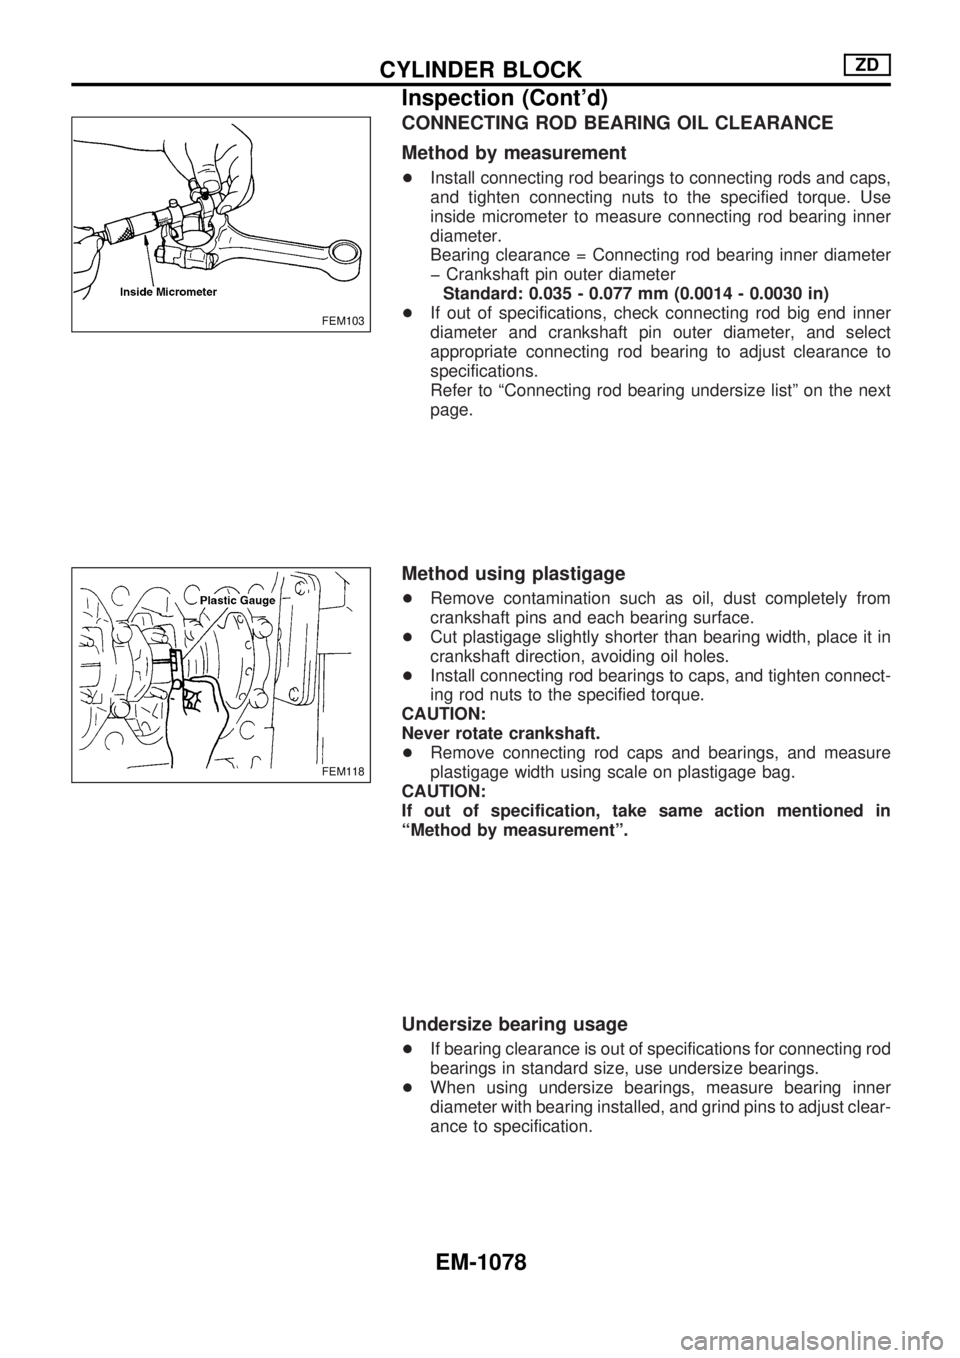
CONNECTING ROD BEARING OIL CLEARANCE
Method by measurement
+Install connecting rod bearings to connecting rods and caps,
and tighten connecting nuts to the specified torque. Use
inside micrometer to measure connecting rod bearing inner
diameter.
Bearing clearance = Connecting rod bearing inner diameter
þ Crankshaft pin outer diameter
Standard: 0.035 - 0.077 mm (0.0014 - 0.0030 in)
+If out of specifications, check connecting rod big end inner
diameter and crankshaft pin outer diameter, and select
appropriate connecting rod bearing to adjust clearance to
specifications.
Refer to ªConnecting rod bearing undersize listº on the next
page.
Method using plastigage
+Remove contamination such as oil, dust completely from
crankshaft pins and each bearing surface.
+Cut plastigage slightly shorter than bearing width, place it in
crankshaft direction, avoiding oil holes.
+Install connecting rod bearings to caps, and tighten connect-
ing rod nuts to the specified torque.
CAUTION:
Never rotate crankshaft.
+Remove connecting rod caps and bearings, and measure
plastigage width using scale on plastigage bag.
CAUTION:
If out of specification, take same action mentioned in
ªMethod by measurementº.
Undersize bearing usage
+If bearing clearance is out of specifications for connecting rod
bearings in standard size, use undersize bearings.
+When using undersize bearings, measure bearing inner
diameter with bearing installed, and grind pins to adjust clear-
ance to specification.
FEM103
FEM118
CYLINDER BLOCKZD
Inspection (Cont'd)
EM-1078
Page 817 of 1033
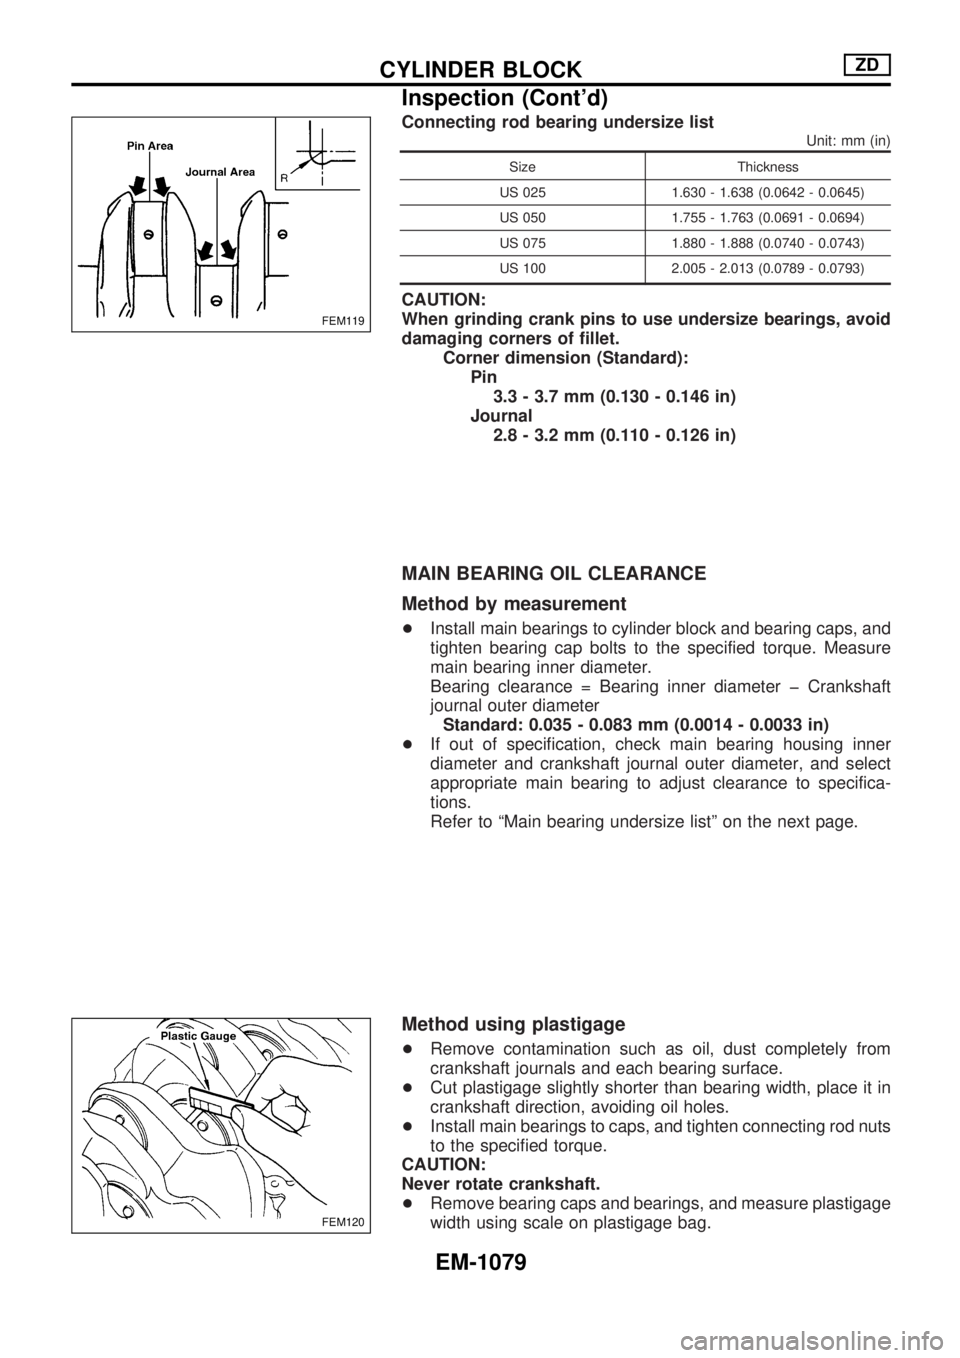
Connecting rod bearing undersize list
Unit: mm (in)
Size Thickness
US 025 1.630 - 1.638 (0.0642 - 0.0645)
US 050 1.755 - 1.763 (0.0691 - 0.0694)
US 075 1.880 - 1.888 (0.0740 - 0.0743)
US 100 2.005 - 2.013 (0.0789 - 0.0793)
CAUTION:
When grinding crank pins to use undersize bearings, avoid
damaging corners of fillet.
Corner dimension (Standard):
Pin
3.3 - 3.7 mm (0.130 - 0.146 in)
Journal
2.8 - 3.2 mm (0.110 - 0.126 in)
MAIN BEARING OIL CLEARANCE
Method by measurement
+Install main bearings to cylinder block and bearing caps, and
tighten bearing cap bolts to the specified torque. Measure
main bearing inner diameter.
Bearing clearance = Bearing inner diameter þ Crankshaft
journal outer diameter
Standard: 0.035 - 0.083 mm (0.0014 - 0.0033 in)
+If out of specification, check main bearing housing inner
diameter and crankshaft journal outer diameter, and select
appropriate main bearing to adjust clearance to specifica-
tions.
Refer to ªMain bearing undersize listº on the next page.
Method using plastigage
+Remove contamination such as oil, dust completely from
crankshaft journals and each bearing surface.
+Cut plastigage slightly shorter than bearing width, place it in
crankshaft direction, avoiding oil holes.
+Install main bearings to caps, and tighten connecting rod nuts
to the specified torque.
CAUTION:
Never rotate crankshaft.
+Remove bearing caps and bearings, and measure plastigage
width using scale on plastigage bag.
FEM119
FEM120
CYLINDER BLOCKZD
Inspection (Cont'd)
EM-1079
Page 818 of 1033
CAUTION:
If out of specification, take same action mentioned in
ªMethod by measurementº.
Undersize bearing usage
+If bearing clearance is out of specifications for main bearings
in standard size, use undersize bearings.
+When using undersize bearings, measure bearing inner
diameter with bearing installed, and grind crank journals to
adjust clearance to specification.
Main bearing undersize list
Unit: mm (in)
Size Thickness
US 025 2.130 - 2.138 (0.0839 - 0.0842)
US 050 2.255 - 2.263 (0.0888 - 0.0891)
US 075 2.380 - 2.388 (0.0937 - 0.0940)
US 100 2.505 - 2.513 (0.0986 - 0.0989)
CAUTION:
When grinding crank journals to use undersize bearings,
avoid damaging corners of fillet.
Corner dimension (Standard):
Pin
3.3 - 3.7 mm (0.130 - 0.146 in)
Journal
2.8 - 3.2 mm (0.110 - 0.126 in)
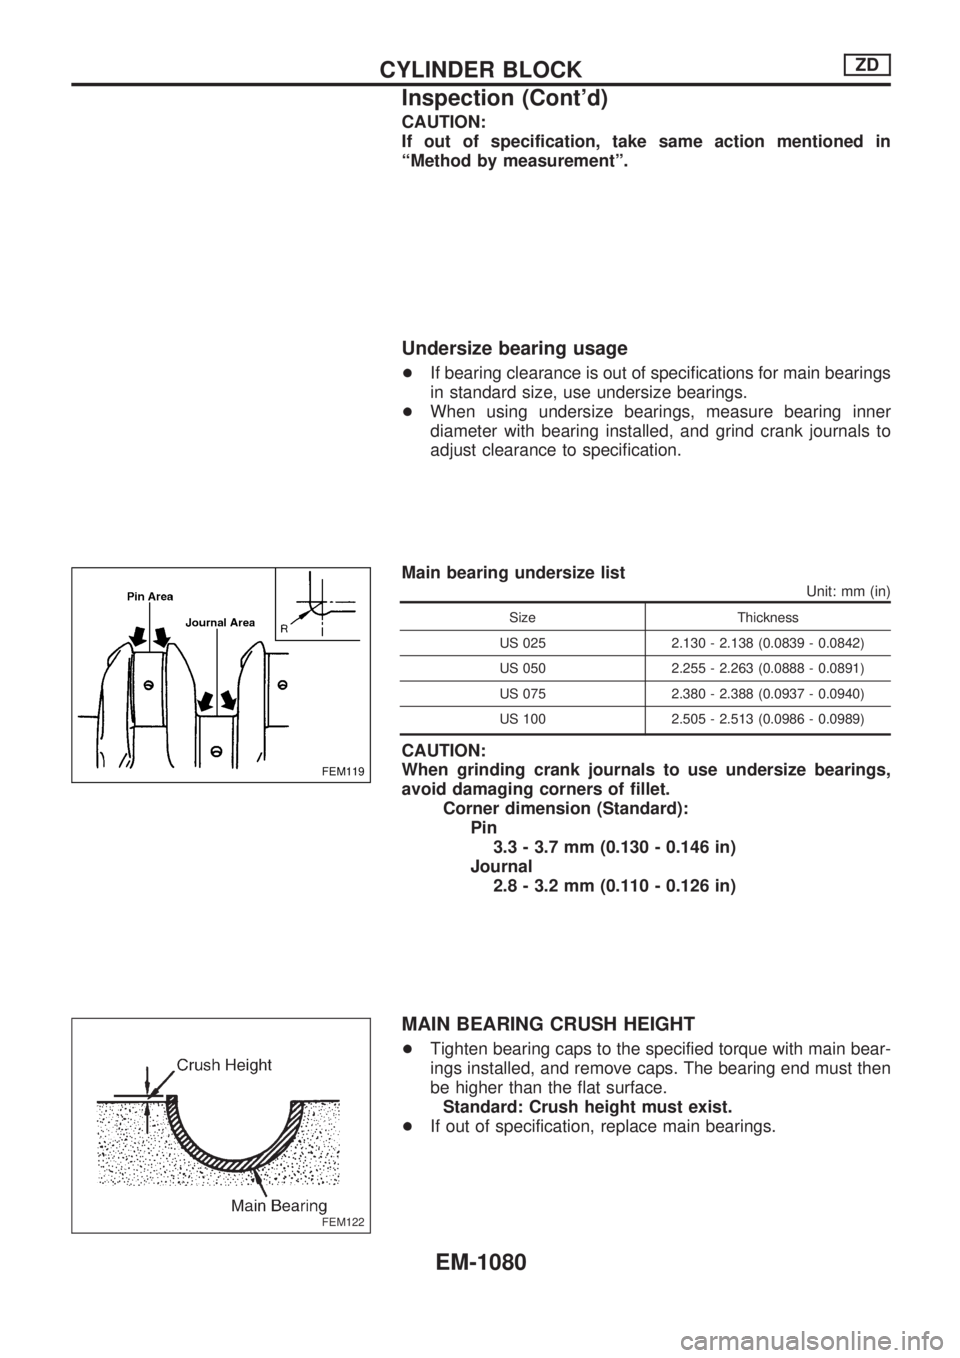
MAIN BEARING CRUSH HEIGHT
+Tighten bearing caps to the specified torque with main bear-
ings installed, and remove caps. The bearing end must then
be higher than the flat surface.
Standard: Crush height must exist.
+If out of specification, replace main bearings.
FEM119
FEM122
CYLINDER BLOCKZD
Inspection (Cont'd)
EM-1080
Page 819 of 1033
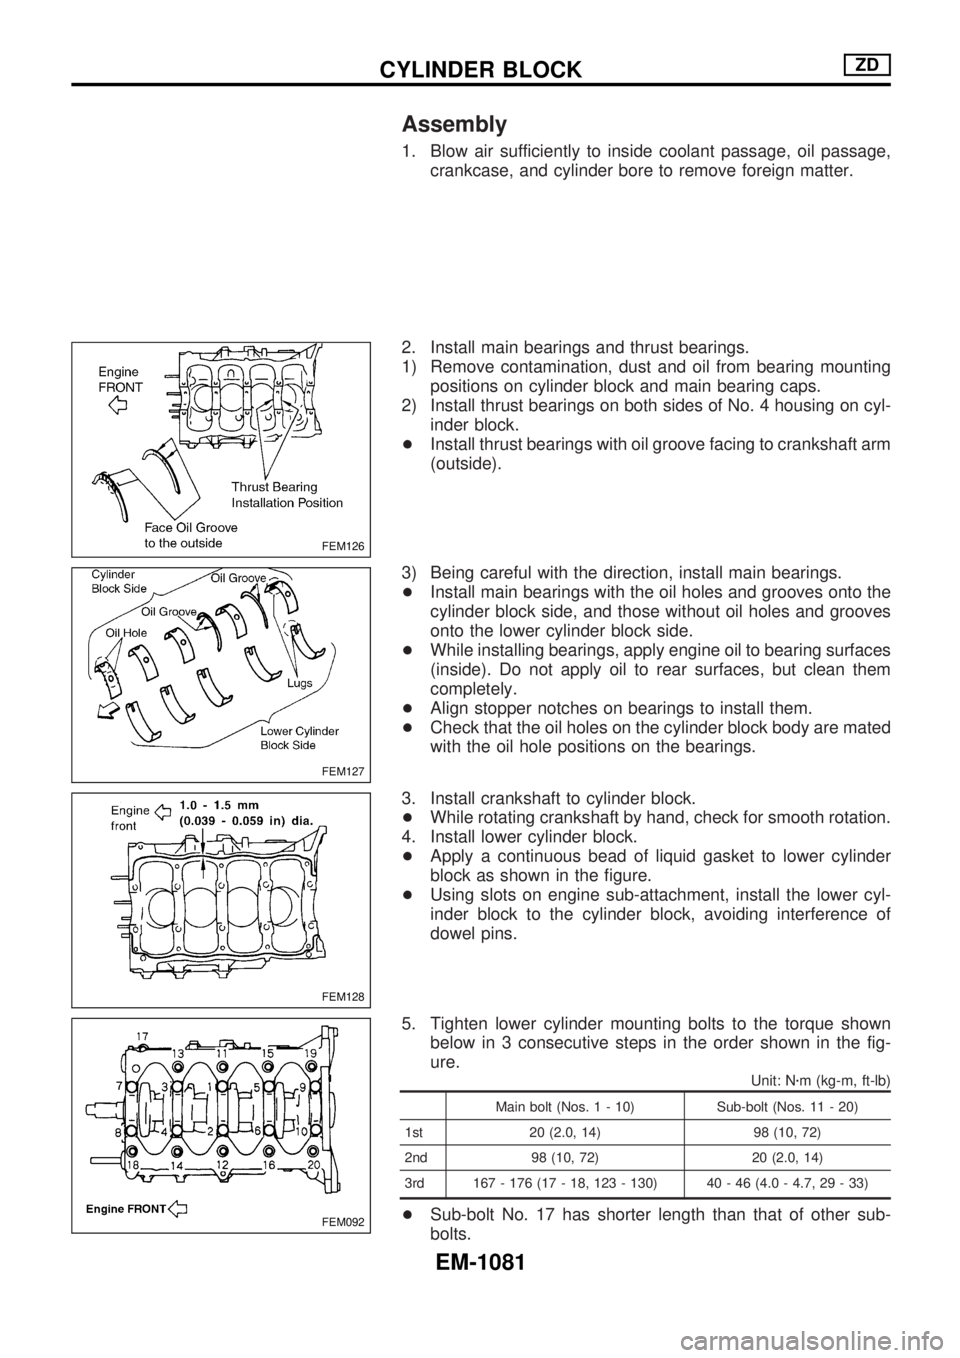
Assembly
1. Blow air sufficiently to inside coolant passage, oil passage,
crankcase, and cylinder bore to remove foreign matter.
2. Install main bearings and thrust bearings.
1) Remove contamination, dust and oil from bearing mounting
positions on cylinder block and main bearing caps.
2) Install thrust bearings on both sides of No. 4 housing on cyl-
inder block.
+Install thrust bearings with oil groove facing to crankshaft arm
(outside).
3) Being careful with the direction, install main bearings.
+Install main bearings with the oil holes and grooves onto the
cylinder block side, and those without oil holes and grooves
onto the lower cylinder block side.
+While installing bearings, apply engine oil to bearing surfaces
(inside). Do not apply oil to rear surfaces, but clean them
completely.
+Align stopper notches on bearings to install them.
+Check that the oil holes on the cylinder block body are mated
with the oil hole positions on the bearings.
3. Install crankshaft to cylinder block.
+While rotating crankshaft by hand, check for smooth rotation.
4. Install lower cylinder block.
+Apply a continuous bead of liquid gasket to lower cylinder
block as shown in the figure.
+Using slots on engine sub-attachment, install the lower cyl-
inder block to the cylinder block, avoiding interference of
dowel pins.
5. Tighten lower cylinder mounting bolts to the torque shown
below in 3 consecutive steps in the order shown in the fig-
ure.
Unit: Nzm (kg-m, ft-lb)
Main bolt (Nos. 1 - 10) Sub-bolt (Nos. 11 - 20)
1st 20 (2.0, 14) 98 (10, 72)
2nd 98 (10, 72) 20 (2.0, 14)
3rd 167 - 176 (17 - 18, 123 - 130) 40 - 46 (4.0 - 4.7, 29 - 33)
+Sub-bolt No. 17 has shorter length than that of other sub-
bolts.
FEM126
FEM127
FEM128
FEM092
CYLINDER BLOCKZD
EM-1081
Page 820 of 1033
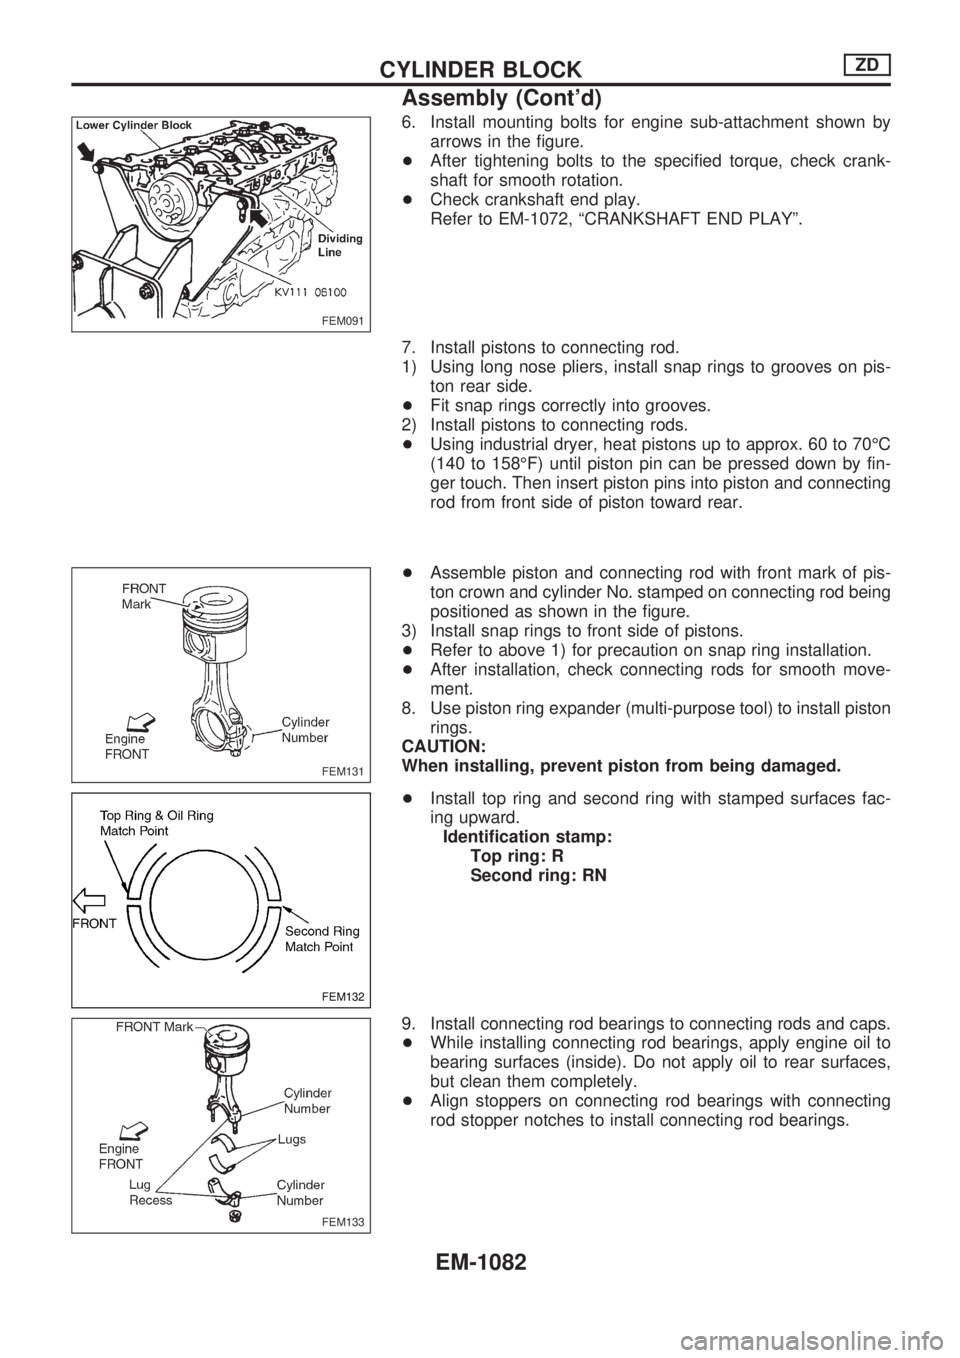
6. Install mounting bolts for engine sub-attachment shown by
arrows in the figure.
+After tightening bolts to the specified torque, check crank-
shaft for smooth rotation.
+Check crankshaft end play.
Refer to EM-1072, ªCRANKSHAFT END PLAYº.
7. Install pistons to connecting rod.
1) Using long nose pliers, install snap rings to grooves on pis-
ton rear side.
+Fit snap rings correctly into grooves.
2) Install pistons to connecting rods.
+Using industrial dryer, heat pistons up to approx. 60 to 70ÉC
(140 to 158ÉF) until piston pin can be pressed down by fin-
ger touch. Then insert piston pins into piston and connecting
rod from front side of piston toward rear.
+Assemble piston and connecting rod with front mark of pis-
ton crown and cylinder No. stamped on connecting rod being
positioned as shown in the figure.
3) Install snap rings to front side of pistons.
+Refer to above 1) for precaution on snap ring installation.
+After installation, check connecting rods for smooth move-
ment.
8. Use piston ring expander (multi-purpose tool) to install piston
rings.
CAUTION:
When installing, prevent piston from being damaged.
+Install top ring and second ring with stamped surfaces fac-
ing upward.
Identification stamp:
Top ring: R
Second ring: RN
9. Install connecting rod bearings to connecting rods and caps.
+While installing connecting rod bearings, apply engine oil to
bearing surfaces (inside). Do not apply oil to rear surfaces,
but clean them completely.
+Align stoppers on connecting rod bearings with connecting
rod stopper notches to install connecting rod bearings.
FEM091
FEM131
FEM132
FEM133
CYLINDER BLOCKZD
Assembly (Cont'd)
EM-1082