Release Bonnet NISSAN QASHQAI 2016 Owner´s Manual
[x] Cancel search | Manufacturer: NISSAN, Model Year: 2016, Model line: QASHQAI, Model: NISSAN QASHQAI 2016Pages: 338, PDF Size: 4.87 MB
Page 247 of 338
In case of a flat tyre, follow the instructions as de-
scribed below:
STOPPING THE VEHICLE
WARNING
•Make sure that the parking brake is securely
applied.
•For Manual Transmission (MT) models: Make
sure the shift lever is in the R (Reverse) posi-
tion.
For XTRONIC models: Make sure that the shift
lever is in the P (Park) position.
•Never change tyres when the vehicle is on a
slope, ice or a slippery area. This is hazard-
ous.
•Never change tyres if oncoming traffic is close
to your vehicle. Wait for professional road as-
sistance.
1. Safely move the vehicle off the road, away from
traffic.
2. Switch on the hazard warning flashers.
3. Park on a level surface.
4. Apply the parking brake.
5. Shift the shift lever (MT models) into the R (Re-
verse) position [XTRONIC models, move the shift
lever to the P (Park) position].
6. Turn off the engine.7. Open the bonnet (for details, see “Bonnet
release” in the “3. Pre-driving checks and
adjustments” section) in order to:
•Warn other traffic.
•Signal to professional road assistance that
you require assistance.
8. Have all passengers exit the vehicle and stand in
a safe place, away from traffic and clear of the
vehicle.
CHANGING FLAT TYRE (Models with
spare wheel, where fitted)
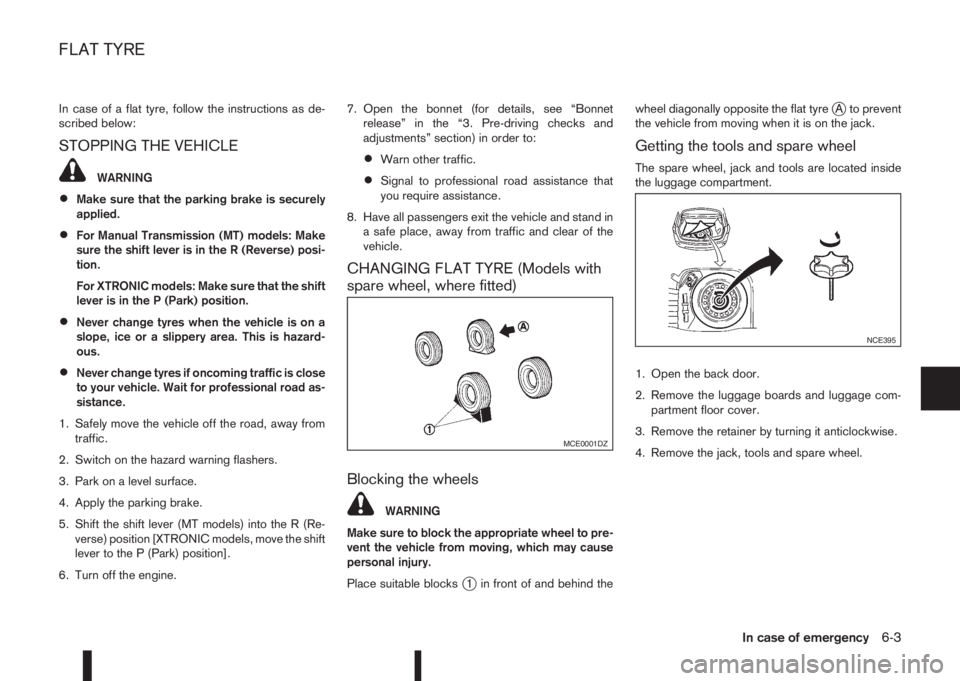
Blocking the wheels
WARNING
Make sure to block the appropriate wheel to pre-
vent the vehicle from moving, which may cause
personal injury.
Place suitable blocks
j1 in front of and behind thewheel diagonally opposite the flat tyre
jA to prevent
the vehicle from moving when it is on the jack.
Getting the tools and spare wheel
The spare wheel, jack and tools are located inside
the luggage compartment.
1. Open the back door.
2. Remove the luggage boards and luggage com-
partment floor cover.
3. Remove the retainer by turning it anticlockwise.
4. Remove the jack, tools and spare wheel.
MCE0001DZ
NCE395
FLAT TYRE
In case of emergency6-3
Page 256 of 338
4. Switch off all unnecessary electrical systems
(headlights, hazard lights etc,).
5. Ensure that the ignition switch of the vehicle be-
ing jump-started is in the LOCK position.
6. Open the bonnet. For details, see “Bonnet
release” in the “3. Pre-driving checks and
adjustments” section.
7. Remove the vent caps (where fitted) on the bat-
tery and cover the battery with an old cloth.
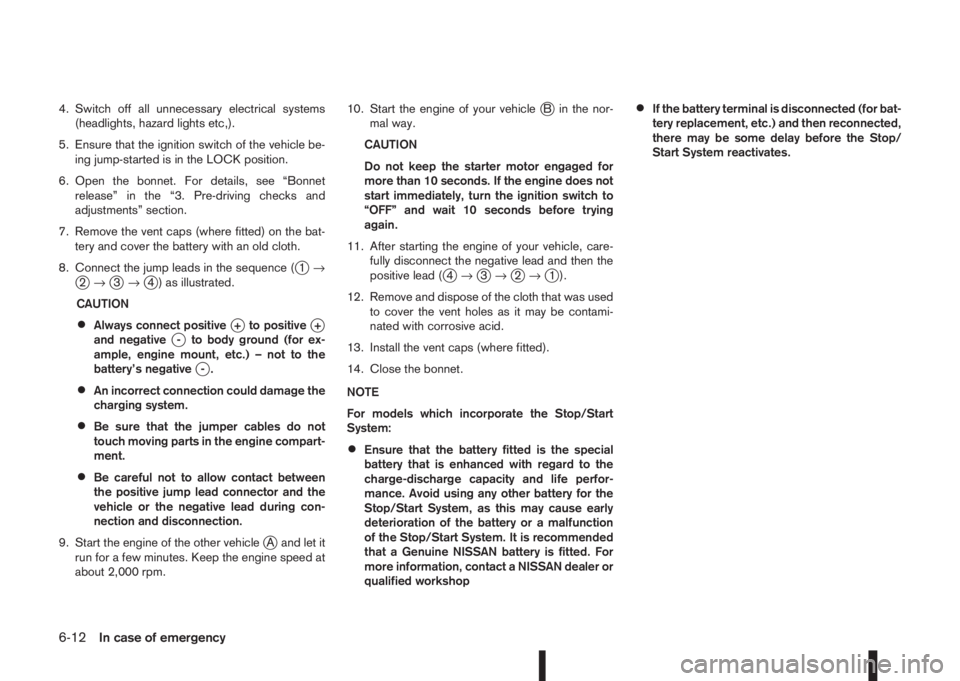
8. Connect the jump leads in the sequence (
j1→j2→j3→j4 ) as illustrated.
CAUTION
•Always connect positivej+ to positivej+
and negativej- to body ground (for ex-
ample, engine mount, etc.) – not to the
battery’s negative
j-.
•An incorrect connection could damage the
charging system.
•Be sure that the jumper cables do not
touch moving parts in the engine compart-
ment.
•Be careful not to allow contact between
the positive jump lead connector and the
vehicle or the negative lead during con-
nection and disconnection.
9. Start the engine of the other vehicle
jA and let it
run for a few minutes. Keep the engine speed at
about 2,000 rpm.10. Start the engine of your vehicle
jB in the nor-
mal way.
CAUTION
Do not keep the starter motor engaged for
more than 10 seconds. If the engine does not
start immediately, turn the ignition switch to
“OFF” and wait 10 seconds before trying
again.
11. After starting the engine of your vehicle, care-
fully disconnect the negative lead and then the
positive lead (
j4→j3→j2→j1).
12. Remove and dispose of the cloth that was used
to cover the vent holes as it may be contami-
nated with corrosive acid.
13. Install the vent caps (where fitted).
14. Close the bonnet.
NOTE
For models which incorporate the Stop/Start
System:
•Ensure that the battery fitted is the special
battery that is enhanced with regard to the
charge-discharge capacity and life perfor-
mance. Avoid using any other battery for the
Stop/Start System, as this may cause early
deterioration of the battery or a malfunction
of the Stop/Start System. It is recommended
that a Genuine NISSAN battery is fitted. For
more information, contact a NISSAN dealer or
qualified workshop
•If the battery terminal is disconnected (for bat-
tery replacement, etc.) and then reconnected,
there may be some delay before the Stop/
Start System reactivates.
6-12In case of emergency
Page 257 of 338
CAUTION
•Three-way catalyst equipped models (where
fitted) should not be started by pushing the
vehicle as the three-way catalyst may be dam-
aged.
•XTRONIC transmission (CVT) models cannot
be started by pushing the vehicle. This may
cause transmission damage.
•Never try to start the vehicle by towing it; when
the engine starts, the forward surge could
cause the vehicle to collide with the tow ve-
hicle.
WARNING
•Never continue driving if the engine of your
vehicle overheats. Doing so could cause a ve-
hicle fire.
•Never open the bonnet if steam is coming
out.
•Never remove engine coolant reservoir cap
when the engine is hot. If the engine coolant
reservoir cap is removed while the engine is
hot, pressurised hot water will spurt out and
possibly cause burning, scalding or serious
injury.
•If steam or coolant is coming out of the en-
gine, stand clear of the vehicle to prevent get-
ting injured.
•The engine cooling fan will start whenever the
coolant temperature exceeds preset degrees.
•Be careful not to allow your hands, hair, jewel-
lery or clothing to come into contact with, or
get caught in, the cooling fan or drive belts.
If the engine of your vehicle is overheating (indi-
cated by the engine coolant temperature gauge) or
if you feel a lack of engine power, detect unusual
noise, etc., proceed as follows:
1. Move and park the vehicle safely off the road and
away from traffic.
2. Turn on the hazard warning flasher lights.
3. Apply the parking brake.4. Shift the shift lever (MT models) into the N (Neu-
tral) position, XTRONIC transmission (CVT)
models: move the shift lever to the P (Park) posi-
tion.
DO NOT STOP THE ENGINE.
5. Open all windows.
6. Switch off the air conditioner system (where fit-
ted).
7. Set the heater or air conditioner temperature
control to maximum “HOT” and fan speed con-
trol to maximum speed.
8. Exit the vehicle.
9. Visually inspect and listen for steam or coolant
escaping from the radiator before opening the
bonnet. Wait until no steam or coolant can be
seen before proceeding.
10. Open the bonnet. For details, see “Bonnet
release” in the “3. Pre-driving checks and
adjustments” section.
11. Visually check if the cooling fan is running.
12. Visually check the radiator and radiator hoses
for leakage.
WARNING
If coolant is leaking, the cooling fan belt is
missing or loose or the cooling fan is not run-
ning, stop the engine.
PUSH-STARTING ENGINE OVERHEAT
In case of emergency6-13
Page 258 of 338
13. After the engine cools down, check the coolant
level in the engine coolant reservoir with the
engine running.
14. If the level is low, remove the engine coolant
reservoir cap and add coolant slowly into the
reservoir. After refilling the reservoir to the MAX
level, install the reservoir cap.
WARNING
Before removing the engine coolant reservoir
cap and to avoid the danger of being scalded,
cover the reservoir cap with a rag and loosen
the reservoir cap to the first notch to allow the
steam to escape.
15. Close the bonnet.
Have your vehicle inspected or repaired by a
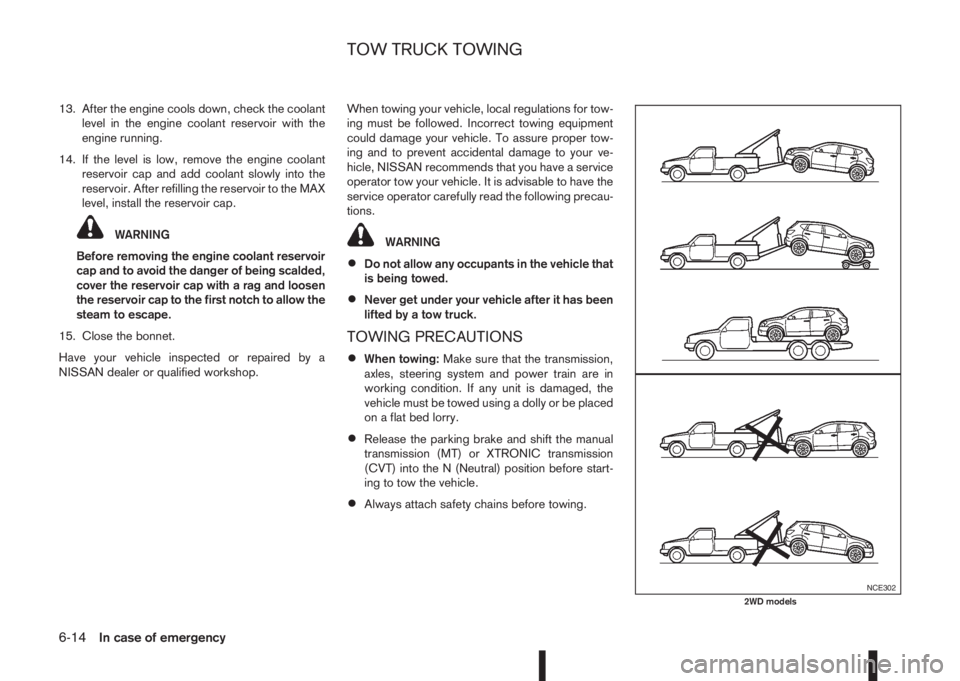
NISSAN dealer or qualified workshop.When towing your vehicle, local regulations for tow-
ing must be followed. Incorrect towing equipment
could damage your vehicle. To assure proper tow-
ing and to prevent accidental damage to your ve-
hicle, NISSAN recommends that you have a service
operator tow your vehicle. It is advisable to have the
service operator carefully read the following precau-
tions.WARNING
•Do not allow any occupants in the vehicle that
is being towed.
•Never get under your vehicle after it has been
lifted by a tow truck.
TOWING PRECAUTIONS
•When towing:Make sure that the transmission,
axles, steering system and power train are in
working condition. If any unit is damaged, the
vehicle must be towed using a dolly or be placed
on a flat bed lorry.
•Release the parking brake and shift the manual
transmission (MT) or XTRONIC transmission
(CVT) into the N (Neutral) position before start-
ing to tow the vehicle.
•Always attach safety chains before towing.
NCE3022WD models
TOW TRUCK TOWING
6-14In case of emergency
Page 270 of 338
Some day-to-day and regular maintenance is essen-
tial to maintain your NISSAN’s good mechanical
condition, as well as its emission and engine perfor-
mance.
It is the owner’s responsibility to make sure that the
specified maintenance, as well as general mainte-
nance, is performed.
As the vehicle owner, you are the only one who can
ensure that your vehicle receives the proper mainte-
nance care.
SCHEDULED MAINTENANCE
For your convenience, the required scheduled main-
tenance items are described and listed in the sepa-
rate Warranty Information and Maintenance book-
let. You must refer to that booklet to ensure that
necessary maintenance is performed on your
NISSAN vehicle at regular intervals.
GENERAL MAINTENANCE
General maintenance includes those items which
should be checked during normal day-to-day opera-
tion of the vehicle. They are essential if your vehicle
is to continue to operate properly. It is your respon-
sibility to perform these procedures regularly as pre-
scribed.
Performing general maintenance checks requires
minimal mechanical skill and a few general automo-
tive tools.
These checks or inspections can be done by your-
self, a qualified technician or, if you prefer, your
NISSAN dealer or qualified workshop.
WHERE TO GO FOR SERVICE
If maintenance service is required or your vehicle
appears to malfunction, have the systems checked
and tuned by an authorised NISSAN dealer or quali-
fied workshop.During the normal day-to-day operation of the ve-
hicle, general maintenance should be performed
regularly as prescribed in this section. If you detect
any unusual sounds, vibrations or smell, be sure to
check for the cause or have a NISSAN dealer or
qualified workshop do it promptly. In addition, you
should notify a NISSAN dealer or qualified work-
shop if repairs are required.
When performing any checks or maintenance work,
closely observe the “Maintenance precautions” later
in this section.
EXPLANATION OF GENERAL
MAINTENANCE ITEMS
Additional information on the following items with
an asterisk (*) is found later in this section.
The maintenance items listed here should be per-
formed from time to time, unless otherwise speci-
fied.
Outside the vehicle
Back door, doors and bonnet:
Check that the back door, all doors and the bonnet
operate properly. Also ensure that all latches lock
securely. Lubricate hinges and latches if necessary.
Make sure that the secondary latch keeps the bon-
net from opening when the primary latch is released.
When driving in areas using road salt or other cor-
rosive materials, check for lubrication frequently.
MAINTENANCE REQUIREMENTS GENERAL MAINTENANCE
8-2Maintenance and do-it-yourself
Page 275 of 338
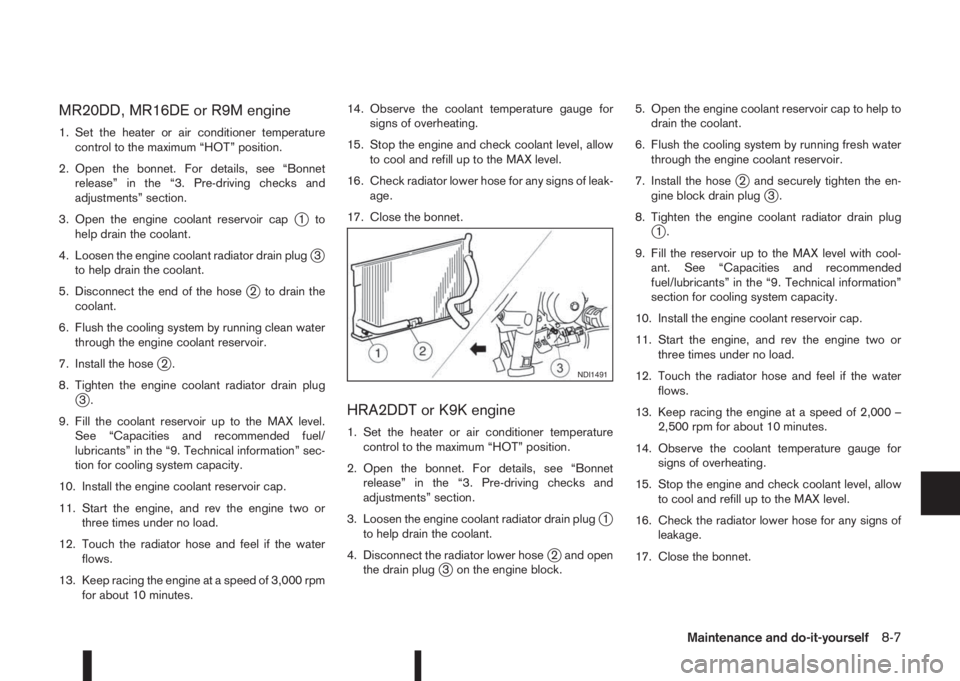
MR20DD, MR16DE or R9M engine
1. Set the heater or air conditioner temperature
control to the maximum “HOT” position.
2. Open the bonnet. For details, see “Bonnet
release” in the “3. Pre-driving checks and
adjustments” section.
3. Open the engine coolant reservoir cap
j1to
help drain the coolant.
4. Loosen the engine coolant radiator drain plug
j3
to help drain the coolant.
5. Disconnect the end of the hose
j2 to drain the
coolant.
6. Flush the cooling system by running clean water
through the engine coolant reservoir.
7. Install the hose
j2.
8. Tighten the engine coolant radiator drain plug
j3.
9. Fill the coolant reservoir up to the MAX level.
See “Capacities and recommended fuel/
lubricants” in the “9. Technical information” sec-
tion for cooling system capacity.
10. Install the engine coolant reservoir cap.
11. Start the engine, and rev the engine two or
three times under no load.
12. Touch the radiator hose and feel if the water
flows.
13. Keep racing the engine at a speed of 3,000 rpm
for about 10 minutes.14. Observe the coolant temperature gauge for
signs of overheating.
15. Stop the engine and check coolant level, allow
to cool and refill up to the MAX level.
16. Check radiator lower hose for any signs of leak-
age.
17. Close the bonnet.HRA2DDT or K9K engine
1. Set the heater or air conditioner temperature
control to the maximum “HOT” position.
2. Open the bonnet. For details, see “Bonnet
release” in the “3. Pre-driving checks and
adjustments” section.
3. Loosen the engine coolant radiator drain plug
j1
to help drain the coolant.
4. Disconnect the radiator lower hose
j2 and open
the drain plugj3 on the engine block.5. Open the engine coolant reservoir cap to help to
drain the coolant.
6. Flush the cooling system by running fresh water
through the engine coolant reservoir.
7. Install the hose
j2 and securely tighten the en-
gine block drain plugj3.
8. Tighten the engine coolant radiator drain plug
j1.
9. Fill the reservoir up to the MAX level with cool-
ant. See “Capacities and recommended
fuel/lubricants” in the “9. Technical information”
section for cooling system capacity.
10. Install the engine coolant reservoir cap.
11. Start the engine, and rev the engine two or
three times under no load.
12. Touch the radiator hose and feel if the water
flows.
13. Keep racing the engine at a speed of 2,000 –
2,500 rpm for about 10 minutes.
14. Observe the coolant temperature gauge for
signs of overheating.
15. Stop the engine and check coolant level, allow
to cool and refill up to the MAX level.
16. Check the radiator lower hose for any signs of
leakage.
17. Close the bonnet.
NDI1491
Maintenance and do-it-yourself8-7
Page 277 of 338
5. Open the bonnet. For details, see “Bonnet
release” in the “3. Pre-driving checks and
adjustments” section.
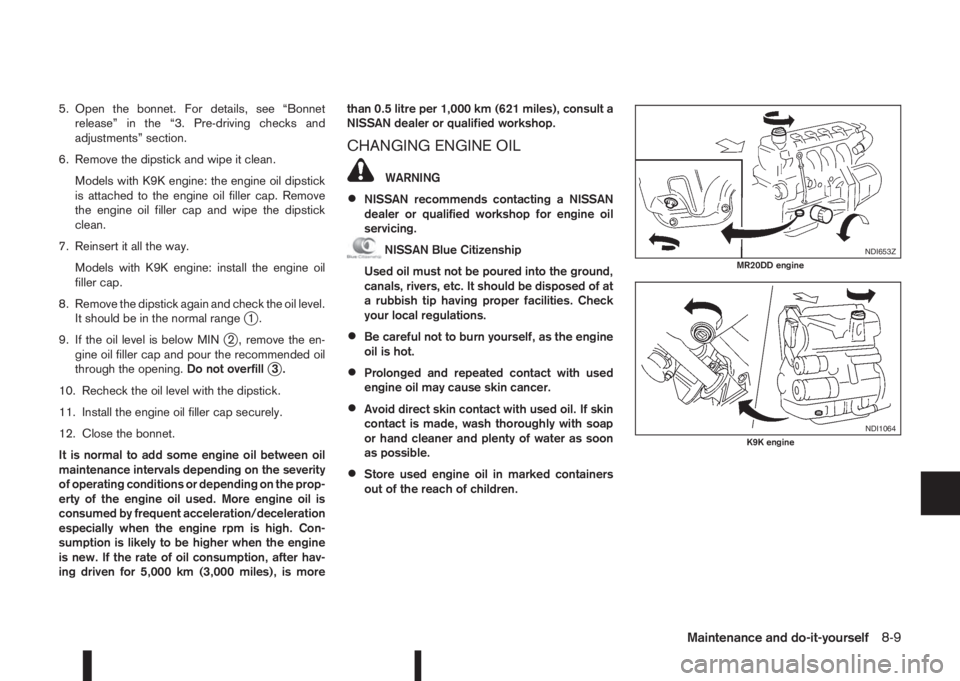
6. Remove the dipstick and wipe it clean.
Models with K9K engine: the engine oil dipstick
is attached to the engine oil filler cap. Remove
the engine oil filler cap and wipe the dipstick
clean.
7. Reinsert it all the way.
Models with K9K engine: install the engine oil
filler cap.
8. Remove the dipstick again and check the oil level.
It should be in the normal range
j1.
9. If the oil level is below MIN
j2 , remove the en-
gine oil filler cap and pour the recommended oil
through the opening.Do not overfill
j3.
10. Recheck the oil level with the dipstick.
11. Install the engine oil filler cap securely.
12. Close the bonnet.
It is normal to add some engine oil between oil
maintenance intervals depending on the severity
of operating conditions or depending on the prop-
erty of the engine oil used. More engine oil is
consumed by frequent acceleration/deceleration
especially when the engine rpm is high. Con-
sumption is likely to be higher when the engine
is new. If the rate of oil consumption, after hav-
ing driven for 5,000 km (3,000 miles), is morethan 0.5 litre per 1,000 km (621 miles), consult a
NISSAN dealer or qualified workshop.
CHANGING ENGINE OIL
WARNING
•NISSAN recommends contacting a NISSAN
dealer or qualified workshop for engine oil
servicing.
NISSAN Blue Citizenship
Used oil must not be poured into the ground,
canals, rivers, etc. It should be disposed of at
a rubbish tip having proper facilities. Check
your local regulations.
•Be careful not to burn yourself, as the engine
oil is hot.
•Prolonged and repeated contact with used
engine oil may cause skin cancer.
•Avoid direct skin contact with used oil. If skin
contact is made, wash thoroughly with soap
or hand cleaner and plenty of water as soon
as possible.
•Store used engine oil in marked containers
out of the reach of children.
NDI653ZMR20DD engine
NDI1064K9K engine
Maintenance and do-it-yourself8-9
Page 278 of 338
1. Park the vehicle on a level surface and apply the
parking brake.
2. Start the engine. If the engine is cold, start and
let the engine idle until the engine temperature
reaches the operational temperature.
3. Turn the engine off and wait at least 10 minutes
to let the engine oil drain back into the oil pan.4. Open the bonnet. For details, see “Bonnet
release” in the “3. Pre-driving checks and
adjustments” section.
5. Remove the engine oil filler cap.
6. Raise and support the vehicle using a suitable
floor jack and safety jack stands.
Place the safety jack stands under the vehicle
jack-up points.
For details, see “Flat tyre” in the “6. In case of
emergency” section.
7. Remove the engine compartment under cover.
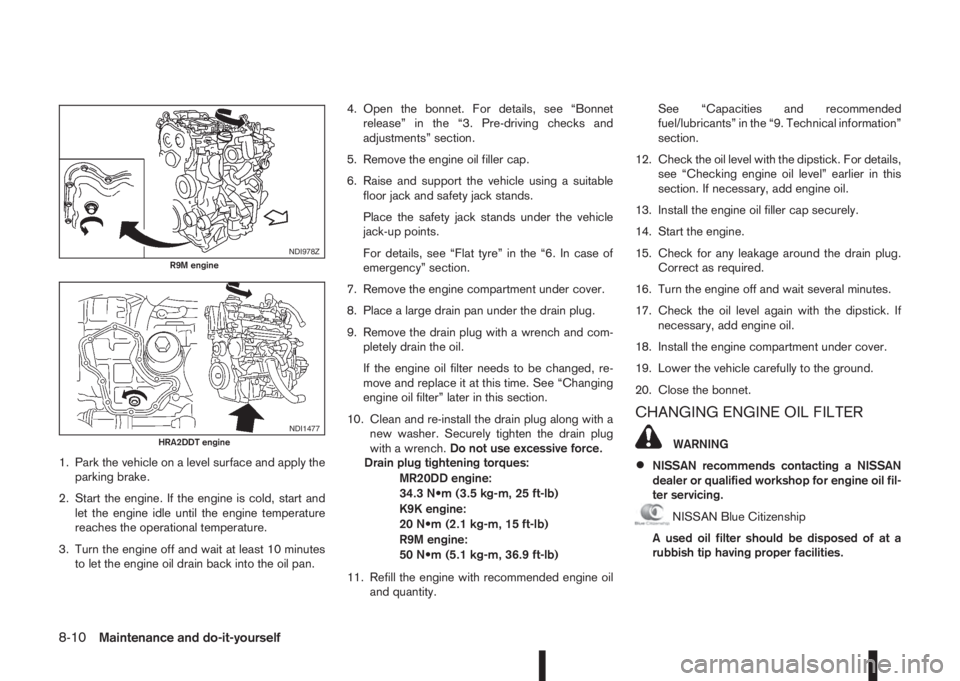
8. Place a large drain pan under the drain plug.
9. Remove the drain plug with a wrench and com-
pletely drain the oil.
If the engine oil filter needs to be changed, re-
move and replace it at this time. See “Changing
engine oil filter” later in this section.
10. Clean and re-install the drain plug along with a
new washer. Securely tighten the drain plug
with a wrench.Do not use excessive force.
Drain plug tightening torques:
MR20DD engine:
34.3 N•m (3.5 kg-m, 25 ft-lb)
K9K engine:
20 N•m (2.1 kg-m, 15 ft-lb)
R9M engine:
50 N•m (5.1 kg-m, 36.9 ft-lb)
11. Refill the engine with recommended engine oil
and quantity.See “Capacities and recommended
fuel/lubricants” in the “9. Technical information”
section.
12. Check the oil level with the dipstick. For details,
see “Checking engine oil level” earlier in this
section. If necessary, add engine oil.
13. Install the engine oil filler cap securely.
14. Start the engine.
15. Check for any leakage around the drain plug.
Correct as required.
16. Turn the engine off and wait several minutes.
17. Check the oil level again with the dipstick. If
necessary, add engine oil.
18. Install the engine compartment under cover.
19. Lower the vehicle carefully to the ground.
20. Close the bonnet.
CHANGING ENGINE OIL FILTER
WARNING
•NISSAN recommends contacting a NISSAN
dealer or qualified workshop for engine oil fil-
ter servicing.
NISSAN Blue Citizenship
A used oil filter should be disposed of at a
rubbish tip having proper facilities.
NDI978ZR9M engine
NDI1477HRA2DDT engine
8-10Maintenance and do-it-yourself
Page 295 of 338
1. Make sure the ignition switch and the headlight
switch are in the “OFF” position.
2. Open the bonnet. For details, see “Bonnet
release” in the “3. Pre-driving checks and
adjustments” section.
3. Remove the air duct, see “Air duct removal” ear-
lier in this section.
4. Remove the fusible link covers.
5. Locate the fuse that needs to be replaced.
6. Remove the fuse with the fuse puller (where fit-
ted). The fuse puller is located in the fuse box of
the passenger compartment.
7. If the fuse is open
jA , replace it with a new fusejB.
8. Install the fusible link covers.
9. Install the air duct in the reverse order of re-
moval.
10. Close the bonnet.
NOTE
If the new fuse opens again, after installing,
have the electrical system checked and re-
paired by a NISSAN dealer or qualified work-
shop.
NDI1493
LIGHTS
Maintenance and do-it-yourself8-27
Page 296 of 338
HEADLIGHTS
LED headlight (where fitted)
The LED headlight is a projector style which uses a
LED module without serviceable parts.
CAUTION
•To prevent an electric shock, never attempt to
modify or disassemble the LED headlights as-
sembly.
•If replacement is required, contact a NISSAN
dealer or qualified workshop.
Replacing the halogen headlight bulb
CAUTION
•High pressure halogen gas is sealed inside
the halogen bulb. The bulb may break if the
glass envelope is scratched or the bulb is
dropped.
•When handling the bulb, DO NOT TOUCH THE
GLASS ENVELOPE.
•Use the same number type and wattage as
originally installed.
•Aiming is usually not necessary after replac-
ing the bulb. When aiming adjustment is nec-
essary, contact a NISSAN dealer or qualified
workshop.
•Do not leave the bulb out of the headlight
reflector for a long period of time as dust,moisture or smoke may enter the headlight
body and affect the performance of the head-
light.
The headlight is a semi-sealed beam type which
uses a replaceable headlight (halogen) bulb. A bulb
can be replaced from inside the engine compart-
ment without removing the headlight assembly.
Contact a NISSAN dealer or qualified workshop, if
you need assistance for bulb replacement.
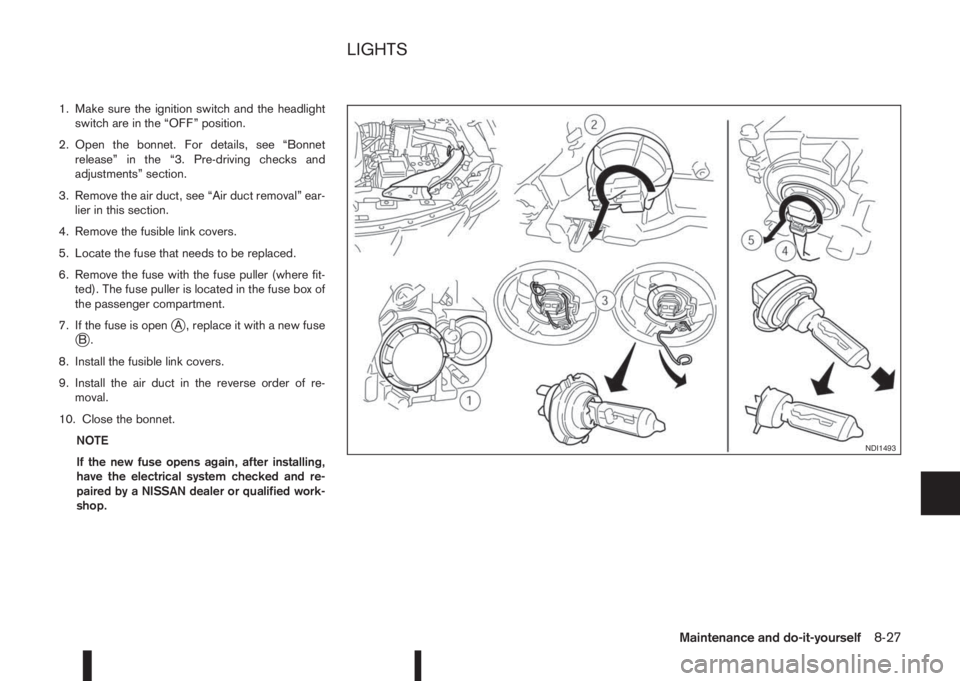
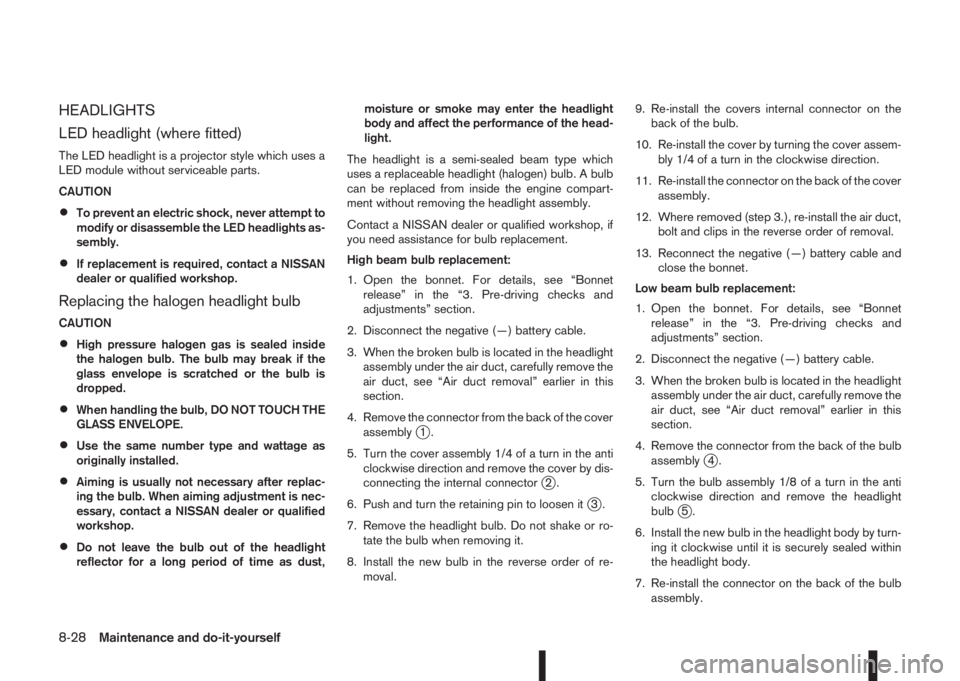
High beam bulb replacement:
1. Open the bonnet. For details, see “Bonnet
release” in the “3. Pre-driving checks and
adjustments” section.
2. Disconnect the negative (—) battery cable.
3. When the broken bulb is located in the headlight
assembly under the air duct, carefully remove the
air duct, see “Air duct removal” earlier in this
section.
4. Remove the connector from the back of the cover
assembly
j1.
5. Turn the cover assembly 1/4 of a turn in the anti
clockwise direction and remove the cover by dis-
connecting the internal connector
j2.
6. Push and turn the retaining pin to loosen it
j3.
7. Remove the headlight bulb. Do not shake or ro-
tate the bulb when removing it.
8. Install the new bulb in the reverse order of re-
moval.9. Re-install the covers internal connector on the
back of the bulb.
10. Re-install the cover by turning the cover assem-
bly 1/4 of a turn in the clockwise direction.
11. Re-install the connector on the back of the cover
assembly.
12. Where removed (step 3.), re-install the air duct,
bolt and clips in the reverse order of removal.
13. Reconnect the negative (—) battery cable and
close the bonnet.
Low beam bulb replacement:
1. Open the bonnet. For details, see “Bonnet
release” in the “3. Pre-driving checks and
adjustments” section.
2. Disconnect the negative (—) battery cable.
3. When the broken bulb is located in the headlight
assembly under the air duct, carefully remove the
air duct, see “Air duct removal” earlier in this
section.
4. Remove the connector from the back of the bulb
assembly
j4.
5. Turn the bulb assembly 1/8 of a turn in the anti
clockwise direction and remove the headlight
bulb
j5.
6. Install the new bulb in the headlight body by turn-
ing it clockwise until it is securely sealed within
the headlight body.
7. Re-install the connector on the back of the bulb
assembly.
8-28Maintenance and do-it-yourself