stop start NISSAN ROGUE SELECT 2015 2.G Owners Manual
[x] Cancel search | Manufacturer: NISSAN, Model Year: 2015, Model line: ROGUE SELECT, Model: NISSAN ROGUE SELECT 2015 2.GPages: 322, PDF Size: 2.21 MB
Page 86 of 322
function is turned off. The brake system then
operates normally, but without anti-lock assis-
tance. (See “Brake system” (P.5-25).)
Brake warning light
This light functions for both the parking brake
and the foot brake systems.
Parking brake indicator:
When the ignition switch is in the ON position,
the light illuminates when the parking brake is
applied.
Low brake fluid warning light:
When the ignition switch is in the ON position,
the light warns of a low brake fluid level. If the
light illuminates while the engine is running with
the parking brake not applied, stop the vehicle
and perform the following:
1. Check the brake fluid level. Add brake fluidas necessary. (See “Brake fluid” (P.8-11) .)
2. If the brake fluid level is correct, have the warning system checked by a NISSAN
dealer.
Anti-lock Braking System (ABS) warning
indicator:
When the parking brake is released and the
brake fluid level is sufficient, if both the brake
warning light and the Anti-lock Braking System (ABS) warning light illuminate, it may indicate
the ABS is not functioning properly. Have the
brake system checked, and if necessary re-
paired, by a NISSAN dealer promptly. (See
“Anti-lock Braking System (ABS) warning light”
(P.2-10) .)
WARNING
.
Your brake system may not be
working properly if the warning light
is on. Driving could be dangerous. If
you judge it to be safe, drive care-
fully to the nearest service station
for repairs. Otherwise, have your
vehicle towed because driving it
could be dangerous.
. Pressing the brake pedal with the
engine stopped and/or low brake
fluid level may increase your stop-
ping distance and braking will re-
quire greater pedal effort as well as
pedal travel.
. If the brake fluid level is below the
minimum or MIN mark on the brake
fluid reservoir, do not drive until the
brake system has been checked at a
NISSAN dealer.
Charge warning light
If the light illuminates while the engine is running,
it may indicate the charging system is not
functioning properly. Turn the engine off and
check the alternator belt. If the belt is loose,
broken, missing or if the light remains on, see a
NISSAN dealer immediately.
CAUTION
Do not continue driving if the alternator
belt is loose, broken or missing.
Electric power steering warning
light
When the ignition switch is in the ON position,
the electric power steering warning light illumi-
nates. After starting the engine, the electric
power steering warning light turns off. This
indicates the electric power steering system is
operational.
If the electric power steering warning light
illuminates while the engine is running, it may
indicate the electric power steering system is
not functioning properly and may need servicing.
Have the electric power steering system
checked by a NISSAN dealer.
Instruments and controls2-11
Page 101 of 322
2-26Instruments and controls
alarm will activate.)
How to stop an activated alarm
The alarm will stop by unlocking a door by
pushing the unlock buttonon the key fob, or
using the key. The alarm will not stop if the
ignition switch is turned to the ACC or ON
position.
If the system does not operate as de-
scribed above, have it checked by a
NISSAN dealer.
NISSAN VEHICLE IMMOBILIZER SYS-
TEM
The NISSAN Vehicle Immobilizer System will not
allow the engine to start without the use of the
registered key.
If the engine fails to start using the registered
key, it may be due to interference caused by
another registered key, an automated toll road
device or automated payment device on the key
ring. Restart the engine using the following
procedures:
1. Leave the ignition switch in the ON position for approximately 5 seconds.
2. Turn the ignition switch to the OFF or LOCK position and wait approximately 10 seconds.
3. Repeat step 1 and 2 again. 4. Restart the engine while holding the device
(which may have caused the interference)
separate from the registered key.
If this procedure allows the engine to start,
NISSAN recommends placing the regis-
tered key on a separate key ring to avoid
interference from other devices.
Statement related to section 15 of FCC
rules for NISSAN Vehicle Immobilizer
System (CONT ASSY-BCM. ANT ASSY-
IMMOBILISER)
FCC Notice:
This device complies with Part 15 of the
FCC Rules. Operation is subject to the
following two conditions: (1) This device
may not cause harmful interference, and
(2) this device must accept any interfer-
ence received, including interference that
may cause undesired operation.
NOTE:
Changes or modifications not expressly
approved by the party responsible for
compliance could void the user’s authority
to operate the equipment.SIC2045
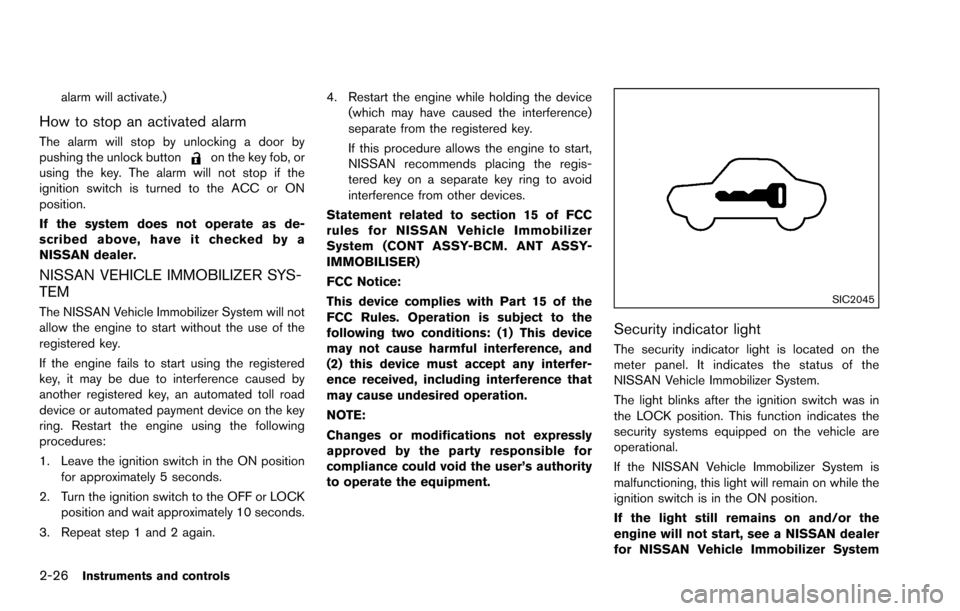
Security indicator light
The security indicator light is located on the
meter panel. It indicates the status of the
NISSAN Vehicle Immobilizer System.
The light blinks after the ignition switch was in
the LOCK position. This function indicates the
security systems equipped on the vehicle are
operational.
If the NISSAN Vehicle Immobilizer System is
malfunctioning, this light will remain on while the
ignition switch is in the ON position.
If the light still remains on and/or the
engine will not start, see a NISSAN dealer
for NISSAN Vehicle Immobilizer System
Page 130 of 322
SPA2415
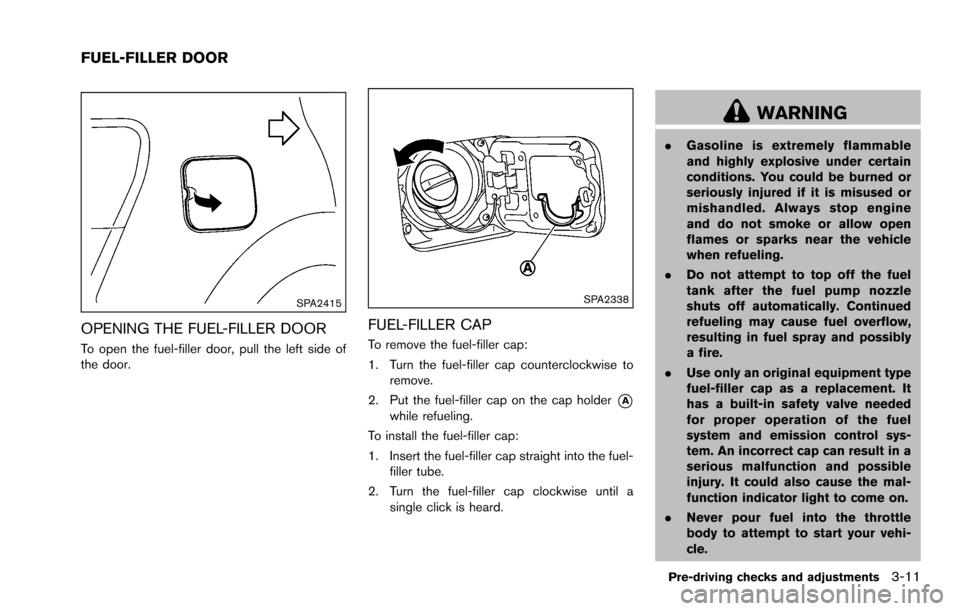
OPENING THE FUEL-FILLER DOOR
To open the fuel-filler door, pull the left side of
the door.
SPA2338
FUEL-FILLER CAP
To remove the fuel-filler cap:
1. Turn the fuel-filler cap counterclockwise toremove.
2. Put the fuel-filler cap on the cap holder
*Awhile refueling.
To install the fuel-filler cap:
1. Insert the fuel-filler cap straight into the fuel- filler tube.
2. Turn the fuel-filler cap clockwise until a single click is heard.
WARNING
.Gasoline is extremely flammable
and highly explosive under certain
conditions. You could be burned or
seriously injured if it is misused or
mishandled. Always stop engine
and do not smoke or allow open
flames or sparks near the vehicle
when refueling.
. Do not attempt to top off the fuel
tank after the fuel pump nozzle
shuts off automatically. Continued
refueling may cause fuel overflow,
resulting in fuel spray and possibly
a fire.
. Use only an original equipment type
fuel-filler cap as a replacement. It
has a built-in safety valve needed
for proper operation of the fuel
system and emission control sys-
tem. An incorrect cap can result in a
serious malfunction and possible
injury. It could also cause the mal-
function indicator light to come on.
. Never pour fuel into the throttle
body to attempt to start your vehi-
cle.
Pre-driving checks and adjustments3-11
FUEL-FILLER DOOR
Page 158 of 322
setting.
AUDIO button:
Push the AUDIO button to change the selecting
mode as follows.
Push the TUNE (,) or SEEK (,)
button to adjust Bass and Treble to the desired
level. Use the TUNE or SEEK button also to
adjust Fade or Balance modes. Fade adjusts the
sound level between the front and rear speakers
and Balance adjusts the sound between the
right and left speakers.
To turn the beep sound off or on, push the TUNE
or SEEK button until the desired mode is
displayed. This turns on or off the beep sound
when audio buttons are pushed.
To change the Speed Sensitive Volume (Spd
Sen Vol) mode to OFF, LOW, MID or HIGH,
push the TUNE or SEEK button until the desired
mode is displayed.
Once you have adjusted the sound quality to the
desired level, push the AUDIO button repeatedly
until the normal mode display reappears. Other-
wise, the normal mode display will automatically
reappear after approximately several seconds.
CLOCK button:
Push the CLOCK button to turn on or off the
CLOCK display.
Adjust the clock according to the following
procedure.
1. Push and hold the CLOCK button until the clock display starts to flash.
2. Push the SEEK/TRACK button to adjust the hours.
3. Push the TUNE/FF·REW FOLDER button to adjust the minutes.
4. Push the CLOCK button again or the DISP/ TEXT button to exit the clock set mode.
The display will return to the regular clock
display after several seconds.
Radio operation
Radio (FM/AM) band select:
Pushing the FM·AM radio band select button will
change the band as follows:
AM ?FM1 ?FM2 ?AM
When the stereo broadcast signal is weak, the
radio will automatically change from stereo to
monaural reception.
When the radio band select button is pushed
while the ignition switch is in the ACC or ON position, the radio will come on at the station last
played.
TUNE (Tuning):
Push the
orbutton for manual tuning.
To move quickly through the stations, push and
hold the TUNE button.
SEEK tuning:
Push the
orbutton to tune from low to
high or high to low frequencies and to stop at
the next broadcasting station.
SCAN tuning:
Push the SCAN/RPT button to tune from low to
high frequencies and stops at each broad-
casting station for 5 seconds. Pushing the
button again during this 5 seconds period will
stop SCAN tuning and the radio will remain
tuned to that station.
If the SCAN/RPT button is not pushed within 5
seconds, SCAN tuning moves to the next
station.
toStation memory operations:
12 stations can be set for the FM band (6 each
for FM1 and FM2) , and 6 can be set for the AM
band for easy access.
Heater, air conditioner, audio, phone and voice recognition systems4-23
Page 160 of 322
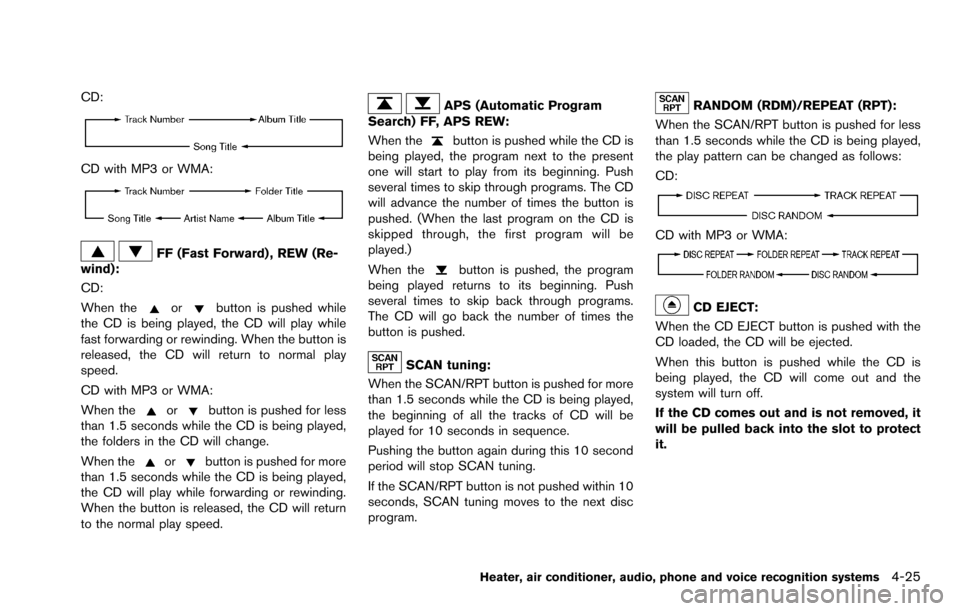
CD:
CD with MP3 or WMA:
FF (Fast Forward) , REW (Re-
wind):
CD:
When the
orbutton is pushed while
the CD is being played, the CD will play while
fast forwarding or rewinding. When the button is
released, the CD will return to normal play
speed.
CD with MP3 or WMA:
When the
orbutton is pushed for less
than 1.5 seconds while the CD is being played,
the folders in the CD will change.
When the
orbutton is pushed for more
than 1.5 seconds while the CD is being played,
the CD will play while forwarding or rewinding.
When the button is released, the CD will return
to the normal play speed.
APS (Automatic Program
Search) FF, APS REW:
When the
button is pushed while the CD is
being played, the program next to the present
one will start to play from its beginning. Push
several times to skip through programs. The CD
will advance the number of times the button is
pushed. (When the last program on the CD is
skipped through, the first program will be
played.)
When the
button is pushed, the program
being played returns to its beginning. Push
several times to skip back through programs.
The CD will go back the number of times the
button is pushed.
SCAN tuning:
When the SCAN/RPT button is pushed for more
than 1.5 seconds while the CD is being played,
the beginning of all the tracks of CD will be
played for 10 seconds in sequence.
Pushing the button again during this 10 second
period will stop SCAN tuning.
If the SCAN/RPT button is not pushed within 10
seconds, SCAN tuning moves to the next disc
program.
RANDOM (RDM)/REPEAT (RPT):
When the SCAN/RPT button is pushed for less
than 1.5 seconds while the CD is being played,
the play pattern can be changed as follows:
CD:
CD with MP3 or WMA:
CD EJECT:
When the CD EJECT button is pushed with the
CD loaded, the CD will be ejected.
When this button is pushed while the CD is
being played, the CD will come out and the
system will turn off.
If the CD comes out and is not removed, it
will be pulled back into the slot to protect
it.
Heater, air conditioner, audio, phone and voice recognition systems4-25
Page 175 of 322
4-40Heater, air conditioner, audio, phone and voice recognition systems
WARNING
.Use a phone after stopping your
vehicle in a safe location. If you
have to use a phone while driving,
exercise extreme caution at all
times so full attention may be given
to vehicle operation.
. If you are unable to devote full
attention to vehicle operation while
talking on the phone, pull off the
road to a safe location and stop
your vehicle.
CAUTION
To avoid draining the vehicle battery,
use a phone after starting the engine.
Your NISSAN is equipped with the Bluetooth
�Š
Hands-Free Phone System. If you have a
compatible Bluetooth�Šenabled cellular phone,
you can set up the wireless connection between
your cellular phone and the in-vehicle phone
module. With Bluetooth
�Šwireless technology,
you can make or receive a hands-free telephone
call in your vehicle. Once your cellular phone is connected to the in-
vehicle phone module, no other phone connect-
ing procedure is required. Your phone is
automatically connected with the in-vehicle
phone module when the ignition switch is
placed in the ON position with the connected
cellular phone turned on and carried in the
vehicle.
You can connect up to 5 different Bluetooth
�Š
cellular phones in the in-vehicle phone module.
However, you can talk on only one cellular phone
at a time.
Before using the Bluetooth
�ŠHands-Free Phone
System, refer to the following notes.
. Wireless LAN (Wi-Fi) and the Bluetooth
�Š
functions share the same frequency band
(2.4 GHz) . Using the Bluetooth�Šand the
wireless LAN functions at the same time may
slow down or disconnect the communica-
tion and cause undesired noise. It is
recommended that you turn off the wireless
LAN (Wi-Fi) when using the Bluetooth
�Š
functions.
. Set up the wireless connection between a
compatible cellular phone and the in-vehicle
phone module before using the Bluetooth
�Š
Hands-Free Phone System.
. Some Bluetooth�Šenabled cellular phones
may not be recognized by the in-vehicle phone module. Please visit www.nissanusa.
com/bluetooth for a recommended phone
list and connecting.
. You will not be able to use a hands-free
phone under the following conditions:
— Your vehicle is outside of the telephone
service area.
— Your vehicle is in an area where it is difficult to receive radio waves; such as in
a tunnel, in an underground parking
garage, near a tall building or in a
mountainous area.
— Your cellular phone is locked to prevent it from being dialed.
. When the radio wave condition is not ideal
or ambient sound is too loud, it may be
difficult to hear the other person’s voice
during a call.
. Immediately after the ignition switch is
placed in the ON position, it may be
impossible to receive a call for a short
period of time.
. Do not place the cellular phone in an area
surrounded by metal or far away from the in-
vehicle phone module to prevent tone quality
degradation and wireless connection dis-
ruption.
. While a cellular phone is connected through
the Bluetooth�Šwireless connection, the
Bluetooth�ŠHANDS-FREE PHONE
SYSTEM (if so equipped)
Page 189 of 322
5-2Starting and driving
WARNING
.Do not leave children or adults who
would normally require the support
of others alone in your vehicle. Pets
should not be left alone either. They
could accidentally injure themselves
or others through inadvertent op-
eration of the vehicle. Also, on hot,
sunny days, temperatures in a
closed vehicle could quickly become
high enough to cause severe or
possibly fatal injuries to people or
animals.
. Properly secure all cargo with ropes
or straps to help prevent it from
sliding or shifting. Do not place
cargo higher than the seatbacks. In
a sudden stop or collision, unse-
cured cargo could cause personal
injury.
EXHAUST GAS (carbon monoxide)
WARNING
.Do not breathe exhaust gases; they
contain colorless and odorless car-
bon monoxide. Carbon monoxide is
dangerous. It can cause uncon-
sciousness or death.
. If you suspect that exhaust fumes
are entering the vehicle, drive with
all windows fully open, and have the
vehicle inspected immediately.
. Do not run the engine in closed
spaces such as a garage.
. Do not park the vehicle with the
engine running for any extended
length of time.
. Keep the lift gate closed while
driving, otherwise exhaust gases
could be drawn into the passenger
compartment. If you must drive with
the lift gate open, follow these
precautions:
1. Open all the windows.
2. Set the
air recirculation to off
and the fan control to high to circulate the air.
. If electrical wiring or other cable
connections must pass to a trailer
through the seal on the lift gate or
the body, follow the manufacturer’s
recommendation to prevent carbon
monoxide entry into the vehicle.
. If a special body, camper or other
equipment is added for recreational
or other usage, follow the manufac-
turer’s recommendation to prevent
carbon monoxide entry into the
vehicle. (Some recreational vehicle
appliances such as stoves, refrig-
erators, heaters, etc. may also gen-
erate carbon monoxide.)
. The exhaust system and body
should be inspected by a qualified
mechanic whenever:
— The vehicle is raised for service.
— You suspect that exhaust fumes
are entering into the passenger
compartment.
— You notice a change in the sound of the exhaust system.
— You have had an accident invol- ving damage to the exhaust
PRECAUTIONS WHEN STARTING
AND DRIVING
Page 190 of 322
system, underbody, or rear of
the vehicle.
THREE-WAY CATALYST
The three-way catalyst is an emission control
device installed in the exhaust system. Exhaust
gases in the three-way catalyst are burned at
high temperatures to help reduce pollutants.
WARNING
.The exhaust gas and the exhaust
system are very hot. Keep people,
animals or flammable materials
away from the exhaust system com-
ponents.
. Do not stop or park the vehicle over
flammable materials such as dry
grass, waste paper or rags. They
may ignite and cause a fire.
CAUTION
.Do not use leaded gasoline. Depos-
its from leaded gasoline will ser-
iously reduce the three-way
catalyst’s ability to help reduce ex- haust pollutants.
. Keep your engine tuned up. Mal-
functions in the ignition, fuel injec-
tion, or electrical systems can cause
overrich fuel flow into the three-way
catalyst, causing it to overheat. Do
not keep driving if the engine mis-
fires, or if noticeable loss of perfor-
mance or other unusual operating
conditions are detected. Have the
vehicle inspected promptly by a
NISSAN dealer.
. Avoid driving with an extremely low
fuel level. Running out of fuel could
cause the engine to misfire, dama-
ging the three-way catalyst.
. Do not race the engine while warm-
ing it up.
. Do not push or tow your vehicle to
start the engine.
TIRE PRESSURE MONITORING SYS-
TEM (TPMS)
Each tire, including the spare (if provided) ,
should be checked monthly when cold and
inflated to the inflation pressure recommended
by the vehicle manufacturer on the vehicle
placard or tire inflation pressure label. (If your vehicle has tires of a different size than the size
indicated on the vehicle placard or tire inflation
pressure label, you should determine the proper
tire inflation pressure for those tires.)
As an added safety feature, your vehicle has
been equipped with a Tire Pressure Monitoring
System (TPMS) that illuminates a low tire
pressure telltale when one or more of your tires
is significantly under-inflated. Accordingly, when
the low tire pressure telltale illuminates, you
should stop and check your tires as soon as
possible, and inflate them to the proper pres-
sure. Driving on a significantly under-inflated tire
causes the tire to overheat and can lead to tire
failure. Under-inflation also reduces fuel effi-
ciency and tire tread life, and may affect the
vehicle’s handling and stopping ability.
Please note that the TPMS is not a substitute for
proper tire maintenance, and it is the driver’s
responsibility to maintain correct tire pressure,
even if under-inflation has not reached the level
to trigger illumination of the TPMS low tire
pressure telltale.
Your vehicle has also been equipped with a
TPMS malfunction indicator to indicate when the
system is not operating properly. The TPMS
malfunction indicator is combined with the low
tire pressure telltale. When the system detects a
malfunction, the telltale will flash for approxi-
Starting and driving5-3
Page 191 of 322
5-4Starting and driving
mately one minute and then remain continuously
illuminated. This sequence will continue upon
subsequent vehicle start-ups as long as the
malfunction exists. When the malfunction indi-
cator is illuminated, the system may not be able
to detect or signal low tire pressure as intended.
TPMS malfunctions may occur for a variety of
reasons, including the installation of replace-
ment or alternate tires or wheels on the vehicle
that prevent the TPMS from functioning properly.
Always check the TPMS malfunction telltale
after replacing one or more tires or wheels on
your vehicle to ensure that the replacement or
alternate tires and wheels allow the TPMS to
continue to function properly.
Additional information
.The TPMS does not monitor the tire
pressure of the spare tire.
. The TPMS will activate only when the
vehicle is driven at speeds above 16 MPH
(25 km/h) . Also, this system may not detect
a sudden drop in tire pressure (for example a
flat tire while driving) .
. The low tire pressure warning light does not
automatically turn off when the tire pressure
is adjusted. After the tire is inflated to the
recommended pressure, the vehicle must be
driven at speeds above 16 MPH (25 km/h)
to activate the TPMS and turn off the low tire pressure warning light. Use a tire pressure
gauge to check the tire pressure.
. The CHECK TIRE PRESSURE warning
appears in the vehicle information display
when the low tire pressure warning light is
illuminated and low tire pressure is detected.
The CHECK TIRE PRESSURE warning
turns off when the low tire pressure warning
light turns off.
The CHECK TIRE PRESSURE warning
appears for a period of time each time the
ignition switch is placed in the ON position
as long as the low tire pressure warning light
remains illuminated.
The CHECK TIRE PRESSURE warning
does not appear if the low tire pressure
warning light illuminates to indicate a TPMS
malfunction.
. Tire pressure rises and falls depending on
the heat caused by the vehicle’s operation
and the outside temperature. Low outside
temperature can lower the temperature of
the air inside the tire which can cause a
lower tire inflation pressure. This may cause
the low tire pressure warning light to
illuminate. If the warning light illuminates in
low ambient temperature, check the tire
pressure for all four tires.
For additional information, see “Low tire pres- sure warning light” (P.2-12) and “Tire Pressure
Monitoring System (TPMS)” (P.6-2) .
WARNING
.
If the low tire pressure warning light
illuminates while driving, avoid sud-
den steering maneuvers or abrupt
braking, reduce vehicle speed, pull
off the road to a safe location and
stop the vehicle as soon as possi-
ble. Driving with under-inflated tires
may permanently damage the tires
and increase the likelihood of tire
failure. Serious vehicle damage
could occur and may lead to an
accident and could result in serious
personal injury. Check the tire pres-
sure for all four tires. Adjust the tire
pressure to the recommended COLD
tire pressure shown on the Tire and
Loading Information label to turn
the low tire pressure warning light
OFF. If you have a flat tire, replace it
with a spare tire as soon as possi-
ble. (See “Flat tire” (P.6-2) for chan-
ging a flat tire.)
. When a spare tire is mounted or a
wheel is replaced, the TPMS will not
Page 193 of 322
5-6Starting and driving
significantly more likely to be injured or
killed than a person properly wearing a
seat belt.
ON-PAVEMENT AND OFF-ROAD
DRIVING PRECAUTIONS
Utility vehicles have a significantly higher
rollover rate than other types of vehicles.
They have higher ground clearance than pas-
senger cars to make them capable of performing
in a variety of on-pavement and off-road
applications. This gives them a higher center of
gravity than ordinary cars. An advantage of
higher ground clearance is a better view of the
road, allowing you to anticipate problems.
However, they are not designed for cornering
at the same speeds as conventional passenger
cars any more than low-slung sports cars are
designed to perform satisfactorily under off-road
conditions. If at all possible, avoid sharp turns or
abrupt maneuvers, particularly at high speeds.
As with other vehicles of this type, failure to
operate this vehicle correctly may result in loss
of control or vehicle rollover. Seat belts help
reduce the risk of injury in collisions and
rollovers. In a rollover crash, an unbelted or
improperly belted person is significantly more
likely to be injured or killed than a person
properly wearing a seat belt.
Be sure to read “Driving safety precautions”(P.5-7) .
OFF-ROAD RECOVERY
If the right side or left side wheels leave the road
surface, maintain control of the vehicle by
following the procedure below. Please note that
this procedure is only a general guide. The
vehicle must be driven as appropriate based on
the conditions of the vehicle, road and traffic.
1. Remain calm and do not overreact.
2. Do not apply the brakes.
3. Maintain a firm grip on the steering wheel
with both hands and try to hold a straight
course.
4. When appropriate, slowly release the accel- erator pedal to gradually slow the vehicle.
5. If there is nothing in the way, steer the vehicle to follow the road while the vehicle
speed is reduced. Do not attempt to drive
the vehicle back onto the road surface until
vehicle speed is reduced.
6. When it is safe to do so, gradually turn the steering wheel until both tires return to the
road surface. When all tires are on the road
surface, steer the vehicle to stay in the
appropriate driving lane.
.If you decide that it is not safe to returnthe vehicle to the road surface based on
vehicle, road or traffic conditions, gradu- ally slow the vehicle to a stop in a safe
place off the road.
RAPID AIR PRESSURE LOSS
Rapid air pressure loss or a “blow-out” can
occur if the tire is punctured or is damaged due
to hitting a curb or pothole. Rapid air pressure
loss can also be caused by driving on under-
inflated tires.
Rapid air pressure loss can affect the handling
and stability of the vehicle, especially at highway
speeds.
Help prevent rapid air pressure loss by main-
taining the correct air pressure and visually
inspect the tires for wear and damage. See
“Wheels and tires” (P.8-29) of this manual.
If a tire rapidly loses air pressure or “blows-out”
while driving maintain control of the vehicle by
following the procedure below. Please note that
this procedure is only a general guide. The
vehicle must be driven as appropriate based on
the conditions of the vehicle, road and traffic.
WARNING
The following actions can increase the
chance of losing control of the vehicle if
there is a sudden loss of tire air
pressure. Losing control of the vehicle