NISSAN TEANA 2014 Service Manual
Manufacturer: NISSAN, Model Year: 2014, Model line: TEANA, Model: NISSAN TEANA 2014Pages: 4801, PDF Size: 51.2 MB
Page 4791 of 4801

WW-56
< REMOVAL AND INSTALLATION >
WASHER NOZZLE & TUBE
NOTE:
Spray positions for LH shown; RH is symmetrical.
Insert a suitable tool (A) into the nozzle hole (B) and move up/down
and left/right to adjust the spray position of each nozzle (1).
WASHER TUBE
WASHER TUBE : Removal and InstallationINFOID:0000000009464637
FRONT WASHER TUBE
Removal
1. Drain the washer fluid.
2. Remove the hood ledge finisher clips and the hood ledge fin- isher (1) (RH).
: Clip
G. 71.1 mm (2.8 in) H. 141 mm (5.6 in) J. 500.2 mm (19.7 in)
K. 505.5 mm (19.9 in)
1. Washer Nozzle (LH) 2. Washer Nozzle (RH) A. 60°± 7.5 °
B. 6 ° C. 1.5°± 1.0 ° D. 4°
ALLIA1165ZZ
ALLIA0779ZZ
ALLIA1174ZZ
Revision: November 20132014 Altima NAMRevision: November 20132014 Altima NAM
Page 4792 of 4801
WASHER NOZZLE & TUBEWW-57
< REMOVAL AND INSTALLATION >
C
D E
F
G H
I
J
K
M A
B
WW
N
O P
3. Remove the hood insulator. Refer to DLK-170, "HOOD ASSEMBLY : Exploded View".
4. Disconnect the washer tube from the washer nozzles (LH/RH).
5. Remove the front under cover. Refer to EXT-28, "Removal and Installation"
.
6. Remove the fender protector (RH). Refer to EXT-26, "FENDER PROTECTOR : Removal and Installation"
.
7. Disconnect the washer tube from the washer pump.
8. Remove the washer tube.
Installation
Installation is in the reverse order of removal.
NOTE:
Fill washer tank with specified amount of fluid. Refer to WW-66, "Specifications"
.
REAR WASHER TUBE (IF EQUIPPED)
Removal
1. Drain the washer fluid.
2. Remove trunk lid finisher. Refer to INT-33, "TRUNK LID FINISHER : Removal and Installation"
.
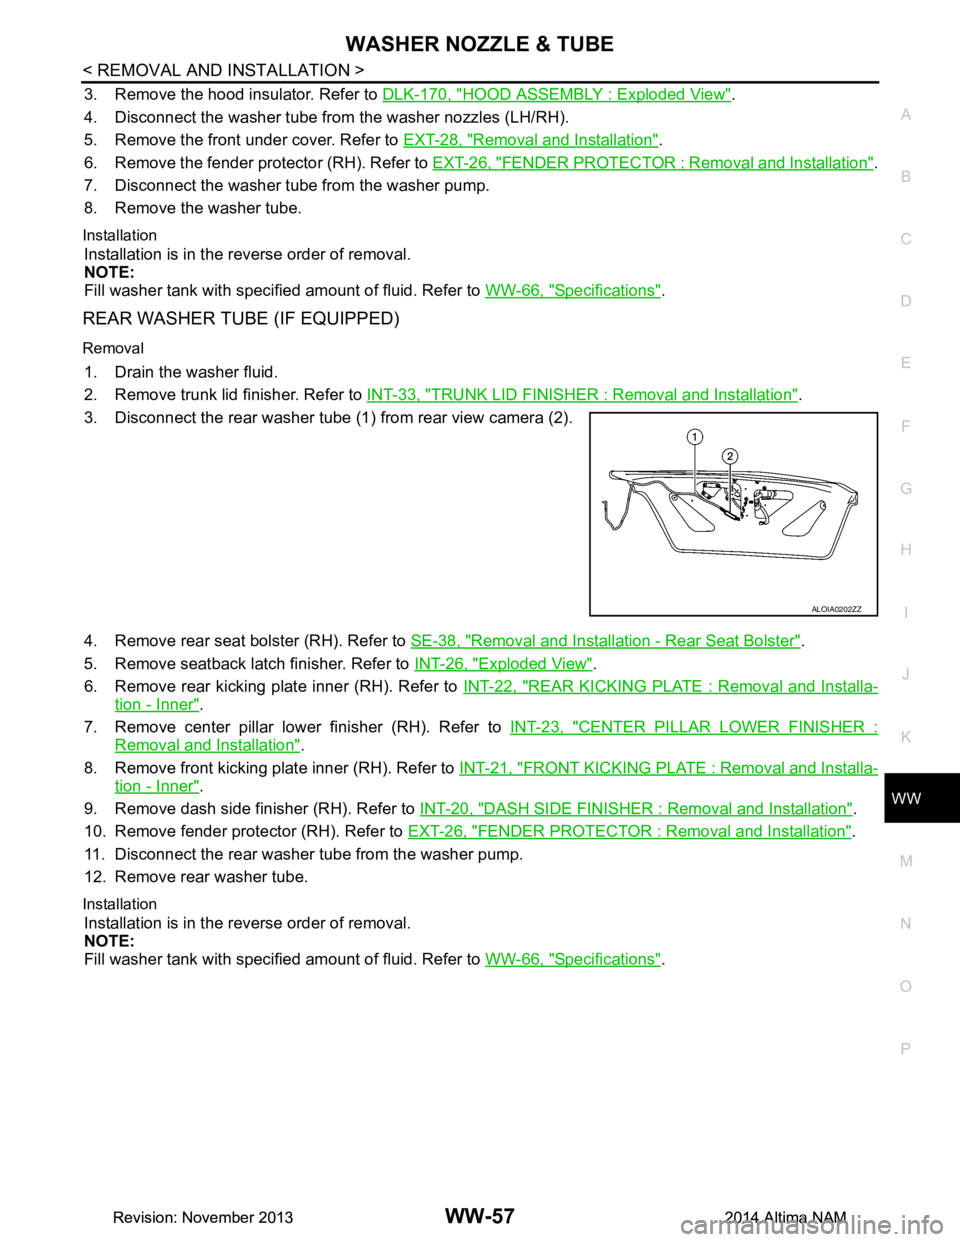
3. Disconnect the rear washer tube (1 ) from rear view camera (2).
4. Remove rear seat bolster (RH). Refer to SE-38, "Removal and Installation - Rear Seat Bolster"
.
5. Remove seatback latch finisher. Refer to INT-26, "Exploded View"
.
6. Remove rear kicking plate inner (RH). Refer to INT-22, "REAR KICKING PLATE : Removal and Installa-
tion - Inner".
7. Remove center pillar lower finisher (RH). Refer to INT-23, "CENTER PILLAR LOWER FINISHER :
Removal and Installation".
8. Remove front kicking plate inner (RH). Refer to INT-21, "FRONT KICKING PLATE : Removal and Installa-
tion - Inner".
9. Remove dash side finisher (RH). Refer to INT-20, "DASH SIDE FINISHER : Removal and Installation"
.
10. Remove fender protector (RH). Refer to EXT-26, "FENDER PROTECTOR : Removal and Installation"
.
11. Disconnect the rear washer tube from the washer pump.
12. Remove rear washer tube.
Installation
Installation is in the reverse order of removal.
NOTE:
Fill washer tank with specified amount of fluid. Refer to WW-66, "Specifications"
.
ALOIA0202ZZ
Revision: November 20132014 Altima NAMRevision: November 20132014 Altima NAM
Page 4793 of 4801
WW-58
< REMOVAL AND INSTALLATION >
FRONT WIPER ARM
FRONT WIPER ARM
Removal and InstallationINFOID:0000000009464638
REMOVAL
1. Remove the wiper arm cap.
2. Remove the wiper arm nut.
3. Raise the wiper arm, then remove the wiper arm.
INSTALLATION
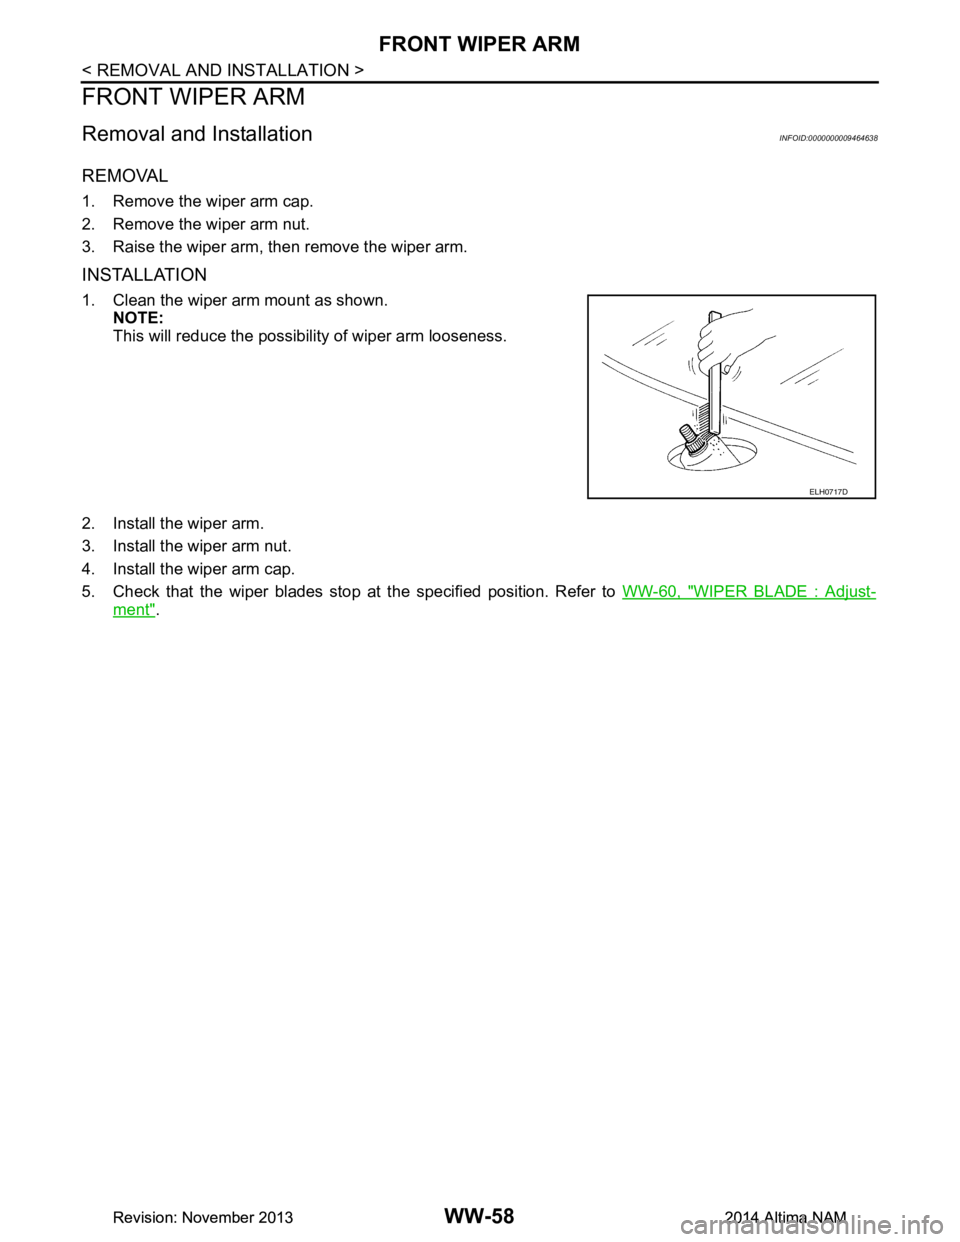
1. Clean the wiper arm mount as shown. NOTE:
This will reduce the possibility of wiper arm looseness.
2. Install the wiper arm.
3. Install the wiper arm nut.
4. Install the wiper arm cap.
5. Check that the wiper blades stop at the specified position. Refer to WW-60, "WIPER BLADE : Adjust-
ment".
ELH0717D
Revision: November 20132014 Altima NAMRevision: November 20132014 Altima NAM
Page 4794 of 4801
WIPER BLADEWW-59
< REMOVAL AND INSTALLATION >
C
D E
F
G H
I
J
K
M A
B
WW
N
O P
WIPER BLADE
WIPER BLADE
WIPER BLADE : Remova l and InstallationINFOID:0000000009464639
REMOVAL
1. Lift the wiper arm and wiper blade away from the windshield glass.
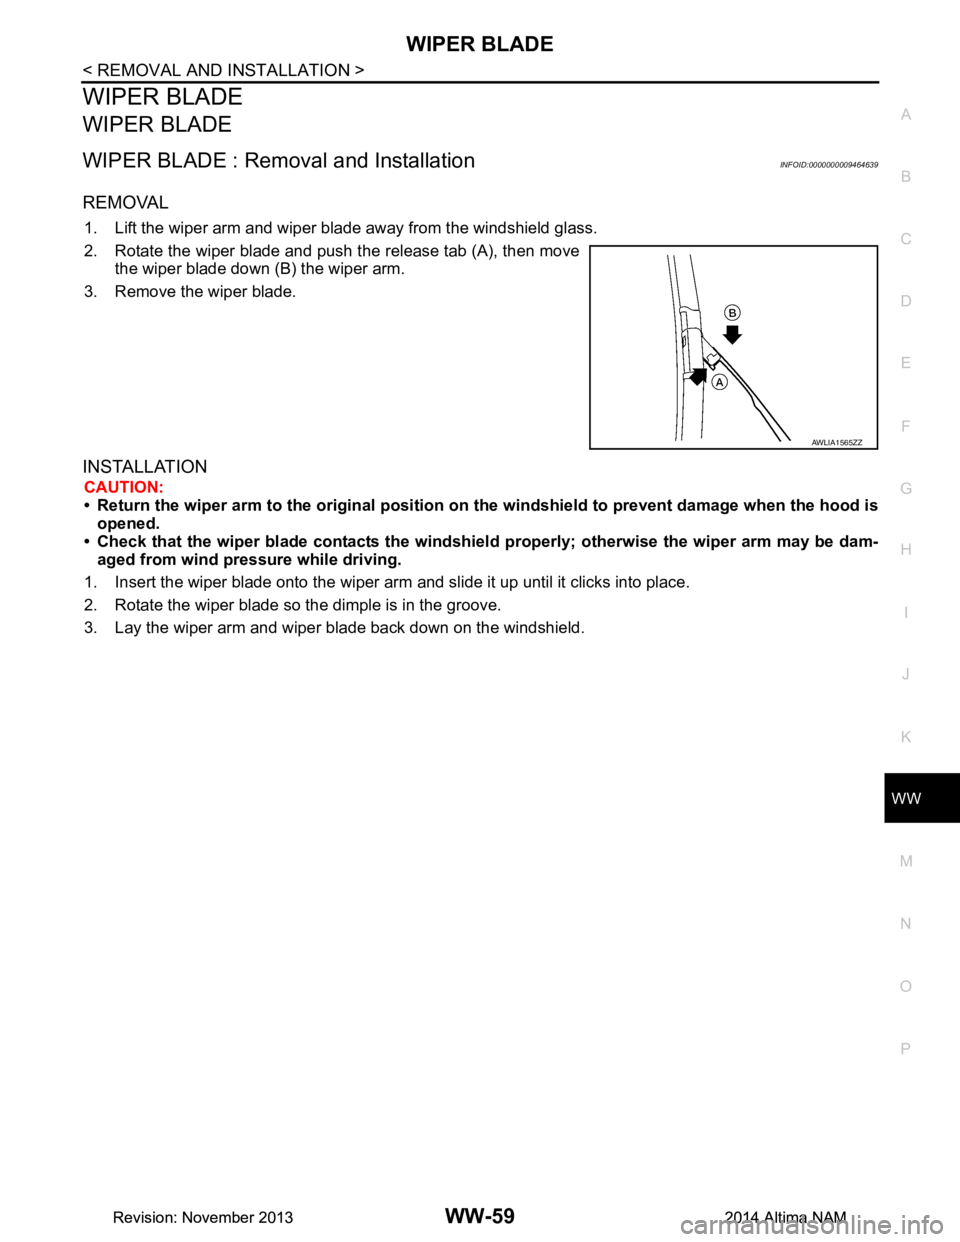
2. Rotate the wiper blade and push the release tab (A), then move the wiper blade down (B) the wiper arm.
3. Remove the wiper blade.
INSTALLATION
CAUTION:
• Return the wiper arm to the origin al position on the windshield to prevent damage when the hood is
opened.
• Check that the wiper blade contacts the windshiel d properly; otherwise the wiper arm may be dam-
aged from wind pressure while driving.
1. Insert the wiper blade onto the wiper arm and slide it up until it clicks into place.
2. Rotate the wiper blade so the dimple is in the groove.
3. Lay the wiper arm and wiper blade back down on the windshield.
AWLIA1565ZZ
Revision: November 20132014 Altima NAMRevision: November 20132014 Altima NAM
Page 4795 of 4801
WW-60
< REMOVAL AND INSTALLATION >
WIPER BLADE
WIPER BLADE : Adjustment
INFOID:0000000009464640
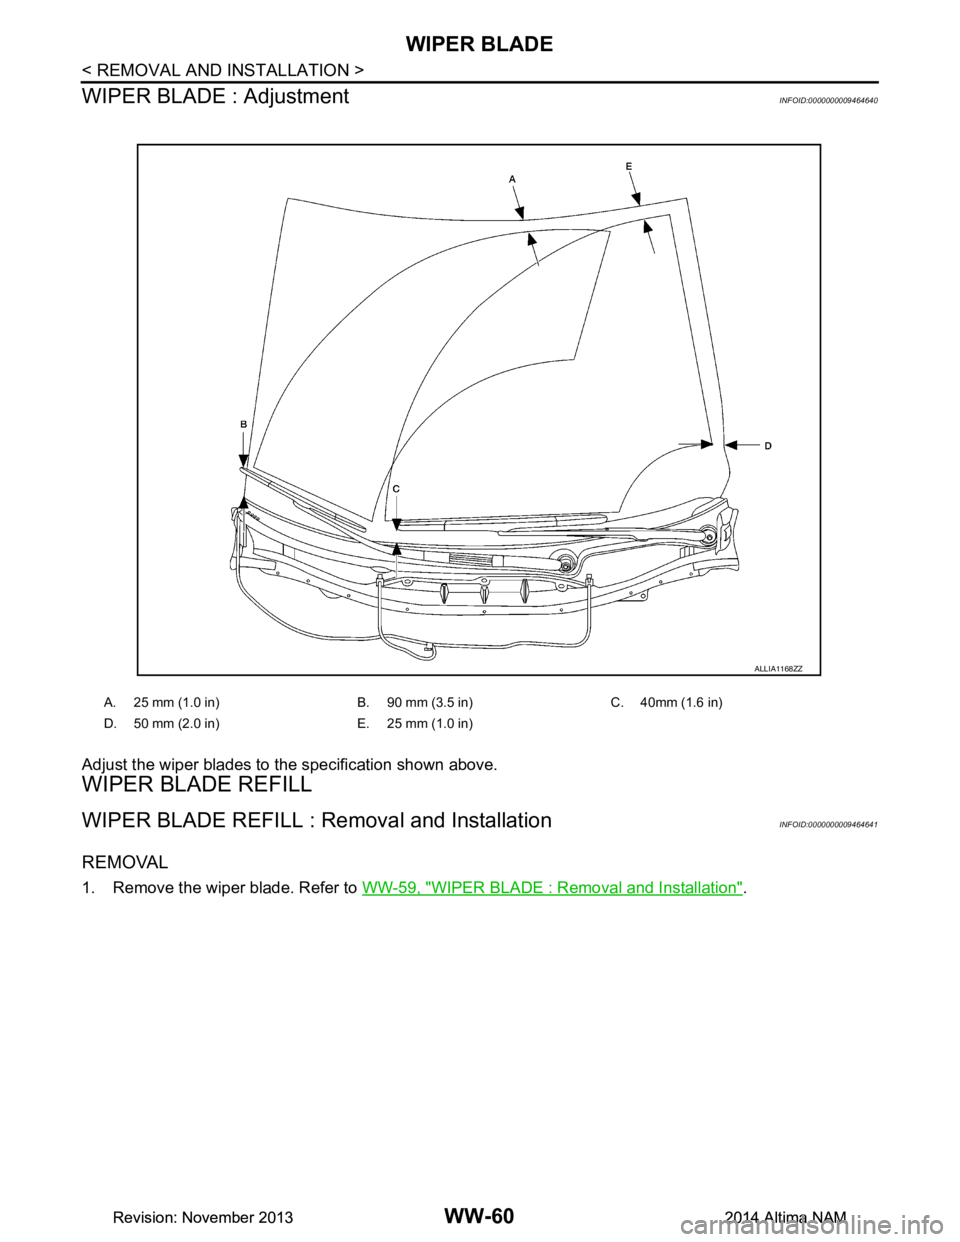
Adjust the wiper blades to the specification shown above.
WIPER BLADE REFILL
WIPER BLADE REFILL : Removal and InstallationINFOID:0000000009464641
REMOVAL
1. Remove the wiper blade. Refer to WW-59, "WIPER BLADE : Removal and Installation".
A. 25 mm (1.0 in) B. 90 mm (3.5 in) C. 40mm (1.6 in)
D. 50 mm (2.0 in) E. 25 mm (1.0 in)
ALLIA1168ZZ
Revision: November 20132014 Altima NAMRevision: November 20132014 Altima NAM
Page 4796 of 4801
WIPER BLADEWW-61
< REMOVAL AND INSTALLATION >
C
D E
F
G H
I
J
K
M A
B
WW
N
O P
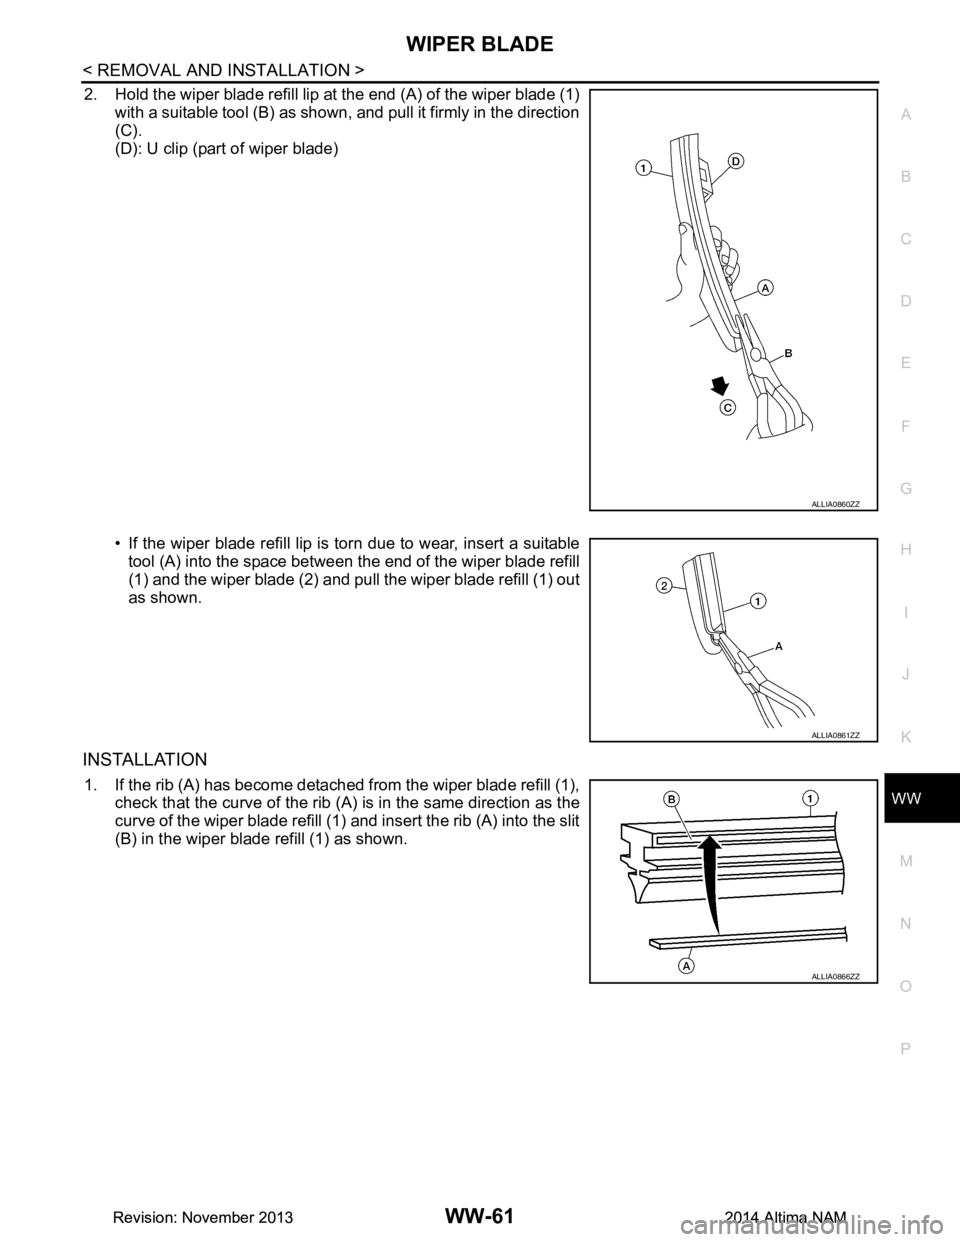
2. Hold the wiper blade refill lip at the end (A) of the wiper blade (1) with a suitable tool (B) as shown, and pull it firmly in the direction
(C).
(D): U clip (part of wiper blade)
• If the wiper blade refill lip is torn due to wear, insert a suitable tool (A) into the space between the end of the wiper blade refill
(1) and the wiper blade (2) and pull the wiper blade refill (1) out
as shown.
INSTALLATION
1. If the rib (A) has become detached from the wiper blade refill (1), check that the curve of the rib (A) is in the same direction as the
curve of the wiper blade refill (1) and insert the rib (A) into the slit
(B) in the wiper blade refill (1) as shown.
ALLIA0860ZZ
ALLIA0861ZZ
ALLIA0866ZZ
Revision: November 20132014 Altima NAMRevision: November 20132014 Altima NAM
Page 4797 of 4801
WW-62
< REMOVAL AND INSTALLATION >
WIPER BLADE
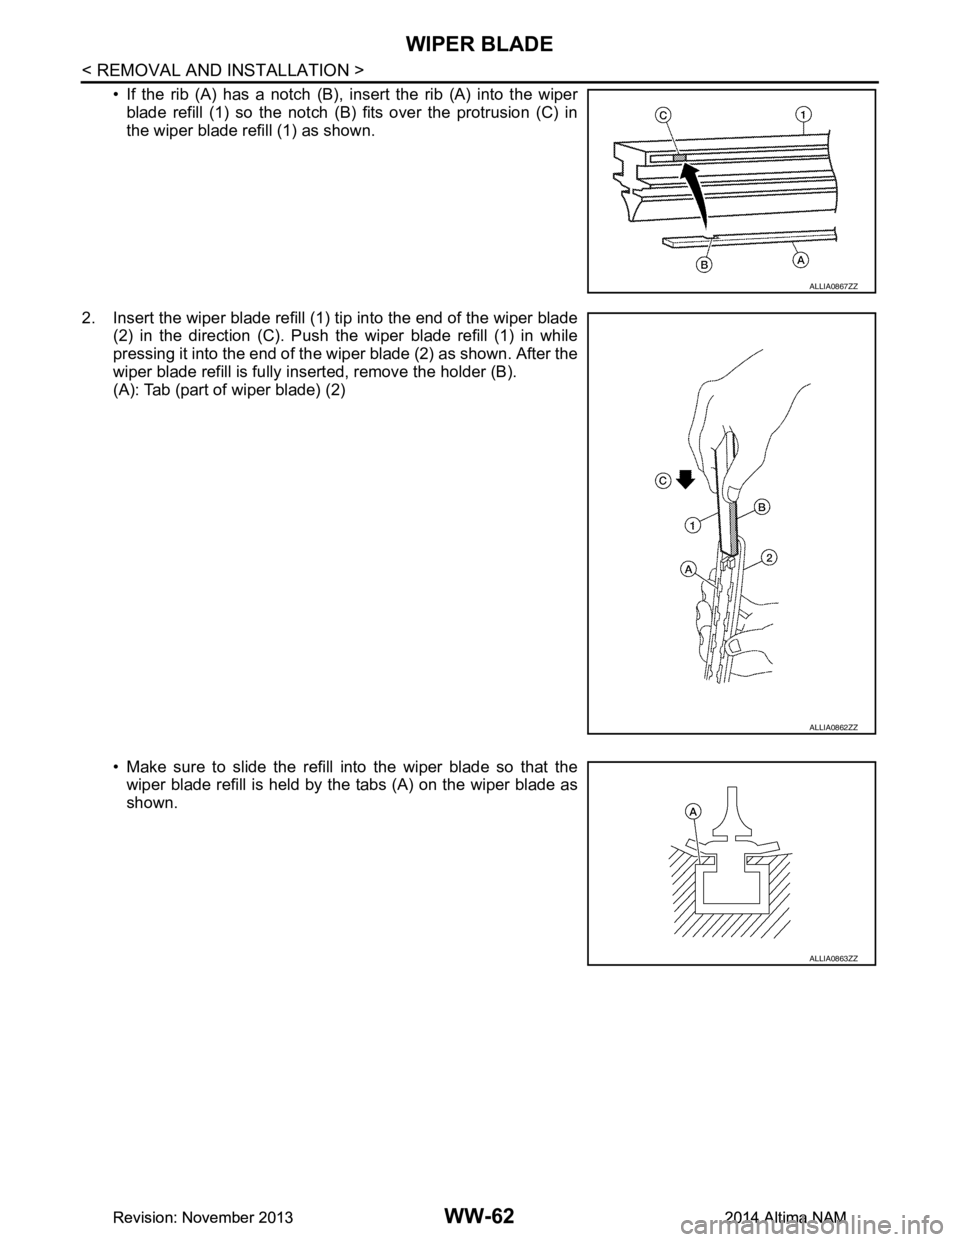
• If the rib (A) has a notch (B), insert the rib (A) into the wiperblade refill (1) so the notch (B) fits over the protrusion (C) in
the wiper blade refill (1) as shown.
2. Insert the wiper blade refill (1) tip into the end of the wiper blade (2) in the direction (C). Push the wiper blade refill (1) in while
pressing it into the end of the wiper blade (2) as shown. After the
wiper blade refill is fully inserted, remove the holder (B).
(A): Tab (part of wiper blade) (2)
• Make sure to slide the refill into the wiper blade so that the wiper blade refill is held by the tabs (A) on the wiper blade as
shown.
ALLIA0867ZZ
ALLIA0862ZZ
ALLIA0863ZZ
Revision: November 20132014 Altima NAMRevision: November 20132014 Altima NAM
Page 4798 of 4801
WIPER BLADEWW-63
< REMOVAL AND INSTALLATION >
C
D E
F
G H
I
J
K
M A
B
WW
N
O P
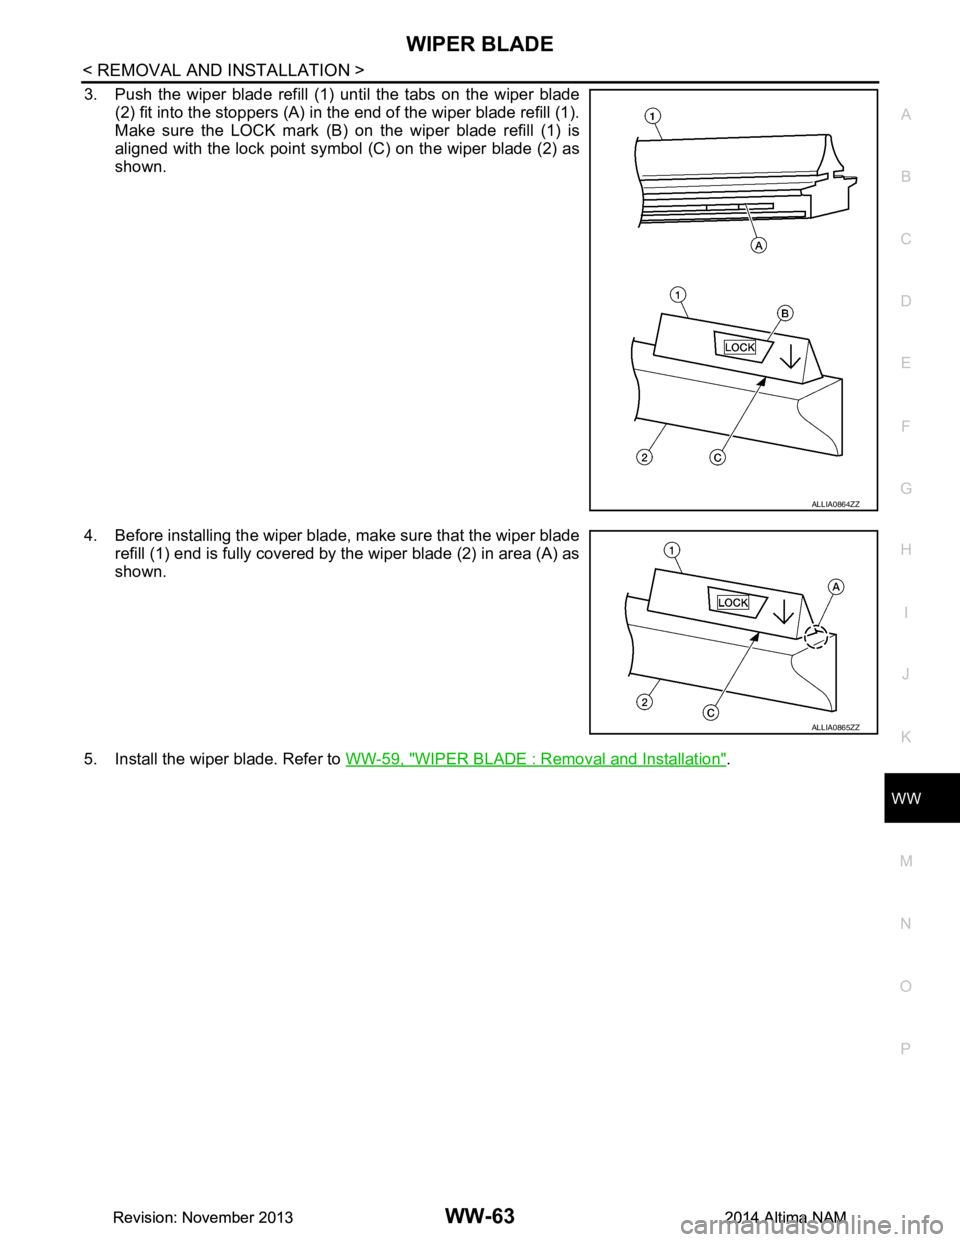
3. Push the wiper blade refill (1) until the tabs on the wiper blade (2) fit into the stoppers (A) in the end of the wiper blade refill (1).
Make sure the LOCK mark (B) on the wiper blade refill (1) is
aligned with the lock point symbol (C) on the wiper blade (2) as
shown.
4. Before installing the wiper blade, make sure that the wiper blade refill (1) end is fully covered by the wiper blade (2) in area (A) as
shown.
5. Install the wiper blade. Refer to WW-59, "WIPER BLADE : Removal and Installation"
.
ALLIA0864ZZ
ALLIA0865ZZ
Revision: November 20132014 Altima NAMRevision: November 20132014 Altima NAM
Page 4799 of 4801
WW-64
< REMOVAL AND INSTALLATION >
FRONT WIPER DRIVE ASSEMBLY
FRONT WIPER DRIVE ASSEMBLY
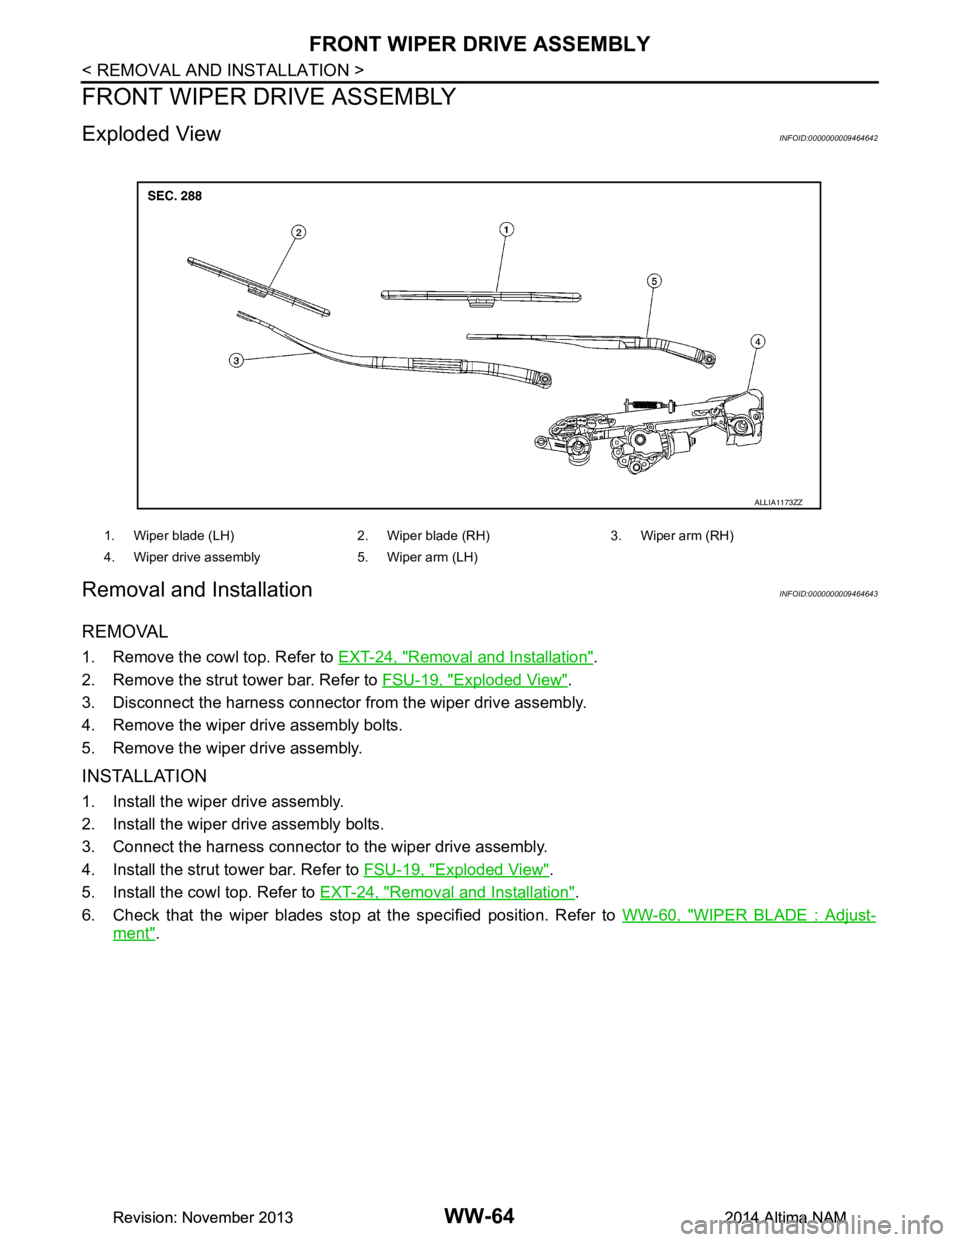
Exploded ViewINFOID:0000000009464642
Removal and InstallationINFOID:0000000009464643
REMOVAL
1. Remove the cowl top. Refer to EXT-24, "Removal and Installation".
2. Remove the strut tower bar. Refer to FSU-19, "Exploded View"
.
3. Disconnect the harness connector from the wiper drive assembly.
4. Remove the wiper drive assembly bolts.
5. Remove the wiper drive assembly.
INSTALLATION
1. Install the wiper drive assembly.
2. Install the wiper drive assembly bolts.
3. Connect the harness connector to the wiper drive assembly.
4. Install the strut tower bar. Refer to FSU-19, "Exploded View"
.
5. Install the cowl top. Refer to EXT-24, "Removal and Installation"
.
6. Check that the wiper blades stop at the specified position. Refer to WW-60, "WIPER BLADE : Adjust-
ment".
1. Wiper blade (LH) 2. Wiper blade (RH) 3. Wiper arm (RH)
4. Wiper drive assembly 5. Wiper arm (LH)
ALLIA1173ZZ
Revision: November 20132014 Altima NAMRevision: November 20132014 Altima NAM
Page 4800 of 4801
WIPER AND WASHER SWITCHWW-65
< REMOVAL AND INSTALLATION >
C
D E
F
G H
I
J
K
M A
B
WW
N
O P
WIPER AND WASHER SWITCH
Removal and InstallationINFOID:0000000009464644
The wiper and washer switch is serviced as an assembly with the combination switch. Refer to BCS-
81, "Removal and Installation"
Revision: November 20132014 Altima NAMRevision: November 20132014 Altima NAM