NISSAN TITAN 2008 1.G Quick Reference Guide
Manufacturer: NISSAN, Model Year: 2008, Model line: TITAN, Model: NISSAN TITAN 2008 1.GPages: 36, PDF Size: 2.4 MB
Page 1 of 36
Sh ift_power
2008
TITAN
Q U I C K R E F E R E N C E G U I D E
Page 2 of 36
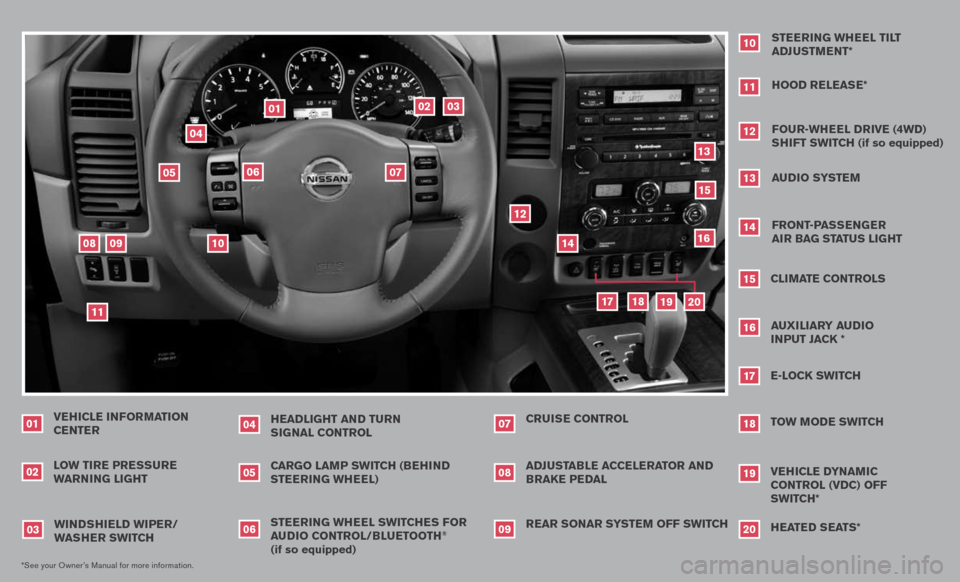
VEHICLE INFORMATION CENTER
LO w TIRE PRE ssuRE
wARNIN g LIgHT
01
HEADLI gHT AND Tu RN
s Ig NAL CONTROL
04
02*See your Owner’s Manual for more information.
sTEERIN g wHEEL swITCHE s FOR
A u DIO CONTROL/BLu ETOOTH
®
(if so equipped) CARgO LAMP swITCH (BEHIND
sTEERIN g wHEEL)
wIND sHIELD wIPER/
w As HER swITCH
03
0506
REAR sONAR sY sTEM OFF swITCH
ADJ
usTABLE ACCELERATOR AND BRAKE PEDAL CRuIs E CONTROL
070809
sTEERIN g wHEEL TILT
ADJ usTMENT*
10
HOOD RELEAs E*
11
FOuR-wHEEL DRIVE (4wD)
s HIFT swITCH (if so equipped)
12
Au DIO sY sTEM
13
FRONT-PAss ENgER
AIR BA g sTATus LI gHT
14
CLIMATE CONTROLs
15
E-LOCK swITCH
17
TOw MODE swITCH
18
11
09
03
02
04
06
01
05
15
18
19
17
14
13
12
07
08
10
VEHICLE DYNAMIC CONTROL (VDC) OFF
swITCH*
19
16
AuxILIARY Au DIO
I NPuT JACK *
16
H EATED s EATs*
20
20
Page 3 of 36
TAB LE O F C O NTE NTS
Remote Keyless Entry System . . . . . . . . . . . . . . . . . . 2
Windshield Wiper/Washer Switch
. . . . . . . . . . . . . . . . 2
Headlight and Turn Signal Control
. . . . . . . . . . . . . . . . 3
Steering Wheel Switches for Audio Control/ Bluetooth
® . . . . 4
Cruise Control
. . . . . . . . . . . . . . . . . . . . . . . . . . 4
Automatic Climate Control
. . . . . . . . . . . . . . . . . . . . 5
FM/AM/XM® Radio with CD Changer . . . . . . . . . . . . . . 6
Vehicle Information Display
. . . . . . . . . . . . . . . . . . . . 7
Control Panel Display with Navigation System
. . . . . . . . . 8
Clock/Set Adjustment
. . . . . . . . . . . . . . . . . . . . . . 8
Instrument Brightness Control/Trip Change Button
. . . . . . . 9
Automatic Driver Positioner
. . . . . . . . . . . . . . . . . . . 10
Adjustable Accelerator and Brake Pedals
. . . . . . . . . . . . 11
Manual Shift Mode
. . . . . . . . . . . . . . . . . . . . . . . . 11
Four-Wheel Drive (4WD) Shift Switch
. . . . . . . . . . . . . . 11
Vehicle Dynamic Control (VDC) Off Switch
. . . . . . . . . . . 12
Tow Mode Switch
. . . . . . . . . . . . . . . . . . . . . . . . . 12
E-Lock Switch
. . . . . . . . . . . . . . . . . . . . . . . . . . . 12
Front-Passenger Air Bag Status Light
. . . . . . . . . . . . . . 13
Tire Pressure Monitoring System (TPMS)
. . . . . . . . . . . . 13
Seatbelt Warning Light and Chime
. . . . . . . . . . . . . . . 13
Cargo Light Switch
. . . . . . . . . . . . . . . . . . . . . . . . 14
Rear Sonar System Off Switch
. . . . . . . . . . . . . . . . . 14
Child Safety Rear Door Locks
. . . . . . . . . . . . . . . . . . 14
Wide Open Doors
. . . . . . . . . . . . . . . . . . . . . . . . 14
High Utility Bed and Utili-Track
™ Channel System . . . . . . . . 15
Outside Mirror Control Switch
. . . . . . . . . . . . . . . . . . 15
Sunroof Controls
. . . . . . . . . . . . . . . . . . . . . . . . . 15
Front Seat Adjustments
. . . . . . . . . . . . . . . . . . . . . 16
Folding the Rear Bench Seat
. . . . . . . . . . . . . . . . . . 16
Homelink® Universal Transceiver . . . . . . . . . . . . . . . . . 16
Bluetooth® Hands-Free Phone System . . . . . . . . . . . . . 18
DVD Controls
. . . . . . . . . . . . . . . . . . . . . . . . . . . 20
Rear Audio Controls
. . . . . . . . . . . . . . . . . . . . . . . 21
Navigation System
. . . . . . . . . . . . . . . . . . . . . . . . 23
Page 4 of 36
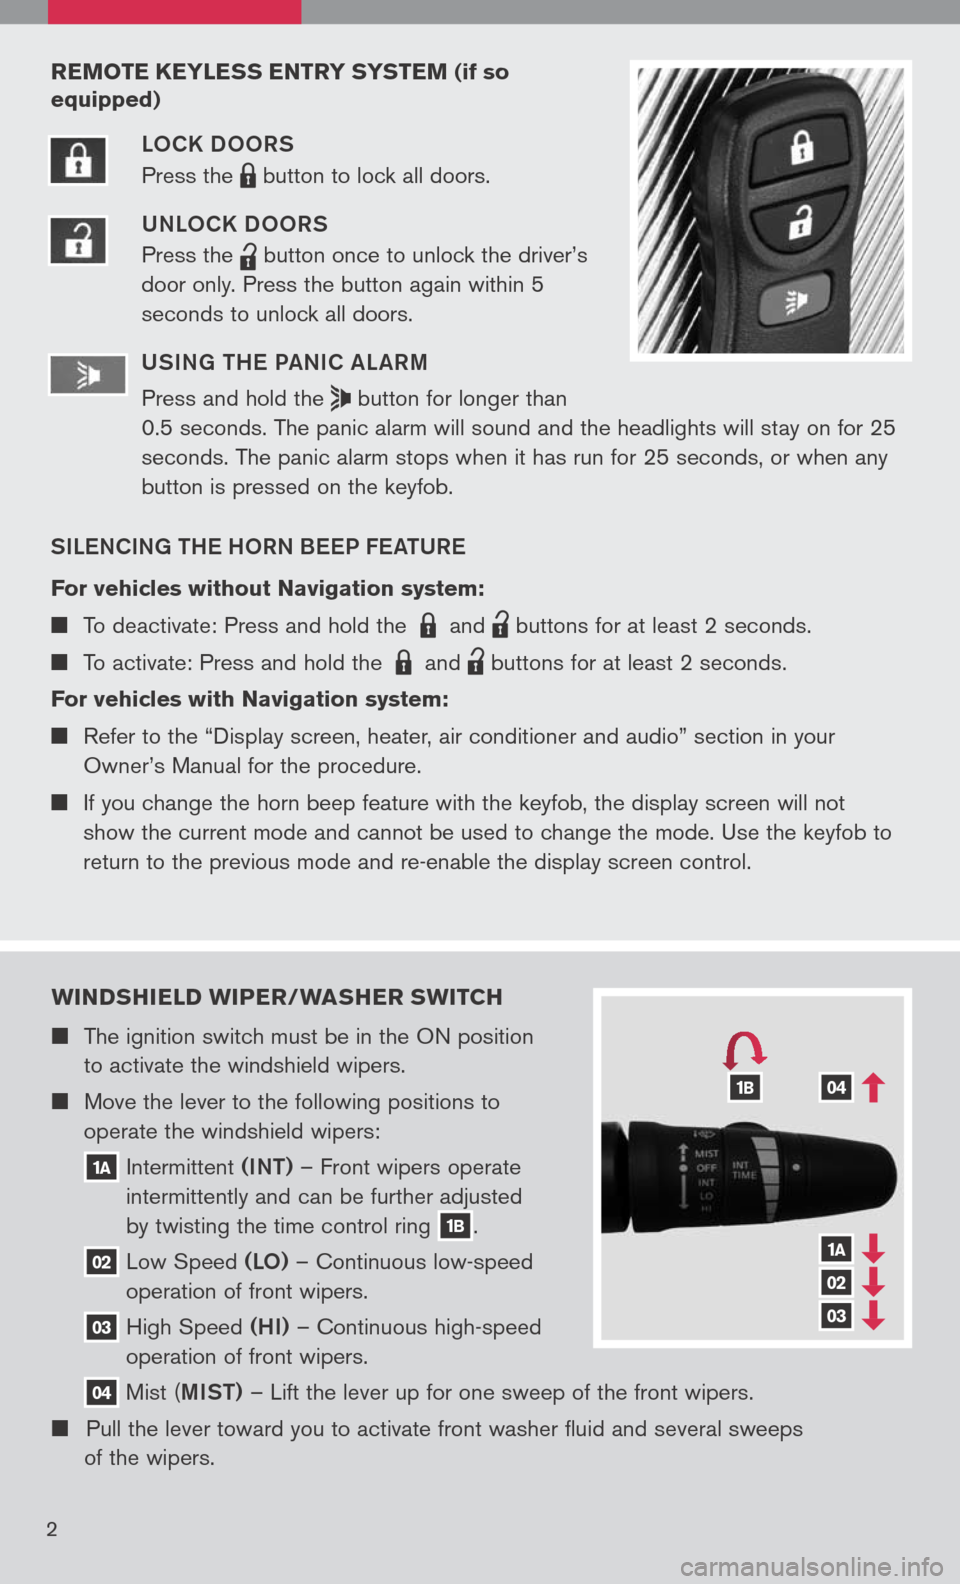
wIND sHIELD wIPER/ wAsHER swITCH
The ignition switch must be in the ON position
to activate the windshield wipers.
Move the lever to the following positions to
operate the windshield wipers:
1A Intermittent (INT)
– Front wipers operate
intermittently and can be further adjusted
by twisting the time control ring
1B.
02 Low
Speed (LO) – Continuous low-speed
operation of front wipers.
03 High
Speed (HI) – Continuous high-speed
operation of front wipers.
04 Mist
(MIST) – Lift the lever up for one sweep of the front wipers.
Pull the lever toward you to activate front washer fluid and several sweeps
of the wipers.
1A
02
03
041B
2
REMOTE KEYLE ss ENTRY sY s TEM (if so
equipped)
LOCK DOORS
Press the
LPD0150 button
to lock all doors.
UNLOCK DOORS
Press the
lpd0151
button
once to unlock the driver’s
door only. Press the button again within 5
seconds to unlock all doors.
U SIN g TH e Pa NIC aL aRM
Press and hold the
button for longer than
0.5 seconds. The panic alarm will sound and the headlights will stay on for 25
seconds. The panic alarm stops when it has run for 25 seconds, or when any
button is pressed on the keyfob.
SIL eNCIN g TH e HORN B eeP F eaTUR e
For vehicles without Navigation system:
To deactivate: Press and hold the LPD0150 and
lpd0151
buttons for at least 2 seconds.
To activate: Press and hold the LPD0150 and
lpd0151
buttons for at least 2 seconds.
For vehicles with Navigation system:
Refer to the “Display screen, heater, air conditioner and audio” section in your
Owner’s Manual for the procedure.
If you change the horn beep feature with the keyfob, the display screen will not
show the current mode and cannot be used to change the mode. Use the keyfob to
return to the previous mode and re-enable the display screen control.
Page 5 of 36
3
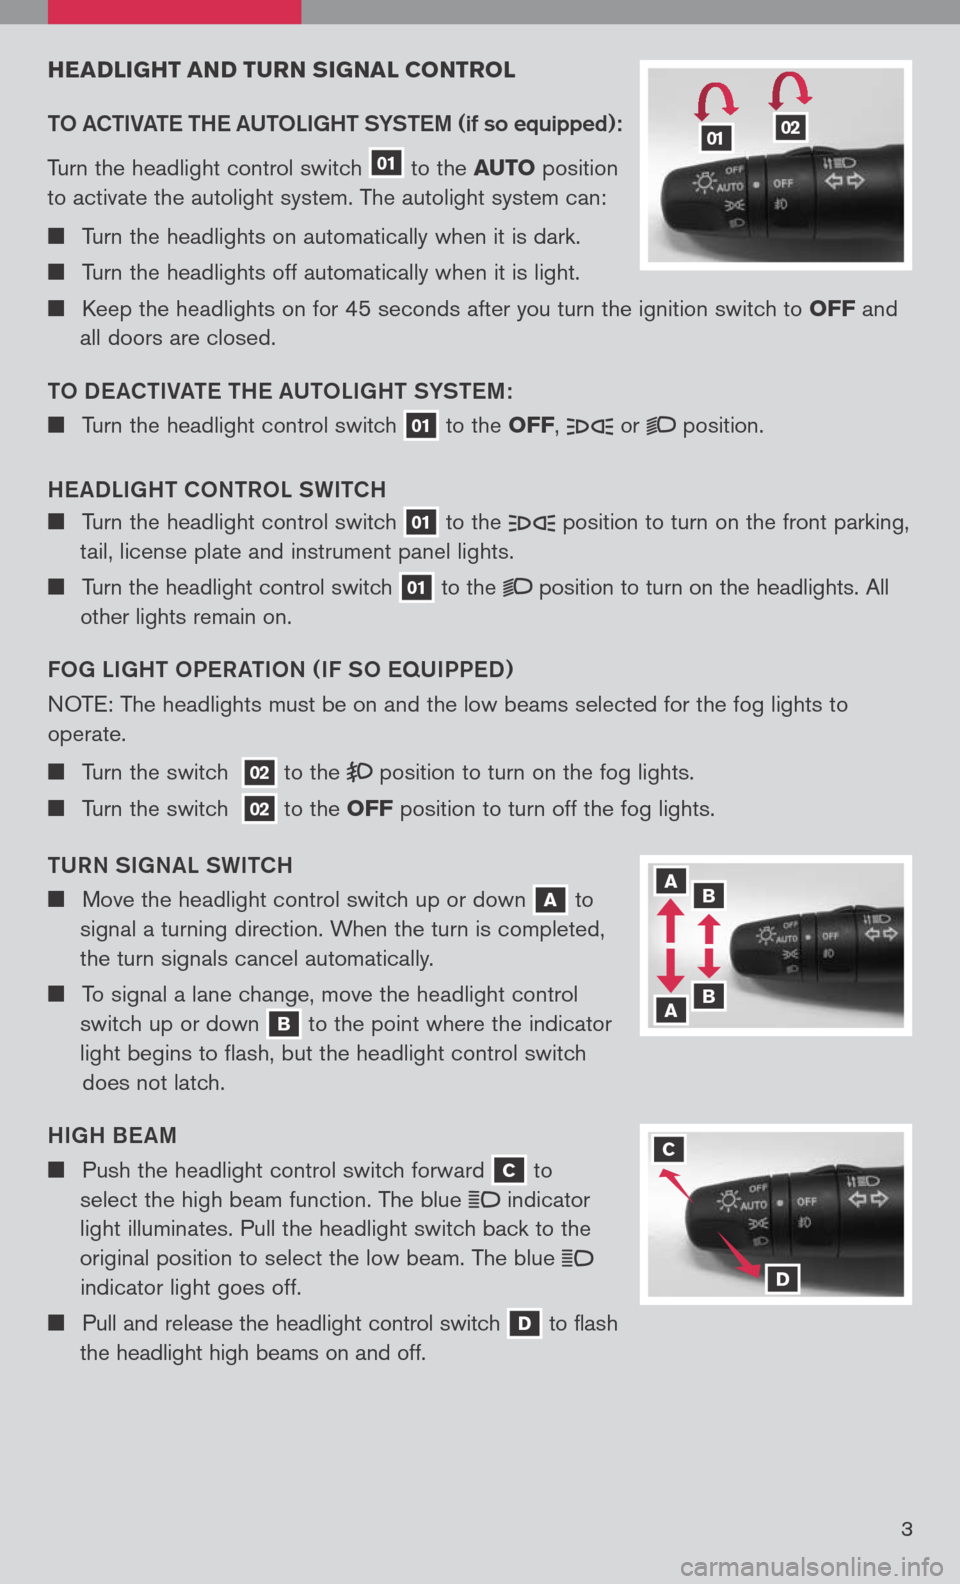
HEADLIgHT AND T uRN sIg NAL CONTROL
TO aCTIV aTe TH e a UTOLI gHT SYST eM
(if so equipped):
Turn the headlight control switch
01
to the AuTO position
to activate the autolight system. The autolight system can:
Turn the headlights on automatically when it is dark.
Turn the headlights off automatically when it is light.
Keep the headlights on for 45 seconds after you turn the ignition switch to OFF and
all doors are closed.
TO D eaCTIV aTe TH e aUTOLI gHT SYST eM :
Turn the headlight control switch 01 to the OFF, or position.
H ea DLI gHT CONTROL SWITCH
Turn the headlight control switch 01 to the position
to turn on the front parking,
tail, license plate and instrument panel lights.
Turn the headlight control switch 01 to the position
to turn on the headlights. All
other lights remain on.
FO g LI gHT OP eR aTION ( IF SO eq UIPPeD )
N OTE: The headlights must be on and the low beams selected for the fog lights to
operate.
Turn the switch 02 to the position
to turn on the fog lights.
Turn the switch 02 to the OFF position to turn off the fog lights.
TURN SI gNaL SWITCH
Move the headlight control switch up or down A to
signal a turning direction. When the turn is completed,
the turn signals cancel automatically.
To signal a lane change, move the headlight control
switch up or down
B to the point where the indicator
light begins to flash, but the headlight control switch
does not latch.
HI gH B eaM
Push the headlight control switch forward C to
select the high beam function. The blue
indicator
light illuminates. Pull the headlight switch back to the
original position to select the low beam. The blue
indicator light goes off.
Pull and release the headlight control switch D to flash
the headlight high beams on and off.
0102
A B
B A
C
D
3
Page 6 of 36
4
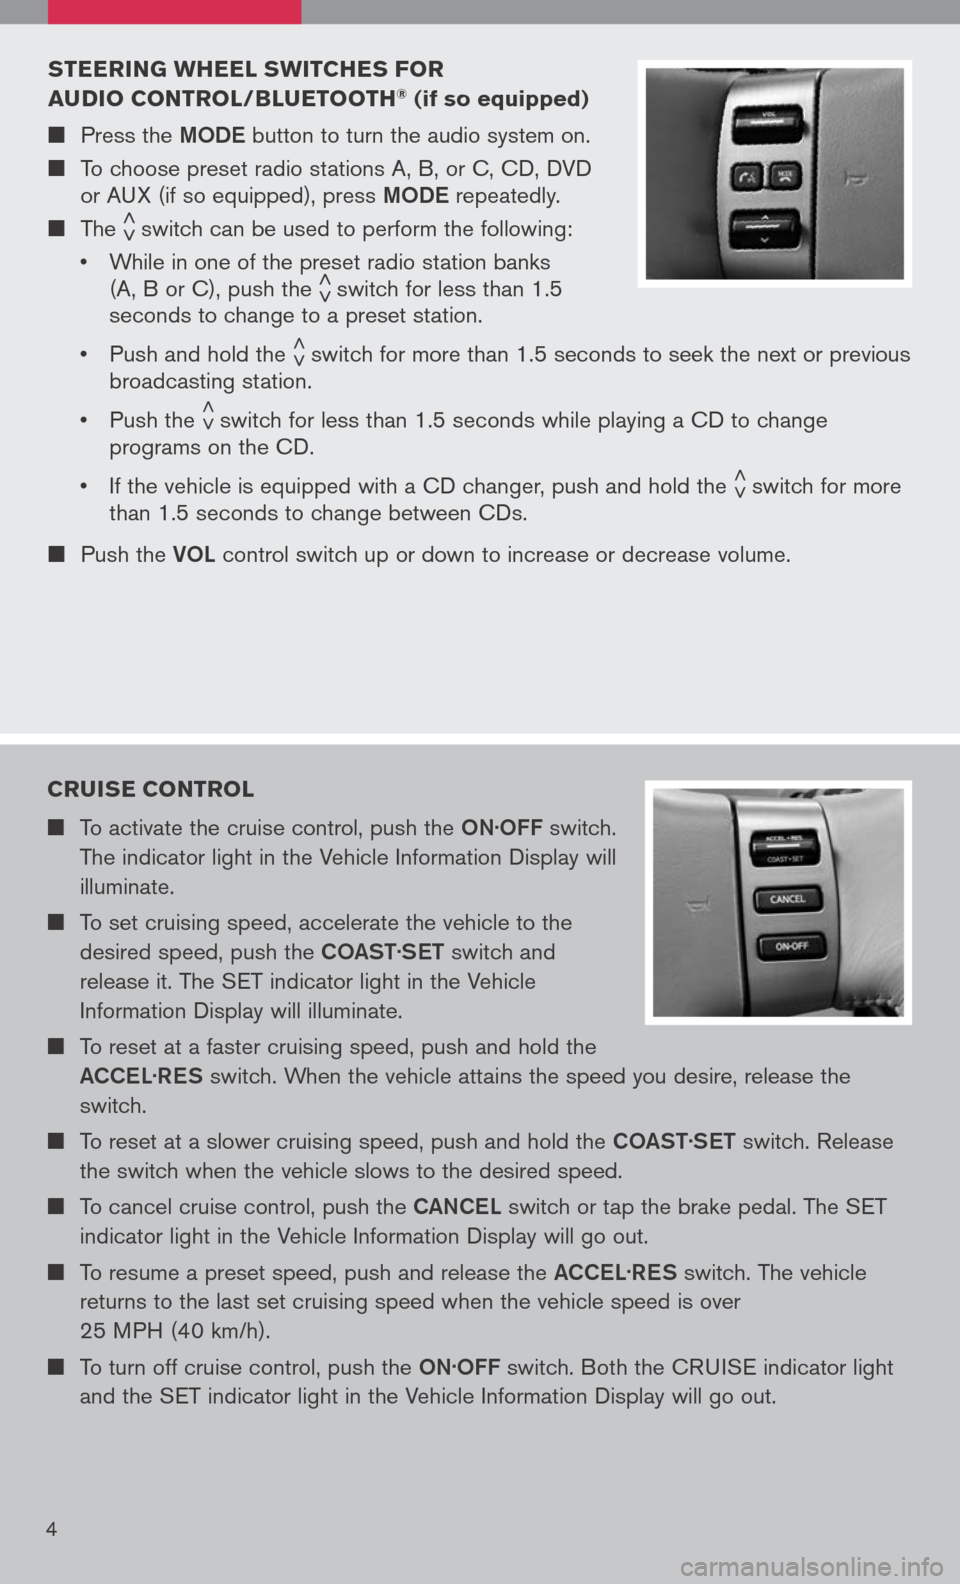
sTEERIN g wHEEL swITCHE s FOR
A u DIO CONTROL/B Lu ETOOTH® (if so equipped)
Press the MODe button to turn the audio system on.
To choose preset radio stations A, B, or C, CD, DVD
or AUX (if so equipped), press MODe repeatedly.
The < >switch can be used to perform the following:
• While in one of the preset radio station banks
(A, B or C), push the < >switch for less than 1.5
seconds to change to a preset station.
• Push and hold the
< >switch for more than 1.5 seconds to seek the next or previous
broadcasting station.
• Push the
< >switch for less than 1.5 seconds while playing a CD to change
programs on the CD.
• If the vehicle is equipped with a CD changer, push and hold the
< >switch for more
than 1.5 seconds to change between CDs.
Push the VOL control switch up or down to increase or decrease volume.
CRuIs E CONTROL
To activate the cruise control, push the ON.OFF switch.
The indicator light in the Vehicle Information Display will
illuminate.
To set cruising speed, accelerate the vehicle to the
desired speed, push the COaST.
S eT switch and
release it. The SET indicator light in the Vehicle
Information Display will illuminate.
To reset at a faster cruising speed, push and hold the
a CCe L.
R eS switch. When the vehicle attains the speed you desire, release the
switch.
To reset at a slower cruising speed, push and hold the COaST.
S eT switch. Release
the switch when the vehicle slows to the desired speed.
To cancel cruise control, push the CaNCe L switch or tap the brake pedal. The SET
indicator light in the Vehicle Information Display will go out.
To resume a preset speed, push and release the aCCe L.
R eS switch. The vehicle
returns to the last set cruising speed when the vehicle speed is over
25 MPH (40 km/h).
To turn off cruise control, push the ON.OFF switch. Both the CRUISE indicator light
and the SET indicator light in the Vehicle Information Display will go out.
Page 7 of 36
5
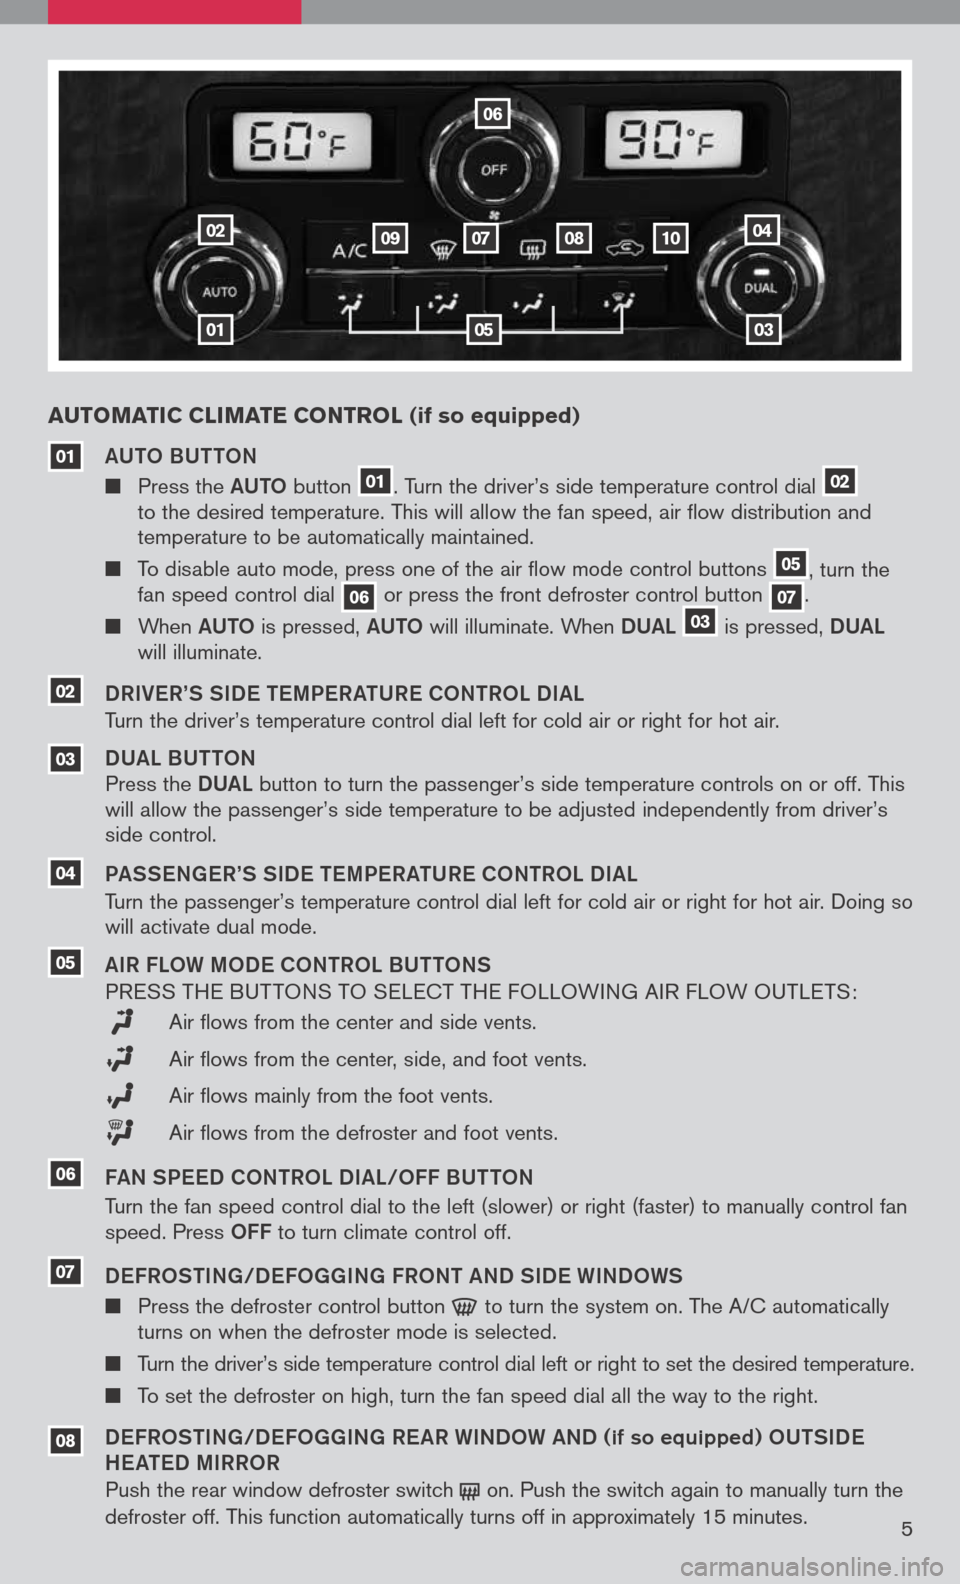
Au TOMATIC CLIMATE CONTROL (if so equipped)
01
02
03
04
06
07080910
05
aUTO BUTTON
Press the aUTO button
01. Turn the driver’s side temperature control dial 02
to the desired temperature. This will allow the fan speed, air flow distribution and
temperature to be automatically maintained.
To disable auto mode, press one of the air flow mode control buttons
05, turn the
fan speed control dial
06or press the front defroster control button 07.
When aUTO is pressed, aUTO will illuminate. When DUaL 03 is
pressed, DUaL
will illuminate.
DRIV eR’S SID e TeMP eR aTUR e CO NTROL DI aL
Turn the driver’s temperature control dial left for cold air or right for hot air.
DUa L BUTTON
Press the DUaL
button
to turn the passenger’s side temperature controls on or off. This
will allow the passenger’s side temperature to be adjusted independently from driver’s
side control.
P a SS eN ge R’S SID e TeMP eR aTUR e CONTROL DI aL
Turn the passenger’s temperature control dial left for cold air or right for hot air. Doing so
will activate dual mode.
a IR FLOW MOD e CONTROL BUTTONS
P RESS THE BUT TONS TO SELECT THE FOLLOWING AIR FLOW OUTLETS :
Air flows from the center and side vents.
Air flows from the center, side, and foot vents.
Air flows mainly from the foot vents.
Air flows from the defroster and foot vents.
F a N SP eeD CONTROL DI aL/OFF BUTTON
Turn the fan speed control dial to the left (slower) or right (faster) to manually control fan
speed. Press
OFF to turn climate control off.
D eFROSTIN g/D eFO gg INg FRONT aND SID e WINDOWS
Press the defroster control button to
turn the system on. The A/C automatically
turns on when the defroster mode is selected.
Turn the driver’s side temperature control dial left or right to set the desired temperature.
To set the defroster on high, turn the fan speed dial all the way to the right.
D eFROSTIN g/D eFO gg INg R eaR WINDOW aND (if so equipped) OUTSID e
H ea Te D MIRROR
Push the rear window defroster switch
on.
Push the switch again to manually turn the
defroster off. This function automatically turns off in approximately 15 minutes .
04
03
01
05
08
07
02
06
Page 8 of 36
6
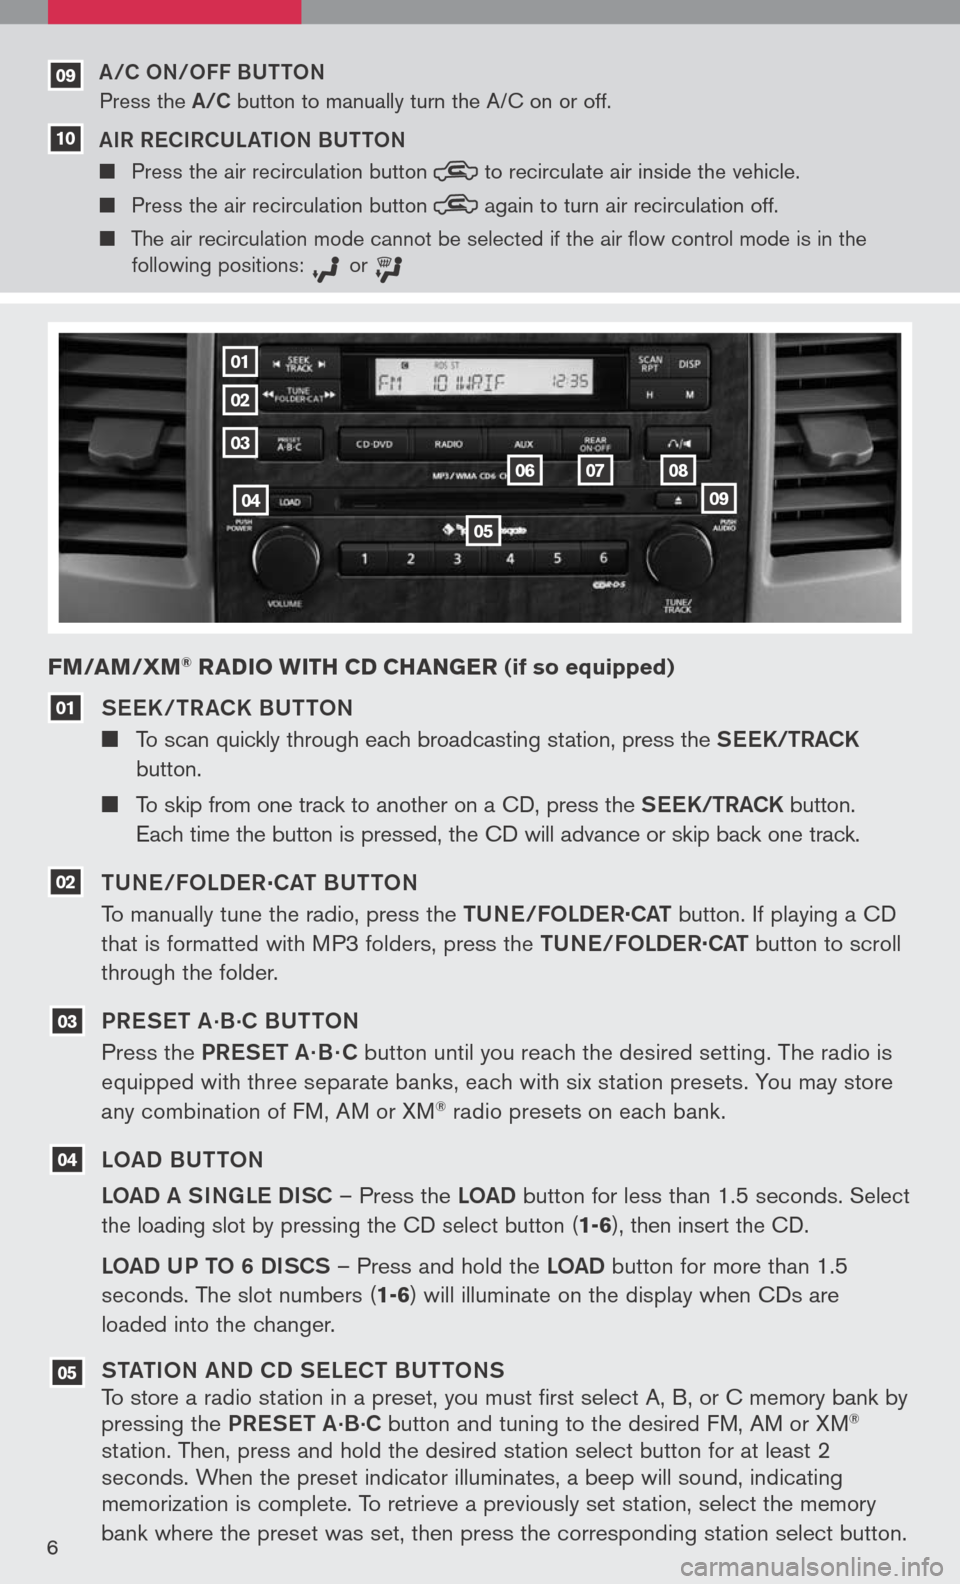
See K / TR aCK BUTTON
To scan quickly through each broadcasting station, press the S ee K/TR aCK
button.
To skip from one track to another on a CD, press the S ee K/TR aCK button.
Each time the button is pressed, the CD will advance or skip back one track.
TUN e/FOLD eR
.
C aT BUTTON
To manually tune the radio, press the TUN e/FOLDe R
.
C aT button. If playing a CD
that is formatted with MP3 folders, press the TUN e/FOLDe R
.
C aT button to scroll
through the folder.
PR eS eT a
.B.C BUTTON
Press the PR eS eT a· B · C button until you reach the desired setting. The radio is
equipped with three separate banks, each with six station presets. You may store
any combination of FM, AM or XM
® radio presets on each bank.
LO aD BUTTON
LO aD a SINg Le DISC – Press the LOaD button for less than 1.5 seconds.
Select
the loading slot by pressing the CD select button
(1-6), then insert the CD.
LOaD UP TO 6 DISCS – Press and hold the LOaD button for more than 1.5
seconds. The slot numbers (
1-6) will illuminate on the display when CDs are
loaded into the changer.
ST aTION aND CD S eLe CT BUTTONS
To store a radio station in a preset, you must first select A, B, or C memory bank by
pressing the PReS eT a
.B.C button and tuning to the desired FM, AM or XM®
station. Then, press and hold the desired station select button for at least 2
seconds. When the preset indicator illuminates, a beep will sound, indicating
memorization is complete. To retrieve a previously set station, select the memory
bank where the preset was set, then press the corresponding station select button.
FM/AM/ xM® RADIO wITH CD CHAN gER (if so equipped)
05
04
03
02
01
01
02
03
04
05
060708
09
a/C ON/OFF BUTTON
Press the a/C button to manually turn the A/C on or off.
a IR R eCIRCUL aTION BUTTON
Press the air recirculation button to
recirculate air inside the vehicle.
Press the air recirculation button again
to turn air recirculation off.
The air recirculation mode cannot be selected if the air
flow control mode is in the
following positions: or
09
10
Page 9 of 36
* XM® presets are only available on XM® Satellite Radio equipped vehicles.
07
06
08
09
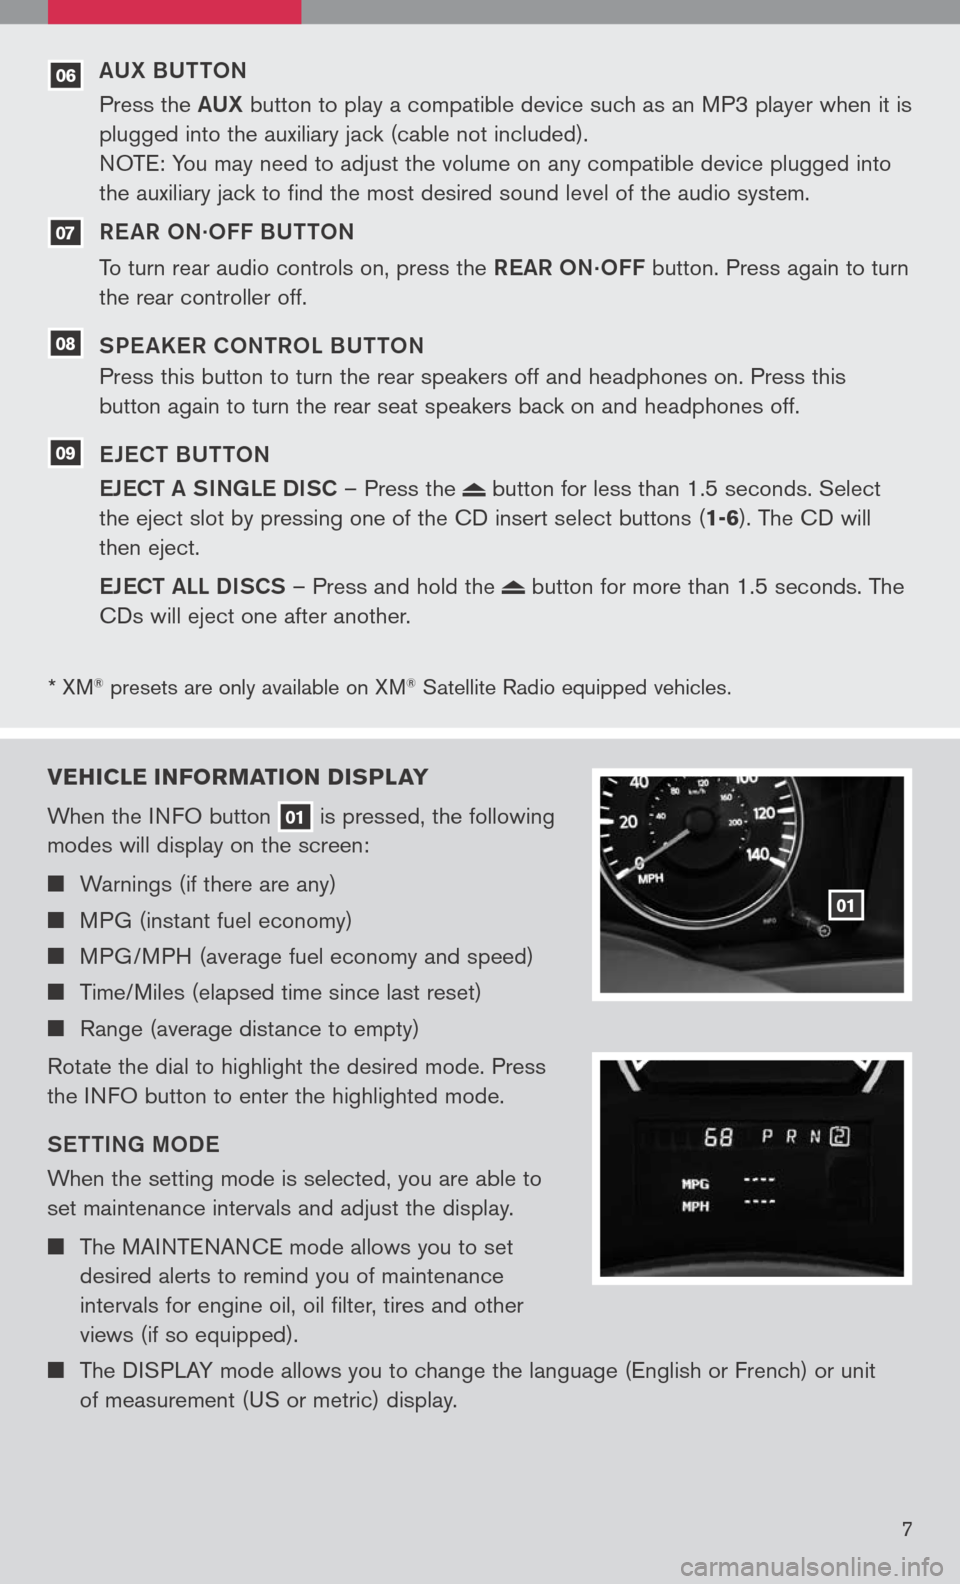
VEHICLE INFORMATION DI sPLAY
When the INFO button
01 is pressed, the following
modes will display on the screen:
Warnings (if there are any)
MPG (instant fuel economy)
MPG/MPH (average fuel economy and speed)
Time/Miles (elapsed time since last reset)
Range (average distance to empty)
Rotate the dial to highlight the desired mode. Press
the INFO button to enter the highlighted mode.
S eTTIN g MOD e
When the setting mode is selected, you are able to
set maintenance intervals and adjust the display.
The MAINTENANCE mode allows you to set
desired alerts to remind you of maintenance
intervals for engine oil, oil filter, tires and other
views (if so equipped).
The DISPLAY mode allows you to change the language (English or French) or unit
of measurement (US or metric) display.
01
7
aUX BUTTON
Press the aUX button to play a compatible device such as an MP3 player when it is
plugged into the auxiliary jack (cable not included).
NOTE: You may need to adjust the volume on any compatible device plugged into
the auxiliary jack to find the most desired sound level of the audio system.
R e a R ON
.OFF BUTTON
To turn rear audio controls on, press the ReaR
ON.OFF button. Press again to turn
the rear controller off.
SP e aKeR CONTROL BUTTON
Press this button to turn the rear speakers off and headphones on. Press this
button again to turn the rear seat speakers back on and headphones off.
e Je CT BUTTON
e JeCT a SINg Le DISC – Press the
button for less than 1.5 seconds. Select
the eject slot by pressing one of the CD insert select buttons (
1-6). The CD will
then eject.
e JeCT aLL DISCS – Press and hold the
button for more than 1.5 seconds. The
CDs will eject one after another.
Page 10 of 36
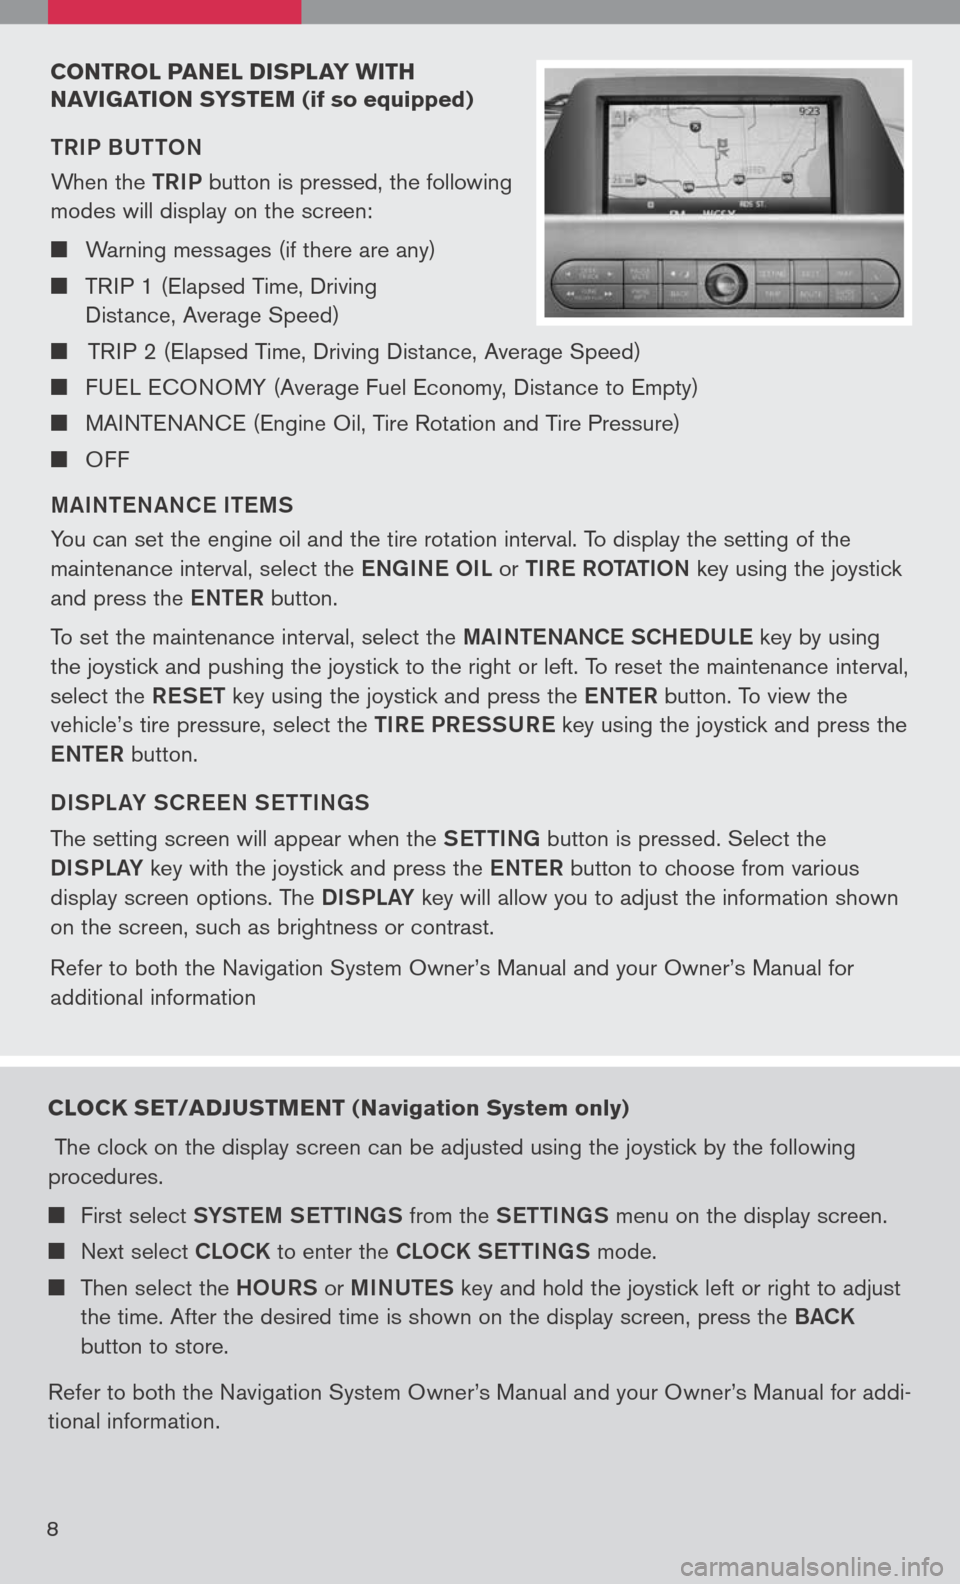
CONTROL PANEL DIsPLAY w ITH
N AVI gATION sY sTEM
(if so equipped)
TRIP BUTTON
When the
TRIP button is pressed, the following
modes will display on the screen:
Warning messages (if there are any)
TRIP 1 (Elapsed Time, Driving
Distance, Average Speed)
TRIP 2 (Elapsed Time, Driving Distance, Average Speed)
FUEL ECONOMY (Average Fuel Economy, Distance to Empty)
MAINTENANCE (Engine Oil, Tire Rotation and Tire Pressure)
OFF
M aINT eN aNC e IT eMS
You can set the engine oil and the tire rotation interval. To display the setting of the
maintenance interval, select the eNg INe OIL or TIR e ROT aTION key using the joystick
and press the eNTe R button.
To set the maintenance interval, select the MaINTe NaNCe SCH eDUL e key by using
the joystick and pushing the joystick to the right or left. To reset the maintenance interval,
select the ReSeT key using the joystick and press the eNTe R button. To view the
vehicle’s tire pressure, select the TIRe PR eSSUR e key using the joystick and press the
e NTe R button.
DISPL aY SCR eeN S eTTIN gS
The setting screen will appear when the SeTTINg button is pressed. Select the
DISPLa Y key with the joystick and press the eNTe R button to choose from various
display screen options. The DISPLa Y key will allow you to adjust the information shown
on the screen, such as brightness or contrast.
Refer to both the Navigation System Owner’s Manual and your Owner’s Manual for
additional information
8
CLOCK sET/ADJ usTMENT ( Navigation system only)
The clock on the display screen can be adjusted using the joystick by the following
procedures.
First select SYSTe M SeTTINg S from the SeTTINg S menu on the display screen.
Next select CLOCK to enter the CLOCK S eTTINgS mode.
Then select the HOURS or MINUTe S key and hold the joystick left or right to adjust
the time. After the desired time is shown on the display screen, press the BaCK
button to store.
Refer to both the Navigation System Owner’s Manual and your Owner’s Manual for addi
-
tional information.