CD player NISSAN XTERRA 2000 WD22 / 1.G User Guide
[x] Cancel search | Manufacturer: NISSAN, Model Year: 2000, Model line: XTERRA, Model: NISSAN XTERRA 2000 WD22 / 1.GPages: 263, PDF Size: 2.16 MB
Page 116 of 263
CAUTION
ODuring cold weather or rainy days,
the player may malfunction due to
the humidity. If this occurs, remove
the CD and dehumidify or ventilate
the player completely.
OThe player may skip while driving on
rough roads.
OThe CD player sometimes cannot
function when the compartment tem-
perature is extremely high. Decrease
the temperature before use.
ODo no expose the CD to direct sun-
light.
ODo not touch the playing surface of
the disc.
ODo not use 8cm CD adapters as this
will cause damage even if using with
the optional adapter.
ORecordable compact discs (CD-R)
may not function properly in the CD
player.
Heater, air conditioner and audio systems
4-27
ZX
Page 117 of 263

AM-FM RADIO WITH CASSETTE
PLAYER AND COMPACT DISC
PLAYER (if so equipped)
ONzOFF/VOL control knob
Turn the ignition key to the ACC or ON
position, then push the ONzOFF/VOL con-
trol knob button. If you listen to the radio
with the engine not running, turn the key to
the ACC position. The mode (radio, tape or
CD) which was playing immediately before
the system was turned off resumes playing.
When no CD or tape is loaded, the radio
comes on. Push the ONzOFF/VOL control
knob button again turns the system off.
Turn the ONzOFF/VOL control knob to ad-
just the volume.
Clock operation
Pressing the clock button displays the clock.
Clock set
Press the CLOCK button for more than 2
seconds the radio beeps and the hours
flash, use the TUNE/FF-REW
but-
tons to set the hour, press the CLOCK
button again until the radio beeps and the
minutes flash, use the TUNE/FF-REW
AHA1112
4-28Heater, air conditioner and audio systems
ZX
Page 121 of 263
CASSETTE TAPE OPERATION
Turn the ignition key to the ACC or ON
position, and carefully insert a cassette tape
into the tape door. The cassette tape auto-
matically pulls into the player. The word
TAPE illuminates in the display. If the radio
is already operating it automatically turns off
and the cassette tape begins to play.
CAUTION
Do not force the cassette tape into the
tape door. This could cause player
damage.
The cassette tape automatically changes
directions to play the other side when the
first side is complete.
Precautions on cassette player op-
eration
OTo maintain good quality sound,
NISSAN recommends using cassette
tapes of 60 minutes or shorter in
length.
OCassette tapes should be removed
from the player when not in use. Store
cassettes in their protective cases
and away from direct sunlight, heat,dust, moisture or magnetic sources.
ODirect sunlight can cause the cassette
to become deformed. The use of de-
formed cassettes may cause the cas-
sette to jam in the player.
ODo not use cassettes that have peel-
ing or loose labels. If used, the label
could jam in the player.
OIf a cassette has loose tape, insert a
pencil through one of the cassette
hubs and rewind the tape firmly.
Loose tape may cause jamming and
wavering sound quality.
OOver a period of time, the playback
head, capstan and pinch roller may
gather a tape coating residue as the
tape is played. This residue accumu-
lation can cause a weak or wavering
sound and should be removed peri-
odically with a head cleaning tape. If
the residue is not removed periodi-
cally, the player may need to be disas-
sembled for cleaning.
PLAY/STOP TAPE button
When thebutton is pushed with the
system turned off and a tape loaded, the
system comes on and the tape plays.The word TAPE illuminates.
When the
button is pushed with either
the radio or compact disc turned on and a
tape loaded, the compact disc or the radio
turns off and the tape plays.
While the tape is playing, pushing the
button stops tape play. Pushing the
button again resumes tape play.
FF (fast forward) and REW (rewind)
buttons
Push thebutton to fast forward the
tape. Push the
button to rewind the
tape. Either REW or FF illuminates in the
display. To stop the FF or REW function,
press the
,,orbuttons.
Automatic Program Search (APS)
SEEK/SCAN buttons
When thebutton is pushed while the
tape is being played, the tape runs quickly,
stops, then plays the next selection from the
beginning. Push the
button several times
to skip several selections. Each time the
button is pushed, the tape fast forwards one
additional selection. This number appears in
4-32Heater, air conditioner and audio systems
ZX
Page 122 of 263
the display window. The tape can be fast
forwarded through up to nine selections. (for
example: 7 in the display indicates that the
button has been pushed seven times to
skip forward through seven selections).
When the
button is pushed, the selection
being played starts again from the begin-
ning. Push the
button several times to
rewind several selections. Each time the
button is pushed, the tape rewinds back
one additional selection. The number of
selections skipped appears in the display
window as a negative number (for example:
-7 in the display indicates that the
button
has been pushed seven times to rewind
back through seven selections). To stop
APS
or, press thebutton.
Either the FF or REW illuminates in the
display when the
(REW) or(FF) but-
ton is pushed.
The system searches for the blank intervals
between selections. If there is a blank inter-
val within one selection or there is no inter-
val between selections, the system may not
stop in the desired or expected location.
SIDE button
Push thebutton to change the tape side
while the tape is being played.
The cassette tape automatically changes
directions to play the other side when the
first side is complete.
Dolby NR (noise reduction)
Push thebutton for Dolby NR encoded
tapes to reduce high frequency tape noise.
The
indicator illuminates in the display.
Dolby NR is manufactured under license
from Dolby Laboratories Licensing Corpora-
tion. DOLBY NR and the double-D symbol
are trademarks of Dolby Laboratories Li-
censing Corporation.
Metal or chrome tape usage
The cassette player is automatically set to
high performance play when playing a metal
or chrome cassette tape.
TAPE EJECT button
Push thebutton to eject an inserted
cassette tape.
COMPACT DISC (CD) PLAYER
OPERATION
Turn the ignition key to the ACC or ON
position and carefully insert the compact
disc into the slot with the label side up. The
compact disc is automatically pulled into the
slot and starts to play.
If the radio or cassette tape is already
operating, it automatically turns off and the
compact disc begins to play.
CAUTION
Do not force the compact disc into the
slot. This could damage the player.
CD button
When thebutton is pushed with the
compact disc loaded and the tape or the
radio playing, the tape or radio turns off and
compact disc starts to play.
FF (fast forward) REW (rewind)
buttons
When theorbutton is pushed
while the compact disc is playing, the com-
pact disc plays at an increased speed while
Heater, air conditioner and audio systems
4-33
ZX
Page 123 of 263
fast forwarding or rewinding. When the but-
ton is released, the compact disc returns to
normal play speed.
Automatic Program Search (APS)
APS FF, APS REW buttons
When thebutton is pushed while the
compact disc is playing, the selection fol-
lowing the present one starts to play from
the beginning. Push the
button several
times to skip several selections. Each time
the button is pushed, the CD advances one
additional selection. The number appears in
the display window. (When the last selection
on the compact disc is skipped, the first
selection is played.)
When the
button is pushed, the selection
being played returns to the beginning. Push
the
button several times to skip back
several selections. Each time the button is
pushed, the CD moves back one selection.
If the play pattern is in RANDOM mode
when the
orbuttons are pushed the
next selection will be chosen at random.
RPT/RDM
(repeat/random) button
When thebutton is pushed while the
compact disc is playing, the play pattern
changes as follows.
1.The current selection is repeated.
RANDOM:Selections are played at ran-
dom, not following the sequence on the
compact disc. The same program may be
repeated twice. If the
button is pushed
in the RANDOM mode, selections will be
chosen at random.
Blank(no symbol): All selections are played
repeatedly in sequence.
When a new compact disc is inserted,
the play pattern automatically changes
to ALL.
CD EJECT button
When thebutton is pushed with a com-
pact disc loaded, the compact disc ejects.
When the
button is pushed while the
compact disc is playing, the compact disc
ejects and the system turns off.
If the compact disc ejects and is notremoved within 10 seconds, it is pulled
back into the slot.
CD (DISC) indicator light
This light comes on when a compact disc is
loaded into the player.
4-34Heater, air conditioner and audio systems
ZX
Page 124 of 263
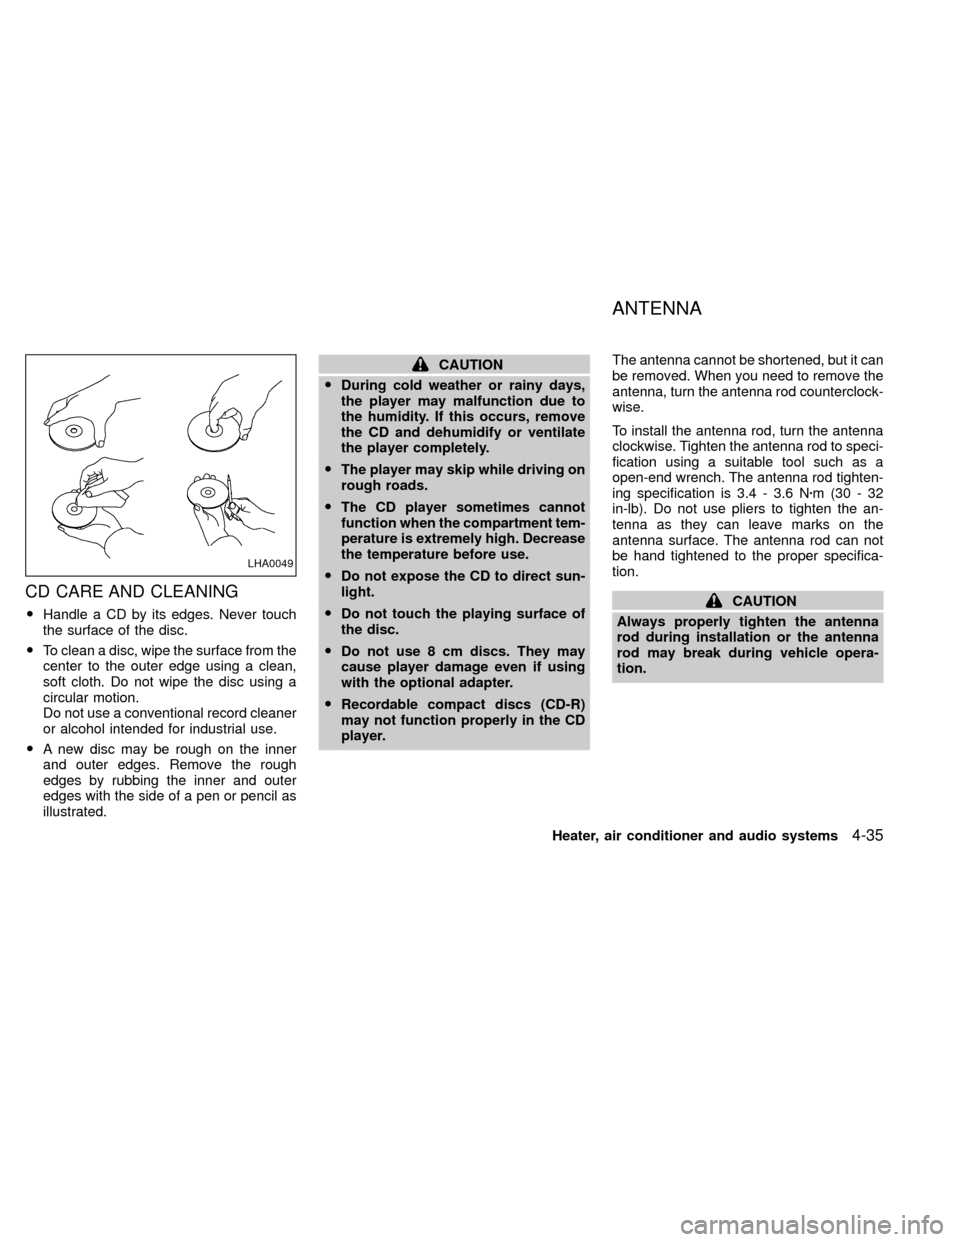
CD CARE AND CLEANING
OHandle a CD by its edges. Never touch
the surface of the disc.
OTo clean a disc, wipe the surface from the
center to the outer edge using a clean,
soft cloth. Do not wipe the disc using a
circular motion.
Do not use a conventional record cleaner
or alcohol intended for industrial use.
OA new disc may be rough on the inner
and outer edges. Remove the rough
edges by rubbing the inner and outer
edges with the side of a pen or pencil as
illustrated.
CAUTION
ODuring cold weather or rainy days,
the player may malfunction due to
the humidity. If this occurs, remove
the CD and dehumidify or ventilate
the player completely.
OThe player may skip while driving on
rough roads.
OThe CD player sometimes cannot
function when the compartment tem-
perature is extremely high. Decrease
the temperature before use.
ODo not expose the CD to direct sun-
light.
ODo not touch the playing surface of
the disc.
ODo not use 8 cm discs. They may
cause player damage even if using
with the optional adapter.
ORecordable compact discs (CD-R)
may not function properly in the CD
player.The antenna cannot be shortened, but it can
be removed. When you need to remove the
antenna, turn the antenna rod counterclock-
wise.
To install the antenna rod, turn the antenna
clockwise. Tighten the antenna rod to speci-
fication using a suitable tool such as a
open-end wrench. The antenna rod tighten-
ing specification is 3.4 - 3.6 Nzm(30-32
in-lb). Do not use pliers to tighten the an-
tenna as they can leave marks on the
antenna surface. The antenna rod can not
be hand tightened to the proper specifica-
tion.
CAUTION
Always properly tighten the antenna
rod during installation or the antenna
rod may break during vehicle opera-
tion.
LHA0049
ANTENNA
Heater, air conditioner and audio systems4-35
ZX
Page 256 of 263
11 Index
A
Air bag (See supplemental restraint
system) ........................................................ 1-9
Air bag warning light .................................. 1-11
Air cleaner housing filter ............................ 8-20
Air conditioner
Air conditioner operation ........................ 4-5
Air conditioner service ............................ 4-9
Air conditioner specification label ....... 10-14
Air conditioner system refrigerant and
lubrication recommendations ................ 10-8
Heater and air conditioner controls ........ 4-3
Air flow charts .............................................. 4-6
Alarm system (See theft warning) ............. 2-12
Anchor point locations ............................... 1-32
Antenna...................................................... 4-35
Anti-lock brake system (ABS).................... 5-25
Anti-lock brake warning light ..................... 2-10
Ashtray (See cigarette lighter and
ashtray) ...................................................... 2-19
Audio system
AM-FM radio with cassette player ........ 4-10
AM-FM radio with cassette player and
compact disc player.............................. 4-28
AM-FM radio with compact disc (CD)
player .................................................... 4-22
FM-AM radio with compact disc (CD)
player .................................................... 4-15Auto-lock free-running hubs ...................... 5-20
Automatic
Automatic power window switch .......... 2-27
Automatic transmission fluid (ATF)....... 8-13
Driving with automatic transmission ....... 5-8
Transmission selector lever lock
release .................................................. 5-11
B
Battery........................................................ 8-16
Battery replacement (See multi-remote
control system) ............................................ 3-7
Before starting the engine ........................... 5-8
Belts (See drive belts) ............................... 8-18
Brake
Anti-lock brake system (ABS) .............. 5-25
Brake booster ....................................... 8-25
Brake fluid ................................... 10-3, 8-15
Brake light (See stop light) ................... 8-30
Brake pedal .......................................... 8-24
Brake system ........................................ 5-24
Brake warning light ................................. 2-8
Brake wear indicators .................. 2-11, 8-25
Parking brake check ............................. 8-24
Parking brake operation ....................... 5-15
Break-in schedule ...................................... 5-18
Bulb check/instrument panel ....................... 2-7Bulb replacement ....................................... 8-30
C
Capacities and recommended fuel/
lubricants.................................................... 10-2
Cargo (See vehicle loading
information) .............................................. 10-15
Cassette player (See audio system) ......... 4-10
CB radio or car phone ............................... 4-36
Check engine indicator light
(See malfunction indicator light) ................ 2-11
Child restraint with top tether strap ........... 1-31
Child restraints ........................................... 1-22
Child safety rear door lock .......................... 3-4
Cigarette lighter (accessory) and
ashtray ....................................................... 2-19
Cleaning exterior and interior ...................... 7-2
Clock .......................................................... 4-17
Clutch
Clutch fluid ............................................ 8-15
Clutch pedal.......................................... 8-26
Cold weather driving .................................. 5-26
Controls
Heater and air conditioner controls ........ 4-3
Coolant
Capacities and recommended fuel/
lubricants .............................................. 10-2
ZX
Page 259 of 263
O
Octane rating (See fuel octane rating) ...... 10-4
Odometer ..................................................... 2-3
Oil
Capacities and recommended fuel/
lubricants .............................................. 10-2
Changing engine oil.............................. 8-10
Changing engine oil filter...................... 8-12
Checking engine oil level ....................... 8-9
Engine oil ................................................ 8-9
Engine oil and oil filter
recommendation ................................... 10-6
Engine oil viscosity ............................... 10-7
Outside mirror control ................................ 3-15
Outside mirrors .......................................... 3-16
Overheat
If your vehicle overheats ...................... 6-10
Owner's manual order form ..................... 10-29
P
Pantograph type jack ................................... 6-6
Parking
Parking brake check ............................. 8-24
Parking brake operation ....................... 5-15
Parking/parking on hills ........................ 5-23
Periodic maintenance schedules ................. 9-5
Power
Power door locks .................................... 3-3
Power steering fluid .............................. 8-14Power steering system ......................... 5-24
Power windows..................................... 2-25
Precautions
Maintenance precautions ....................... 8-2
On-pavement and off-road driving
precautions ............................................. 5-3
Precautions on seat belt usage............ 1-13
Precautions when starting and driving ... 5-2
Push starting .............................................. 6-10
R
Radio
AM-FM radio with cassette player ........ 4-10
AM-FM radio with cassette player and
compact disc player.............................. 4-28
AM-FM radio with compact disc (CD)
player .................................................... 4-22
CB radio or car phone .......................... 4-36
FM-AM radio with compact disc (CD)
player .................................................... 4-15
Readiness for inspection maintenance
(I/M) test................................................... 10-27
Rear anti-lock brake warning light ............. 2-10
Rear door lock ........................................... 3-10
Rear seat ..................................................... 1-4
Rear window defogger switch ................... 2-18
Rear window wiper and washer
switches ..................................................... 2-17
Registering your vehicle in another
country ..................................................... 10-12Remote keyless entry system
(See multi-remote control system) .............. 3-4
Reporting safety defects (USA) ............... 10-27
Roof rack with gear basket ........................ 3-11
S
Safety
Child safety rear door lock ..................... 3-4
Reporting safety defects (USA) .......... 10-27
Seat belt
Precautions on seat belt usage............ 1-13
Seat belt extenders .............................. 1-21
Seat belt maintenance.......................... 1-21
Seat belts.............................................. 1-13
Three-point type with retractor ............. 1-16
Two-point type without retractor
(rear center lap belt) ............................. 1-19
Seat belt warning light ................................. 2-8
Seats
Adjustment .............................................. 1-2
Rear seat ................................................ 1-4
Separate seats ....................................... 1-2
Service manual order form ...................... 10-29
Shifting
Manual transmission............................. 5-13
Skyroof ....................................................... 2-27
Spark plug replacement............................. 8-19
Speedometer ............................................... 2-3
Spotlights (See map light) ......................... 2-24
SRS warning label ..................................... 1-11
11-4
ZX