turn signal OLDSMOBILE AURORA 1996 Owners Manual
[x] Cancel search | Manufacturer: OLDSMOBILE, Model Year: 1996, Model line: AURORA, Model: OLDSMOBILE AURORA 1996Pages: 388, PDF Size: 20.24 MB
Page 7 of 388

.nu-=* UJ LLlUUl
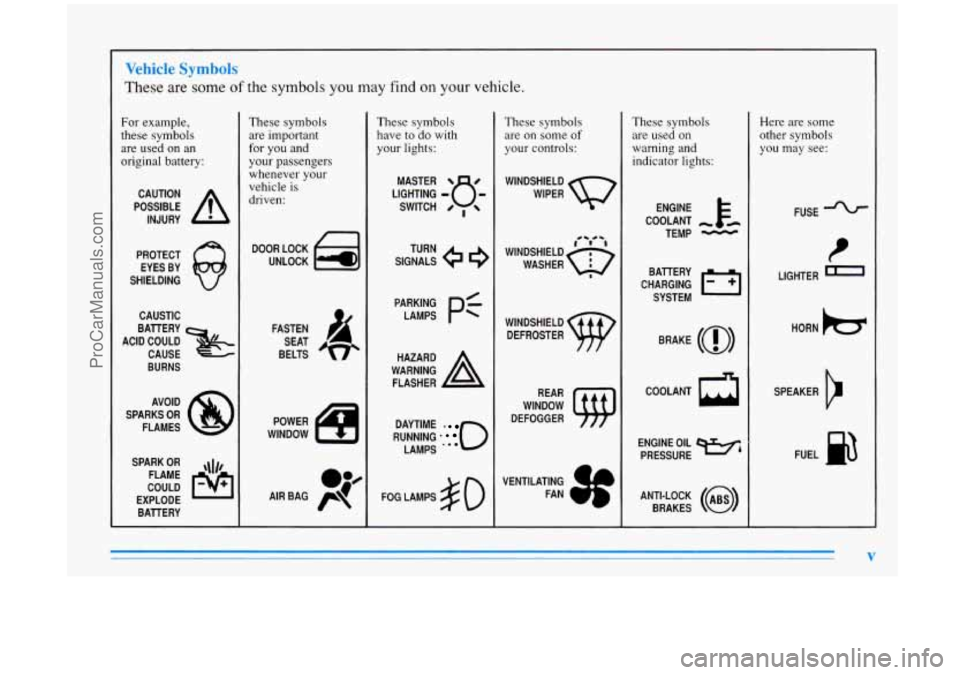
I nese are some of the symbols you may find on your vehicle.
For example,
these symbols
are used on an
original battery:
POSSIBLE A
CAUTION
INJURY
PROTECT EYES BY
SHIELDING
CAUSTIC
BURNS
SPARK
OR ,\I/,
COULD FLAME
EXPLODE BAllERY
These symbols are important
for you and
your passengers whenever your
vehicle
is
driven:
DOOR LOCK
UNLOCK
FASTEN SEAT
BELTS
These symbols have to do with
your lights:
SIGNALS e
TURN
RUNNING
* 0
DAYTIME -
LAMPS .**
FOG LAMPS $0
These symbols
are
on some of
your controls:
WINDSHIELD
WIPER
WINDSHIELD DEFROSTER
WINDOW
DEFOGGER
VENTILATING FAN
These symbols are used on
warning and
indicator lights:
COOLANT -
TEMP -
CHARGING I-1
BAllERY
SYSTEM
BRAKE
(0)
ENGINE OIL w,
PRESSURE
ANTI-LOCK
(@)
BRAKES
Here are some
other symbols
you may see:
FUSE
t
LIGHTER -
HORN )cr
SPEAKER
b
FUEL e3
ProCarManuals.com
Page 66 of 388

This provides feedback to the driver when the vehicle
receives a command from the key transmitter. The
following modes may be selected:
Mode Transmitter Response
Y' .
0
1
2
3
4
5
No transmitter response when locking or
unlocking vehicle
No transmitter response when locking;
exterior lamps flash when unlocking vehicle
Exterior lamps flash when locking; no
transmitter response when unlocking vehicle
Exterior lamps flash when locking and when
unlocking vehicle
Exterior lamps flash and horn chirps when
locking; no transmitter response when
unlocking vehicle
Exterior lamps flash and horn chirps when
locking; exterior lamps flash when unlocking Vehicles
are delivered programmed in Mode
5. To
change to another mode:
1. Press and hold the power door lock switch.
2. Press the opened trunk button on the transmitter. The
3. Press the opened trunk button again. Each time the
opened trunk button is pressed, the transmitter will
advance to the next mode.
transmitter will remain
in its current mode.
4. Release the power door lock switch.
De ng (Option)
Note: This feature is available only if you request your
retailer
to activate this option. After initial activation,
you can turn this feature
on and off by using the
following procedure.
This feature lets the driver delay the actual locking of
the vehicle. When the power door lock switch is
pressed, with the key removed from the ignition and the
driver's door open, a chime will sound three times to
signal that the lock delay mode is active. When all doors
have been closed, the doors will lock automatically after
five seconds. If any door is opened before this, the
five-second timer will reset itself once all the doors have
been closed again.
ProCarManuals.com
Page 89 of 388

Tilt Wheel hrn Signal/Multifunction Lever
A tilt steering wheel allows you to adjust the steering
wheel before
you drive.
You can also raise it to the highest level to give your
legs more room when you exit and enter the vehicle.
To tilt the wheel, hold the steering wheel and pull the
lever toward
you. Move the steering wheel to a
comfortable level, then release the lever
to lock the
wheel in place. The
lever on the left side
of the steering column
includes your:
0 Turn Signal and Lane Change Indicator
0 Cruise Control
0 Headlamp High/Low Beam
0 Parking Lamps
0 Flash-To-Pass Feature
ProCarManuals.com
Page 90 of 388

’hrn and Lane Change Signals If you leave the turn signal on, a chime will sound after
you drive about 3/4 of a mile (1.2 km).
The turn signal has two upward (for right) and two
downward (for left) positions. These positions allow you
to signal a turn or a lane change.
To signal a turn, move the lever all the way up
or
down. When the turn is finished, the lever will
return automatically. An
arrow on
the instrument
panel will flash in the
direction of the turn or
lane change.
To signal a lane change, just raise or lower the lever
until the
arrow starts to flash. Hold it there until you
complete your lane change. The lever will return by
itself when you release it.
As you signal a turn or a lane change, if the arrows don’t
flash but just stay on, a signal bulb may be burned out
and other drivers won’t
see your turn signal.
If a bulb is burned out, replace it to help avoid an accident.
If the arrows don’t go on at all when you signal a turn,
check the fuse (see “Fuses and Circuit Breakers”
in the
Index) and for burned-out bulbs.
ProCarManuals.com
Page 91 of 388

lhrn Signal On Chime
If your turn signal is left on for more than 3/4 of a mile
(1.2 km), a chime will sound at each flash of the turn
signal. To turn off the chime, move the turn signal lever
to the off position.
Headlamps
Sidemarker Lamps
Taillamps
0 Instrument Panel Lights
0 License Plate Lamps
#, Turn the band to this symbol to turn on:
Headlamps
0 Parking Lamps
-‘a-
0 Sidemarker Lamps
0 Taillamps
0 Instrument Panel Lights
m License Plate Lamps
Turn the band to
OFF to turn off the lampshights.
2-35
ProCarManuals.com
Page 92 of 388

Flash-To-Pass
I
If the headlamp switch is left on you’ll hear a warning
chime when you turn the ignition
off, remove the key
from the ignition and open the driver’s door.
Headlamp High/Low Beam
To change the headlamps
from low beam to high or
high to low, pull the turn
signal lever all the way
toward you. Then release it.
When the high beams are on, a light on the instrument
panel also will be on.
This feature lets you use your high-beariheadlamps to
signal .a driver
in front of you that you want to pass. It
works even if your headlamps are
off.
To use it, pull the turn signal lever toward you.
If your headlamps are
off, your high-beam headlamps
will turn on. They’ll stay on as long as you hold the
lever there. Release the lever to turn them
off.
If your headlamps are on, but on low beam, the system
works normally. Just pull the lever until it clicks. Your
headlamps will shift to high beam and stay there.
To
return to low beam, just pull the lever toward you.
If your headlamps are on, and on high beam, your
headlamps will switch to low beam.
To get back to high
beam, pull the lever toward you.
2-36
ProCarManuals.com
Page 98 of 388

Windshield Washer
The lever on the right side of your steering column also
controls your windshield washer. To spray washer fluid
on the windshield, pull the lever toward you. The wipers
will clear the window and then either stop or return to
your preset speed. For more washer cycles, pull and
hold the lever.
If the fluid level in the windshield washer bottle is low,
the message LOW WASHER
FLUID will appear in the
Driver Information Center. See “Windshield Washer
Fluid”
in the Index.
Driving without washer fluid can be dangerous. A bad
mud splash can block your vision.
You could hit another
vehicle or go
off the road. Check your washer fluid
level often.
In freezing weather, don’t use your washer until
the windshield is warmed. Otherwise the washer
fluid can
form ice on the windshield, blocking
your vision.
Lamps
Headlamps
See “Turn Signal/Multifunction Lever” in the Index.
Daytime Running Lamps
Daytime Running Lamps (DRL) can make it easier for
others to see the front of your vehicle during the day.
DRL can be helpful in many different driving
conditions, but they can be especially helpful in the
short periods after dawn and before sunset.
A light sensor on top
of the instrument panel makes the
DRL work,
so be sure it isn’t covered.
The DRL system will make your low-beam headlamps
come on at reduced brightness in daylight when:
The ignition is on,
The headlamp switch is off, and
0 The transaxle is not in PARK (P).
ProCarManuals.com
Page 100 of 388

Cornering Lamps Twilight Sentinel
TWILIGHTSENTINEL
Twilight sentinel turns your
headlamps, taillamps and
parking lamps on and off by
sensing how dark it is
outside.
The cornering lamps are designed to
come on when you
signal a turn. This will provide more light for cornering
at night. To
operate it, leave the headlamp switch off and move
the twilight sentinel control toward MAX.
If you move the control all the way to MAX, your lamps
will remain on for three minutes after you turn off your
engine.
If you move the control toward MIN, the lamps
will
go off quickly when you turn off your engine. You
can set this delay time for only
a few seconds or up to
three minutes.
Light Sensor
Your twilight sentinel and daytime running lamps work
with the light sensor on top
of the instrument panel.
Don’t cover
it up. If you do it will read “dark” and the
headlamps will come on.
- ~~ ~~
~~
ProCarManuals.com
Page 115 of 388

15. Selectable Shift
The
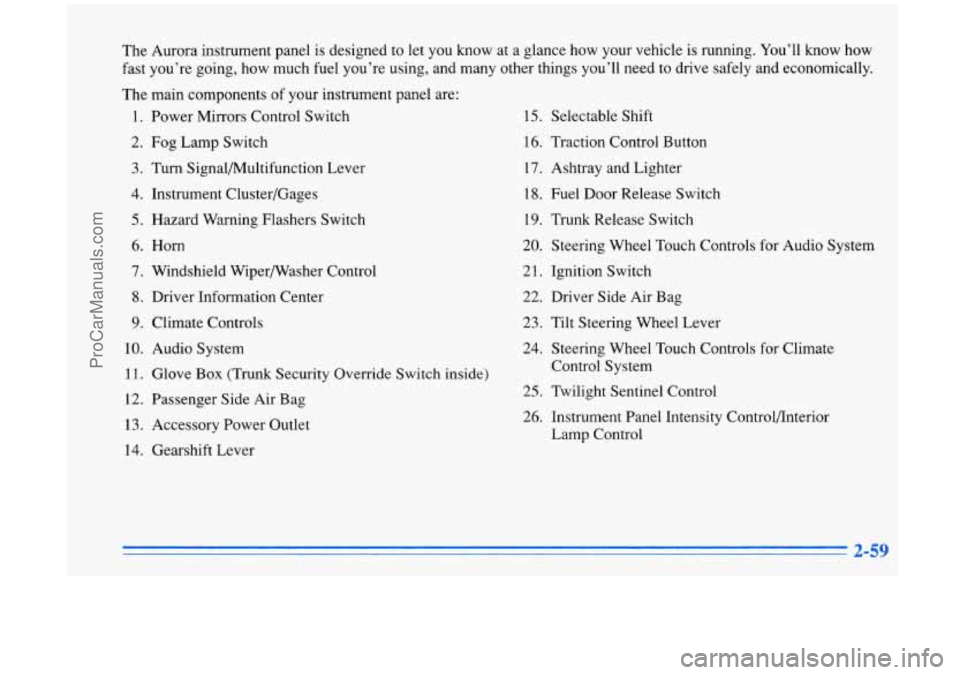
Aurora instrument panel is designed to let you know at a glance how your vehicle is running. You’ll know how
fast you’re going, how much fuel you’re using, and many other things you’ll need to drive safely and economically.
The main components of your instrument panel are: 1. Power Mirrors Control Switch
2. Fog Lamp Switch
3. Turn Signal/Multifunction Lever
4. Instrument Cluster/Gages
5. Hazard Warning Flashers Switch
6. Horn
7. Windshield Wipermasher Control
8. Driver Information Center
9. Climate Controls
10. Audio System 11. Glove
Box (Trunk Security Override Switch inside)
12. Passenger Side Air Bag
13. Accessory Power Outlet
14. Gearshift Lever 16. Traction Control Button
17. Ashtray and Lighter
18. Fuel Door Release Switch
19. Trunk Release Switch
20. Steering
Wheel Touch Controls for Audio System
21. Ignition Switch 22. Driver Side Air Bag
23. Tilt Steering Wheel Lever
24. Steering Wheel Touch Controls for Climate
Control System
25, Twilight Sentinel Control
26. Instrument Panel Intensity Controlflnterior Lamp Control
ProCarManuals.com
Page 165 of 388

mechanism. Cassette tapes should be stored in their
cases away from contaminants, direct sunlight and
extreme heat. If they aren’t, they may not operate
properly
or may cause failure of the tape player.
Your tape player should be cleaned regularly after
every
50 hours of use. Your radio may display CLN to indicate
that you have used your tape player for
50 hours without
resetting the tape clean timer.
If you notice a reduction in
sound quality,
try a known good cassette to see if the tape
or the tape player is at fault.
If this other cassette has no
improvement in sound quality, clean the
tape player.
Cleaning may be done with
a scrubbing action, non-abrasive
cleaning cassette with pads which scrub the
tape head as the
hubs of the cleaner cassette
turn. A scrubbing action cleaning
cassette is available through your Aurora retailer. You
may also choose a non-scrubbing action, wet-type
cleaner which uses a cassette with a fabric belt
to clean
the tape head. It may not clean as thoroughly as the
scrubbing type cleaner.
Cassettes are subject to wear and the sound quality may
degrade over time. Always make sure that the cassette
tape is
in good condition before you have your tape player serviced.
Care of Your Compact Discs
Handle discs carefully. Store them in their original cases
or other protective cases and away from direct sunlight
and dust.
If the surface of a disc is soiled, dampen a
clean, soft cloth in a mild, neutral detergent solution and
clean it, wiping from the center to the edge.
Be sure never to touch the signal surface when handling
discs. Pick up discs by grasping the outer edges or the
edge of the hole and the outer edge.
3-27
ProCarManuals.com