relay Oldsmobile Aurora 1998 Owner's Manuals
[x] Cancel search | Manufacturer: OLDSMOBILE, Model Year: 1998, Model line: Aurora, Model: Oldsmobile Aurora 1998Pages: 380, PDF Size: 19.75 MB
Page 313 of 380
Maxifuse@/Relay Center
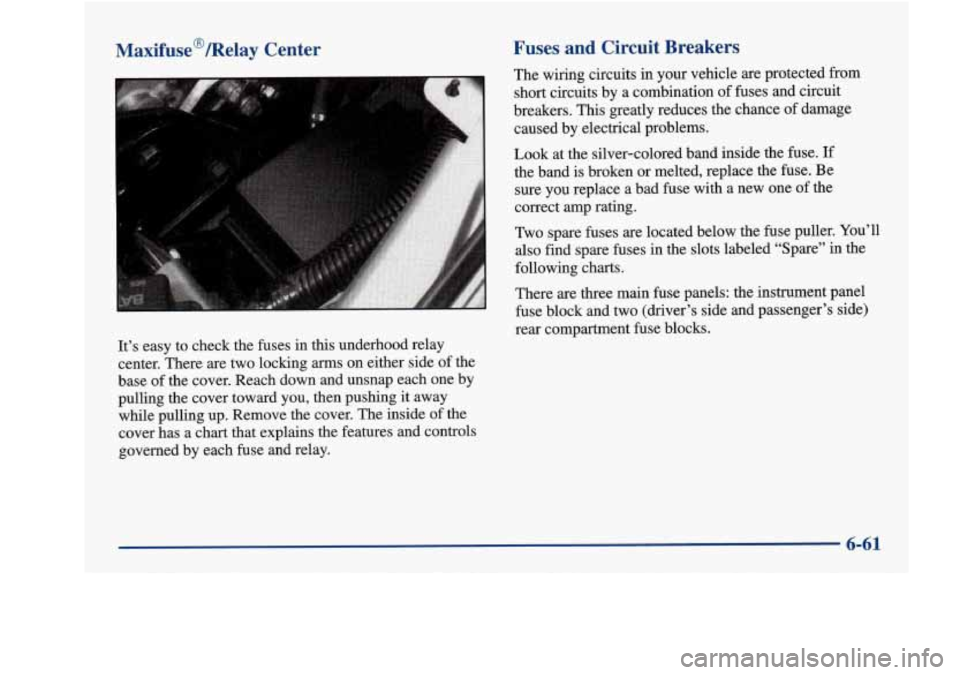
It’s easy to check the fuses in this underhood relay
center. There are two locking
arms on either side of the
base of the cover. Reach down and unsnap each one by
pulling the cover toward you, then pushing it away
while pulling up. Remove the cover. The inside of the
cover has a chart that explains the features and controls
governed by each fuse and relay.
Fuses and Circuit Breakers
The wiring circuits in your vehicle are protected from
short circuits by a combination
of fuses and circuit
breakers. This greatly reduces the chance
of damage
caused by electrical problems.
Look at the silver-colored band inside the fuse.
If
the band is broken or melted, replace the fuse. Be
sure you replace a bad fuse with a new one of the
correct amp rating.
1wo spare fuses are located below the fuse puller. You’ll
also find spare fuses in the slots labeled “Spare’’ in the
following charts.
There are three main fuse panels: the instrument panel
fuse block and two (driver’s side and passenger’s side)
rear compartment fuse blocks.
6-61
Page 314 of 380
Instrument Panel Fuse Block
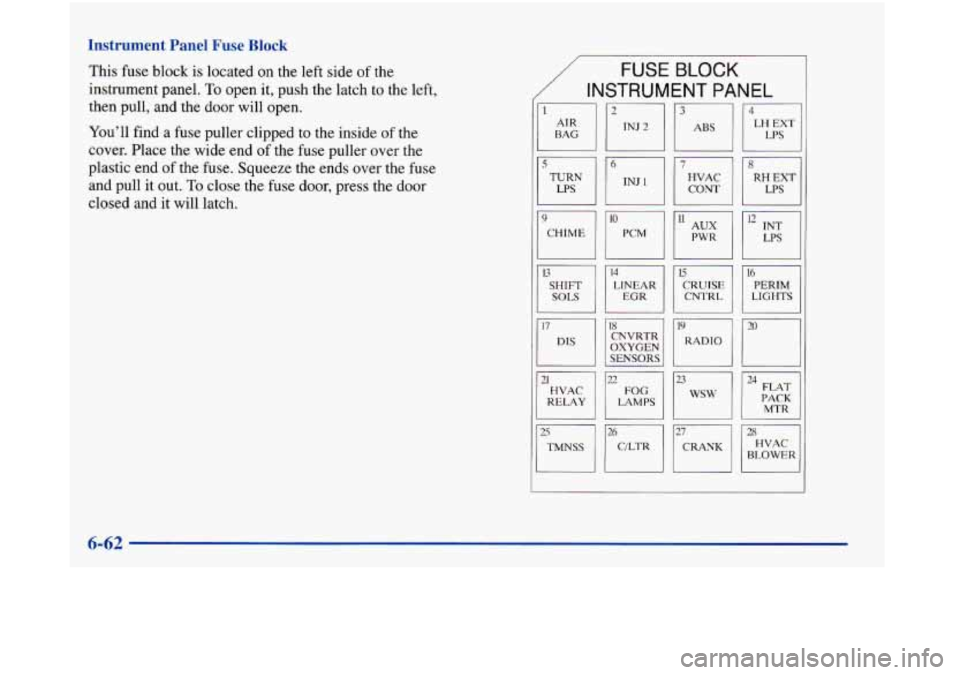
This fuse block is located on the left side of the
instrument panel.
To open it, push the latch to the left,
then pull, and the door will open.
You’ll find
a fuse puller clipped to the inside of the
cover. Place the wide end
of the fuse puller over the
plastic end
of the fuse. Squeeze the ends over the fuse
and pull it out. To close the fuse door, press the door
closed and it
will latch.
/ INSTRUMENT PANEL
11112113114
FUSE BLOCK
CHIME PCM PWR
CNTRL LIGHTS
I
RELAY LAMPS PACK MTR
mmJ2?CRANK/12fiHVhC BLOWER
Page 315 of 380
Fuse Usage
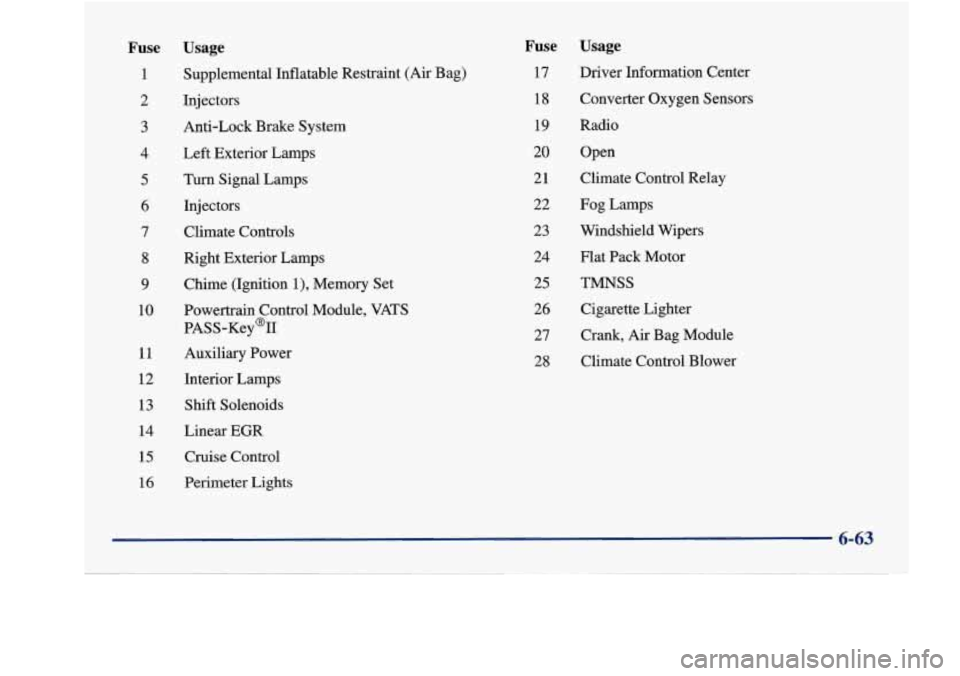
1 Supplemental Inflatable Restraint (Air Bag)
2
3
4
5
6
7
Injectors
Anti-Lock Brake System
Left Exterior Lamps Turn Signal Lamps
Injectors Climate Controls
8 Right Exterior Lamps
9 Chime (Ignition l), Memory Set
10 Powertrain Control Module, VATS
PASS-Key@II
11 Auxiliary Power
12
13
14
15
16
Interior Lamps Shift Solenoids
Linear
EGR
Cruise Control
Perimeter Lights
Fuse
17 18
19
20
21 22
23
24
25
26 27
28
Usage
Driver Information Center
Converter Oxygen Sensors
Radio Open
Climate Control Relay
Fog Lamps
Windshield Wipers
Flat Pack Motor
TMNSS
Cigarette Lighter
Crank,
Air Bag Module
Climate Control Blower
6-63
Page 316 of 380
Removing the Rear Seat Cushion
To access the battery and rear compartment fuse panels,
the rear seat cushion must be removed. This procedure is
somewhat difficult. You may wish to have your retailer
do this for you.
NOTICE:
The battery and main fuse boxes are located
under the rear seat cushion. The battery’s
ground terminal and some relay wires are
exposed.
To help avoid damage to the battery
and wires, be careful when removing or
reinstalling the seat cushion.
Do not remove
covers from covered parts.
Do not store anything
under the seat, as objects could touch exposed
wires and cause a short.
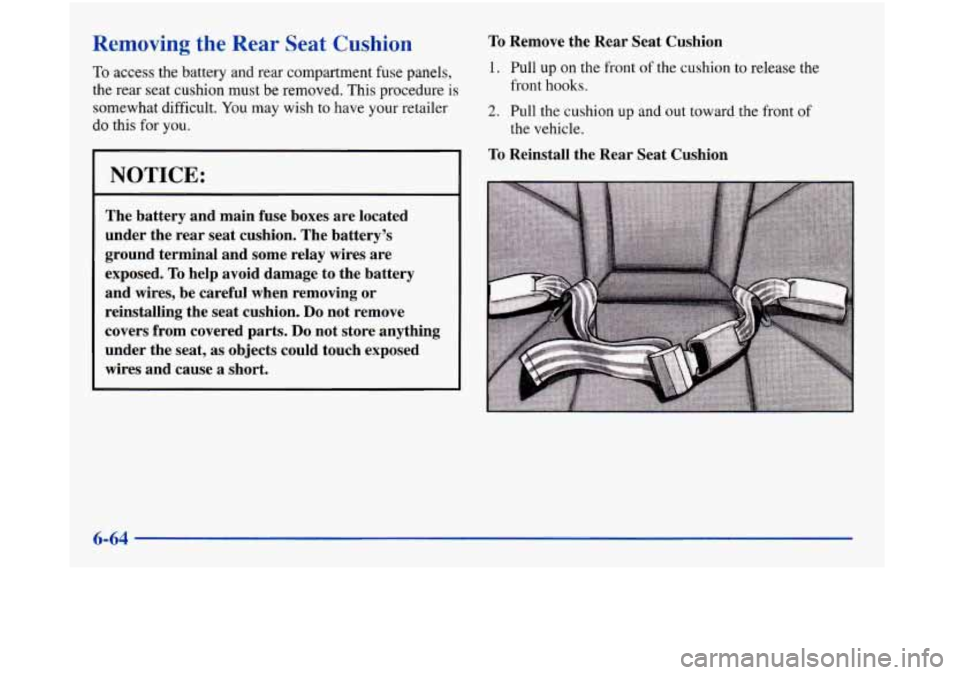
To Remove the Rear Seat Cushion
1. Pull up on the front of the cushion to release the
front hooks.
2. Pull the cushion up and out toward the front of
To Reinstall the Rear Seat Cushion
the vehicle.
6-64
Page 318 of 380

REAR COMPARTMENT
DRIVER SIDE FUSE BLOCK
1 3
11 FPMP 1 I DDooR UNLOCK F E D
B
L2
DBFG - RR #1
A
ACSRY DAP OPEN
Fuse
1
2
3
4
5
6
7- 10
11
12
13 14
15
16
17-22
23
24
Usage
Open
Electronic Level Control Relay
Trunk Release Relay
Open
Fuel Pump Relay
Driver Door Unlock Relay
Open
Rear Defogger Relay (Upper Zone)
Rear Defogger Relay (Lower Zone)
Open
Spare
Spare
Spare
Open
Direct Accessory Power
-- Accessory Relay
Open
6-66
Page 320 of 380
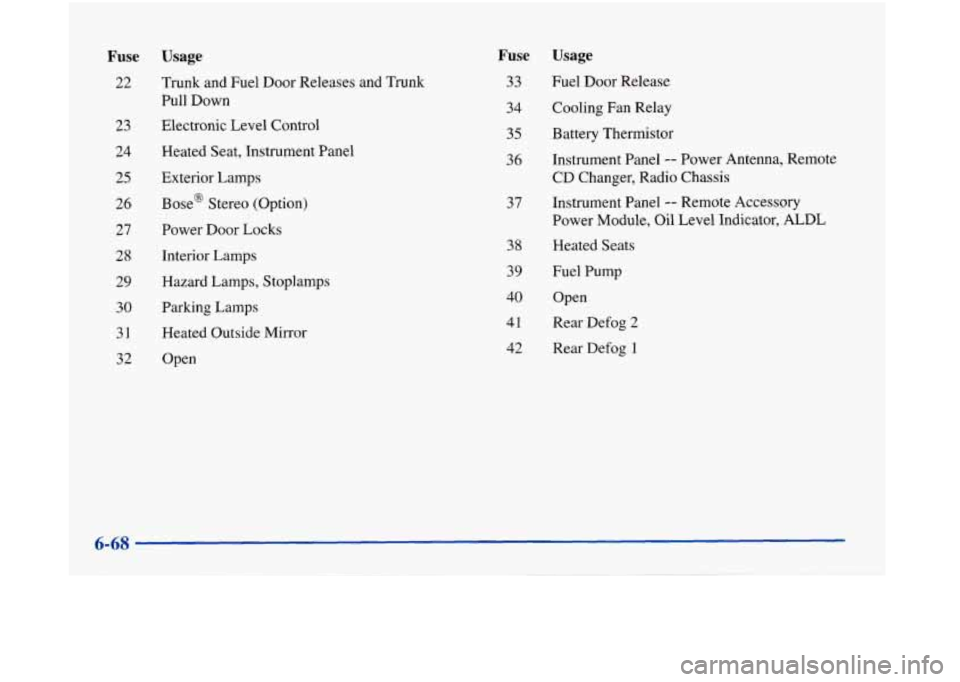
Fuse
22
23 24
25
26
27
28
29
30
31
32
Usage
Trunk and Fuel Door Releases and Trunk Pull Down
Electronic Level Control
Heated Seat, Instrument Panel Exterior Lamps
Base@ Stereo (Option)
Power Door Locks
Interior Lam]
Hazard Lamps, xoplamps
Parking Lamps
Heated Outside
Mirror
Open
Fuse Usage
33 Fuel Door Release
34 Cooling Fan Relay
35 Battery Thermistor
36 Instrument Panel
-- Power Antenna, Remote
CD Changer, Radio Chassis
Instrument Panel -- Remote Accessory
Power Module, Oil Level Indicator,
ALDL
37
38
39
40
41
42
Heated Seats
Fuel Pump
Open
Rear Defog
2
Rear Defog 1
Page 369 of 380
Rear Door Security ............................. 2-7
Tr~nk
...................................... 2-14
Window
.................................... 2-33
Lubricants and Fluids
............................ 7-20
Lubrication Service. Body
........................ 7- 15
Lumbar Controls
................................ 1-3
Magnasteer
M ................................ 4. 10
Maintenance. Normal Replacement Parts
............ 6-7 1
Maintenance Record ............................ 7-22
Maintenance Schedule
............................ 7- 1
Owner Checks and Services ..................... 7- 14
Periodic Maintenance Inspections
................ 7- 18
Recommended Fluids and Lubricants
............. 7-20
Scheduled Maintenance Services
.................. 7-4
Maintenance. Underbody
......................... 6-57
Malfunction Indicator Lamp
...................... 2-7 1
Maxifuse/Relay Center
.......................... 6-6 1
Memory Door Locks
........................ 2.5. 2. 11
Memory Seat and Mirrors
........................ 2- 11
Methanol
...................................... 6-4
Mirrors
....................................... 2-48
Convex Outside
.............................. 2-52
Electrochromic Daymight Rearview
.............. 2-48
Heated Outside
............................... 2-52
Memory
.................................... 2-11
Parallel Park Assist
........................... 2-5 1
Power Remote Control
......................... 2-5 1
Visor Vanity. Illuminated ....................... 2-55
With Compass
............................... 2-48
Maintenance
When Trailer Towing
................. 4-37 MMT
......................................... 6-4
Mountain Roads
................................ 4-23
Multifunction Lever
............................. 2-34
Net. Convenience
.............................. 2-53
Neutral. Automatic Transaxle
..................... 2-25
New Vehicle Break-In
........................... 2-19
Nightvision
................................... 4-16
Normal Maintenance Replacement Parts ............. 6-71
Odometer
.................................... 2-63
Odometer. Trip
................................. 2-63
Off-Road Recovery
............................. 4-13
Oil. Engine
.................................... 6-11
Oil Life Indicator
............................... 2-78
Oil Pressure Light
.............................. 2-73
Oil Pressure Message
............................ 2-77
Overdrive. Automatic Transaxle
................... 2-26
Overheated Engine Protection Operating Mode
....... 5-14
Overheating Engine
............................. 5-14
Owner Checks and Services
....................... 7-14
Owner Publications. Ordering
................. 8-9. 8-10
Paint Spotting. Chemical
........................ 6-57
Parallel Park Assist Mirror
........................ 2-51
Park
Automatic Transaxle
.......................... 2-24
Shifting Into
................................. 2-28
Shifting
Out of ............................... 2-30