tailgate OPEL ASTRA K 2017 Manual user
[x] Cancel search | Manufacturer: OPEL, Model Year: 2017, Model line: ASTRA K, Model: OPEL ASTRA K 2017Pages: 305, PDF Size: 9.11 MB
Page 238 of 305

236Vehicle careLight assembly in the tailgate
1. Release the cover in the tailgateand remove it.
2. Unscrew the plastic securing nutby hand.
3. Carefully withdraw the lightassembly from the recesses and
remove.
4. Detach the plug from the light assembly.
5.Press the three retaining lugs and
remove the bulb carrier from the
light assembly.
Page 239 of 305

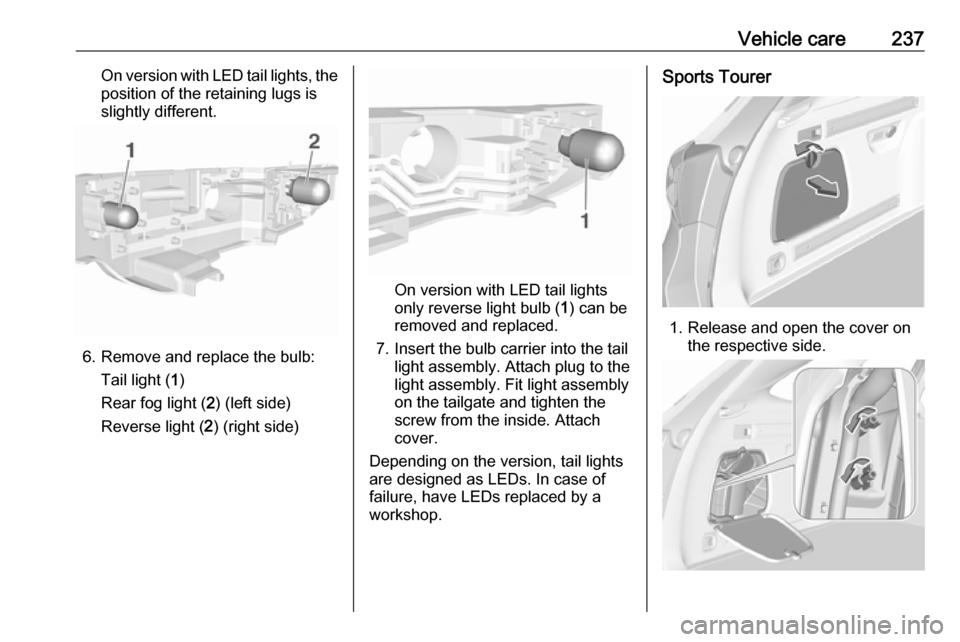
Vehicle care237On version with LED tail lights, theposition of the retaining lugs is
slightly different.
6. Remove and replace the bulb:
Tail light ( 1)
Rear fog light ( 2) (left side)
Reverse light ( 2) (right side)
On version with LED tail lights
only reverse light bulb ( 1) can be
removed and replaced.
7. Insert the bulb carrier into the tail light assembly. Attach plug to the
light assembly. Fit light assembly
on the tailgate and tighten the
screw from the inside. Attach
cover.
Depending on the version, tail lights are designed as LEDs. In case of failure, have LEDs replaced by aworkshop.
Sports Tourer
1. Release and open the cover on the respective side.
Page 241 of 305

Vehicle care2399. Attach the cable to the retainer.
10. Attach the light assembly to the vehicle body and tighten the
securing nuts from the inside of
the load compartment. Attach
cover.
Depending on the version, tail lights
and brake lights are designed as
LEDs. In case of failure, have LEDs
replaced by a workshop.
Light assembly in the tailgate
1. Release the cover in the tailgate and remove it.
2. Unscrew the plastic securing nutby hand.
3. Carefully withdraw the lightassembly from the recesses and
remove.
4. Press the three retaining lugs and
remove the bulb carrier from the
light assembly.
5. Remove and replace the bulb:
Page 242 of 305

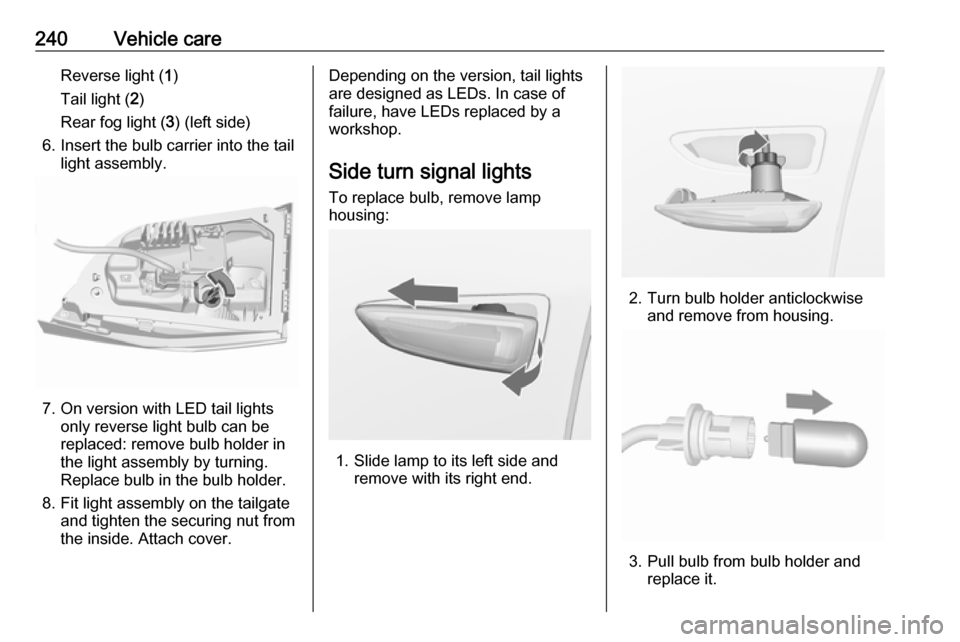
240Vehicle careReverse light (1)
Tail light ( 2)
Rear fog light ( 3) (left side)
6. Insert the bulb carrier into the tail light assembly.
7. On version with LED tail lightsonly reverse light bulb can be
replaced: remove bulb holder in
the light assembly by turning.
Replace bulb in the bulb holder.
8. Fit light assembly on the tailgate and tighten the securing nut from
the inside. Attach cover.
Depending on the version, tail lights
are designed as LEDs. In case of
failure, have LEDs replaced by a
workshop.
Side turn signal lights
To replace bulb, remove lamp
housing:
1. Slide lamp to its left side and remove with its right end.
2. Turn bulb holder anticlockwiseand remove from housing.
3. Pull bulb from bulb holder and replace it.
Page 245 of 305

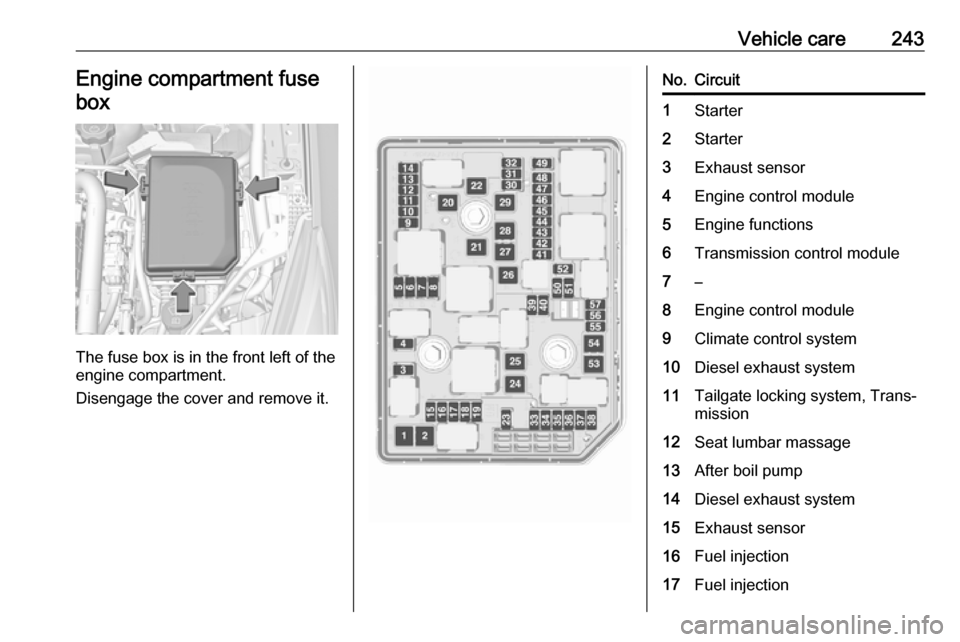
Vehicle care243Engine compartment fusebox
The fuse box is in the front left of the
engine compartment.
Disengage the cover and remove it.
No.Circuit1Starter2Starter3Exhaust sensor4Engine control module5Engine functions6Transmission control module7–8Engine control module9Climate control system10Diesel exhaust system11Tailgate locking system, Trans‐
mission12Seat lumbar massage13After boil pump14Diesel exhaust system15Exhaust sensor16Fuel injection17Fuel injection
Page 246 of 305

244Vehicle careNo.Circuit18Diesel exhaust system19Diesel exhaust system20–21DC/AC Converter22ABS23Washer system for windscreen
and rear window24–25Diesel fuel heating26Transmission control module27Power tailgate module28–29Heated rear window30Mirror defrost31–32DC transformer/LED display/
Electrical heater/Climate
control/Glow plug controllerNo.Circuit33Anti theft warning34Horn35Power outlet load compartment36Right high beam (Halogen)/
Right low beam (LED)37Left high beam (Halogen)38LED headlight/Automatic head‐
light range adjustment39Front fog light40OnStar41Water in fuel sensor/Water
pump42Manual headlight range adjust‐
ment43Fuel pump44Rear view camera/Inside rear
view mirror/Trailer module45LED headlight left/Automatic
headlight range adjustment leftNo.Circuit46Instrument cluster47Steering column lock48Rear wiper49–50LED headlight right/Automatic
headlight range adjustment
right51Left low beam (LED)52Engine control module/Trans‐
mission control module53–54Windscreen wiper55Diesel exhaust system56–57–
After having changed defective fuses,
close the fuse box cover and press
until it engages.
If the fuse box cover is not closed
correctly, malfunction may occur.
Page 248 of 305

246Vehicle careNo.Circuit1–2Climate control system, fan3Power seat driver side4Cigarette lighter/Power outlet
front5–6Power window front7ABS8Heated steering wheel9Body control module10Power window rear11Sunroof12Body control module13Seat heating (only on vehicles
without alarm horn)14Exterior mirror15Body control module16Body control moduleNo.Circuit17Body control module18Body control module19Data link connector20Airbag system21Climate control system22Central locking system, tailgate23Electronic key system24Power seat memory function25Airbag system steering wheel26Ignition switch/Steering column
lock27Body control module28USB socket29–30Selector lever31Rear window wiper32Transmission control moduleNo.Circuit33Anti-theft alarm system/Power
sounder34Parking assist/Side blind spot
alert/Infotainment system/USB
socket35OnStar36Info display/Instrument cluster/ CD player37Infotainment system, radio
After having changed defective fuses,
close the fuse box cover and press
until it engages.
Vehicles with power connector: 1. Apply the cover on the right side.
Page 250 of 305

248Vehicle careNo.Circuit1–2DC/AC Inverter3Trailer module4Power seat passenger side5–6Distance warning module7–8–9Rear seat heating (on vehicles
without alarm horn)10Service11–12Front seat heating (on vehicles
with alarm horn)13Rear seat heating (on vehicles
with alarm horn)14Ignition15Seat ventilationNo.Circuit16Trailer outlet17Trailer outlet18–19–20–21Electrical rear seat folding22Power tailgate
After having changed defective fuses,
close the fuse box cover and press
until it engages.
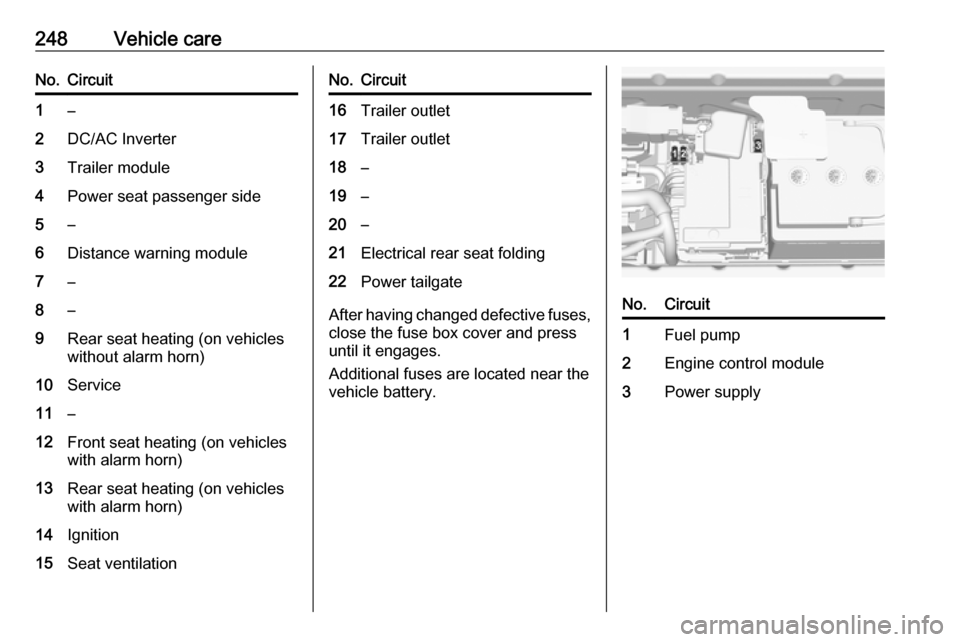
Additional fuses are located near the
vehicle battery.
No.Circuit1Fuel pump2Engine control module3Power supply