turn signal OPEL COMBO D 2018 Manual user
[x] Cancel search | Manufacturer: OPEL, Model Year: 2018, Model line: COMBO D, Model: OPEL COMBO D 2018Pages: 203, PDF Size: 4.97 MB
Page 13 of 203

In brief111Fixed air vents ..................... 112
2 Side air vents ...................... 111
3 Light switch ........................ 100
High beam, low beam .........100
Headlight flash ....................100
Daytime running lights ........101
Turn and lane-change
signals ................................. 102
4 Instruments ........................... 77
Driver Information Centre ...... 91
5 Windscreen wiper/washer .....72
Rear window wiper/washer ..72
Headlamp washer .................73
Trip odometer reset ............... 77
6 Centre air vents .................. 111
7 Document holder, pocket
for Personal Navigation
Device .................................. 61
8 Headlight range
adjustment ......................... 101
Driver Information Centre
controls ................................ 91Trip computer........................ 97
Instrument illumination ........103
Hazard warning flashers .....101
Front fog lights ...................102
Rear fog light ...................... 102
Heated rear window ..............34
Heated exterior mirrors .........31
Clock ..................................... 73
Airbag deactivation ...............53
9 Front passenger airbag ........52
10 Glovebox .............................. 62
11 Heating and ventilation
system ................................. 107
Air conditioning system .......108
Electronic climate control
system ................................. 109
12 Selector lever, manual
transmission ....................... 122
Manual transmission
automated ........................... 123
13 Ignition switch with
steering wheel lock ............11514Steering wheel controls .......71
15 Horn ..................................... 71
Driver airbag ........................ 52
16 Steering wheel adjustment ..71
17 Cruise control .....................131
18 Fuse box ............................. 157
19 Bonnet release lever ..........143
Page 16 of 203
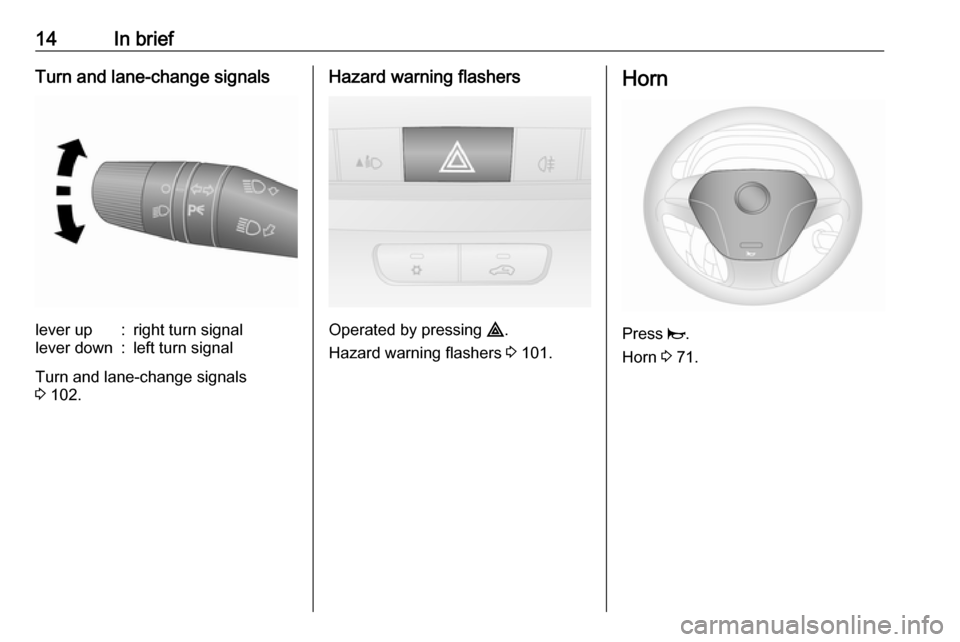
14In briefTurn and lane-change signalslever up:right turn signallever down:left turn signal
Turn and lane-change signals
3 102.
Hazard warning flashers
Operated by pressing ¨.
Hazard warning flashers 3 101.
Horn
Press j.
Horn 3 71.
Page 72 of 203

70Instruments and controlsInstruments and
controlsControls ....................................... 71
Steering wheel adjustment ........71
Steering wheel controls .............71
Horn ........................................... 71
Windscreen wiper/washer .........72
Rear window wiper/washer .......72
Headlamp washer .....................73
Outside temperature ..................73
Clock ......................................... 73
Power outlets ............................. 75
Cigarette lighter ......................... 76
Ashtrays .................................... 76
Warning lights, gauges and indi‐ cators ........................................... 77
Instrument cluster ......................77
Speedometer ............................. 77
Odometer .................................. 77
Trip odometer ............................ 77
Tachometer ............................... 77
Fuel gauge ................................ 78
Fuel selector .............................. 78
Engine coolant temperature gauge ....................................... 79
Service display .......................... 79Transmission display .................80
Control indicators ......................80
Generic warning ........................82
Turn signal ................................. 83
Seat belt reminder .....................83
Airbag and belt tensioners .........83
Airbag deactivation ....................84
Charging system .......................84
Malfunction indicator light ..........84
Brake system ............................. 85
Brake pad wear ......................... 85
Antilock brake system (ABS) .....85
Transmission ............................. 85
Gear shifting .............................. 86
Hill start assist ........................... 86
Ultrasonic parking assist ...........86
Electronic Stability Control ........86
Engine coolant temperature ......87
Preheating ................................. 87
Diesel particle filter ....................87
Tyre pressure monitoring system ...................................... 88
Engine oil pressure ....................88
Change engine oil .....................89
Low engine oil level ...................89
Low fuel ..................................... 89
Drain fuel filter ........................... 90
Immobiliser ................................ 90
Stop-start system ......................90
Exterior light .............................. 90High beam................................. 90
Fog light ..................................... 91
Rear fog light ............................. 91
Cruise control ............................ 91
Door open .................................. 91
Information displays .....................91
Driver Information Centre ..........91
Vehicle messages ........................96
Warning chimes .........................96
Fuel system messages ..............97
Trip computer ............................... 97
Page 84 of 203
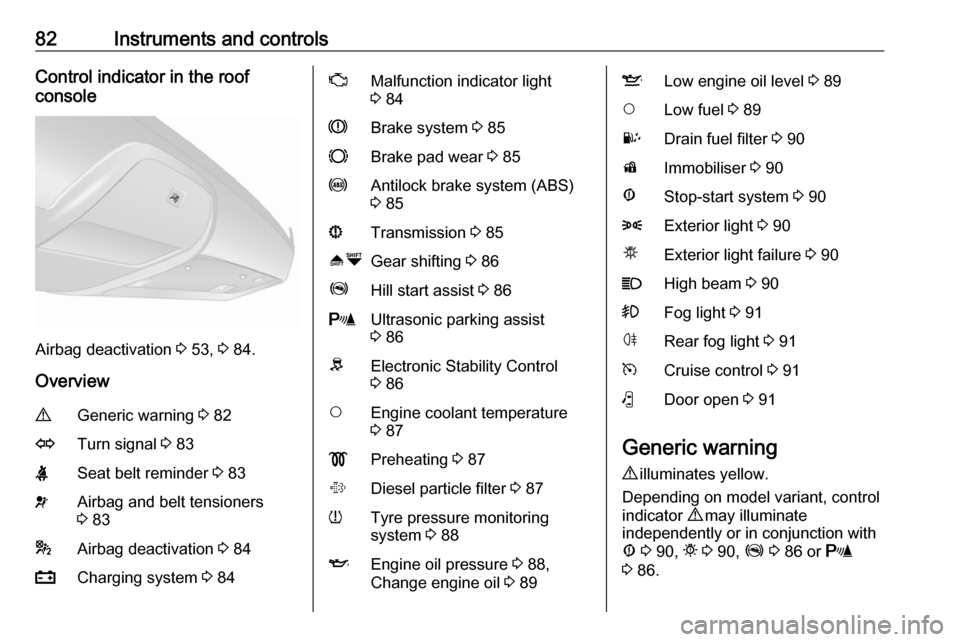
82Instruments and controlsControl indicator in the roof
console
Airbag deactivation 3 53, 3 84.
Overview
9Generic warning 3 82OTurn signal 3 83XSeat belt reminder 3 83vAirbag and belt tensioners
3 83*Airbag deactivation 3 84pCharging system 3 84ZMalfunction indicator light
3 84RBrake system 3 85FBrake pad wear 3 85uAntilock brake system (ABS)
3 85sTransmission 3 85[ ÒGear shifting 3 86ZHill start assist 3 86rUltrasonic parking assist
3 86RElectronic Stability Control
3 86$Engine coolant temperature
3 87!Preheating 3 87%Diesel particle filter 3 87wTyre pressure monitoring
system 3 88IEngine oil pressure 3 88,
Change engine oil 3 89SLow engine oil level 3 89$Low fuel 3 89UDrain fuel filter 3 90dImmobiliser 3 90ÆStop-start system 3 908Exterior light 3 90µExterior light failure 3 90CHigh beam 3 90>Fog light 3 91øRear fog light 3 91mCruise control 3 91(Door open 3 91
Generic warning
9 illuminates yellow.
Depending on model variant, control
indicator 9 may illuminate
independently or in conjunction with
Æ 3 90, t 3 90, Z 3 86 or r
3 86.
Page 85 of 203

Instruments and controls83If 9 illuminates together with I
3 89; stop engine immediately and
seek the assistance of a workshop.
In the event of the failure of control
indicator v for airbags and belt
tensioners 3 83, 9 will illuminate.
9 also illuminates if the fuel cut-off
switch is triggered. Consult a
workshop.
Fuel cut-off system 3 97, Vehicle
shutdown 3 116.
Depending on version, a
corresponding warning message may
also be displayed in the Driver
Information Centre 3 91.
Turn signal 2 or 3 flashes green.
Flashes
A turn signal or the hazard warning flashers are activated.
Rapid flashing: failure of a turn signal
light or associated fuse, failure of turn signal light on trailer.
Bulb replacement 3 149, Fuses
3 155.Turn signals 3 102.
Seat belt reminder
Seat belt reminder for front seats
X for driver's seat and / or front
passenger seat illuminates or flashes
red.
Illuminates
When the ignition has been switched on, control indicator X illuminates
briefly if driver's seat belt and/or front
passenger seat belt is not fastened. A warning chime also sounds for a few
seconds.
Flashes
During driving X will flash and a
warning chime will sound for
90 seconds until the front seat belts are fastened.
Three-point seat belts 3 46.9 Warning
Fasten seat belt before each trip.
In the event of an accident, people
not wearing seat belts endanger their fellow occupants and
themselves.
Note
The volume of the warning chime
can also be adjusted via the Driver
Information Centre 3 91.
Airbag and belt tensioners v illuminates red.
When the ignition is switched on, the control indicator illuminates for
approx. four seconds.
If it does not illuminate, does not go
out after four seconds or illuminates
whilst driving, there is a fault in the
airbag system. Seek the assistance
of a workshop. The airbags and belt
pretensioners may fail to trigger in the event of an accident.
Deployment of the belt pretensioners
or airbags is indicated by continuous
illumination of v.
Page 102 of 203
100LightingLightingExterior lighting.......................... 100
Light switch .............................. 100
High beam ............................... 100
Headlight flash ......................... 100
Headlight range adjustment ....101
Headlights when driving abroad .................................... 101
Daytime running lights .............101
Hazard warning flashers ..........101
Turn and lane-change signals . 102
Front fog lights ......................... 102
Rear fog lights ......................... 102
Reversing lights .......................103
Misted light covers ...................103
Interior lighting ........................... 103
Instrument panel illumination control ..................................... 103
Interior lights ............................ 104
Load compartment lighting ......105
Lighting features ........................106
Exit lighting .............................. 106
Battery discharge protection ....106Exterior lighting
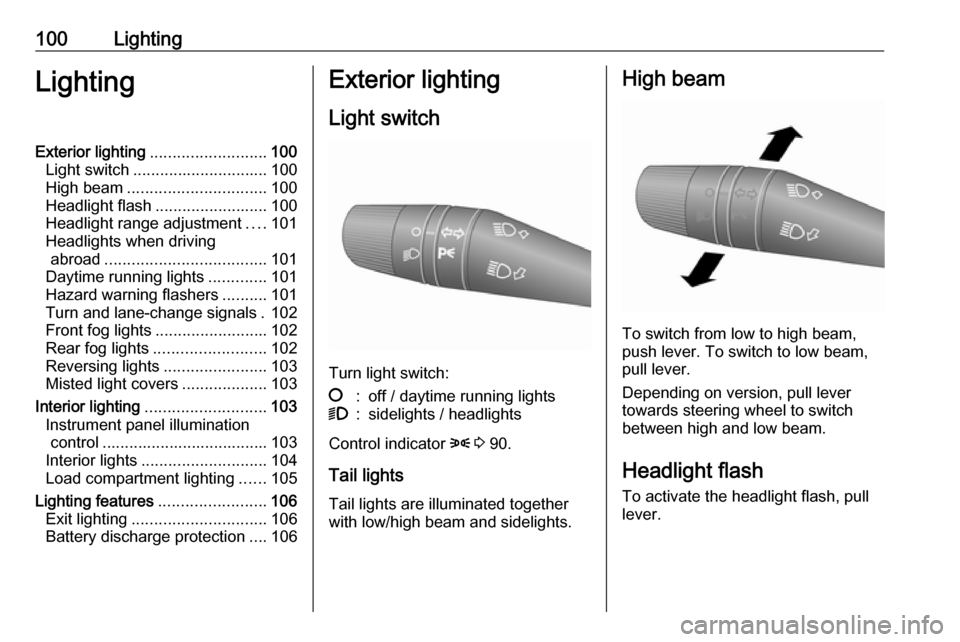
Light switch
Turn light switch:
§:off / daytime running lights9:sidelights / headlights
Control indicator 8 3 90.
Tail lights Tail lights are illuminated together
with low/high beam and sidelights.
High beam
To switch from low to high beam,
push lever. To switch to low beam,
pull lever.
Depending on version, pull lever
towards steering wheel to switch
between high and low beam.
Headlight flash To activate the headlight flash, pull
lever.
Page 104 of 203
102LightingDepending on version, hazard
warning flashers may come on
automatically during hard braking.
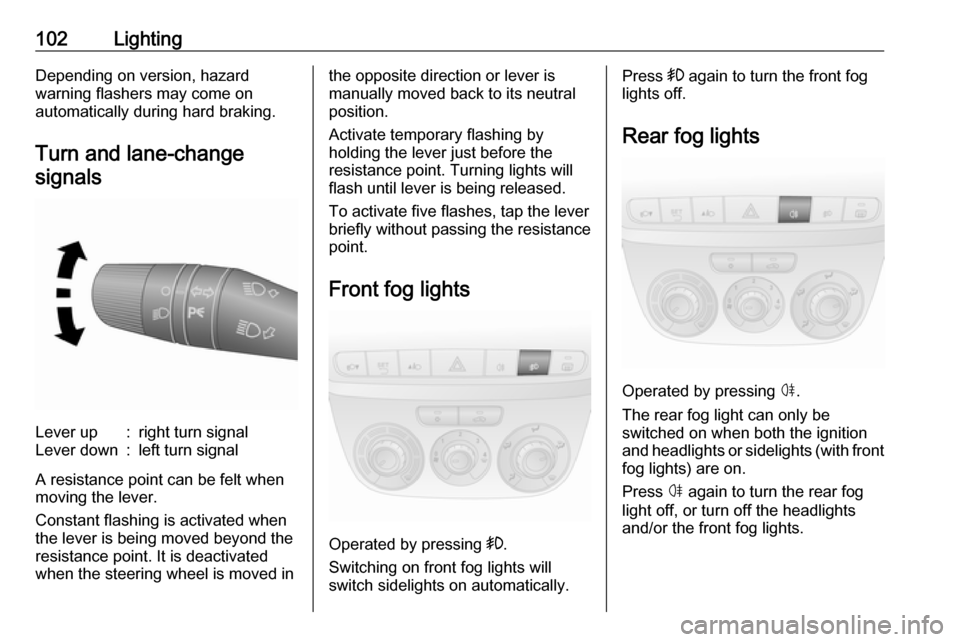
Turn and lane-change signalsLever up:right turn signalLever down:left turn signal
A resistance point can be felt when
moving the lever.
Constant flashing is activated when
the lever is being moved beyond the
resistance point. It is deactivated
when the steering wheel is moved in
the opposite direction or lever is
manually moved back to its neutral
position.
Activate temporary flashing by
holding the lever just before the
resistance point. Turning lights will
flash until lever is being released.
To activate five flashes, tap the lever
briefly without passing the resistance
point.
Front fog lights
Operated by pressing >.
Switching on front fog lights will
switch sidelights on automatically.
Press > again to turn the front fog
lights off.
Rear fog lights
Operated by pressing ø.
The rear fog light can only be
switched on when both the ignition
and headlights or sidelights (with front
fog lights) are on.
Press ø again to turn the rear fog
light off, or turn off the headlights
and/or the front fog lights.
Page 108 of 203
106LightingLighting featuresExit lighting
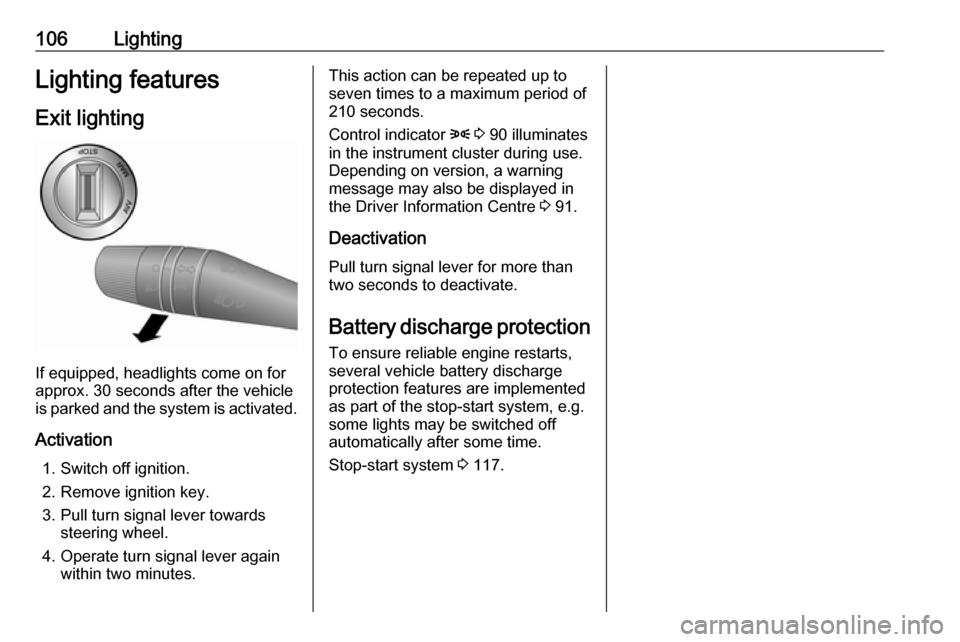
If equipped, headlights come on for
approx. 30 seconds after the vehicle
is parked and the system is activated.
Activation 1. Switch off ignition.
2. Remove ignition key.
3. Pull turn signal lever towards steering wheel.
4. Operate turn signal lever again within two minutes.
This action can be repeated up to
seven times to a maximum period of
210 seconds.
Control indicator 8 3 90 illuminates
in the instrument cluster during use.
Depending on version, a warning
message may also be displayed in
the Driver Information Centre 3 91.
Deactivation Pull turn signal lever for more thantwo seconds to deactivate.
Battery discharge protection
To ensure reliable engine restarts,
several vehicle battery discharge
protection features are implemented
as part of the stop-start system, e.g.
some lights may be switched off
automatically after some time.
Stop-start system 3 117.
Page 119 of 203
Driving and operating117Control indicator 9 illuminates if the
fuel cut-off switch is triggered and,
depending on version, a
corresponding warning message may
also appear in the Driver Information
Centre 3 91.
Generic warning control indicator 9
3 82.
Note
In addition, the vehicle is
automatically unlocked and the
hazard warning flashers and interior lights are illuminated.
Turn the ignition key to position 0 to
prevent vehicle battery discharge and
seek the assistance of a workshop
immediately. Have the vehicle
checked for fuel leaks in the engine
compartment, beneath the vehicle
and near the fuel tank.
To reset the fuel cut-off system and
enable the vehicle to be driven:
1. Turn the ignition key to position 1
3 115.
2. Fully actuate the right turn signal light 3 102.
3. Deactivate the right turn signal light.4. Fully actuate the left turn signallight.
5. Deactivate the left turn signal light.
6. Repeat steps 2, 3, 4 and 5.
7. Turn the ignition key to position 0.9 Danger
If you can smell fuel in the vehicle,
or a fuel leak is present, have the
cause of this remedied
immediately by a workshop. Do
not reset the fuel cut-off system, to avoid the risk of fire.
Fuel system messages 3 97.
Overrun cut-off The fuel supply is automatically cut-
off during overrun, i.e. when the
vehicle is driven with a gear engaged
but accelerator is released.
Depending on driving conditions, the
overrun cut-off may be deactivated.
Stop-start system
The stop-start system helps to save
fuel and to reduce exhaust emissions. When conditions allow, it switches off
the engine as soon as the vehicle is
at a low speed or at a standstill, e.g.
at a traffic light or in a traffic jam. It
starts the engine automatically as
soon as the clutch is depressed.
A vehicle battery sensor ensures that an Autostop is only performed if thevehicle battery is sufficiently charged
for a restart.
Activation
The stop-start system is available as
soon as the engine is started, the
vehicle starts-off and the conditions
as stated below in this section are
fulfilled.
Page 126 of 203

124Driving and operatingmalfunction and a warning message
may be displayed in the Driver
Information Centre.
Return the selector lever to the
centre position. After a short while,
N will be displayed in the Driver
Information Centre and the system
will operate normally again.
Driver Information Centre 3 91.
After selecting A/M, + or - and
releasing the selector lever, the lever automatically returns to the centre
position.N:neutralo:drive positionA/M:switch between automatic and manual mode
The transmission display
shows AUTO when in
automatic mode.R:reverse gear
Engage only when vehicle is
stationary. The transmission
display shows "R" when
reverse gear is engaged.+:shift to a higher gear-:shift to a lower gearCaution
It is not advisable to drive with the hand resting on the selector lever.
Starting-off
When the engine is started, depress
the brake pedal and move the
selector lever towards + to engage
first gear. Shift to a higher or lower
gear by moving selector lever to + or -.
Gears can be skipped by moving the selector lever repeatedly at short
intervals.
The driver will be alerted to an
incorrect gear selection by an audible warning chime in conjunction with a
message in the Driver Information
Centre 3 91. The system will
downshift, selecting the most
appropriate gear automatically.
If R is selected, reverse gear is
engaged. The vehicle starts to move
when the brake pedal is released. To
start off quickly, release the brake
pedal and accelerate immediately
after engaging a gear.
Move the selector lever towards A/M
to engage automatic mode; the
transmission shifts to other gears
automatically, dependent on driving conditions.
To engage manual mode, move the selector lever towards A/M. The
current gear will appear in the
transmission display.
Stopping the vehicle
In automatic or manual mode,
first gear is engaged and the clutch is
released when the vehicle is stopped. In R, reverse gear remains engaged.
When the vehicle is at a standstill, if
the engine is running and a forward or
reverse gear is engaged, a warning
chime will sound and the
transmission automatically shifts to
N in certain situations.
When stopping on gradients, engage
parking brake or depress the brake pedal. To prevent overheating of theclutch, an intermittent audible
warning chime may sound as a signal
to depress the brake pedal or apply
the parking brake.