tailgate OPEL COMBO E 2019.75 Manual user
[x] Cancel search | Manufacturer: OPEL, Model Year: 2019.75, Model line: COMBO E, Model: OPEL COMBO E 2019.75Pages: 285, PDF Size: 10.68 MB
Page 37 of 285
Keys, doors and windows35smelled, could enter the vehicle.
This can cause unconsciousness and even death.Caution
Before opening the tailgate, check overhead obstructions, e.g. a
garage door, to avoid damage to
the tailgate. Always check the
moving area above and behind the
tailgate.
Note
The installation of certain heavy
accessories onto the tailgate may
affect its ability to remain open.
Note
At low outside temperatures the
tailgate may not open fully by itself.
In this case lift the tailgate manually to its normal end position.
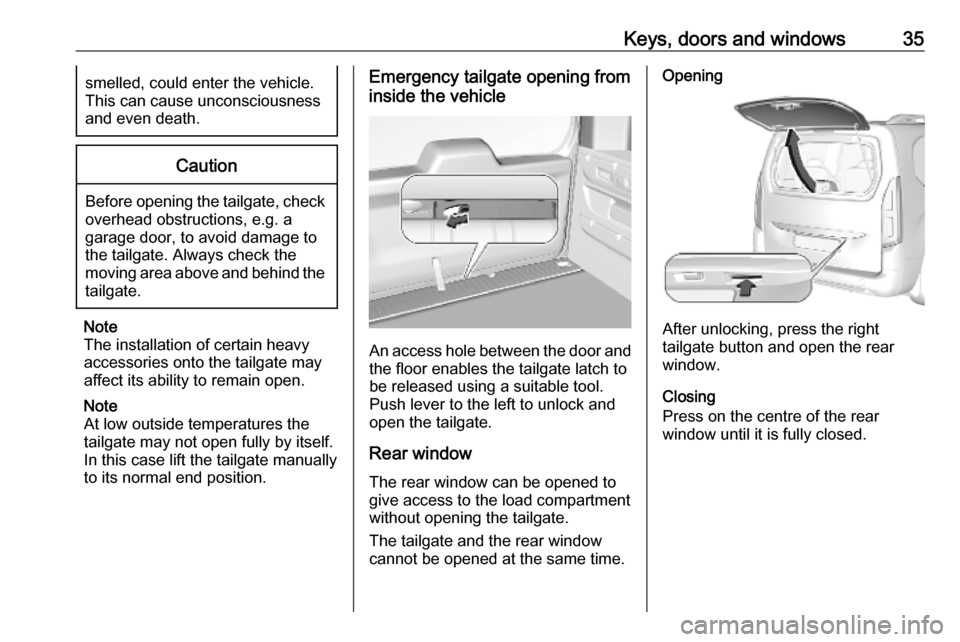
Emergency tailgate opening from
inside the vehicle
An access hole between the door and the floor enables the tailgate latch tobe released using a suitable tool.
Push lever to the left to unlock and
open the tailgate.
Rear window The rear window can be opened to
give access to the load compartment
without opening the tailgate.
The tailgate and the rear window
cannot be opened at the same time.
Opening
After unlocking, press the right
tailgate button and open the rear
window.
Closing
Press on the centre of the rear
window until it is fully closed.
Page 38 of 285

36Keys, doors and windowsVehicle security
Anti-theft locking system9 Warning
Do not use the system if there are
people in the vehicle! The doorscannot be unlocked from the
inside.
The system deadlocks all the doors. All doors must be closed otherwise
the system cannot be activated.
Unlocking the vehicle disables the
mechanical anti-theft locking system.
This is not possible with the central
locking button.
Activating
Simple key: Insert the key and turn it
clockwise twice within 5 seconds.
Remote control: Press N on the radio
remote control twice within five
seconds.
Electronic key: Press twice with a
finger or thumb on one of the door
handles (at the markings) within five seconds
Anti-theft alarm system The anti-theft alarm system is
combined with the anti-theft locking
system.
It monitors: ● doors, tailgate, bonnet
● passenger compartment including adjoining load
compartment
Activation
Ignition must be switched off. All
doors must be closed and the
electronic key must not remain in the
vehicle. Otherwise the system cannot
be activated.
● Radio remote control: Monitoring
of doors, tailgate and bonnet is
activated 5 seconds after locking
the vehicle by pressing e.
Monitoring of passenger
compartment including adjoiningload compartment is activated
45 seconds after locking the
vehicle by pressing e.
● Electronic key system: Monitoring of doors, tailgate and
bonnet is activated 5 seconds
after locking the vehicle by
pressing with a finger or thumb
on one of the front door handles
at the markings. Monitoring of
passenger compartment
including adjoining load
compartment is activated
45 seconds after locking the
vehicle by pressing with a finger
or thumb on one of the front door handles at the markings.
Activation is confirmed by the flashing of the status LED and coming on of
the turn lights for a short time.
If a door or the tailgate is not correctly
closed and the vehicle is locked via
remote control or electronic key
system, the vehicle remains
unlocked. However, the anti-theft
alarm system will be activated after
45 seconds.
Page 39 of 285
Keys, doors and windows37Note
Changes to the vehicle interior such
as the use of seat covers and open
windows, could impair the function
of passenger compartment
monitoring.
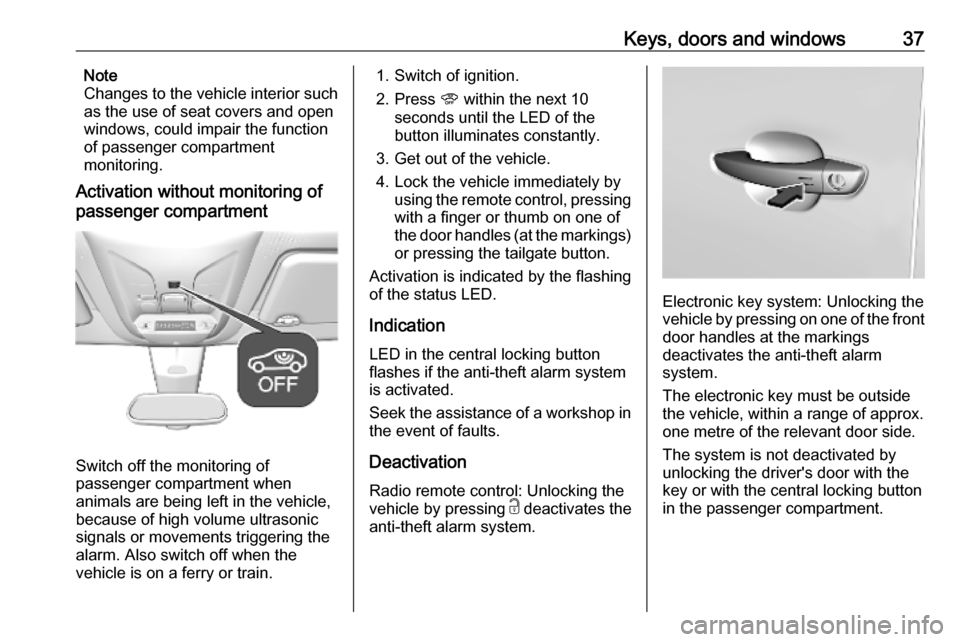
Activation without monitoring of
passenger compartment
Switch off the monitoring of
passenger compartment when
animals are being left in the vehicle,
because of high volume ultrasonic
signals or movements triggering the
alarm. Also switch off when the
vehicle is on a ferry or train.
1. Switch of ignition.
2. Press U within the next 10
seconds until the LED of the
button illuminates constantly.
3. Get out of the vehicle.
4. Lock the vehicle immediately by using the remote control, pressing
with a finger or thumb on one of
the door handles (at the markings) or pressing the tailgate button.
Activation is indicated by the flashing
of the status LED.
Indication
LED in the central locking button
flashes if the anti-theft alarm system
is activated.
Seek the assistance of a workshop in
the event of faults.
Deactivation
Radio remote control: Unlocking the
vehicle by pressing c deactivates the
anti-theft alarm system.
Electronic key system: Unlocking the
vehicle by pressing on one of the front door handles at the markings
deactivates the anti-theft alarm
system.
The electronic key must be outside
the vehicle, within a range of approx. one metre of the relevant door side.
The system is not deactivated by
unlocking the driver's door with the
key or with the central locking button
in the passenger compartment.
Page 112 of 285

110Instruments and controlsIlluminates whiteThe system is on.
Illuminates green Cruise control is active. Set speed is
indicated in the Driver Information
Centre.
Cruise control 3 170.
Adaptive cruise control
m illuminates white or green.
C illuminates in the Driver
Information Centre.
m illuminates white
The system is on.
m illuminates green
Adaptive cruise control is active.
When Adaptive cruise control is on or active, C with the set speed is
indicated in the Driver Information
Centre.
Adaptive cruise control 3 175.Vehicle detected ahead
A illuminates green.
Illuminates green
A vehicle ahead is detected in the
same lane.
Adaptive cruise control 3 175.
Forward collision alert 3 181.
Side blind spot alert
B illuminates continously green in the
instrument cluster.
The system is active 3 194.
Active emergency braking
m illuminates or flashes yellow.
Illuminates
The system has been deactivated or a fault has been detected.
Additionally, a warning message is
displayed in the Driver Information
Centre.Check the reason of the deactivation
3 183 and in case of a system fault,
seek the assistance of a workshop.
Flashes
The system is actively engaged. Depending on the situation, the
vehicle may automatically brake
moderately or hard.
Forward collision alert 3 181.
Front pedestrian protection 3 185.
Active emergency braking 3 183.
Speed limiter
ß illuminates in the Driver
Information Centre when speed
limiter is active. Set speed is indicated alongside ß symbol.
Speed limiter 3 173.
Door open
h illuminates red.
A door or the tailgate is open.
Page 119 of 285

Instruments and controls117Selecting a view
Select the standard rear view or
passenger side view by pressing the
p on the bottom side.
Close rear view is automatically
activated when reverse gear is
engaged.
Switching off
Press m.
Vehicle messages
Messages are indicated in the Driver
Information Centre, in some cases
together with a warning chime.
Press SET / CLR to confirm a
message.
Vehicle and service messages The vehicle messages are displayed
as text. Follow the instructions given
in the messages.
Messages in the
Colour Info Display
Some important messages may
appear additionally in the
Info Display. Some messages only
pop-up for a few seconds.
Warning chimes
If several warnings appear at the same time, only one warning chime
will sound.
When starting the engine or whilst driving
The warning chime regarding not
fastened seat belts has priority over
any other warning chime.
● If a seat belt is not fastened.
● If a door or the tailgate is not fully
closed.
● If a certain speed is exceeded with parking brake applied.
● If cruise control deactivates automatically.
● If a programmed speed or speed
limit is exceeded.
Page 199 of 285
Driving and operating197The system uses:● rear camera, installed in the tailgate
● ultrasonic parking sensors in the rear bumper
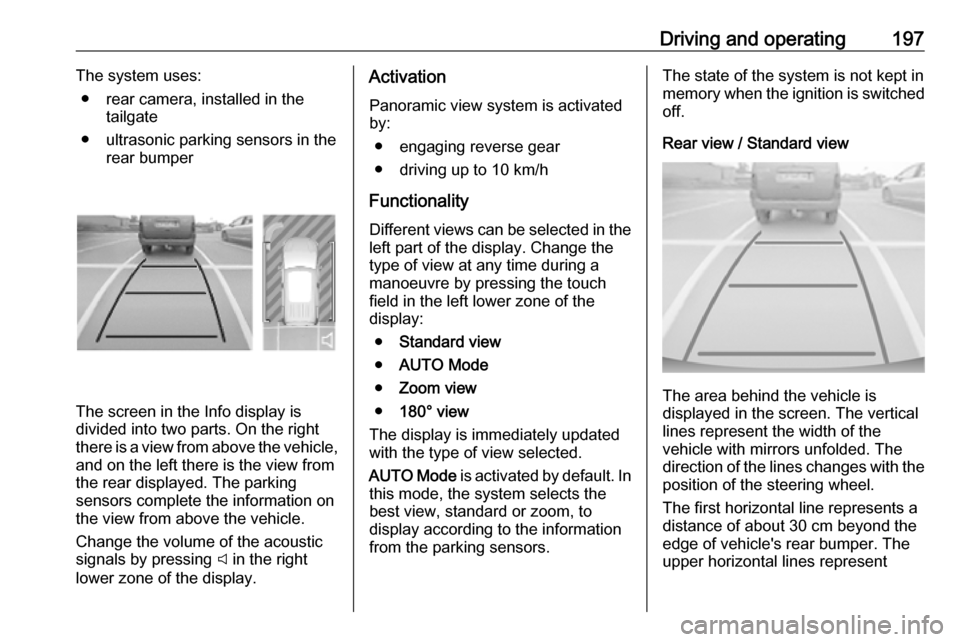
The screen in the Info display is
divided into two parts. On the right
there is a view from above the vehicle,
and on the left there is the view from
the rear displayed. The parking
sensors complete the information on
the view from above the vehicle.
Change the volume of the acoustic
signals by pressing C in the right
lower zone of the display.
Activation
Panoramic view system is activated
by:
● engaging reverse gear
● driving up to 10 km/h
Functionality
Different views can be selected in the left part of the display. Change the
type of view at any time during a
manoeuvre by pressing the touch
field in the left lower zone of the
display:
● Standard view
● AUTO Mode
● Zoom view
● 180° view
The display is immediately updated
with the type of view selected.
AUTO Mode is activated by default. In
this mode, the system selects the
best view, standard or zoom, to
display according to the information
from the parking sensors.The state of the system is not kept in memory when the ignition is switched
off.
Rear view / Standard view
The area behind the vehicle is
displayed in the screen. The vertical
lines represent the width of the
vehicle with mirrors unfolded. The
direction of the lines changes with the position of the steering wheel.
The first horizontal line represents a
distance of about 30 cm beyond the
edge of vehicle's rear bumper. The
upper horizontal lines represent
Page 200 of 285

198Driving and operatingdistances of about 1 and 2 m beyond
the edge of your vehicle's rear
bumper.
This view is available in AUTO Mode
or in the view selection menu.
Rear zoom view / Zoom view
The camera records the vehicle's
surroundings during the manoeuvre in order to reconstruct a view fromabove the rear of the vehicle in its
near surroundings, allowing the
vehicle to be manoeuvred around
obstacles nearby. This view is
available with AUTO Mode or in the
view selection menu.
Rear side view / 180° view
The 180° view facilitates reversing
out of a parking bay, making it
possible to see the approach of
vehicles, pedestrians and cyclists.
This view is not recommended for
carrying out a complete manoeuvre.
It is made up of three areas: left 1,
centre 2 and right 3. This view is
available from the view selection menu only.
Deactivation
Panoramic view system is
deactivated when:
● driving faster than 10 km/h
● seven seconds after disengaging
reverse gear
● by pressing the icon Ù in the left
upper corner of the touch screen
and then &
● opening the tailgate
● attaching a trailer or a bike carrier
General information9 Warning
The panoramic view system does
not replace driver vision. It will not display children, pedestrians,
cyclists, crossing traffic, animals,
or any other objects outside of the camera view area, e. g. below the
bumper, or underneath the
vehicle.
Do not drive or park the vehicle
using only the panoramic view
system.
Page 201 of 285

Driving and operating199Always check the surrounding of
the vehicle before driving.
Displayed images may be further
or closer than they appear. The
area displayed is limited and
objects that are close to either
edge of the bumper or under the
bumper are not displayed on the
screen.
System limitations
Caution
For optimal operation of the
system, it is important to keep the
lense of the camera in the tailgate between the number plate lightsalways clean. Rinse the lense with water and wipe with a soft cloth.
Do not clean the lense with a
steam-jet or high-pressure jet
cleaner.
The panoramic view system may not
operate properly when:
● The surrounding is dark.
● The sun or the beam of headlights is shining directly into
the camera lenses.
● During nighttime driving.
● Weather limits visibility, such as fog, rain, or snow.
● The camera lenses are blocked by snow, ice, slush, mud, dirt.
● The vehicle is towing a trailer.
● The vehicle had an accident.
● There are extreme temperature changes.
Rear view camera Depending on version, camera is
mounted above the license plate in
the tailgate / left rear door or at the top
of the left rear door.9 Warning
The rear view camera does not
replace driver vision. Note that
objects that are outside the
camera's field of view and the
parking assist sensors, e.g. below
the bumper or underneath the
vehicle, are not displayed.
Do not reverse or park the vehicle
using only the rear view camera.
Always check the surrounding of
the vehicle before driving.
Camera above the license plate
on the tailgate / left rear door
Page 203 of 285
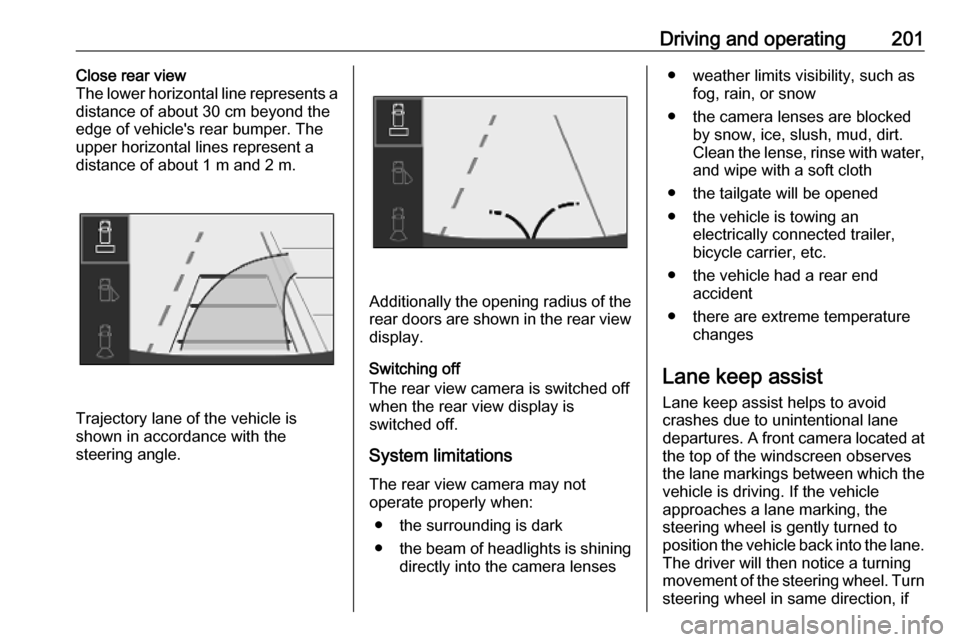
Driving and operating201Close rear view
The lower horizontal line represents a
distance of about 30 cm beyond the
edge of vehicle's rear bumper. The
upper horizontal lines represent a
distance of about 1 m and 2 m.
Trajectory lane of the vehicle is
shown in accordance with the
steering angle.
Additionally the opening radius of the
rear doors are shown in the rear view display.
Switching off
The rear view camera is switched off
when the rear view display is
switched off.
System limitationsThe rear view camera may not
operate properly when:
● the surrounding is dark
● the beam of headlights is shining
directly into the camera lenses
● weather limits visibility, such as fog, rain, or snow
● the camera lenses are blocked by snow, ice, slush, mud, dirt.
Clean the lense, rinse with water, and wipe with a soft cloth
● the tailgate will be opened
● the vehicle is towing an electrically connected trailer,
bicycle carrier, etc.
● the vehicle had a rear end accident
● there are extreme temperature changes
Lane keep assist
Lane keep assist helps to avoid
crashes due to unintentional lane
departures. A front camera located at the top of the windscreen observes
the lane markings between which the
vehicle is driving. If the vehicle
approaches a lane marking, the
steering wheel is gently turned to
position the vehicle back into the lane. The driver will then notice a turning
movement of the steering wheel. Turn
steering wheel in same direction, if
Page 227 of 285
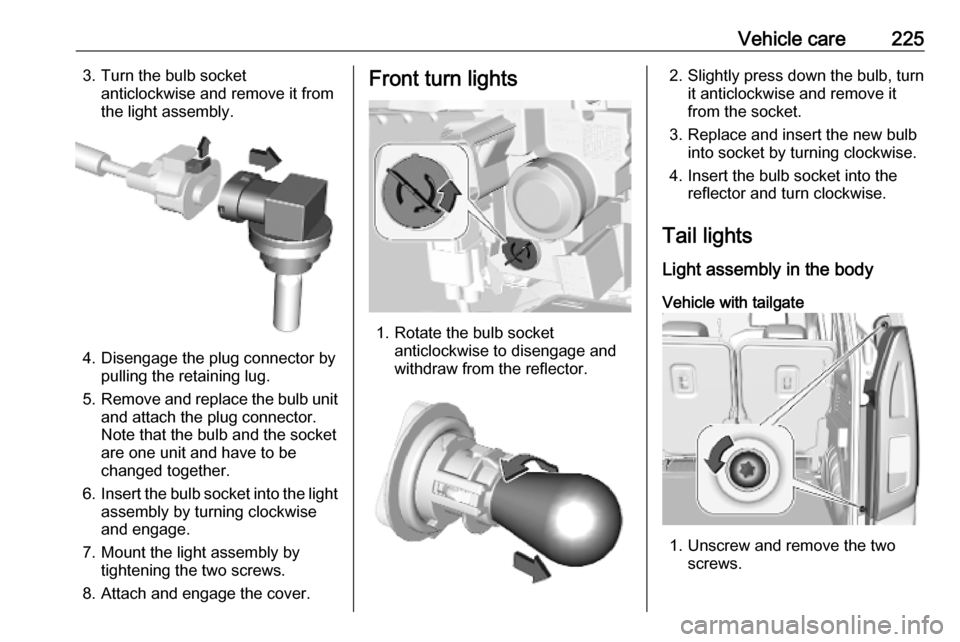
Vehicle care2253. Turn the bulb socketanticlockwise and remove it from
the light assembly.
4. Disengage the plug connector by pulling the retaining lug.
5. Remove and replace the bulb unit
and attach the plug connector.
Note that the bulb and the socket
are one unit and have to be
changed together.
6. Insert the bulb socket into the light
assembly by turning clockwise
and engage.
7. Mount the light assembly by tightening the two screws.
8. Attach and engage the cover.
Front turn lights
1. Rotate the bulb socket anticlockwise to disengage and
withdraw from the reflector.
2. Slightly press down the bulb, turn it anticlockwise and remove it
from the socket.
3. Replace and insert the new bulb into socket by turning clockwise.
4. Insert the bulb socket into the reflector and turn clockwise.
Tail lights
Light assembly in the body Vehicle with tailgate
1. Unscrew and remove the two screws.