immobilizer OPEL FRONTERA 1998 Workshop Manual
[x] Cancel search | Manufacturer: OPEL, Model Year: 1998, Model line: FRONTERA, Model: OPEL FRONTERA 1998Pages: 6000, PDF Size: 97 MB
Page 1169 of 6000

6E–52
ENGINE DRIVEABILITY AND EMISSIONS
10.This vehicle is equipped with a PCM which utilizes
an electrically erasable programmable read only
memory (EEPROM). When the PCM is replaced,
the new PCM must be programmed.
Refer to UBS
98 model year Immobilizer Workshop Manual.
Page 1174 of 6000

6E–57 ENGINE DRIVEABILITY AND EMISSIONS
A/C Clutch Control Circuit Diagnosis
StepNo Ye s Va l u e ( s ) Action
19Replace the A/C switch.
Is the action complete?
—Verify repair—
20Use an ohmmeter to check continuity between the
electronic A/C thermostat and the blower switch.
Was there an open circuit?
—Go to Step 21Go to Step 22
21Repair the open wire (GRN/YEL) between the
thermostat and the blower switch.
Is the action complete?
—Verify repair—
22Replace the electronic A/C thermostat.
Is the an action complete?
—Verify repair—
23Check for an open circuit between A/C thermostat relay
and PCM A/C request terminal (E-15).
Was there an open circuit?
—Go to Step 24Go to Step 25
24Repair the open circuit between the PCM and A/C
thermostat relay.
Is the action complete?
—Verify repair—
25Check for an open circuit between the A/C switch (LT
GRN) and the A/C thermostat relay (LT GRN).
Was there an open circuit?
—Go to Step 26Go to Step 27
26Repair the open circuit between the A/C switch and the
A/C thermostat relay.
Is the action complete?
—Verify repair—
271. Ignition “ON.”
2. Use a DVM to check voltage at the A/C pressure
switch (BRN).
Was voltage equal to the specified value?
+BGo to Step 29Go to Step 28
28Repair the open circuit between the 10A A/C fuse and
the pressure switch.
Is the action complete?
—Verify repair—
29Use an ohmmeter to check continuity between the
pressure switch (GRN/WHT) and the A/C thermostat
relay (GRN/WHT).
Was the circuit open?
—Go to Step 30Go to Step 31
30Repair the open circuit between the pressure switch
and the A/C thermostat relay.
Is the action complete?
—Verify repair—
31Check for damaged pin or terminal at E-15 of the PCM.
Was a damaged pin or terminal found?
—Go to Step 32Go to Step 33
32Repair the damaged pin or terminal.
Is the action complete?
—Verify repair—
33Replace the PCM.
IMPORTANT:The replacement PCM must be
programmed. Refer to
UBS 98model year Immobilizer
Workshop Manual.
Is the action complete?—Verify repair—
Page 1184 of 6000

6E–67 ENGINE DRIVEABILITY AND EMISSIONS
Multiple PCM Information Sensor DTCs Set
StepNo Ye s Va l u e ( s ) Action
111. Disconnect the EGR valve.
2. Measure the voltage between the EGR pintle
position sensor signal circuit at the PCM harness
connector and ground.
Does the voltage measure near the specified value?
0 VGo to Step 13Go to Step 18
12Measure the voltage between the TFT sensor signal
circuit at the PCM harness connector and ground.
Does the voltage measure near the specified value?
0 VGo to Step 20Go to Step 19
13Replace the EGR valve.
Is the action complete?
—Verify repair—
14Locate and repair the short to voltage in the MAP
sensor signal circuit.
Is the action complete?
—Verify repair—
15Locate and repair the short to voltage in the TP sensor
signal circuit.
Is the action complete?
—Verify repair—
16Locate and repair the short to voltage in the IAT sensor
signal circuit.
Is the action complete?
—Verify repair—
17Locate and repair the short to voltage in the ECT
sensor signal circuit.
Is the action complete?
—Verify repair—
18Locate and repair the short to voltage in the EGR pintle
position sensor signal circuit.
Is the action complete?
—Verify repair—
19Locate and repair the short to voltage in the TFT sensor
signal circuit.
Is the action complete?
—Verify repair—
20Replace the PCM.
IMPORTANT:The replacement PCM must be
programmed. Refer to
UBS 98model year Immobilizer
Workshop Manual.
Is the action complete?—
Go to OBD
System
Check
—
Page 1192 of 6000

6E–75 ENGINE DRIVEABILITY AND EMISSIONS
17.This vehicle is equipped with a PCM which utilizes
an electrically erasable programmable read only
memory (EEPROM). When the PCM is replaced,
the new PCM must be programmed. Refer to
UBS
98 model year Immobilizer Workshop Manual.
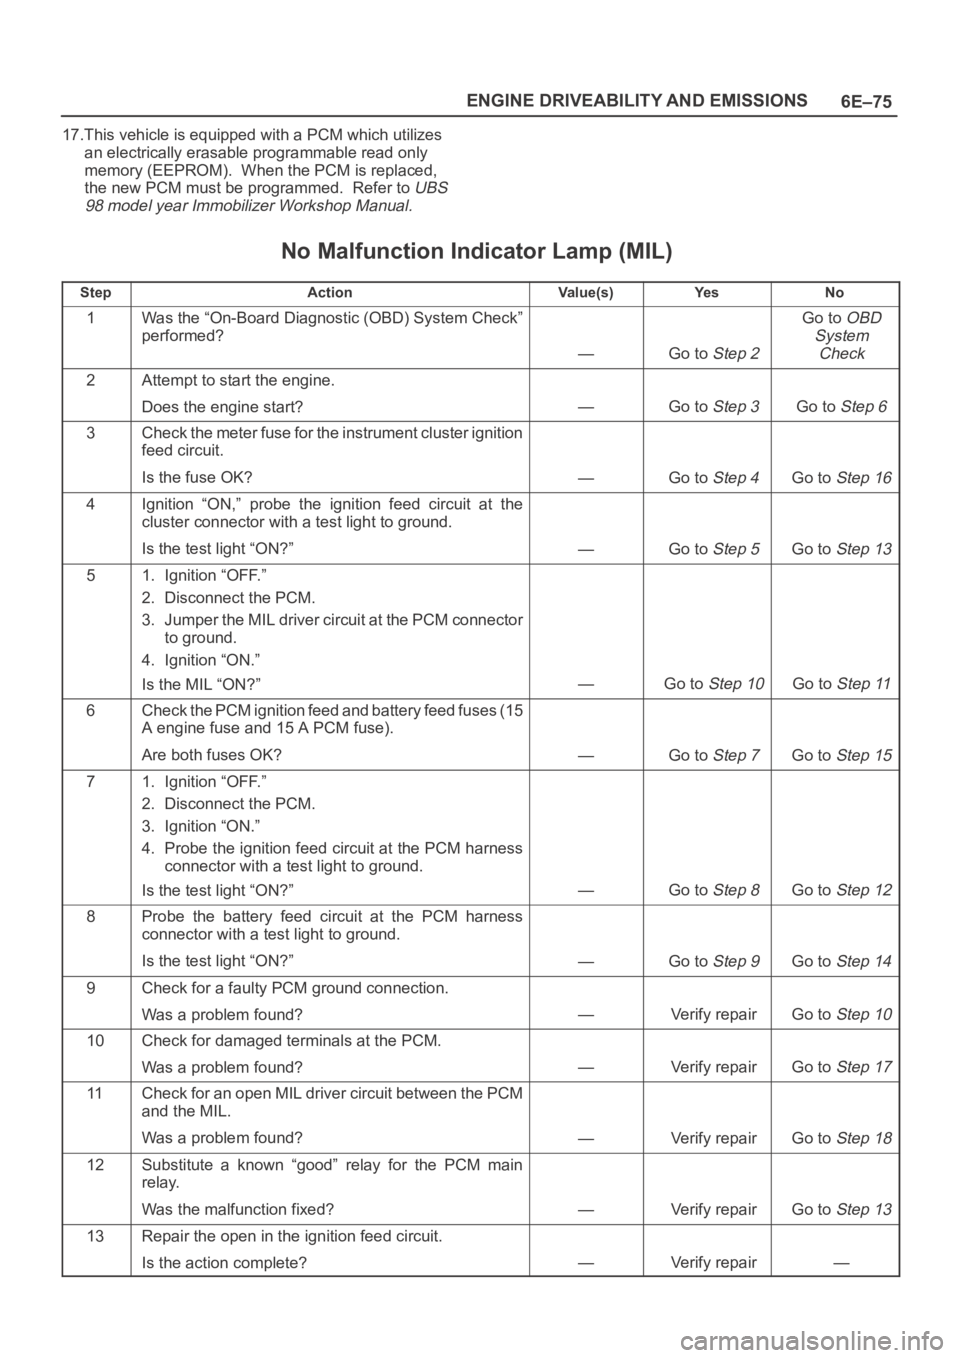
No Malfunction Indicator Lamp (MIL)
StepActionVa l u e ( s )Ye sNo
1Was the “On-Board Diagnostic (OBD) System Check”
performed?
—Go to Step 2
Go to OBD
System
Check
2Attempt to start the engine.
Does the engine start?
—Go to Step 3Go to Step 6
3Check the meter fuse for the instrument cluster ignition
feed circuit.
Is the fuse OK?
—Go to Step 4Go to Step 16
4Ignition “ON,” probe the ignition feed circuit at the
cluster connector with a test light to ground.
Is the test light “ON?”
—Go to Step 5Go to Step 13
51. Ignition “OFF.”
2. Disconnect the PCM.
3. Jumper the MIL driver circuit at the PCM connector
to ground.
4. Ignition “ON.”
Is the MIL “ON?”
—Go to Step 10Go to Step 11
6Check the PCM ignition feed and battery feed fuses (15
A engine fuse and 15 A PCM fuse).
Are both fuses OK?
—Go to Step 7Go to Step 15
71. Ignition “OFF.”
2. Disconnect the PCM.
3. Ignition “ON.”
4. Probe the ignition feed circuit at the PCM harness
connector with a test light to ground.
Is the test light “ON?”
—Go to Step 8Go to Step 12
8Probe the battery feed circuit at the PCM harness
connector with a test light to ground.
Is the test light “ON?”
—Go to Step 9Go to Step 14
9Check for a faulty PCM ground connection.
Was a problem found?
—Verify repairGo to Step 10
10Check for damaged terminals at the PCM.
Was a problem found?
—Verify repairGo to Step 17
11Check for an open MIL driver circuit between the PCM
and the MIL.
Was a problem found?
—Verify repairGo to Step 18
12Substitute a known “good” relay for the PCM main
relay.
Was the malfunction fixed?
—Verify repairGo to Step 13
13Repair the open in the ignition feed circuit.
Is the action complete?
—Verify repair—
Page 1194 of 6000

6E–77 ENGINE DRIVEABILITY AND EMISSIONS
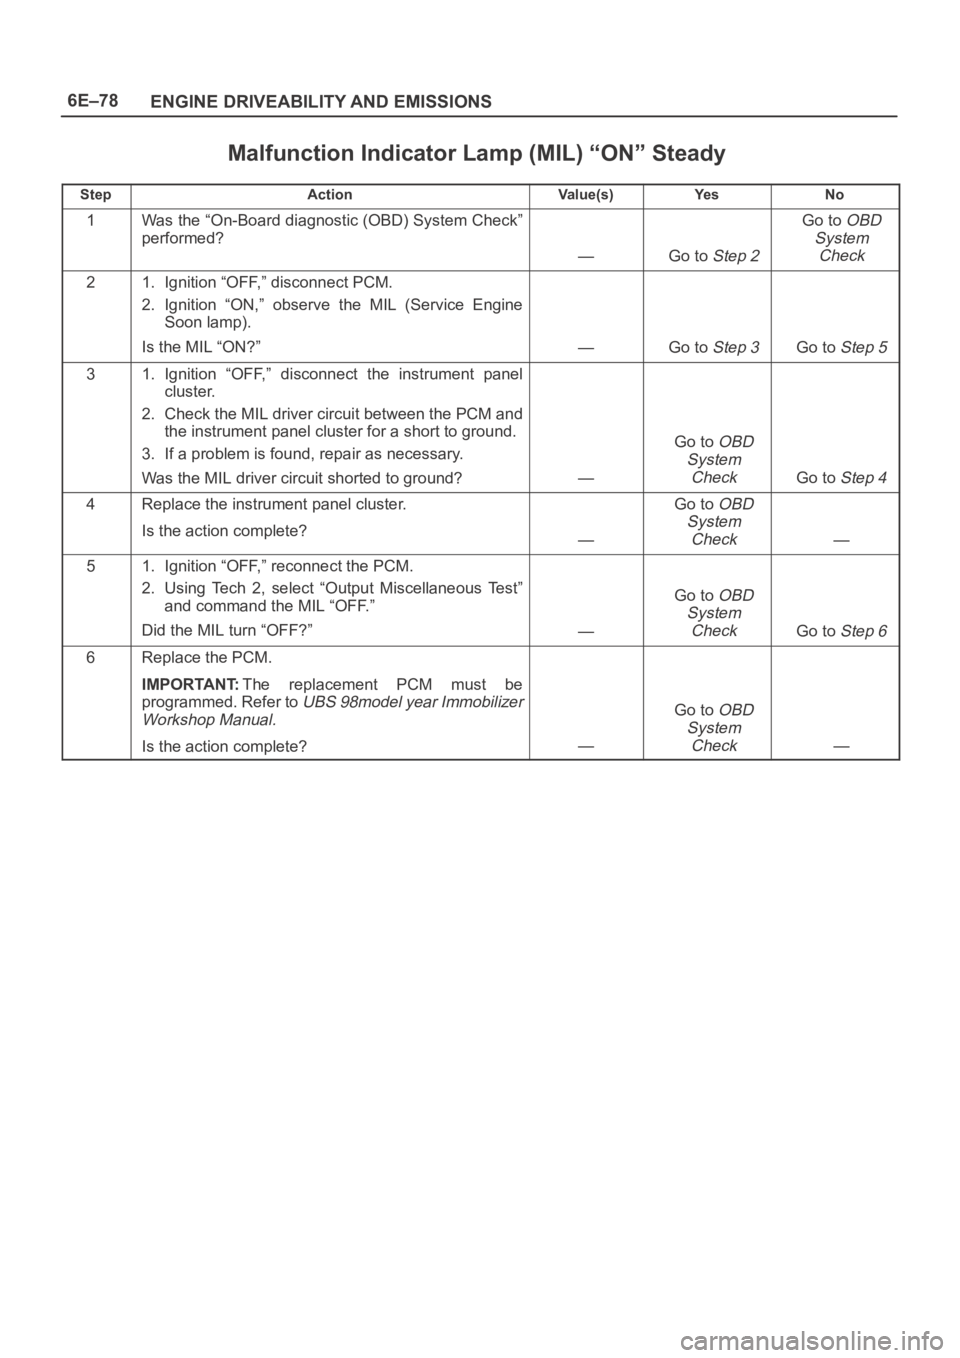
Malfunction Indicator Lamp (MIL) “ON” Steady
D06RW00007
Circuit description
The malfunction indicator lamp (MIL) should always be
illuminated and steady with ignition “ON” and the engine
stopped. Ignition feed voltage is supplied directly to the
MIL indicator. The powertrain control module (PCM)
turns the MIL “ON” by grounding the MIL driver circuit.
The MIL should not remain “ON” with the engine running
and no DTC(s) set. A steady MIL with the engine running
and no DTC(s) suggests a short to ground in the MIL
driver circuit.
Diagnostic Aids
An intermittent may be caused by a poor connection,
rubbed-through wire insulation, or a wire broken inside
the insulation. Check for the following items:
Poor connection or damaged harness – Inspect the
PCM harness and connectors for improper mating,
broken locks, improperly formed or damaged
terminals, poor terminal-to-wire connection, and
damaged harness.
Test Description
Number(s) below refer to the step number(s) on the
Diagnostic Chart.
2. If the MIL does not remain “ON” when the PCM is
disconnected, the MIL driver wiring is not faulty.
3. If the MIL driver circuit is OK, the instrument panel
cluster is faulty.
6. This vehicle is equipped with a PCM which utilizes
an electrically erasable programmable read only
memory (EEPROM). When the PCM is replaced,
the new PCM must be programmed. Refer to
UBS
98 model year Immobilizer Workshop Manual.
Page 1195 of 6000

6E–78
ENGINE DRIVEABILITY AND EMISSIONS
Malfunction Indicator Lamp (MIL) “ON” Steady
StepActionVa l u e ( s )Ye sNo
1Was the “On-Board diagnostic (OBD) System Check”
performed?
—Go to Step 2
Go to OBD
System
Check
21. Ignition “OFF,” disconnect PCM.
2. Ignition “ON,” observe the MIL (Service Engine
Soon lamp).
Is the MIL “ON?”
—Go to Step 3Go to Step 5
31. Ignition “OFF,” disconnect the instrument panel
cluster.
2. Check the MIL driver circuit between the PCM and
the instrument panel cluster for a short to ground.
3. If a problem is found, repair as necessary.
Was the MIL driver circuit shorted to ground?
—
Go to OBD
System
Check
Go to Step 4
4Replace the instrument panel cluster.
Is the action complete?
—
Go to OBD
System
Check
—
51. Ignition “OFF,” reconnect the PCM.
2. Using Tech 2, select “Output Miscellaneous Test”
and command the MIL “OFF.”
Did the MIL turn “OFF?”
—
Go to OBD
System
Check
Go to Step 6
6Replace the PCM.
IMPORTANT:The replacement PCM must be
programmed. Refer to
UBS 98model year Immobilizer
Workshop Manual.
Is the action complete?—
Go to OBD
System
Check
—
Page 1200 of 6000

6E–83 ENGINE DRIVEABILITY AND EMISSIONS
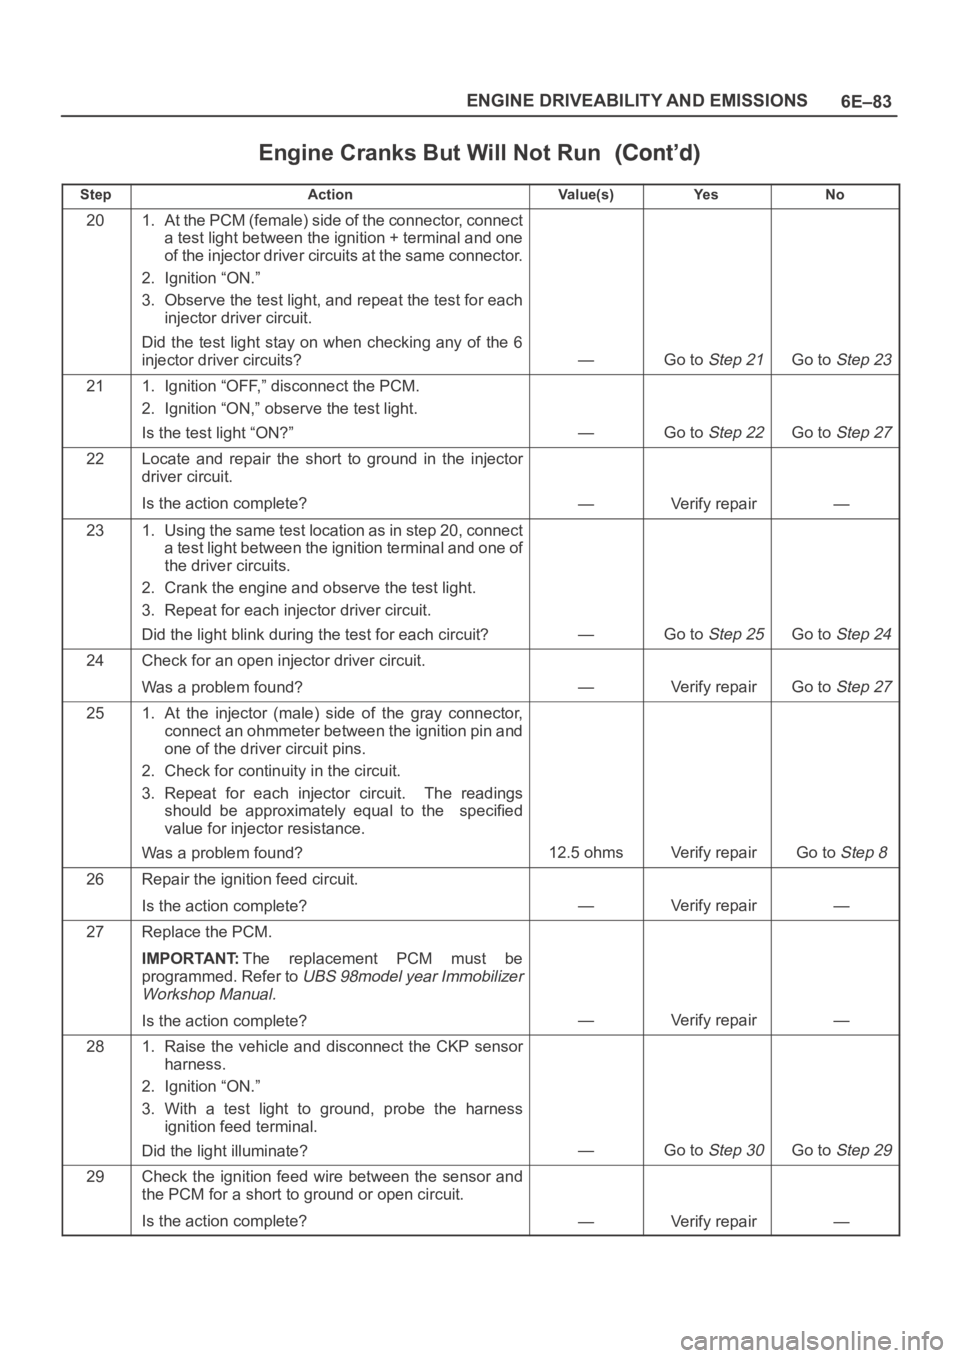
Engine Cranks But Will Not Run
StepNo Ye s Va l u e ( s ) Action
201. At the PCM (female) side of the connector, connect
a test light between the ignition + terminal and one
of the injector driver circuits at the same connector.
2. Ignition “ON.”
3. Observe the test light, and repeat the test for each
injector driver circuit.
Did the test light stay on when checking any of the 6
injector driver circuits?
—Go to Step 21Go to Step 23
211. Ignition “OFF,” disconnect the PCM.
2. Ignition “ON,” observe the test light.
Is the test light “ON?”
—Go to Step 22Go to Step 27
22Locate and repair the short to ground in the injector
driver circuit.
Is the action complete?
—Verify repair—
231. Using the same test location as in step 20, connect
a test light between the ignition terminal and one of
the driver circuits.
2. Crank the engine and observe the test light.
3. Repeat for each injector driver circuit.
Did the light blink during the test for each circuit?
—Go to Step 25Go to Step 24
24Check for an open injector driver circuit.
Was a problem found?
—Verify repairGo to Step 27
251. At the injector (male) side of the gray connector,
connect an ohmmeter between the ignition pin and
one of the driver circuit pins.
2. Check for continuity in the circuit.
3. Repeat for each injector circuit. The readings
should be approximately equal to the specified
value for injector resistance.
Was a problem found?
12.5 ohmsVerify repairGo to Step 8
26Repair the ignition feed circuit.
Is the action complete?
—Verify repair—
27Replace the PCM.
IMPORTANT:The replacement PCM must be
programmed. Refer to
UBS 98model year Immobilizer
Workshop Manual.
Is the action complete?—Verify repair—
281. Raise the vehicle and disconnect the CKP sensor
harness.
2. Ignition “ON.”
3. With a test light to ground, probe the harness
ignition feed terminal.
Did the light illuminate?
—Go to Step 30Go to Step 29
29Check the ignition feed wire between the sensor and
the PCM for a short to ground or open circuit.
Is the action complete?
—Verify repair—
Page 1204 of 6000

6E–87 ENGINE DRIVEABILITY AND EMISSIONS
Fuel System Electrical Test
StepNo Ye s Va l u e ( s ) Action
9Check for short or open between the PCM and the fuel
pump relay.
Was a problem found?
—Verify repairGo to Step 10
101. Check the fuel pump relay circuit for a poor terminal
connection at the PCM.
2. If a problem is found, replace terminal as necessary.
Was a problem found?
—Verify repairGo to Step 11
11Replace the PCM.
IMPORTANT:The replacement PCM must be
programmed. Refer to
UBS 98model year Immobilizer
Workshop Manual.
Is the action complete?—Verify repair—
121. Reconnect the fuel pump relay.
2. Disconnect the fuel pump electrical connector at the
fuel tank.
3. Using a test light connected to ground, probe the
fuel pump feed wire (harness side).
4. Command the fuel pump “ON” with Tech 2.
Did the light illuminate for 2 seconds?
—Go to Step 15Go to Step 13
131. Honk the horn to verify that the horn relay is
functioning.
2. Substitute the horn relay for the fuel pump relay.
3. Leave the test light connected as in step 12.
4. Command the fuel pump “ON” with Tech 2.
Did the test light illuminate for 2 seconds when the fuel
pump was commanded “ON?”
—Go to Step 17Go to Step 14
141. Re-connect the horn relay in its proper location.
2. Check for a short circuit, blown fuse or open circuit
between the relay and the fuel tank.
Is the action complete?
—Verify repair—
151. With the fuel pump electrical connector at the fuel
tank disconnected, connect a test light between the
feed wire and the ground wire (harness side).
2. Command the fuel pump “ON” with Tech 2.
Did the test light illuminate for 2 seconds?
—Go to Step 18Go to Step 16
16Repair the open circuit in the fuel pump ground wire.
Is the action complete?
—Verify repair—
171. Re-connect the horn relay in its proper location.
2. Replace the fuel pump relay.
Is the action complete?
—Verify repair—
18Replace the fuel pump.
Is the action complete?
—Verify repair—
Page 1213 of 6000

6E–96
ENGINE DRIVEABILITY AND EMISSIONS
Knock Sensor (KS) System Check
(Engine Knock, Poor Performance, or Poor Economy)
StepActionVa l u e ( s )Ye sNo
1Is DTC P0325 or P0327 set?
—
Go to DTC
P0325 or
DTC P0327
Go to Step 2
2Run the engine at 1500 RPM.
Is there an internal engine knock?
—Go to Step 3Go to Step 4
3Repair the mechanical problem.
Is the action complete?
—Verify repair—
41. Install Tech 2.
2. Turn the ignition “ON.”
3. Cycle through the list until “Knock Retard” is
displayed.
Is knock retard at the specified value?
0Go to Step 6Go to Step 7
5Replace the PCM.
IMPORTANT:The replacement PCM must be
programmed. Refer to
UBS 98model year Immobilizer
Workshop Manual.
Is the action complete?—Verify repair—
61. Start the engine.
2. Monitor the knock retard display on Tech 2 while
changing the throttle setting to place different loads
on the engine.
Is knock retard at the specified value? (Turn the ignition
“OFF.”)
0Go to Step 9Go to Step 7
71. At the rear of the engine, behind the rear fuel
injector on the lift side, disconnect the 2-wire knock
sensor harness connector.
2. Attach the positive lead of DVM to B+.
3. On the m ain harness side of the connector, use th e
negative lead of the DVM to probe the connector pin
that is connected to the black wire.
Dose the DVM indicate the specified value?
(Reconnect the knock sensor harness.)
B+Go to Step 9Go to Step 8
8Repair the open black wire ground for the shield which
prevents stray electromagnetic pulses from affecting
the knock signal.
Is the action complete?
—Verify repair—
91. Reconnect the wire harness.
2. Set a DVM to AC voltage.
3. With the DVM, backprobe the PCM connector at
A2.
4. Tap the engine lift brackprobe with a socket
extension.
Did the DVM show an increase in AC voltage while
tapping on the lift bracket?
—System OKGo to Step 10
10Replace the knock sensor.
Is the action complete?
—Verify repair—
Page 1226 of 6000

6E–109 ENGINE DRIVEABILITY AND EMISSIONS
DTC P0102 – MAF Sensor Circuit Low Frequency
StepNo Ye s Va l u e ( s ) Action
91. Ignition “OFF.”
2. Disconnect the PCM white connector.
3. Ignition “ON.”
4. Check the MAF sensor signal circuit for a short to 5
volts.
Is the action complete?
—Verify repair—
101. Ignition “OFF.”
2. Disconnect the PCM white connector.
3. Ignition “ON.”
4. Check the MAF sensor signal circuit between the
PCM and the MAF sensor for an open, short to
ground, or short to the MAF ground circuit.
Is the action complete?
—Verify repairGo to Step 13
11Locate and repair the open in the ground circuit to the
MAF sensor.
Is the action complete?
—Verify repair—
12Locate and repair the open in the ignition feed circuit to
the MAF sensor.
Is the action complete?
—Verify repair—
13Replace the MAF sensor.
Is the action complete?
—Verify repairGo to Step 14
14Replace the PCM.
IMPORTANT:The replacement PCM must be
programmed. Refer to
UBS 98model year Immobilizer
Workshop Manual.
Is the action complete?—Verify repair—