ESP OPEL GRANDLAND X 2020 Manual user
[x] Cancel search | Manufacturer: OPEL, Model Year: 2020, Model line: GRANDLAND X, Model: OPEL GRANDLAND X 2020Pages: 283, PDF Size: 22.19 MB
Page 5 of 283
Introduction3Vehicle specific dataPlease enter your vehicle's data on
the previous page to keep it easily
accessible.
Please refer to the sections "Service
and maintenance", "Technical data",
the vehicle’s identification plate and
national registration documents.
Introduction
Your vehicle is a designed
combination of advanced technology, safety, environmental friendliness
and economy.
This Owner's Manual provides you
with all the necessary information to
enable you to drive your vehicle
safely and efficiently.
Make sure your passengers are
aware of the possible risk of accident
and injury which may result from
improper use of the vehicle.
You must always comply with the
specific laws and regulations of the
country that you are in. These laws
may differ from the information in this Owner's Manual.Disregarding the description given in
this manual may affect your warranty.
When this Owner's Manual refers to a
workshop visit, we recommend your Opel Service Partner.
All Opel Service Partners provide
first-class service at reasonable
prices. Experienced mechanics
trained by Opel work according to
specific Opel instructions.
The customer literature pack should
always be kept ready to hand in the
vehicle.
Using this manual ● This manual describes all options
and features available for this
model. Certain descriptions,
including those for display and
menu functions, may not apply to
your vehicle due to model
variant, country specifications,
special equipment or
accessories.
● The "In brief" section will give you
an initial overview.● The table of contents at the beginning of this manual and
within each section shows where the information is located.
● The index will enable you to search for specific information.
● This Owner's Manual depicts left-
hand drive vehicles. Operation is similar for right-hand drive
vehicles.
● The Owner's Manual uses the engine identifier code. The
corresponding sales designation
and engineering code can be
found in the section "Technical
data".
● Directional data, e.g. left or right, or front or back, always relate to
the direction of travel.
● Displays may not support your specific language.
● Display messages and interior labelling are written in bold
letters.
Page 11 of 283
In brief9Mirror adjustment
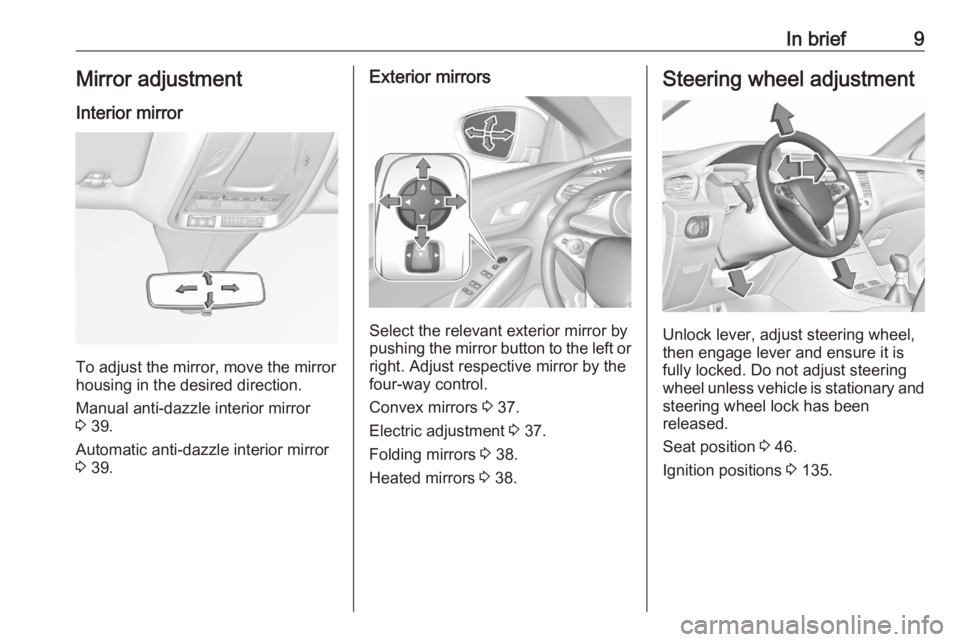
Interior mirror
To adjust the mirror, move the mirror
housing in the desired direction.
Manual anti-dazzle interior mirror
3 39.
Automatic anti-dazzle interior mirror 3 39.
Exterior mirrors
Select the relevant exterior mirror by
pushing the mirror button to the left or right. Adjust respective mirror by the
four-way control.
Convex mirrors 3 37.
Electric adjustment 3 37.
Folding mirrors 3 38.
Heated mirrors 3 38.
Steering wheel adjustment
Unlock lever, adjust steering wheel,
then engage lever and ensure it is fully locked. Do not adjust steering
wheel unless vehicle is stationary and steering wheel lock has been
released.
Seat position 3 46.
Ignition positions 3 135.
Page 26 of 283
24Keys, doors and windowsNote
To save battery power, the keyless
functions are set to stand-by after 21 days of non-use. To reactivate the
functions, press a button on the
electronic key.
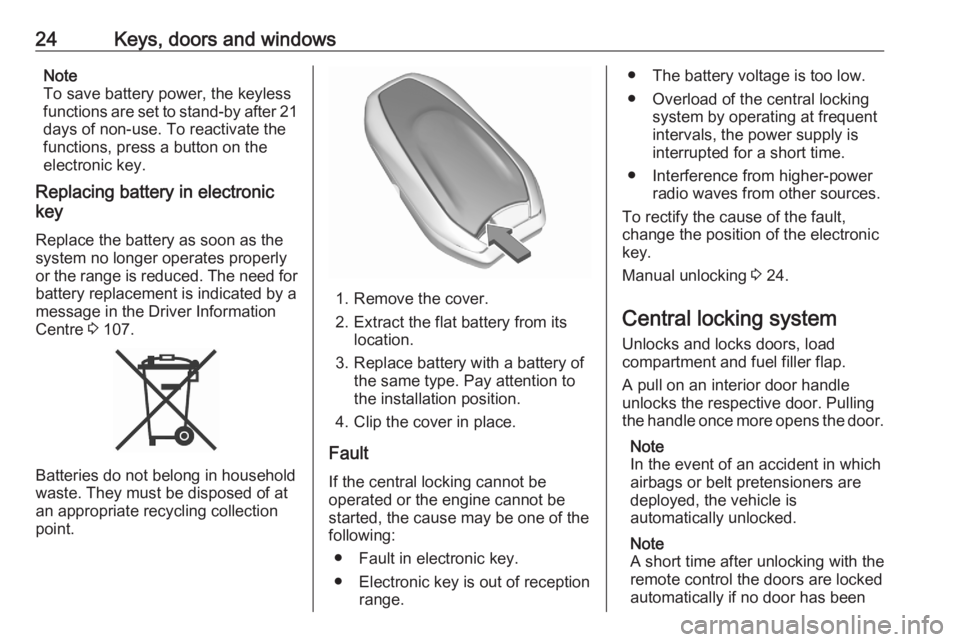
Replacing battery in electronic
key
Replace the battery as soon as the
system no longer operates properly
or the range is reduced. The need for battery replacement is indicated by a
message in the Driver Information
Centre 3 107.
Batteries do not belong in household
waste. They must be disposed of at
an appropriate recycling collection
point.
1. Remove the cover.
2. Extract the flat battery from its location.
3. Replace battery with a battery of the same type. Pay attention to
the installation position.
4. Clip the cover in place.
Fault
If the central locking cannot be
operated or the engine cannot be
started, the cause may be one of the
following:
● Fault in electronic key.
● Electronic key is out of reception range.
● The battery voltage is too low.
● Overload of the central locking system by operating at frequent
intervals, the power supply is
interrupted for a short time.
● Interference from higher-power radio waves from other sources.
To rectify the cause of the fault,
change the position of the electronic
key.
Manual unlocking 3 24.
Central locking system Unlocks and locks doors, load
compartment and fuel filler flap.
A pull on an interior door handle
unlocks the respective door. Pulling
the handle once more opens the door.
Note
In the event of an accident in which
airbags or belt pretensioners are
deployed, the vehicle is
automatically unlocked.
Note
A short time after unlocking with the
remote control the doors are locked
automatically if no door has been
Page 31 of 283
Keys, doors and windows29If one of the doors or the tailgate is
open, the automatic central locking
does not take place. This is signalled
by the sound of the locks rebounding,
accompanied by illumination of h in
the instrument cluster, an audible signal and the display of an alert
message.
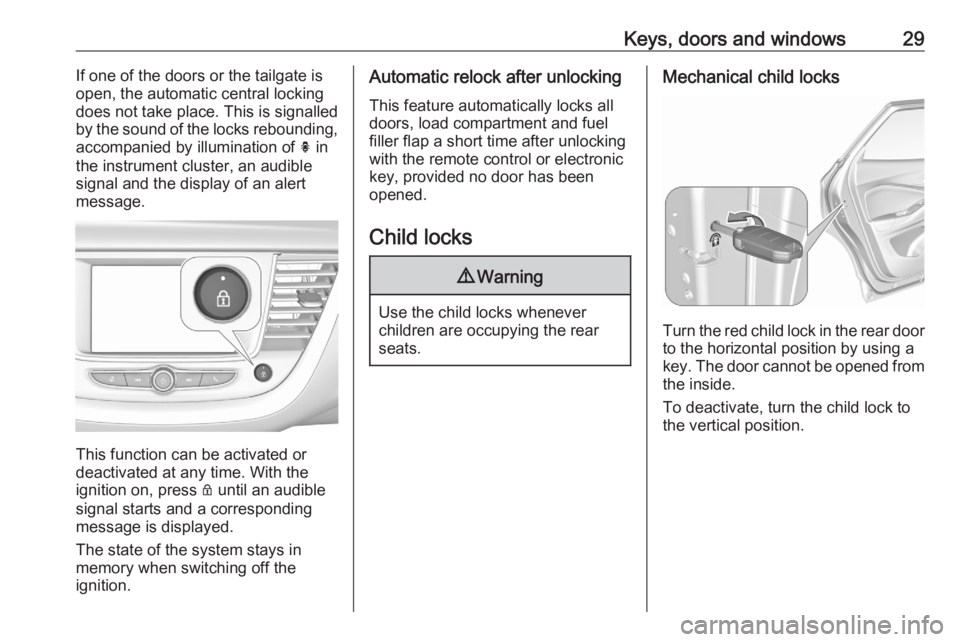
This function can be activated or
deactivated at any time. With the
ignition on, press Q until an audible
signal starts and a corresponding message is displayed.
The state of the system stays in
memory when switching off the
ignition.
Automatic relock after unlocking
This feature automatically locks all
doors, load compartment and fuel
filler flap a short time after unlocking
with the remote control or electronic
key, provided no door has been
opened.
Child locks9 Warning
Use the child locks whenever
children are occupying the rear
seats.
Mechanical child locks
Turn the red child lock in the rear door to the horizontal position by using a
key. The door cannot be opened from
the inside.
To deactivate, turn the child lock to
the vertical position.
Page 42 of 283

40Keys, doors and windowsWindscreen replacementCaution
If the vehicle has a front-looking
camera sensor for the driver
assistance systems, it is very
important that any windscreen
replacement is performed
accurately according to Opel
specifications. Otherwise, these
systems may not work properly
and there is a risk of unexpected
behaviour and / or messages from these systems.
Power windows
9 Warning
Take care when operating the
power windows. Risk of injury,
particularly to children.
If there are children on the rear seats, switch on the child safety
system for the power windows.
Keep a close watch on the
windows when closing them.
Ensure that nothing becomes
trapped in them as they move.
Switch on ignition to operate power
windows.
Operate the switch for the respective
window by pushing to open or pulling to close.
Pushing or pulling gently to the first
detent: window moves up or down as long as the switch is operated.
Pushing or pulling firmly to the second
detent then releasing: window moves
up or down automatically with safety
function enabled. To stop movement,
operate the switch once more in the
same direction.
Safety function
If the window glass encounters
resistance above the middle of the
window during automatic closing, it is
immediately stopped and opened
again.
Override safety function
In the event of closing difficulties due
to frost or the like, switch on the
ignition, then pull the switch to the first
detent and hold. The window moves
up without safety function enabled.
To stop movement, release the
switch.
Page 48 of 283
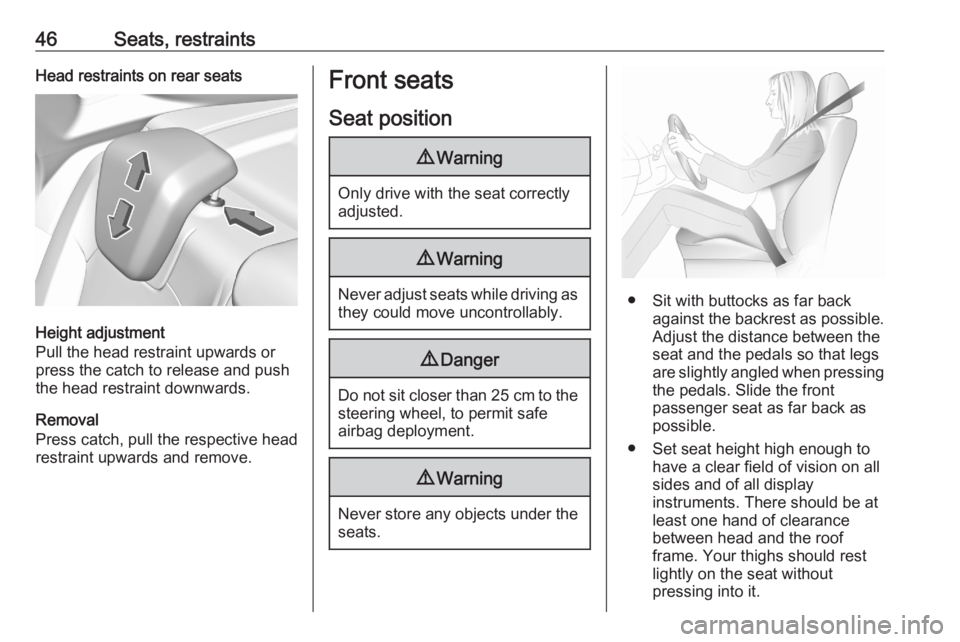
46Seats, restraintsHead restraints on rear seats
Height adjustment
Pull the head restraint upwards or
press the catch to release and push the head restraint downwards.
Removal
Press catch, pull the respective head
restraint upwards and remove.
Front seats
Seat position9 Warning
Only drive with the seat correctly
adjusted.
9 Warning
Never adjust seats while driving as
they could move uncontrollably.
9 Danger
Do not sit closer than 25 cm to the
steering wheel, to permit safe
airbag deployment.
9 Warning
Never store any objects under the
seats.
● Sit with buttocks as far back against the backrest as possible.
Adjust the distance between the
seat and the pedals so that legs
are slightly angled when pressing the pedals. Slide the front
passenger seat as far back as
possible.
● Set seat height high enough to have a clear field of vision on allsides and of all display
instruments. There should be at
least one hand of clearance
between head and the roof
frame. Your thighs should rest
lightly on the seat without
pressing into it.
Page 53 of 283

Seats, restraints51Armrest
The armrest can be slid forwards by
10 cm. Pull the handle to slide the
armrest. Under the armrest there is a storage compartment.
Heating
Adjust heating to the desired setting
by pressing ß for the respective seat
one or more times. The control
indicator in the button indicates the
setting.
Prolonged use of the highest setting
for people with sensitive skin is not
recommended.
Seat heating is operational when
engine is running and during an
Autostop.
Stop-start system 3 139.
Ventilating
Activate ventilation by pressing A for
the respective front seat.
Ventilated seats are operational when
engine is running and during an
Autostop.
Stop-start system 3 139.
Page 54 of 283
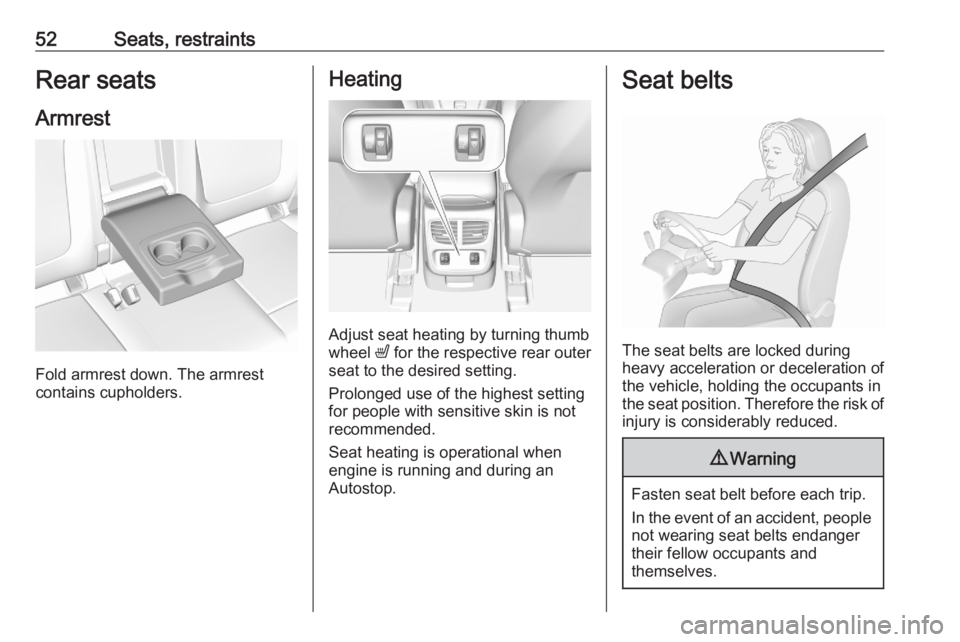
52Seats, restraintsRear seats
Armrest
Fold armrest down. The armrest
contains cupholders.
Heating
Adjust seat heating by turning thumb
wheel ß for the respective rear outer
seat to the desired setting.
Prolonged use of the highest setting
for people with sensitive skin is not
recommended.
Seat heating is operational when engine is running and during an
Autostop.
Seat belts
The seat belts are locked during
heavy acceleration or deceleration of
the vehicle, holding the occupants in
the seat position. Therefore the risk of injury is considerably reduced.
9 Warning
Fasten seat belt before each trip.
In the event of an accident, people
not wearing seat belts endanger their fellow occupants and
themselves.
Page 55 of 283

Seats, restraints53Seat belts are designed to be used by
only one person at a time.
Child restraint system 3 62.
Periodically check all parts of the seat belt system for damage, soiling and
proper functionality.
Have damaged components
replaced. After an accident, have the
seat belts and triggered seat belt pretensioners replaced by a
workshop.
Note
Make sure that the seat belts are
neither damaged by shoes or sharp-
edged objects nor trapped. Prevent
dirt from getting into the seat belt
retractors.
Seat belt reminder
Each seat is equipped with a seat belt reminder, indicated by a control
indicator X for the respective seat in
the overhead console.
Seat belt reminder 3 94.Seat belt force limiters
Stress on the body is reduced by the
gradual release of the seat belt during
a collision.
Seat belt pretensioners In the event of a head-on, rear-end or
side-on collision of a certain severity,
the front seat belts and the outer rear
seat belts are tightened by seat belt
pretensioners.9 Warning
Incorrect handling ( e.g. removal or
fitting of seat belts) can trigger the
seat belt pretensioners.
Deployment of the seat belt
pretensioners is indicated by
continuous illumination of control
indicator v.
Airbag and seat belt
pretensioners 3 94
Triggered seat belt pretensioners
must be replaced by a workshop.
Seat belt pretensioners can only be
triggered once.
Note
Do not affix or install accessories or
other objects that may interfere with
the operation of the seat belt
pretensioners. Do not make any
modifications to seat belt
pretensioner components as this will
invalidate the vehicle operating
permit.
Three-point seat belt
Fasten
Withdraw the seat belt from the
retractor, guide it untwisted across
the body and insert the latch plate into
Page 67 of 283
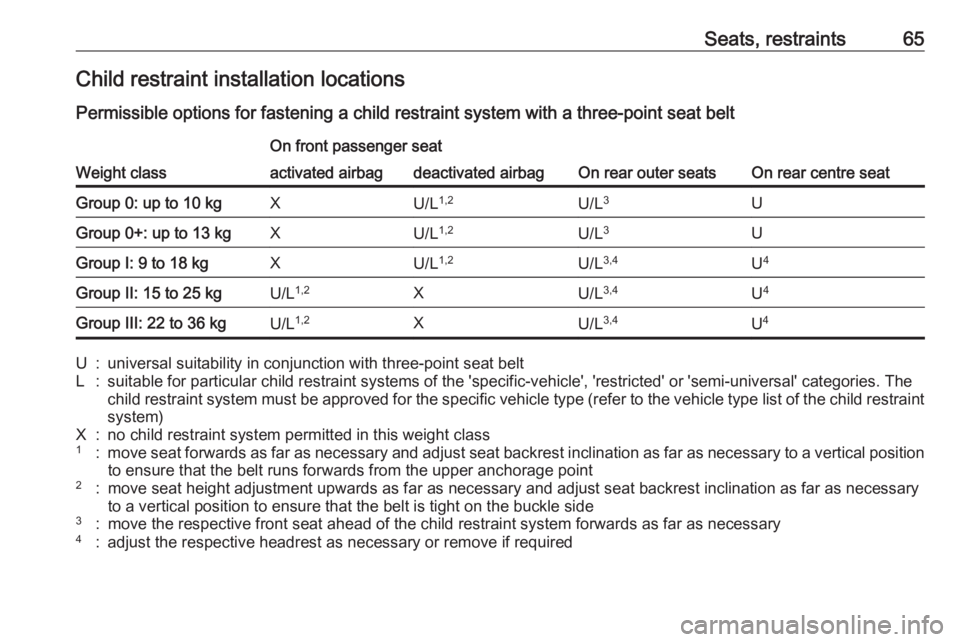
Seats, restraints65Child restraint installation locations
Permissible options for fastening a child restraint system with a three-point seat belt
Weight class
On front passenger seat
On rear outer seatsOn rear centre seat
activated airbagdeactivated airbagGroup 0: up to 10 kgXU/L 1,2U/L 3UGroup 0+: up to 13 kgXU/L1,2U/L3UGroup I: 9 to 18 kgXU/L 1,2U/L3,4U4Group II: 15 to 25 kgU/L 1,2XU/L3,4U4Group III: 22 to 36 kgU/L 1,2XU/L3,4U4U:universal suitability in conjunction with three-point seat beltL:suitable for particular child restraint systems of the 'specific-vehicle', 'restricted' or 'semi-universal' categories. The
child restraint system must be approved for the specific vehicle type (refer to the vehicle type list of the child restraint
system)X:no child restraint system permitted in this weight class1:move seat forwards as far as necessary and adjust seat backrest inclination as far as necessary to a vertical position to ensure that the belt runs forwards from the upper anchorage point2:move seat height adjustment upwards as far as necessary and adjust seat backrest inclination as far as necessaryto a vertical position to ensure that the belt is tight on the buckle side3:move the respective front seat ahead of the child restraint system forwards as far as necessary4:adjust the respective headrest as necessary or remove if required