lock OPEL GT-R 1973 Service Manual
[x] Cancel search | Manufacturer: OPEL, Model Year: 1973, Model line: GT-R, Model: OPEL GT-R 1973Pages: 625, PDF Size: 17.22 MB
Page 573 of 625

9B-64 1973 OPEL SERVICE MANUAL
4. Using No. 21 Truarc pliers (J-5403) take out
retainer ring from hub of clutch drive plate (see Fig-
ure 9B-106). Lift our spacer.
Figure 95.106 Removing
or Installing Retainer Ring inClutch Drive Plate5. If compressor has an absorbent sleeve in the neck,
pry out the sleeve retainer and remove the sleeve.
Remove the seal seat retainer ring, using No. 21
Truarc pliers, Tool J-5403, (see Figure
9B-107).
SEAL SEATFigure 98.107 Removing or Installing Shaft Seal Seat
Retaining Ring6. Thoroughly clean the area inside the compressor
neck surrounding the shaft, the
ezxposed portion of
the seal seat and the shaft itself of any dirt or foreign
material. This is absolutely necessary to prevent any
such material from getting into
t:he compressor.
7. Remove the seal seat (see Figure 9B-108) using
Tool J-23128. Insert Tool
J-2312E; into seal seat and
tighten, using a twisting motion remove the seal seat.96-82
Figure SE-108 Removing or Installing Ceramic Shaft
Seal seat
8. Remove the seal assembly, using Tool J-9392.
Press tool downward on seal while twisting it clock-
wise to engage the tabs of the seal assembly. Gently
but firmly, pull tool straight out (see Figure
9B-109).9. Remove the seal seat
“0” ring, using Tool J-9553
(see Figure
9B-110).10. Recheck the inside of the compressor neck and
the shaft. Be sure these areas are perfectly clean
before installing new parts.
Reassembly
1. Coat the new seal seat
“0” ring with clean refrig-
eration oil and install it in its groove in the compres-
sor neck. Tool J-21508 may be used to accomplish
this. (See Figure
9B;,lll)2. Coat the
“0” ring and seal face of the new seal
assembly with clean refrigeration oil. Carefully
mount the seal assembly to Tool J-9392 by engaging
the tabs of the seal with the tangs of the tool.
3. Place seal protector, Tool J-22974, over end of
shaft and carefully slide the new seal assembly onto
the shaft. Gently twist the tool clockwise while push-
ing the seal assembly down the shaft until the seal
Page 574 of 625
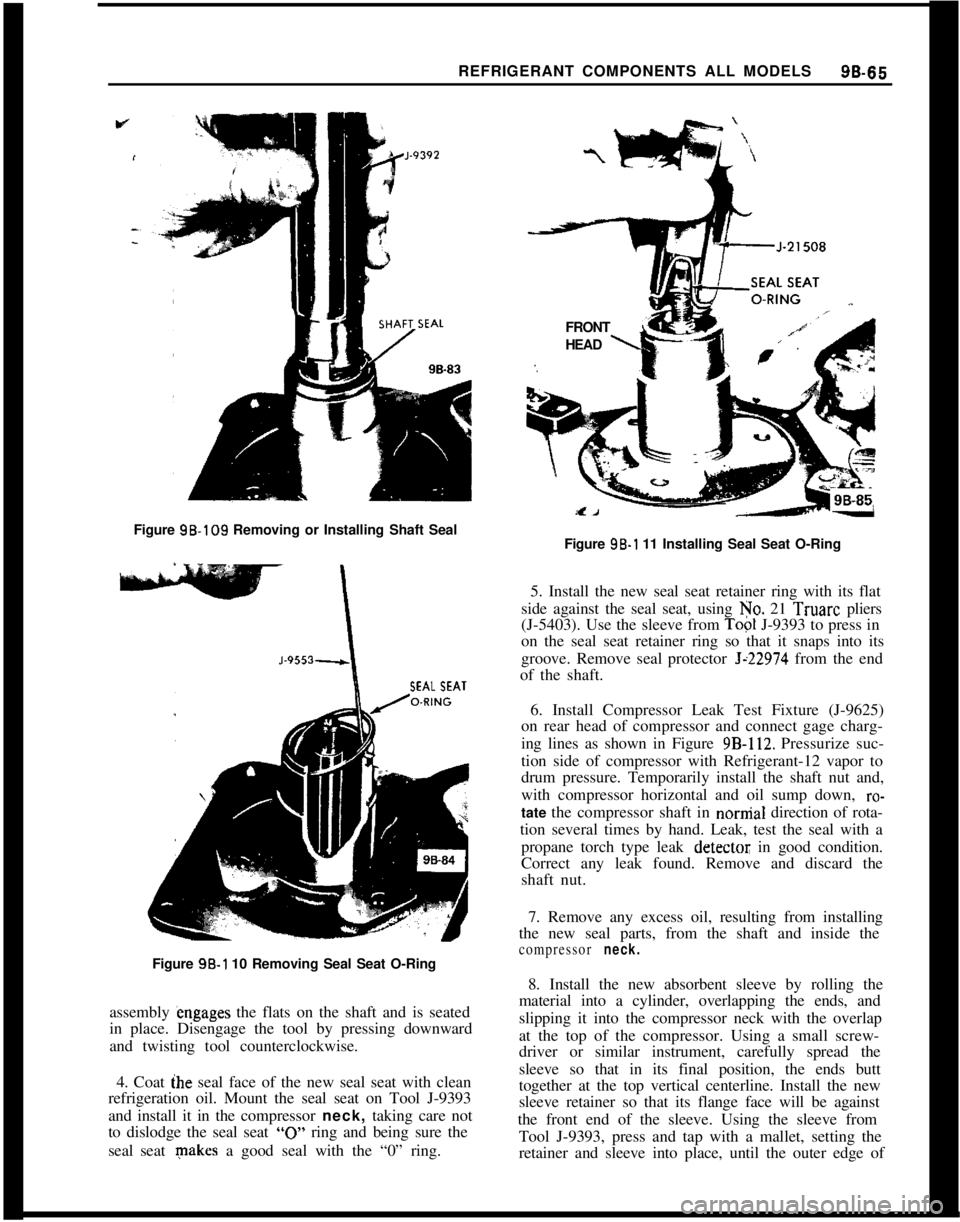
REFRIGERANT COMPONENTS ALL MODELS96-66Figure 98.109 Removing or Installing Shaft Seal
SEAL SEAT
-Figure 98-l 10 Removing Seal Seat O-Ring
assembly engages the flats on the shaft and is seated
in place. Disengage the tool by pressing downward
and twisting tool counterclockwise.
4. Coat ihe seal face of the new seal seat with clean
refrigeration oil. Mount the seal seat on Tool J-9393
and install it in the compressor neck, taking care not
to dislodge the seal seat
“0” ring and being sure the
seal seat makes a good seal with the “0” ring.FRONT
L’HEAD
\Figure 96-l 11 Installing Seal Seat O-Ring
5. Install the new seal seat retainer ring with its flat
side against the seal seat, using No. 21 Truarc pliers
(J-5403). Use the sleeve from
Top1 J-9393 to press in
on the seal seat retainer ring so that it snaps into its
groove. Remove seal protector
Jz22974 from the end
of the shaft.
6. Install Compressor Leak Test Fixture (J-9625)
on rear head of compressor and connect gage charg-
ing lines as shown in Figure
9B-112. Pressurize suc-
tion side of compressor with Refrigerant-12 vapor to
drum pressure. Temporarily install the shaft nut and,
with compressor horizontal and oil sump down,
ro-tate the compressor shaft in nornial direction of rota-
tion several times by hand. Leak, test the seal with a
propane torch type leak
detectot; in good condition.
Correct any leak found. Remove and discard the
shaft nut.
7. Remove any excess oil, resulting from installing
the new seal parts, from the shaft and inside the
compressor neck.8. Install the new absorbent sleeve by rolling the
material into a cylinder, overlapping the ends, and
slipping it into the compressor neck with the overlap
at the top of the compressor. Using a small screw-
driver or similar instrument, carefully spread the
sleeve so that in its final position, the ends butt
together at the top vertical centerline. Install the new
sleeve retainer so that its flange face will be against
the front end of the sleeve. Using the sleeve from
Tool J-9393, press and tap with a mallet, setting the
retainer and sleeve into place, until the outer edge of
Page 577 of 625

98-68 1973 OPEL SERVICE MANUAL
J-9395:
Figure 9B-1 17 Removing Pulley Assembly
Figure
9B-1 10 Removing Pulley Bearing Retainer
26 truarc pliers (J-6435), and lift out coil and housing
assembly.
Reassembly
1. Reassemble coil and housing assembly reverse of
disassembly.
2. Drive new bearing into pulley assembly (see Fig-
ure 9B-121) with installer (J-9481) and handle
(J-
8092).3. Lock bearing in position with bearing to pulley
retainer ring (see Figure 9B-118).
4. Drive pulley assembly onto hub of front head (seeFigure 99-l 19 Removing Bearing From Pulley
AssemblyFigure 9B-120 Removing or Installing Coil and
Housing Retainer Ring
Figure 9B-122) using installer (J-9481) and handle
(J- 8092).
If the pulley assembly is going to be reused, clean thefriction surface with trichlorethylene, alcohol, or a
similar solvent.
5. Lock pulley assembly in position with bearing to
head retainer ring (flat side of retainer ring down-
ward) using No. 26 Truarc pliers (J-6435). (See Fig-
ure
9B-116).
Page 578 of 625

REFRIGERANT COMPONENTS ALL MODELS96.69
J-9481\J-8092
/BEARING
Disassembly of Rear Head, Oil Pump, Rear
Discharge Valve Plate, and Rear Suction Valve
Reed Disc
If compressor is not going to be disassembled any
further than removal of rear head, oil pump, rear
discharge valve plate, or rear suction valve reed disc,
omit Steps “1, 2 and
4”.
1. Disassemble clutch drive plate and shaft seal.
2. Disassemble pulley assembly, and coil and hous-
ing assembly.
3. Clean surface of compressor shell and dry with
compressed air.
4. Remove compressor from holding fixture
(J-
9396), unscrew drain screw. Drain, measure and re-
cord amount of oil in compressor.
Figure
98-121 Installing Bearing into Pulley Assembly 5. Reinstall compressor in holding fixture (J-9396)
positioned as shown in Figure 9B-123.
Figure SB-122 Installing Pulley Assembly
6. Reassemble clutch drive plate.
DISASSEMBLY AND REASSEMBLY OF INTERNAL
PARTS OF COMPRESSOR AND LEAK TESTING
COMPRESSOR
A clean work area and a place for each part removed
is required to properly disassemble and reassemble compressor. The internal parts of the compressor
must be kept free of dirt or foreign material.
When working with compressor, under no circum-
stances should compressor be rested on pulley end.
PRESSURE
Figure 96.123 Compressor Installed in Holding
Fixture
6. Unscrew and discard four lock nuts from rear of
compressor, and lift off rear head by tapping it with
a mallet. If Teflon sealing surface is damaged (see
Figure
9B-124), replace rear head. Clean or replace
suction screen as necessary.
7. Pencil mark top side of both oil pump rotors and
lift out rotors. Replace both oil pump inner and outer
rotors if one or both are damaged or worn.
Page 580 of 625
REI:RIGERANT COMPONENTS ALL MODELS9s. 71
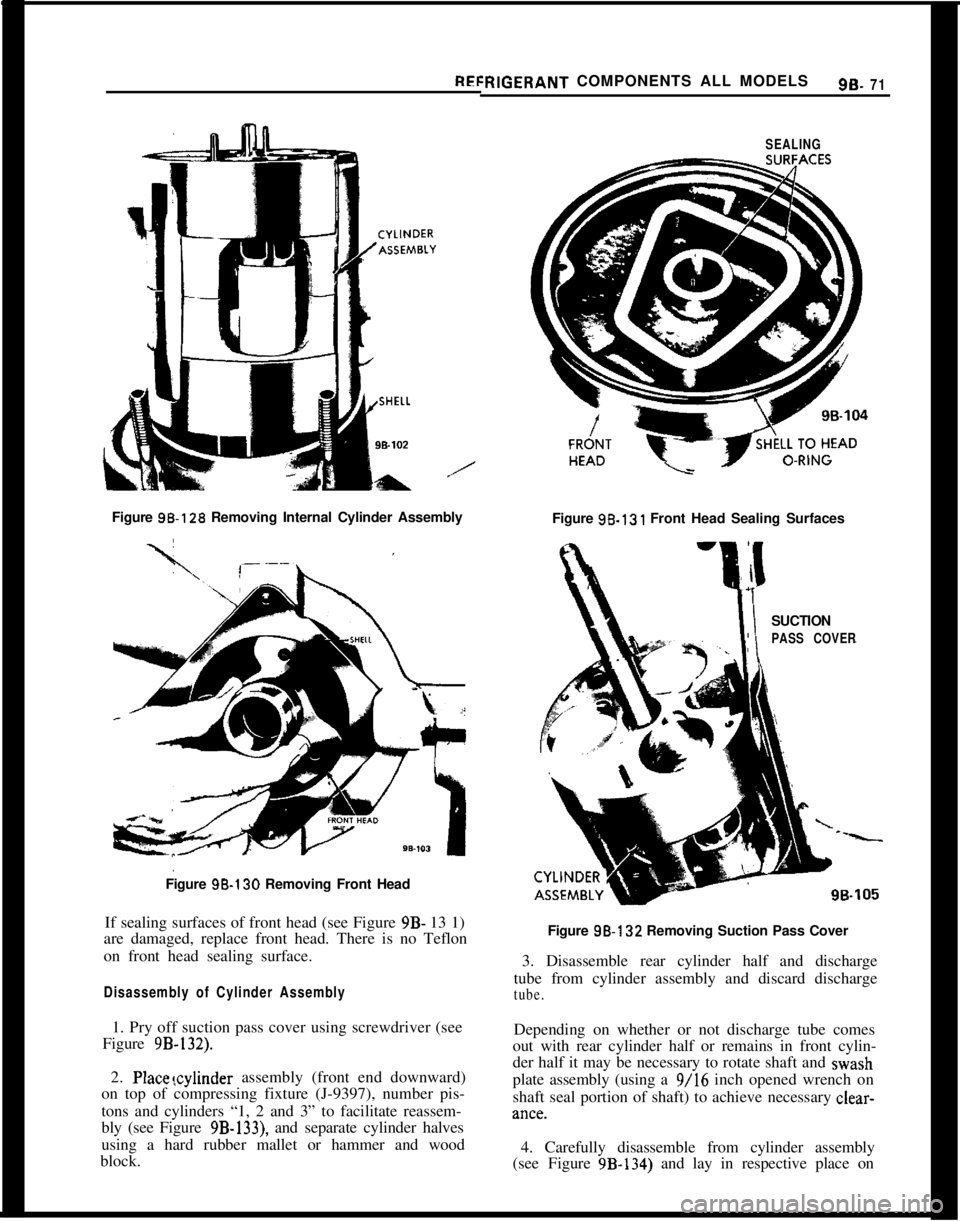
/Figure 9%128 Removing Internal Cylinder Assembly
Figure 9B-130 Removing Front Head
If sealing surfaces of front head (see Figure 9B- 13 1)
are damaged, replace front head. There is no Teflon
on front head sealing surface.
Disassembly of Cylinder Assembly1. Pry off suction pass cover using screwdriver (see
Figure
9B-132).2. Placevzylinder assembly (front end downward)
on top of compressing fixture (J-9397), number pis-
tons and cylinders “1, 2 and 3” to facilitate reassem-
bly (see Figure
9B-133), and separate cylinder halves
using a hard rubber mallet or hammer and wood
block.
SEALINGFigure 96.131 Front Head Sealing Surfaces
SUCTION
PASS COVERFigure 98-132 Removing Suction Pass Cover
3. Disassemble rear cylinder half and discharge
tube from cylinder assembly and discard discharge
tube.Depending on whether or not discharge tube comes
out with rear cylinder half or remains in front cylin-
der half it may be necessary to rotate shaft and wash
plate assembly (using a 9/16 inch opened wrench on
shaft seal portion of shaft) to achieve necessary clear-kl”Ct?.
4. Carefully disassemble from cylinder assembly
(see Figure 9B-134) and lay in respective place on
Page 582 of 625
REFRIGERANT COMPONENTS ALL MODELS9B- 73
F
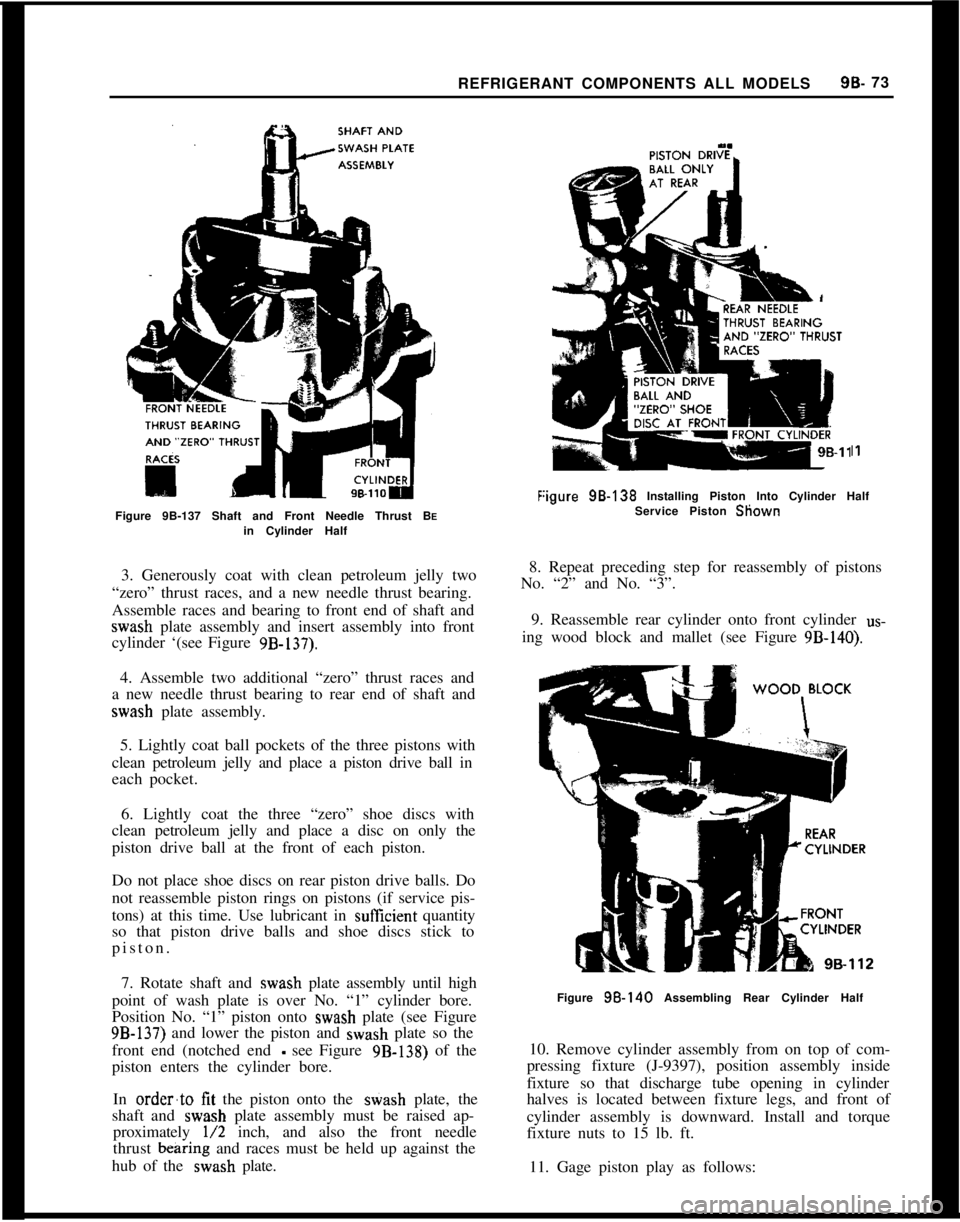
Figure 9B-137 Shaft and Front Needle Thrust BEin Cylinder Half
I1
:igure 98.138 Installing Piston Into Cylinder Half
Service Piston Sliown
3. Generously coat with clean petroleum jelly two
“zero” thrust races, and a new needle thrust bearing.
Assemble races and bearing to front end of shaft and
wash plate assembly and insert assembly into front
cylinder ‘(see Figure
9B-137).
8. Repeat preceding step for reassembly of pistons
No. “2” and No. “3”.
9. Reassemble rear cylinder onto front cylinder
us-
ing wood block and mallet (see Figure 9B-140).
4. Assemble two additional “zero” thrust races and
a new needle thrust bearing to rear end of shaft and
wash plate assembly.
5. Lightly coat ball pockets of the three pistons with
clean petroleum jelly and place a piston drive ball in
each pocket.
6. Lightly coat the three “zero” shoe discs with
clean petroleum jelly and place a disc on only the
piston drive ball at the front of each piston.
Do not place shoe discs on rear piston drive balls. Do
not reassemble piston rings on pistons (if service pis-
tons) at this time. Use lubricant in
sufEcient quantity
so that piston drive balls and shoe discs stick to
piston.
7. Rotate shaft and
wash plate assembly until high
point of wash plate is over No. “1” cylinder bore.
Position No. “1” piston onto
wash plate (see Figure
9B-137) and lower the piston and wash plate so the
front end (notched end
- see Figure 9B-138) of the
piston enters the cylinder bore.
In
order’to tit the piston onto the stiash plate, the
shaft and
wash plate assembly must be raised ap-
proximately
l/2 inch, and also the front needle
thrust
bearing and races must be held up against the
hub of the
wash plate.
Figure 98.140 Assembling Rear Cylinder Half
10. Remove cylinder assembly from on top of com-
pressing fixture (J-9397), position assembly inside
fixture so that discharge tube opening in cylinder
halves is located between fixture legs, and front of
cylinder assembly is downward. Install and torque
fixture nuts to 15 lb. ft.
11. Gage piston play as follows:
Page 585 of 625
9B-76 1973 OPEL SERVICE MANUAL
race. If, for example a feeler gage reading of 0.009
inch results, a thrust race with a number “9”,
stamped on it should be selected.Thrust Race TableSERVICEID NO.THICK-
PART NO. ON RACE
NESS
6556000
0.0920
6556050
5.09656556055
5l/2.09706556060
6.0975
65560656
l/2.09806556070
7.0985
6556075
7l/2.09906556080
8.0995
6556085
8l/2.lOOO6556090
T/2,100s
65560959.lOlO
655610010,101s
655610510 l/2.10206556110
.10256556115
11111/2.10306556120
12.1035The selected thrust race will replace only the “zero”
outer rear thrust race. The remaining three “zero”
thrust races will remain as part of the cylinder assem-
bly.
13. Remove cylinder assembly from inside compress-
ing fixture (J-9397), place on top of compressing
fixture (see Figure 9B-133) and disassemble rear cyl-
inder from front cylinder using rubber mallet or
hammer and wood block.
14. Carefully disassemble one piston at a time from
front cylinder and lay piston, front and rear piston
drive balls and front “zero” shoe disc in respective
slot of parts tray (J-9402). To disassemble, rotatewash plate until piston is at highest point, raise awash plate approximately
l/2 inch and lift out pis-
ton and related parts, one at a time.
15. Remove outer rear ‘?ero” thrust race from shaft
and set it aside for future gaging procedures.
16. Remove previously selected outer rear thrust
race from parts tray, lightly coat with clear pe-
troleum jelly and assemble onto shaft.
Final Reassembly of Cylinder Assembly1. Reassemble piston rings (if service pistons) onto
pistons (ring scraper groove toward center of piston)
and rotate ring so that break or gap in ring can be
squeezed together when piston is being inserted into
cylinder bore.
2. Reassemble piston drive balls, “zero” and se-lected shoe discs onto No. “1” piston, and apply
clear petroleum jelly to piston pockets and shoe discs
so that balls and discs stick to piston. BE SURE to
reassemble balls and shoe discs into their specific
positions on front and rear of piston.
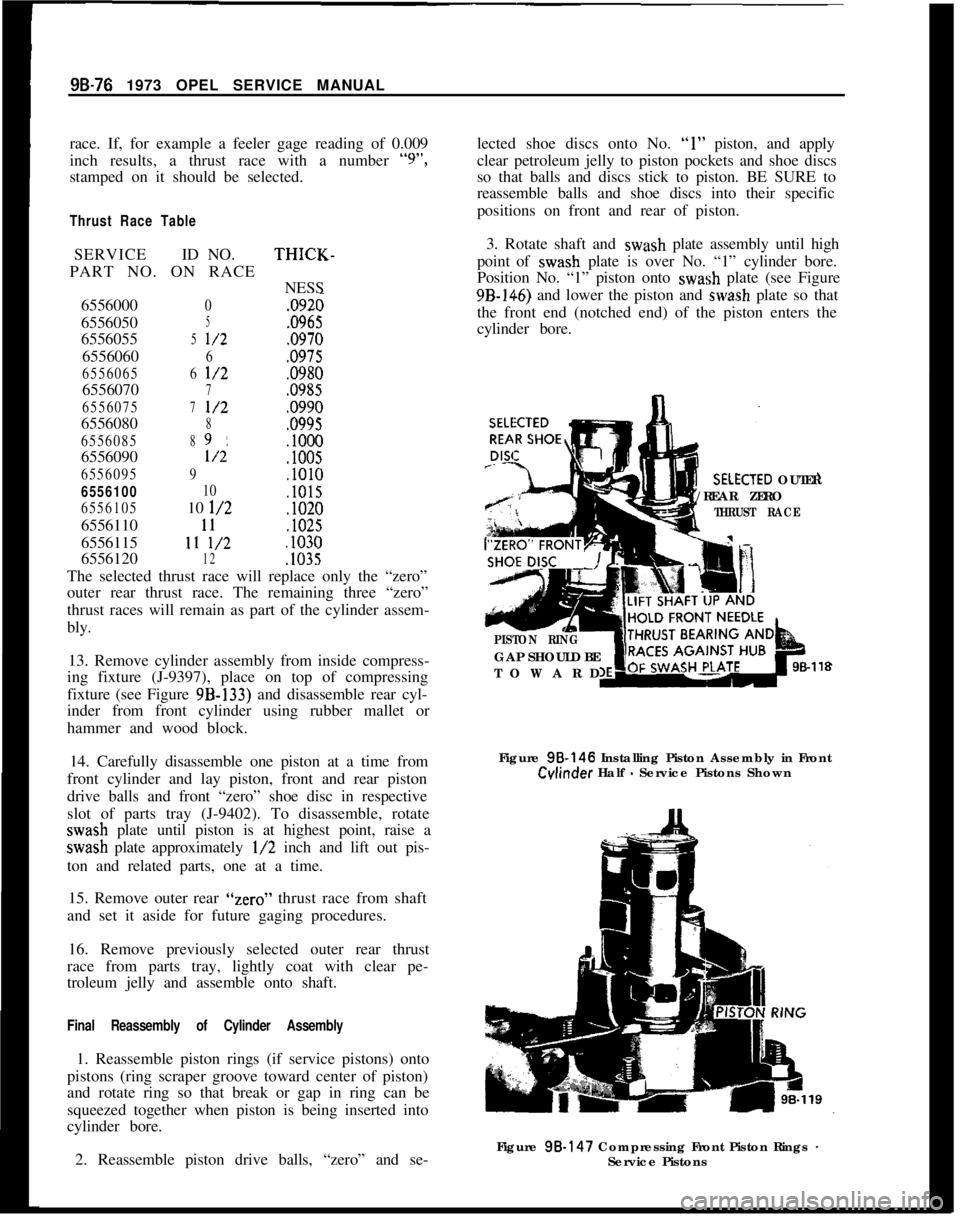
3. Rotate shaft and wash plate assembly until high
point of wash plate is over No. “1” cylinder bore.
Position No. “1” piston onto wash plate (see Figure9B-146) and lower the piston and wash plate so that
the front end (notched end) of the piston enters the
cylinder bore.XTED OUTER
/REAR ZERO
THRUST RACE
PISTON RINGGAP SHOULD BE
TOWARD
98-118Figure 98.146 Installing Piston Assembly in Front
Cvlinder Half - Service Pistons Shown
Figure 98.147 Compressing Front Piston Rings
-Service Pistons
Page 598 of 625
System controls are the AIR knob controlling the
three speed blower motor switch and the TEMP
knob which controls the setting of the thermostatic
switch. When operating this system, the heater must
be off for maximum cooling.DIAGNOSIS
TROUBLE DIAGNOSIS GUIDE
Air Knob
Insufficient CoolingTurning the AIR knob clockwise operates the three-
speed blower motor.CHECK AIR FLOW9B-90 1973 OPEL SERVICE MANUAL
AIR CONDITIONER SYSTEM
OPEL 1900
- MANTA
CONTENTS
Subject
DESCRIPTION AND OPERATION:
General Description of System
. . . . . . . . . . . . . . . . . . . . . . . . . . . . . . . ...”Operation of Controls
. . . . . . . . . . . . . . . . . . . . . . . . . . . . . . . . . . .. . . . . . . . . . . . . . . . . . .DIAGNOSIS:
DiagnosisGuide. . . . . . . . . . . . . . . . . . . . . . . . . . . . . . . . . . . ..“................... . . . . . . . . .MAINTENANCE AND ADJUSTMENT:
Adjustment of Thermostatic Switch
. . . . . . . . . . . . . . . . . . . . . . . . .MAJOR REPAIR:
Removal81InstallationBlowerSwitch. . . . . . . . . . . . . . . . . . . . . .Page No.
9B-90
9B-90
9B-90
9B-91
98-92Removal
& Installation Temperature Control Switch
. . . . . . . . . . . . . . . . . . . . . . . . . . . . . . . . . . . . . . . . . . . . . . . . . . . . . . . . . . . . * . . . . . . . . . . . . . . . . . . . . . . . . . . . . . . . . . . . . . . . . .Removal
& Installation Resistor Assembly. . . . . . . . . . . . . .Removal
& Installation Blower Motor Assembly . .
SPECIFICATIONS:
Specifications
.,...,,.,,..~.,.,..,,......,.,....,.,........,......,........ ,, . . . . . . .
98-92
98-92
98-92
98-96
DESCRIPTION AND OPERATION
GENERAL DESCRIPTION OF SYSTEMThe air conditioner is intended to give maximum
cooling comfort within the vehicle. To do this, care-
ful attention must be given to the following Sections.
The system operates on recirculated air only and is
entirely independent of the vehicle heater.
Temp KnobThis knob may be regulated to control the degree of
cooling desired. Fully clockwise provides maximum
cooling; however, turning the knob to the center de-
tent position provides adequate cooling for highway
operation.
When maximum cooling is required, outside air
should not be admitted to the car.
Recirculated inside air is drawn into the unit, passed
through the evaporator core and into the car through
the adjustable outlets in the evaporator case.
Operation of ControlsWhen the unit is set for maximum cooling and the
vehicle is being driven continuously at highway
speeds or at elevations of
4,OOC!ft. or more, there is
a possibility of the formation of ice on the evaporator
core fins.
Page 599 of 625
AIR CONDITIONER SYSTEM -OPEL 1900 - MANTA9B- 91FAN DOES NOT RUN Correct electrical fault.
FAN RUNS
- Check air velocity.
NOT OK Clean evaporator inlets.
Clean evaporator core.
Clean evaporator outlets.
OK Check refrigeration (refer to Refrigeration
Diagnosis Guide).
MAINTENANCE AND ADJUSTMENTS
ADJUSTMENT OF THERMOSTATIC SWITCHThe system makes use of a thermostatic switch with
a self-supporting air sensing capillary. This capillary
controls the switch by sensing the temperature of the
air leaving the evaporator fins.
Checking for Proper Operation
I. Install the gauge set and set up the vehicle as
described under FUNCTIONAL TESTING SYS-
TEM iti Refrigerant Components Section.
2. Movement of the temperature control knob
should result in a definite change in suction pressure
and cycling of the compressor clutch.
3. If compressor continues to operate regardless of
the knob adjustment, it indicates that the switch
points are fused, which will lead to evaporator
freeze- up. The switch should be replaced.
Adjusting Switch
If, after ihe foregoing checks, the switch seems to be
operating correctly, adjust for proper setting if neces-
sary, as
~follows:1. Set up car as described in FUNCTIONAL
TESTING SYSTEM in Refrigerant Components
Section.2. The suction side of the system, read on the low
pressure gauge, should pull down to the pressure
shown in the chart in SPECIFICATIONS in Refrig-
erant Components Section.
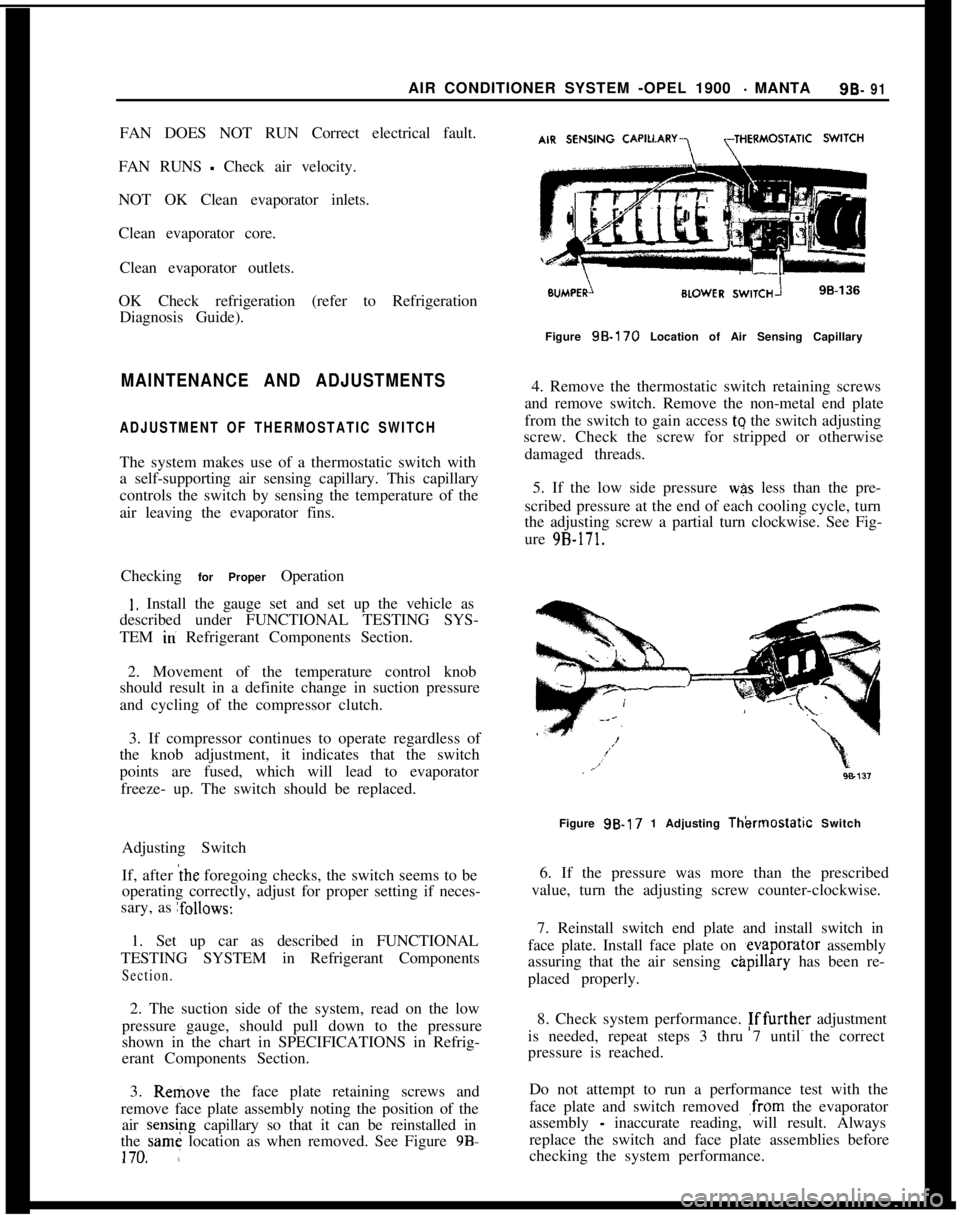
3. Remove the face plate retaining screws and
remove face plate assembly noting the position of the
air sensipg capillary so that it can be reinstalled in
the same location as when removed. See Figure 98.170. ,:Figure
98.170 Location of Air Sensing Capillary
4. Remove the thermostatic switch retaining screws
and remove switch. Remove the non-metal end plate
from the switch to gain access tq the switch adjusting
screw. Check the screw for stripped or otherwise
damaged threads.
5. If the low side pressure
was less than the pre-
scribed pressure at the end of each cooling cycle, turn
the adjusting screw a partial turn clockwise. See Fig-
ure
9B-171.Figure 9B-17 1 Adjusting
Thkmosfatic Switch
6. If the pressure was more than the prescribed
value, turn the adjusting screw counter-clockwise.
7. Reinstall switch end plate and install switch in
face plate. Install face plate on ,evaporator assembly
assuring that the air sensing
c&pillary has been re-
placed properly.
8. Check system performance. Fffurther adjustment
is needed, repeat steps 3 thru 7 until the correct
pressure is reached.
Do not attempt to run a performance test with the
face plate and switch removed
,from the evaporator
assembly
- inaccurate reading, will result. Always
replace the switch and face plate assemblies before
checking the system performance.
Page 603 of 625

AIR CONDITIONER SYSTEM -OPEL 1900 - MANTA9B- 95
Figure 96.185 Evaporator Inlet and Outlet Pipes andO-Rings
7. Connect the 2 drain hoses underneath evapora-
tor.
8. Install evaporator inlet and outlet pipes retainer
and rubber grommet. See Figure
9B-178.
9. Connect vacuum cut-off switch and electrical
wiring,, making sure the delay restrictor and check
valve hose are installed correctly. See Figure
9B-180.
10. Install refrigerant hoses and pipes using new o-
rings on line fittings and evacuate system. Refer to
EVACUATING SYSTEM.
Il. While system is being evacuated install the in-line
fuse and left side of distributor duct. See Figure
9B-
174.
12. Install the glove box.
Figure 98.186 Delay Restrictor and Check Valve Hose
Assembly
Figure 9B-187 Fuse Block Connections
13. Install negative battery cable and charge the sys-
tem. Refer to CHARGING SYSTEM.