jacking OPEL INSIGNIA BREAK 2020 Manual user
[x] Cancel search | Manufacturer: OPEL, Model Year: 2020, Model line: INSIGNIA BREAK, Model: OPEL INSIGNIA BREAK 2020Pages: 315, PDF Size: 9.45 MB
Page 267 of 315

Vehicle care265Wheel changing
Make the following preparations and observe the following information:
● Park the vehicle on a level, firm and non-skid surface. The front
wheels must be in the straight- ahead position.
● Apply the parking brake and engage first gear, reverse gear or
P .
● If the ground on which the vehicle
is standing is soft, a solid board
(max. 1 cm thick) should be
placed under the jack.
● Take heavy objects out of the vehicle before jacking up.
● No people or animals may be in the vehicle when it is jacked-up.
● Never crawl under a jacked-up vehicle.
● Do not start the vehicle when it is
raised on the jack.
● Clean wheel nuts and thread with
a clean cloth before mounting the
wheel.9 Warning
Do not grease wheel bolt, wheel
nut and wheel nut cone.
Jacking positions
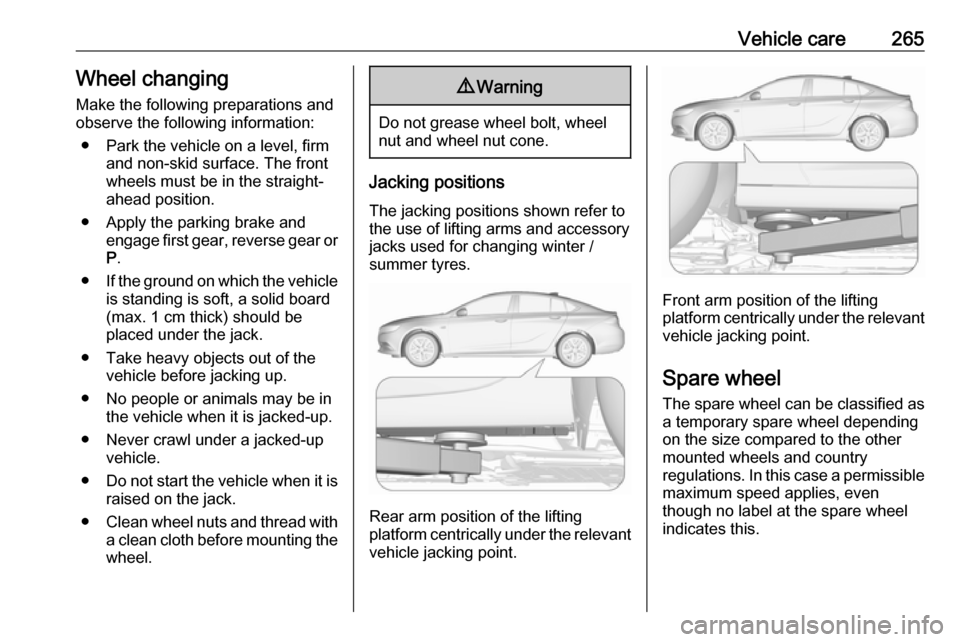
The jacking positions shown refer to
the use of lifting arms and accessory
jacks used for changing winter /
summer tyres.
Rear arm position of the lifting
platform centrically under the relevant
vehicle jacking point.
Front arm position of the lifting
platform centrically under the relevant vehicle jacking point.
Spare wheel The spare wheel can be classified as
a temporary spare wheel depending
on the size compared to the other
mounted wheels and country
regulations. In this case a permissible maximum speed applies, even
though no label at the spare wheel
indicates this.
Page 269 of 315

Vehicle care267● Use the jack only to changewheels in case of puncture, not
for seasonal winter or summer
tyre change.
● The jack is maintenance-free.
● If the ground on which the vehicle
is standing is soft, a solid board
(max. 1 cm thick) should be
placed under the jack.
● Take heavy objects out of the vehicle before jacking up.
● No people or animals may be in the vehicle when it is jacked-up.
● Never crawl under a jacked-up vehicle.
● Do not start the vehicle when it is
raised on the jack.
● Clean wheel nuts and thread with
a clean cloth before mounting the wheel.9 Warning
Do not grease wheel bolt, wheel
nut and wheel nut cone.
1. Steel wheels with cover: Pull off the wheel cover.
Alloy wheels: Disengage wheel
nut caps with a flat screwdriver
and remove. To protect the wheel paint and the cap, wrap a cloth
around the screwdriver tip.
2. Fold out the wheel wrench and install ensuring that it locates
securely and loosen each wheel
nut by half a turn.
The wheels might be protected by
locking wheel nuts. To loosen
these specific nuts, first attach the adapter for the locking wheel nuts
onto the head of the nut before
installing the wheel wrench. The
adapter is located in the glovebox.
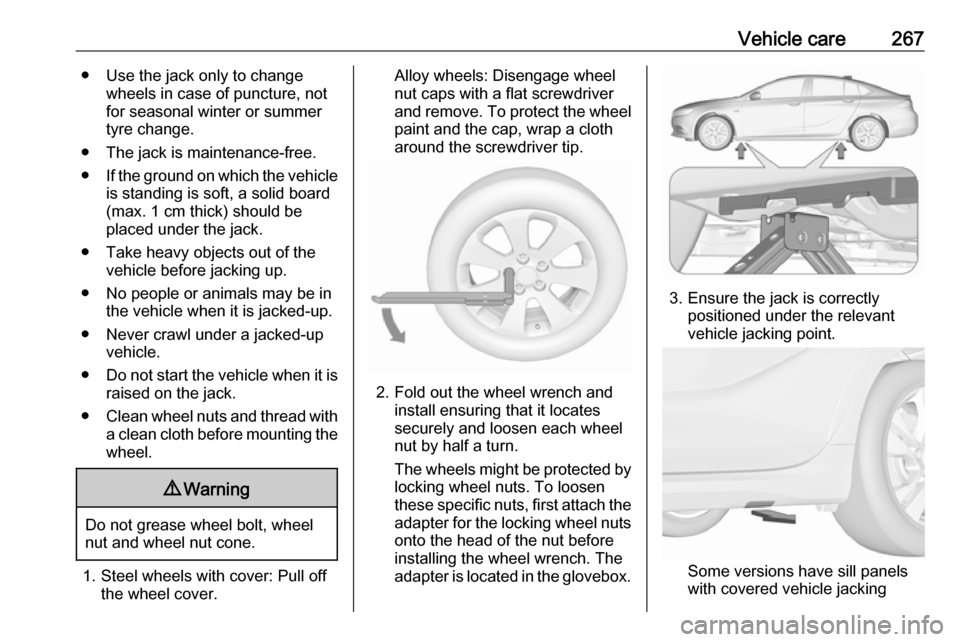
3. Ensure the jack is correctly positioned under the relevant
vehicle jacking point.
Some versions have sill panels
with covered vehicle jacking
Page 270 of 315

268Vehicle carepoints: pull out the cover at the
respective jacking point firstly.
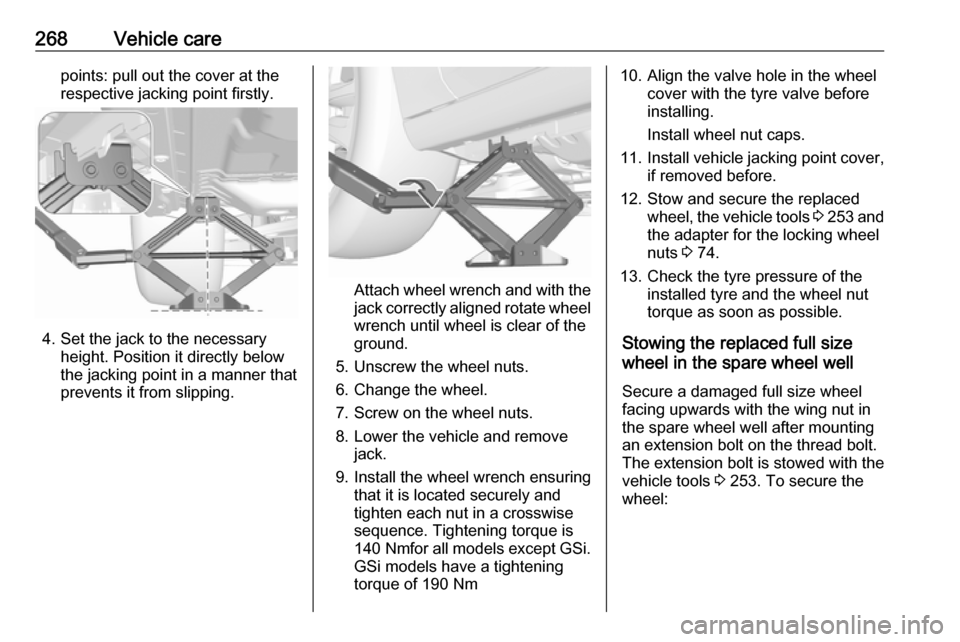
4. Set the jack to the necessary height. Position it directly below
the jacking point in a manner that
prevents it from slipping.
Attach wheel wrench and with the
jack correctly aligned rotate wheel wrench until wheel is clear of the
ground.
5. Unscrew the wheel nuts. 6. Change the wheel.
7. Screw on the wheel nuts.
8. Lower the vehicle and remove jack.
9. Install the wheel wrench ensuring that it is located securely and
tighten each nut in a crosswise
sequence. Tightening torque is
140 Nm for all models except GSi.
GSi models have a tightening
torque of 190 Nm
10. Align the valve hole in the wheel cover with the tyre valve before
installing.
Install wheel nut caps.
11. Install vehicle jacking point cover,
if removed before.
12. Stow and secure the replaced wheel, the vehicle tools 3 253 and
the adapter for the locking wheel
nuts 3 74.
13. Check the tyre pressure of the installed tyre and the wheel nut
torque as soon as possible.
Stowing the replaced full size
wheel in the spare wheel well
Secure a damaged full size wheel facing upwards with the wing nut in
the spare wheel well after mounting
an extension bolt on the thread bolt.
The extension bolt is stowed with the
vehicle tools 3 253. To secure the
wheel: