ignition OPEL MOKKA X 2018.5 Infotainment system
[x] Cancel search | Manufacturer: OPEL, Model Year: 2018.5, Model line: MOKKA X, Model: OPEL MOKKA X 2018.5Pages: 255, PDF Size: 6.79 MB
Page 150 of 255

148Driving and operatingAutomatic transmission
adaptation feature
This feature adapts transmission
operation during constant driving or
gear shifting. It increases durability
and keeps best shift quality over the
life cycle. You may perceive shifting
at initial mileage as uncomfortable,
but this is normal. Shift quality will be
improved gradually by constant
driving at each gear and gear shifting.
Kickdown
Pressing down the accelerator pedal
beyond the kickdown detent will lead
to maximum acceleration
independent of selected driving
mode. The transmission shifts to a
lower gear depending on engine
speed.
Fault
In the event of a fault, a vehicle
message is displayed in the Driver
Information Centre. Vehicle
messages 3 103.The transmission no longer shifts
automatically. Continued travel is
possible with manual shifting.
Only the highest gear is available.
Depending on the fault, second gear
may also be available in manual
mode. Shift only when vehicle is at a
standstill.
Have the cause of the fault remedied
by a workshop.
Interruption of power supply In the event of an interruption of
power supply, the selector lever
cannot be moved out of the P
position. The ignition key cannot be
removed from the ignition switch.
If the battery is discharged, start the
vehicle using jump leads 3 214.
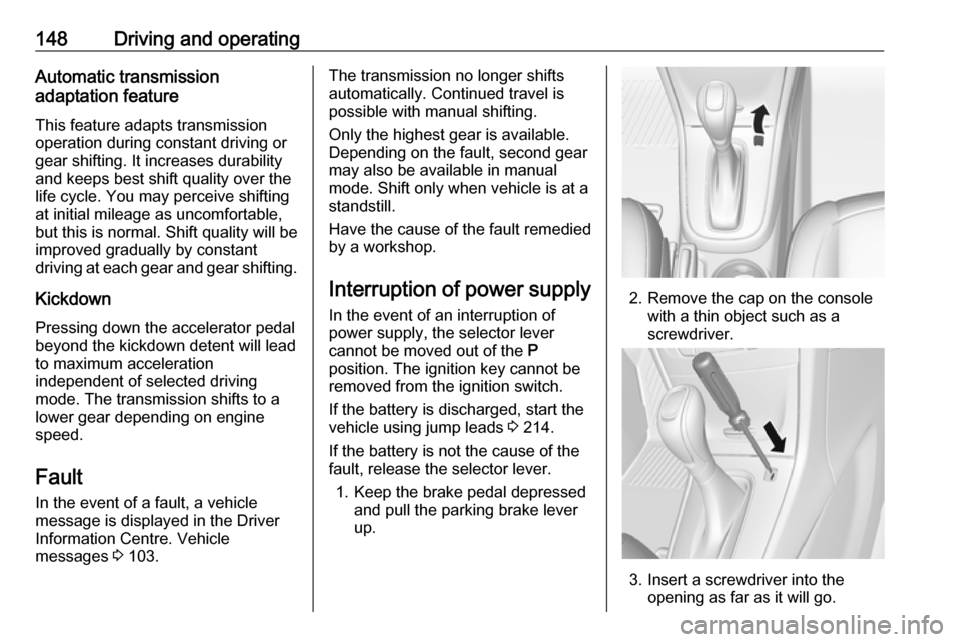
If the battery is not the cause of the fault, release the selector lever.
1. Keep the brake pedal depressed and pull the parking brake lever
up.
2. Remove the cap on the console
with a thin object such as a
screwdriver.
3. Insert a screwdriver into the opening as far as it will go.
Page 155 of 255

Driving and operating153
Control indicator k illuminates.
A status message appears in the
Driver Information Centre when TC is
deactivated.
When TC is deactivated, ESC
remains active but with higher control threshold.
TC is reactivated by pressing b
again. A status message pops up in the Driver Information Centre when
TC is reactivated.
TC is also reactivated the next time
the ignition is switched on.
Fault
If there is a fault in the system the
control indicator b illuminates
continuously and a message appears in the Driver Information Centre. The
system is not operational.
Have the cause of the fault remedied by a workshop.
Electronic Stability Control
Electronic Stability Control (ESC)
improves driving stability when
necessary, regardless of the type of
road surface or tyre grip.
As soon as the vehicle starts to
swerve (understeer / oversteer),
engine output is reduced and the wheels are braked individually.
ESC operates in combination with the Traction Control system (TC). It
prevents the drive wheels from
spinning.
ESC is operational after each engine
start as soon as the control indicator
b extinguishes.
When ESC operates b flashes.
9 Warning
Do not let this special safety
feature tempt you into taking risks
when driving.
Adapt speed to the road
conditions.
Control indicator b 3 93.
Deactivation
ESC can be deactivated: press and
hold t for approx. 5 s.
Control indicators k and n illuminate.
Page 156 of 255

154Driving and operatingESC is reactivated by pressing t
again. If the TC system was
previously disabled, both TC and
ESC are reactivated.
ESC is also reactivated the next time
the ignition is switched on.
Fault
If there is a fault in the system the
control indicator b illuminates
continuously and a message appears in the Driver Information Centre. The
system is not operational.
Have the cause of the fault remedied
by a workshop.
Descent control system
The Descent control system (DCS)
allows the vehicle to travel at a low
speed without depressing the brake pedal. The vehicle will automatically
decelerate to a low speed and remain
at that speed when the system is
activated. Some noise or vibration
from the brake system may be
apparent when the system is active.Caution
Use only when descending steep
grades while driving off-road. Do
not use when driving on normal
road surfaces. Unnecessary
usage of the DCS function, such
as while driving on normal roads,
may damage the brake system
and the ESC function.
Activation
At speeds below approx. 40 km/h,
press u. The green control indicator
u flashes in the instrument cluster, to
show DCS is in operation. DCS will
not activate at speeds above
50 km/h, even if the button is pressed.
Deactivation
Press u again. The green control
indicator u extinguishes. Depressing
the foot brake or accelerator will also
cause the system to be deactivated.
Fault
If the green control indicator u does
not illuminate or flash after pressing
the button, there is a fault in the
system.
Seek the assistance of a workshop.
DSC control indicators u 3 93.
Page 158 of 255

156Driving and operatingIncrease speed
With cruise control active, hold thumb
wheel turned to RES/+ or briefly turn
to RES/+ repeatedly: speed
increases continuously or in small
increments.
Alternatively accelerate to the desired speed and store by turning to SET/-.
Reduce speed
With cruise control active, hold thumb
wheel turned to SET/- or briefly turn to
SET/- repeatedly: speed decreases
continuously or in small increments.
Deactivation of the functionality
Press y: control indicator m in
instrument cluster illuminates white.
On Uplevel display m changes to
white.
Cruise control is deactivated, but not
switched off. Last stored speed
remains in memory for later speed
resume.
Automatic deactivation: ● Vehicle speed is below approx. 30 km/h.
● Vehicle speed drops more than 25 km/h below the set speed.
● The brake pedal is depressed.
● The clutch pedal is depressed for
a few seconds.
● Selector lever is in N.
● Engine speed is in a very low range.
● The Traction Control system (TC)
or Electronic Stability Control
(ESC) is operating.● Parking brake is applied.
● Simultaneous pressing RES/+
and brake pedal deactivates
cruise control and will delete
stored speed.
Resume stored speed
Turn thumb wheel to RES/+ at a
speed above 30 km/h. The stored
speed will be resumed.
Switching off the system
Press m: control indicator m in
instrument cluster extinguishes. The stored speed is deleted.
Pressing L for activating speed
limiter or switching off the ignition also
switches off cruise control and
deletes the stored speed.
Speed limiter
The speed limiter prevents the
vehicle exceeding a preset maximum speed.
The maximum speed can be set at a
speed above 25 km/h.
Page 160 of 255

158Driving and operatingOn Midlevel display the stored limited
speed is indicated in brackets.
On Uplevel display L changes to
white.
Additionally, a corresponding
message appears.
Speed limiter is deactivated, but not
switched off. Last stored speed
remains in memory for later speed
resume.
Resume limit speed Turn thumb wheel to RES/+. The
stored speed limit will be obtained
and is indicated without brackets in the Driver Information Centre.
Switching off the system
Press L, the speed limit indication
extinguishes in the Driver Information Centre. The stored speed is deleted.
By pressing m to activate cruise
control, speed limiter is also
deactivated and the stored speed is
deleted.By switching off the ignition, speed
limiter is also deactivated, but the
speed limit will be stored for next
speed limiter activation.
Forward collision alert
The forward collision alert may help to avoid or reduce the harm caused by
front-end crashes.
A vehicle ahead is indicated by the
control indicator A.
If a vehicle directly ahead is
approached too quickly, a warning
chime is provided.
Additionally the driver gets notified by
a flashing red LED stripe which is
projected on the windscreen in the
driver's field of view.
A precondition is that forward collision
alert is not deactivated by pressing
V on the steering wheel.
Activation
Forward collision alert uses the front
camera system in the windscreen to
detect a vehicle directly ahead, in
your path, within a distance of approx.
60 m.
Forward collision alert operates
automatically above 40 km/h, if it is
not deactivated by pressing V, see
below.
Alerting the driver The vehicle ahead control indicator
A illuminates green in the instrument
cluster when the system has detected
a vehicle in the driving path.
Page 163 of 255

Driving and operating161Parking assist
The parking assist makes parking
easier by measuring the distance between the vehicle and obstacles,
and giving acoustic signals. It is the
driver, however, who bears full
responsibility for the parking
manoeuvre.
The system consists of four ultrasonic parking sensors in the rear bumper. If
the vehicle is equipped with a front
parking assist the system consists of
four additional ultrasonic parking
sensors in the front bumper.
Activation
After ignition is switched on, the rear
parking assist is activated.
The front parking assist can also be activated at a low speed by pressing
r .
An illuminated LED in the parking
assist button indicates that the
system is ready to operate.
An obstacle is indicated by a buzzing
sound. The interval between the sounds becomes shorter as the
vehicle gets closer to the obstacle.
When the distance is less than
30 cm, the buzzing is continuous.
If r is pressed once within an
ignition cycle, the front parking assist
is reactivated if the vehicle speed
goes below a certain value and if the
vehicle speed has not exceeded
25 km/h beforehand.
Deactivation
Deactivate the system by pressing
r .
The LED in the button will go out and
Park Assist Off will be displayed in the
Driver Information Centre.
If the parking assist is deactivated
manually, it will be reactivated
automatically the next time the
ignition is switched on.
The system is deactivated
automatically at a certain speed.
Fault
In the event of a fault in the system, a
vehicle message is displayed in the Driver Information Centre.
Additionally, a vehicle message is
displayed in the Driver Information
Centre if a malfunction of the system
due to temporary conditions, e.g.
snow covered sensors is detected.
Page 174 of 255

172Driving and operating9Danger
Before refuelling, switch off
ignition and any external heaters
with combustion chambers.
Follow the operating and safety
instructions of the filling station
when refuelling.
9 Danger
Fuel is flammable and explosive.
No smoking. No naked flames or
sparks.
If you can smell fuel in your
vehicle, have the cause of this
remedied immediately by a
workshop.
A label with symbols at the fuel filler
flap is indicating the allowed fuel
types. In Europe the pump nozzles of the filling stations are marked with
these symbols. Refuel only the
allowed fuel type.
Caution
In case of misfuelling, do not
switch on ignition.
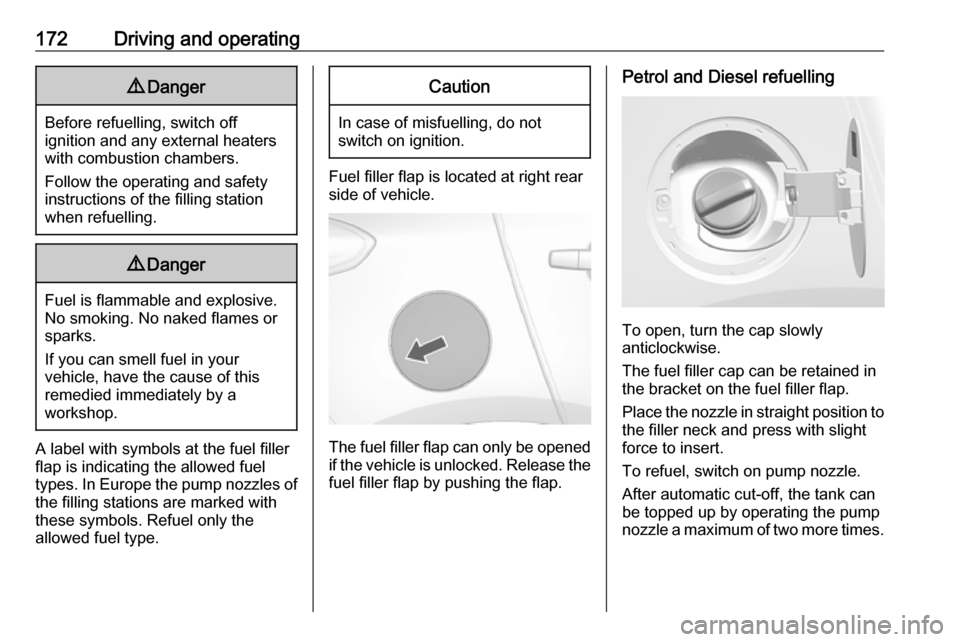
Fuel filler flap is located at right rear
side of vehicle.
The fuel filler flap can only be opened
if the vehicle is unlocked. Release the
fuel filler flap by pushing the flap.
Petrol and Diesel refuelling
To open, turn the cap slowly
anticlockwise.
The fuel filler cap can be retained in
the bracket on the fuel filler flap.
Place the nozzle in straight position to the filler neck and press with slight
force to insert.
To refuel, switch on pump nozzle.
After automatic cut-off, the tank can be topped up by operating the pump
nozzle a maximum of two more times.
Page 184 of 255

182Vehicle careVehicle checks
Performing work9 Warning
Only perform engine compartment
checks when the ignition is off.
The cooling fan may start
operating even if the ignition is off.
9 Danger
The ignition system and Xenon
headlights use extremely high
voltage. Do not touch.
Bonnet
Opening
Pull the release lever and return it to
its original position.
Move the safety catch sideways to the left vehicle side and open the bonnet.
Page 188 of 255

186Vehicle care
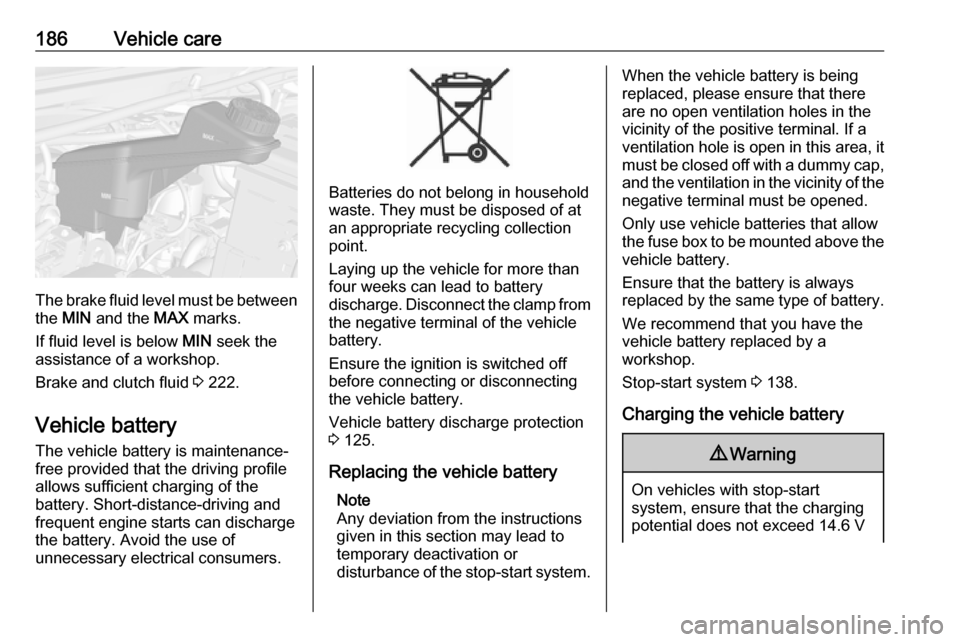
The brake fluid level must be betweenthe MIN and the MAX marks.
If fluid level is below MIN seek the
assistance of a workshop.
Brake and clutch fluid 3 222.
Vehicle battery
The vehicle battery is maintenance-
free provided that the driving profile
allows sufficient charging of the
battery. Short-distance-driving and
frequent engine starts can discharge
the battery. Avoid the use of
unnecessary electrical consumers.
Batteries do not belong in household
waste. They must be disposed of at
an appropriate recycling collection
point.
Laying up the vehicle for more than
four weeks can lead to battery
discharge. Disconnect the clamp from the negative terminal of the vehicle
battery.
Ensure the ignition is switched off
before connecting or disconnecting
the vehicle battery.
Vehicle battery discharge protection
3 125.
Replacing the vehicle battery Note
Any deviation from the instructions
given in this section may lead to
temporary deactivation or
disturbance of the stop-start system.
When the vehicle battery is being
replaced, please ensure that there
are no open ventilation holes in the
vicinity of the positive terminal. If a
ventilation hole is open in this area, it
must be closed off with a dummy cap,
and the ventilation in the vicinity of the negative terminal must be opened.
Only use vehicle batteries that allow the fuse box to be mounted above the
vehicle battery.
Ensure that the battery is always replaced by the same type of battery.
We recommend that you have the
vehicle battery replaced by a
workshop.
Stop-start system 3 138.
Charging the vehicle battery9 Warning
On vehicles with stop-start
system, ensure that the charging
potential does not exceed 14.6 V
Page 189 of 255

Vehicle care187when using a battery charger.
Otherwise the vehicle battery may be damaged.
Jump starting 3 214.
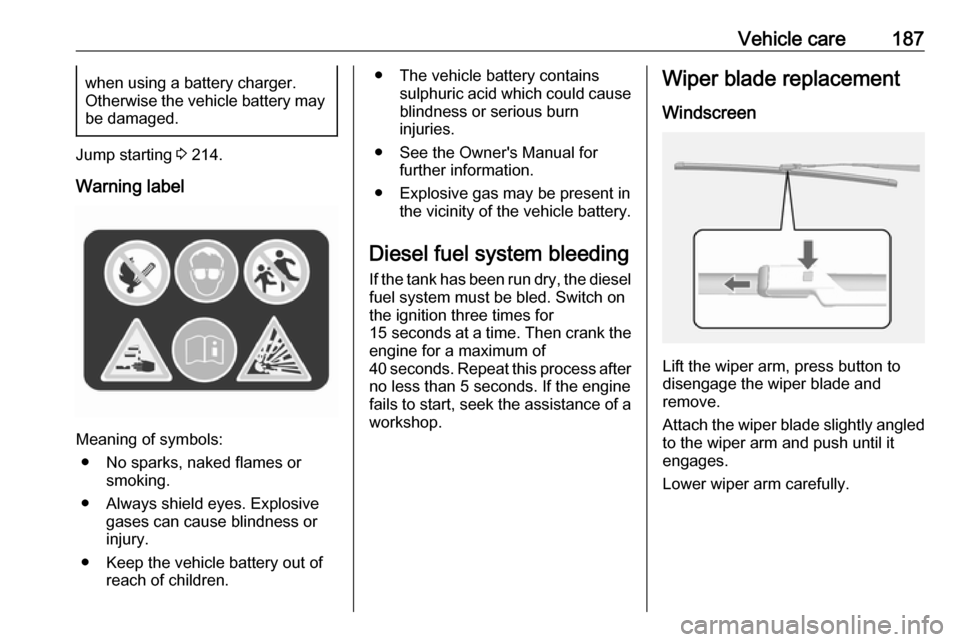
Warning label
Meaning of symbols: ● No sparks, naked flames or smoking.
● Always shield eyes. Explosive gases can cause blindness or
injury.
● Keep the vehicle battery out of reach of children.
● The vehicle battery containssulphuric acid which could cause
blindness or serious burn
injuries.
● See the Owner's Manual for further information.
● Explosive gas may be present in the vicinity of the vehicle battery.
Diesel fuel system bleeding If the tank has been run dry, the diesel
fuel system must be bled. Switch on
the ignition three times for
15 seconds at a time. Then crank the
engine for a maximum of 40 seconds. Repeat this process after
no less than 5 seconds. If the engine fails to start, seek the assistance of a
workshop.Wiper blade replacement
Windscreen
Lift the wiper arm, press button to
disengage the wiper blade and
remove.
Attach the wiper blade slightly angled
to the wiper arm and push until it
engages.
Lower wiper arm carefully.