ESP Peugeot 508 2016 Owner's Guide
[x] Cancel search | Manufacturer: PEUGEOT, Model Year: 2016, Model line: 508, Model: Peugeot 508 2016Pages: 371, PDF Size: 12.12 MB
Page 90 of 371
88
508_en_Chap03_ergonomie-et-confort_ed01-2016
Dual-zone digital air conditioning
the air conditioning can only operate with the engine running.
Automatic operation
When the engine is cold, to prevent
too great a distribution of cold air, the
air flow will reach its optimum level
gradually.
In cold weather, it favours the
distribution of warm air to the
windscreen, side windows and footwells
o n l y.
F
P
ress this "AUTO"
button. th
e
indicator lamp comes on.
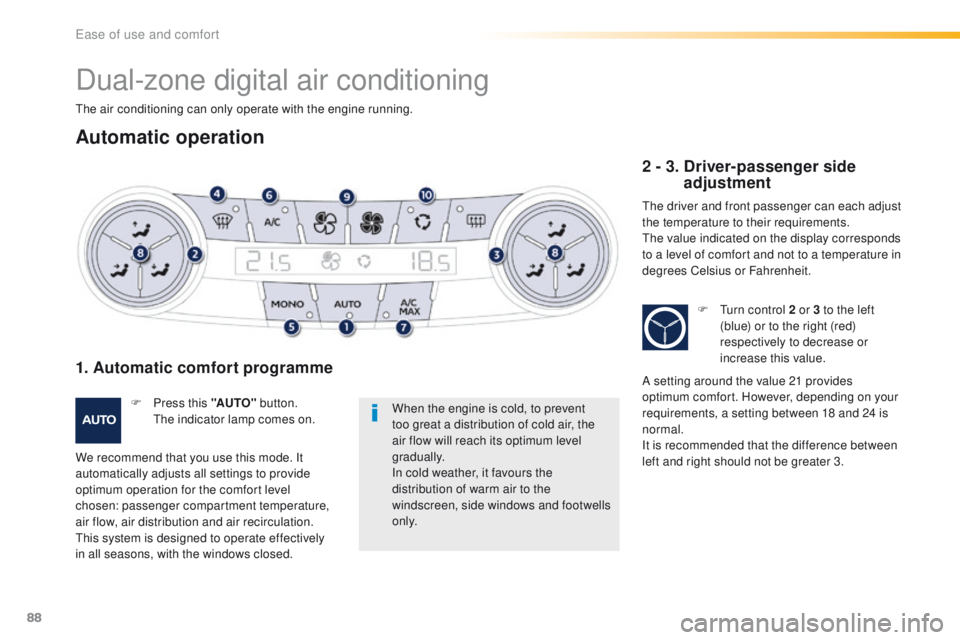
1. Automatic comfort programme
We recommend that you use this mode. It
automatically adjusts all settings to provide
optimum operation for the comfort level
chosen: passenger compartment temperature,
air flow, air distribution and air recirculation.
th
is system is designed to operate effectively
in all seasons, with the windows closed.
2 - 3. Driver-passenger side adjustment
the driver and front passenger can each adjust
the temperature to their requirements.
th
e value indicated on the display corresponds
to a level of comfort and not to a temperature in
degrees Celsius or Fahrenheit.
F
t
u
rn control 2 or 3 to the left
(blue) or to the right (red)
respectively to decrease or
increase this value.
A setting around the value 21 provides
optimum comfort. However, depending on your
requirements, a setting between 18 and 24 is
normal.
It is recommended that the difference between
left and right should not be greater 3.
ease of use and comfort
Page 92 of 371
90
508_en_Chap03_ergonomie-et-confort_ed01-2016
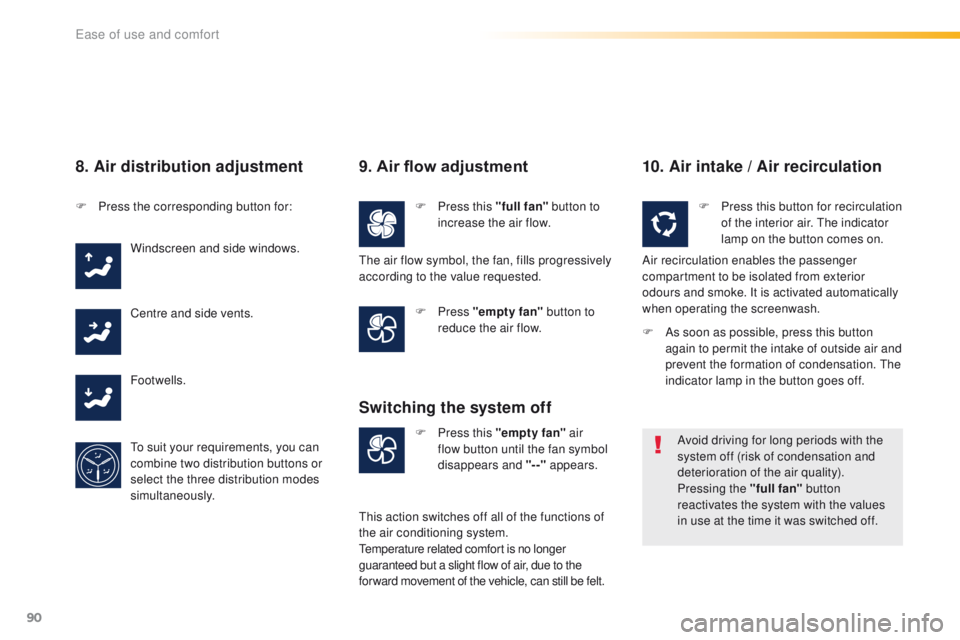
8. Air distribution adjustment
F Press the corresponding button for:Windscreen and side windows.
Centre and side vents.
Footwells.
to s
uit your requirements, you can
combine two distribution buttons or
select the three distribution modes
simultaneously.
9. Air flow adjustment
F Press this "full fan" button to
increase the air flow.
F
Press "empty fan" button to
reduce the air flow.
10. Air intake / Air recirculation
F Press this "empty fan" air
flow button until the fan symbol
disappears and "--" appears.
Switching the system off
F Press this button for recirculation
of the interior air. th e indicator
lamp on the button comes on.
Air recirculation enables the passenger
compartment to be isolated from exterior
odours and smoke. It is activated automatically
when operating the screenwash.
Avoid driving for long periods with the
system off (risk of condensation and
deterioration of the air quality).
Pressing the "full fan" button
reactivates the system with the values
in use at the time it was switched off.
th
e air flow symbol, the fan, fills progressively
according to the value requested.
th
is action switches off all of the functions of
the air conditioning system.
te
mperature related comfort is no longer
guaranteed but a slight flow of air, due to the
for ward movement of the vehicle, can still be felt. F
A
s soon as possible, press this button
again to permit the intake of outside air and
prevent the formation of condensation.
t
h
e
indicator lamp in the button goes off.
ease of use and comfort
Page 93 of 371
91
508_en_Chap03_ergonomie-et-confort_ed01-2016
Quad-zone digital air conditioning
Automatic operation
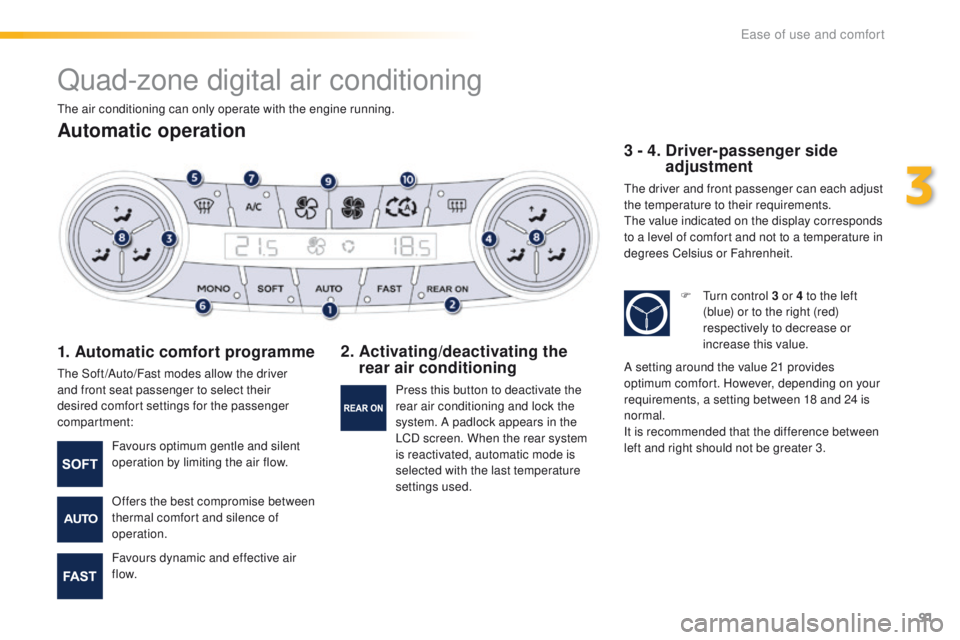
1. Automatic comfort programme
the Soft /Auto/Fast modes allow the driver
and front seat passenger to select their
desired comfort settings for the passenger
compartment:
2. Activating/deactivating the rear air conditioning 3 - 4.
D
river-passenger side
adjustment
the driver and front passenger can each adjust
the temperature to their requirements.
th
e value indicated on the display corresponds
to a level of comfort and not to a temperature in
degrees Celsius or Fahrenheit.
Favours optimum gentle and silent
operation by limiting the air flow.
Offers the best compromise between
thermal comfort and silence of
operation.
Favours dynamic and effective air
f low. Press this button to deactivate the
rear air conditioning and lock the
system. A padlock appears in the
LCD screen. When the rear system
is reactivated, automatic mode is
selected with the last temperature
settings used. F
t
u
rn control 3 or 4 to the left
(blue) or to the right (red)
respectively to decrease or
increase this value.
A setting around the value 21 provides
optimum comfort. However, depending on your
requirements, a setting between 18 and 24 is
normal.
It is recommended that the difference between
left and right should not be greater 3.
th
e air conditioning can only operate with the engine running.
3
ease of use and comfort
Page 95 of 371
93
508_en_Chap03_ergonomie-et-confort_ed01-2016
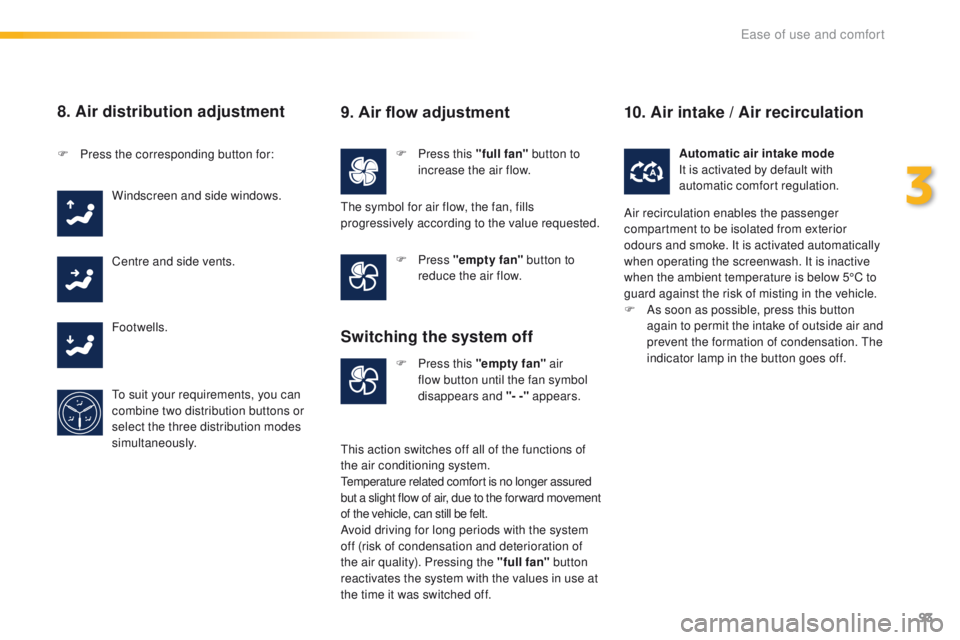
8. Air distribution adjustment
F Press this "full fan" button to
increase the air flow.
F
P
ress the corresponding button for:
Windscreen and side windows.
Centre and side vents.
Footwells.
to s
uit your requirements, you can
combine two distribution buttons or
select the three distribution modes
simultaneously. F
Press "empty fan" button to
reduce the air flow.
F
P
ress this "empty fan" air
flow button until the fan symbol
disappears and "- -" appears. Automatic air intake mode
It is activated by default with
automatic comfort regulation.
9. Air flow adjustment
the symbol for air flow, the fan, fills
progressively according to the value requested.
Switching the system off
this action switches off all of the functions of
the air conditioning system.
te
mperature related comfort is no longer assured
but a slight flow of air, due to the for ward movement
of the vehicle, can still be felt.
Avoid driving for long periods with the system
off (risk of condensation and deterioration of
the air quality). Pressing the "full fan" button
reactivates the system with the values in use at
the time it was switched off.
10. Air intake / Air recirculation
Air recirculation enables the passenger
compartment to be isolated from exterior
odours and smoke. It is activated automatically
when operating the screenwash. It is inactive
when the ambient temperature is below 5°C to
guard against the risk of misting in the vehicle.
F
A
s soon as possible, press this button
again to permit the intake of outside air and
prevent the formation of condensation.
t
h
e
indicator lamp in the button goes off.
3
ease of use and comfort
Page 96 of 371
94
508_en_Chap03_ergonomie-et-confort_ed01-2016
Adjusting the rear passenger comfort level
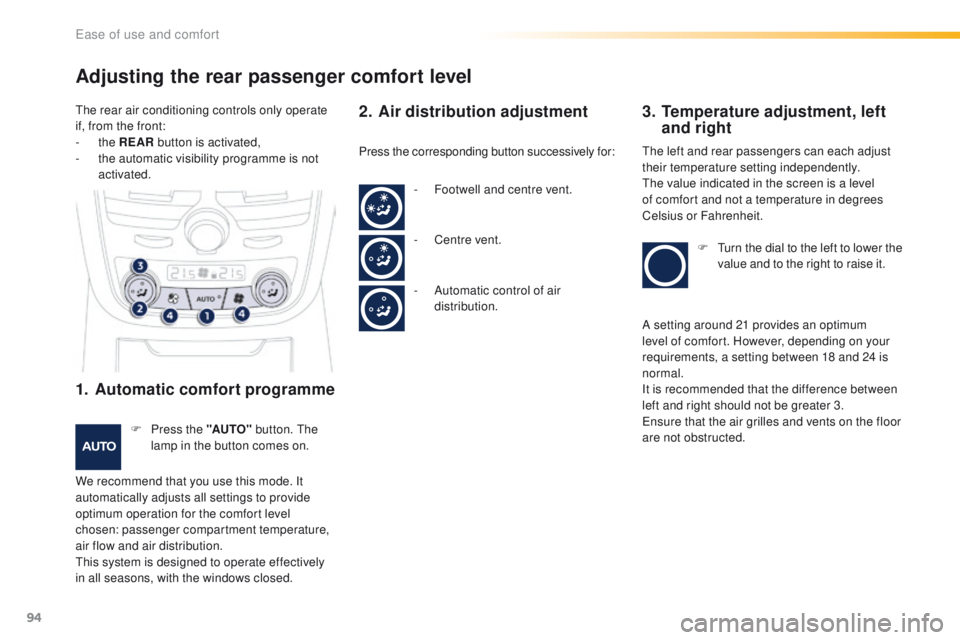
1. Automatic comfort programme
F Press the "AUTO" button. th e
lamp in the button comes on.
We recommend that you use this mode. It
automatically adjusts all settings to provide
optimum operation for the comfort level
chosen: passenger compartment temperature,
air flow and air distribution.
th
is system is designed to operate effectively
in all seasons, with the windows closed.
2. Air distribution adjustment 3. T emperature adjustment, left
and right
Press the corresponding button successively for:th e left and rear passengers can each adjust
their temperature setting independently.
th
e value indicated in the screen is a level
of comfort and not a temperature in degrees
Celsius or Fahrenheit.
F
t
u
rn the dial to the left to lower the
value and to the right to raise it.
-
F
ootwell and centre vent.
-
C
entre vent.
-
A
utomatic control of air
distribution.
th
e rear air conditioning controls only operate
if, from the front:
-
the
REAR button is activated,
-
t
he automatic visibility programme is not
activated.
A setting around 21 provides an optimum
level of comfort. However, depending on your
requirements, a setting between 18 and 24 is
normal.
It is recommended that the difference between
left and right should not be greater 3.
en
sure that the air grilles and vents on the floor
are not obstructed.
ease of use and comfort
Page 100 of 371
98
508_en_Chap03_ergonomie-et-confort_ed01-2016
Always switch off the programmable
heating while refuelling to avoid any risk
of fire or explosion.
to a
void the risk of intoxication and
asphyxiation, the programmable
heating must not be used, even for
short periods, in an enclosed area such
as a garage or workshop not equipped
with exhaust gas extraction.
Do not park the vehicle on an
inflammable sur face (dry grass, dead
leaves, paper…), there is a risk of fire.
Only one programmed or immediate
preheating/preventilation can be
activated between two starts of
the
vehicle.the
heating and the ventilation in
immediate or programmable mode is
not activated when:
-
t
he fuel level is too low,
-
t
he battery is not sufficiently
charged.
to p
rogramme the heating and the
ventilation, it is necessary to first
deactivate the alarm volumetric and tilt
monitoring.
For more information on the alarm, refer
to the corresponding section.
ease of use and comfort
Page 104 of 371
102
508_en_Chap03_ergonomie-et-confort_ed01-2016
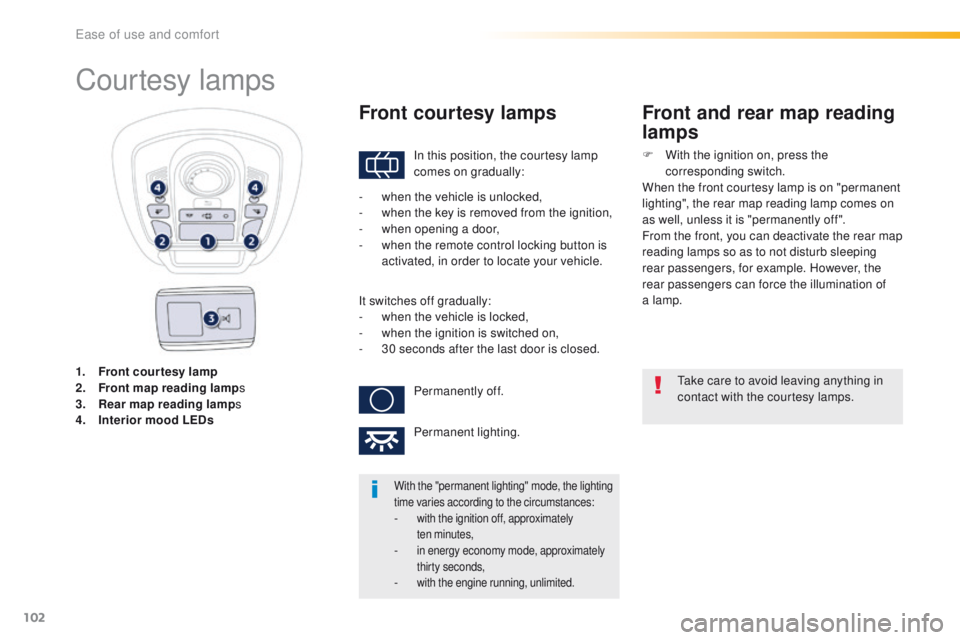
1. Front courtesy lamp
2. Front map reading lamp s
3.
R
ear map reading lamp s
4.
I
nterior mood LEDs
Courtesy lamps
In this position, the courtesy lamp
comes on gradually:
Front courtesy lamps
take care to avoid leaving anything in
contact with the courtesy lamps.
With the "permanent lighting" mode, the lighting
time varies according to the circumstances:
- with the ignition off, approximately ten minutes,
- in energy economy mode, approximately thirty seconds,
- with the engine running, unlimited.
- when the vehicle is unlocked,
- w hen the key is removed from the ignition,
-
w
hen opening a door,
-
w
hen the remote control locking button is
activated, in order to locate your vehicle.
It switches off gradually:
-
w
hen the vehicle is locked,
-
w
hen the ignition is switched on,
-
3
0 seconds after the last door is closed.Permanently off.
Permanent lighting.
Front and rear map reading
lamps
F With the ignition on, press the corresponding switch.
When the front courtesy lamp is on "permanent
lighting", the rear map reading lamp comes on
as well, unless it is "permanently off ".
From the front, you can deactivate the rear map
reading lamps so as to not disturb sleeping
rear passengers, for example. However, the
rear passengers can force the illumination of
a lamp.
ease of use and comfort
Page 110 of 371
108
508_en_Chap03_ergonomie-et-confort_ed01-2016
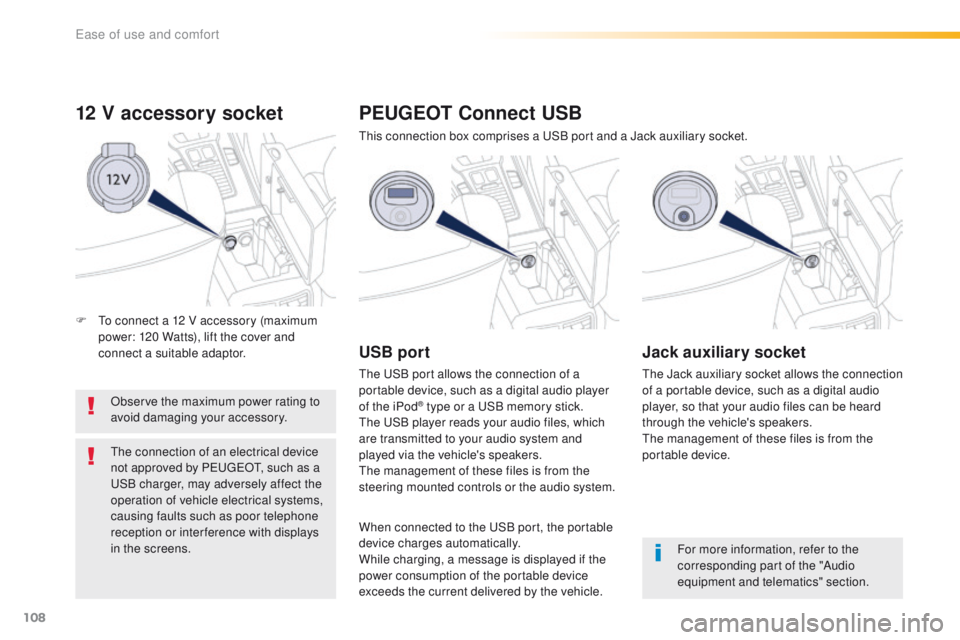
12 V accessory socket
Observe the maximum power rating to
avoid damaging your accessory.
th
e connection of an electrical device
not approved by P
e
uge
Ot, s
uch as a
uS
B charger, may adversely affect the
operation of vehicle electrical systems,
causing faults such as poor telephone
reception or inter ference with displays
in the screens.
PEUGEOT Connect USB
this connection box comprises a uS B port and a Jack auxiliary socket.
USB port
the uSB port allows the connection of a
portable device, such as a digital audio player
of the iPod
® type or a uS B memory stick.th
e
uS
B player reads your audio files, which
are transmitted to your audio system and
played via the vehicle's speakers.
th
e management of these files is from the
steering mounted controls or the audio system.
Jack auxiliary socket
the Jack auxiliary socket allows the connection
of a portable device, such as a digital audio
player, so that your audio files can be heard
through the vehicle's speakers.
th
e management of these files is from the
portable device.
For more information, refer to the
corresponding part of the "Audio
equipment and telematics" section.
When connected to the
u
S
B port, the portable
device charges automatically.
While charging, a message is displayed if the
power consumption of the portable device
exceeds the current delivered by the vehicle.
F
t
o c
onnect a 12 V accessory (maximum
power: 120 Watts), lift the cover and
connect a suitable adaptor.
ease of use and comfort
Page 112 of 371
110
508_en_Chap03_ergonomie-et-confort_ed01-2016
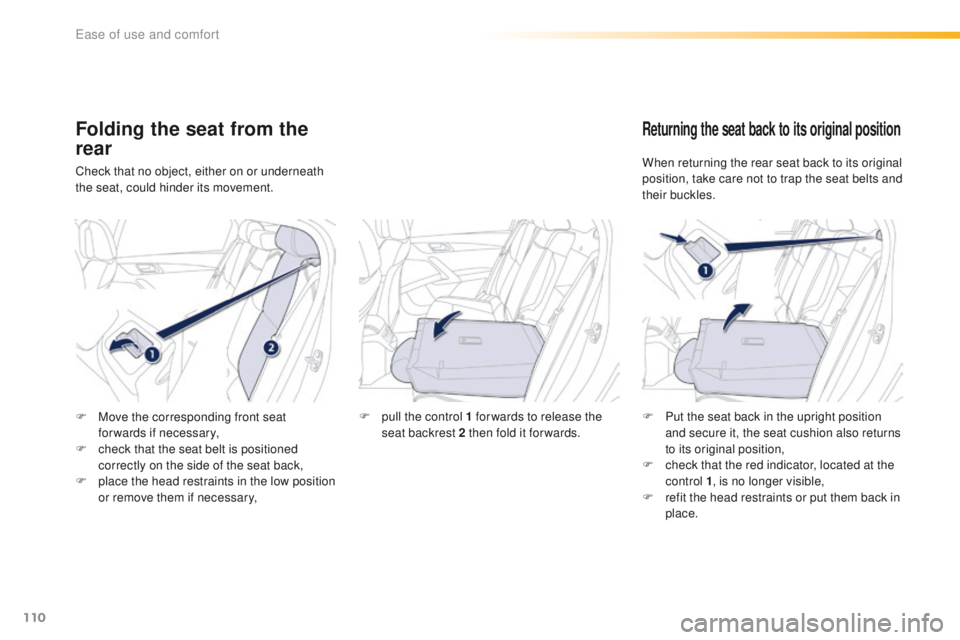
Folding the seat from the
rear
Check that no object, either on or underneath
the seat, could hinder its movement.
Returning the seat back to its original position
When returning the rear seat back to its original
position, take care not to trap the seat belts and
their buckles.
F
M
ove the corresponding front seat
forwards if necessary,
F
c
heck that the seat belt is positioned
correctly on the side of the seat back,
F
p
lace the head restraints in the low position
or remove them if necessary, F
p
ull the control 1 for wards to release the
seat backrest 2 then fold it forwards. F
P
ut the seat back in the upright position
and secure it, the seat cushion also returns
to its original position,
F
c
heck that the red indicator, located at the
control 1 , is no longer visible,
F
r
efit the head restraints or put them back in
place.
ease of use and comfort
Page 117 of 371
115
508_en_Chap03_ergonomie-et-confort_ed01-2016
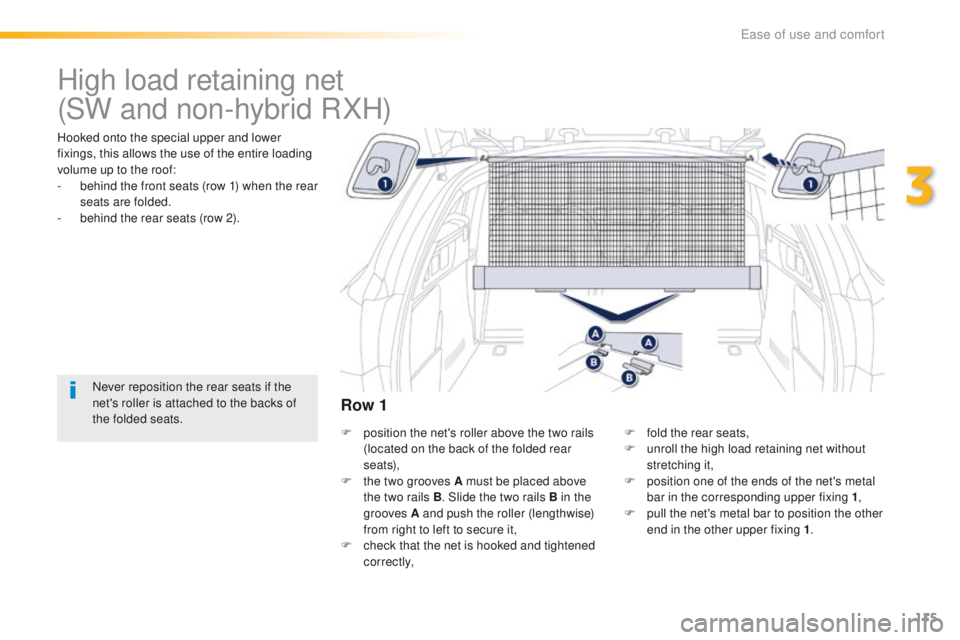
High load retaining net
Hooked onto the special upper and lower
fixings, this allows the use of the entire loading
volume up to the roof:
-
b
ehind the front seats (row 1) when the rear
seats are folded.
-
b
ehind the rear seats (row 2).
Never reposition the rear seats if the
net's roller is attached to the backs of
the folded seats. F
p
osition the net's roller above the two rails
(located on the back of the folded rear
seats),
F
t
he two grooves A must be placed above
the two rails B . Slide the two rails B in the
grooves A and push the roller (lengthwise)
from right to left to secure it,
F
c
heck that the net is hooked and tightened
c o r r e c t l y, F
f
old the rear seats,
F
u
nroll the high load retaining net without
stretching it,
F
p
osition one of the ends of the net's metal
bar in the corresponding upper fixing 1 ,
F
p
ull the net's metal bar to position the other
end in the other upper fixing 1 .
Row 1
(SW and non-hybrid RXH)
3
ease of use and comfort