reset PONTIAC GRAND-AM 1993 Owners Manual
[x] Cancel search | Manufacturer: PONTIAC, Model Year: 1993, Model line: GRAND-AM, Model: PONTIAC GRAND-AM 1993Pages: 306, PDF Size: 15.39 MB
Page 72 of 306
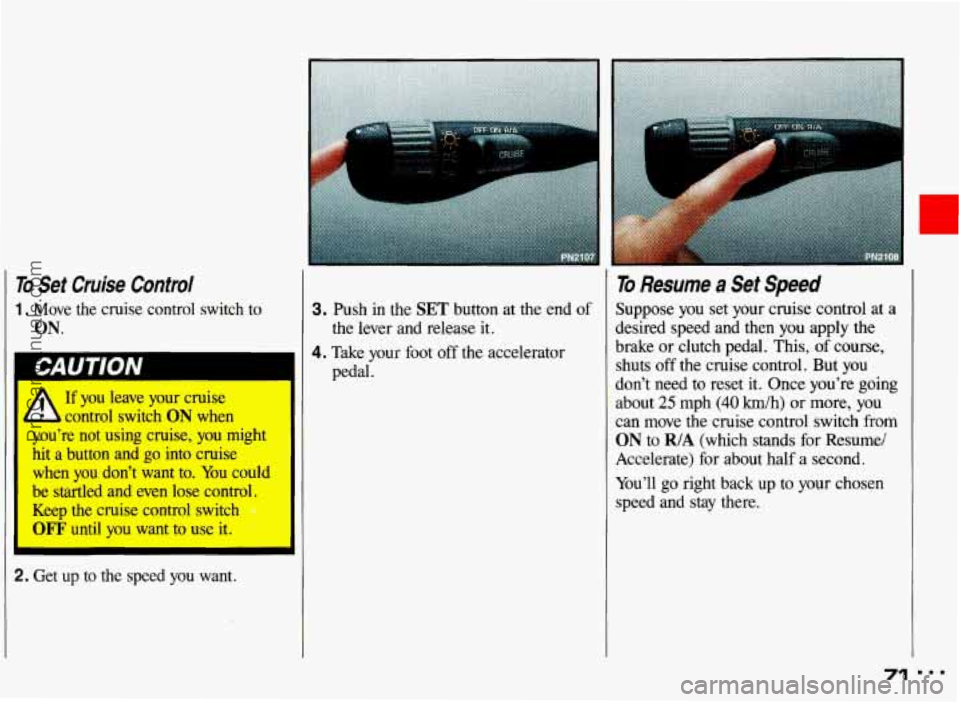
To Set Cruise Control
1. Move the cruise control switch to
ON.
If you leave your cruise
W control switch ON when
you’re not using cruise, you might
hit a button and go into cruise
when you don’t want to. You could
be startled and even lose control.
Keep the cruise control switch
OFF until you want to use it.
I
3. Push in the SET button at the end of
4. Take your foot off the accelerator
the lever and release
it.
pedal.
To Resume a Set Speed
Suppose you set your cruise control at a
desired speed and then you apply the
brake or clutch pedal. This, of course,
shuts off the cruise control. But you
don’t need to reset it. Once you’re going
about
25 mph (40 kdh) or more, you
can move the cruise control switch from
ON to R/A (which stands for Resume/
Accelerate) for about half a second.
You’ll
go right back up to your chosen
speed and
stay there.
2. Get up to the speed you want,
71 ...
ProCarManuals.com
Page 79 of 306
Features & Controls
Trunk Light
This light comes on when you open
your trunk. It also comes on when you
open the doors or turn on the courtesy
lights.
78
Battery Rundown Protection
Your Pontiac is equipped with a Battery
Rundown Protection feature designed to
protect your vehicle’s battery.
When any interior light (trunk, reading,
footwell or glove box) is left on when
the ignition is turned off, the Battery
Rundown Protection system will
automatically shut the light off after
20
minutes. This will avoid draining the
battery.
To reactivate the interior lights, either:
The ignition must be turned on
The activated light switch must be
turned off and then on, OR
A front door must be opened. The Battery Rundown Protection feature
will
also be activated when any door of
your vehicle is left open.
Also,
if your vehicle is left with the
ignition turned
off for over 24 days,
battery power to your clock and audio
system will be turned off to reduce
battery drain. When the ignition is
turned on again, battery power will
be
resupplied. However, under these
conditions, it will be necessary to reset
the clock and audio system settings.
ProCarManuals.com
Page 91 of 306
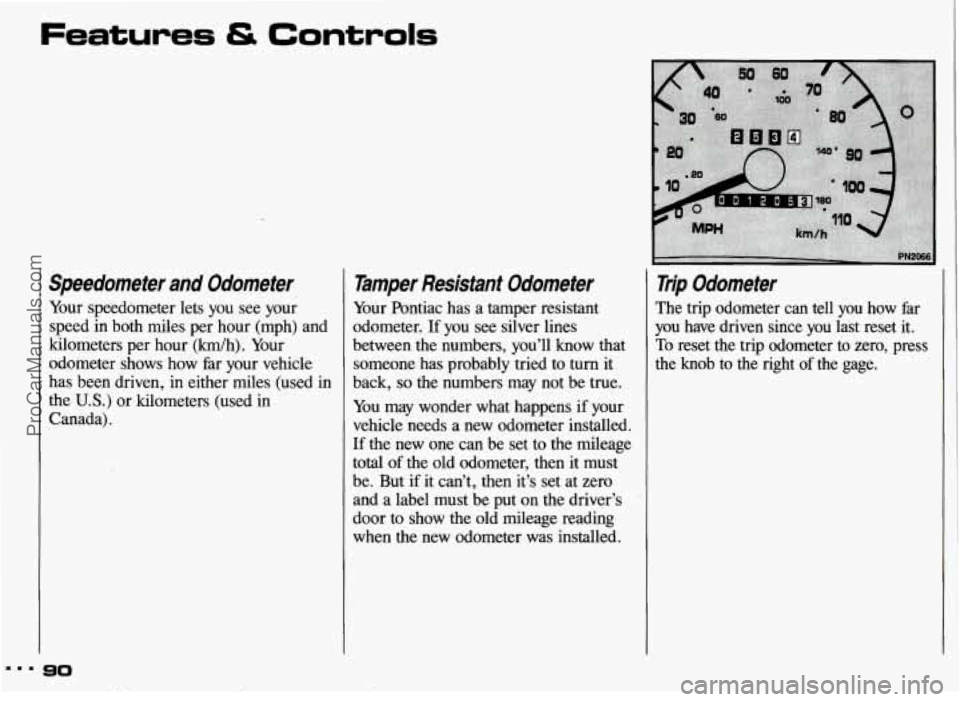
Speedometer and Odometer
Your speedometer lets you see your
speed in both miles per hour (mph)
and
kilometers per hour (kmlh). Your
odometer shows how
far your vehicle
has been driven, in either miles (used in
the
U.S.) or kilometers (used in
Canada).
Tamper Resistant Odometer
Your hntiac has a tamper resistant
odometer.
If you see silver lines
between the numbers, you’ll know that
someone has probably tried to
turn it
back,
so the numbers may not be true.
You may wonder what happens if your
vehicle needs a new odometer installed.
If the new one
can be set to the mileage
total
of the old odometer, then it must
be. But if it can’t, then it’s set at zero
and a label must be put on the driver’s
door
to show the old mileage reading
when the new odometer was installed.
Trip Odometer
The trip odometer can tell you how far
you have driven since you last reset it.
To reset the trip odometer to zero, press
the knob to the right of the gage.
ProCarManuals.com
Page 98 of 306
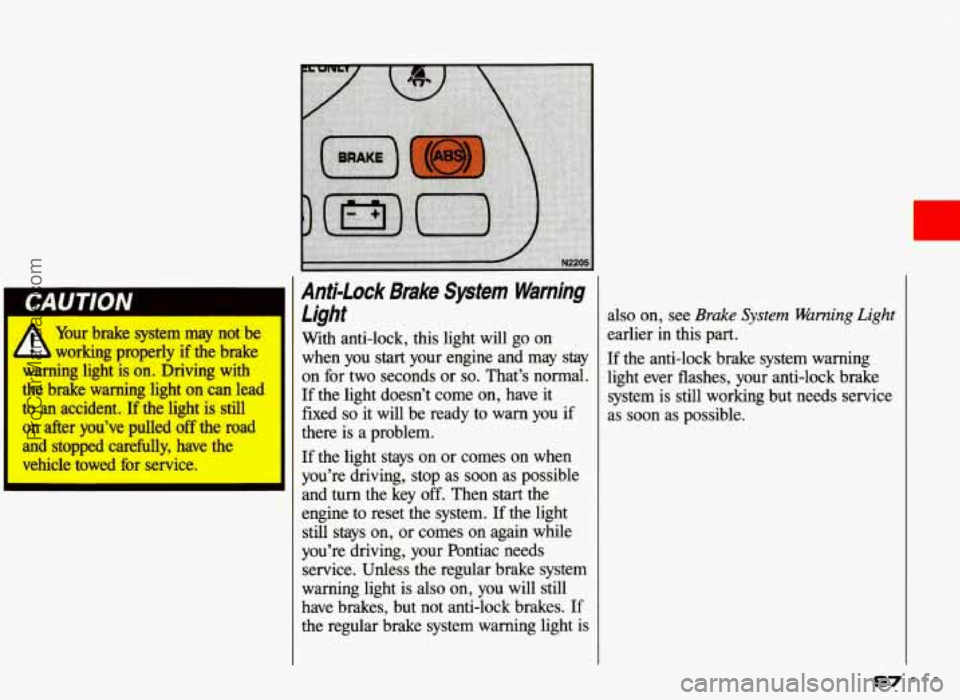
I CAUTION Anti-lock Brake Sptetn Warning
Light A Your brake system may not be
working properly if the brake
warning light is on. Driving with
the brake warning light on can lead
to
an accident. If the light is still
on after you’ve pulled off the road
and stopped carefully, have the
vehicle towed for service. Vith
anti-lock, this light will
go on
when you start your engine and may stay
on for two seconds or so. That’s normal.
If the light doesn’t come on, have it
fixed so it will be ready to warn you if
there is a problem.
If the light
stays on or comes on when
you’re driving, stop
as soon as possible
and turn the key off. Then start the
engine to reset the system.
If the light
still
stays on, or comes on again while
you’re driving, your Pontiac needs
service. Unless the regular brake system
warning light
is also on, you will still
have brakes, but not anti-lock brakes.
If
the regular brake system warning light is
also on, see Brake System Warning Light
earlier in this part.
If the anti-lock brake system warning
light ever flashes, your anti-lock brake
system
is still working but needs service
as soon as possible.
ProCarManuals.com
Page 109 of 306
Comfort Controls & Audio Systems
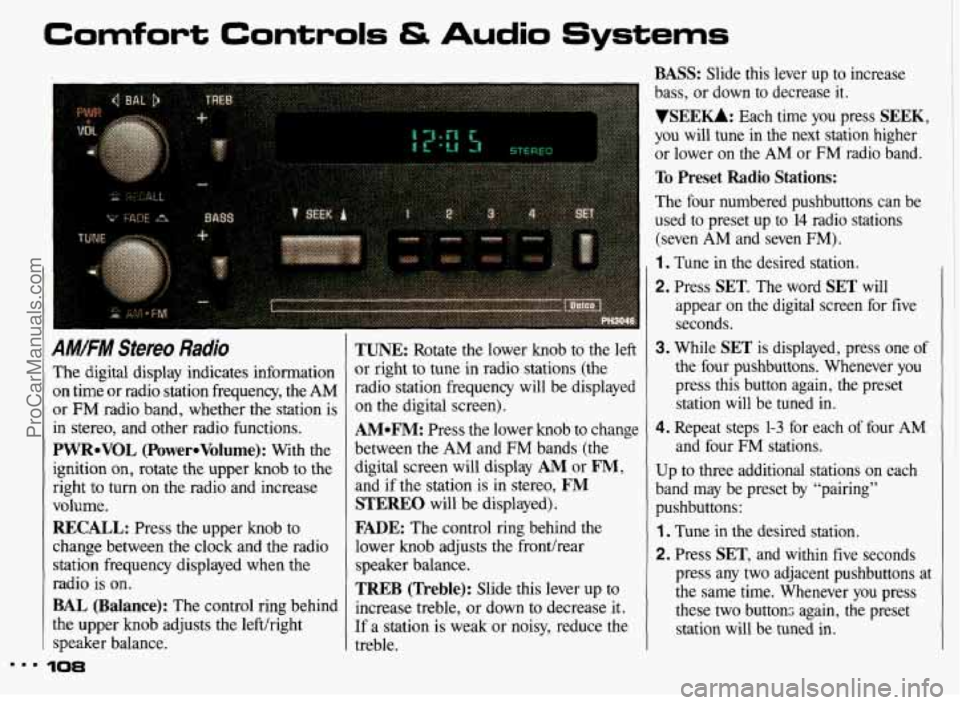
AM!FM Stereo Radio
The digital display indicates information
on time or radio station frequency, the AM
or FM radio band, whether the station is
in stereo, and other radio functions.
PWReVOL (PowereVolume): With the
ignition
on, rotate the upper knob to the
right to turn on the radio and increase
volume.
RECALL: Press the upper knob to
change between the clock and the radio
station frequency displayed when the
radio is on.
BAL (Balance): The control ring behind
the upper knob adjusts the left/right
speaker balance.
10%
TUNE: Rotate the lower knob to the left
or right to tune in radio stations (the
radio station frequency will be displayed
on the digital screen).
AMeFM: Press the lower knob to change
between
the AM and FM bands (the
digital screen will display
AM or FM,
and if the station is in stereo, FM
STEREO will be displayed).
FADE: The control ring behind the
lower knob adjusts the fronthear
speaker balance.
TREB (Treble): Slide this lever up to
increase treble, or down to decrease it.
If a station is weak or noisy, reduce the
treble.
BASS: Slide this lever up to increase
bass, or down to decrease
it.
VSEEKk Each time you press SEEK,
you will tune in the next station higher
or lower on the
AM or FM radio band.
To Preset Radio Stations:
The four numbered pushbuttons can be
used to preset
up to 14 radio stations
(seven
AM and seven FM).
1. Tune in the desired station.
2. Press SET. The word SET will
appear on the digital screen for five seconds.
3. While SET is displayed, press one of
the four pushbuttons. Whenever you
press this button again, the preset
station will be tuned in.
4. Repeat steps 1-3 for each of four AM
and four FM stations.
Up
to three additional stations on each
band may be preset by “pairing”
pushbuttons:
1. Tune in the desired station.
2. Press SET, and within five seconds
press any two adjacent pushbuttons at
the same time. Whenever you press
these two buttons again, the preset station will be tuned
in.
ProCarManuals.com
Page 110 of 306
AM/FM Stereo Radio with
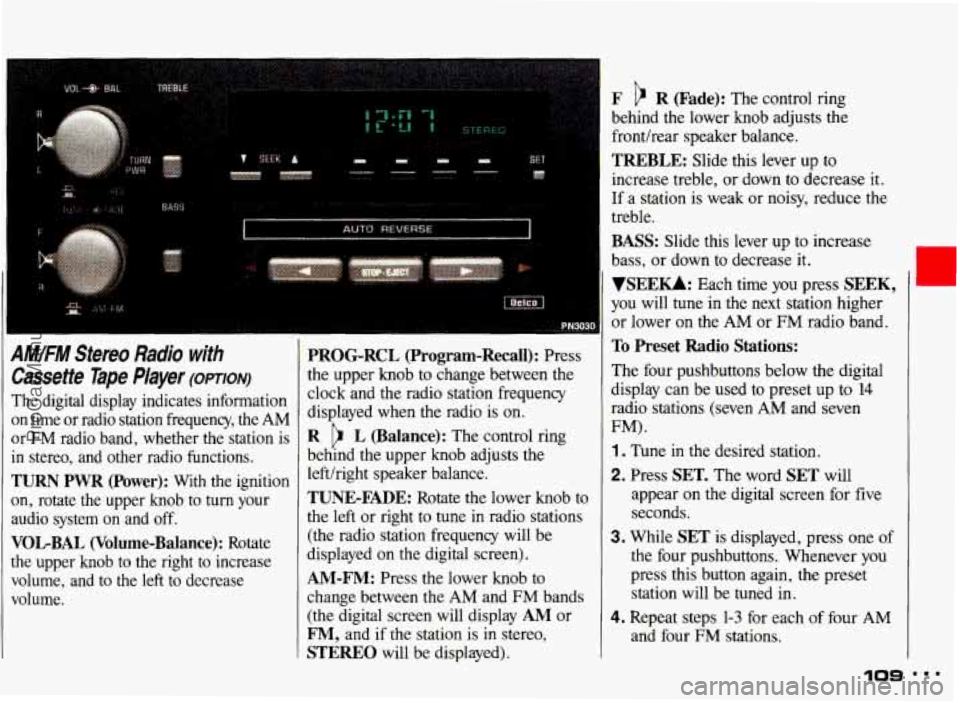
Cassette Tape Player (OPTION)
The digital display indicates information
on time or radio station frequency, the AM
or
FM radio band, whether the station is
in stereo, and other radio functions.
TURN PWR (Power): With the ignition
on, rotate the upper knob to turn your
audio system on and off.
VOLBAL (Volume-Balance): Rotate
the upper knob to the right to increase
volume, and to the left to decrease.
volume.
PROG-RCL (Program-Recall): Press
the upper knob
to change between the
clock and the radio station frequency
displayed when the radio is
on.
R L (Balance): The control ring
behind the upper knob adjusts the
lefthight speaker balance.
TUNE-FADE: Rotate the lower knob to
the
left or right to tune in radio stations
(the radio station frequency will be
displayed on
the digital screen).
AM-FM: Press the lower knob to
change between the AM and FM bands
(the digital screen will display
AM or
F", and if the station is in stereo,
STEREO will be displayed).
F R (Fade): The control ring
behind the lower knob adjusts the
fronthear speaker balance.
TREBLE: Slide this lever up to
increase treble, or down to decrease it.
If a station is weak or noisy, reduce the
treble.
BASS: Slide this lever up to increase
bass, or down to decrease it.
VSEE-: Each time you press SEEK,
you will tune in the next station higher
or lower on the AM
or FM radio band.
To Preset Radio Stations:
The four pushbuttons below the digital
display can be used to preset up
to 14
radio stations (seven AM and seven
FM).
1 . Tune in the desired station.
2. Press SET. The word SET will
appear
on the digital screen for five
seconds.
3. While SET is displayed, press one of
the four pushbuttons. Whenever you
press this button again, the preset
station will be tuned
in.
4. Repeat steps 1-3 for each of four AM
and four
FM stations,
109
ProCarManuals.com
Page 111 of 306
Comfort Controls & Audio Systems
1
AM.FM Stereo Radio with
Cassette Tape Player
(CONT:)
Up to three additional stations on each
band may be preset by “pairing”
pushbuttons:
1. Tune in the desired station.
2. Press SET, and within five seconds
press any two adjacent pushbuttons at
the same time. Whenever you press
these two buttons again, the preset
station will be tuned in.
110
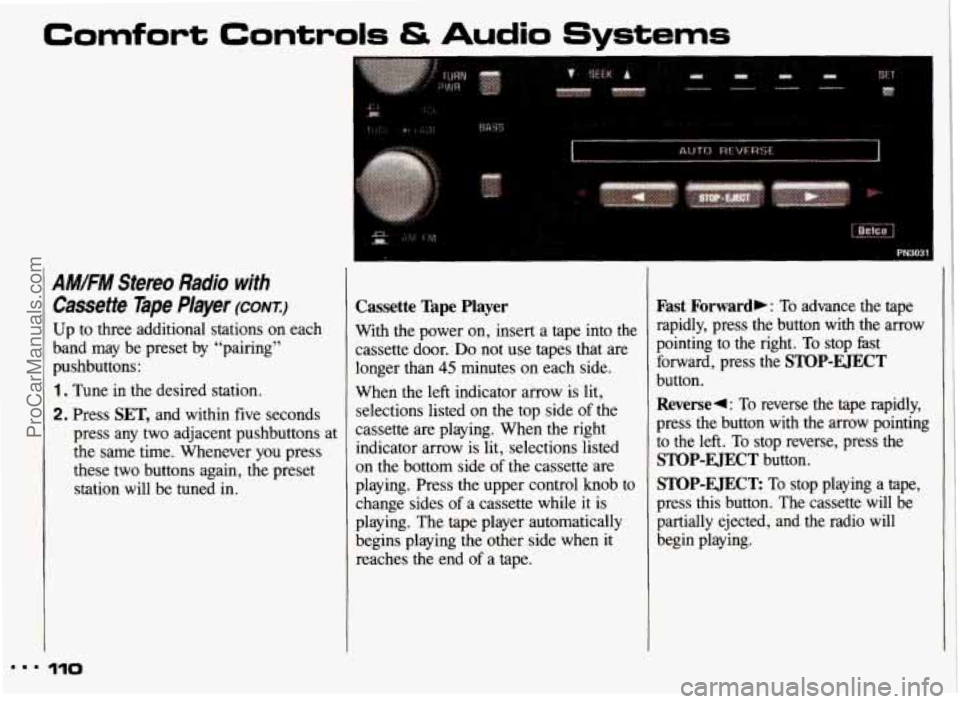
Cassette Tape Player
With the power on, insert a tape into the
cassette door.
Do not use tapes that are
longer than
45 minutes on each side.
When the
left indicator arrow is lit,
selections listed on the top side
of the
cassette are playing. When the right
indicator arrow is lit, selections listed
on the bottom side
of the cassette are
playing. Press the upper control knob to
change sides of a cassette while
it is
playing. The tape player automatically
begins playing the other side when it
reaches the end
of a tape.
Fast Forward,: To advance the tape
rapidly, press the button with the arrow
pointing to the right.
To stop fast
forward, press the
STOP-EJECT
button.
Reversed : To reverse the tape rapidly,
press the button with the arrow pointing
to the left.
To stop reverse, press the
STOP-EJECT button.
STOP-EJECT To stop playing a tape,
press this button. The cassette will be
partially ejected, and the radio will
begin playing.
ProCarManuals.com
Page 113 of 306
Comfort Controls & Audio Systems
AM/FM Stereo Radio with
Cassette Tape Player
and
Graphic Equalizer (CONT.)
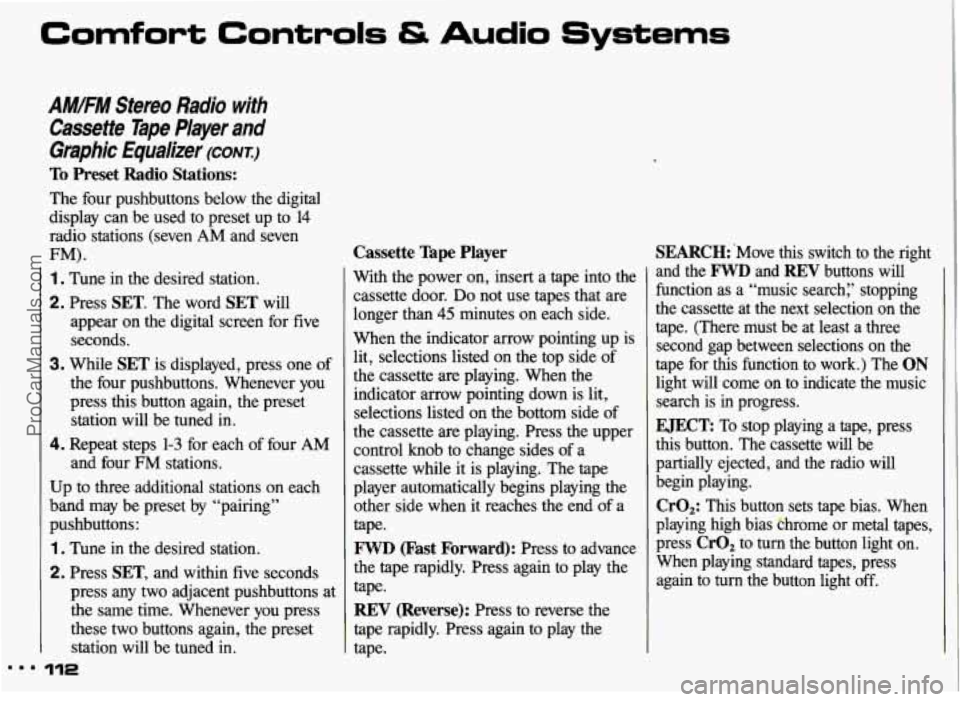
To Preset Radio Stations:
The four pushbuttons below the digital
display can be used to preset up to
14
radio stations (seven AM and seven
FM).
1 . Tune in the desired station.
2. Press SET. The word SET will
appear on the digital screen for five
seconds.
3. While SET is displayed, press one of
the four pushbuttons. Whenever you
press this button again, the preset
station will be tuned in.
4. Repeat steps 1-3 for each of four AM
and four FM stations.
Up to three additional stations on each
band may be preset by “pairing”
pushbuttons:
1 . Tune in the desired station.
2. Press SET, and within five seconds
press any two adjacent pushbuttons at
the same time. Whenever you press
these two buttons again, the preset
station will be tuned in. Cassette Tape Player
With the power
on, insert a tape into the
cassette door.
Do not use tapes that are
longer than
45 minutes on each side.
When the indicator arrow pointing up is
lit, selections listed on the top side of
the cassette are playing. When the
indicator arrow pointing down is lit,
selections listed on the bottom side of
the cassette are playing. Press the upper
control knob to change sides
of a
cassette while it is playing. The tape
player automatically begins playing the other side when it reaches the end of a
tape.
FWD (Fast Forward): Press to advance
the tape rapidly. Press again to play the tape.
REV (Reverse): Press to reverse the
tape rapidly. Press again to play the
tape. SEARCH:’Move this switch to the
right
and the FWD and REV buttons will
function as a “music search:’ stopping
the cassette at the next selection on the tape. (There must be at least a three
second gap between selections on the
tape for this function to work.) The
ON
light will come on to indicate the music search is in progress.
EJECT To stop playing a tape, press
this button. The cassette will be
partially ejected, and the radio will
begin playing.
CrO,: This button sets tape bias. When
playing high bias bhrome or metal tapes,
press CrO, to
turn the button light on.
When playing standard tapes, press again to
turn the button light off.
ProCarManuals.com
Page 115 of 306
Comfort Controls & Audio Systems
4
AMIFM Stereo Radio with
Compact Disc
Player (CONT.)
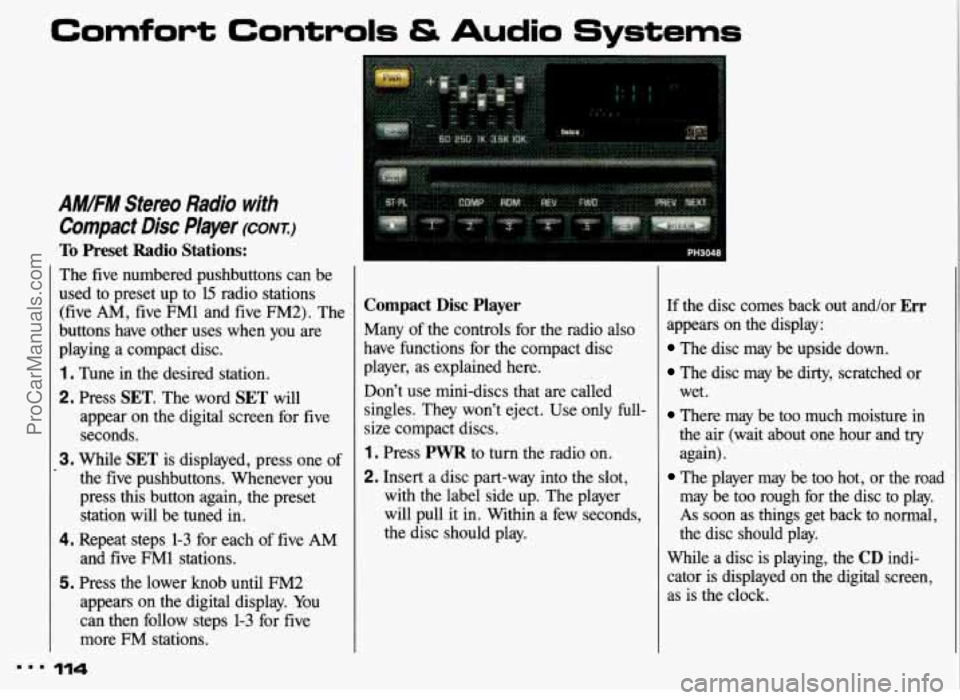
To Preset Radio Stations:
The five numbered pushbuttons can be
used to preset up
to 15 radio stations
(five AM, five FM1 and five FM2). The
buttons have other uses when you are
playing a compact disc.
1. Tune in the desired station.
2. Press SET. The word SET will
appear on the digital screen for five
seconds.
3. While SET is displayed, press one of
the five pushbuttons. Whenever you
press this button again, the preset
station will be tuned in.
4. Repeat steps 1-3 for each of five AM
and five FM1 stations.
5. Press the lower knob until FM2
appears on the digital display. You
can then follow steps
1-3 for five
more FM stations.
114
Compact Disc Player
Many of the controls for the radio also
have functions for the compact disc
player, as explained here.
Don’t use mini-discs that are called
singles. They won’t eject. Use only full-
size compact discs.
1 . Press PWR to turn the radio on.
2. Insert a disc part-way into the slot,
with the label side up. The player
will pull it in. Within a few seconds,
the disc should play.
If the disc comes back out and/or Err
appears on the display:
The disc may be upside down.
The disc may be dirty, scratched or
wet.
There may be too much moisture in
the air (wait about one hour and
try
again),
The player may be too hot, or the road
may be too rough for the disc to play.
As soon as things get back to normal,
the disc should play.
While a disc is playing, the
CD indi-
cator is displayed on the digital screen,
as is the clock.
ProCarManuals.com
Page 117 of 306
...
Comfort Controls & Audio Systems
CD Player Anti-Theft Feature
Delco LOC II@ is an anti-theft feature
for the compact disc player. It can be
used or ignored. If ignored, the system
plays normally. If it is used, your player won’t be usable if it is ever stolen,
because it will go to
LOC mode any
time battery power is removed. It will also go to LOC mode any time power
from the battery is turned
off by the
Battery Rundown Protection feature (see
the
Index under Battery Rundown
Protection). Until an unLOC code is
entered, it will not turn on.
The instructions below tell you how to
enter a secret code into the system. If
your vehicle loses battery power for any reason, you must unlock the system with
the secret code before your audio system
will
turn on.
To Set the Anti-Theft System:
1 . Write down any six-digit number and
keep it in a safe place. This is your
secret code.
2. Turn the ignition to the Accessory or
Run position.
3. Press the PWR button to turn the
radio off.
116
4. Press station preset buttons 1 and 4
at the same time and hold until
“---” appears on the display.
NOTE: You now have only 15 seconds
between each of the following steps.
5. Press SET, and 000 will appear on
the display.
6. Press the SEEK, button until the
first digit of your code appears.
7. Rotate the lower knob right or left
until the second and third digits of
your code appear.
8. Press the lower knob (000 will
appear again on the display).
9. Press the SEEK, button until the
fourth digit of your code appears.
1 0. Rotate the lower knob right or left
until the
fifth and sixth digits of
your code appear.
1 1 . Press the lower knob (rEP will
appear for five seconds, then
000).
12. Repeat steps 6-11. This time SEC
will appear, indicating that Delco
LOC II@ is set, and your audio
system is secure.
To Disable the Anti-Theft System:
Enter your secret code by following
these steps (you will have only
15
seconds between each step).
1 . Turn the ignition to the Accessory or
Run position, and turn the radio off.
2. Press station preset buttons 1 and 4 at
the same time.
SEC will appear on
the display, indicating the audio system is secure.
3. Press SET, and 000 will appear on
the display.
4. Press the SEEK, button until the first digit of your code appears.
5. Rotate the lower knob right or left
until the second and third digits of
your code appear.
ProCarManuals.com