turn signal PONTIAC VIBE 2010 User Guide
[x] Cancel search | Manufacturer: PONTIAC, Model Year: 2010, Model line: VIBE, Model: PONTIAC VIBE 2010Pages: 318, PDF Size: 1.7 MB
Page 122 of 318
Radio Reception
Frequency interference and static
can occur during normal radio
reception if items such as cell phone
chargers, vehicle convenience
accessories, and external electronic
devices are plugged into the
accessory power outlet. If there is
interference or static, unplug the item
from the accessory power outlet.
FM
FM signals only reach about 10 to
40 miles (16 to 65 km). Although the
radio has a built-in electronic circuit
that automatically works to reduce
interference, some static can occur,
especially around tall buildings or
hills, causing the sound to fade in
and out.
AM
The range for most AM stations is
greater than for FM, especially at
night. The longer range can cause
station frequencies to interfere
with each other. For better radio
reception, most AM radio stations
boost the power levels during the
day, and then reduce these levels
during the night. Static can also
occur when things like storms and
power lines interfere with radio
reception. When this happens, try
reducing the treble on the radio.
XM™ Satellite Radio Service
XM Satellite Radio Service
gives digital radio reception from
coast-to-coast in the 48 contiguous
United States, and in Canada. Just
as with FM, tall buildings or hills can
interfere with satellite radio signals,
causing the sound to fade in and out.
In addition, traveling or standing
under heavy foliage, bridges,
garages, or tunnels may cause loss
of the XM signal for a period of time.
Cellular Phone Usage
Cellular phone usage may cause
interference with the vehicle’s radio.
This interference may occur when
making or receiving phone calls,
charging the phone’s battery,
or simply having the phone on.
This interference can cause an
increased level of static while
listening to the radio. If static is
received while listening to the radio,
unplug the cellular phone and turn
it off.
Fixed Mast Antenna
The fixed mast antenna can
withstand most car washes without
being damaged as long as it is
securely attached to the base.
If the mast becomes slightly bent,
straighten it out by hand. If the mast
is badly bent, replace it.
Occasionally check to make sure
the antenna is tightened to its base.
If tightening is required, tighten
by hand.
6-8 Infotainment System
Page 145 of 318
To save fuel, run the engine for only
short periods as needed to warm the
vehicle and then shut the engine off
and close the window most of the
way to save heat. Repeat this until
help arrives but only when you feel
really uncomfortable from the cold.
Moving about to keep warm also
helps.
If it takes some time for help to
arrive, now and then when you run
the engine, push the accelerator
pedal slightly so the engine runs
faster than the idle speed. This
keeps the battery charged to restart
the vehicle and to signal for help with
the headlamps. Do this as little as
possible to save fuel.If the Vehicle is Stuck
Slowly and cautiously spin the
wheels to free the vehicle when
stuck in sand, mud, ice, or snow.
{CAUTION
If you let your vehicle’s tires spin at
high speed, they can explode, and
you or others could be injured. The
vehicle can overheat, causing an
engine compartment fire or other
damage. Spin the wheels as little
as possible and avoid going above
55 km/h (35 mph) as shown on the
speedometer.
For information about using tire
chains on the vehicle, see Tire
Chains on page 9-61 .
Rocking the Vehicle to Get
it Out
Turn the steering wheel left and
right to clear the area around the
front wheels. Turn off any traction
system. Shift back and forth between
R (Reverse) and a forward gear,
or with a manual transmission,
between 1 (First) or 2 (Second) and
R (Reverse), spinning the wheels
as little as possible. To prevent
transmission wear, wait until the
wheels stop spinning before shifting
gears. Release the accelerator pedal
while shifting, and press lightly on
the accelerator pedal when the
transmission is in gear. Slowly
spinning the wheels in the forward
and reverse directions causes a
rocking motion that could free the
vehicle. If that does not get the
vehicle out after a few tries, it might
need to be towed out. If the vehicle
does need to be towed out, see
Towing the Vehicle on page 9-73 .
Driving and Operating 8-11
Page 180 of 318
Making Turns
Notice:Making very sharp turns
while trailering could cause the
trailer to come in contact with the
vehicle. The vehicle could be
damaged. Avoid making very
sharp turns while trailering.
When turning with a trailer, make
wider turns than normal. Do this so
the trailer won’t strike soft shoulders,
curbs, road signs, trees or other
objects. Avoid jerky or sudden
maneuvers. Signal well in advance.
Turn Signals When Towing a
Trailer
The arrows on the instrument panel
flash whenever signaling a turn or
lane change. Properly hooked up,
the trailer lamps also flash, telling
other drivers the vehicle is turning,
changing lanes or stopping. When towing a trailer, the arrows on
the instrument panel flash for turns
even if the bulbs on the trailer are
burned out. For this reason you may
think other drivers are seeing the
signal when they are not. It is
important to check occasionally to be
sure the trailer bulbs are still working.
Driving On Grades
Reduce speed and shift to a lower
gear before starting down a long or
steep downgrade. If the transmission
is not shifted down, the brakes
might have to be used so much that
they would get hot and no longer
work well.
Vehicles with an automatic
transmission can tow in D (Drive).
Shift the transmission to a lower gear
if the transmission shifts too often
under heavy loads and/or hilly
conditions. For vehicles with a
manual transmission, it is better
not to use the highest gear.When towing at high altitude on
steep uphill grades, consider the
following: Engine coolant will boil at a
lower temperature than at normal
altitudes. If the engine is turned off
immediately after towing at high
altitude on steep uphill grades, the
vehicle may show signs similar to
engine overheating. To avoid this,
let the engine run while parked,
preferably on level ground, with the
automatic transmission in P (Park)
for a few minutes before turning the
engine off. For vehicles with manual
transmissions, let the engine run
while parked, preferably on level
ground, with the transmission out of
gear and the parking brake applied,
for a few minutes before turning the
engine off. If the overheat warning
comes on, see
Engine Overheating
on page 9-23.
8-46 Driving and Operating
Page 217 of 318
Bulb Replacement
For the proper type of replacement
bulbs, seeReplacement Bulbs
on page 9-37.
For any bulb changing procedure
not listed in this section, contact
your dealer/retailer.
Halogen Bulbs
{CAUTION
Halogen bulbs have pressurized
gas inside and can burst if you
drop or scratch the bulb. You or
others could be injured. Be sure
to read and follow the instructions
on the bulb package.
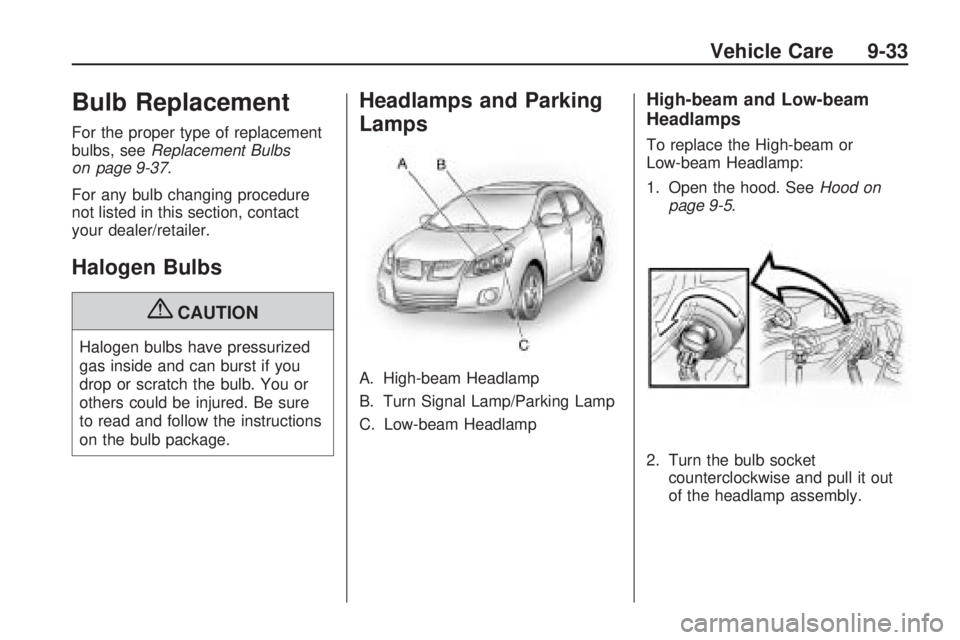
Headlamps and Parking
Lamps
A. High-beam Headlamp
B. Turn Signal Lamp/Parking Lamp
C. Low-beam Headlamp
High-beam and Low-beam
Headlamps
To replace the High-beam or
Low-beam Headlamp:
1. Open the hood. See Hood on
page 9-5.
2. Turn the bulb socket counterclockwise and pull it out
of the headlamp assembly.
Vehicle Care 9-33
Page 218 of 318
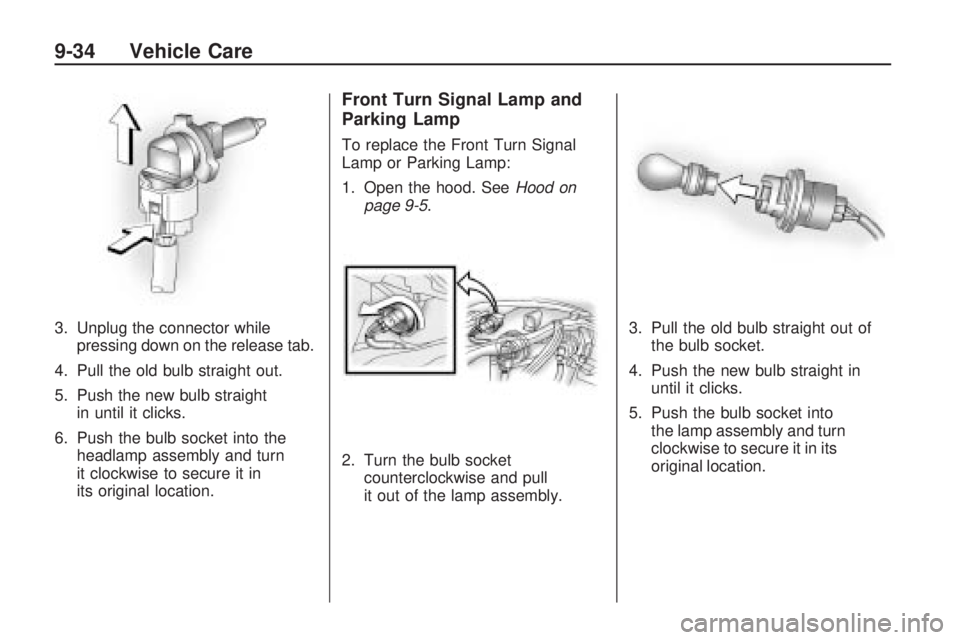
3. Unplug the connector whilepressing down on the release tab.
4. Pull the old bulb straight out.
5. Push the new bulb straight in until it clicks.
6. Push the bulb socket into the headlamp assembly and turn
it clockwise to secure it in
its original location.
Front Turn Signal Lamp and
Parking Lamp
To replace the Front Turn Signal
Lamp or Parking Lamp:
1. Open the hood. See Hood on
page 9-5.
2. Turn the bulb socket counterclockwise and pull
it out of the lamp assembly. 3. Pull the old bulb straight out of
the bulb socket.
4. Push the new bulb straight in until it clicks.
5. Push the bulb socket into the lamp assembly and turn
clockwise to secure it in its
original location.
9-34 Vehicle Care
Page 219 of 318

Taillamps
A. Turn Signal Lamp
B. Stoplamp/SidemarkerLamp/Taillamp
C. Back-up Lamp To replace one of these lamps:
1. Open the liftgate.
2. Remove the storagecompartment cover in the
rear cargo area of the vehicle
to access the bulbs.
3. Turn the bulb socket counterclockwise and pull it out.Passenger Side
Driver Side
Vehicle Care 9-35
Page 224 of 318
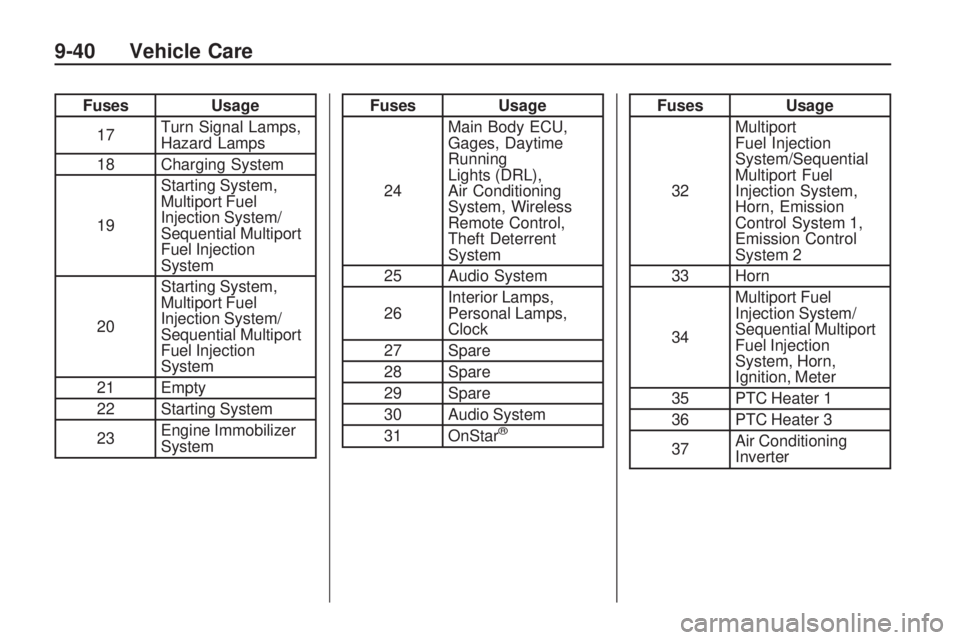
FusesUsage
17 Turn Signal Lamps,
Hazard Lamps
18 Charging System
19 Starting System,
Multiport Fuel
Injection System/
Sequential Multiport
Fuel Injection
System
20 Starting System,
Multiport Fuel
Injection System/
Sequential Multiport
Fuel Injection
System
21 Empty
22 Starting System
23 Engine Immobilizer
SystemFuses
Usage
24 Main Body ECU,
Gages, Daytime
Running
Lights (DRL),
Air Conditioning
System, Wireless
Remote Control,
Theft Deterrent
System
25 Audio System
26 Interior Lamps,
Personal Lamps,
Clock
27 Spare
28 Spare
29 Spare
30 Audio System
31 OnStar
®
Fuses Usage
32 Multiport
Fuel Injection
System/Sequential
Multiport Fuel
Injection System,
Horn, Emission
Control System 1,
Emission Control
System 2
33 Horn
34 Multiport Fuel
Injection System/
Sequential Multiport
Fuel Injection
System, Horn,
Ignition, Meter
35 PTC Heater 1
36 PTC Heater 3
37 Air Conditioning
Inverter
9-40 Vehicle Care
Page 316 of 318
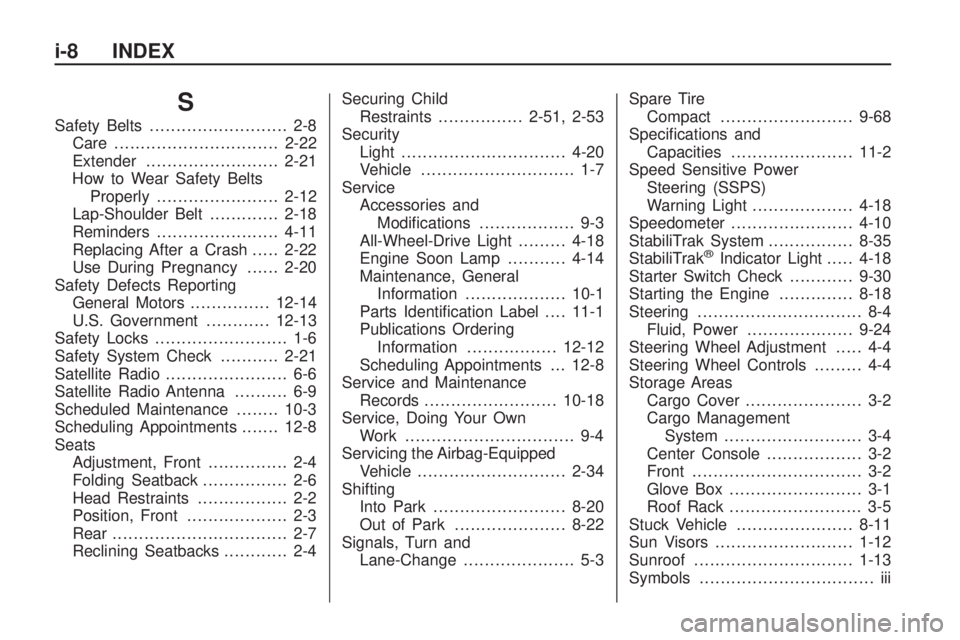
S
Safety Belts.......................... 2-8
Care ............................... 2-22
Extender ......................... 2-21
How to Wear Safety Belts Properly ....................... 2-12
Lap-Shoulder Belt .............2-18
Reminders ....................... 4-11
Replacing After a Crash .....2-22
Use During Pregnancy ......2-20
Safety Defects Reporting General Motors ...............12-14
U.S. Government ............12-13
Safety Locks ......................... 1-6
Safety System Check ...........2-21
Satellite Radio ....................... 6-6
Satellite Radio Antenna .......... 6-9
Scheduled Maintenance ........10-3
Scheduling Appointments .......12-8
Seats Adjustment, Front ............... 2-4
Folding Seatback ................ 2-6
Head Restraints ................. 2-2
Position, Front ................... 2-3
Rear ................................. 2-7
Reclining Seatbacks ............ 2-4Securing Child
Restraints ................ 2-51, 2-53
Security Light ............................... 4-20
Vehicle ............................. 1-7
Service Accessories andModifications .................. 9-3
All-Wheel-Drive Light .........4-18
Engine Soon Lamp ...........4-14
Maintenance, General Information ................... 10-1
Parts Identification Label ....11-1
Publications Ordering Information ................. 12-12
Scheduling Appointments . . . 12-8
Service and Maintenance Records ......................... 10-18
Service, Doing Your Own Work ................................ 9-4
Servicing the Airbag-Equipped Vehicle ............................ 2-34
Shifting Into Park ......................... 8-20
Out
of Park ..................... 8-22
Signals, Turn and Lane-Change ..................... 5-3 Spare Tire
Compact ......................... 9-68
Specifications and Capacities ....................... 11-2
Speed Sensitive Power Steering (SSPS)
Warning Light ................... 4-18
Speedometer ....................... 4-10
StabiliTrak System ................8-35
StabiliTrak
®Indicator Light .....4-18
Starter Switch Check ............9-30
Starting the Engine ..............8-18
Steering ............................... 8-4
Fluid, Power .................... 9-24
Steering Wheel Adjustment ..... 4-4
Steering Wheel Controls ......... 4-4
Storage Areas Cargo Cover ...................... 3-2
Cargo Management System .......................... 3-4
Center Console .................. 3-2
Front ................................ 3-2
Glove Box ......................... 3-1
Roof Rack ......................... 3-5
Stuck Vehicle ...................... 8-11
Sun Visors .......................... 1-12
Sunroof .............................. 1-13
Symbols ................................. iii
i-8 INDEX
Page 317 of 318
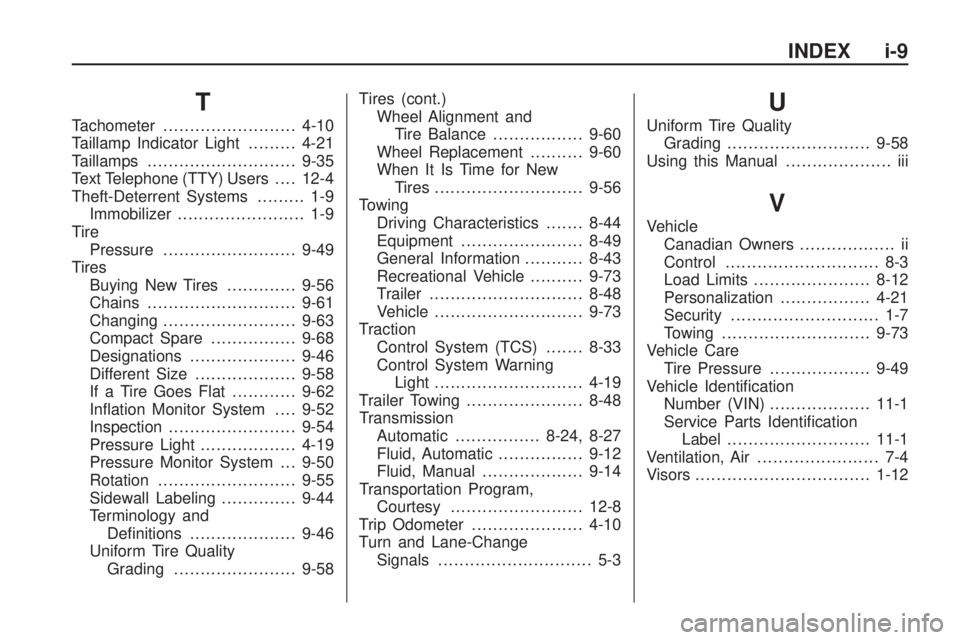
T
Tachometer......................... 4-10
Taillamp Indicator Light .........4-21
Taillamps ............................ 9-35
Text Telephone (TTY) Users ....12-4
Theft-Deterrent Systems ......... 1-9
Immobilizer ........................ 1-9
Tire Pressure ......................... 9-49
Tires Buying New Tires .............9-56
Chains ............................ 9-61
Changing ......................... 9-63
Compact Spare ................9-68
Designations .................... 9-46
Different Size ................... 9-58
If a Tire Goes Flat ............9-62
Inflation Monitor System ....9-52
Inspection ........................ 9-54
Pressure Light ..................4-19
Pressure Monitor System . . . 9-50
Rotation .......................... 9-55
Sidewall Labeling ..............9-44
Terminology and Definitions .................... 9-46
Uniform Tire Quality Grading ....................... 9-58Tires (cont.)
Wheel Alignment andTire Balance .................9-60
Wheel Replacement ..........9-60
When It Is Time for New Tires ............................ 9-56
Towing Driving Characteristics .......8-44
Equipment ....................... 8-49
General Information ...........8-43
Recreational Vehicle ..........9-73
Trailer ............................. 8-48
Vehicle ............................ 9-73
Traction Control System (TCS) .......8-33
Control System Warning Light ............................ 4-19
T
railer Towing ...................... 8-48
Transmission Automatic ................ 8-24, 8-27
Fluid, Automatic ................9-12
Fluid, Manual ................... 9-14
Transportation Program, Courtesy ......................... 12-8
Trip Odometer ..................... 4-10
Turn and Lane-Change Signals ............................. 5-3
U
Uniform Tire Quality
Grading ........................... 9-58
Using this Manual .................... iii
V
Vehicle
Canadian Owners .................. ii
Control ............................. 8-3
Load Limits ...................... 8-12
Personalization .................4-21
Security ............................ 1-7
Towing ............................ 9-73
Vehicle Care Tire Pressure ................... 9-49
Vehicle Identification Number (VIN) ................... 11-1
Service Parts Identification Label ........................... 11-1
Ventilation, Air ....................... 7-4
Visors ................................. 1-12
INDEX i-9