wheel PORSCHE BOXSTER 2009 2.G Repair Manual
[x] Cancel search | Manufacturer: PORSCHE, Model Year: 2009, Model line: BOXSTER, Model: PORSCHE BOXSTER 2009 2.GPages: 294, PDF Size: 6.89 MB
Page 230 of 294

228
Practical Tips, Emergency Service
Danger!
Risk of serious personal injury or death.
Driving the vehicle with low tire pressure
increases risk of a tire failure and resulting
loss of control. Furthermore, low tire pres-
sure increases rate of wear of the affected
tires.
f Check tires – including sidewalls – regularly for
foreign bodies, nicks, cuts, cracks and bulges.
f After driving off road, examine tires for signs
of damage such as cuts, tears, bulges or for-
eign objects stuck in the tread. Replace a dam-
aged tire if necessary.
f Cross curb edges slowly and at right angles if
possible.
Avoid driving over steep or sharp curbs.
f In cases of doubt, have the wheel (particularly
the inner side) checked by an authorized Porsche dealer.
Tire replacements If in doubt, contact your Porsche dealer.
Use only tire makes and types approved by
Porsche.
If you do not use a Porsche recommended
replacement tire, make sure that you
purchase your new tires from a reputable tire
dealer and that the dealer complies with all
manufacturers warnings for those tires.
Only tires with the same make and with the
same specification code (e.g. “N0”, “N1”...)
can be mounted.
Before mounting new tires, check with your
Porsche dealer about the current release
status.
Use tires with “ZR” quality standards. There
are currently no standards concerning tire
strength at speeds above 150 mph (240 km/h).
Tires should be replaced no less than on one axle
at the time.
Only tires of the same make and type must be
used. Mixed tires are not permissible.
Initially, new tires do not have their full traction.
You should therefore drive at moderate speeds
during the first 60 - 120 miles (100 - 200 km). If new tires are installed only on one axle, a notice-
able change in handling occurs due to the different
tread depth of the other tires.
This happens especially if only rear tires are re-
placed. However, this condition disappears as the
new tires are broken in.
f
Please adjust your driving style accordingly.
Installation of new tires sh ould only be done by a
qualified tire technician.
Valves
Rubber valve stems must be replaced every time
a tire is replaced.
For metal valves, the installation and replacement
instructions must be observed.
f Use only genuine Porsche metal valves.
f Protect the valve inserts against soiling with
valve caps.
Soiled valve inserts can cause a gradual loss
of air.
f Use only plastic valve caps.
Page 231 of 294

Practical Tips, Emergency Service
229
Parking at the curb
Warning!
Hard impacts against curbs (or traffic
islands) are dangerous and may cause hid-
den tire damage which is not noticeable until
later. Such damage can result in accidents at
high speeds causing serious personal injury
or death.
Depending on the force of impact, the edge
of the rim can also be damaged.
f If you are in doubt, have the wheel checked by
an expert, particularly if you suspect damage
on the inside.
f If you must drive over a curb or other obstacle,
drive slowly and at an obtuse angle. Exercise care when parking along curbs.
Wheel alignment, wheel balancing As a precaution, have wheels with summer tires
balanced in the spring, and those with mud and
snow tires before winter.
Unbalanced wheels may affect car handling and
tire life.
Only the specified weight s may be used for wheel
balancing.
Self-adhesive weights must not come into contact
with cleaning agents, since they could drop off.
Uneven tread wear indicates wheel imbalance. In
this event, the vehicle should be checked at an au-
thorized Porsche dealer.
Warning!
If, during a trip, uneven running or vibrations
occur that could be caused by damage to
tires or the car, the speed must be reduced
immediately, but without braking sharply.
If you continue your trip without having the
cause of the fault reme died, you might lose
control of your vehicle which could cause se-
rious personal injury or death.
f Stop the vehicle and check the tires.
f If no cause for the fault can be found, drive
carefully to the nearest authorized Porsche dealer.
Wheels with Tire Pressure Monitoring
(TPM) sensorsBefore changing wheels, make sure that the
wheels are compatible with your vehicle's TPM.
f Check this with your authorized Porsche
dealer.Removing and storing tires fAfter changing, adjust tire pressure and torque
wheel bolts diagonally to 94 ftlb (130 Nm).
Tires must always remain on the same side of
the vehicle.
When wheels are removed, the direction of
rotation and position of each wheel should be
marked.
Example
FR (front right), FL, RR and RL.
Wheels must always be fitted in accordance with
their marking.
The perception that tire durability and perform-
ance are immune to the effects of storage and
age is unfounded.
Chemical additives, whic h make the rubber elas-
tic, lose their effectivene ss in the course of time
and the rubber becomes brittle and cracks.
Therefore, the tires should be inspected from
time to time.
Page 232 of 294

230
Practical Tips, Emergency Service
Note
Under no circumstances sh
ould tires older than 6
years be used on your Porsche.
The age of the tire can be obtained from the “DOT”
code number. If, for example, the last four num-
bers read 1208, then the ti re was produced in the
12th week of 2008.
f Store tires in a cool and dry place.
Snow tires For a better grip on snow and ice, use radial M+S
tires with studs.
Check with your local Motor Vehicle Bureau for
possible restrictions.
Danger!
Risk of loss of control and damage to the
vehicle as well as seri ous personal injury or
death.
The standard tires prof ile and rubber mixture
are optimized for wet and dry driving condi-
tions, and may not prove favorable for snow
conditions.
f Therefore install M+S tires before driving in such conditions. Before mounting snow tires, consult with
your Porsche dealer. He has the technical
information necessary to advise you on
wheel and tire compatibility.
Snow tires should have the same load capacity as
original equipment tires and should be mounted on
all four wheels.
Snow tires with studs should be run at moderate
speeds when new in order to give the studs time
to settle.
Danger!
Tires with badly worn treads and studs are
very dangerous and could cause accidents
resulting in serious personal injuries or
death.
f Make sure they are replaced immediately.
f Do not drive a vehicle equipped with snow tires
at prolonged high speed.
Snow tires do not have the same degree of
traction on dry, wet or snowfree roads as a
normal tire.
Furthermore, snow tires wear rapidly under
these conditions.
Comply with all state and local laws
governing snow tire and tread depth
requirements.
Danger!
Risk of accident and se rious personal injury
or death due to excessive speed.
f Always check the maximum speed rating on
the tire sidewall on any tire on the vehicle.
f Never exceed the maximum speed rating of the tires.
f Fit winter tires to both axles well before the
cold season begins.
Your authorized Porsche dealer will be pleased
to advise you.
Maintenance note
We recommend fitting snow tires on the vehicle at
temperatures below 45 °F (7 °C) since the driving
performance of summer tires is reduced at low
temperatures. Summer tires may be permanently
damaged at extremely low temperatures.
Winter tires lose their traction capability when their
tread depth falls below 5/32 in. (4 mm).
Page 233 of 294

Practical Tips, Emergency Service
231
Snow chains
Caution!
Risk of damage to body, axle or brake com-
ponents.
f Fit snow chains only to the rear wheels, and
only with the tire/rim combination listed in the
Technical Data.
To ensure adequate clearance between chain
and body, Porsche recommends only the use
of fine-link chains such as those approved by
Porsche.
f Follow instructions issued by the supplier of the chains.
Different states and countries have varying statu-
tory requirements regarding maximum speed.
Check with local authorities for possible restric-
tions.
f Remove chains as soon as the roads are free
of ice and snow. Fitting snow chains
The use of snow chains is not permitted when
5 mm spacers are mounted.
Caution!
Risk of damage to the wheel housings if the
5 mm spacers are not removed before fitting
snow chains.
f To permit the fitting of snow chains, have the 5 mm spacers removed on all 4 wheels.
f To fit/remove the spacers:
Please consult an authorized Porsche dealer.
f Please see the chapter “SPACERS” on
Page 243.
Tire designations Due to new speed and load ratings for radial tires,
new designations have come into force for snow
tires for your Porsche.
The designation to be used for ZR tires is e.g.,
265/40 ZR 18 (Z = code letter for radial tires for
speeds above 150 mph / 240 km/h).
Page 235 of 294
Practical Tips, Emergency Service
233
E Maximum Load rating
The maximum load in kilograms and pounds can
be carried by the tire. If you replace tires always
use a tire that has the same maximum load rating
as the factory installed tire.
FRadial
The identification indicates if the tire has radial
structure.
G Term of tubeless or tube tire
Identification for tubeless tires.Speed code letterThe speed code letter indicates the maximum per-
missible speed for the tire.
This code letter is shown on the tire sidewall.Tip on driving
Tires with a maximum speed rating that is lower
than the specified maximum vehicle speed may be
mounted only if they bear an M+S identification on
the tire sidewall.
f
Please note that in addition to the winter tires,
all-season and all-terrain tires are also subject
to speed limits and bear this identification.
Inscription on light alloy wheelsMaintenance note
fProtect the valve inserts against soiling with
valve caps.
Use only plastic valve caps.
Soiled valve inserts can cause a gradual loss
of air.
Note on operation
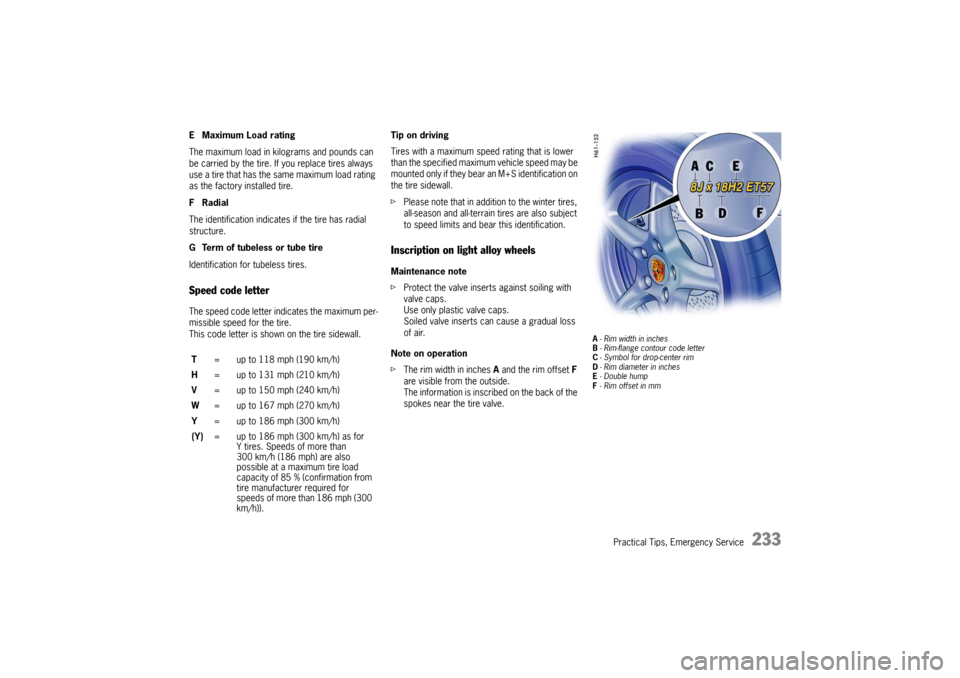
f The rim width in inches A and the rim offset F
are visible from the outside.
The information is inscri bed on the back of the
spokes near the tire valve.
A - Rim width in inches
B - Rim-flange contour code letter
C - Symbol for drop-center rim
D - Rim diameter in inches
E -Double hump
F - Rim offset in mm
T = up to 118 mph (190 km/h)
H = up to 131 mph (210 km/h)
V = up to 150 mph (240 km/h)
W = up to 167 mph (270 km/h)
Y = up to 186 mph (300 km/h)
(Y) = up to 186 mph (300 km/h) as for
Y tires. Speeds of more than
300 km/h (186 mph) are also
possible at a maximum tire load
capacity of 85 % (confirmation from
tire manufacturer required for
speeds of more than 186 mph (300
km/h)).
Page 238 of 294
236
Practical Tips, Emergency Service
Wheel Bolts
Danger!
Risk of wheel bolt breakage and wheel sepa-
ration, resulting in serious personal injury or
death.
f Follow all instructions concerning wheel bolts. f
Always clean the wheel bolts before fitting.
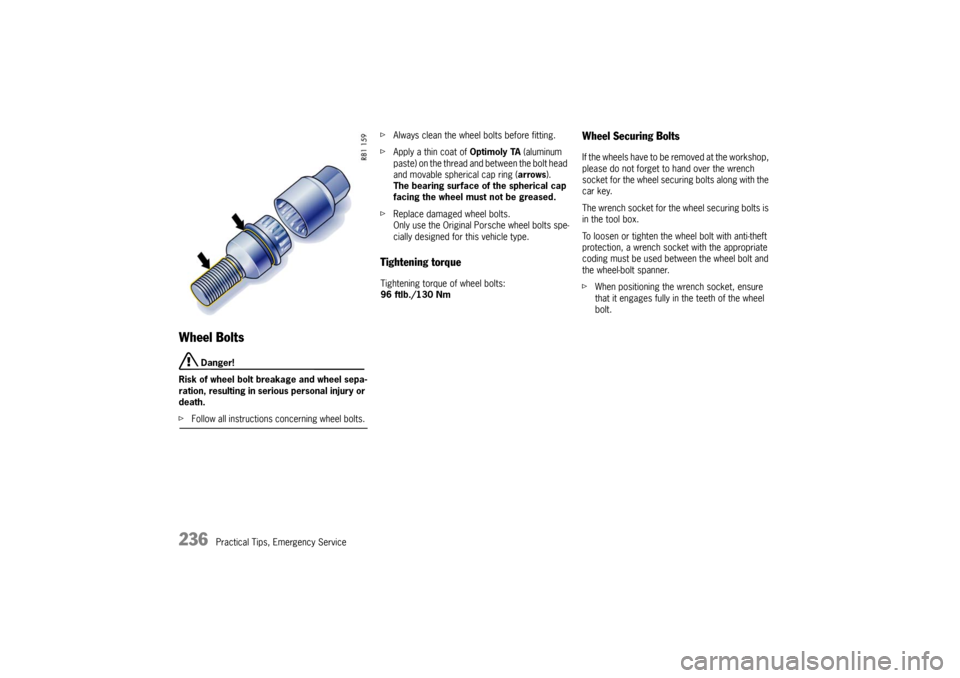
f Apply a thin coat of Optimoly TA (aluminum
paste) on the thread and between the bolt head
and movable spherical cap ring ( arrows).
The bearing surface of the spherical cap
facing the wheel must not be greased.
f Replace damaged wheel bolts.
Only use the Original Porsche wheel bolts spe-
cially designed for this vehicle type.
Tightening torque Tightening torque of wheel bolts:
96 ftlb./130 Nm
Wheel Securing Bolts If the wheels have to be removed at the workshop,
please do not forget to hand over the wrench
socket for the wheel securing bolts along with the
car key.
The wrench socket for the wheel securing bolts is
in the tool box.
To loosen or tighten the wheel bolt with anti-theft
protection, a wrench sock et with the appropriate
coding must be used be tween the wheel bolt and
the wheel-bolt spanner.
f When positioning the wr ench socket, ensure
that it engages fully in the teeth of the wheel
bolt.
Page 239 of 294
Practical Tips, Emergency Service
237
Changing a wheel
Warning!
Risk of serious personal injury or death. The
car may slip off the jack.
f Make sure that no one is in the vehicle when
jacking up and changing a wheel.
f Always place the car on stable supports if work
has to be carried out under the car.
Risk of damage to the brake discs of the
Porsche Ceramic Composite Brake (PCCB).
f Always screw in both assembly aids when changing a wheel.
Note
The tools required for changing a wheel (e.g. jack,
wheel bolt wrench, assembly aids) are not sup-
plied with the car.
Your authorized Porsche dealer will be pleased to
advise you.
1. Apply the handbrake fully and engage 1st gear or PDK selector-lever position P and remove
the ignition key.
2. Switch on the hazard warning lights if neces- sary.
3. Secure the car against rolling away, e.g. by
means of wedges under the wheels on the op-
posite side.
This is particularly important on slopes. 4. Slightly slacken the whee
l bolts of the wheel to
be changed.
5. Lift the car only at the specified jacking points.
6. Raise the car until the wheel lifts off the ground.
Please see the chapter “LIFTING THE VEHICLE
WITH A LIFTING PLATFORM OR GARAGE LIFT”
on Page 242.
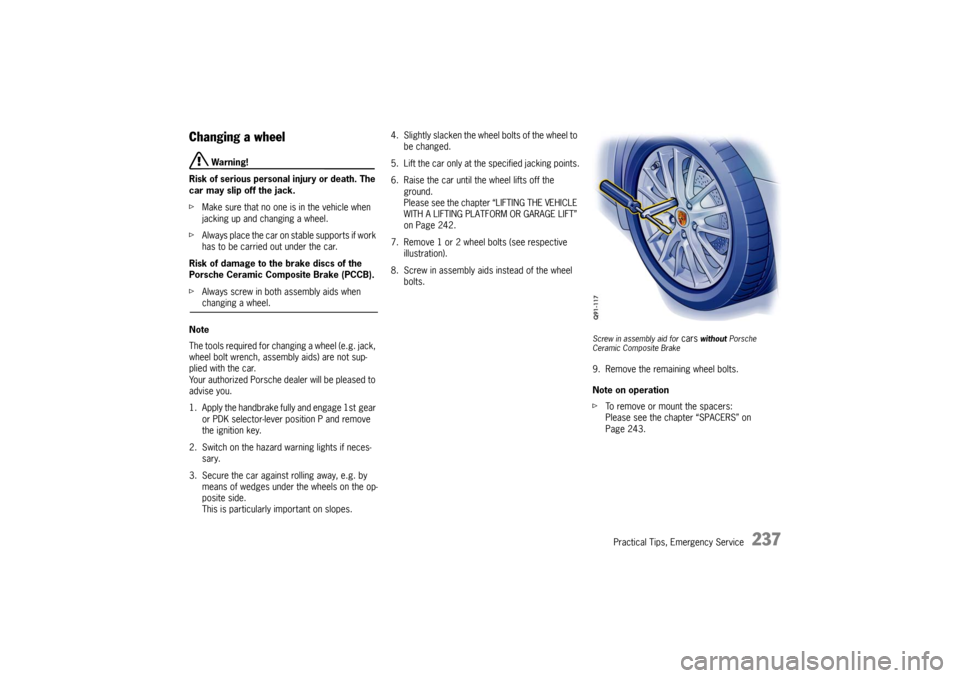
7. Remove 1 or 2 wheel bolts (see respective illustration).
8. Screw in assembly aids instead of the wheel bolts.
Screw in assembly aid for
cars
without Porsche
Ceramic Composite Brake
9. Remove the remaining wheel bolts.
Note on operation
f To remove or mount the spacers:
Please see the chapter “SPACERS” on
Page 243.
Page 240 of 294
238
Practical Tips, Emergency Service
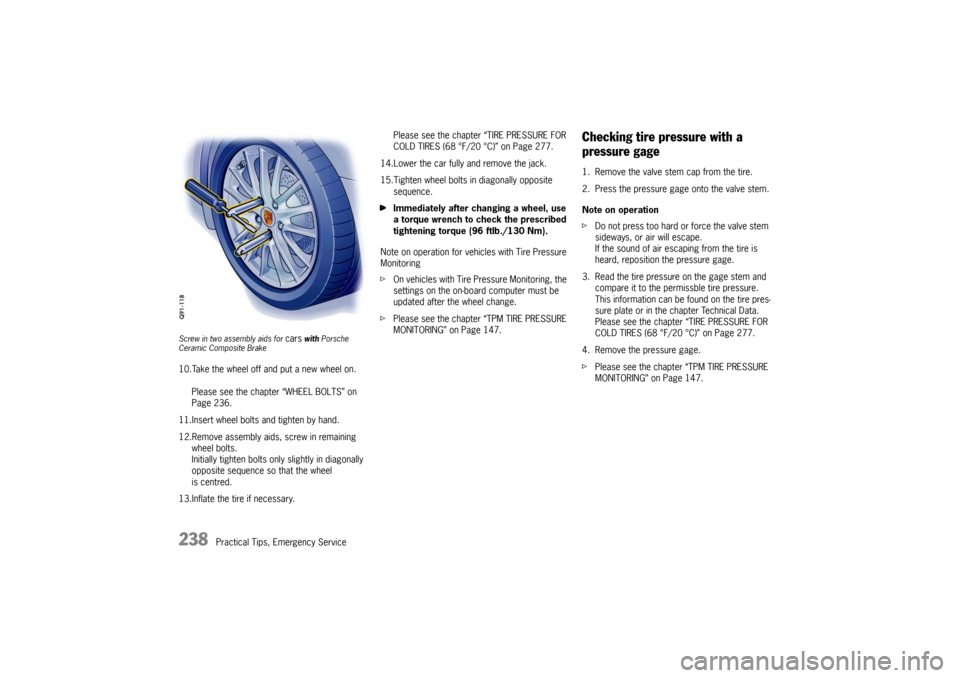
Screw in two assembly aids for
cars
with Porsche
Ceramic Composite Brake
10.Take the wheel off and put a new wheel on.
Please see the chapter “WHEEL BOLTS” on
Page 236.
11.Insert wheel bolts and tighten by hand.
12.Remove assembly aids, screw in remaining wheel bolts.
Initially tighten bolts only slightly in diagonally
opposite sequence so that the wheel
is centred.
13.Inflate the tire if necessary. Please see the chapter “TIRE PRESSURE FOR
COLD TIRES (68 °F/20 °C)” on Page 277.
14.Lower the car fully and remove the jack.
15.Tighten wheel bolts in diagonally opposite sequence.
f Immediately after changing a wheel, use
a torque wrench to check the prescribed
tightening torque (96 ftlb./130 Nm).
Note on operation for vehicles with Tire Pressure
Monitoring
f On vehicles with Tire Pressure Monitoring, the
settings on the on-board computer must be
updated after the wheel change.
f Please see the chapter “TPM TIRE PRESSURE
MONITORING” on Page 147.
Checking tire pressure with a
pressure gage1. Remove the valve stem cap from the tire.
2. Press the pressure gage onto the valve stem.
Note on operation
fDo not press too hard or force the valve stem
sideways, or air will escape.
If the sound of air escaping from the tire is
heard, reposition the pressure gage.
3. Read the tire pressure on the gage stem and compare it to the permissble tire pressure.
This information can be found on the tire pres-
sure plate or in the chapter Technical Data.
Please see the chapter “TIRE PRESSURE FOR
COLD TIRES (68 °F/20 °C)” on Page 277.
4. Remove the pressure gage.
f Please see the chapter “TPM TIRE PRESSURE
MONITORING” on Page 147.
Page 243 of 294
Practical Tips, Emergency Service
241
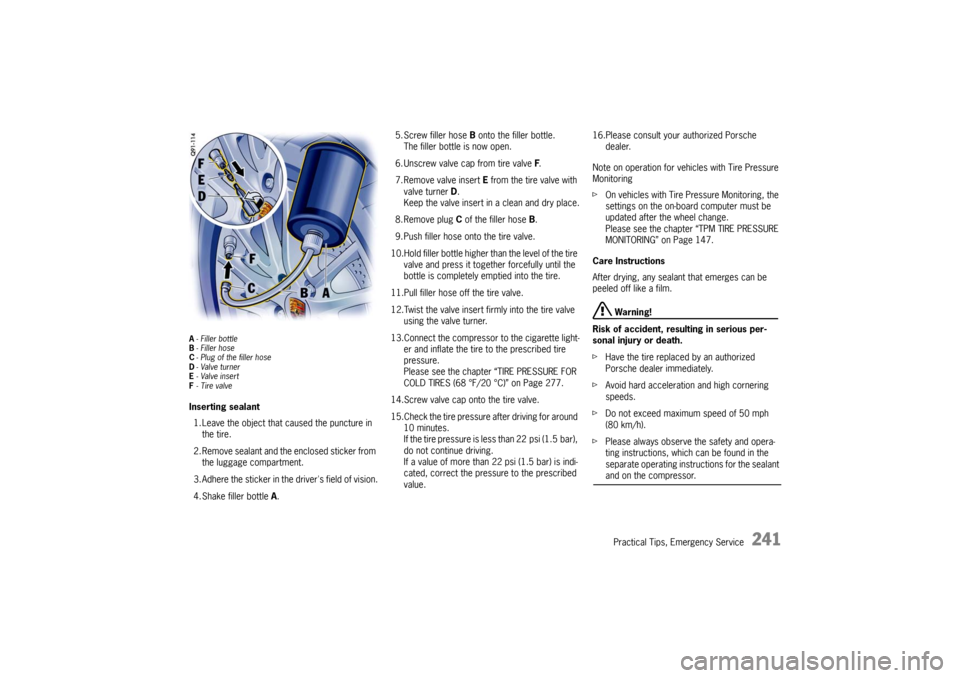
A- Filler bottle
B - Filler hose
C - Plug of the filler hose
D -Valve turner
E -Valve insert
F - Tire valveInserting sealant
1. Leave the object that caused the puncture in the tire.
2. Remove sealant and the enclosed sticker from the luggage compartment.
3. Adhere the sticker in the driver's field of vision.
4. Shake filler bottle A. 5. Screw filler hose B
onto the filler bottle.
The filler bottle is now open.
6. Unscrew valve cap from tire valve F.
7. Remove valve insert E from the tire valve with
valve turner D.
Keep the valve insert in a clean and dry place.
8. Remove plug C of the filler hose B.
9. Push filler hose onto the tire valve.
10.Hold filler bottle higher than the level of the tire valve and press it together forcefully until the
bottle is completely emptied into the tire.
11.Pull filler hose off the tire valve.
12.Twist the valve insert fi rmly into the tire valve
using the valve turner.
13.Connect the compressor to the cigarette light- er and inflate the tire to the prescribed tire
pressure.
Please see the chapter “TIRE PRESSURE FOR
COLD TIRES (68 °F/20 °C)” on Page 277.
14.Screw valve cap onto the tire valve.
15.Check the tire pressure after driving for around 10 minutes.
If the tire pressure is less than 22 psi (1.5 bar),
do not continue driving.
If a value of more than 22 psi (1.5 bar) is indi-
cated, correct the pressure to the prescribed
value. 16.Please consult your authorized Porsche
dealer.
Note on operation for vehicles with Tire Pressure
Monitoring
f On vehicles with Tire Pressure Monitoring, the
settings on the on-board computer must be
updated after the wheel change.
Please see the chapter “TPM TIRE PRESSURE
MONITORING” on Page 147.
Care Instructions
After drying, any sealan t that emerges can be
peeled off like a film.
Warning!
Risk of accident , resulting in serious per-
sonal injury or death.
f Have the tire replaced by an authorized
Porsche dealer immediately.
f Avoid hard acceleration and high cornering
speeds.
f Do not exceed maximum speed of 50 mph
(80 km/h).
f Please always observe the safety and opera-
ting instructions, which can be found in the
separate operating instructions for the sealant and on the compressor.
Page 245 of 294
Practical Tips, Emergency Service
243
SpacersfUse the spacers only together with wheels and
fastening parts approved by Porsche.
Before having spacers fitted, find out about the
current approval status.
Mounting an emergency spare wheel
If 5 mm spacers are mounted, these must not be
removed to mount an emergency spare wheel.
Fitting snow chains
The use of snow chains is not permitted when
5 mm spacers are mounted.
Caution!
Risk of damage to the wheel housings if the
5 mm spacers are not removed before fitting
snow chains.
f To permit the fitting of snow chains, have the 5 mm spacers removed on all 4 wheels.Note on operation
f
To fit/remove the spacers:
Please consult an authorized Porsche dealer.
f Please see the chapter “CHANGING A WHEEL”
on Page 237.
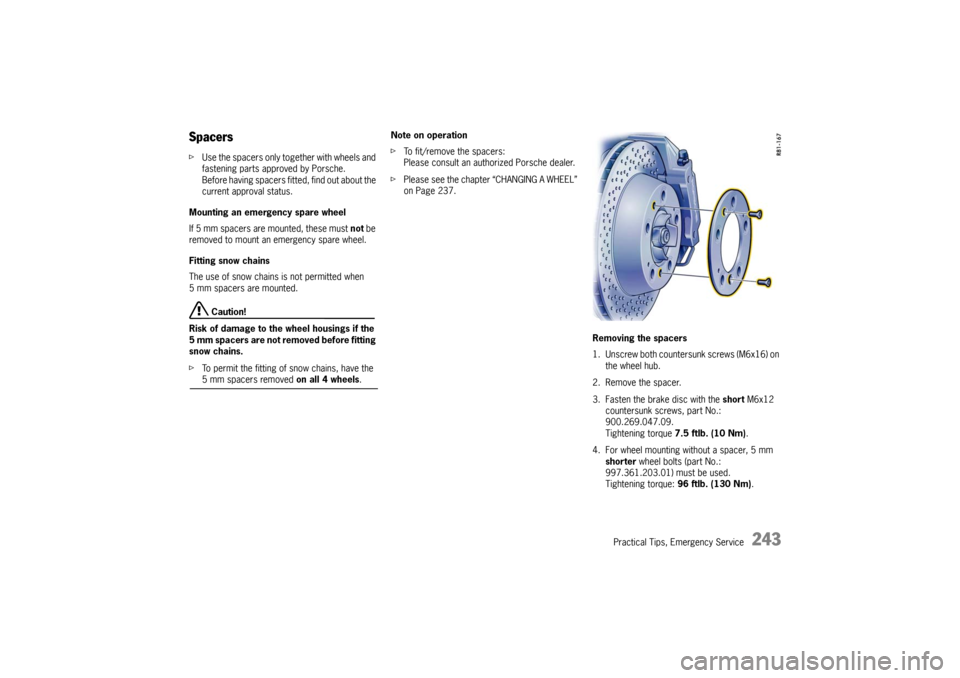
Removing the spacers
1. Unscrew both countersunk screws (M6x16) on the wheel hub.
2. Remove the spacer.
3. Fasten the brake disc with the short M6x12
countersunk screws, part No.:
900.269.047.09.
Tightening torque 7.5 ftlb. (10 Nm) .
4. For wheel mounting without a spacer, 5 mm
shorter wheel bolts (part No.:
997.361.203.01 ) must be used.
Tightening torque: 96 ftlb. (130 Nm) .