tow Ram 3500 2019 Owner's Guide
[x] Cancel search | Manufacturer: RAM, Model Year: 2019, Model line: 3500, Model: Ram 3500 2019Pages: 696, PDF Size: 13.89 MB
Page 156 of 696

154 GETTING TO KNOW YOUR VEHICLE
4. Push clamp handles upward to the clamped position toproperly engage the clamps.
Clamped Position NOTE:
Once clamped, be sure the clamps are not improperly
attached to the truck bed flange.
Improper Clamp Position
5. Disengage the stowage straps.
Page 159 of 696

GETTING TO KNOW YOUR VEHICLE 157
7. Completely unfold the Tonneau Cover.Fully Unfolded Position 8. Pull the rear clamp handles down into the released posi
-
tion.
Stowed Position
2
Page 164 of 696

162 GETTING TO KNOW YOUR INSTRUMENT PANEL
7. Temperature Gauge•The gauge pointer shows engine coolant temperature.The pointer positioned within the normal range indi -
cates that the engine cooling system is operating satis -
factorily.
•The gauge pointer will likely indicate a higher tempera -
ture when driving in hot weather, up mountain grades,
or when towing a trailer. It should not be allowed to
exceed the upper limits of the normal operating range.WARNING!
A hot engine cooling system is dangerous. You or others
could be badly burned by steam or boiling coolant. You
may want to call an authorized dealer for service if your
vehicle overheats. If you decide to look under the hood
yourself, see “Servicing And Maintenance.” Follow the
warnings under the Cooling System Pressure Cap
paragraph.
CAUTION!
Driving with a hot engine cooling system could damage
your vehicle. If the temperature gauge reads “H,” pull
over and stop the vehicle. Idle the vehicle with the air
conditioner turned off until the pointer drops back into
the normal range. If the pointer remains on the “H,” turn
the engine off immediately and call an authorized dealer
for service.
Page 166 of 696
164 GETTING TO KNOW YOUR INSTRUMENT PANEL
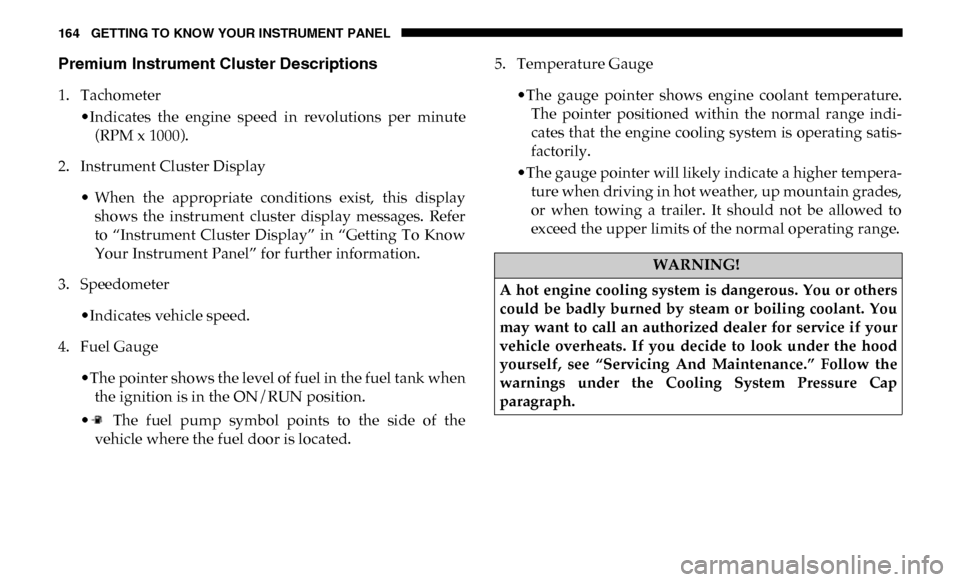
Premium Instrument Cluster Descriptions
1. Tachometer•Indicates the engine speed in revolutions per minute(RPM x 1000).
2. Instrument Cluster Display
• When the appropriate conditions exist, this displayshows the instrument cluster display messages. Refer
to “Instrument Cluster Display” in “Getting To Know
Your Instrument Panel” for further information.
3. Speedometer
•Indicates vehicle speed.
4. Fuel Gauge
•The pointer shows the level of fuel in the fuel tank whenthe ignition is in the ON/RUN position.
• The fuel pump symbol points to the side of the vehicle where the fuel door is located. 5. Temperature Gauge
•The gauge pointer shows engine coolant temperature.The pointer positioned within the normal range indi -
cates that the engine cooling system is operating satis -
factorily.
•The gauge pointer will likely indicate a higher tempera -
ture when driving in hot weather, up mountain grades,
or when towing a trailer. It should not be allowed to
exceed the upper limits of the normal operating range.
WARNING!
A hot engine cooling system is dangerous. You or others
could be badly burned by steam or boiling coolant. You
may want to call an authorized dealer for service if your
vehicle overheats. If you decide to look under the hood
yourself, see “Servicing And Maintenance.” Follow the
warnings under the Cooling System Pressure Cap
paragraph.
Page 168 of 696
166 GETTING TO KNOW YOUR INSTRUMENT PANEL
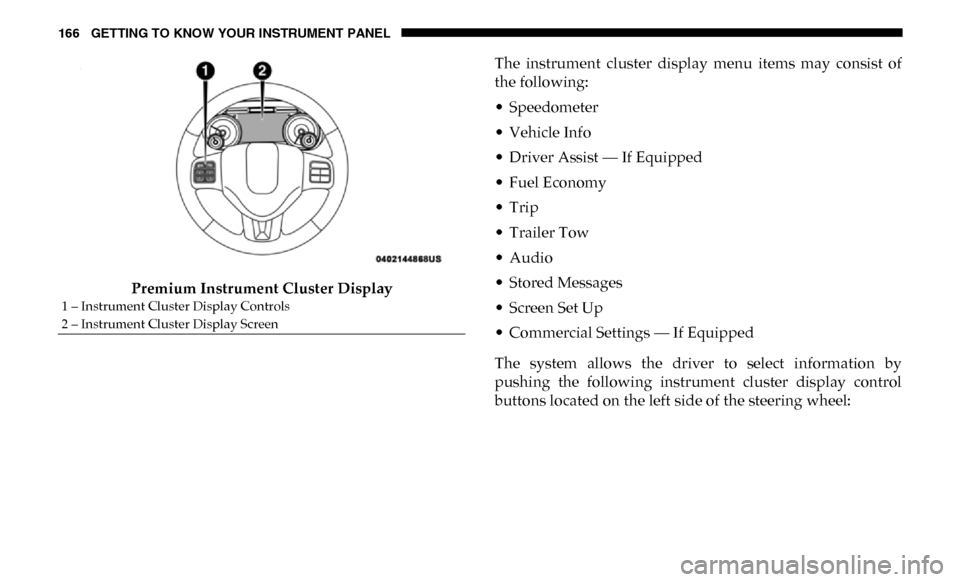
Premium Instrument Cluster DisplayThe instrument cluster display menu items may consist of
the following:
• Speedometer
• Vehicle Info
• Driver Assist — If Equipped
• Fuel Economy
• Trip
• Trailer Tow
• Audio
• Stored Messages
• Screen Set Up
• Commercial Settings — If Equipped
The system allows the driver to select information by
pushing the following instrument cluster display control
buttons located on the left side of the steering wheel:
1 – Instrument Cluster Display Controls
2 – Instrument Cluster Display Screen
Page 173 of 696
GETTING TO KNOW YOUR INSTRUMENT PANEL 171
Trip A/Trip B
Push and release the up or down arrow button until the Trip
menu item is highlighted in the instrument cluster display.
Push and release the right arrow button to enter the
submenus of Trip A and Trip B. The Trip A or Trip B infor -
mation will display the following:
• Distance
• Average Fuel Economy
• Elapsed Time
Push and hold right arrow button to reset all information.
Trailer Tow
Push and release the up or down arrow button until the
Trailer Tow menu item is highlighted in the instrument
cluster display. Push and release the right arrow button and
the next screen will display the following trailer trip infor -
mation:
• Trip (trailer specific) Distance: Push and hold the right
arrow button to reset the distance. • Trailer Brake
•Output
•Type
•Gain
• Trailer Tire Pressure — If Equipped
Audio
Push and release the up or down arrow button until the
Audio Menu icon/title is highlighted in the instrument
cluster display. This menu will display the audio source
information, including the Song name, Artist name, and
audio source with an accompanying graphic.
Phone Call Status
When a call is incoming, a Phone Call Status pop-up will
display on the screen. The pop-up will remain until the
phone is answered or ignored.
NOTE:
The call status will temporarily replace the previous media
source information displayed on the screen. When the
pop-up is no longer displayed, the display will return to the
last used screen.
3
Page 174 of 696

172 GETTING TO KNOW YOUR INSTRUMENT PANEL
Stored Messages
Push and release the up or down arrow button until the
Messages Menu item is highlighted. This feature shows the
number of stored warning messages. Push and release the
right or left arrow buttons to cycle through stored messages.
Screen Setup Menu Item
Push and release the up or down arrow button until the
Screen Setup menu item is highlighted in the instrument
cluster display. Push and release the right arrow button to
enter the Screen Setup submenu. The Screen Setup feature
allows you to change what information is displayed in the
instrument cluster as well as the location that information is
displayed.
Current Gear
• Off (Default Setting)
• On
Odometer
• Unit Without Decimal (Default Setting)
• Unit With Decimal Favorite Menu
• Speedometer
• Vehicle Info
• Driver Assist (Show/Hide) — If Equipped
• Fuel Economy (Show/Hide)
• Trip Info (Show/Hide)
• Trailer Tow (Show/Hide)
• Audio (Show/Hide)
• Messages
• Screen Setup
• Commercial Settings — If Equipped
NOTE:
Menus with (Show/Hide) can push the
OK button to choose
whether to show or hide this menu in the instrument cluster
display.
Page 180 of 696

178 GETTING TO KNOW YOUR INSTRUMENT PANEL
NOTE:
• The charging system is independent from load reduction.The charging system performs a diagnostic on the
charging system continuously.
• If the Battery Charge Warning Light is on it may indicate a problem with the charging system. Refer to “Battery
Charge Warning Light” in “Getting To Know Your Instru -
ment Panel” for further information.
The electrical loads that may be switched off (if equipped), and
vehicle functions which can be affected by load reduction:
• Heated Seats/Vented Seats/Heated Wheel
• Rear Defroster And Heated Mirrors
• HVAC System
• 115V AC Power Inverter System
• Audio and Telematics System
Loss of the battery charge may indicate one or more of the
following conditions:
• The charging system cannot deliver enough electrical power to the vehicle system because the electrical loads are
larger than the capability of charging system. The charging
system is still functioning properly. • Turning on all possible vehicle electrical loads (e.g. HVAC
to max settings, exterior and interior lights, overloaded
power outlets +12V, 115V AC, USB ports) during certain
driving conditions (city driving, towing, frequent stop -
ping).
• Installing options like additional lights, upfitter electrical accessories, audio systems, alarms and similar devices.
• Unusual driving cycles (short trips separated by long parking periods).
• The vehicle was parked for an extended period of time (weeks, months).
• The battery was recently replaced and was not charged completely.
• The battery was discharged by an electrical load left on when the vehicle was parked.
• The battery was used for an extended period with the engine not running to supply radio, lights, chargers, +12V
portable appliances like vacuum cleaners, game consoles
and similar devices.
Page 184 of 696
182 GETTING TO KNOW YOUR INSTRUMENT PANEL
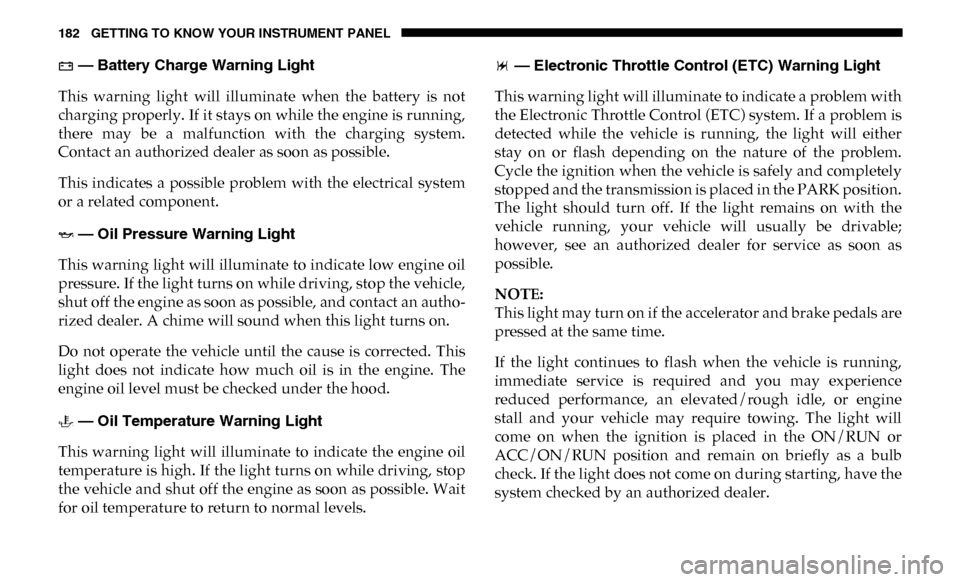
— Battery Charge Warning Light
This warning light will illuminate when the battery is not
charging properly. If it stays on while the engine is running,
there may be a malfunction with the charging system.
Contact an authorized dealer as soon as possible.
This indicates a possible problem with the electrical system
or a related component.
— Oil Pressure Warning Light
This warning light will illuminate to indicate low engine oil
pressure. If the light turns on while driving, stop the vehicle,
shut off the engine as soon as possible, and contact an autho -
rized dealer. A chime will sound when this light turns on.
Do not operate the vehicle until the cause is corrected. This
light does not indicate how much oil is in the engine. The
engine oil level must be checked under the hood.
— Oil Temperature Warning Light
This warning light will illuminate to indicate the engine oil
temperature is high. If the light turns on while driving, stop
the vehicle and shut off the engine as soon as possible. Wait
for oil temperature to return to normal levels. — Electronic Throttle Control (ETC) Warning Light
This warning light will illuminate to indicate a problem with
the Electronic Throttle Control (ETC) system. If a problem is
detected while the vehicle is running, the light will either
stay on or flash depending on the nature of the problem.
Cycle the ignition when the vehicle is safely and completely
stopped and the transmission is placed in the PARK position.
The light should turn off. If the light remains on with the
vehicle running, your vehicle will usually be drivable;
however, see an authorized dealer for service as soon as
possible.
NOTE:
This light may turn on if the accelerator and brake pedals are
pressed at the same time.
If the light continues to flash when the vehicle is running,
immediate service is required and you may experience
reduced performance, an elevated/rough idle, or engine
stall and your vehicle may require towing. The light will
come on when the ignition is placed in the ON/RUN or
ACC/ON/RUN position and remain on briefly as a bulb
check. If the light does not come on during starting, have the
system checked by an authorized dealer.
Page 185 of 696
GETTING TO KNOW YOUR INSTRUMENT PANEL 183
— Electric Power Steering Fault Warning Light
This warning light will turn on when there's a fault with the
EPS (Electric Power Steering) system. Refer to “Power
Steering” in “Starting And Operating” for further informa -
tion.
— Trailer Brake Disconnected Warning Light
This warning light will illuminate when the Trailer Brake has
been disconnected.
— Transmission Temperature Warning Light — If
Equipped
This warning light will illuminate to warn of a high transmis -
sion fluid temperature. This may occur with strenuous usage
such as trailer towing. If this light turns on, stop the vehicle
and run the engine at idle or slightly faster, with the trans -
mission in PARK or NEUTRAL, until the light turns off.
Once the light turns off, you may continue to drive normally. — Door Open Warning Light
This indicator will illuminate when a door is ajar/open and
not fully closed.
NOTE:
If the vehicle is moving there will also be a single chime.
WARNING!
Continued operation with reduced assist could pose a
safety risk to yourself and others. Service should be
obtained as soon as possible.
WARNING!
If you continue operating the vehicle when the
Transmission Temperature Warning Light is illuminated
you could cause the fluid to boil over, come in contact
with hot engine or exhaust components and cause a fire.
CAUTION!
Continuous driving with the Transmission Temperature
Warning Light illuminated will eventually cause severe
transmission damage or transmission failure.
3