change time RAM CHASSIS CAB 2022 Owner's Manual
[x] Cancel search | Manufacturer: RAM, Model Year: 2022, Model line: CHASSIS CAB, Model: RAM CHASSIS CAB 2022Pages: 428, PDF Size: 20.18 MB
Page 128 of 428

126STARTING AND OPERATING
You can switch between DRIVE and ERS mode at
any vehicle speed. When the transmission gear
selector is in DRIVE, the transmission will operate
automatically, shifting between all available gears.
Tapping the GEAR “–” switch (on the steering
wheel) will activate ERS mode, display the current
gear in the instrument cluster, and set that gear as
the top available gear. Once in ERS mode, tapping
the GEAR “–” or GEAR “+” switch will change the
top available gear.
ERS Control
To exit ERS mode, simply push and hold the
GEAR “+” switch until the gear limit display
disappears from the instrument cluster.
When to Use TOW/HAUL Mode
When driving in hilly areas, towing a trailer, carrying
a heavy load, etc., and frequent transmission
shifting occurs, push the TOW/HAUL switch to
activate TOW/HAUL mode. This will improve
performance and reduce the potential for
transmission overheating or failure due to
excessive shifting.
TOW/HAUL Switch
The “TOW/HAUL Indicator Light” will illuminate in
the instrument cluster to indicate that TOW/HAUL
mode has been activated. Pushing the switch a
second time restores normal operation. Normal
operation is always the default at engine start-up.
If TOW/HAUL mode is desired, the switch must be
pushed each time the engine is started.
6-SPEED AUTOMATIC TRANSMISSION —
I
F EQUIPPED
Chassis Cab models may use either the AS66RC or
AS69RC transmission (which are equipped with a
Power Take-Off (PTO) access cover on the side of
the transmission case).
The transmission gear position display (located in
the instrument cluster) indicates the transmission
gear range. The gear selector is mounted on the
right side of the steering column. You must press
1 — GEAR “+” Switch
2 — GEAR “–” Switch
WARNING!
Do not downshift for additional engine braking
on a slippery surface. The drive wheels could
lose their grip and the vehicle could skid,
causing a collision or personal injury.
WARNING!
Do not use the TOW/HAUL feature when driving
in icy or slippery conditions. The increased
engine braking can cause the rear wheels to
slide, and the vehicle to swing around with the
possible loss of vehicle control, which may
cause an accident possibly resulting in personal
injury or death.
22_DPF_OM_EN_USC_t.book Page 126
Page 142 of 428

140STARTING AND OPERATING
Care should be taken to avoid sudden
accelerations when both rear wheels are on a
slippery surface. This could cause both rear wheels
to spin, and allow the vehicle to slide sideways on
the crowned surface of a road or in a turn.
POWER TAKE OFF (PTO) OPERATION —
IF EQUIPPED
This vehicle when equipped with PTO Prep and the
AS66RC/AS69RC automatic 6-speed, will allow for
an aftermarket upfit with a transmission driven
PTO (power take off). The customer will have the
ability to operate the PTO in either a “stationary”,
“mobile” or “remote” mode. The vehicles will be
factory set to the “stationary” mode. To select a
different mode, or to change any other PTO setting,
you will need to enter the commercial vehicle
menu on the instrument cluster screen. Details of
the PTO selection modes and further PTO information is available at the Ram Truck Body
Builder’s web site: https://www.ramtrucks.com/
ram-commercial/body-builders-guide.html
HYDRAULIC POWER STEERING
The standard power steering system provides
increased vehicle response and ease of
maneuverability in tight spaces. The system will
provide mechanical steering capability if power
assist is lost.
If for some reason the power assist is interrupted,
it will still be possible to steer your vehicle. Under
these conditions, you will observe a substantial
increase in steering effort, especially at very low
vehicle speeds and during parking maneuvers.
NOTE:
Increased noise levels at the end of the steering
wheel travel are considered normal and do not
indicate that there is a problem with the power
steering system.
Upon initial start-up in cold weather, the power
steering pump may make noise for a short
amount of time. This is due to the cold, thick
fluid in the steering system. This noise should
be considered normal, and it does not in any
way damage the steering system.
POWER STEERING FLUID CHECK
Checking the power steering fluid level at a defined
service interval is not required. The fluid should
only be checked if a leak is suspected, abnormal
noises are apparent, and/or the system is not
functioning as anticipated. Check fluid level when
the engine is cold and off. Coordinate inspection
efforts through an authorized dealer.
WARNING!
On vehicles equipped with a limited-slip
differential never run the engine with one rear
wheel off the ground since the vehicle may drive
through the rear wheel remaining on the ground.
You could lose control of the vehicle.
CAUTION!
Prolonged operation of the steering system at
the end of the steering wheel travel will increase
the steering fluid temperature and it should be
avoided when possible. Damage to the power
steering pump may occur.
WARNING!
Fluid level should be checked on a level surface
and with the engine off to prevent injury from
moving parts and to ensure accurate fluid level
reading. Do not overfill. Use only manufacturer's
recommended power steering fluid.
22_DPF_OM_EN_USC_t.book Page 140
Page 147 of 428

STARTING AND OPERATING145
To Activate/Deactivate
Push and release the Adaptive Cruise Control
(ACC) on/off button. The ACC menu in the
instrument cluster displays “ACC Ready.”
To turn the system off, push and release the
Adaptive Cruise Control (ACC) on/off button again.
At this time, the system will turn off and the
instrument cluster display will show “Adaptive
Cruise Control (ACC) Off.”
To Set A Desired ACC Speed
When the vehicle reaches the speed desired, push
the SET (-) button and release. The instrument
cluster display will show the set speed.
NOTE:Fixed Speed Cruise Control can be used without
ACC enabled. To change between the different
modes, push the ACC on/off button which turns
the ACC and the Fixed Speed Cruise Control off. Pushing the Fixed Speed Cruise Control on/off
button will result in turning on (changing to) Fixed
Speed Cruise Control mode.
If ACC is set when the vehicle speed is
below
20 mph (32 km/h), the set speed will default to
20 mph (32 km/h).
NOTE:Fixed Speed Cruise Control cannot be set below
20 mph (32 km/h).
If either system is set when the vehicle speed is
above 20 mph (32 km/h), the set speed shall be
the current speed of the vehicle.
NOTE:
Keeping your foot on the accelerator pedal can
cause the vehicle to continue to accelerate
beyond the set speed. If this occurs, the
message “ACC DRIVER OVERRIDE” will display
in the instrument cluster display.
If you continue to accelerate beyond the set
speed while ACC is enabled, the system will not
be controlling the distance between your vehicle
and the vehicle ahead. The vehicle speed will
only be determined by the position of the accel-
erator pedal.
To Cancel
The following conditions cancel the ACC or Fixed
Speed Cruise Control systems:
The brake pedal is applied.
The CANCEL button is pushed.
An Anti-Lock Brake System (ABS) event occurs.
The gear selector is removed from the DRIVE
position.
The Electronic Stability Control/Traction Control
System (ESC/TCS) activates.
The vehicle parking brake is applied.
Driver seat belt is unbuckled at low speeds.
Driver door is opened at low speeds.
WARNING!
Leaving the Adaptive Cruise Control (ACC)
system on when not in use is dangerous. You
could accidentally set the system or cause it to
go faster than you want. You could lose control
and have a collision. Always leave the system off
when you are not using it.
WARNING!
In the Fixed Speed Cruise Control mode (ACC not
enabled), the system will not react to vehicles
ahead. In addition, the proximity warning does
not activate and no alarm will sound even if you
are too close to the vehicle ahead since neither
the presence of the vehicle ahead nor the
vehicle-to-vehicle distance is detected. Be sure
to maintain a safe distance between your vehicle
and the vehicle ahead. Always be aware which
mode is selected.
4
22_DPF_OM_EN_USC_t.book Page 145
Page 149 of 428

STARTING AND OPERATING147
When ACC Is Active
When you use the SET (-) button to decelerate, if
the engine’s braking power does not slow the
vehicle sufficiently to reach the set speed, the
brake system will automatically slow the
vehicle.
The ACC system applies the brake down to a full
stop when following the vehicle in front. If your
vehicle follows the vehicle in front to a standstill,
your vehicle will release the brakes two seconds
after coming to a full stop.
The ACC system maintains set speed when
driving uphill and downhill. However, a slight
speed change on moderate hills is normal. In
addition, downshifting may occur while climbing
uphill or descending downhill. This is normal
operation and necessary to maintain set speed.
When driving uphill and downhill, the ACC
system will cancel if the braking temperature
exceeds normal range (overheated).
Setting The Following Distance In ACC
The specified following distance for Adaptive
Cruise Control (ACC) can be set by varying the
distance setting between four bars (longest), three
bars (long), two bars (medium) and one bar (short).
Using this distance setting and the vehicle speed,
ACC calculates and sets the distance to the vehicle
ahead. This distance setting displays in the
instrument cluster display.
Distance Settings
To adjust the distance setting, push the Distance
Button and release. Each time the button is
pushed, the distance setting increases by one bar
(longer). When the farthest distance is set, pushing
the distance button again will reset to the shortest
distance.
If there is no vehicle ahead, the vehicle will
maintain the set speed. If a slower moving vehicle
is detected in the same lane, the instrument
cluster displays the ACC Set With Target Detected
Indicator Light, and the system adjusts vehicle
speed automatically to maintain the distance
setting, regardless of the set speed. The vehicle will then maintain the set distance
until:
The vehicle ahead accelerates to a speed above
the set speed.
The vehicle ahead moves out of your lane or
view of the sensor.
The distance setting is changed.
The system disengages.
The maximum braking applied by ACC is limited;
however, the driver can always apply the brakes
manually, if necessary.
NOTE:The brake lights will illuminate whenever the ACC
system applies the brakes.
A Proximity Warning will alert the driver if ACC
predicts that its maximum braking level is not
sufficient to maintain the set distance. If this
occurs, a visual alert “BRAKE!” will flash in the
instrument cluster display and a chime will sound
while ACC continues to apply its maximum braking
force.
NOTE:The “BRAKE!” screen in the instrument cluster
display is a warning for the driver to take action
and does not necessarily mean that the Forward
Collision Warning system is applying the brakes
autonomously.
1 — Longest Distance Setting (Four Bars)
2 — Medium Distance Setting (Two Bars)
3 — Long Distance Setting (Three Bars)
4 — Short Distance Setting (One Bar)
4
22_DPF_OM_EN_USC_t.book Page 147
Page 160 of 428
158STARTING AND OPERATING
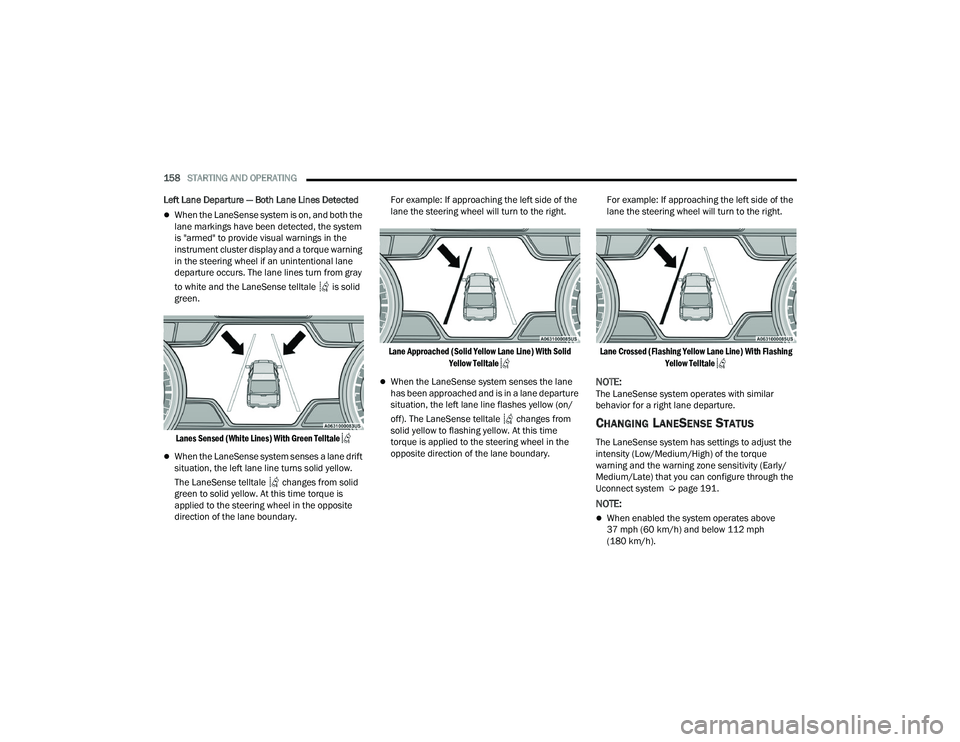
Left Lane Departure — Both Lane Lines Detected
When the LaneSense system is on, and both the
lane markings have been detected, the system
is "armed" to provide visual warnings in the
instrument cluster display and a torque warning
in the steering wheel if an unintentional lane
departure occurs. The lane lines turn from gray
to white and the LaneSense telltale is solid
green.
Lanes Sensed (White Lines) With Green Telltale
When the LaneSense system senses a lane drift
situation, the left lane line turns solid yellow.
The LaneSense telltale changes from solid
green to solid yellow. At this time torque is
applied to the steering wheel in the opposite
direction of the lane boundary. For example: If approaching the left side of the
lane the steering wheel will turn to the right.
Lane Approached (Solid Yellow Lane Line) With Solid Yellow Telltale
When the LaneSense system senses the lane
has been approached and is in a lane departure
situation, the left lane line flashes yellow (on/
off). The LaneSense telltale changes from
solid yellow to flashing yellow. At this time
torque is applied to the steering wheel in the
opposite direction of the lane boundary. For example: If approaching the left side of the
lane the steering wheel will turn to the right.
Lane Crossed (Flashing Yellow Lane Line) With Flashing Yellow Telltale
NOTE:The LaneSense system operates with similar
behavior for a right lane departure.
CHANGING LANESENSE STATUS
The LaneSense system has settings to adjust the
intensity (Low/Medium/High) of the torque
warning and the warning zone sensitivity (Early/
Medium/Late) that you can configure through the
Uconnect system Ú page 191.
NOTE:
When enabled the system operates above
37 mph (60 km/h) and below 112 mph
(180 km/h).
22_DPF_OM_EN_USC_t.book Page 158
Page 184 of 428
182STARTING AND OPERATING
When activated the feature will enable all of the
exterior lights sequentially for up to five minutes
allowing time to walk around and verify
functionality. The following exterior lights will
remain on for the entirety of the sequence:
Park/Running Lamps
Side Marker Lamps (if equipped)
License Lamp
Signature Lamp (if equipped)
Low Beams
Fog Lamps (if equipped)
Daytime Running Lamps
During this time the following lights will sequence,
each activating for three seconds:
1. Brake and CHMSL (third brake light)
2. Left turn signal
3. Right turn signal
4. Reverse Lamps
5. High Beam
This light check sequence will continue for a total
of five minutes. The sequence will only activate if the following
conditions are met:
Vehicle is equipped with the Trailer Tow
Package
Vehicle is in PARK
Vehicle is not in motion
Ignition in ACC or RUN
Remote start is inactive
Brakes are not applied
Left turn signal is not applied
Right turn signal not applied
Hazard switch is not applied
The sequence will cancel if any of the following
conditions occur:
Brakes are applied
Vehicle is shifted from PARK
Vehicle is no longer stationary
Left turn signal activated from stalk
Right turn signal is activated from stalk
Hazard switch is activated
Any button on the key fob is pushed
Ignition button is pushed
High Beam stalk position is changed
Sequence is canceled in the instrument cluster
TOWING TIPS
Before setting out on a trip, practice turning,
stopping, and backing up the trailer in an area
located away from heavy traffic.
Automatic Transmission
The DRIVE range can be selected when towing. The
transmission controls include a drive strategy to
avoid frequent shifting when towing. However, if
frequent shifting does occur while in DRIVE, select
TOW/HAUL mode or select a lower gear range
(using the Electronic Range Select (ERS) shift
control).
NOTE:Using TOW/HAUL mode or selecting a lower gear
range (using the ERS shift control) while operating
the vehicle under heavy loading conditions will
improve performance and extend transmission life
by reducing excessive shifting and heat build-up.
This action will also provide better engine braking.
6-Speed Automatic Transmission Only
When towing a loaded trailer up steep grades at
low speeds (20 mph [32 km/h] or below), holding
your vehicle in FIRST gear (using the ERS shift
control) can help to avoid transmission
overheating.
22_DPF_OM_EN_USC_t.book Page 182
Page 193 of 428
MULTIMEDIA191
UCONNECT SETTINGS
The Uconnect system uses a combination of
buttons on the touchscreen and buttons on the
faceplate located on the center of the instrument
panel. These buttons allow you to access and
change the Customer Programmable Features.
Many features can vary by vehicle.
Buttons on the faceplate are located below and/or
beside the Uconnect system in the center of the
instrument panel. In addition, there is a Scroll/
Enter control knob located on the right side. Turn
the control knob to scroll through menus and
change settings. Push the center of the control
knob one or more times to select or change a
setting.
Your Uconnect system may also have Screen Off
and Mute buttons on the faceplate.
Push the Screen Off button on the faceplate to turn
off the Uconnect screen. Push the button again or
tap the screen to turn the screen on.
Press the Back Arrow button to exit out of a Menu
or certain option on the Uconnect system.
For the Uconnect 5 systems, push and hold the
Power button on the radio’s faceplate for a
minimum of 15 seconds to reset the radio.
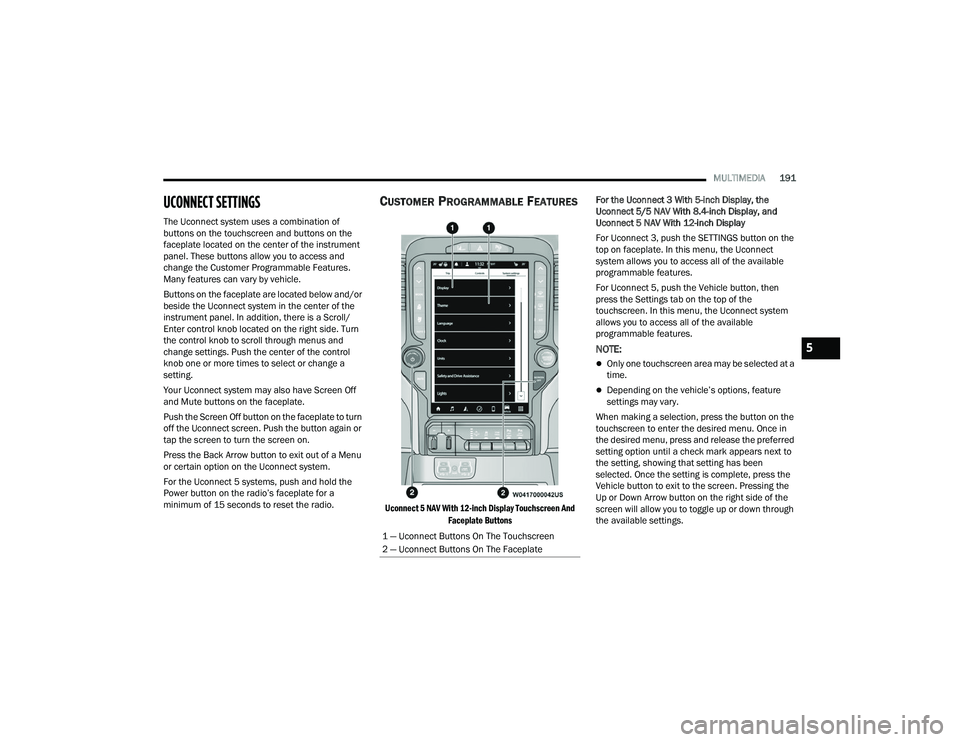
CUSTOMER PROGRAMMABLE FEATURES
Uconnect 5 NAV With 12-inch Display Touchscreen And
Faceplate Buttons
For the Uconnect 3 With 5-inch Display, the
Uconnect 5/5 NAV With 8.4-inch Display, and
Uconnect 5 NAV With 12-inch Display
For Uconnect 3, push the SETTINGS button on the
top on faceplate. In this menu, the Uconnect
system allows you to access all of the available
programmable features.
For Uconnect 5, push the Vehicle button, then
press the Settings tab on the top of the
touchscreen. In this menu, the Uconnect system
allows you to access all of the available
programmable features.
NOTE:
Only one touchscreen area may be selected at a
time.
Depending on the vehicle’s options, feature
settings may vary.
When making a selection, press the button on the
touchscreen to enter the desired menu. Once in
the desired menu, press and release the preferred
setting option until a check mark appears next to
the setting, showing that setting has been
selected. Once the setting is complete, press the
Vehicle button to exit to the screen. Pressing the
Up or Down Arrow button on the right side of the
screen will allow you to toggle up or down through
the available settings.
1 — Uconnect Buttons On The Touchscreen
2 — Uconnect Buttons On The Faceplate
5
22_DPF_OM_EN_USC_t.book Page 191
Page 194 of 428
192MULTIMEDIA
My Profile
When the My Profile button is pressed on the touchscreen, the system displays options related to the vehicle’s profiles.
NOTE:Depending on the vehicle’s options, feature settings may vary.
Setting Name Description
Language This setting will change the language of the Uconnect system and Instrument
Cluster Display. The available languages are English, Français, and Español.
Display Mode This setting will adjust the display for the radio to “Auto” or “Manual”.
“Manual” allows for more customization with the radio display.
Display Brightness Headlights On This setting will allow you to set the brightness when the headlights are on. To
access this setting, Display Mode must be set to “Manual”. The “+” setting will
increase the brightness; the “-” will decrease the brightness.
Display Brightness Headlights Off This setting will allow you to set the brightness when the headlights are off. To
access this setting, Display Mode must be set to “Manual”. The “+” setting will
increase the brightness; the “-” will decrease the brightness.
Set Theme This setting will allow you to change the display theme.
Units The available settings are “Speed” (MPH or km/h), “Distance” (mi or km),
“Fuel Consumption” (MPG [US], MPG [UK], L/100 km, or km/L), “Pressure”
(psi, kPa, or bar), “Temperature” (°C or °F), Power” (HP [US], Gal HP [UK], or
kW), and “Torque” (lb-ft or Nm) units of measurement independently.
Touchscreen Beep This setting will allow you to turn the touchscreen beep on or off.
Show Main Category Bar Labels This setting will allow the main category bar labels to be shown on or off.
Navigation Next Turn Pop-ups Displayed in Cluster This setting will display navigation prompts in the Instrument Cluster Display.
Phone Pop-ups Displayed In Cluster This setting will display smartphone notifications and messages in the
Instrument Cluster Display.
22_DPF_OM_EN_USC_t.book Page 192
Page 195 of 428
MULTIMEDIA193
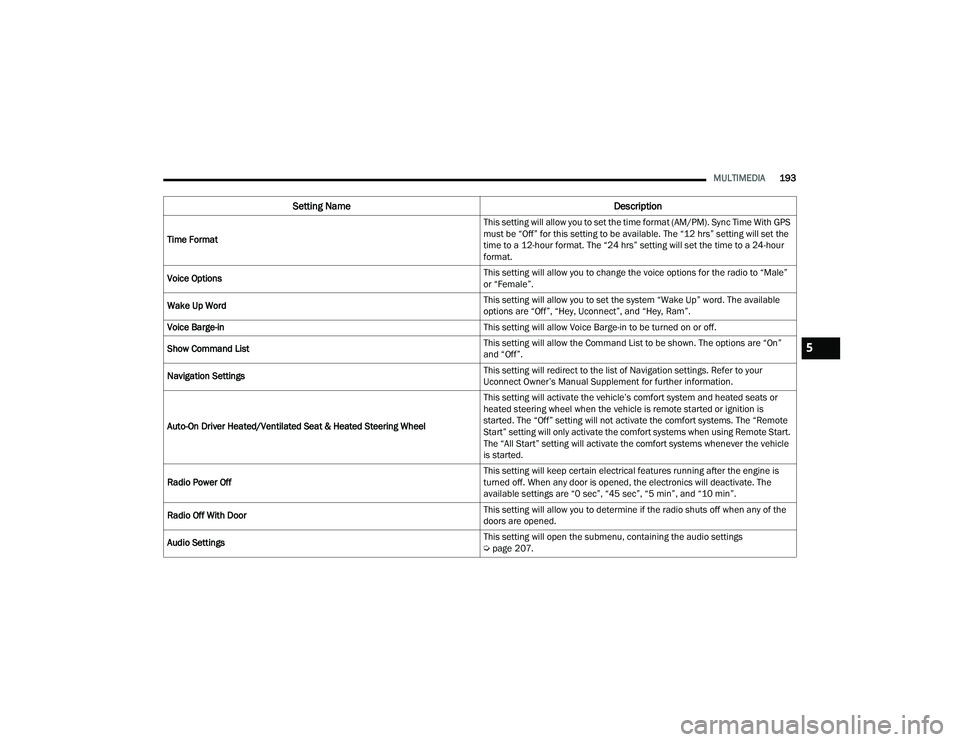
Time Format This setting will allow you to set the time format (AM/PM). Sync Time With GPS
must be “Off” for this setting to be available. The “12 hrs” setting will set the
time to a 12-hour format. The “24 hrs” setting will set the time to a 24-hour
format.
Voice Options This setting will allow you to change the voice options for the radio to “Male”
or “Female”.
Wake Up Word This setting will allow you to set the system “Wake Up” word. The available
options are “Off”, “Hey, Uconnect”, and “Hey, Ram”.
Voice Barge-in This setting will allow Voice Barge-in to be turned on or off.
Show Command List This setting will allow the Command List to be shown. The options are “On”
and “Off”.
Navigation Settings This setting will redirect to the list of Navigation settings. Refer to your
Uconnect Owner’s Manual Supplement for further information.
Auto-On Driver Heated/Ventilated Seat & Heated Steering Wheel This setting will activate the vehicle’s comfort system and heated seats or
heated steering wheel when the vehicle is remote started or ignition is
started. The “Off” setting will not activate the comfort systems. The “Remote
Start” setting will only activate the comfort systems when using Remote Start.
The “All Start” setting will activate the comfort systems whenever the vehicle
is started.
Radio Power Off This setting will keep certain electrical features running after the engine is
turned off. When any door is opened, the electronics will deactivate. The
available settings are “0 sec”, “45 sec”, “5 min”, and “10 min”.
Radio Off With Door This setting will allow you to determine if the radio shuts off when any of the
doors are opened.
Audio Settings This setting will open the submenu, containing the audio settings
Ú
page 207.
Setting Name Description
5
22_DPF_OM_EN_USC_t.book Page 193
Page 196 of 428
194MULTIMEDIA
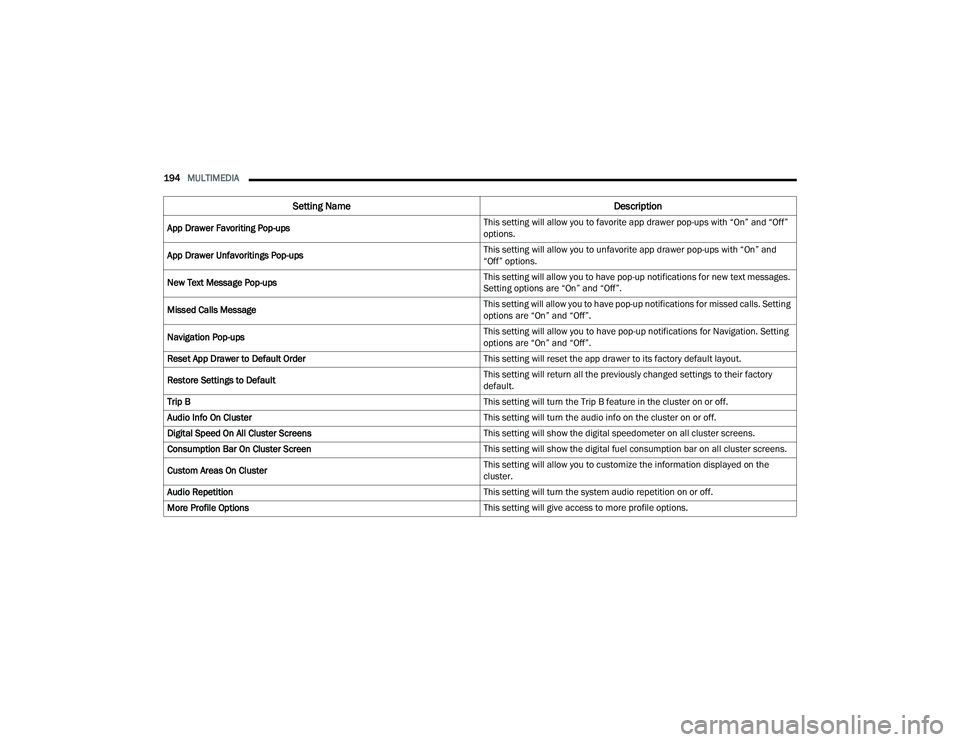
App Drawer Favoriting Pop-ups This setting will allow you to favorite app drawer pop-ups with “On” and “Off”
options.
App Drawer Unfavoritings Pop-ups This setting will allow you to unfavorite app drawer pop-ups with “On” and
“Off” options.
New Text Message Pop-ups This setting will allow you to have pop-up notifications for new text messages.
Setting options are “On” and “Off”.
Missed Calls Message This setting will allow you to have pop-up notifications for missed calls. Setting
options are “On” and “Off”.
Navigation Pop-ups This setting will allow you to have pop-up notifications for Navigation. Setting
options are “On” and “Off”.
Reset App Drawer to Default Order This setting will reset the app drawer to its factory default layout.
Restore Settings to Default This setting will return all the previously changed settings to their factory
default.
Trip B This setting will turn the Trip B feature in the cluster on or off.
Audio Info On Cluster This setting will turn the audio info on the cluster on or off.
Digital Speed On All Cluster Screens This setting will show the digital speedometer on all cluster screens.
Consumption Bar On Cluster Screen This setting will show the digital fuel consumption bar on all cluster screens.
Custom Areas On Cluster This setting will allow you to customize the information displayed on the
cluster.
Audio Repetition This setting will turn the system audio repetition on or off.
More Profile Options This setting will give access to more profile options.
Setting NameDescription
22_DPF_OM_EN_USC_t.book Page 194