remote start RAM CHASSIS CAB 2023 User Guide
[x] Cancel search | Manufacturer: RAM, Model Year: 2023, Model line: CHASSIS CAB, Model: RAM CHASSIS CAB 2023Pages: 444, PDF Size: 20.51 MB
Page 38 of 444

36GETTING TO KNOW YOUR VEHICLE
NOTE:The engine must be running for the ventilated
seats to operate.
For information on use with the Remote Start
system, see Úpage 21.
HEAD RESTRAINTS
Head restraints are designed to reduce the risk of
injury by restricting head movement in the event of
a rear impact. Head restraints should be adjusted
so that the top of the head restraint is located
above the top of your ear.
NOTE:Do not reverse the head restraints (making the
rear of the head restraint face forward) in an
attempt to gain additional clearance to the back of
your head.
Front Head Restraints
Four-Way Head Restraints — If Equipped
Your vehicle may be equipped with front four-way
driver and passenger head restraints.
To raise the head restraint, pull upward on the
head restraint. To lower the head restraint, push
the adjustment button, located at the base of the
head restraint, and push downward on the head
restraint.
To adjust the head restraint forward, pull the top of
the head restraint toward the front of the vehicle
as desired and release. To adjust the head
restraint rearward, pull the top of the head
restraint to the forward most position and release.
The head restraint will return to the rear most
position.
Forward Adjustment
NOTE:Four-way head restraints have seven tilt/locking
positions. When pulling fully forward, the head
restraint will spring back to the untilted, rearward
most position when released.
Two-Way Head Restraints — If Equipped
Your vehicle may be equipped with front two-way
driver and passenger head restraints.
To raise the head restraint, pull upward on the
head restraint. To lower the head restraint, push
the adjustment button, located at the base of head
restraint, and push downward on the head
restraint.
Head Restraint Adjustment Button Location
NOTE:If your vehicle is equipped with a front bench seat,
the center head restraint is not adjustable or
removable.
WARNING!
All occupants, including the driver, should not
operate a vehicle or sit in a vehicle’s seat until
the head restraints are placed in their proper
positions in order to minimize the risk of neck
injury in the event of a crash.
Head restraints should never be adjusted
while the vehicle is in motion. Driving a vehicle
with the head restraints improperly adjusted
or removed could cause serious injury or
death in the event of a collision.
23_DPF_OM_EN_USC_t.book Page 36
Page 60 of 444

58GETTING TO KNOW YOUR VEHICLE
Mist
When a single wipe to clear off road mist or spray
from a passing vehicle is needed, push the washer
knob, located on the end of the multifunction lever,
inward to the first detent and release. The wipers
will cycle one time and automatically shut off.
NOTE:The mist feature does not activate the washer
pump; therefore, no washer fluid will be sprayed on
the windshield. The washer function must be used
in order to spray the windshield with washer fluid.
For information on wiper care and replacement,
see Ú page 365.
RAIN SENSING WIPERS — IF EQUIPPED
This feature senses rain or snowfall on the
windshield and automatically activates the wipers.
Rotate the end of the multifunction lever to one of
five detent positions to activate this feature. The sensitivity of the system can be adjusted with
the multifunction lever. Wiper delay position 1 is
the least sensitive, and wiper delay position 5 is
the most sensitive. Position 3 should be used for
normal rain conditions. Positions 1 and 2 can be
used if the driver desires less wiper sensitivity.
Positions 4 and 5 can be used if the driver desires
more sensitivity. Place the wiper switch in the O
(off) position when not using the system.
NOTE:
The Rain Sensing feature will not operate when
the wiper switch is in the low or high-speed posi
-
tion.
The Rain Sensing feature may not function prop -
erly when ice, or dried salt water is present on
the windshield.
Use of products containing wax or silicone may
reduce Rain Sensing performance.
The Rain Sensing feature can be turned on and
off using the Uconnect system Ú page 199.
The Rain Sensing system has protection features
for the wiper blades and arms, and will not operate
under the following conditions:
Low Ambient Temperature — When the ignition
is first placed in the ON position, the Rain
Sensing system will not operate until the wiper
switch is moved, vehicle speed is greater than
0 mph (0 km/h), or the outside temperature is
greater than 32°F (0°C).
Transmission In NEUTRAL Position — When the
ignition is ON, and the transmission is in the
NEUTRAL position, the Rain Sensing system will
not operate until the wiper switch is moved,
vehicle speed is greater than 5 mph (8 km/h),
or the gear selector is moved out of the
NEUTRAL position.
Remote Start Mode Inhibit — On vehicles
equipped with the Remote Start system, Rain
Sensing wipers are not operational when the
vehicle is in the Remote Start mode. Once the
operator is in the vehicle and has placed the
ignition switch in the RUN position, Rain Sensing
wiper operation can resume, if it has been
selected, and no other inhibit conditions
(mentioned previously) exist.
CLIMATE CONTROLS
The Climate Control system allows you to regulate
the temperature, air flow, and direction of air
circulating throughout the vehicle. The controls are
located on the touchscreen, on the sides of the
touchscreen (if equipped), or on the instrument
panel below the radio.
WARNING!
Sudden loss of visibility through the windshield
could lead to a collision. You might not see other
vehicles or other obstacles. To avoid sudden
icing of the windshield during freezing weather,
warm the windshield with the defroster before
and during windshield washer use.
23_DPF_OM_EN_USC_t.book Page 58
Page 100 of 444
98GETTING TO KNOW YOUR INSTRUMENT PANEL
Fuel Gauge
Hide Range
Show Range
Defaults (Restores All Settings To Default Settings)
Restore
Cancel
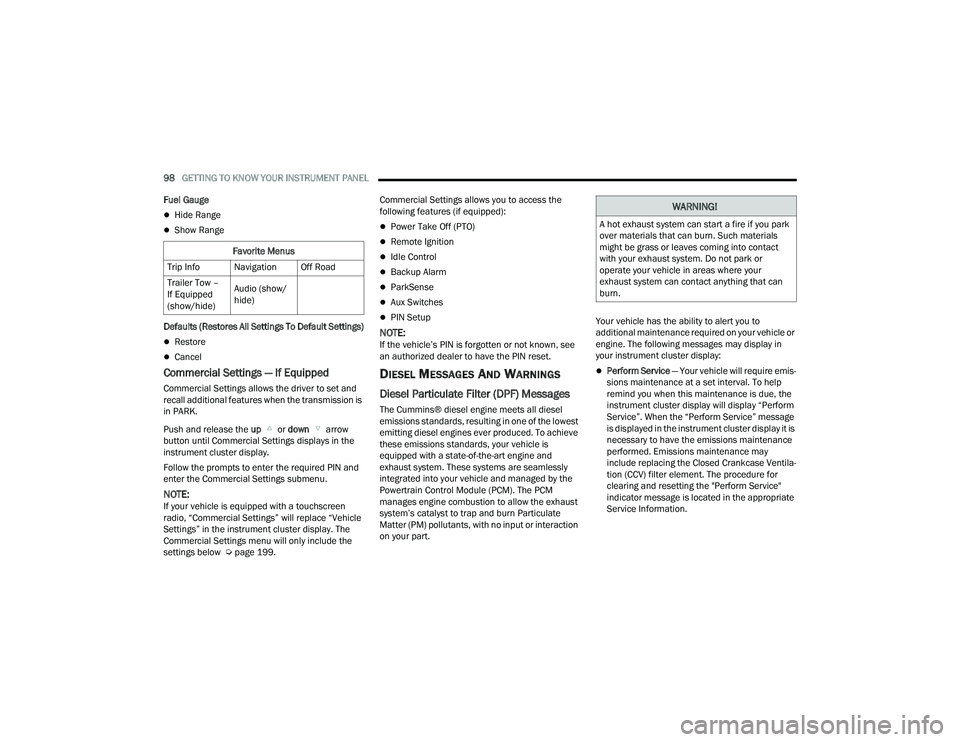
Commercial Settings — If Equipped
Commercial Settings allows the driver to set and
recall additional features when the transmission is
in PARK.
Push and release the up or down arrow
button until Commercial Settings displays in the
instrument cluster display.
Follow the prompts to enter the required PIN and
enter the Commercial Settings submenu.
NOTE:If your vehicle is equipped with a touchscreen
radio, “Commercial Settings” will replace “Vehicle
Settings” in the instrument cluster display. The
Commercial Settings menu will only include the
settings below Ú page 199. Commercial Settings allows you to access the
following features (if equipped):
Power Take Off (PTO)
Remote Ignition
Idle Control
Backup Alarm
ParkSense
Aux Switches
PIN Setup
NOTE:If the vehicle’s PIN is forgotten or not known, see
an authorized dealer to have the PIN reset.
DIESEL MESSAGES AND WARNINGS
Diesel Particulate Filter (DPF) Messages
The Cummins® diesel engine meets all diesel
emissions standards, resulting in one of the lowest
emitting diesel engines ever produced. To achieve
these emissions standards, your vehicle is
equipped with a state-of-the-art engine and
exhaust system. These systems are seamlessly
integrated into your vehicle and managed by the
Powertrain Control Module (PCM). The PCM
manages engine combustion to allow the exhaust
system’s catalyst to trap and burn Particulate
Matter (PM) pollutants, with no input or interaction
on your part.
Your vehicle has the ability to alert you to
additional maintenance required on your vehicle or
engine. The following messages may display in
your instrument cluster display:
Perform Service
— Your vehicle will require emis -
sions maintenance at a set interval. To help
remind you when this maintenance is due, the
instrument cluster display will display “Perform
Service”. When the “Perform Service” message
is displayed in the instrument cluster display it is
necessary to have the emissions maintenance
performed. Emissions maintenance may
include replacing the Closed Crankcase Ventila -
tion (CCV) filter element. The procedure for
clearing and resetting the "Perform Service"
indicator message is located in the appropriate
Service Information.
Favorite Menus
Trip Info Navigation Off Road
Trailer Tow –
If Equipped
(show/hide) Audio (show/
hide)
WARNING!
A hot exhaust system can start a fire if you park
over materials that can burn. Such materials
might be grass or leaves coming into contact
with your exhaust system. Do not park or
operate your vehicle in areas where your
exhaust system can contact anything that can
burn.
23_DPF_OM_EN_USC_t.book Page 98
Page 117 of 444

STARTING AND OPERATING115
TIP START FEATURE
Do not press the accelerator. Place the ignition
switch briefly to the START position and release it.
The starter motor will continue to run and will
automatically disengage when the engine is
running.
KEYLESS ENTER ‘N GO™ — IGNITION
This feature allows the driver to operate the
ignition switch with the push of a button, as long as
the Remote Start/Keyless Enter ‘n Go™ key fob is
in the passenger compartment.
NORMAL STARTING USING ENGINE
START/S TOP B
UTTON
To Turn On The Engine Using The ENGINE START/
STOP Button
1. The transmission must be in PARK.
2. Press and hold the brake pedal while pushing
the ENGINE START/STOP button once.
3. The system takes over and attempts to start the vehicle. If the vehicle fails to start, the
starter will disengage automatically after 10
seconds.
4. If you wish to stop the cranking of the engine prior to the engine starting, push the ENGINE
START/STOP button again.
NOTE:Normal starting of either a cold or a warm engine is
obtained without pumping or pressing the accel -
erator pedal.
To Turn Off The Engine Using ENGINE START/STOP
Button
1. Place the gear selector in PARK, then push and release the ENGINE START/STOP button.
2. The ignition will return to the OFF position.
3. If the gear selector is not in PARK, the ENGINE START/STOP button must be held for two
seconds or three short pushes in a row with
the vehicle speed above 5 mph (8 km/h) before the engine will shut off. The ignition will
remain in the ACC position until the gear
selector is in PARK and the button is pushed
twice to the OFF position.
4. If the gear selector is not in PARK and the ENGINE START/STOP button is pushed once
with the vehicle speed above 5 mph (8 km/h), the instrument cluster will display a “ Vehicle
Not In Park ” message and the engine will
remain running. Never leave a vehicle out of
the PARK position, or it could roll.NOTE:If the gear selector is not in PARK, and the ENGINE
START/STOP button is pushed once with the
vehicle speed below 5 mph (8 km/h), the engine
will shut off and the ignition will remain in the ACC
position. If vehicle speed drops below 1.2 mph
(1.9 km/h), the vehicle may AutoPark
Ú page 113.
ENGINE START/STOP Button Functions — With
Driver’s Foot Off The Brake Pedal (In PARK Or
NEUTRAL Position)
The ENGINE START/STOP button operates similar
to an ignition switch. It has three positions: OFF,
ACC, and RUN. To change the ignition positions
without starting the vehicle and use the
accessories, follow these directions:
1. Start with the ignition in the OFF position.
2. Push the ENGINE START/STOP button once to place the ignition to the ACC position.
3. Push the ENGINE START/STOP button a second time to place the ignition to the ON/
RUN position.
4. Push the ENGINE START/STOP button a third time to return the ignition to the OFF position.
4
23_DPF_OM_EN_USC_t.book Page 115
Page 119 of 444

STARTING AND OPERATING117
(Continued)
COLD WEATHER OPERATION
(B
ELOW –22°F OR −30°C)
To ensure reliable starting at these temperatures,
use of an externally powered electric engine block
heater (available from an authorized dealer) is
recommended.
AFTER STARTING
The idle speed is controlled automatically, and it
will decrease as the engine warms up.
STARTING THE ENGINE — DIESEL ENGINE
Before starting your vehicle, adjust your seat,
adjust both inside and outside mirrors, and fasten
your seat belts.
The starter should not be operated for more than
25-second intervals. Waiting two minutes between
such intervals will protect the starter from
overheating.
AUTOMATIC TRANSMISSION
Start the engine with the transmission in the
NEUTRAL or PARK position. Apply the brake before
shifting to any driving range.
Tip Start Feature
Do not press the accelerator. Place the ignition
switch briefly to the START position and release it.
The starter motor will continue to run and will
automatically disengage when the engine is
running.
KEYLESS ENTER ‘N GO™ — IGNITION
This feature allows the driver to operate the
ignition switch with the push of a button, as long as
the Remote Start/Keyless Enter ‘n Go™ key fob is
in the passenger compartment.
Normal Starting
USING THE ENGINE START/STOP BUTTON
1. The transmission must be in PARK or NEUTRAL.
2. Press and hold the brake pedal while pushing the ENGINE START/STOP button once.
3. The system takes over and attempts to start the vehicle. If the vehicle fails to start, the
starter will disengage automatically after 25
seconds.
4. If you wish to stop the cranking of the engine prior to the engine starting, remove your foot
from the brake pedal and push the ENGINE
START/STOP button again.
WARNING!
Do not leave children or animals inside parked
vehicles in hot weather. Interior heat build-up
may cause serious injury or death.
When leaving the vehicle, always remove the
key fob and lock your vehicle.
Never leave children alone in a vehicle, or with
access to an unlocked vehicle. Allowing chil -
dren to be in a vehicle unattended is
dangerous for a number of reasons. A child or
others could be seriously or fatally injured.
Children should be warned not to touch the
parking brake, brake pedal or the gear
selector. Do not leave the key fob in or near
the vehicle (or in a location accessible to chil -
dren), and do not leave the ignition of a
vehicle equipped with Keyless Enter ‘n Go™ in
the ACC or ON/RUN position. A child could
operate power windows, other controls, or
move the vehicle.
WARNING!
4
23_DPF_OM_EN_USC_t.book Page 117
Page 149 of 444

STARTING AND OPERATING147
2H OR 4H TO 4L
NOTE:
When shifting into or out of 4L some gear noise
may be heard. This noise is normal and is not detri -
mental to the vehicle or occupants.
With the vehicle rolling at 2 to 3 mph (3 to 5 km/h),
shift the transmission into NEUTRAL. While the
vehicle is coasting at 2 to 3 mph (3 to 5 km/h),
shift the transfer case lever firmly to the desired
position. Do not pause in transfer case Neutral.
NOTE:
Pausing in transfer case N (Neutral) in vehicles
equipped with an automatic transmission may
require shutting the engine OFF to avoid gear
clash while completing the shift. If difficulty
occurs, shift the transmission into Neutral, hold
your foot on the brake, and turn the engine OFF.
Complete the range shift to the desired position.
Shifting into or out of 4L is possible with the
vehicle completely stopped, however difficulty
may occur due to the mating teeth not being prop -
erly aligned. Several attempts may be required for
teeth alignment and shift completion to occur.
The preferred method is with the vehicle rolling 2
to 3 mph (3 to 5 km/h). Avoid attempting to
engage or disengage 4L with the vehicle moving
faster than 2 to 3 mph (3 to 5 km/h).
Do not attempt to shift into or out of 4L while the
transmission is in gear.
Transfer Case Position Indicator Light
The Transfer Case Position Indicator Light in the
instrument cluster is used to alert the driver that
the front axle is fully engaged and all four wheels
are driving.
LIMITED-SLIP DIFFERENTIAL
The limited-slip differential provides additional
traction on snow, ice, mud, sand and gravel,
particularly when there is a difference between the
traction characteristics of the surface under the
right and left rear wheels. During normal driving
and cornering, the limited-slip unit performs
similarly to a conventional differential. On slippery
surfaces, however, the differential delivers more of
the driving effort to the rear wheel having the
better traction.
The limited-slip differential is especially helpful
during slippery driving conditions. With both rear
wheels on a slippery surface, a slight application of
the accelerator will supply maximum traction.
When starting with only one rear wheel on an
excessively slippery surface, slight momentary
application of the parking brake may be necessary
to gain maximum traction. Care should be taken to avoid sudden
accelerations when both rear wheels are on a
slippery surface. This could cause both rear wheels
to spin, and allow the vehicle to slide sideways on
the crowned surface of a road or in a turn.
POWER TAKE OFF (PTO) OPERATION —
IF EQUIPPED
This vehicle when equipped with PTO Prep and the
AS66RC/AS69RC automatic 6-speed, will allow for
an aftermarket upfit with a transmission driven
PTO. The customer will have the ability to operate
the PTO in either a “stationary”, “mobile” or
“remote” mode. The vehicles will be factory set to
the “stationary” mode. To select a different mode,
or to change any other PTO setting, you will need to
enter the commercial vehicle menu on the
instrument cluster screen. Details of the PTO
selection modes and further PTO information is
available at the Ram Truck Body Builder’s web site:
https://www.ramtrucks.com/ram-commercial/
body-builders-guide.html
WARNING!
On vehicles equipped with a limited-slip
differential never run the engine with one rear
wheel off the ground since the vehicle may drive
through the rear wheel remaining on the ground.
You could lose control of the vehicle.
4
23_DPF_OM_EN_USC_t.book Page 147
Page 193 of 444
STARTING AND OPERATING191
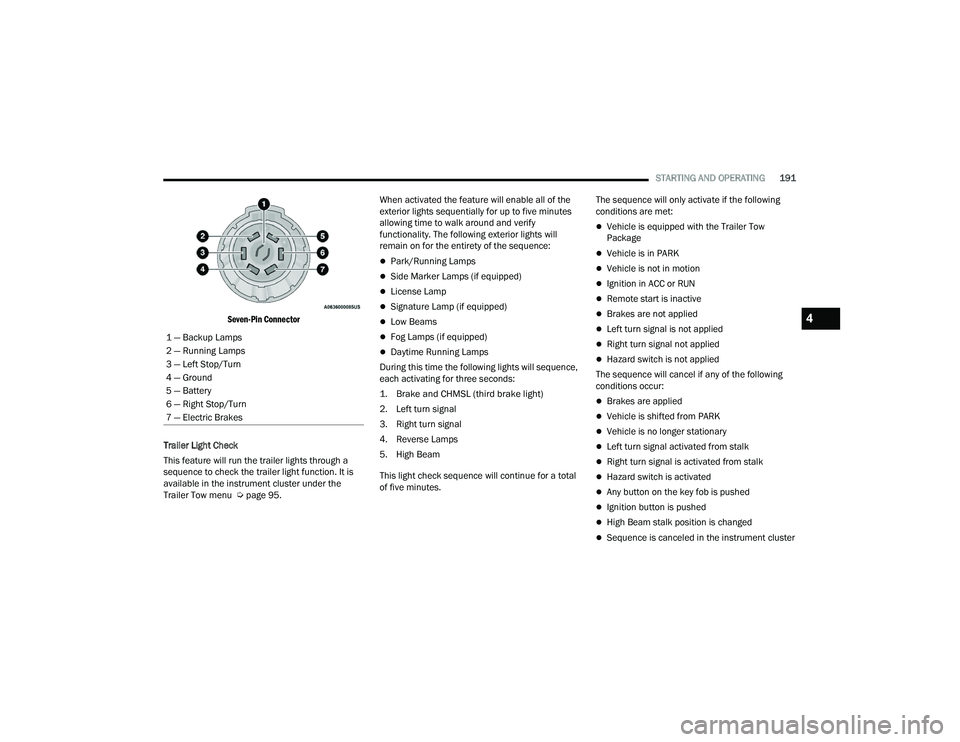
Seven-Pin Connector
Trailer Light Check
This feature will run the trailer lights through a
sequence to check the trailer light function. It is
available in the instrument cluster under the
Trailer Tow menu Ú page 95. When activated the feature will enable all of the
exterior lights sequentially for up to five minutes
allowing time to walk around and verify
functionality. The following exterior lights will
remain on for the entirety of the sequence:
Park/Running Lamps
Side Marker Lamps (if equipped)
License Lamp
Signature Lamp (if equipped)
Low Beams
Fog Lamps (if equipped)
Daytime Running Lamps
During this time the following lights will sequence,
each activating for three seconds:
1. Brake and CHMSL (third brake light)
2. Left turn signal
3. Right turn signal
4. Reverse Lamps
5. High Beam
This light check sequence will continue for a total
of five minutes. The sequence will only activate if the following
conditions are met:
Vehicle is equipped with the Trailer Tow
Package
Vehicle is in PARK
Vehicle is not in motion
Ignition in ACC or RUN
Remote start is inactive
Brakes are not applied
Left turn signal is not applied
Right turn signal not applied
Hazard switch is not applied
The sequence will cancel if any of the following
conditions occur:
Brakes are applied
Vehicle is shifted from PARK
Vehicle is no longer stationary
Left turn signal activated from stalk
Right turn signal is activated from stalk
Hazard switch is activated
Any button on the key fob is pushed
Ignition button is pushed
High Beam stalk position is changed
Sequence is canceled in the instrument cluster
1 — Backup Lamps
2 — Running Lamps
3 — Left Stop/Turn
4 — Ground
5 — Battery
6 — Right Stop/Turn
7 — Electric Brakes
4
23_DPF_OM_EN_USC_t.book Page 191
Page 206 of 444
204MULTIMEDIA
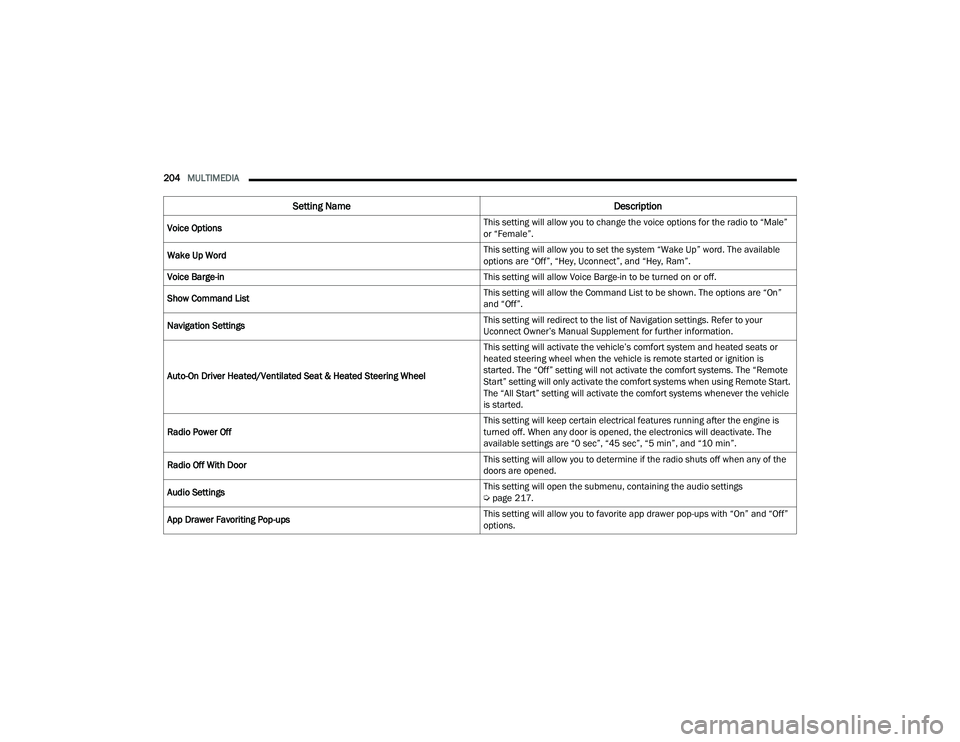
Voice Options This setting will allow you to change the voice options for the radio to “Male”
or “Female”.
Wake Up Word This setting will allow you to set the system “Wake Up” word. The available
options are “Off”, “Hey, Uconnect”, and “Hey, Ram”.
Voice Barge-in This setting will allow Voice Barge-in to be turned on or off.
Show Command List This setting will allow the Command List to be shown. The options are “On”
and “Off”.
Navigation Settings This setting will redirect to the list of Navigation settings. Refer to your
Uconnect Owner’s Manual Supplement for further information.
Auto-On Driver Heated/Ventilated Seat & Heated Steering Wheel This setting will activate the vehicle’s comfort system and heated seats or
heated steering wheel when the vehicle is remote started or ignition is
started. The “Off” setting will not activate the comfort systems. The “Remote
Start” setting will only activate the comfort systems when using Remote Start.
The “All Start” setting will activate the comfort systems whenever the vehicle
is started.
Radio Power Off This setting will keep certain electrical features running after the engine is
turned off. When any door is opened, the electronics will deactivate. The
available settings are “0 sec”, “45 sec”, “5 min”, and “10 min”.
Radio Off With Door This setting will allow you to determine if the radio shuts off when any of the
doors are opened.
Audio Settings This setting will open the submenu, containing the audio settings
Ú
page 217.
App Drawer Favoriting Pop-ups This setting will allow you to favorite app drawer pop-ups with “On” and “Off”
options.
Setting Name
Description
23_DPF_OM_EN_USC_t.book Page 204
Page 216 of 444
214MULTIMEDIA
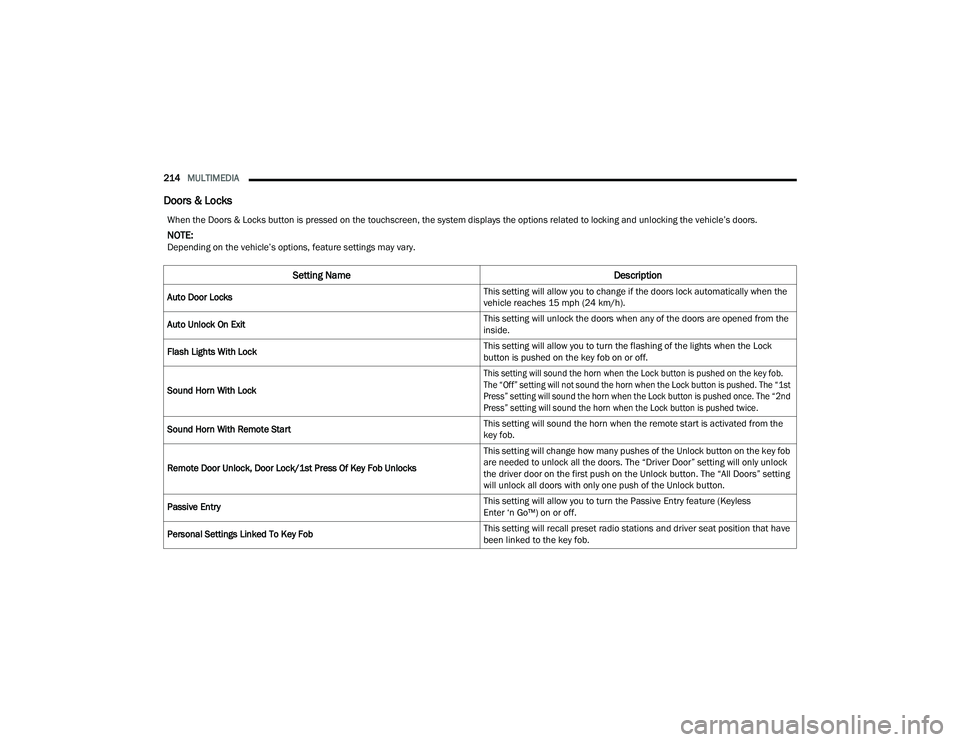
Doors & Locks
When the Doors & Locks button is pressed on the touchscreen, the system displays the options related to locking and unlocking the vehicle’s doors.
NOTE:Depending on the vehicle’s options, feature settings may vary.
Setting Name Description
Auto Door Locks This setting will allow you to change if the doors lock automatically when the
vehicle reaches 15 mph (24 km/h).
Auto Unlock On Exit This setting will unlock the doors when any of the doors are opened from the
inside.
Flash Lights With Lock This setting will allow you to turn the flashing of the lights when the Lock
button is pushed on the key fob on or off.
Sound Horn With Lock
This setting will sound the horn when the Lock button is pushed on the key fob.
The “Off” setting will not sound the horn when the Lock button is pushed. The “1st
Press” setting will sound the horn when the Lock button is pushed once. The “2nd
Press” setting will sound the horn when the Lock button is pushed twice.
Sound Horn With Remote Start This setting will sound the horn when the remote start is activated from the
key fob.
Remote Door Unlock, Door Lock/1st Press Of Key Fob Unlocks This setting will change how many pushes of the Unlock button on the key fob
are needed to unlock all the doors. The “Driver Door” setting will only unlock
the driver door on the first push on the Unlock button. The “All Doors” setting
will unlock all doors with only one push of the Unlock button.
Passive Entry This setting will allow you to turn the Passive Entry feature (Keyless
Enter ‘n Go™) on or off.
Personal Settings Linked To Key Fob This setting will recall preset radio stations and driver seat position that have
been linked to the key fob.
23_DPF_OM_EN_USC_t.book Page 214
Page 217 of 444
MULTIMEDIA215
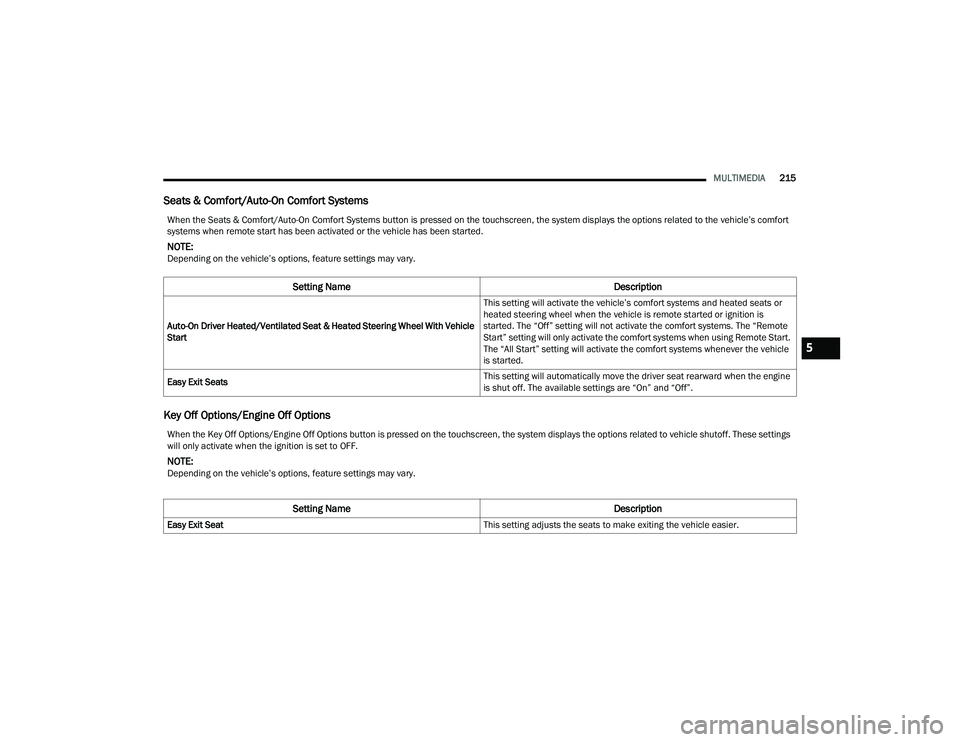
Seats & Comfort/Auto-On Comfort Systems
Key Off Options/Engine Off Options
When the Seats & Comfort/Auto-On Comfort Systems button is pressed on the touchscreen, the system displays the options related to the vehicle’s comfort
systems when remote start has been activated or the vehicle has been started.
NOTE:Depending on the vehicle’s options, feature settings may vary.
Setting Name Description
Auto-On Driver Heated/Ventilated Seat & Heated Steering Wheel With Vehicle
Start This setting will activate the vehicle’s comfort systems and heated seats or
heated steering wheel when the vehicle is remote started or ignition is
started. The “Off” setting will not activate the comfort systems. The “Remote
Start” setting will only activate the comfort systems when using Remote Start.
The “All Start” setting will activate the comfort systems whenever the vehicle
is started.
Easy Exit Seats This setting will automatically move the driver seat rearward when the engine
is shut off. The available settings are “On” and “Off”.
When the Key Off Options/Engine Off Options button is pressed on the touchscreen, the system displays the options related to vehicle shutoff. These settings
will only activate when the ignition is set to OFF.
NOTE:Depending on the vehicle’s options, feature settings may vary.
Setting Name
Description
Easy Exit Seat This setting adjusts the seats to make exiting the vehicle easier.
5
23_DPF_OM_EN_USC_t.book Page 215