key RAM CHASSIS CAB 2023 Owner's Manual
[x] Cancel search | Manufacturer: RAM, Model Year: 2023, Model line: CHASSIS CAB, Model: RAM CHASSIS CAB 2023Pages: 444, PDF Size: 20.51 MB
Page 36 of 444

34GETTING TO KNOW YOUR VEHICLE
Power Lumbar — If Equipped
Vehicles equipped with power driver or passenger
seats may also be equipped with power lumbar.
The power lumbar switch is located on the
outboard side of the power seat. Push the switch
forward to increase the lumbar support. Push the
switch rearward to decrease the lumbar support.
Lumbar Control Switch
Easy Entry/Exit Seat — If Equipped
This feature provides automatic driver’s seat
positioning to enhance driver mobility when
entering and exiting the vehicle.
The distance the driver’s seat moves depends on
where you have the driver’s seat positioned when
you place the vehicle’s ignition in the OFF position.
When you place the vehicle’s ignition in the OFF
position, the driver’s seat will move about
2.4 inches (6 cm) rearward if the driver’s seat position is greater than or equal to 2.7 inches
(6.77 cm) forward of the rear stop. The seat will
return to its previously set position when you
place the ignition into the ACC or ON/RUN posi
-
tion.
When you remove the key fob from the ignition,
the driver’s seat will move to a position
0.3 inches (0.77 cm) forward of the rear stop if
the driver’s seat position is between 0.9 inches
and 2.7 inches (2.27 cm and 6.77 cm) forward
of the rear stop. The seat will return to its previ -
ously set position when you place the ignition to
the ACC or ON/RUN position.
The Easy Entry/Easy Exit feature is disabled
when the driver’s seat position is less than
0.9 inches (2.27 cm) forward of the rear stop. At
this position, there is no benefit to the driver by
moving the seat for Easy Exit or Easy Entry.
When enabled in Uconnect Settings, Easy Entry
and Easy Exit positions are stored in each memory
setting profile Ú page 30.
NOTE:The Easy Entry/Exit feature is enabled or disabled
through the programmable features in the
Uconnect system Ú page 199.
HEATED SEATS — IF EQUIPPED
On some models, the front and rear seats may be
equipped with heaters located in the seat cushions
and seatbacks.
WARNING!
Persons who are unable to feel pain to the
skin because of advanced age, chronic illness,
diabetes, spinal cord injury, medication,
alcohol use, exhaustion or other physical
condition must exercise care when using the
seat heater. It may cause burns even at low
temperatures, especially if used for long
periods of time.
Do not place anything on the seat or seatback
that insulates against heat, such as a blanket
or cushion. This may cause the seat heater to
overheat. Sitting in a seat that has been over -
heated could cause serious burns due to the
increased surface temperature of the seat.
23_DPF_OM_EN_USC_t.book Page 34
Page 40 of 444

38GETTING TO KNOW YOUR VEHICLE
Rear Head Restraint Removal
To remove the head restraint, push the adjustment
button and the release button while pulling upward
on the whole assembly. To reinstall the head
restraint, put the head restraint posts into the
holes and adjust it to the appropriate height.
NOTE:To remove outboard restraints, the rear seat
bottom must be folded up.
DRIVER ADJUSTABLE PEDALS —
IF EQUIPPED
The adjustable pedals system is designed to allow
a greater range of driver comfort for steering wheel
tilt and seat position. This feature allows the brake
and accelerator pedals to move toward or away
from the driver to provide improved position with
the steering wheel.
The adjustable pedal switch is located to the left
side of the steering column.
Adjustable Pedals Switch
The pedals can be adjusted with the ignition in the
OFF position.
The pedals
cannot be adjusted when the vehicle is
in REVERSE or when the Cruise Control system is
on. If there is an attempt to adjust the pedals when
the system is locked out, the following messages
will appear (on vehicles equipped with an
instrument cluster display):
Adjustable Pedal Disabled — Cruise Control
Engaged
Adjustable Pedal Disabled — Vehicle In Reverse
NOTE:
Always adjust the pedals to a position that
allows full movement of the pedal.
Further small adjustments may be necessary to
find the best possible seat/pedal position.
For vehicles equipped with Driver Memory
Settings, you can use your remote keyless entry
key fob or the memory switch on the driver’s
door trim panel to return the adjustable pedals
to saved positions Ú page 30.
WARNING!
A loose head restraint thrown forward in a
collision or hard stop could cause serious
injury or death to occupants of the vehicle.
Always securely stow removed head restraints
in a location outside the occupant compart -
ment.
ALL the head restraints MUST be reinstalled in
the vehicle to properly protect the occupants.
Follow the reinstallation instructions prior to
operating the vehicle or occupying a seat.
WARNING!
Do not adjust the pedals while the vehicle is
moving. You could lose control and have an
accident. Always adjust the pedals while the
vehicle is parked.
23_DPF_OM_EN_USC_t.book Page 38
Page 47 of 444
GETTING TO KNOW YOUR VEHICLE45
The exterior mirrors will auto-fold in the following
situations after the ignition is placed in the OFF
position:
Pushing the lock button on the door panel
before the door is opened.
NOTE:If the doors are already locked, push the lock
button again.
Opening the door, then pushing the lock button
on the door panel, followed by closing the door.
After exiting the vehicle, close the doors then
push the lock button on the key fob.
After exiting the vehicle, close the doors then
touch the lock icon on the Passive Entry door
handle.
If the exterior mirrors were folded automatically,
they will unfold when the ignition is placed in the
ON/RUN position.
NOTE:If the mirrors were folded manually, by using the
power folding mirror switch on the driver’s door
panel, they will not automatically unfold.
POWER CONVEX MIRROR SWITCH —
I
F EQUIPPED
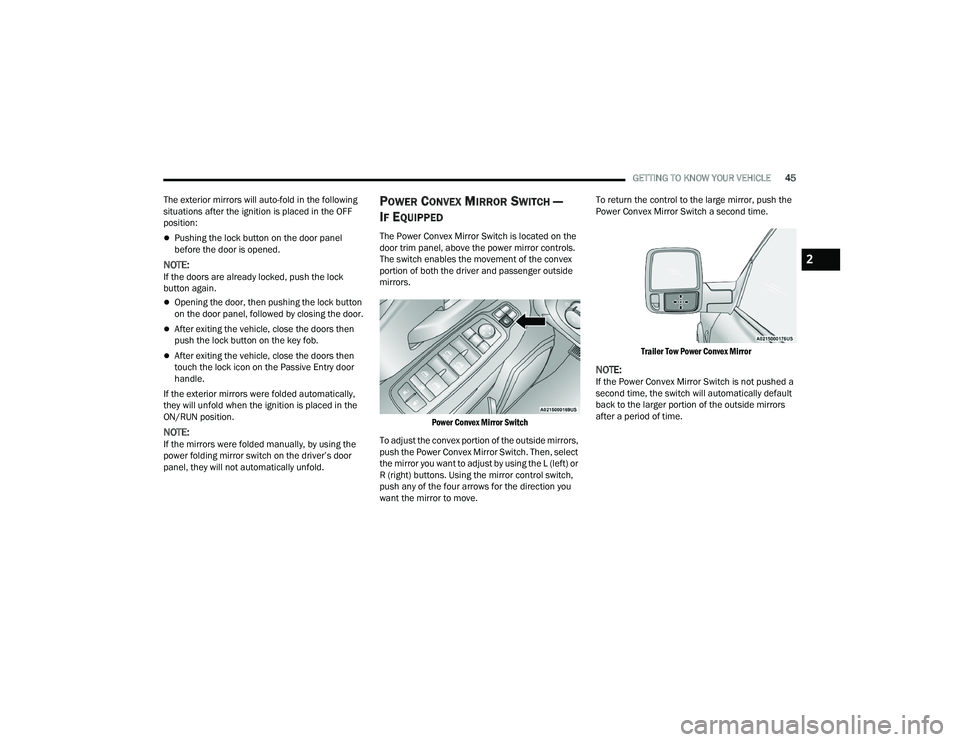
The Power Convex Mirror Switch is located on the
door trim panel, above the power mirror controls.
The switch enables the movement of the convex
portion of both the driver and passenger outside
mirrors.
Power Convex Mirror Switch
To adjust the convex portion of the outside mirrors,
push the Power Convex Mirror Switch. Then, select
the mirror you want to adjust by using the L (left) or
R (right) buttons. Using the mirror control switch,
push any of the four arrows for the direction you
want the mirror to move. To return the control to the large mirror, push the
Power Convex Mirror Switch a second time.
Trailer Tow Power Convex Mirror
NOTE:If the Power Convex Mirror Switch is not pushed a
second time, the switch will automatically default
back to the larger portion of the outside mirrors
after a period of time.
2
23_DPF_OM_EN_USC_t.book Page 45
Page 51 of 444
GETTING TO KNOW YOUR VEHICLE49
PROGRAMMING HOMELINK® TO A
M
ISCELLANEOUS DEVICE
The procedure on how to program HomeLink® to a
miscellaneous device follows the same procedure
as programming to a garage door opener
Ú page 48. Be sure to determine if the device has
a rolling code, or non-rolling code before beginning
the programming process.
NOTE:Canadian Radio Frequency (RF) laws require trans -
mitter signals to time-out (or quit) after several
seconds of transmission, which may not be long
enough for HomeLink® to pick up the signal during
programming. Similar to this Canadian law, some
U.S. gate operators are designed to time-out in the
same manner. The procedure may need to be
performed multiple times to successfully pair the
device to your HomeLink® buttons.
REPROGRAMMING A SINGLE
H
OMELINK® BUTTON
To reprogram a single HomeLink® button that has
been previously trained, without erasing all the
channels, proceed as follows. Be sure to
determine whether the new device you want to
program the HomeLink® button to has a rolling
code, or non-rolling code.
1. Place the ignition in the ON/RUN position,
without starting the engine.
2. Push and hold the desired HomeLink® button until the HomeLink® indicator light begins to
flash after 20 seconds. Do not release the
button.
3. Without releasing the button , proceed with
Step 2 in “Programming HomeLink® To A
Garage Door Opener” and follow all remaining
steps.
CANADIAN/GATE OPERATOR
P
ROGRAMMING
For programming transmitters in Canada/United
States that require the transmitter signals to
“time-out” after several seconds of transmission:
Canadian Radio Frequency (RF) laws require
transmitter signals to time-out (or quit) after
several seconds of transmission, which may not be
long enough for HomeLink® to pick up the signal
during programming. Similar to this Canadian law,
some U.S. gate operators are designed to time-out
in the same manner.
It may be helpful to unplug the device during the
cycling process to prevent possible overheating of
the garage door or gate motor.
1. Place the ignition in the ON/RUN position.
NOTE:For vehicles equipped with Keyless Enter ‘n Go™,
place the ignition in the RUN position. Make sure
while programming HomeLink® with the engine on
that your vehicle is outside of your garage, or that
the garage door remains open at all times.
2. Place the hand-held transmitter 1 to 3 inches
(3 to 8 cm) away from the HomeLink® button
you wish to program while keeping the
HomeLink® indicator light in view.
3. Continue to push and hold the HomeLink® button while you push and release (cycle) your
hand-held transmitter every two seconds until
HomeLink® has successfully accepted the
frequency signal. The indicator light will flash
slowly and then rapidly when fully trained.
4. Watch for the HomeLink® indicator to change flash rates. When it changes, it is
programmed. It may take up to 30 seconds or
longer in rare cases. The garage door may
open and close while you are programming.
5. Push and hold the programmed HomeLink® button and observe the indicator light.
2
23_DPF_OM_EN_USC_t.book Page 49
Page 55 of 444
GETTING TO KNOW YOUR VEHICLE53
DIRECTIONAL LED HEADLAMP SYSTEM —
I
F EQUIPPED
This is a system consisting of LED (low/high beam)
headlights that incorporate dynamic cornering with
5-degree inboard/15-degree outboard swivel. The
headlights continuously and automatically adapt
to the driving conditions around bends or when
cornering based on steering wheel angle.
The system directs the headlights to light up the
road in the best way, taking into account the speed
of the vehicle and the bend or corner angle, as well
as the speed of the vehicle while the steering
wheel is being turned.
The adaptive lights are automatically activated
when the vehicle is traveling above approximately
5 mph (8 km/h).
This system can be turned on/off through the
Uconnect Settings under “Steering Directed
Lights” Ú page 199.
PARKING LIGHTS
To turn on the parking lights and instrument panel
lights, rotate the headlight switch clockwise. To
turn off the parking lights, rotate the headlight
switch back to the O (off) position.
NOTE:Vehicles sold in Canada are equipped with a head -
light switch with an AUTO and ON detent but without an OFF detent. Headlights will be deacti-
vated when the headlight switch is placed in the
parking lights position. However, the Daytime
Running Lights (DRLs) will be activated along with
the front and rear marker lights. The DRLs may be
deactivated when the parking brake is engaged.
HEADLIGHTS ON WITH WIPERS
If your vehicle is equipped with Automatic
Headlights, it also has this
customer-programmable feature. When your
headlights are in the automatic mode and the
engine is running, they will automatically turn on
when the wiper system is on. This feature is
programmable through the Uconnect system
Ú
page 199.
If your vehicle is equipped with the Rain Sensing
Wiper system Ú page 58, and it is activated, the
headlights will automatically turn on after the
wipers complete five wipe cycles within
approximately one minute. They will turn off
approximately four minutes after the wipers
completely stop.
NOTE:When your headlights come on during the daytime,
the instrument panel lights will automatically dim
to the lower nighttime intensity.
HEADLIGHT ILLUMINATION ON
A
PPROACH
When enabled, the headlights, exterior door
handle pocket lights (if equipped), and interior
lights will illuminate when the unlock button on the
key fob is pushed as the operator is approaching
the vehicle. This feature can be turned on/off, and
the length of time the headlights stay on can be
programmed for up to 90 seconds within Uconnect
Settings Ú page 199.
HEADLIGHT DELAY
To assist when exiting the vehicle, the headlight
delay feature will leave the headlights on for up to
90 seconds. This delay is initiated when the
ignition is placed in the OFF position while the
headlight switch is on, and then the headlight
switch is cycled off. Headlight delay can be
canceled by either turning the headlight switch on
then off, or by placing the ignition in the ON
position.
NOTE:
This feature can be programmed through the
Uconnect system Ú page 199.
The headlight delay feature is automatically
activated if the headlight switch is left in the
AUTO position when the ignition is placed in the
OFF position.
2
23_DPF_OM_EN_USC_t.book Page 53
Page 57 of 444
GETTING TO KNOW YOUR VEHICLE55
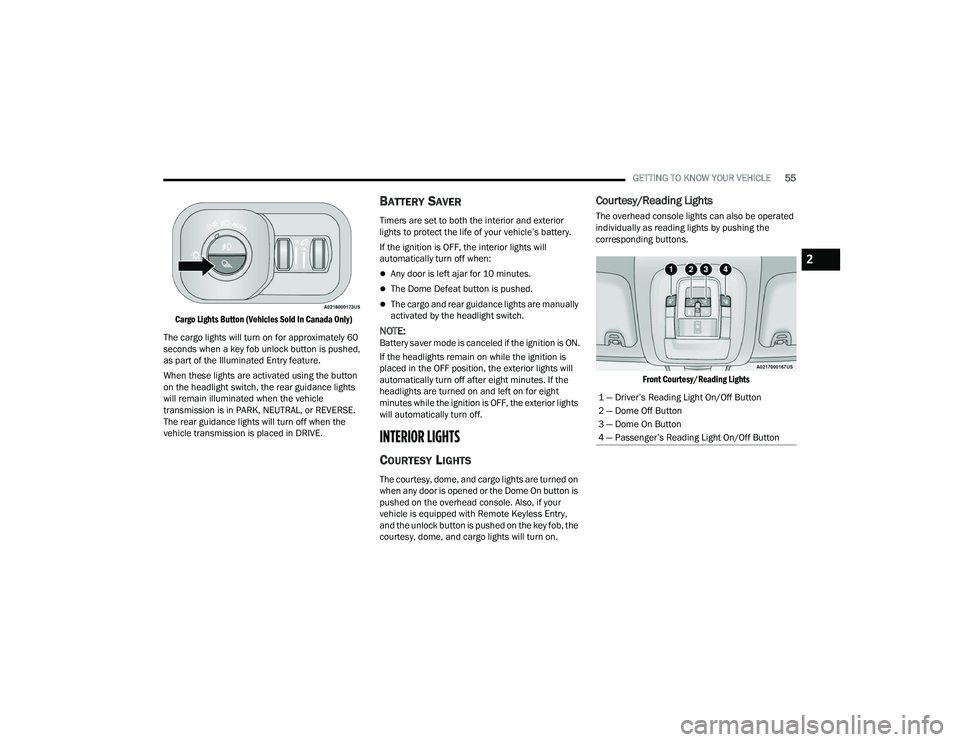
Cargo Lights Button (Vehicles Sold In Canada Only)
The cargo lights will turn on for approximately 60
seconds when a key fob unlock button is pushed,
as part of the Illuminated Entry feature.
When these lights are activated using the button
on the headlight switch, the rear guidance lights
will remain illuminated when the vehicle
transmission is in PARK, NEUTRAL, or REVERSE.
The rear guidance lights will turn off when the
vehicle transmission is placed in DRIVE.
BATTERY SAVER
Timers are set to both the interior and exterior
lights to protect the life of your vehicle’s battery.
If the ignition is OFF, the interior lights will
automatically turn off when:
Any door is left ajar for 10 minutes.
The Dome Defeat button is pushed.
The cargo and rear guidance lights are manually
activated by the headlight switch.
NOTE:Battery saver mode is canceled if the ignition is ON.
If the headlights remain on while the ignition is
placed in the OFF position, the exterior lights will
automatically turn off after eight minutes. If the
headlights are turned on and left on for eight
minutes while the ignition is OFF, the exterior lights
will automatically turn off.
INTERIOR LIGHTS
COURTESY LIGHTS
The courtesy, dome, and cargo lights are turned on
when any door is opened or the Dome On button is
pushed on the overhead console. Also, if your
vehicle is equipped with Remote Keyless Entry,
and the unlock button is pushed on the key fob, the
courtesy, dome, and cargo lights will turn on.
Courtesy/Reading Lights
The overhead console lights can also be operated
individually as reading lights by pushing the
corresponding buttons.
Front Courtesy/Reading Lights
1 — Driver’s Reading Light On/Off Button
2 — Dome Off Button
3 — Dome On Button
4 — Passenger’s Reading Light On/Off Button
2
23_DPF_OM_EN_USC_t.book Page 55
Page 73 of 444
GETTING TO KNOW YOUR VEHICLE71
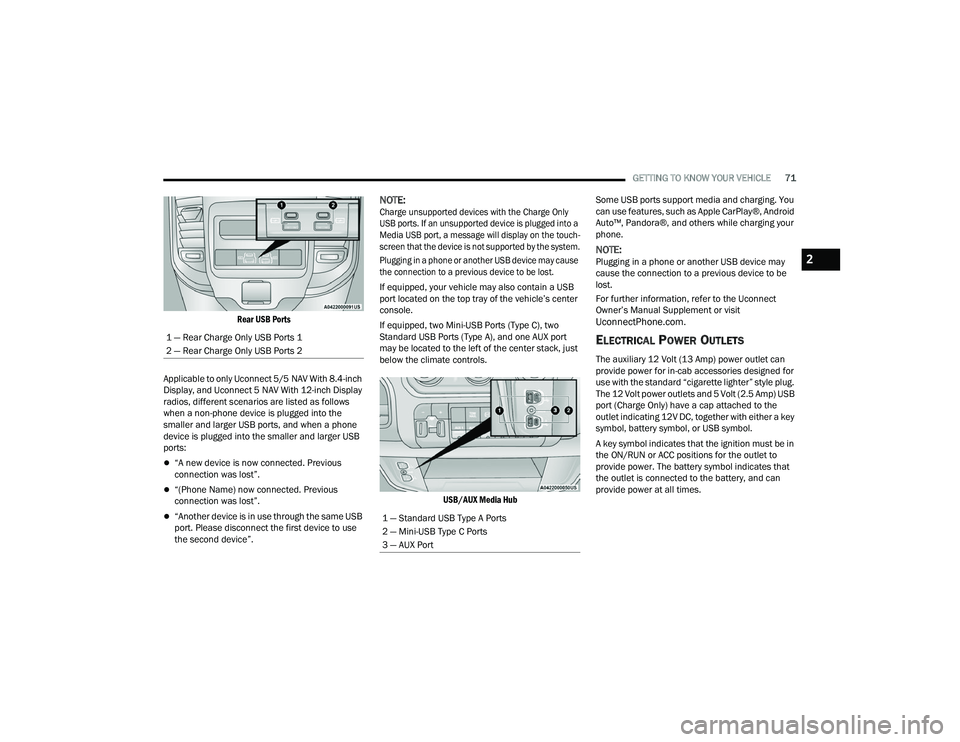
Rear USB Ports
Applicable to only Uconnect 5/5 NAV With 8.4-inch
Display, and Uconnect 5 NAV With 12-inch Display
radios, different scenarios are listed as follows
when a non-phone device is plugged into the
smaller and larger USB ports, and when a phone
device is plugged into the smaller and larger USB
ports:
“A new device is now connected. Previous
connection was lost”.
“(Phone Name) now connected. Previous
connection was lost”.
“Another device is in use through the same USB
port. Please disconnect the first device to use
the second device”.
NOTE:
Charge unsupported devices with the Charge Only
USB ports. If an unsupported device is plugged into a
Media USB port, a message will display on the touch -
screen that the device is not supported by the system.
Plugging in a phone or another USB device may cause
the connection to a previous device to be lost.
If equipped, your vehicle may also contain a USB
port located on the top tray of the vehicle’s center
console.
If equipped, two Mini-USB Ports (Type C), two
Standard USB Ports (Type A), and one AUX port
may be located to the left of the center stack, just
below the climate controls.
USB/AUX Media Hub
Some USB ports support media and charging. You
can use features, such as Apple CarPlay®, Android
Auto™, Pandora®, and others while charging your
phone.
NOTE:Plugging in a phone or another USB device may
cause the connection to a previous device to be
lost.
For further information, refer to the Uconnect
Owner’s Manual Supplement or visit
UconnectPhone.com.
ELECTRICAL POWER OUTLETS
The auxiliary 12 Volt (13 Amp) power outlet can
provide power for in-cab accessories designed for
use with the standard “cigarette lighter” style plug.
The 12 Volt power outlets and 5 Volt (2.5 Amp) USB
port (Charge Only) have a cap attached to the
outlet indicating 12V DC, together with either a key
symbol, battery symbol, or USB symbol.
A key symbol indicates that the ignition must be in
the ON/RUN or ACC positions for the outlet to
provide power. The battery symbol indicates that
the outlet is connected to the battery, and can
provide power at all times.
1 — Rear Charge Only USB Ports 1
2 — Rear Charge Only USB Ports 2
1 — Standard USB Type A Ports
2 — Mini-USB Type C Ports
3 — AUX Port
2
23_DPF_OM_EN_USC_t.book Page 71
Page 76 of 444

74GETTING TO KNOW YOUR VEHICLE
WIRELESS CHARGING PAD —
I
F EQUIPPED
Wireless Charging Pad
Your vehicle may be equipped with a 15W 3A Qi
wireless charging pad located inside of the center
console. This charging pad is designed to
wirelessly charge your Qi enabled mobile phone. Qi
is a standard that uses magnetic induction to
transfer power to your mobile device.
Your mobile phone must be designed for Qi
wireless charging. If the phone is not equipped
with Qi wireless charging functionality, an
aftermarket sleeve or a specialized back plate can
be purchased from your mobile phone provider or
a local electronics retailer. Please see your
phone’s owner’s manual for further information. The wireless charging pad is equipped with an
anti-slip mat to hold your mobile phone in place
and an LED indicator light.
LED Indicator Status:
No Light: Charging pad is idle or searching for a
device.
Blue Light: Device is detected, and is charging.
Red Light/Flashing: Internal error, or foreign
object is detected.
NOTE:
The ignition must be in the ON/RUN or START
position and all vehicle doors must be closed for
the wireless charging pad to operate.
Using a phone case may interfere with wireless
charging.
WINDOWS
POWER WINDOWS — IF EQUIPPED
The window controls on the driver's door control all
the door windows.
Power Window Switches
The passenger door windows can also be operated
by using the single window controls on the
passenger door trim panel. The window controls
will operate only when the ignition is in the ACC or
ON/RUN position.
To open the window part way (manually), push the
window switch down briefly and release.
CAUTION!
The key fob should not be placed on the
charging pad or within 6 inches (15 cm) of it.
Doing so can cause excessive heat buildup and
damage to the fob. Placing the fob in close
proximity of the charging pad blocks the fob from
being detected by the vehicle and prevents the
vehicle from starting.
23_DPF_OM_EN_USC_t.book Page 74
Page 77 of 444

GETTING TO KNOW YOUR VEHICLE75
NOTE:The power window switches will remain active for
up to 10 minutes after the ignition is placed in the
OFF position. Opening either front door will cancel
this feature. The timing is programmable within
Uconnect Settings Úpage 199.
AUTOMATIC WINDOW FEATURES —
I
F EQUIPPED
Auto-Down Feature
The driver and front passenger door power window
switches have an Auto-Down feature. Push the
window switch down for a short briefly, then
release, and the window will go down
automatically. To stop the window from going all the way down
during the Auto-Down operation, pull up or push
down on the switch briefly.
Auto-Up Feature With Anti-Pinch Protection
Lift the window switch up for a short briefly and
release; the window will go up automatically.
To stop the window from going all the way up
during the Auto-Up operation, push down on the
switch briefly.
To close the window part way, lift the window
switch and release it when you want the window to
stop.
If the window runs into any obstacle during
auto-closure, it will reverse direction and then go
back down. Remove the obstacle and use the
window switch again to close the window.
NOTE:Any impact due to rough road conditions may
trigger the auto-reverse function unexpectedly
during auto-closure. If this happens, pull the switch
lightly and hold to close the window manually.
RESET AUTO-UP
Should the Auto-Up feature stop working, the
window probably needs to be reset. To reset
Auto-Up:
1. Pull the window switch up to close the window
completely and continue to hold the switch up
for an additional two seconds after the
window is closed.
2. Push the window switch down firmly to open the window completely and continue to hold
the switch down for an additional two seconds
after the window is fully open.
WARNING!
Never leave children unattended in a vehicle. Do
not leave the key fob in or near the vehicle or in
a location accessible to children, and do not
leave the Keyless Enter ‘n Go™ Ignition in the
ACC or ON/RUN position. Occupants, particularly
unattended children, can become entrapped by
the windows while operating the power window
switches. Such entrapment may result in serious
injury or death.
WARNING!
There is no anti-pinch protection when the
window is almost closed. To avoid personal
injury be sure to clear your arms, hands, fingers
and all objects from the window path before
closing.
2
23_DPF_OM_EN_USC_t.book Page 75
Page 85 of 444
GETTING TO KNOW YOUR INSTRUMENT PANEL83
PREMIUM INSTRUMENT CLUSTER
D
ESCRIPTIONS — GASOLINE
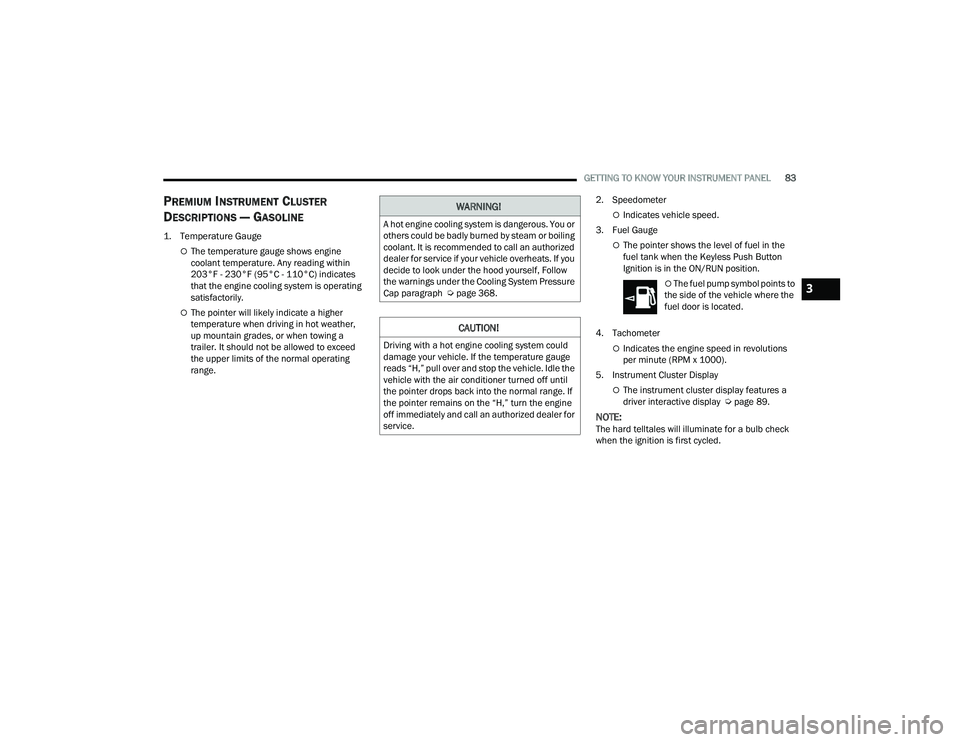
1. Temperature Gauge
The temperature gauge shows engine
coolant temperature. Any reading within
203°F - 230°F (95°C - 110°C) indicates
that the engine cooling system is operating
satisfactorily.
The pointer will likely indicate a higher
temperature when driving in hot weather,
up mountain grades, or when towing a
trailer. It should not be allowed to exceed
the upper limits of the normal operating
range. 2. Speedometer
Indicates vehicle speed.
3. Fuel Gauge
The pointer shows the level of fuel in the
fuel tank when the Keyless Push Button
Ignition is in the ON/RUN position.
The fuel pump symbol points to
the side of the vehicle where the
fuel door is located.
4. Tachometer
Indicates the engine speed in revolutions
per minute (RPM x 1000).
5. Instrument Cluster Display
The instrument cluster display features a
driver interactive display Ú page 89.
NOTE:The hard telltales will illuminate for a bulb check
when the ignition is first cycled.
WARNING!
A hot engine cooling system is dangerous. You or
others could be badly burned by steam or boiling
coolant. It is recommended to call an authorized
dealer for service if your vehicle overheats. If you
decide to look under the hood yourself, Follow
the warnings under the Cooling System Pressure
Cap paragraph Úpage 368.
CAUTION!
Driving with a hot engine cooling system could
damage your vehicle. If the temperature gauge
reads “H,” pull over and stop the vehicle. Idle the
vehicle with the air conditioner turned off until
the pointer drops back into the normal range. If
the pointer remains on the “H,” turn the engine
off immediately and call an authorized dealer for
service.
3
23_DPF_OM_EN_USC_t.book Page 83