display RAM PROMASTER CITY 2021 Service Manual
[x] Cancel search | Manufacturer: RAM, Model Year: 2021, Model line: PROMASTER CITY, Model: RAM PROMASTER CITY 2021Pages: 280, PDF Size: 15.78 MB
Page 116 of 280
114MULTIMEDIA
NOTE:
For devices which are not made a favorite, the
device priority is determined by the order in
which it was paired. The latest device paired will
have the higher priority.
You can also use a following VR command to
bring up a list of paired audio devices:
“Show Paired Phones”
Connecting To A Particular Mobile Phone Or
Audio Device After Pairing
Uconnect Phone will automatically connect to
the highest priority paired phone and/or Audio
Device within range. If you need to choose a
particular phone or audio device follow these
steps:
1. Press the
Settings
button on the
touchscreen.
2. Press the Paired Phones/Audio Sources buttons.
3. Press to select the particular phone or the particular audio device. A pop-up menu will
appear; press “Connect Phone”.
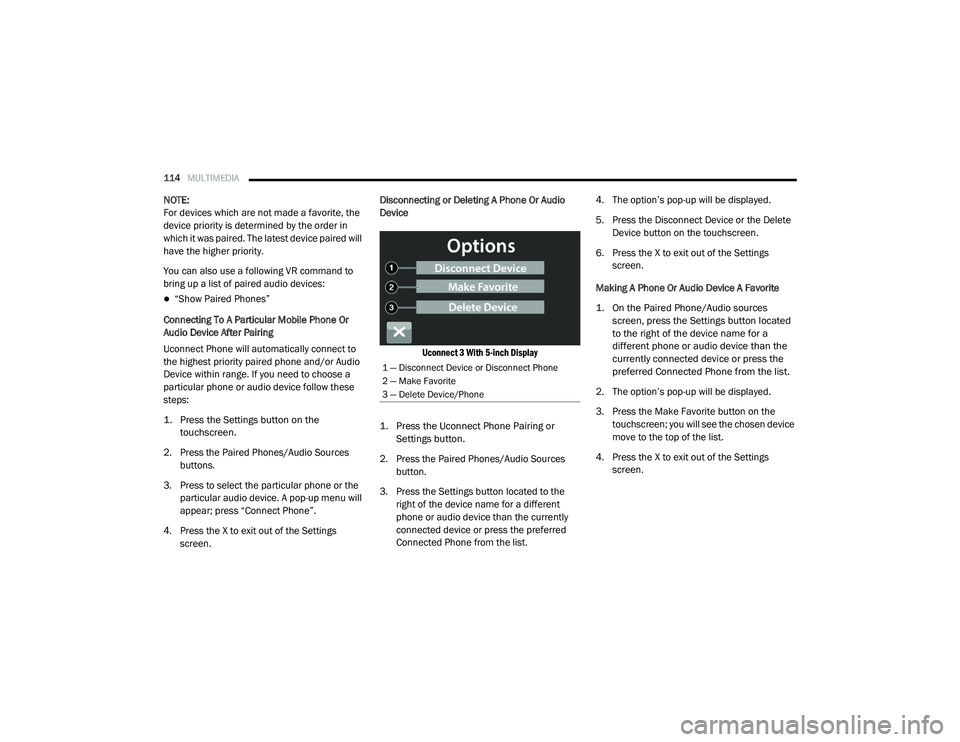
4. Press the X to exit out of the Settings screen. Disconnecting or Deleting A Phone Or Audio
Device
Uconnect 3 With 5-inch Display
1. Press the Uconnect Phone Pairing or Settings button.
2. Press the Paired Phones/Audio Sources button.
3. Press the Settings button located to the right of the device name for a different
phone or audio device than the currently
connected device or press the preferred
Connected Phone from the list. 4. The option’s pop-up will be displayed.
5. Press the Disconnect Device or the Delete
Device button on the touchscreen.
6. Press the X to exit out of the Settings screen.
Making A Phone Or Audio Device A Favorite
1. On the Paired Phone/Audio sources screen, press the Settings button located
to the right of the device name for a
different phone or audio device than the
currently connected device or press the
preferred Connected Phone from the list.
2. The option’s pop-up will be displayed.
3. Press the Make Favorite button on the touchscreen; you will see the chosen device
move to the top of the list.
4. Press the X to exit out of the Settings screen.
1 — Disconnect Device or Disconnect Phone
2 — Make Favorite
3 — Delete Device/Phone
21_VM_OM_EN_USC_t.book Page 114
Page 117 of 280
MULTIMEDIA115
Phonebook Download (Automatic Phonebook
Transfer From Mobile Phone) — If Equipped
If supported by your phone, Uconnect Phone
has the ability to download contact names and
number entries from the mobile phone’s
phonebook. Specific Bluetooth® Phones with
Phonebook Access Profile may support this
feature. Your mobile phone may receive a
pop-up asking for permission for the Uconnect
System to access your messages and contacts.
Selecting “Ok” or “Allow” will sync your contacts
with the Uconnect System.
See the Uconnect website,
UconnectPhone.com, for supported phones.
To call a name from a downloaded mobile
phonebook, follow the procedure in the
“Voice Command” in this section.
Automatic download and update of a phone -
book, if supported, begins as soon as the
Bluetooth® wireless phone connection is
made to the Uconnect Phone, for example,
after you start the vehicle.
A maximum of 5,000 contact names with
four numbers per contact will be downloaded
and updated every time a phone is
connected to the Uconnect Phone.
Depending on the maximum number of
entries downloaded, there may be a short
delay before the latest downloaded names
can be used. Until then, if available, the previ -
ously downloaded phonebook is available for
use.
Only the phonebook of the currently
connected mobile phone is accessible.
This downloaded phonebook cannot be
edited or deleted on the Uconnect Phone.
These can only be edited on the mobile
phone. The changes are transferred and
updated to Uconnect Phone on the next
phone connection. Managing Your Favorites — If Equipped
There are two ways you can add an entry to your
favorites:
1. After loading the mobile phonebook, press
the Favorites button on the touchscreen,
and then press one of the +Add Favorite
Contact buttons that appears on the list.
2. After loading the mobile phonebook, select Contacts from the Phone main screen, and
then select the appropriate number. Press
the Down Arrow button next to the selected
number to display the option’s pop-up. In
the pop-up, select “Add to Favorites”.
NOTE:
If the Favorites list is full, you will be asked to
remove an existing favorite.
5
21_VM_OM_EN_USC_t.book Page 115
Page 118 of 280
116MULTIMEDIA
To Remove A Favorite — If Equipped
1. To remove a Favorite, select “Favorites”
from the Phone main screen.
2. Next, select the Down Arrow icon next to the contact you want to remove from your
favorites. This will bring up the options for
that Favorite contact.
3. Deselect the Star icon to delete the Favorite.
Phone Call Features
The following features can be accessed through
the Uconnect Phone if the feature(s) are
available and supported by Bluetooth® on your
mobile service plan. For example, if your mobile
service plan provides three-way calling, this
feature can be accessed through the Uconnect
Phone. Check with your mobile service provider
for the features that you have.
Listed below are the phone options with
Uconnect Phone:
Redial
Dial by pressing in the number
Voice Commands (Dial by Saying a Name,
Call by Saying a Phonebook Name, Redial or
Call Back)
Favorites
Mobile Phonebook
Recent Call Log
SMS Message Viewer
Call Controls
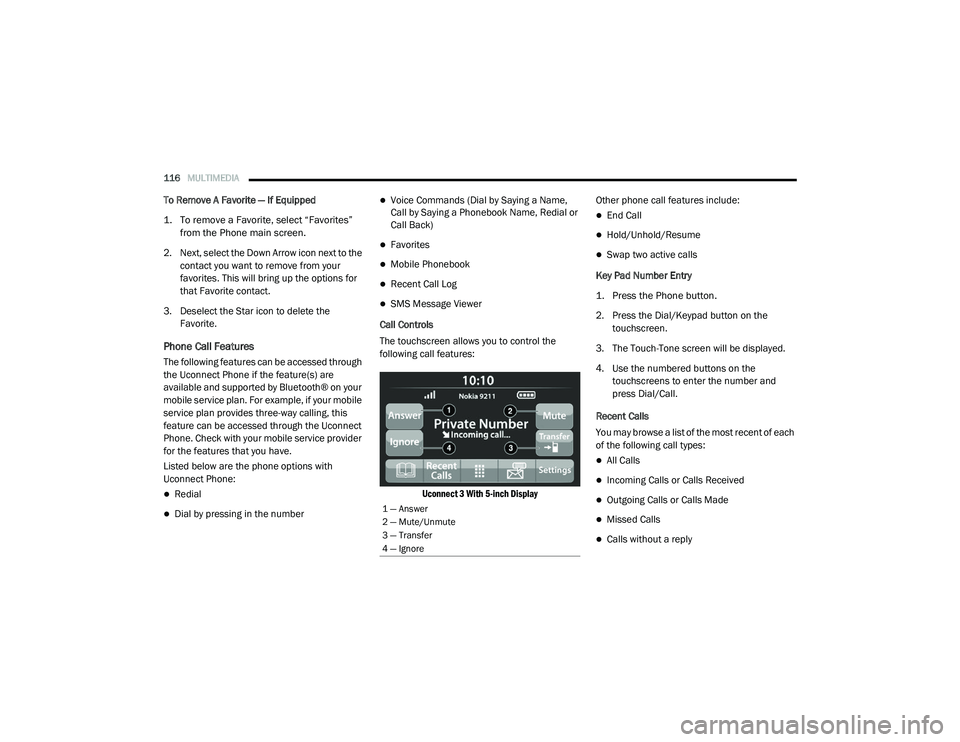
The touchscreen allows you to control the
following call features:
Uconnect 3 With 5-inch Display
Other phone call features include:
End Call
Hold/Unhold/Resume
Swap two active calls
Key Pad Number Entry
1. Press the Phone button.
2. Press the Dial/Keypad button on the touchscreen.
3. The Touch-Tone screen will be displayed.
4. Use the numbered buttons on the touchscreens to enter the number and
press Dial/Call.
Recent Calls
You may browse a list of the most recent of each
of the following call types:
All Calls
Incoming Calls or Calls Received
Outgoing Calls or Calls Made
Missed Calls
Calls without a reply
1 — Answer
2 — Mute/Unmute
3 — Transfer
4 — Ignore
21_VM_OM_EN_USC_t.book Page 116
Page 119 of 280
MULTIMEDIA117
These can be accessed by pressing the Recent
Calls button on the phone main screen.
You can also push the VR button on your
steering wheel and perform the above
operation. For example, say “Show my incoming
calls”.
Answer Or Ignore An Incoming Call — No Call
Currently In Progress
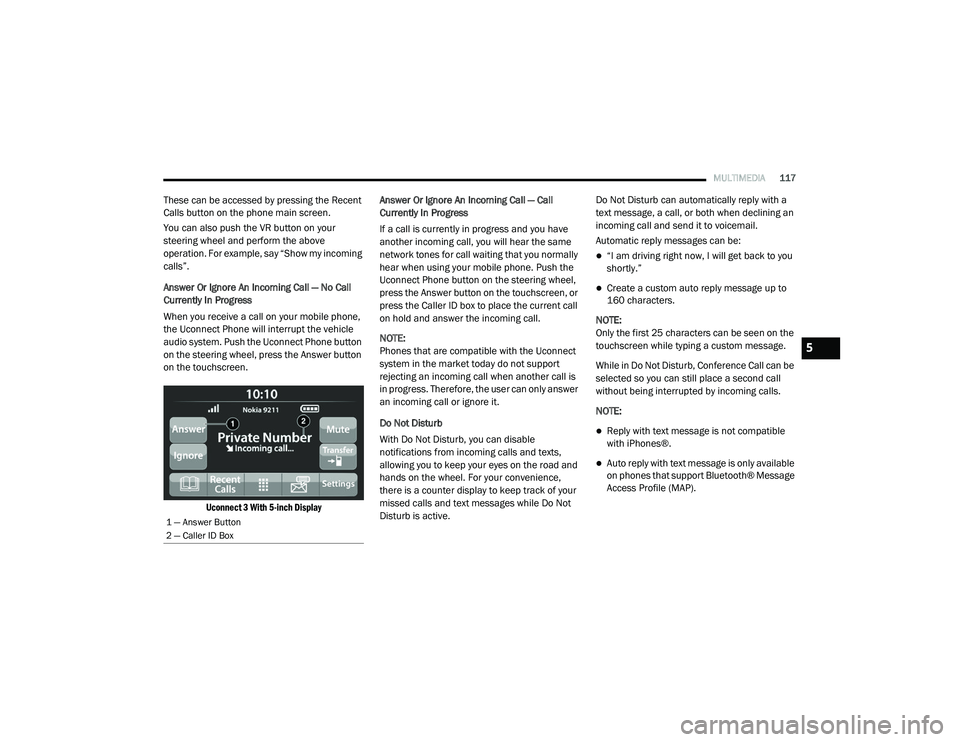
When you receive a call on your mobile phone,
the Uconnect Phone will interrupt the vehicle
audio system. Push the Uconnect Phone button
on the steering wheel, press the Answer button
on the touchscreen.
Uconnect 3 With 5-inch Display
Answer Or Ignore An Incoming Call — Call
Currently In Progress
If a call is currently in progress and you have
another incoming call, you will hear the same
network tones for call waiting that you normally
hear when using your mobile phone. Push the
Uconnect Phone button on the steering wheel,
press the Answer button on the touchscreen, or
press the Caller ID box to place the current call
on hold and answer the incoming call.
NOTE:
Phones that are compatible with the Uconnect
system in the market today do not support
rejecting an incoming call when another call is
in progress. Therefore, the user can only answer
an incoming call or ignore it.
Do Not Disturb
With Do Not Disturb, you can disable
notifications from incoming calls and texts,
allowing you to keep your eyes on the road and
hands on the wheel. For your convenience,
there is a counter display to keep track of your
missed calls and text messages while Do Not
Disturb is active. Do Not Disturb can automatically reply with a
text message, a call, or both when declining an
incoming call and send it to voicemail.
Automatic reply messages can be:
“I am driving right now, I will get back to you
shortly.”
Create a custom auto reply message up to
160 characters.
NOTE:
Only the first 25 characters can be seen on the
touchscreen while typing a custom message.
While in Do Not Disturb, Conference Call can be
selected so you can still place a second call
without being interrupted by incoming calls.
NOTE:
Reply with text message is not compatible
with iPhones®.
Auto reply with text message is only available
on phones that support Bluetooth® Message
Access Profile (MAP).
1 — Answer Button
2 — Caller ID Box
5
21_VM_OM_EN_USC_t.book Page 117
Page 120 of 280
118MULTIMEDIA
Place/Retrieve A Call From Hold
During an active call, press the Hold or Call On
Hold button on the Phone main screen.
Making A Second Call While Current Call Is In
Progress
You can place a call on hold by pressing the
Hold button on the Phone main screen, then
dial a number from the keypad, recent calls,
SMS Inbox or from the phonebooks.
Toggling Between Calls — If Equipped
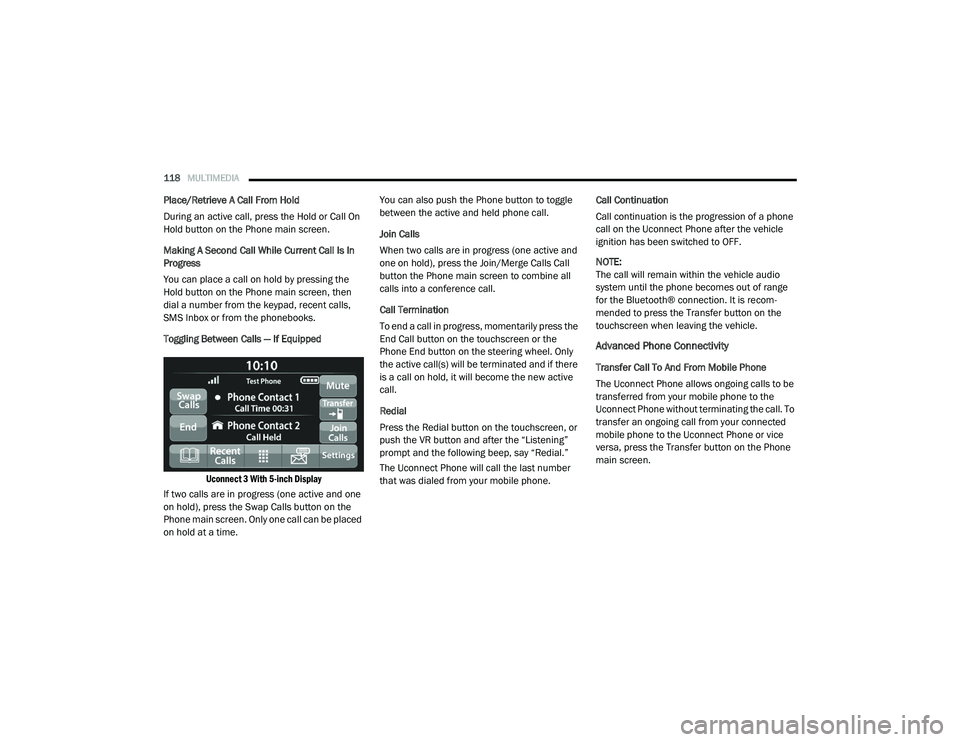
Uconnect 3 With 5-inch Display
If two calls are in progress (one active and one
on hold), press the Swap Calls button on the
Phone main screen. Only one call can be placed
on hold at a time. You can also push the Phone button to toggle
between the active and held phone call.
Join Calls
When two calls are in progress (one active and
one on hold), press the Join/Merge Calls Call
button the Phone main screen to combine all
calls into a conference call.
Call Termination
To end a call in progress, momentarily press the
End Call button on the touchscreen or the
Phone End button on the steering wheel. Only
the active call(s) will be terminated and if there
is a call on hold, it will become the new active
call.
Redial
Press the Redial button on the touchscreen, or
push the VR button and after the “Listening”
prompt and the following beep, say “Redial.”
The Uconnect Phone will call the last number
that was dialed from your mobile phone.
Call Continuation
Call continuation is the progression of a phone
call on the Uconnect Phone after the vehicle
ignition has been switched to OFF.
NOTE:
The call will remain within the vehicle audio
system until the phone becomes out of range
for the Bluetooth® connection. It is recom
-
mended to press the Transfer button on the
touchscreen when leaving the vehicle.
Advanced Phone Connectivity
Transfer Call To And From Mobile Phone
The Uconnect Phone allows ongoing calls to be
transferred from your mobile phone to the
Uconnect Phone without terminating the call. To
transfer an ongoing call from your connected
mobile phone to the Uconnect Phone or vice
versa, press the Transfer button on the Phone
main screen.
21_VM_OM_EN_USC_t.book Page 118
Page 123 of 280
MULTIMEDIA121
Siri® Eyes Free — If Equipped
When used with your Apple® iPhone®
connected to your vehicle, Siri lets you use your
voice to send text messages, select media,
place phone calls and much more. Siri uses
your natural language to understand what you
mean and responds back to confirm your
requests. The system is designed to keep your
eyes on the road and your hands on the wheel
by letting Siri help you perform useful tasks.
To enable Siri, push and hold, then release the
Uconnect Voice Recognition (VR) button on the
steering wheel. After you hear a double beep,
you can ask Siri to play podcasts and music, get
directions, read text messages, and many other
useful requests.
Bluetooth® Communication Link
Mobile phones may lose connection to the
Uconnect Phone. When this happens, the
connection can generally be re-established by
restarting the mobile phone. Your mobile phone
is recommended to remain in Bluetooth® ON
mode. Power-Up
After switching the ignition key from OFF to
either the ON/RUN or ACC position, or after a
language change, you must wait at least
15 seconds prior to using the system
Ú
page 265.
NAVIGATION MODE — IF EQUIPPED
Operating Navigation Mode — If Equipped
Planning A Route
Using the search bar provides a wide range of
ways to find places and then navigate to them.
You can search for your destination in different
ways:
A specific address
A partial address
A type of place
A zip code
A city to navigate to a city center
A Point of Interest (POI) near your current
location
Latitude and longitude coordinates Using Search
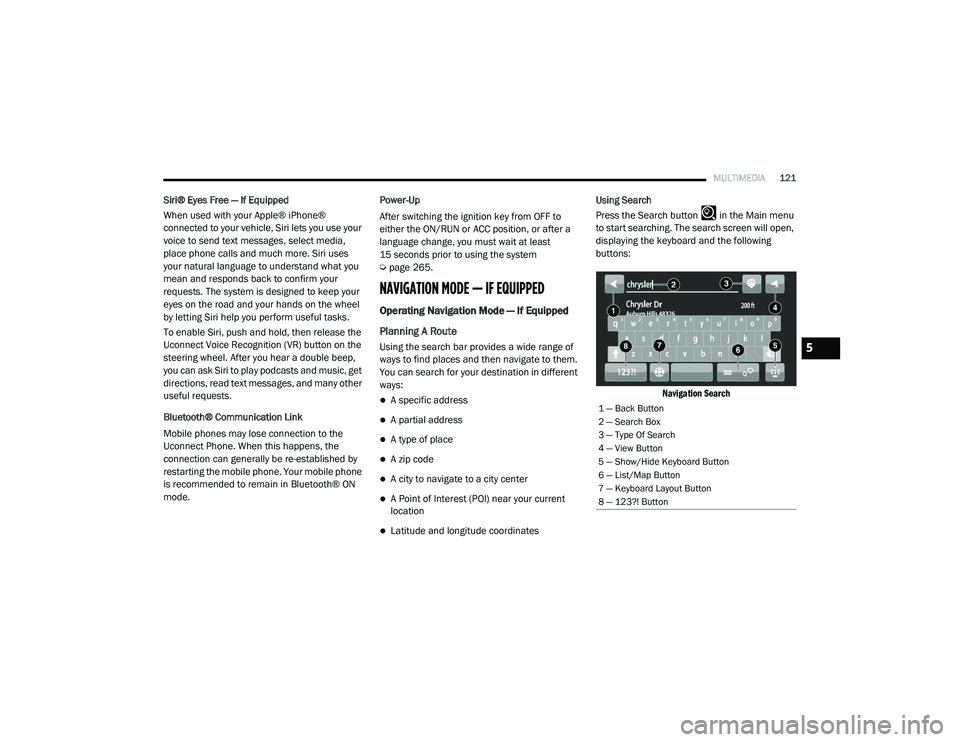
Press the Search button in the Main menu
to start searching. The search screen will open,
displaying the keyboard and the following
buttons:
Navigation Search
1 — Back Button
2 — Search Box
3 — Type Of Search
4 — View Button
5 — Show/Hide Keyboard Button
6 — List/Map Button
7 — Keyboard Layout Button
8 — 123?! Button
5
21_VM_OM_EN_USC_t.book Page 121
Page 136 of 280
134MULTIMEDIA
Feature Description
Back Button Press the Back button to return to an overview of the route. If no route is
planned, pressing this button moves the map to put your current location
at the center.
Map Symbols Symbols are used on the map to show the destination and saved places
Ú
page 138.
Map symbols include:
Your destination
Your home location
A stop on your route
A location saved in My Places
Traffic Information — If Equipped Select the Traffic Information button to display information about traffic
delays.
Selected Location Press and hold the Selected Location button to select a location on the
map. Select the Pop-up Menu button to show options for the location, or
select the Drive button to plan a route to the location.
Current Location This symbol shows your current location on the map.
Your Route If you have a planned route, it will appear on the map. You can select the
route to clear it, change the route type, add a stop, or save changes to
your route Ú
page 126.
Main Menu Button Press the Main Menu button to open the main menu.
21_VM_OM_EN_USC_t.book Page 134
Page 140 of 280
138MULTIMEDIA
Points Of Interest
About Points Of Interest
Points Of Interest (POI) are useful places on the
map.
Here are some examples:
Restaurants
Hotels
Museums
Parking lots
Gas stations
Emergency Services
Using POIs To Plan A Route
When you plan a route, you can use a POI for the
destination or as a stop along the route.
Using Search
1. Select “Search” on the Main Menu to begin a search. The search screen will open,
displaying the keyboard. Enter the name of
your desired destination. Your search
results will be displayed in two lists.
Addresses and city matches are shown in the list called “Addresses.” POIs, types of
POIs, and Places are shown in the list
called “Points of Interest.” You can also
select a POI category to only see POI
search results from that category.
2. Select the desired POI. The location will appear on the map. From here, you can
save the POI to “My Places,” use this POI as
a starting point, begin navigation to this
destination, or view more details about this
POI. By pressing “More Information,” you
can view the phone number and full
address of the POI.
3. If a route is already planned, you can add the location to your current route. To plan a
route to this destination, press the Drive
button on the touchscreen.
NOTE:
Your navigation system will calculate a route,
and guidance to your destination will begin.
Guidance view will begin as soon as you start
driving.
My Places
About My Places My Places provides an easy way to
select a location without the need to
enter the address or search for the
location. You can use My Places to
create a collection of useful or favorite
addresses.
The following items are always in My Places:
Home : Your home location can be your home
address or somewhere you often visit. This
feature provides an easy way to navigate
there.
Recent Destinations: Select this button to
select your destination from a list of locations
you have recently navigated to.
21_VM_OM_EN_USC_t.book Page 138
Page 153 of 280
SAFETY151
NOTE:
The TPMS is not intended to replace normal
tire care and maintenance or to provide
warning of a tire failure or condition.
The TPMS should not be used as a tire pres -
sure gauge while adjusting your tire pressure.
Driving on a significantly under-inflated tire
causes the tire to overheat and can lead to
tire failure. Under-inflation also reduces fuel
efficiency and tire tread life, and may affect
the vehicle’s handling and stopping ability.
The TPMS is not a substitute for proper tire
maintenance, and it is the driver’s responsi -
bility to maintain correct tire pressure using
an accurate tire pressure gauge, even if
under-inflation has not reached the level to
trigger illumination of the TPMS Warning
Light.
Seasonal temperature changes will affect
tire pressure, and the TPMS will monitor the
actual tire pressure in the tire Ú page 265.
Base System
This is the TPMS warning indicator
located in the instrument cluster.
The TPMS uses wireless technology with wheel
rim mounted electronic sensors to monitor tire
pressure levels. Sensors, mounted to each
wheel as part of the valve stem, transmit tire
pressure readings to the Receiver Module.
NOTE:
It is particularly important for you to check the
tire pressure in all of the tires on your vehicle
regularly and to maintain the proper pressure.
The TPMS consists of the following
components:
Receiver Module
Four Tire Pressure Monitoring sensors
Tire Pressure Monitoring System Warning
Light
Tire Pressure Monitoring Low Pressure
Warnings
The Tire Pressure Monitoring System Warning
Light will illuminate in the instrument cluster, an
audible chime will be activated, and the “Check
tire pressure” text message will display when
one or more of the four active road tire
pressures are low. Should this occur, you
should stop as soon as possible, check the
inflation pressure of each tire on your vehicle,
and inflate each tire to the vehicle’s
recommended cold placard pressure value. The
system will automatically update and the Tire
Pressure Monitoring Light will extinguish once
the updated tire pressures have been received.
The vehicle may need to be driven for up to
20 minutes above 15 mph (24 km/h) to receive
this information.
6
21_VM_OM_EN_USC_t.book Page 151
Page 154 of 280
152SAFETY
Check TPMS Warnings
The Tire Pressure Monitoring Warning Light will
flash on and off for 75 seconds and remain on
solid when a system fault is detected, an
audible chime will be activated and a proper
text message will be displayed. If the ignition
key is cycled, this sequence will repeat
providing the system fault still exists. The Tire
Pressure Monitoring Warning Light will turn off
when the fault condition no longer exists. A
system fault can occur with any of the following
scenarios:
1. Jamming due to electronic devices or
driving next to facilities emitting the same
radio frequencies as the TPM sensors.
2. Installing some form of aftermarket window tinting that affects radio wave signals.
3. Snow or ice around the wheels or wheel housings. 4. Using tire chains on the vehicle.
5. Using wheels/tires not equipped with TPM
sensors.
NOTE:
Your vehicle can be equipped with either a Tire
Service Kit, a compact spare tire or a regular
size spare tire (with or without original TPMS
sensor).
1. Tire Service Kit (original tire sealant – if equipped): After fixing the punctured tire
with original tire sealant, the original
situation will be restored, so system will
turn off the telltale during the normal drive.
2. Compact Spare Tire – if equipped: The compact spare wheel is not equipped with a
TPMS sensor. So when mounted, during the
normal drive the system will turn on the
telltale (flashing for approximately
75 seconds then remains solid). This
condition persists until a wheel equipped
with original TPMS sensor has been
mounted on the vehicle. 3. Regular size spare tire (not equipped with
TPMS sensor): When mounted, during the
normal drive the system will turn on the
telltale (flashing for approximately
75 seconds then remains solid). This
condition persists until a wheel equipped
with original TPMS sensor has been
mounted on the vehicle. Then the system
will be restored and the telltale will turn off
during the normal drive.
4. Regular size spare tire (equipped with TPMS sensor): When mounted, the telltale will
turn off during the normal drive.
5. In all the above cases, please check the replacement tire inflation pressure before
driving your vehicle.
6. In case of tire replacement, if the vehicle is driven for short periods of time, then the
system can take a while to be restored.
NOTE:
For a correct Tire Pressure Monitoring behavior,
please wait for about 20 minutes in key-off
during each tire substitution.
21_VM_OM_EN_USC_t.book Page 152