tow RENAULT CLIO 2009 X85 / 3.G Owner's Manual
[x] Cancel search | Manufacturer: RENAULT, Model Year: 2009, Model line: CLIO, Model: RENAULT CLIO 2009 X85 / 3.GPages: 264, PDF Size: 15.68 MB
Page 190 of 264
Downloaded from www.Manualslib.com manuals search engine
puncture................................................(up to the end of the DU)emergency spare wheel .......................(up to the end of the DU)
5.2
ENG_UD10596_1Roue de secours (X85 - B85 - C85 - S85 - K85 - Renault)ENG_NU_853-3_BCSK85_Renault_5
JauneNoirNoir texte
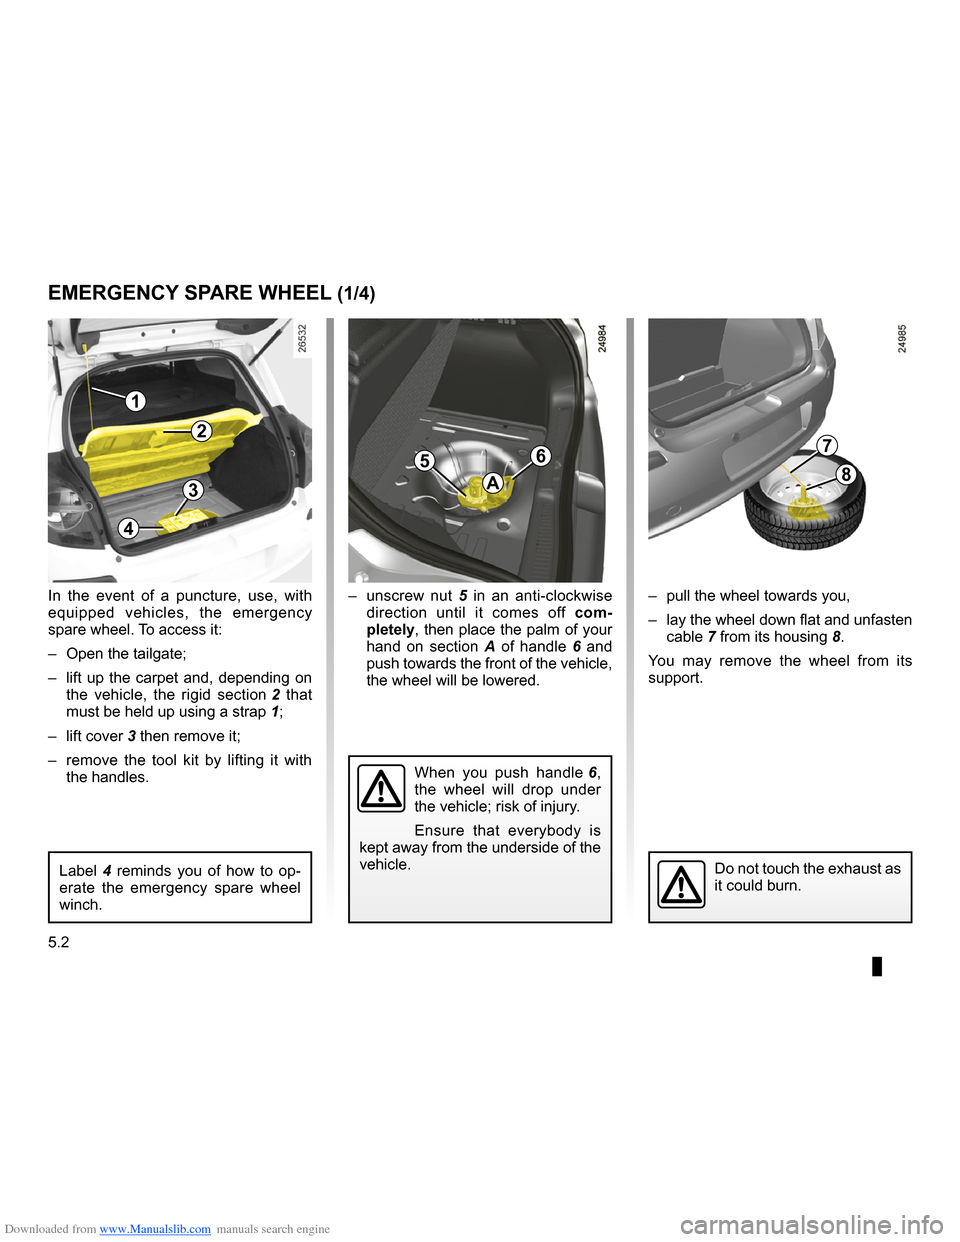
– unscrew nut 5 in an anti-clockwise direction until it comes off com- pletely, then place the palm of your hand on section A of handle 6 and push towards the front of the vehicle, the wheel will be lowered.
Emergency spare wheel
Label 4 reminds you of how to op- erate the emergency spare wheel winch.
Do not touch the exhaust as it could burn.
– pull the wheel towards you,
– lay the wheel down flat and unfasten
cable 7 from its housing 8.
You may remove the wheel from its support.
In the event of a puncture, use, with equipped vehicles, the emergency spare wheel. To access it:
– Open the tailgate;
– lift up the carpet and, depending on
the vehicle, the rigid section 2 that
must be held up using a strap 1;
– lift cover
3 then remove it;
– remove the tool kit by lifting it with
the handles.
EMERGENCY SPARE WHEEL (1/4)
1
2
3
4
56
A
7
8
When you push handle 6, the wheel will drop under the vehicle; risk of injury.
Ensure that everybody is kept away from the underside of the vehicle.
Page 192 of 264
Downloaded from www.Manualslib.com manuals search engine
5.4
ENG_UD10596_1Roue de secours (X85 - B85 - C85 - S85 - K85 - Renault)ENG_NU_853-3_BCSK85_Renault_5
JauneNoirNoir texte
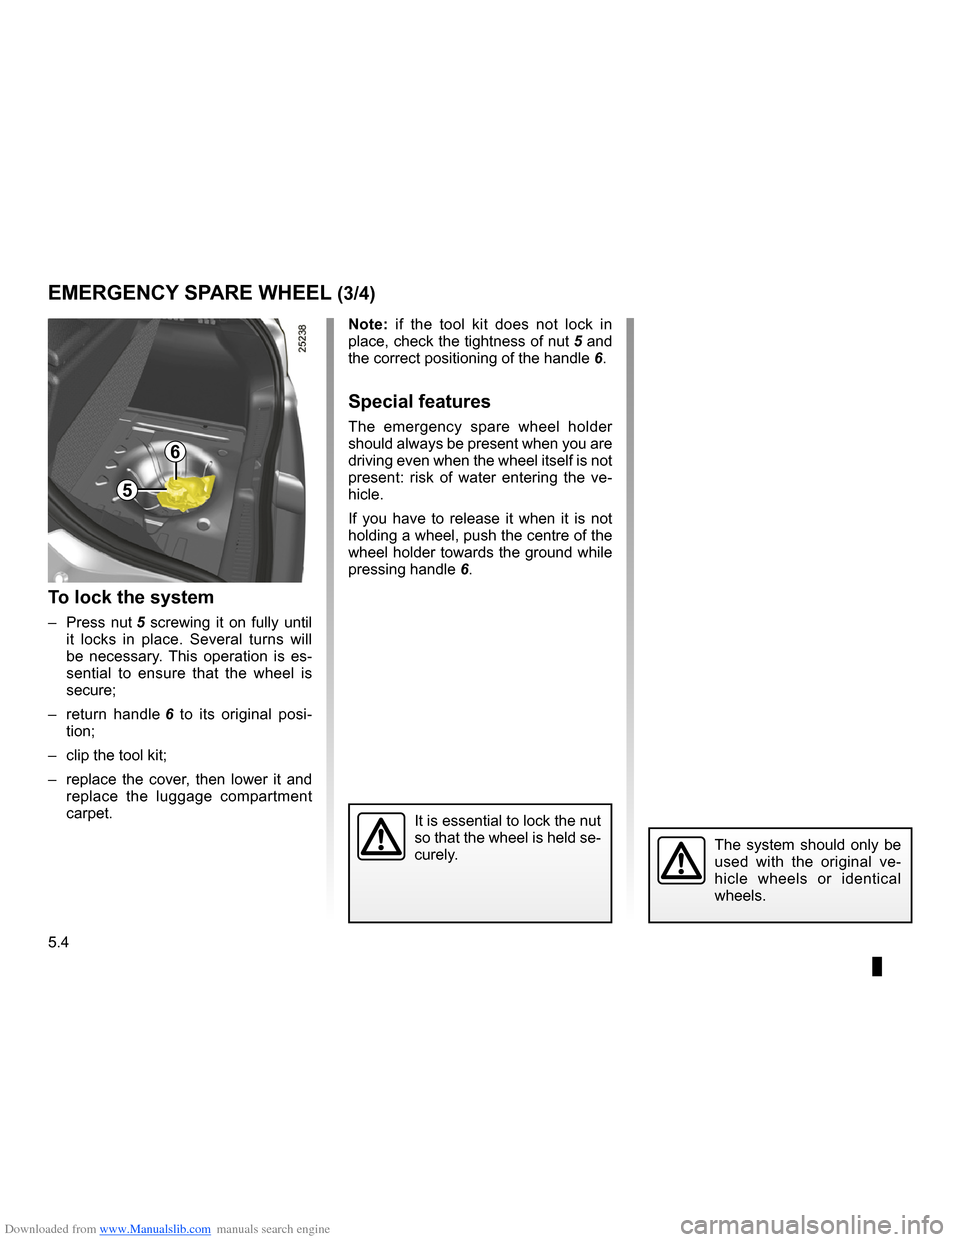
Note: if the tool kit does not lock in
place, check the tightness of nut 5 and
the correct positioning of the handle 6.
Special features
The emergency spare wheel holder should always be present when you are driving even when the wheel itself is not present: risk of water entering the ve- hicle.
If you have to release it when it is not holding a wheel, push the centre of the wheel holder towards the ground while pressing handle 6.
To lock the system
– Press nut 5 screwing it on fully until it locks in place. Several turns will be necessary. This operation is es- sential to ensure that the wheel is secure;
– return handle
6 to its original posi- tion;
– clip the tool kit;
– replace the cover, then lower it and
replace the luggage compartment carpet.
EMERGENCY SPARE WHEEL (3/4)
The system should only be used with the original ve- hicle wheels or identical wheels.
It is essential to lock the nut so that the wheel is held se- curely.
6
5
Page 197 of 264
Downloaded from www.Manualslib.com manuals search engine
tool kit ...................................................(up to the end of the DU)hubcap tool ...........................................(up to the end of the DU)jack .......................................................(up to the end of the DU)wheelbrace ...........................................(up to the end of the DU)towing hitch...........................................(up to the end of the DU)wheelbrace ...........................................(up to the end of the DU)puncture................................................(up to the end of the DU)
5.9
ENG_UD12590_2Bloc-outils (X85 - B85 - C85 - S85 - K85 - Renault)ENG_NU_853-3_BCSK85_Renault_5
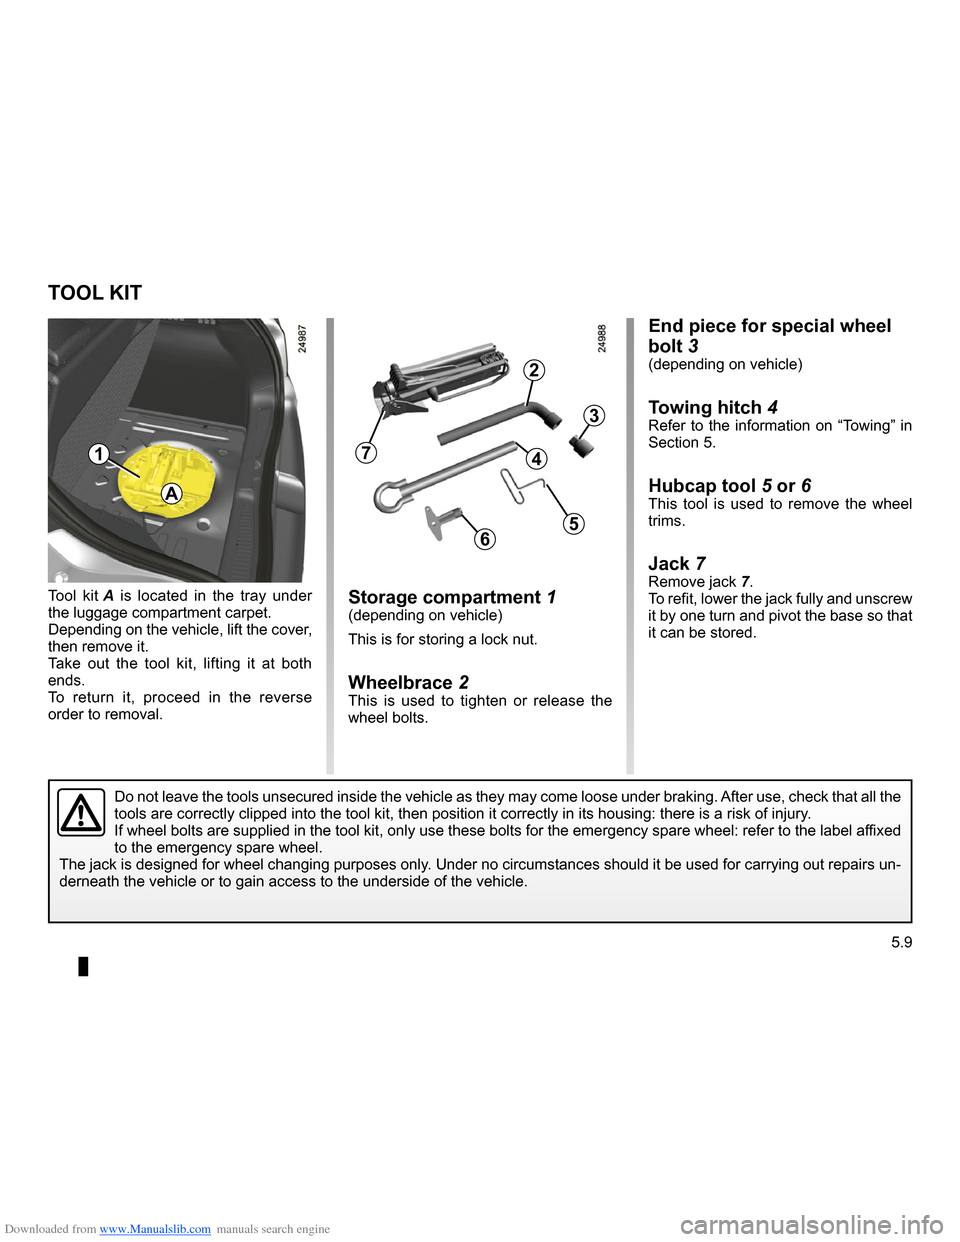
End piece for special wheel
bolt
3(depending on vehicle)
Towing hitch 4Refer to the information on “Towing” in Section 5.
Hubcap tool 5 or 6This tool is used to remove the wheel trims.
Jack 7Remove jack 7.To refit, lower the jack fully and unscrew it by one turn and pivot the base so that it can be stored.
Storage compartment 1(depending on vehicle)
This is for storing a lock nut.
Wheelbrace 2This is used to tighten or release the wheel bolts.
Tool kit
A is located in the tray under the luggage compartment carpet.Depending on the vehicle, lift the cover, then remove it.Take out the tool kit, lifting it at both ends.To return it, proceed in the reverse order to removal.
TOOL KIT
Tool kit (jack, wheelbrace, etc.)
1
A
7
2
3
4
56
Do not leave the tools unsecured inside the vehicle as they may come loose under braking. After use, check that all the tools are correctly clipped into the tool kit, then position it correctl\
y in its housing: there is a risk of injury.If wheel bolts are supplied in the tool kit, only use these bolts for the emergency spare wheel: refer to the label affixed to the emergency spare wheel.
The jack is designed for wheel changing purposes only. Under no circumstances should it be used for carrying out repairs un- derneath the vehicle or to gain access to the underside of the vehicle.
Page 207 of 264
Downloaded from www.Manualslib.com manuals search engine
bulbschanging .........................................(up to the end of the DU)changing a bulb ....................................(up to the end of the DU)indicators ..............................................(up to the end of the DU)lights:fog lights ..........................................................(current page)lights:direction indicators ...........................................(current page)lights:side lights .........................................................(current page)lights:reversing lights .................................................(current page)lights:brake lights .....................................(up to the end of the DU)bulbschanging .........................................(up to the end of the DU)
5.19
ENG_UD12617_2Feux arrière : remplacement des lampes (X85 - B85 - C85 - S85 - K85 \
- Renault)ENG_NU_853-3_BCSK85_Renault_5
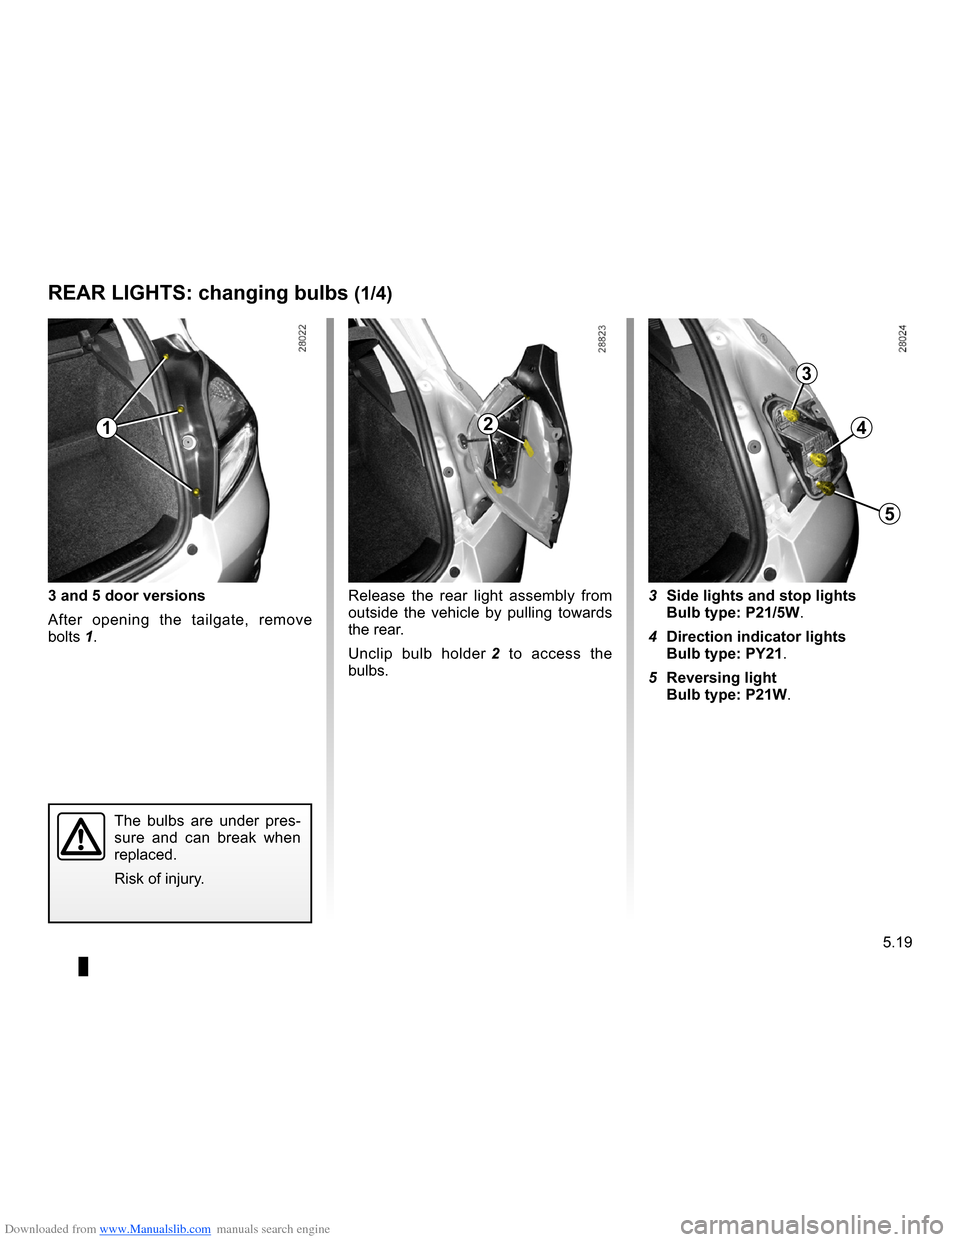
Release the rear light assembly from outside the vehicle by pulling towards the rear.
Unclip bulb holder
2 to access the bulbs.
Rear lights (changing bulbs)
The bulbs are under pres- sure and can break when replaced.
Risk of injury.
3 Side lights and stop lightsBulb type: P21/5W.
4 Direction indicator lightsBulb type: PY21.
5 Reversing lightBulb type: P21W.
3 and 5 door versions
After opening the tailgate, remove
bolts 1.
REAR LIGHTS: changing bulbs (1/4)
3
4
5
12
Page 208 of 264
Downloaded from www.Manualslib.com manuals search engine
5.20
ENG_UD12617_2Feux arrière : remplacement des lampes (X85 - B85 - C85 - S85 - K85 \
- Renault)ENG_NU_853-3_BCSK85_Renault_5
JauneNoirNoir texte
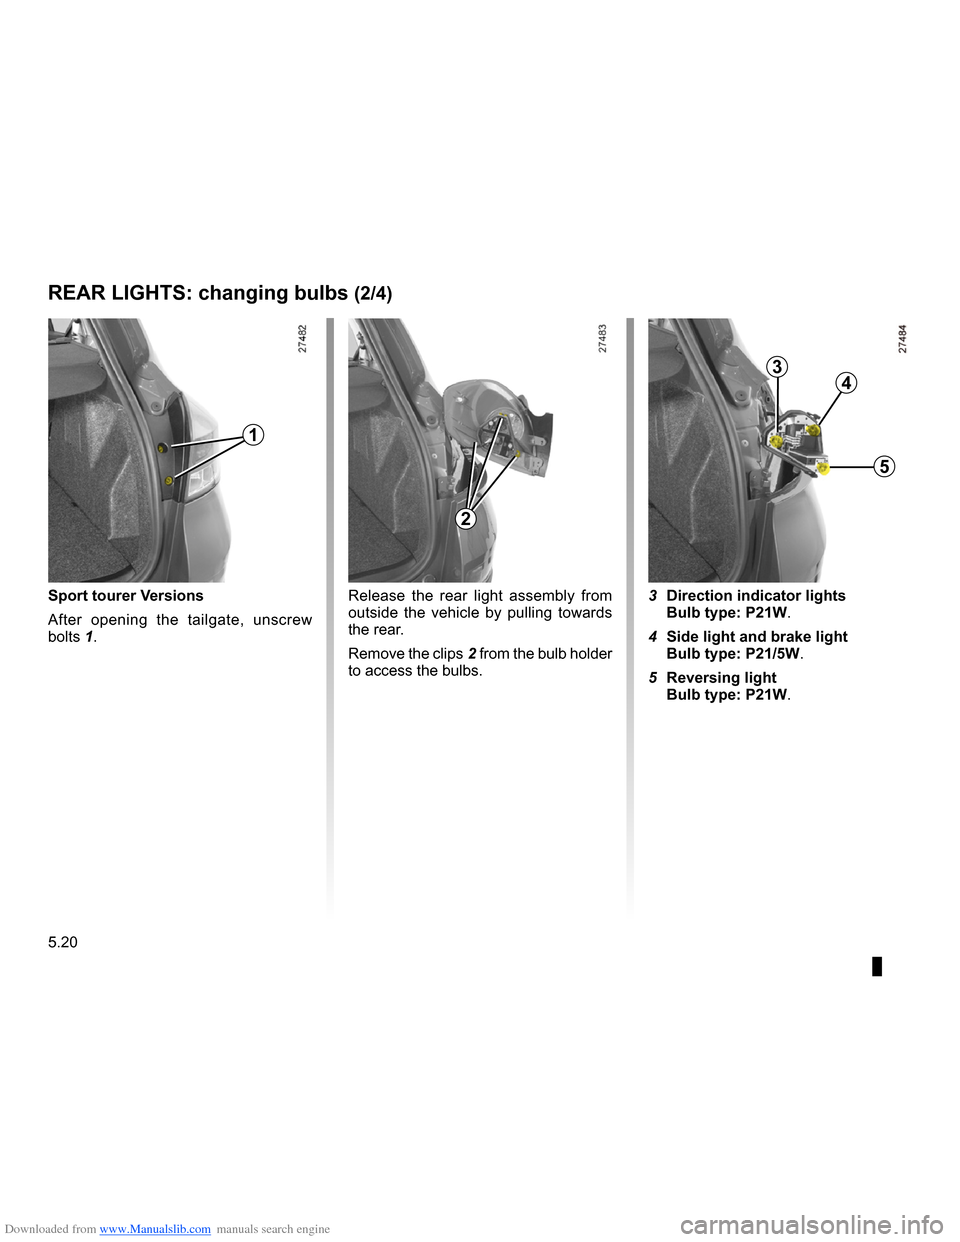
Sport tourer Versions
After opening the tailgate, unscrew
bolts 1.
REAR LIGHTS: changing bulbs (2/4)
3 Direction indicator lightsBulb type: P21W.
4 Side light and brake lightBulb type: P21/5W.
5 Reversing lightBulb type: P21W.
Release the rear light assembly from outside the vehicle by pulling towards the rear.
Remove the clips
2 from the bulb holder to access the bulbs.
1
2
43
5
Page 216 of 264
Downloaded from www.Manualslib.com manuals search engine
5.28
ENG_UD12592_2Batterie : dépannage (X85 - B85 - C85 - S85 - K85 - Renault)ENG_NU_853-3_BCSK85_Renault_5
JauneNoirNoir texte
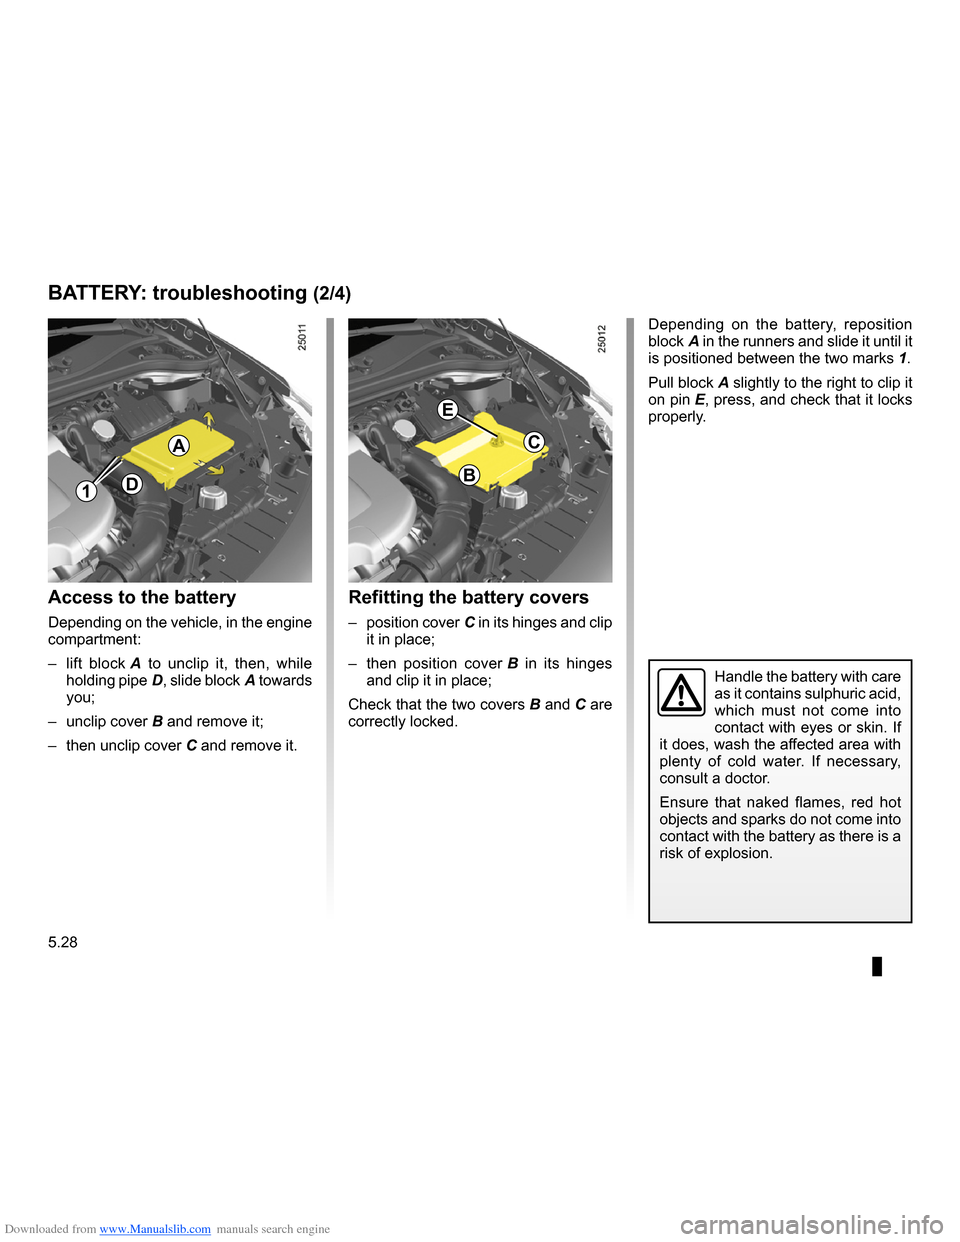
Depending on the battery, reposition
block A in the runners and slide it until it
is positioned between the two marks 1.
Pull block
A slightly to the right to clip it
on pin E, press, and check that it locks properly.
Refitting the battery covers
– position cover C in its hinges and clip it in place;
– then position cover
B in its hinges and clip it in place;
Check that the two covers
B and C are correctly locked.
Access to the battery
Depending on the vehicle, in the engine compartment:
– lift block
A to unclip it, then, while
holding pipe D , slide block A towards you;
– unclip cover
B and remove it;
– then unclip cover
C and remove it.
BATTERY: troubleshooting (2/4)
D
A
B
C
E
1
Handle the battery with care as it contains sulphuric acid, which must not come into contact with eyes or skin. If it does, wash the affected area with
plenty of cold water. If necessary, consult a doctor.
Ensure that naked flames, red hot objects and sparks do not come into contact with the battery as there is a risk of explosion.
Page 217 of 264
Downloaded from www.Manualslib.com manuals search engine
JauneNoirNoir texte
5.29
ENG_UD12592_2Batterie : dépannage (X85 - B85 - C85 - S85 - K85 - Renault)ENG_NU_853-3_BCSK85_Renault_5
BATTERY: troubleshooting (3/4)
Special procedures may be required to charge some batteries. Contact your ap- proved Dealer.
Avoid all risk of sparks which may cause an immediate explosion and charge the battery in a well-venti- lated area. Risk of serious injury.
If your vehicle is to be left stationary for a relatively long time, disconnect the battery or have it recharged regularly, particularly during cold weather. It will then be necessary, with the engine run- ning, to move the steering wheel slowly, from lock to lock and to reprogram the electronic equipment with a memory feature, radio, etc. The battery should be stored in a cool and dry location pro- tected from frost.
Note: if you have disconnected or re- charged a battery, move the steering wheel slowly from lock to lock to reset the system.
Have the battery’s charge status checked regularly:
– especially if you use your vehicle for
short journeys or for frequent driving in town;
– when the exterior temperature drops
(in winter), the charge decreases. In winter, only use the electrical equipment that is really necessary;
– finally, you should understand that
the charge decreases naturally as a result of certain permanent electrical consumers such as the clock, after- sales accessories, etc.
When many accessories are fitted to the vehicle, have them connected to the + after ignition feed. In this case, it is advisable to have your vehicle fitted with a battery which has an increased nominal capacity. Contact an approved Dealer.
Connecting a battery charger
The battery charger must be com- patible with a battery with nominal voltage of 12 volts.
Switch the engine off and then discon- nect both battery leads starting with the negative terminal.
Do not disconnect the battery when the engine is running. Follow the instruc- tions given by the manufacturer for the battery charger you are using.
Only a fully charged and well-main- tained battery will have a long and useful life and enable you to start the vehicle’s engine normally.
The battery must be kept clean and dry.
Page 225 of 264

Downloaded from www.Manualslib.com manuals search engine
towing hitch...........................................(up to the end of the DU)towingbreakdown ......................................(up to the end of the DU)
5.37
ENG_UD12597_2Remorquage : dépannage (X85 - B85 - C85 - S85 - K85 - Renault)ENG_NU_853-3_BCSK85_Renault_5
Insert the key in the ignition switch, or the card in the reader, to unlock the steering wheel and use the sig- nalling lights (brake lights, indica- tors, etc.). The towed vehicle’s lights must be switched on at night.
The speed specified by current legisla- tion for towing must always be observed. If your vehicle is the towing vehicle, do not exceed the maximum towing weight for your vehicle (refer to the information on “Weights” in Section 6).
Only use the front towing points 3 and rear towing points 4 (never use the drive shafts). These towing points may only be used for towing: never use them for lifting the vehicle directly or in- directly.
Access to towing pointsUnclip by pulling towards you and lift
cover 1 or 5 (depending on the vehi- cle).Screw in towing hitch 2 fully: as much as possible by hand at first, then finish by tightening it using the wheelbrace.
Towing hitch 2 and the wheelbrace are located under the luggage compartment carpet in the tool kit (refer to the infor- mation on the “Tool kit” in Section 5).
Towing
TOWING: breakdown (1/3)
3
1
2
1
5
2
4
Do not remove the key from the ignition switch or the card from the reader during towing.
1
Page 226 of 264
Downloaded from www.Manualslib.com manuals search engine
5.38
ENG_UD12597_2Remorquage : dépannage (X85 - B85 - C85 - S85 - K85 - Renault)ENG_NU_853-3_BCSK85_Renault_5
JauneNoirNoir texte
Towing a vehicle with an
automatic gearbox
With the engine switched off: the transmission is no longer lubricated. It is preferable to tow this type of vehi- cle on a trailer or tow it with the front wheels off the ground.
Under exceptional circumstances, you may tow the vehicle with all four wheels on the ground, only going forward, with the gear lever in the Neutral position, and for a distance not exceeding 30 miles (50 km).
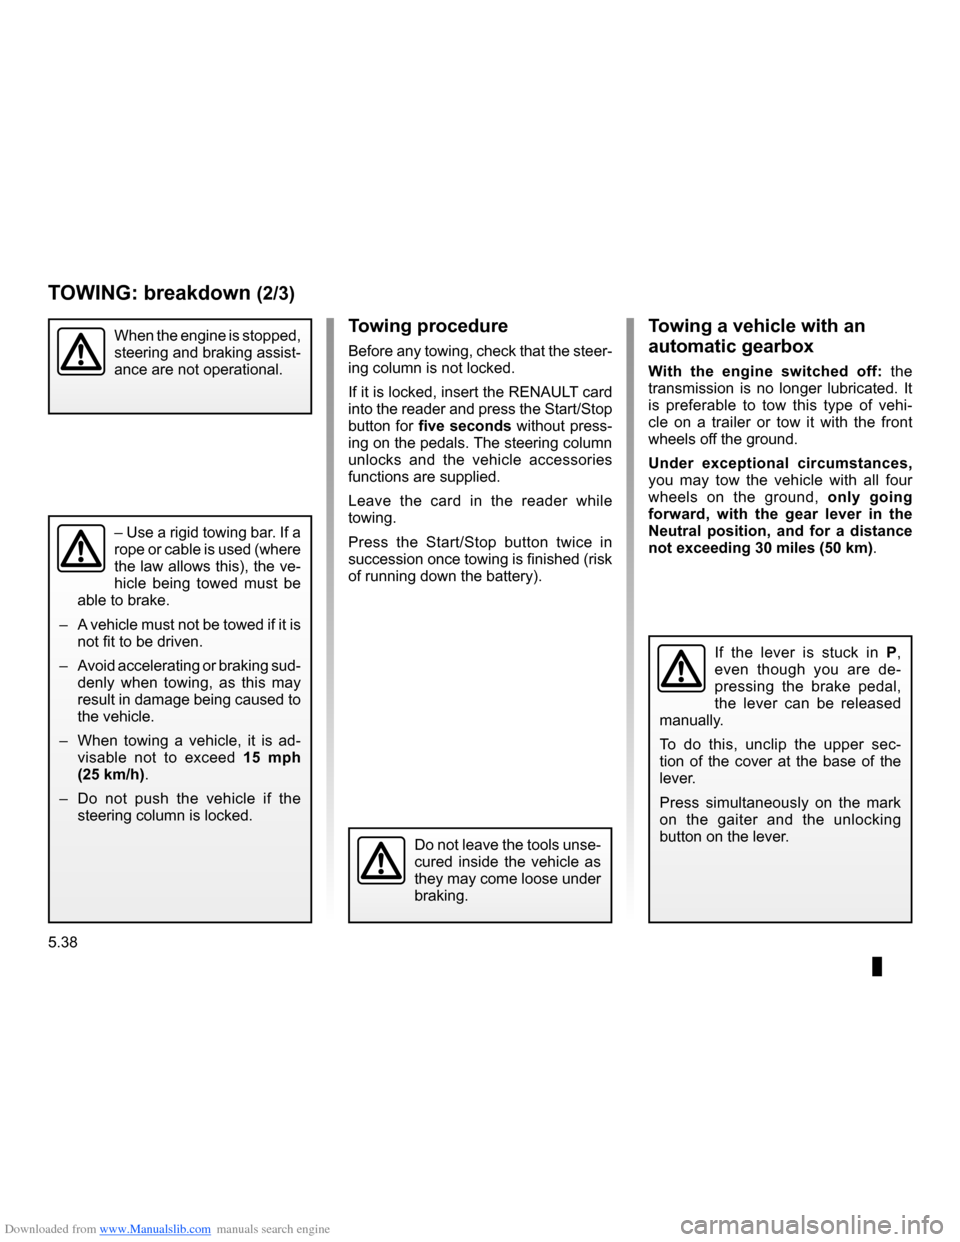
If the lever is stuck in P, even though you are de- pressing the brake pedal, the lever can be released manually.
To do this, unclip the upper sec-
tion of the cover at the base of the lever.
Press simultaneously on the mark on the gaiter and the unlocking button on the lever.
– Use a rigid towing bar. If a rope or cable is used (where the law allows this), the ve- hicle being towed must be able to brake.
– A vehicle must not be towed if it is
not fit to be driven.
– Avoid accelerating or braking sud
- denly when towing, as this may result in damage being caused to the vehicle.
– When towing a vehicle, it is ad
- visable not to exceed 15 mph (25 km/h).
– Do not push the vehicle if the
steering column is locked.
Towing procedure
Before any towing, check that the steer- ing column is not locked.
If it is locked, insert the RENAULT card into the reader and press the Start/Stop button for five seconds without press- ing on the pedals. The steering column unlocks and the vehicle accessories functions are supplied.
Leave the card in the reader while towing.
Press the Start/Stop button twice in succession once towing is finished (risk of running down the battery).
TOWING: breakdown (2/3)
Do not leave the tools unse- cured inside the vehicle as they may come loose under braking.
When the engine is stopped, steering and braking assist- ance are not operational.
Page 227 of 264
Downloaded from www.Manualslib.com manuals search engine
towingtowing a caravan ..............................................(current page)towingtowing equipment .............................................(current page)towing equipmentfitting ................................................................(current page)
JauneNoirNoir texte
5.39
ENG_UD12597_2Remorquage : dépannage (X85 - B85 - C85 - S85 - K85 - Renault)ENG_NU_853-3_BCSK85_Renault_5
Towing a vehicle with a
Quickshift gearbox
If a gear is engaged:
– with the ignition on, select neutral
while depressing the brake pedal;
– check that neutral is engaged (e.g.
by pushing the vehicle);
– switch off the ignition.
The vehicle should always be towed with the ignition switched off.
If you cannot engage neutral, the vehi- cle must be towed with its front wheels off the ground.
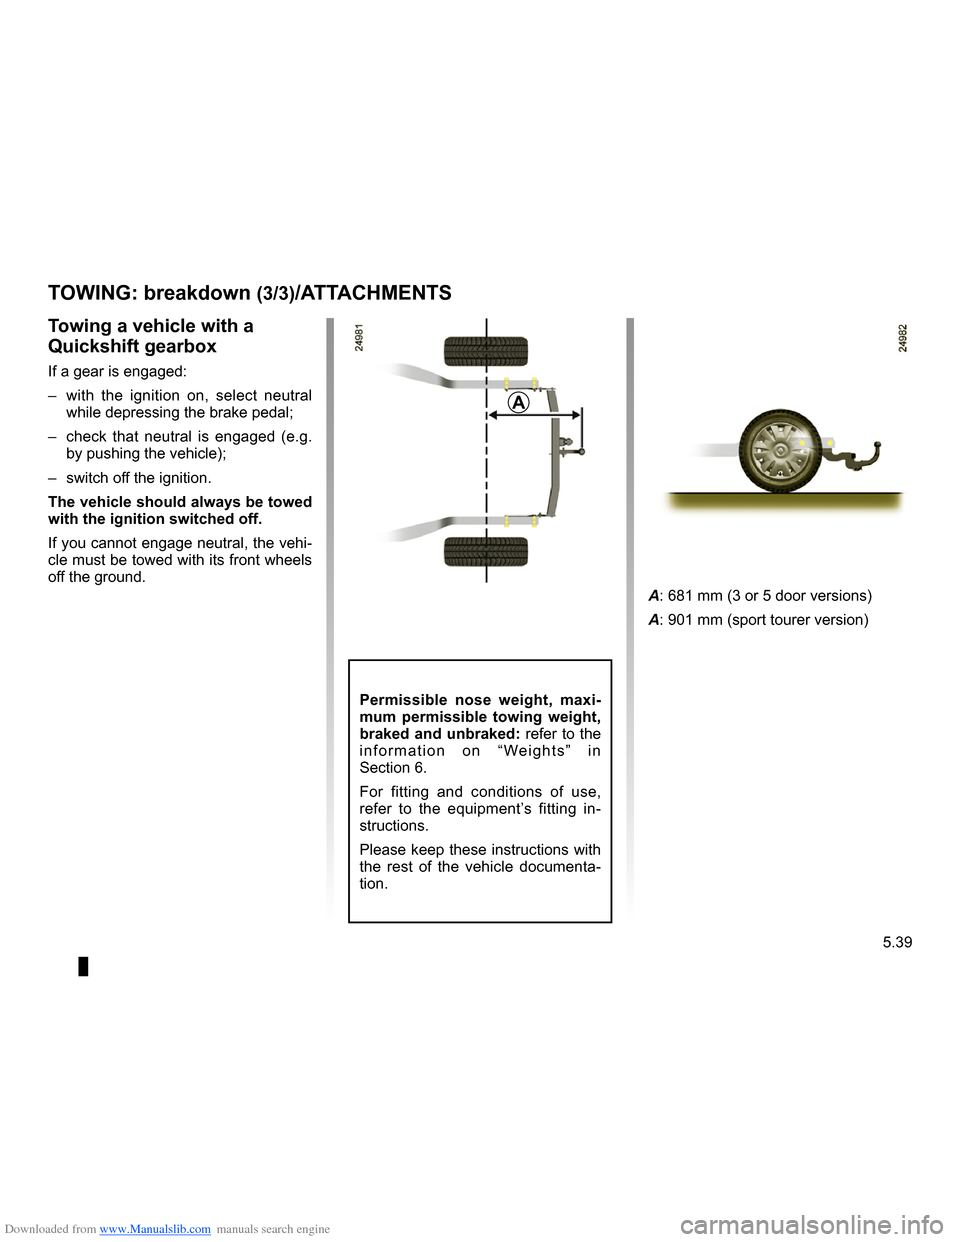
Permissible nose weight, maxi- mum permissible towing weight, braked and unbraked: refer to the i n f o r m a t i o n o n “ We i g h t s ” i n
Section 6.
For fitting and conditions of use, refer to the equipment’s fitting in- structions.
Please keep these instructions with the rest of the vehicle documenta- tion.
TOWING: breakdown (3/3)/ATTACHMENTS
A
A: 681 mm (3 or 5 door versions)
A: 901 mm (sport tourer version)