tow RENAULT KANGOO ZERO EMISSION 2012 X61 / 2.G User Guide
[x] Cancel search | Manufacturer: RENAULT, Model Year: 2012, Model line: KANGOO ZERO EMISSION, Model: RENAULT KANGOO ZERO EMISSION 2012 X61 / 2.GPages: 213, PDF Size: 6.08 MB
Page 116 of 213
de-icing .................................................................. (current page)
windscreen de-icing/demisting .............................. (current page)
JauneNoirNoir texte
3.5
ENG_UD25325_3
Chauffage, climatisation (X61 électrique - Renault)
ENG_NU_911-4_F61e_Renault_3
iThe air flow is directed to the
windscreen demisting vents,
the side windows and the passenger
footwells.
This is the recommended position for
the best temperature in cold weather.
óThe air flow is directed mainly
towards the footwells.
GThe air flow is directed to all air
vents and the footwells.
This is the recommended position for
the best temperature in hot weather.
JThe air flow is directed mainly
to the dashboard vents.
rapid demisting
Turn the controls to the positions W:
– air from the outside;
– maximum temperature;
– demisting.
Using the climate control increases the
speed of demisting.
Adjusting the air temperature
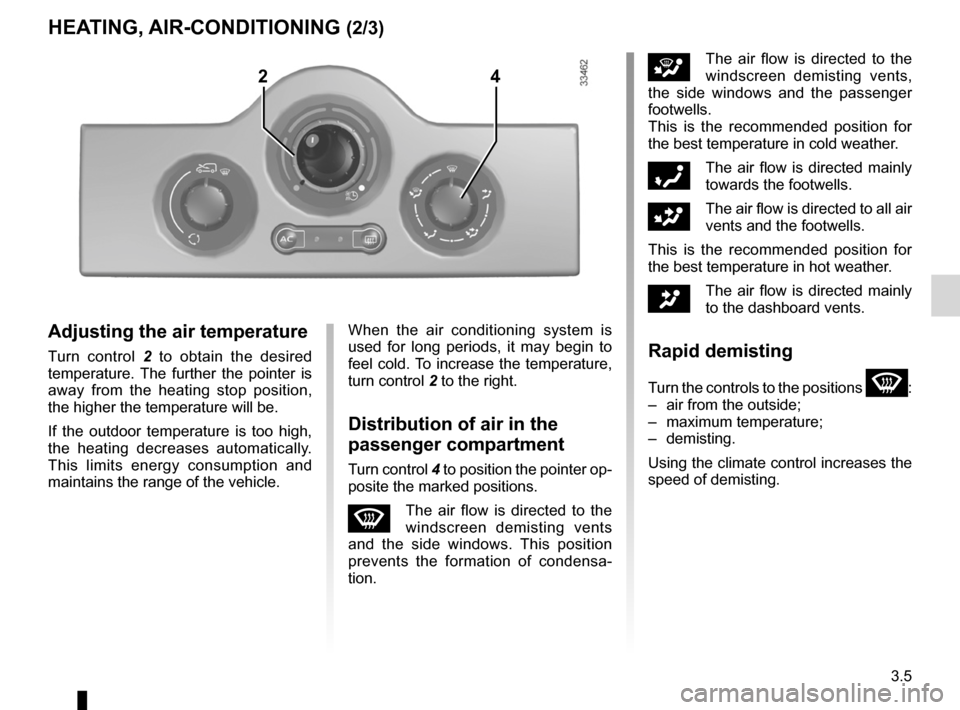
Turn control 2 to obtain the desired
temperature. The further the pointer is
away from the heating stop position,
the higher the temperature will be.
If the outdoor temperature is too high,
the heating decreases automatically.
This limits energy consumption and
maintains the range of the vehicle.
HeA tinG, Air-ConditioninG (2/3)
When the air conditioning system is
used for long periods, it may begin to
feel cold. To increase the temperature,
turn control 2 to the right.
distribution of air in the
passenger compartment
Turn control 4 to position the pointer op-
posite the marked positions.
WThe air flow is directed to the
windscreen demisting vents
and the side windows. This position
prevents the formation of condensa -
tion.
24
Page 117 of 213
3.6
ENG_UD25325_3
Chauffage, climatisation (X61 électrique - Renault)
ENG_NU_911-4_F61e_Renault_3
Adjusting the ventilation
speed
normal use
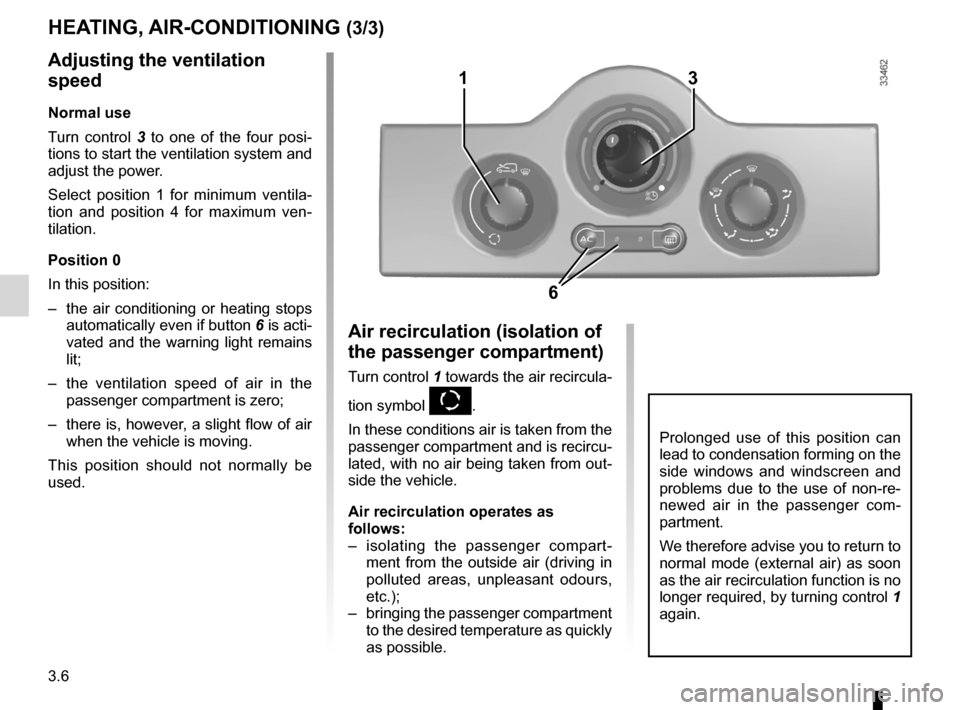
Turn control 3 to one of the four posi -
tions to start the ventilation system and
adjust the power.
Select position 1 for minimum ventila -
tion and position 4 for maximum ven -
tilation.
Position 0
In this position:
– the air conditioning or heating stops
automatically even if button 6 is acti-
vated and the warning light remains
lit;
– the ventilation speed of air in the
passenger compartment is zero;
– there is, however, a slight flow of air
when the vehicle is moving.
This position should not normally be
used.
HeA tinG, Air-ConditioninG (3/3)
Air recirculation (isolation of
the passenger compartment)
Turn control 1 towards the air recircula -
tion symbol
K.
In these conditions air is taken from the
passenger compartment and is recircu-
lated, with no air being taken from out-
side the vehicle.
Air recirculation operates as
follows:
– isolating the passenger compart -
ment from the outside air (driving in
polluted areas, unpleasant odours,
etc.);
– bringing the passenger compartment
to the desired temperature as quickly
as possible.
Prolonged use of this position can
lead to condensation forming on the
side windows and windscreen and
problems due to the use of non-re-
newed air in the passenger com -
partment.
We therefore advise you to return to
normal mode (external air) as soon
as the air recirculation function is no
longer required, by turning control 1
again.
3
6
1
Page 134 of 213
headrest................................................ (up to the end of the DU)
3.23
ENG_UD26787_3
Appuis-tête arrière (X61 - F61 - Renault)
ENG_NU_911-4_F61e_Renault_3
The headrest is a safety
component; check that it is
fitted and in the correct po-
sition.
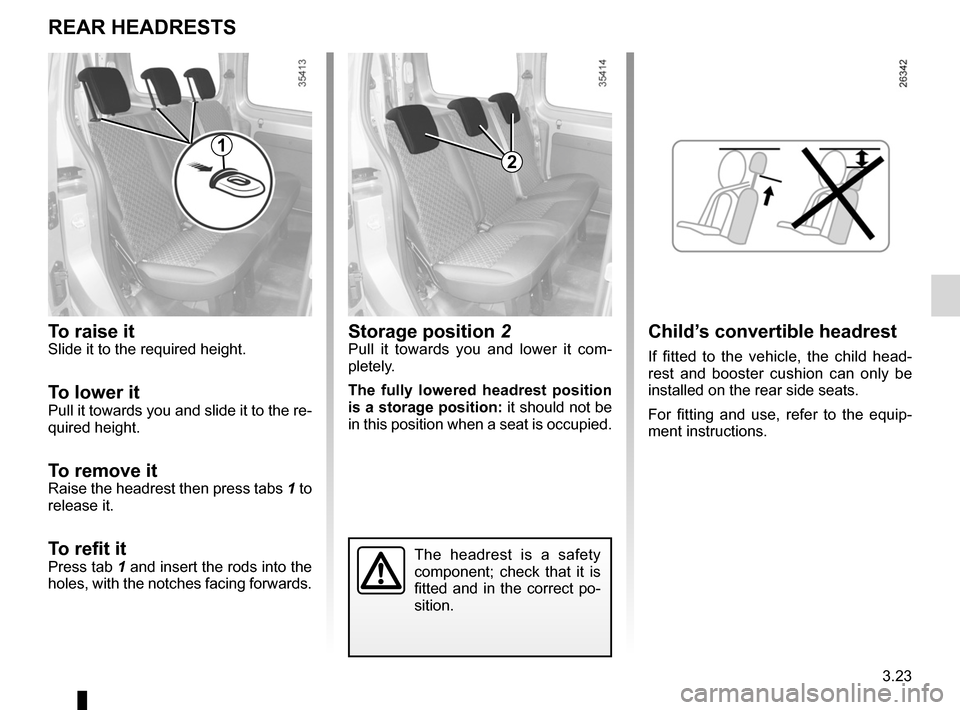
storage position 2Pull it towards you and lower it com -
pletely.
t he fully lowered headrest position
is a storage position: it should not be
in this position when a seat is occupied.t o raise itSlide it to the required height.
to lower itPull it towards you and slide it to the re-
quired height.
to remove it
Raise the headrest then press tabs 1 to
release it.
t o refit itPress tab 1 and insert the rods into the
holes, with the notches facing forwards.
reAr HeAdrests
Child’s convertible headrest
If fitted to the vehicle, the child head -
rest and booster cushion can only be
installed on the rear side seats.
For fitting and use, refer to the equip -
ment instructions.
12
Page 136 of 213
towingtowing equipment ............................ (up to the end of the DU)
towing equipment fitting ............................................... (up to the end of the DU)
3.25
ENG_UD29274_3
Remorquage : attelage (X61 - F61 - K61 - Renault)
ENG_NU_911-4_F61e_Renault_3
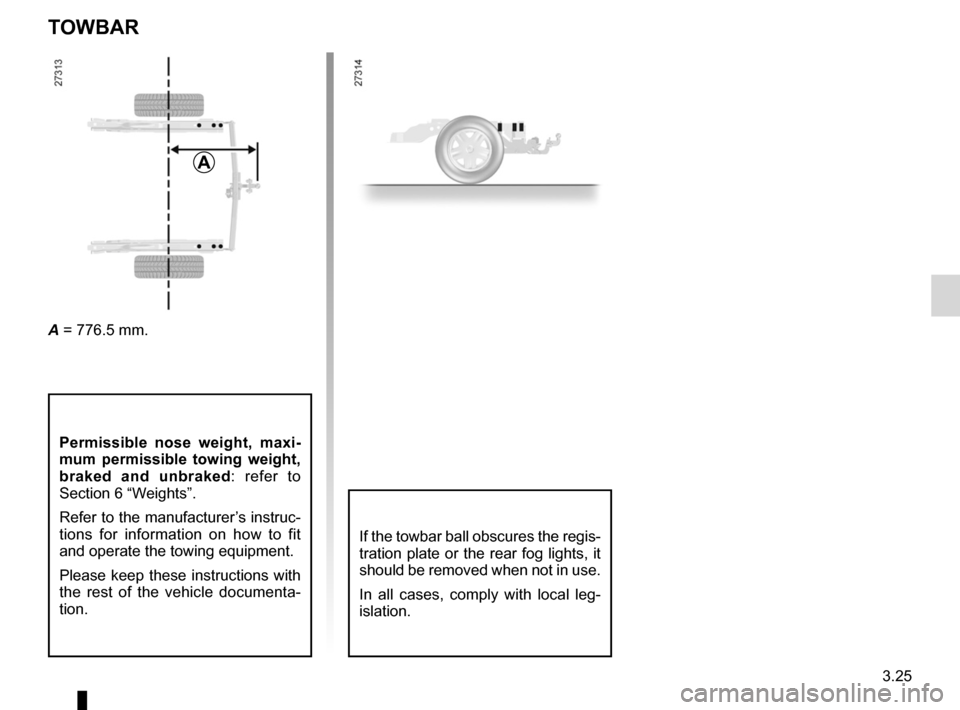
A = 776.5 mm.
Towbar
Permissible nose weight, maxi -
mum permissible towing weight,
braked and unbraked : refer to
Section 6 “Weights”.
Refer to the manufacturer’s instruc-
tions for information on how to fit
and operate the towing equipment.
Please keep these instructions with
the rest of the vehicle documenta -
tion.
t oWBAr
A
If the towbar ball obscures the regis-
tration plate or the rear fog lights, it
should be removed when not in use.
In all cases, comply with local leg -
islation.
Page 139 of 213
bonnet................................................... (up to the end of the DU)
maintenance: mechanical ...................................... (up to the end of the DU)
4.2
ENG_UD20963_2
Capot moteur (X61 - F61 - Renault)
ENG_NU_911-4_F61e_Renault_4
Jaune NoirNoir texte
Bonnet
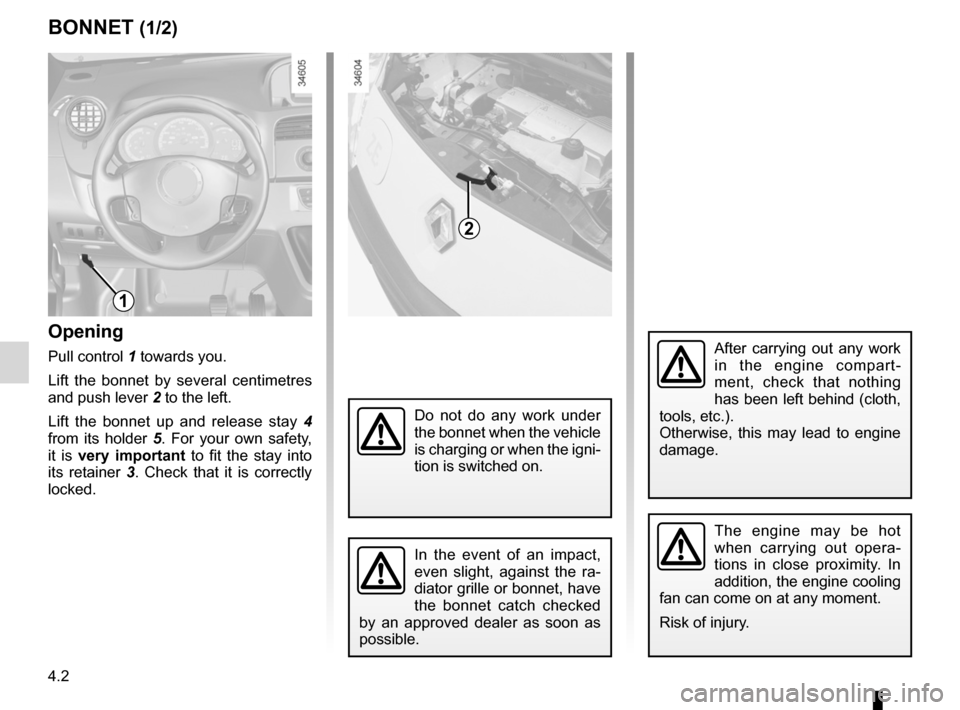
Opening
Pull control 1 towards you.
Lift the bonnet by several centimetres
and push lever 2 to the left.
Lift the bonnet up and release stay 4
from its holder 5. For your own safety,
it is very important to fit the stay into
its retainer 3. Check that it is correctly
locked.
BOnnet (1/2)
The engine may be hot
when carrying out opera -
tions in close proximity. In
addition, the engine cooling
fan can come on at any moment.
Risk of injury.
1
2
In the event of an impact,
even slight, against the ra -
diator grille or bonnet, have
the bonnet catch checked
by an approved dealer as soon as
possible.
After carrying out any work
in the engine compart -
ment, check that nothing
has been left behind (cloth,
tools, etc.).
Otherwise, this may lead to engine
damage.
Do not do any work under
the bonnet when the vehicle
is charging or when the igni -
tion is switched on.
Page 145 of 213
tyre pressure.......................................................... (current page)
tyres ....................................................................... (current page)
tyre pressures ....................................... (up to the end of the DU)
4.8
ENG_UD28661_2
Pressions de gonflage des pneumatiques (en bar) (X61 - F61 - Renault)ENG_NU_911-4_F61e_Renault_4
Tyre pressure
tyRe pRessuRe
a
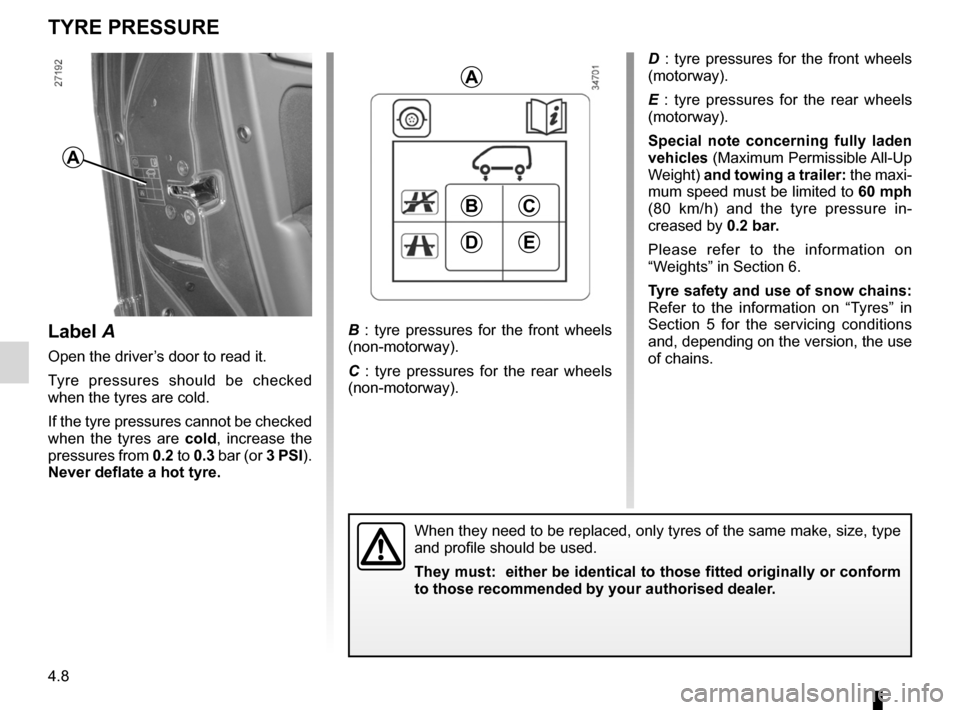
B : tyre pressures for the front wheels
(non-motorway).
C : tyre pressures for the rear wheels
(non-motorway). D : tyre pressures for the front wheels
(motorway).
E
: tyre pressures for the rear wheels
(motorway).
s pecial note concerning fully laden
vehicles (Maximum Permissible All-Up
Weight) and towing a trailer: the maxi-
mum speed must be limited to 60 mph
(80 km/h) and the tyre pressure in -
creased by 0.2 bar.
Please refer to the information on
“Weights” in Section 6.
t yre safety and use of snow chains:
Refer to the information on “Tyres” in
Section 5 for the servicing conditions
and, depending on the version, the use
of chains.
BC
eD
a
When they need to be replaced, only tyres of the same make, size, type
and profile should be used.
they must: either be identical to those fitted originally or conform
to those recommended by your authorised dealer.
Label A
Open the driver’s door to read it.
Tyre pressures should be checked
when the tyres are cold.
If the tyre pressures cannot be checked
when the tyres are cold, increase the
pressures from 0.2 to 0.3 bar (or 3 psI).
never deflate a hot tyre.
Page 150 of 213
5.1
ENG_UD29096_4
Sommaire 5 (X61 - F61 - Renault)
ENG_NU_911-4_F61e_Renault_5
Section 5: Practical advice
Puncture . . . . . . . . . . . . . . . . . . . . . . . . . . . . . . . . . . . . . . . . . . . . . . . . . . . . . . . . . . . . . . . . . . . . . . 5.2
Emergency spare wheel . . . . . . . . . . . . . . . . . . . . . . . . . . . . . . . . . . . . . . . . . . . . . . . . . . . . . . . . . . 5.2
Tyre inflation kit . . . . . . . . . . . . . . . . . . . . . . . . . . . . . . . . . . . . . . . . . . . . . . . . . . . . . . . . . . . . . . . . . 5.3
Tool kit . . . . . . . . . . . . . . . . . . . . . . . . . . . . . . . . . . . . . . . . . . . . . . . . . . . . . . . . . . . . . . . . . . . . . . . . 5.8
Wheels, trim . . . . . . . . . . . . . . . . . . . . . . . . . . . . . . . . . . . . . . . . . . . . . . . . . . . . . . . . . . . . . . . . . . . . 5.9
Changing a wheel . . . . . . . . . . . . . . . . . . . . . . . . . . . . . . . . . . . . . . . . . . . . . . . . . . . . . . . . . . . . . . . 5.10
Tyres . . . . . . . . . . . . . . . . . . . . . . . . . . . . . . . . . . . . . . . . . . . . . . . . . . . . . . . . . . . . . . . . . . . . . . . . . 5.12
Headlights: changing bulbs . . . . . . . . . . . . . . . . . . . . . . . . . . . . . . . . . . . . . . . . . . . . . . . . . . . . . . . . 5.15
Fog lights: changing bulbs . . . . . . . . . . . . . . . . . . . . . . . . . . . . . . . . . . . . . . . . . . . . . . . . . . . . . . . . . 5.17
Rear lights: changing bulbs . . . . . . . . . . . . . . . . . . . . . . . . . . . . . . . . . . . . . . . . . . . . . . . . . . . . . . . . 5.18
Indicator lights: changing bulbs . . . . . . . . . . . . . . . . . . . . . . . . . . . . . . . . . . . . . . . . . . . . . . . . . . . . . 5.21
Interior lights: changing bulbs . . . . . . . . . . . . . . . . . . . . . . . . . . . . . . . . . . . . . . . . . . . . . . . . . . . . . . 5.22
12 volt battery: breakdowns . . . . . . . . . . . . . . . . . . . . . . . . . . . . . . . . . . . . . . . . . . . . . . . . . . . . . . . . 5.24
Fuses . . . . . . . . . . . . . . . . . . . . . . . . . . . . . . . . . . . . . . . . . . . . . . . . . . . . . . . . . . . . . . . . . . . . . . . . . 5.26
Wiper blades . . . . . . . . . . . . . . . . . . . . . . . . . . . . . . . . . . . . . . . . . . . . . . . . . . . . . . . . . . . . . . . . . . . 5.28
Towing/breakdown . . . . . . . . . . . . . . . . . . . . . . . . . . . . . . . . . . . . . . . . . . . . . . . . . . . . . . . . . . . . . . . 5.30
Fitted audio equipment . . . . . . . . . . . . . . . . . . . . . . . . . . . . . . . . . . . . . . . . . . . . . . . . . . . . . . . . . . . 5.33
Accessories . . . . . . . . . . . . . . . . . . . . . . . . . . . . . . . . . . . . . . . . . . . . . . . . . . . . . . . . . . . . . . . . . . . . 5.35
Radio frequency remote control unit: batteries . . . . . . . . . . . . . . . . . . . . . . . . . . . . . . . . . . . . . . . . . 5.36
Operating faults . . . . . . . . . . . . . . . . . . . . . . . . . . . . . . . . . . . . . . . . . . . . . . . . . . . . . . . . . . . . . . . . . 5.37
Page 157 of 213
tool kit .................................................................... (current page)
hubcap tool ............................................................ (current page)
wheelbrace ............................................................ (current page)
puncture ................................................................. (current page)
jack ........................................................................ (current page)
towing hitch ............................................................ (current page)
wheelbrace ............................................................ (current page)
5.8
ENG_UD25342_5
Bloc outils (X61 - F61 - K61 - Renault)
ENG_NU_911-4_F61e_Renault_5
Tool kit
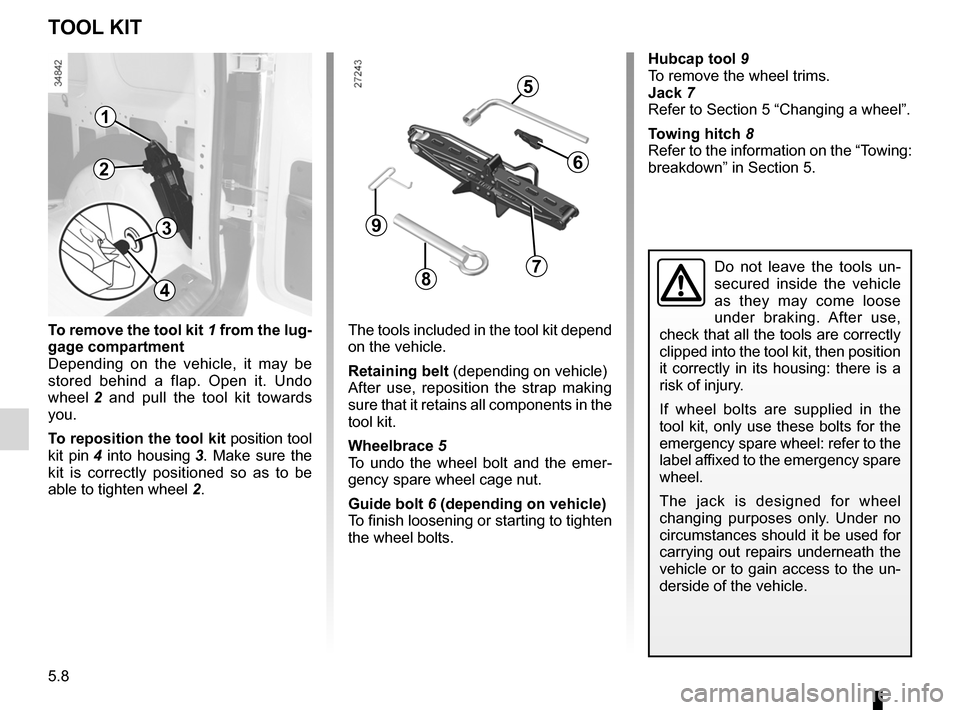
The tools included in the tool kit depend
on the vehicle.
retaining belt (depending on vehicle)
After use, reposition the strap making
sure that it retains all components in the
tool kit.
wheelbrace 5
To undo the wheel bolt and the emer -
gency spare wheel cage nut.
guide bolt 6 (depending on vehicle)
To finish loosening or starting to tighten
the wheel bolts.
t
o remove the tool kit 1 from the lug-
gage compartment
Depending on the vehicle, it may be
stored behind a flap. Open it. Undo
wheel 2 and pull the tool kit towards
you.
t o reposition the tool kit position tool
kit pin 4 into housing 3. Make sure the
kit is correctly positioned so as to be
able to tighten wheel 2.
tOOl KIt
5
6
9
1
3
2
87Do not leave the tools un -
secured inside the vehicle
as they may come loose
under braking. After use,
check that all the tools are correctly
clipped into the tool kit, then position
it correctly in its housing: there is a
risk of injury.
If wheel bolts are supplied in the
tool kit, only use these bolts for the
emergency spare wheel: refer to the
label affixed to the emergency spare
wheel.
The jack is designed for wheel
changing purposes only. Under no
circumstances should it be used for
carrying out repairs underneath the
vehicle or to gain access to the un-
derside of the vehicle.
4
hubcap tool 9
To remove the wheel trims.
Jack 7
Refer to Section 5 “Changing a wheel”.
t owing hitch 8
Refer to the information on the “Towing:
breakdown” in Section 5.
Page 165 of 213
indicators ............................................................... (current page)
indicators: direction indicators ........................................... (current page)
5.16
ENG_UD25296_2
Projecteurs : remplacement des lampes (X61 - F61 - Renault)
ENG_NU_911-4_F61e_Renault_5
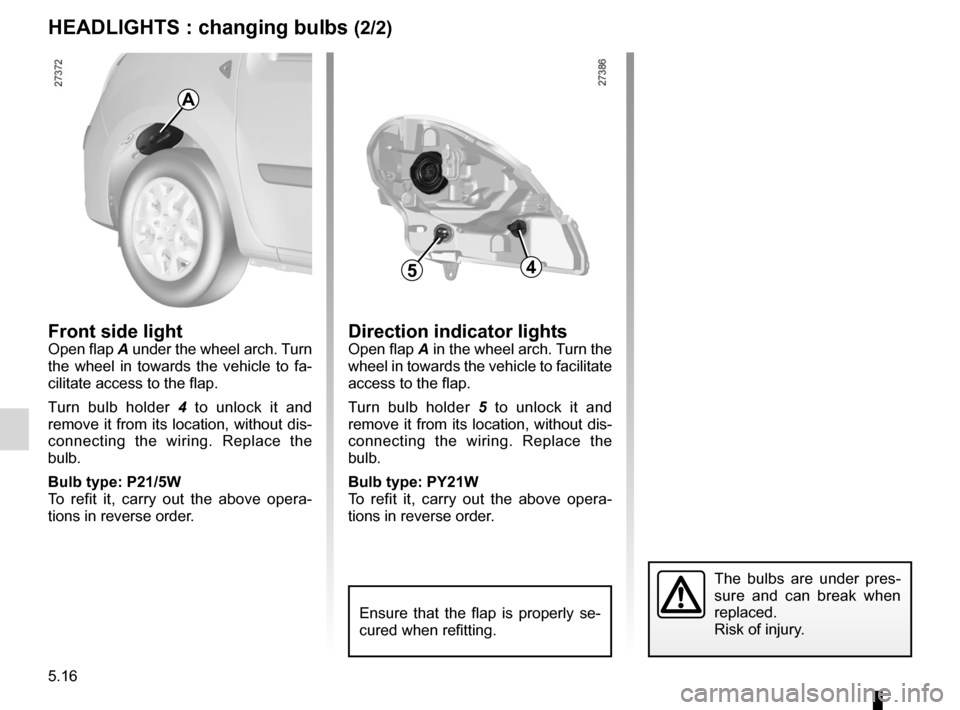
Front side lightOpen flap A under the wheel arch. Turn
the wheel in towards the vehicle to fa-
cilitate access to the flap.
Turn bulb holder 4 to unlock it and
remove it from its location, without dis-
connecting the wiring. Replace the
bulb.
Bulb type: P21/5w
To refit it, carry out the above opera -
tions in reverse order.Direction indicator lightsOpen flap A in the wheel arch. Turn the
wheel in towards the vehicle to facilitate
access to the flap.
Turn bulb holder 5 to unlock it and
remove it from its location, without dis-
connecting the wiring. Replace the
bulb.
Bulb type: Py21w
To refit it, carry out the above opera -
tions in reverse order.
The bulbs are under pres -
sure and can break when
replaced.
Risk of injury.
heaDlIghts : changing bulbs (2/2)
45
a
Ensure that the flap is properly se -
cured when refitting.
Page 167 of 213
rear lightschanging bulbs ................................ (up to the end of the DU)
lights: reversing lights ................................................. (current page)
lights: direction indicators ........................................... (current page)
lights: brake lights ...................................................... (current page)
bulbs changing ......................................... (up to the end of the DU)
brake lights changing bulbs ................................................. (current page)
bulbs changing ......................................... (up to the end of the DU)
5.18
ENG_UD25344_3
Feux arrière : remplacement des lampes (X61 - F61 - K61 - Renault)
ENG_NU_911-4_F61e_Renault_5
Jaune NoirNoir texte
Rear lights: changing bulbs
The bulbs are under pres -
sure and can break when
replaced.
Risk of injury.
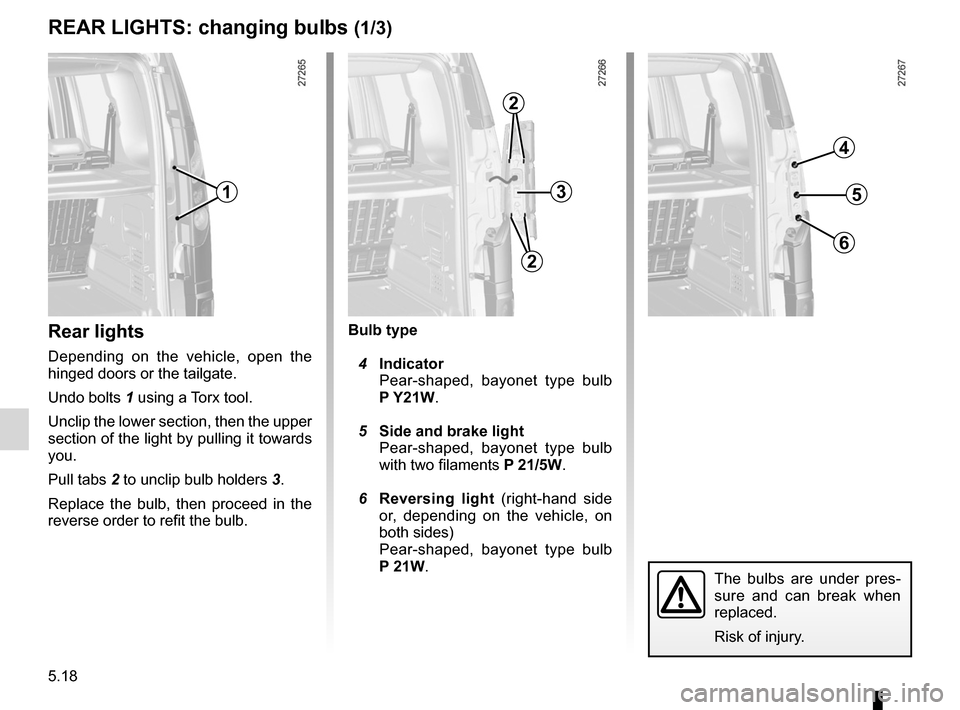
Bulb type
4 Indicator
Pear-shaped, bayonet type bulb
P y21w.
5 side and brake light
Pear-shaped, bayonet type bulb
with two filaments P 21/5w.
6 r eversing light (right-hand side
or, depending on the vehicle, on
both sides)
Pear-shaped, bayonet type bulb
P 21w.rear lights
Depending on the vehicle, open the
hinged doors or the tailgate.
Undo bolts 1 using a Torx tool.
Unclip the lower section, then the upper
section of the light by pulling it towards
you.
Pull tabs 2 to unclip bulb holders 3.
Replace the bulb, then proceed in the
reverse order to refit the bulb.
rear lIghts: changing bulbs (1/3)
31
2
2
5
4
6