SAAB 900 1986 Owners Manual
Manufacturer: SAAB, Model Year: 1986,
Model line: 900,
Model: SAAB 900 1986
Pages: 133, PDF Size: 11.74 MB
SAAB 900 1986 Owners Manual
900 1986
SAAB
SAAB
https://www.carmanualsonline.info/img/65/57499/w960_57499-0.png
SAAB 900 1986 Owners Manual
Trending: tow, heating, horn, check engine, tow bar, sensor, engine oil
Page 91 of 133
Downloaded from www.Manualslib.com manuals search engine 843-2 Window glass
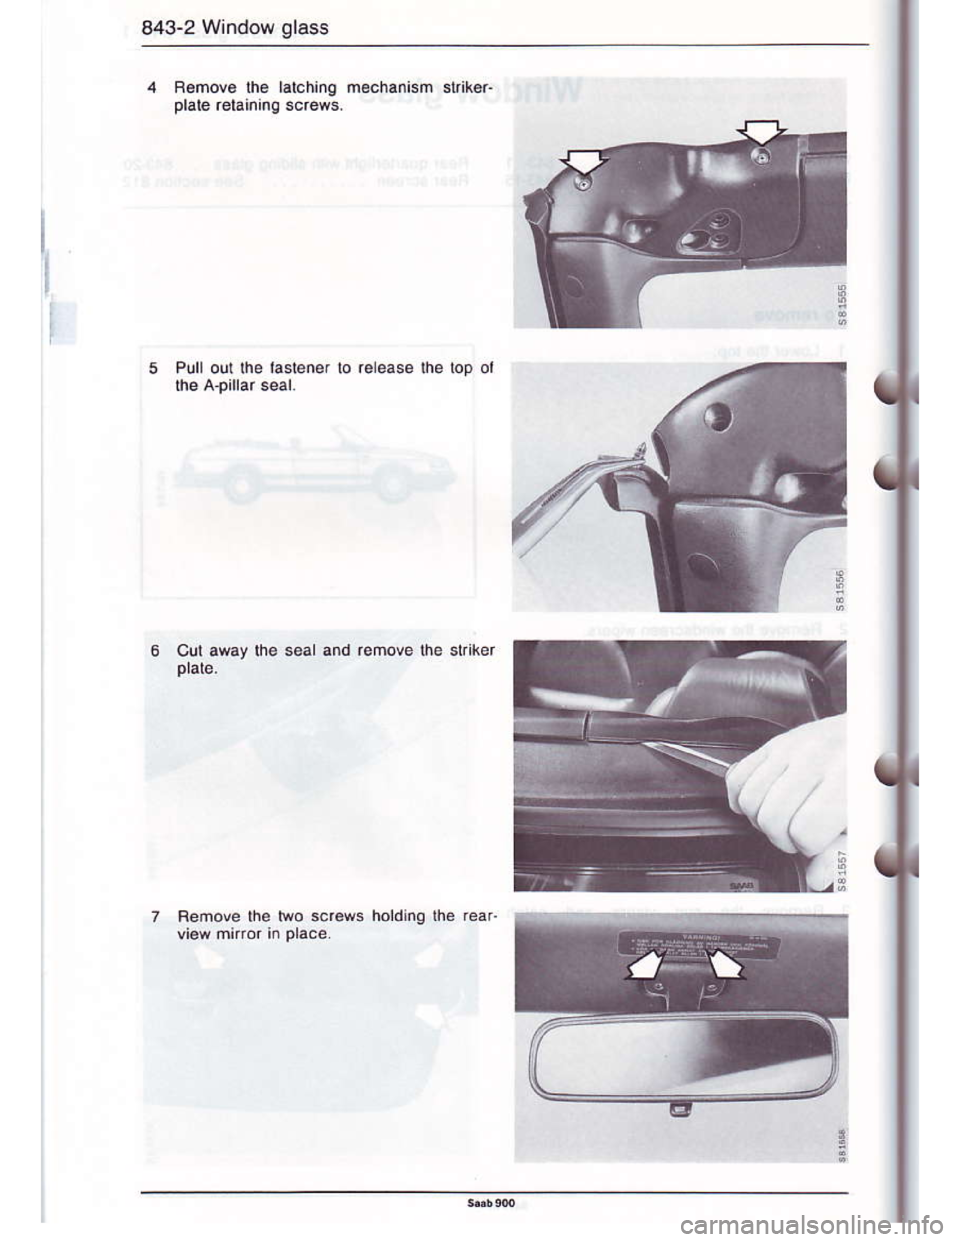
F6mov6 lhe lalchinq mechanism sl ke.
Femove ihe lwo screws
Page 92 of 133
Downloaded from www.Manualslib.com manuals search engine Window glass 843-3
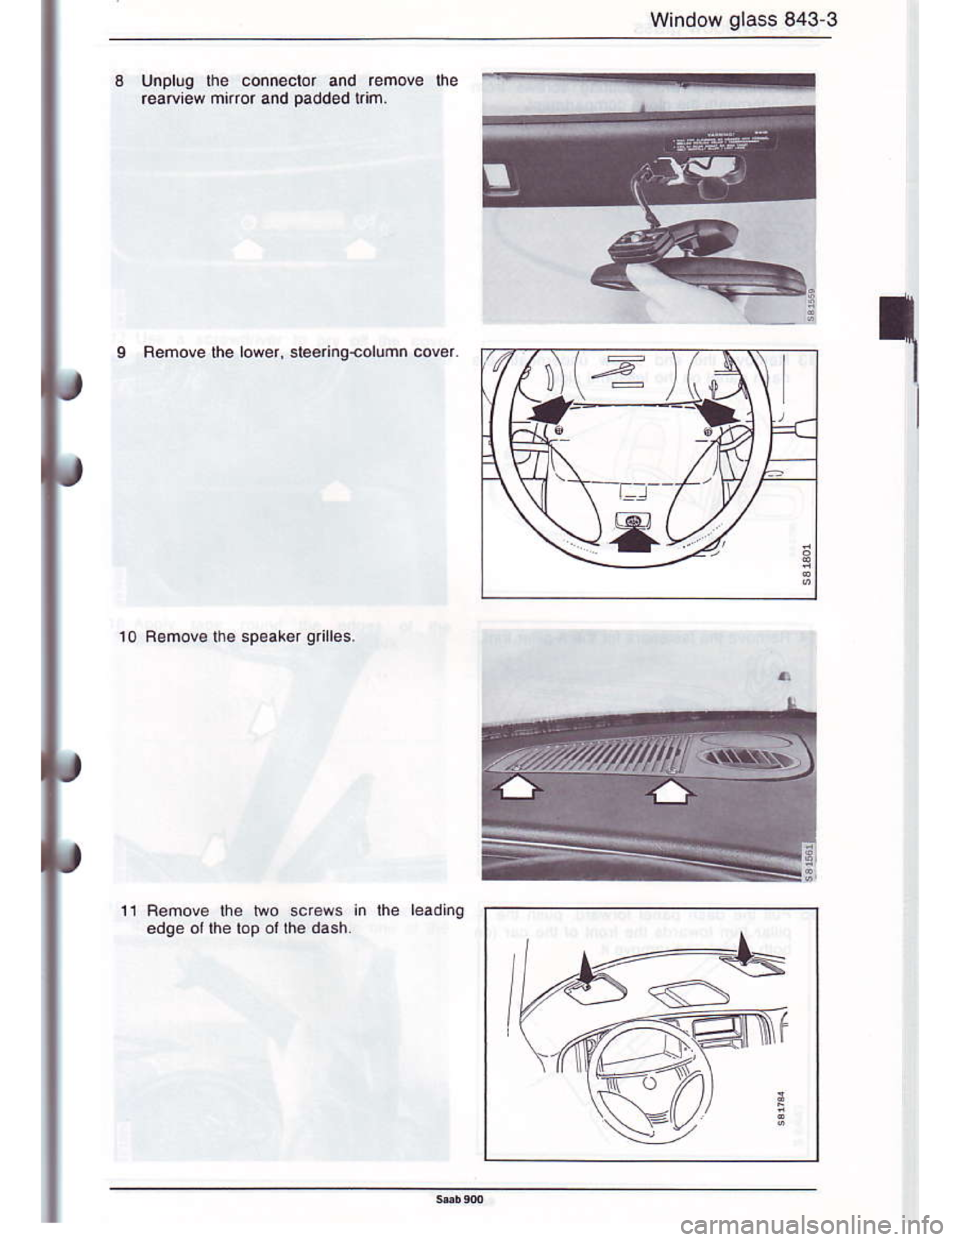
Unpluq fte connector and remove lne
r€atoiew mnro. and paddod Lim.
Femove the lower, slee.iqrolumtr covar
10 Bemov€ the sp€alar griLles.
Femole lhe lwo scr6ws in lhe leading
edqe otthetop ol the dash
--=--.-
/@ffi
Page 93 of 133
Downloaded from www.Manualslib.com manuals search engine 843-4 Window glass
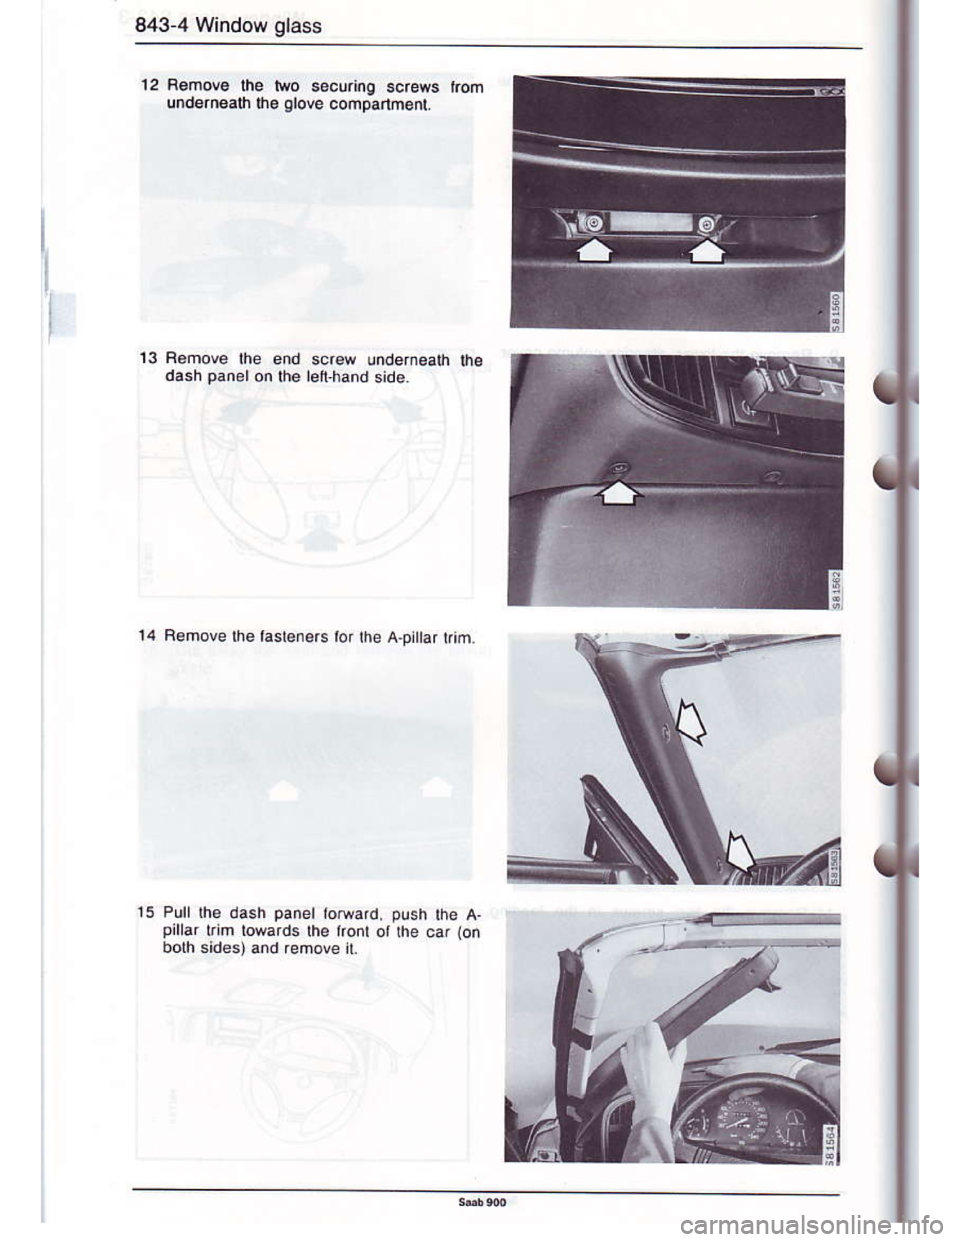
12 R€move lhe two s.curi.O screws kom
undernoalh lh. olove comparthent.
13
15Pull the dash panel loeard, push rhe a.pirrar kifr lowards the rront ot rhe caf ionboth sides) and.enove it
Page 94 of 133
Downloaded from www.Manualslib.com manuals search engine Window glass 843-5
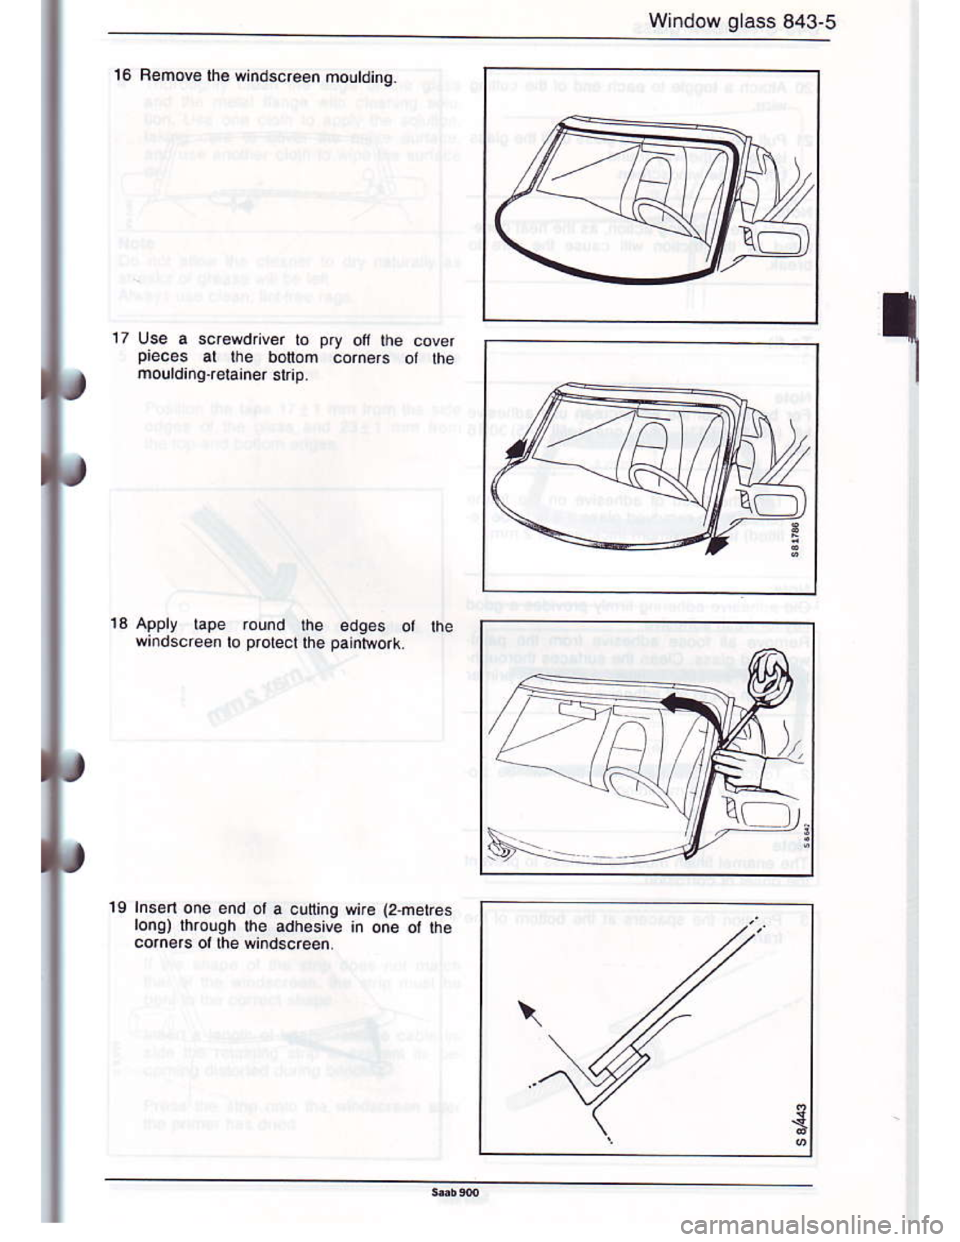
16 Femov€ the qin.tscreen moutding.
17
piec.s at lhe botom
13 APply lape .ound the ed96s ot
wrndscre€n b protecl lh€ paintrort
l9 Insen one end ol a cudinq *ire iZmelreslono) lhrough he adh.Bive h one ot |hecorn€6 ol lhe windscreen.
Page 95 of 133
Downloaded from www.Manualslib.com manuals search engine 843-6 Window glass
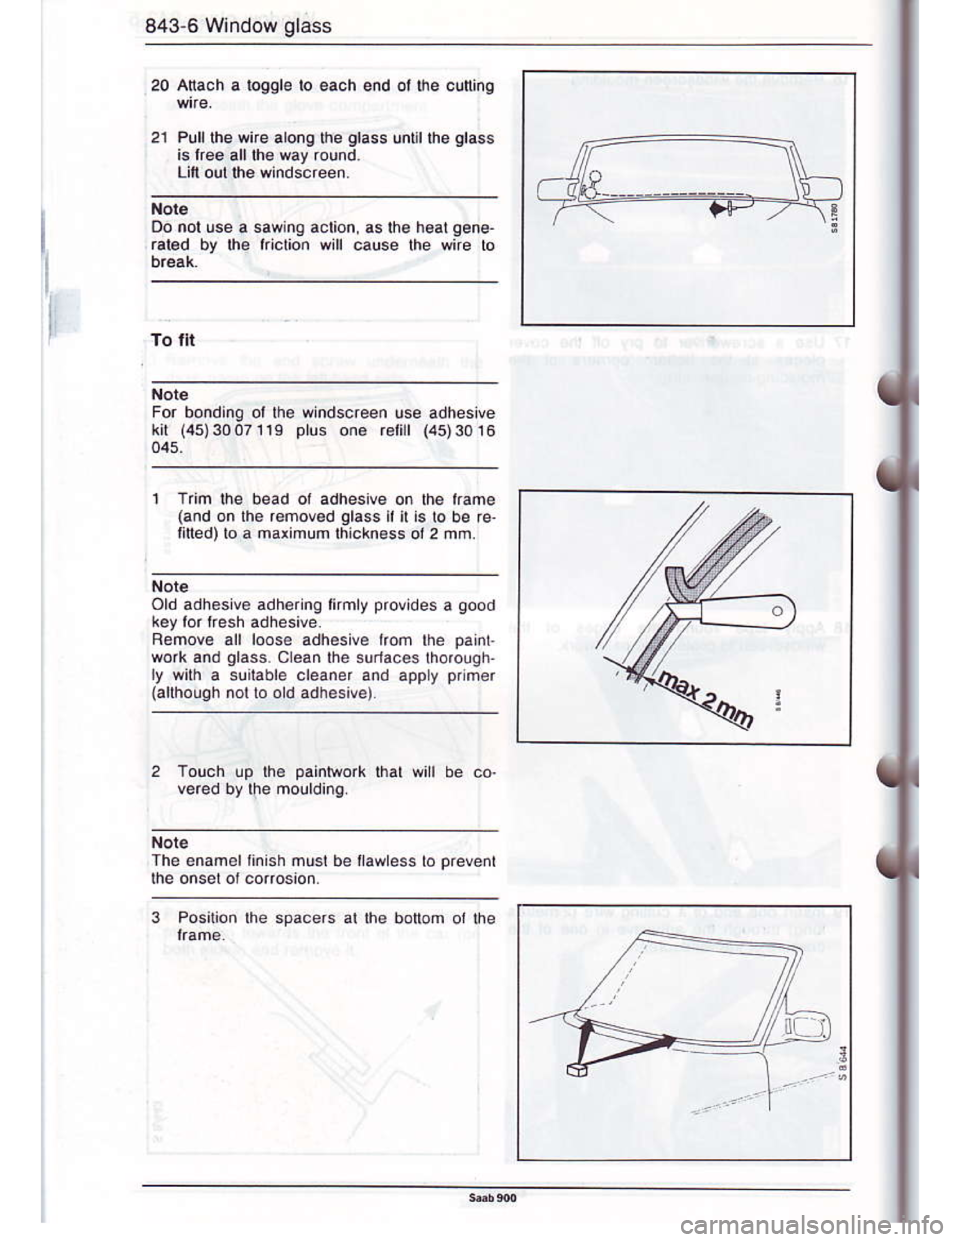
20 Anach a logql€ lo each end ol he clning
2l Pllllhe wire along the glass unlillhe glass
is lree alllh€ way round.
Litl oll the windscreen.
acton, as lh€ heal gene
will cause lhe wire to
To fit
Trim lhe bead ol adhesve on lh6 lrame
(and on th€ romoved glass il it is to be re-
nfled)b a maximum lhicknes. o,2 mm.
Old adhesive adh6rin9ltmy provides a good
Remove all loose adhesive lrom lhe pahr
wo|k and glass. clean the surlaces lhorough
ly with a slilable cleaner and apply prlm€r
(althouqh not lo ord adh€sive)
Touch !p the painNeork lhat wit be co.
Postuon lhe spacers at the bonom ol tne
wndsc.een use adhesive
plus one rolill {45)3016
i
Page 96 of 133
Downloaded from www.Manualslib.com manuals search engine Window g ass 843-7
Do nor allow lha clea^er ro dry naruraly as
st6ak5 ot arease will b6lel1.
Always use clean, lint rree rags
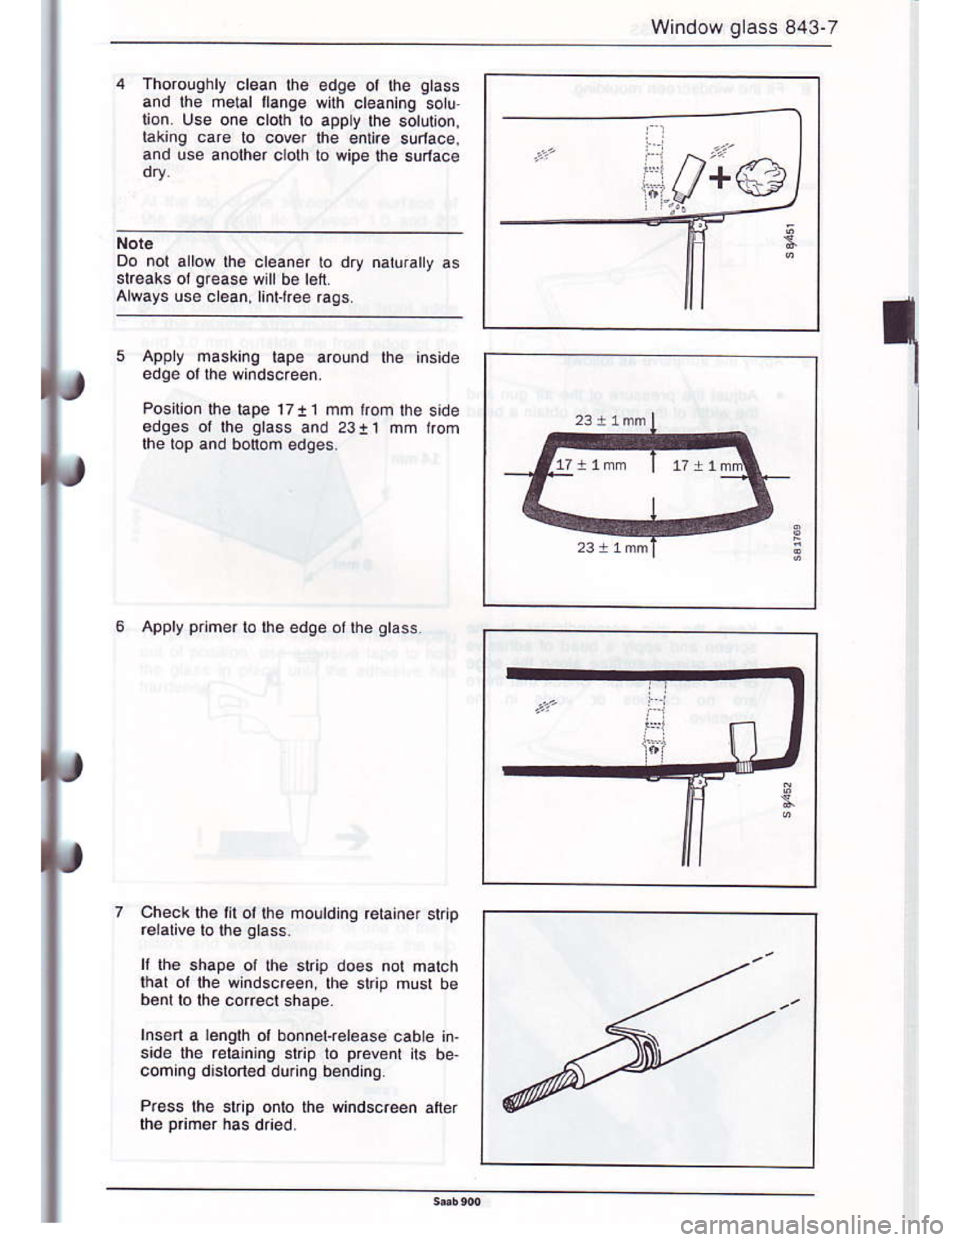
appry maskinq tape around the inside
Position the lape 17J1 mm rom the side
edges ol lhe glass and 23!1 frh kom
the top and bonom edges
17 r 1mm | 17 !rmi
Apply primr lo Ue edqe ol lhe qras5
Check th€ lit ol the froutding rolainer strip
ll lhe shape ol the srrip do€s not malch
$at ot ihe windscreen the slrip musl be
b€nl lo lhe corect shape
Insen a bngth ol bonner.r€iease cabte in-
sjde lh€ r€taining slrip lo p.event its be
comino disroned during bendino
P..ss the stip onto lhe windsc.een after
Page 97 of 133
Downloaded from www.Manualslib.com manuals search engine 843 8 Window glass
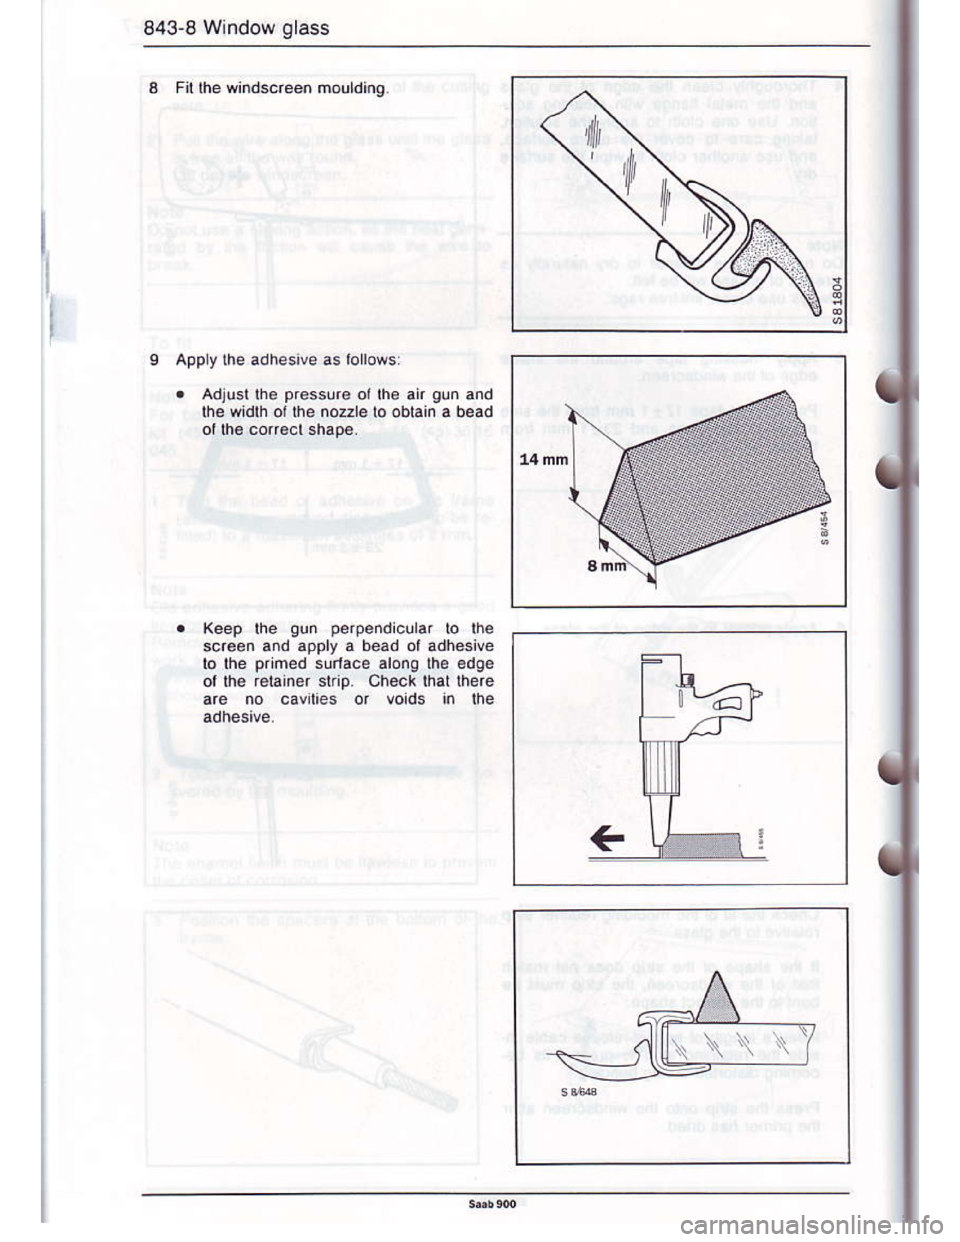
F( lhe windscreen mou ding.
APPy ihe adliesive as roloas
Keep rhe gun perpendicurar to lhe
scr€en and apply a bead ot adheslve
lo the Fmed surrace arong lhe edge
ol the relain€r srrip check thal lhere
E
Page 98 of 133
Downloaded from www.Manualslib.com manuals search engine Window glass 843-9
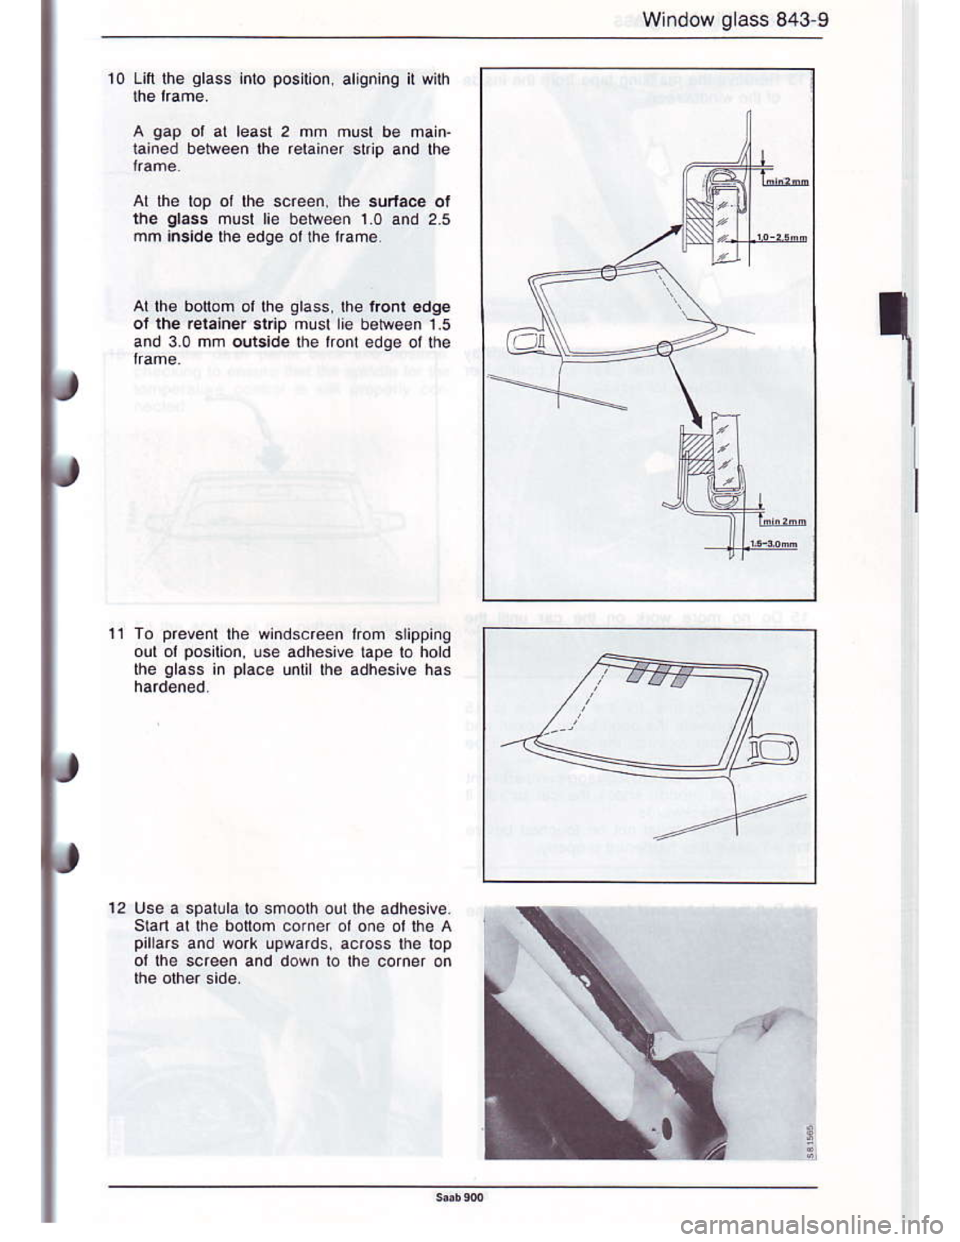
10 Lifi the qlass inlo position. alieninq il with
A gap ot al leasl 2 mm musl b€ main.
tained betireen lhe r€tainer stip and lhe
Al lhe lop ol lhe s6.een. the su.lace ol
tne glass mlsl lie belween 1.0 and 2.5
mm anside lhe edge ot lhe trame.
a
a
a
a
11 To prevent lhe windscr66n lrom slipping
oul or posilion, use adhesive lape to hold
the qlass in plac€ unlil lhe adhesive has
12 use a sparula lo shoolh out lhe adhesive
s|an at ihe bonom corner ol oie ot lhe A
pillars and work upwards across lhe lop
ot lhe screen and down to the come. on
3
4'
Page 99 of 133
Downloaded from www.Manualslib.com manuals search engine 843 10 Window glass
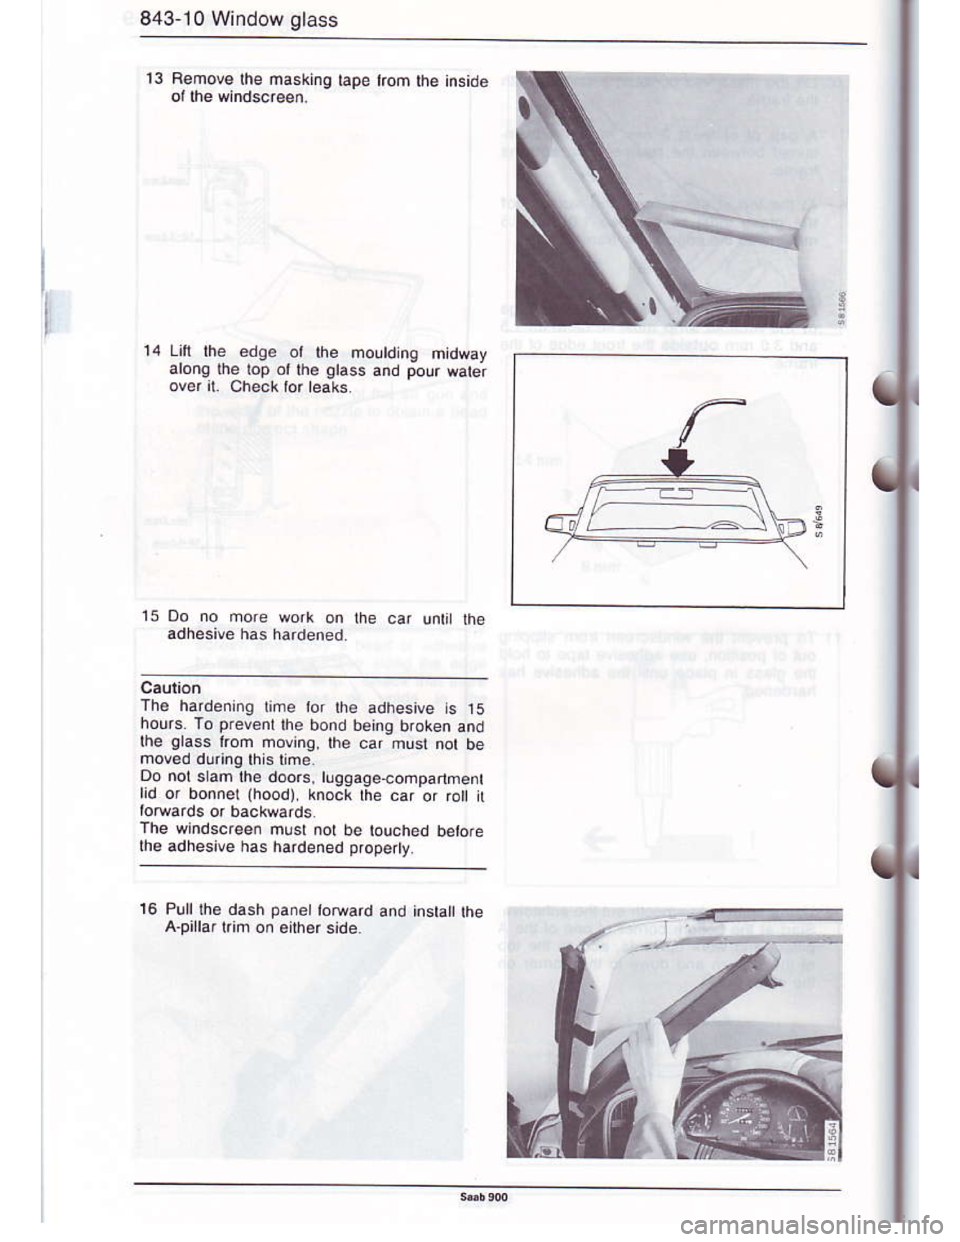
13 Remove the masking tape trom lhe inside
14 Li lhe edqe or the froutdin9 mtdway
arono lhe lop ol rhe otass and pour waterover il Check lor leaks
15 Do no frore work on lhe car un[ rhe
adhesive has hardened.
'rhe hardenno lime ror lhe adhesive s 15
hours To prevenl lhe bond being broken and
the qlass lrom movina lhe car musl nol be
Do nol sam the doors, luqgage cofrparhenlrd or bonnel (hood) knock fie car of rol I
The windscreen musr nol be touched berorethe adhesrve has hardened property
16 Pull rhe dash paiet totu6rd and inslalt theA.pirraf tr'n on either side.
.E
Page 100 of 133
Downloaded from www.Manualslib.com manuals search engine Window glass 843-11
ta
)
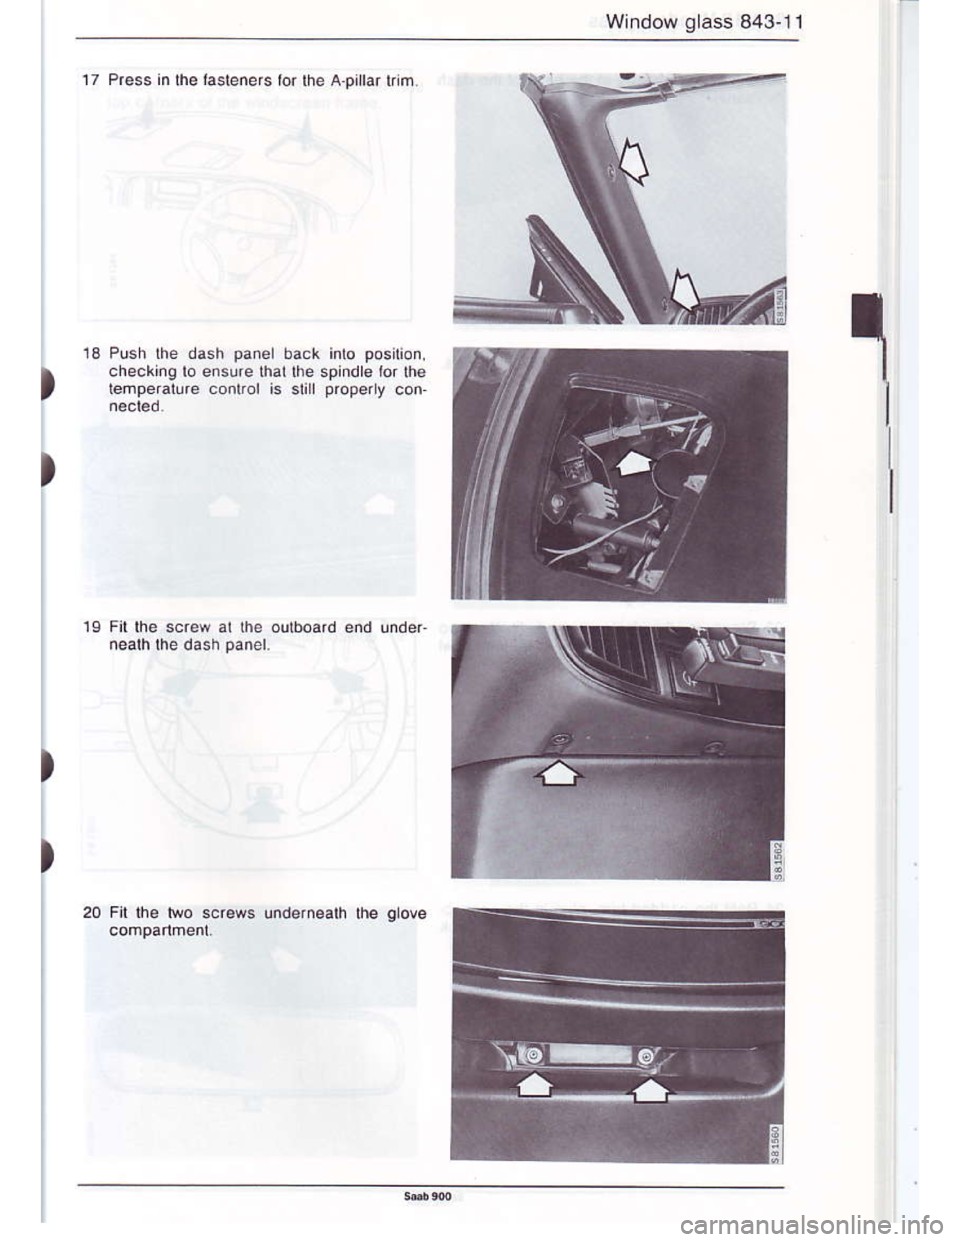
17 Pre53 in th€ lssreners lor rhe A.pllar rnm
Push lhe dash panel back inlo position.
checking lo ensure that lhe spindl6lor th€
tefrpeaturs conlrol is still ptoperly con
1S Fil lhe scres at lh€ oulboard end unde.
nealh the dash panel.
20 Fil the lwo screws undernealh the glove
)
)
)
Trending: sensor, reset, engine oil, ESP, tow bar, check engine, dimensions
