tow SATURN AURA HYBRID 2008 Owners Manual
[x] Cancel search | Manufacturer: SATURN, Model Year: 2008, Model line: AURA HYBRID, Model: SATURN AURA HYBRID 2008Pages: 362, PDF Size: 2.05 MB
Page 1 of 362
Seats and Restraint Systems........................... 1-1
Front Seats
............................................... 1-2
Rear Seats
............................................... 1-8
Safety Belts
.............................................1-10
Child Restraints
.......................................1-29
Airbag System
.........................................1-54
Restraint System Check
............................1-70
Features and Controls..................................... 2-1
Keys
........................................................ 2-2
Doors and Locks
....................................... 2-7
Windows
.................................................2-12
Theft-Deterrent Systems
............................2-15
Starting and Operating Your Vehicle
...........2-19
Mirrors
....................................................2-34
OnStar
®System
......................................2-35
Storage Areas
.........................................2-38
Sunroof
..................................................2-39
Instrument Panel............................................. 3-1
Instrument Panel Overview
.......................... 3-4
Climate Controls
......................................3-19
Warning Lights, Gages, and Indicators
........3-25
Driver Information Center (DIC)
..................3-43
Audio System(s)
.......................................3-56Driving Your Vehicle....................................... 4-1
Your Driving, the Road, and Your Vehicle
..... 4-2
Towing
...................................................4-27
Service and Appearance Care.......................... 5-1
Service
..................................................... 5-3
Fuel
......................................................... 5-6
Checking Things Under the Hood
...............5-12
Headlamp Aiming
.....................................5-41
Bulb Replacement
....................................5-42
Windshield Wiper Blade Replacement
.........5-45
Tires
......................................................5-46
Appearance Care
.....................................5-77
Vehicle Identi�cation
.................................5-85
Electrical System
......................................5-86
Capacities and Speci�cations
.....................5-95
Maintenance Schedule..................................... 6-1
Maintenance Schedule
................................ 6-2
Customer Assistance Information.................... 7-1
Customer Assistance and Information
........... 7-2
Reporting Safety Defects
...........................7-14
Vehicle Data Recording and Privacy
...........7-16
Index................................................................ 1
2008 Saturn AURA Green Line Hybrid Owner ManualM
Page 12 of 362
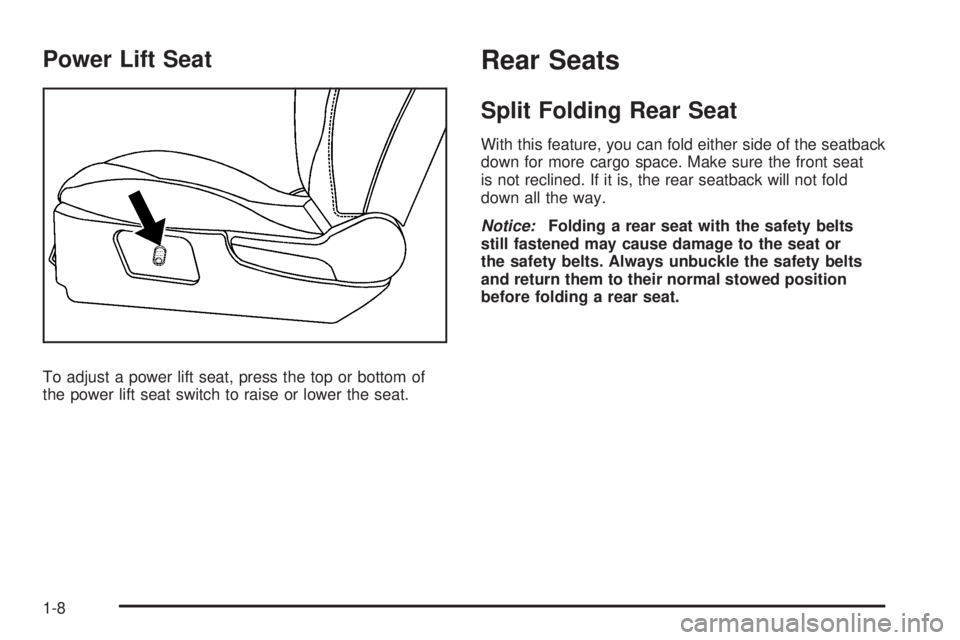
Power Lift Seat
To adjust a power lift seat, press the top or bottom of
the power lift seat switch to raise or lower the seat.
Rear Seats
Split Folding Rear Seat
With this feature, you can fold either side of the seatback
down for more cargo space. Make sure the front seat
is not reclined. If it is, the rear seatback will not fold
down all the way.
Notice:Folding a rear seat with the safety belts
still fastened may cause damage to the seat or
the safety belts. Always unbuckle the safety belts
and return them to their normal stowed position
before folding a rear seat.
1-8
Page 13 of 362

To lower the rear seatback, pull on the seat tab located
on the outboard side of the seatback cushion and
fold the seatback down. This allows access to the trunk.
To raise the rear seatback pull the seatback up and
make sure it latches. Push and pull on the seatback
to be sure it is locked in position. Make sure that
the safety belts are properly stowed over the seatback
in all three positions.
{CAUTION:
A safety belt that is improperly routed, not
properly attached, or twisted will not provide
the protection needed in a crash. The person
wearing the belt could be seriously injured.
After raising the rear seatback, always check
to be sure that the safety belts are properly
routed and attached, and are not twisted.
{CAUTION:
If the seatback is not locked, it could move
forward in a sudden stop or crash. That could
cause injury to the person sitting there. Always
push and pull on the seatback to be sure it
is locked.
When the seat is not in use, it should be kept in the
upright locked position.
1-9
Page 49 of 362

CAUTION: (Continued)
Pull the shoulder belt all the way out of the
retractor to set the lock, if your vehicle has
one, after the child restraint has been installed.
Be sure to follow the instructions of the child
restraint manufacturer.
Notice:Contact between the child restraint LATCH
attachment parts and the vehicle’s safety belt
assembly may cause damage to these parts. Make
sure when securing unused safety belts behind
the child restraint that there is no contact between
the child restraint LATCH attachment parts and
the vehicle’s safety belt assembly.
Folding an empty rear seat with the safety belts
secured may cause damage to the safety belt or the
seat. When removing the child restraint, always
remember to return the safety belts to their normal,
stowed position before folding the rear seat.
If you need to secure more than one child restraint
in the rear seat, seeWhere to Put the Restraint
on page 1-38. Depending on where you place the
child restraint, you may not be able to access certain
safety belt assemblies or LATCH anchors for additional
passengers or child restraints.You cannot secure three child restraints using the
LATCH anchors in the rear seat at the same time,
but you can install two of them. If you want to do this,
install one LATCH child restraint in the passenger-side
position, and install the other one either in the
driver-side position or in the center position. Refer to
the following illustration to learn which anchors to use.
A. Passenger Side Rear Seat Lower Anchors
B. Center Rear Seat Lower Anchors
C. Driver Side Rear Seat Lower Anchors
Make sure to attach the child restraint at the proper
anchor location.
1-45
Page 65 of 362
What Makes an Airbag In�ate?
In a deployment event, the sensing system sends
an electrical signal triggering a release of gas from
the in�ator. Gas from the in�ator �lls the airbag
causing the bag to break out of the cover and deploy.
The in�ator, the airbag, and related hardware are
all part of the airbag module.
Frontal airbag modules are located inside the
steering wheel and instrument panel. For vehicles
with seat-mounted side impact airbags, there are
airbag modules in the side of the front seatbacks
closest to the door. For vehicles with roof-rail
airbags, there are airbag modules in the ceiling
of the vehicle, near the side windows that have
occupant seating positions.
How Does an Airbag Restrain?
In moderate to severe frontal or near frontal collisions,
even belted occupants can contact the steering
wheel or the instrument panel. In moderate to severe
side collisions, even belted occupants can contact
the inside of the vehicle.
Airbags supplement the protection provided by
safety belts. Frontal airbags distribute the force of the
impact more evenly over the occupant’s upper body,
stopping the occupant more gradually. Seat-mounted
side impact and roof-rail airbags distribute the force
of the impact more evenly over the occupant’s
upper body.
But airbags would not help in many types of
collisions, primarily because the occupant’s motion
is not toward those airbags. SeeWhen Should an
Airbag Inflate? on page 1-59for more information.
Airbags should never be regarded as anything
more than a supplement to safety belts.
1-61
Page 71 of 362
{CAUTION:
If the airbag readiness light in the instrument
panel cluster ever comes on and stays on,
it means that something may be wrong with
the airbag system. If this ever happens, have
the vehicle serviced promptly, because an
adult-size person sitting in the right front
passenger’s seat may not have the protection
of the airbag(s). SeeAirbag Readiness Light
on page 3-29for more on this, including
important safety information.A thick layer of additional material, such as a blanket
or cushion, or aftermarket equipment such as seat
covers, seat heaters, and seat massagers can affect
how well the passenger sensing system operates.
We recommend that you not use seat covers or other
aftermarket equipment other than any that GM has
approved for your speci�c vehicle. SeeAdding
Equipment to Your Airbag-Equipped Vehicle on
page 1-68for more information about modi�cations
that can affect how the system operates.
{CAUTION:
Stowing of articles under the passenger’s
seat or between the passenger’s seat cushion
and seatback may interfere with the proper
operation of the passenger sensing system.
1-67
Page 95 of 362
To program the new key:
1. Verify that the new key has a
1stamped on it.
2. Insert the already programmed key in the ignition
and start the engine. If the engine will not start,
see your dealer/retailer for service.
3. After the engine has started, turn the key to
LOCK/OFF, and remove the key.
4. Insert the key to be programmed and turn it to
the ON/RUN position within �ve seconds of the
original key being turned to the LOCK/OFF position.
The security light will turn off once the key has
been programmed.
5. Repeat Steps 1 through 4 if additional keys are
to be programmed.
If you are ever driving and the security light comes on
and stays on, you may be able to restart your engine if
you turn it off. Your PASS-Key
®III+ system, however,
is not working properly and must be serviced by
your dealer/retailer. Your vehicle is not protected by
the PASS-Key
®III+ system at this time.
If the PASS-Key
®III+ key is lost or damaged, see
your dealer/retailer or a locksmith who can service
PASS-Key
®III+ to have a new key made.
Do not leave the key or device that disarms or
deactivates the theft deterrent system in the vehicle.
Starting and Operating
Your Vehicle
New Vehicle Break-In
Notice:Your vehicle does not need an elaborate
break-in. But it will perform better in the long run
if you follow these guidelines:
Do not drive at any one constant speed,
fast or slow, for the �rst 500 miles (805 km).
Do not make full-throttle starts. Do not exceed
5,000 engine rpm. Avoid downshifting to
brake or slow the vehicle.
Avoid making hard stops for the �rst 200 miles
(322 km) or so. During this time the new brake
linings are not yet broken in. Hard stops
with new linings can mean premature wear and
earlier replacement. Follow this breaking-in
guideline every time you get new brake linings.
Do not tow a trailer during break-in. See
Towing a Trailer on page 4-29for the trailer
towing capabilities of your vehicle and more
information.
Following break-in, engine speed and load can
be gradually increased.
2-19
Page 103 of 362
REVERSE (R):Use this gear to back up.
Notice:Shifting to REVERSE (R) while your vehicle
is moving forward could damage the transmission.
The repairs would not be covered by your warranty.
Shift to REVERSE (R) only after your vehicle is
stopped.
To rock your vehicle back and forth to get out of
snow, ice or sand without damaging your transmission,
seeIf Your Vehicle is Stuck in Sand, Mud, Ice, or
Snow on page 4-21.
NEUTRAL (N):In this position, your engine does not
connect with the wheels. To restart when you are
already moving, use NEUTRAL (N) only. Also, use
NEUTRAL (N) when your vehicle is being towed.
{CAUTION:
Shifting into a drive gear while the engine is
running at high speed is dangerous. Unless
your foot is �rmly on the brake pedal, your
vehicle could move very rapidly. You could
lose control and hit people or objects. Do not
shift into a drive gear while your engine is
running at high speed.Notice:Shifting out of PARK (P) or NEUTRAL (N)
with the engine running at high speed may
damage the transmission. The repairs would not
be covered by your warranty. Be sure the engine
is not running at high speed when shifting your
vehicle.
DRIVE (D):This position is for normal driving with
the automatic transmission. It provides the best
fuel economy for your vehicle. If you need more power
for passing, and you are:
Going less than about 35 mph (55 km/h),
push the accelerator pedal about halfway down.
Going above 35 mph (55 km/h), push the
accelerator all the way down.
Downshifting the transmission in slippery road conditions
could result in skidding, see “Skidding” underLoss of
Control on page 4-12.
2-27
Page 105 of 362
The PUSH PARK PEDAL message will also appear
in the Driver Information Center (DIC) to remind you
to release the parking brake. SeeDIC Warnings
and Messages on page 3-46.
Notice:Driving with the parking brake on can
overheat the brake system and cause premature
wear or damage to brake system parts. Make sure
that the parking brake is fully released and the
brake warning light is off before driving.
Regenerative Braking
Regenerative braking takes some of the energy from
the moving vehicle and turns it back into electrical
energy. This energy is then stored back into the
vehicle’s hybrid battery system, contributing to
increased fuel efficiency.
The system works whenever you take your foot off
the accelerator pedal while your vehicle is moving
in a forward gear. This causes your vehicle to
slow down slightly faster. It may feel like the brake
pedal is being pressed, even when it is not.
Shifting Into PARK (P)
{CAUTION:
It can be dangerous to get out of your vehicle
if the shift lever is not fully in PARK (P) with
the parking brake �rmly set. Your vehicle can
roll. If you have left the engine running, the
vehicle can move suddenly. You or others
could be injured. To be sure your vehicle will
not move, even when you are on fairly level
ground, use the steps that follow.
1. Hold the brake pedal down with your right foot and
set the parking brake.
2. Move the shift lever into PARK (P) by pressing the
button on the shift lever while pushing the shift
lever all the way toward the front of the vehicle.
3. Turn the ignition key to OFF/LOCK.
4. Remove the key and take it with you. If you can
leave your vehicle with the ignition key in your
hand, your vehicle is in PARK (P).
2-29
Page 107 of 362
Shifting Out of PARK (P)
This vehicle is equipped with an electronic shift lock
release system. The shift lock release is designed to:
Prevent ignition key removal unless the shift
lever is in PARK (P) with the shift lever button
fully released, and
Prevent movement of the shift lever out of
PARK (P), unless the ignition is in ON/RUN or
ACC/ACCESSORY and the regular brake pedal
is applied.
The shift lock release is always functional except in the
case of an uncharged or low voltage (less than 9 volt)
battery.
If your vehicle has an uncharged battery or a battery
with low voltage, try charging or jump starting the
battery. SeeJump Starting on page 5-36for more
information.
To shift out of PARK (P) use the following:
1. Apply the brake pedal.
2. Then press the shift lever button.
3. Move the shift lever to the desired position.If you still are unable to shift out of PARK (P):
1. Fully release the shift lever button.
2. While holding down the brake pedal, press the
shift lever button again.
3. Move the shift lever to the desired position.
If you still cannot move the shift lever from PARK (P),
consult your dealer/retailer or a professional towing
service.
Parking Over Things That Burn
{CAUTION:
Things that can burn could touch hot exhaust
parts under your vehicle and ignite. Do not
park over papers, leaves, dry grass, or other
things that can burn.
2-31