climate control SATURN RELAY 2007 Owner's Manual
[x] Cancel search | Manufacturer: SATURN, Model Year: 2007, Model line: RELAY, Model: SATURN RELAY 2007Pages: 570, PDF Size: 3.41 MB
Page 315 of 570

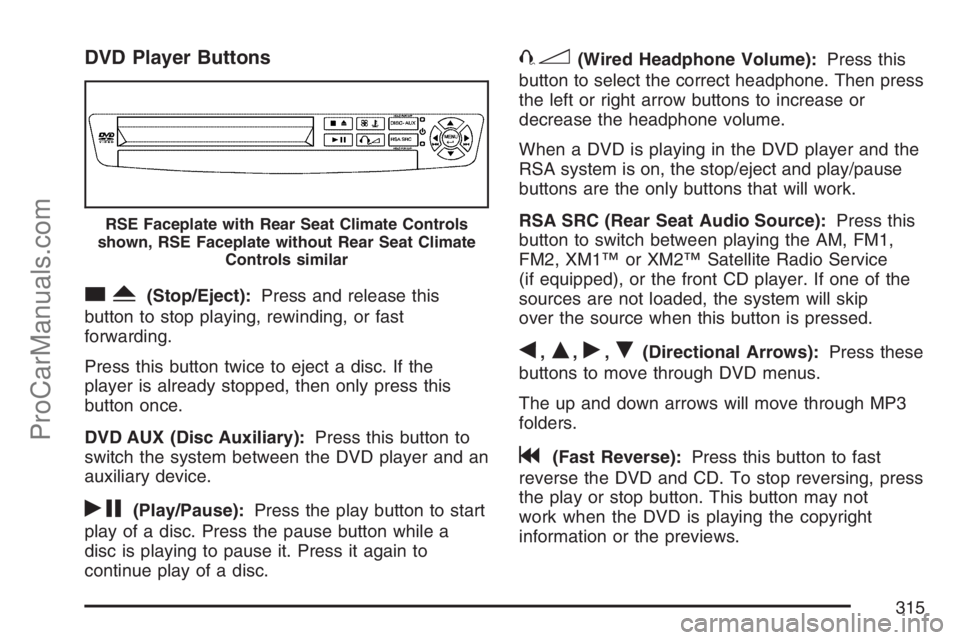
DVD Player Buttons
cY(Stop/Eject):Press and release this
button to stop playing, rewinding, or fast
forwarding.
Press this button twice to eject a disc. If the
player is already stopped, then only press this
button once.
DVD AUX (Disc Auxiliary):Press this button to
switch the system between the DVD player and an
auxiliary device.
rj(Play/Pause):Press the play button to start
play of a disc. Press the pause button while a
disc is playing to pause it. Press it again to
continue play of a disc.
43(Wired Headphone Volume):Press this
button to select the correct headphone. Then press
the left or right arrow buttons to increase or
decrease the headphone volume.
When a DVD is playing in the DVD player and the
RSA system is on, the stop/eject and play/pause
buttons are the only buttons that will work.
RSA SRC (Rear Seat Audio Source):Press this
button to switch between playing the AM, FM1,
FM2, XM1™ or XM2™ Satellite Radio Service
(if equipped), or the front CD player. If one of the
sources are not loaded, the system will skip
over the source when this button is pressed.
q,Q,r,R(Directional Arrows):Press these
buttons to move through DVD menus.
The up and down arrows will move through MP3
folders.
g(Fast Reverse):Press this button to fast
reverse the DVD and CD. To stop reversing, press
the play or stop button. This button may not
work when the DVD is playing the copyright
information or the previews.
RSE Faceplate with Rear Seat Climate Controls
shown, RSE Faceplate without Rear Seat Climate
Controls similar
315
ProCarManuals.com
Page 316 of 570

l(Fast Forward):Press this button to fast
forward the DVD and CD. To stop forwarding,
press the play or stop button. This button may not
work when the DVD is playing the copyright
information or the previews.
MENU (Disc):Press this button to view the main
DVD menu. The menu is different on every
disc. Use the up, down, right, and left arrow
buttons to move the cursor around the menu. After
making a selection, press the enter button.
r(Enter/Select):Press this button to select
the choice that is highlighted in any menu.
z(Display Control Button):For vehicles
without rear seat climate control, this button will
take the place of the fan/temp button. For vehicles
with rear seat climate control, this button is also
found on the remote control. Press this button
to open the RSE On-Screen Display (OSD) menus
to adjust the color, tint, brightness, contrast, and
display modes.
Playing a Disc
To play a disc, gently insert the disc, with the label
side up, into the loading slot. The DVD player
will continue loading the disc and the player will
automatically start if the vehicle is in
ACCESSORY, RUN, or RAP.
If a disc is already in the player, make sure that
the DVD player is on, then press the play/pause
button on the player faceplate or on the remote
control. You can also press the DVD AUX button
on the player faceplate, or the CD AUX button
on the radio faceplate until RSE appears on
the display, to start playing a disc.
Some DVDs will not allow fast forwarding or
skipping of the copyright information or previews.
Some DVDs will begin playing after the previews
have �nished. If the DVD does not begin playing at
the main title, refer to the on-screen instructions.
316
ProCarManuals.com
Page 320 of 570

\(Clear):Press this button within two seconds
after entering a numeric selection, to clear all
numeric inputs.
}10 (Multiple Digit Entries):Press this button
to select chapter or track numbers greater
than 9. Press this button before entering the
number.
RSE On-Screen Display (OSD) Menu
To use the RSE OSD menu when using a DVD or
an auxiliary device, do the following:
To access this menu, press the display button on
the remote control or on the DVD faceplate, if
you do not have rear seat climate control. Once
the menu is on the screen, use the directional
arrows and the enter button to navigate the screen.
This menu will let you select default preferences
for video format, language preference, brightness,
color, contrast, and tint. Not all DVDs support
all the feature defaults in the setup menus.If a feature is not supported, the defaults will be
provided by the DVD media. To exit this menu,
press the display button, or the return button
on the remote control, or faceplate if there is no
rear seat climate control, or wait for the menu
to time out.
The default language selection will apply to all
future DVDs.
To use the RSE OSD menu when using a CD or
an MP3, do the following:
Make sure that a CD or an MP3 is loaded in the
RSE system and that the system is not in auxiliary,
then press the display button on the remote
control, or faceplate if there is no rear seat climate
control. Once the menu is on the screen, use
the directional arrows and the enter button
to navigate the screen. This menu lets you select
default preferences for language and playback
settings. To exit this menu, press the display
button, or the return button on the remote control,
or faceplate if there is no rear seat climate
control, or wait for the menu to time out.
320
ProCarManuals.com
Page 405 of 570

CAUTION: (Continued)
This will bring fresh, outside air into
your vehicle. Do not use the climate
control setting for maximum air
because it only recirculates the air
inside your vehicle. SeeClimate
Control System on page 205orDual
Climate Control System on page 209.
Towing a trailer requires a certain amount of
experience. Before setting out for the open road,
you will want to get to know your rig. Acquaint
yourself with the feel of handling and braking
with the added weight of the trailer. And always
keep in mind that the vehicle you are driving
is now a good deal longer and not nearly
as responsive as your vehicle is by itself.Before you start, check all trailer hitch parts and
attachments, safety chains, electrical connector,
lamps, tires, and mirror adjustment. If the trailer has
electric brakes, start your vehicle and trailer moving
and then apply the trailer brake controller by hand
to be sure the brakes are working. This lets you
check your electrical connection at the same time.
During your trip, check occasionally to be sure
that the load is secure, and that the lamps and
any trailer brakes are still working.
Following Distance
Stay at least twice as far behind the vehicle ahead
as you would when driving your vehicle without
a trailer. This can help you avoid situations
that require heavy braking and sudden turns.
Passing
You will need more passing distance up ahead
when you are towing a trailer. And, because
you are a good deal longer, you will need to
go much farther beyond the passed vehicle
before you can return to your lane.
405
ProCarManuals.com
Page 477 of 570

Uniform Tire Quality Grading
Quality grades can be found where applicable on
the tire sidewall between tread shoulder and
maximum section width. For example:
Treadwear 200 Traction AA Temperature A
The following information relates to the system
developed by the United States National Highway
Traffic Safety Administration (NHTSA), which
grades tires by treadwear, traction, and
temperature performance. This applies only to
vehicles sold in the United States. The grades are
molded on the sidewalls of most passenger car
tires. The Uniform Tire Quality Grading (UTQG)
system does not apply to deep tread, winter-type
snow tires, space-saver, or temporary use
spare tires, tires with nominal rim diameters of
10 to 12 inches (25 to 30 cm), or to some
limited-production tires.
While the tires available on General Motors
passenger cars and light trucks may vary with
respect to these grades, they must also conform
to federal safety requirements and additional
General Motors Tire Performance Criteria (TPC)
standards.
Treadwear
The treadwear grade is a comparative rating
based on the wear rate of the tire when tested
under controlled conditions on a speci�ed
government test course. For example, a tire
graded 150 would wear one and a half (1.5) times
as well on the government course as a tire
graded 100. The relative performance of tires
depends upon the actual conditions of their use,
however, and may depart signi�cantly from
the norm due to variations in driving habits, service
practices, and differences in road characteristics
and climate.
Traction – AA, A, B, C
The traction grades, from highest to lowest, are AA,
A, B, and C. Those grades represent the tire’s
ability to stop on wet pavement as measured under
controlled conditions on speci�ed government test
surfaces of asphalt and concrete. A tire marked C
may have poor traction performance.
Warning:The traction grade assigned to this
tire is based on straight-ahead braking traction
tests, and does not include acceleration, cornering,
hydroplaning, or peak traction characteristics.
477
ProCarManuals.com
Page 516 of 570

Fuses Usage
BLANK Not Used
4 Left High-Beam
BLANK Not Used
BLANK Not Used
BLANK Not Used
5 Not Used
6 Air Conditioning Clutch
7 Horn
8 Left Low-Beam
9Powertrain Control Module,
Electronic Throttle Control
10 Not Used
11 Transmission Solenoid
12 Right Low-Beam
13 Anti-lock Brake System
14 Powertrain Control Module IgnitionFuses Usage
15 Electronic Ignition
16 Fuel Injector
17Climate Control, RPA,
Cruise Control
18 Electronic Throttle Control
19 Engine Sensor, Evaporator
20 Airbag
21 Not Used
22 Not Used
23 Auxiliary Power
24 Front Windshield Washer
25 AC/DC Inverter
26 Rear Blower
27 Front Blower
28 Front Windshield Wiper
516
ProCarManuals.com
Page 518 of 570

Capacities and Speci�cations
The following approximate capacities are given in English and metric measurements. SeeRecommended
Fluids and Lubricants on page 530for more information.
Capacities and Speci�cations
ApplicationCapacities
English Metric
Air Conditioning Refrigerant R134aFor the air conditioning system refrigerant charge
amount, see the refrigerant caution label located under
the hood. See your dealer for more information.
Automatic Transaxle — Pan Removal and Replacement 7.4 qt 7.0 L
Cooling System
3.9L Engine Front Climate Controls Only 10.77 qt 10.2 L
3.9L Engine with Rear Climate Controls 12.11 qt 11.55 L
Engine Oil with Filter 4.0 qt 3.8 L
Fuel Capacity 25.1 gal 95.0 L
Wheel Nut Torque 100 ft lb
140Y
All capacities are approximate. When adding, be sure to �ll to the approximate level, as recommended in this manual.
Recheck �uid level after �lling.
Engine Speci�cations
Engine VIN Code Transaxle Spark Plug Gap
3.9L V6 1 Automatic 0.040 in (1.1 mm)
518
ProCarManuals.com
Page 558 of 570

Climate Control System............................... 205
Air Filter, Passenger Compartment........... 217
Dual......................................................... 209
Outlet Adjustment..................................... 212
Rear...............................................212, 215
Collision Damage Repair............................. 548
Comfort Guides, Rear Safety Belt................. 52
Compact Spare Tire.................................... 500
Compass..................................................... 240
Content Theft-Deterrent............................... 133
Control of a Vehicle..................................... 362
Convenience Net......................................... 173
Coolant
Engine Temperature Gage........................ 228
Heater, Engine......................................... 141
Cooling System........................................... 438
Cruise Control............................................. 188
Cruise Control Light.................................... 233
Cupholder(s)................................................ 167
Customer Assistance Information
Customer Assistance for Text
Telephone (TTY) Users......................... 542
Customer Assistance Offices.................... 542
Customer Satisfaction Procedure.............. 538
GM Mobility Reimbursement Program...... 543
Reporting Safety Defects to Saturn.......... 552Customer Assistance Information (cont.)
Reporting Safety Defects to the
Canadian Government.......................... 552
Reporting Safety Defects to the
United States Government.................... 552
Roadside Assistance Program.................. 543
Service Publications Ordering
Information........................................... 553
D
Daytime Running Lamps/Automatic
Headlamp System.................................... 193
Defensive Driving........................................ 358
Delayed Lighting.......................................... 196
Delayed Locking.......................................... 116
DIC Compass.............................................. 240
Disc, MP3................................................... 287
Doing Your Own Service Work.................... 413
Dome Lamp................................................ 196
Door
Automatic Door Lock................................ 117
Delayed Locking...................................... 116
Dual Sliding Doors................................... 118
Locks....................................................... 114
558
ProCarManuals.com
Page 559 of 570

Door (cont.)
Power Door Locks................................... 116
Power Sliding Door.................................. 121
Programmable Automatic Door Unlock..... 118
Driver
Position, Safety Belt................................... 38
Driver Information Center (DIC)................... 234
DIC Operation and Displays..................... 235
DIC Vehicle Personalization..................... 261
DIC Warnings and Messages................... 241
Driving
At Night................................................... 375
City.......................................................... 380
Defensive................................................. 358
Drunken................................................... 359
Freeway................................................... 381
Hill and Mountain Roads.......................... 384
In Rain and on Wet Roads...................... 376
Rocking Your Vehicle to Get it Out.......... 391
Winter...................................................... 386
Dual Climate Control System....................... 209
DVD
Rear Seat Entertainment System.....294, 309E
Electric Power Management........................ 198
Electrical System
Add-On Equipment................................... 511
Fuses and Circuit Breakers...................... 512
Headlamp Wiring..................................... 511
Instrument Panel Fuse Block................... 512
Power Windows and Other Power
Options................................................. 511
Underhood Fuse Block............................. 514
Windshield Wiper Fuses........................... 511
Engine
Air Cleaner/Filter...................................... 428
Battery..................................................... 449
Check and Service Engine Soon Light..... 229
Coolant.................................................... 432
Coolant Heater......................................... 141
Coolant Temperature Gage...................... 228
Drive Belt Routing.................................... 533
Engine Compartment Overview ................ 422
Exhaust................................................... 151
Oil ........................................................... 423
559
ProCarManuals.com
Page 565 of 570

P
Paint, Damage............................................ 508
Park Aid...................................................... 200
Park (P)
Shifting Into............................................. 148
Shifting Out of......................................... 149
Parking
Assist....................................................... 200
Brake....................................................... 147
Over Things That Burn............................ 150
Passenger Airbag Status Indicator............... 224
Passenger Compartment Air Filter............... 217
Passenger Sensing System........................... 93
Passing....................................................... 372
PASS-Key
®III ............................................. 135
PASS-Key®III Operation............................. 136
Power
Accessory Outlet(s).................................. 203
Door Locks.............................................. 116
Electrical System..................................... 511
Outlet 115 Volt Alternating Current........... 204
Rear Quarter Windows............................. 132
Retained Accessory (RAP)....................... 139
Seat.......................................................... 10Power (cont.)
Sliding Door............................................. 121
Steering Fluid.......................................... 443
Windows.................................................. 131
Pretensioners, Safety Belt............................. 55
Programmable Automatic Door Unlock......... 118
Q
Questions and Answers About Safety Belts ... 37
R
Radiator Pressure Cap................................ 435
Radios........................................................ 270
Care of Your CD and DVD Player............ 355
Care of Your CDs and DVDs................... 355
Navigation/Radio System, see
Navigation Manual................................ 294
Radio with CD......................................... 272
Rear Seat Audio.............................325, 328
Setting the Time...................................... 272
Theft-Deterrent......................................... 352
Understanding Reception......................... 354
Rear Climate Control System.............212, 215
565
ProCarManuals.com