remove seats Seat Alhambra 2011 Owner's Manual
[x] Cancel search | Manufacturer: SEAT, Model Year: 2011, Model line: Alhambra, Model: Seat Alhambra 2011Pages: 385, PDF Size: 7.92 MB
Page 19 of 385
17
Seat belts WARNING (Continued)
● If the fabric or other parts of the seat belt are damaged, the seat belts
c ou
ld break in the event of an accident or sudden braking.
● Always have damaged seatbelts replaced immediately by seat belts
appro
ved for the vehicle in question by SEAT. Seat belts which have been
worn in an accident and stretched must be replaced by a Technical Serv-
ice. Renewal may be necessary even if there is no apparent damage. The
belt anchorage should also be checked.
● Never attempt to repair, modify or remove a seat belt yourself. All re-
pairs
to seat belts, retractors and buckles must be carried out by a spe-
cialist workshop.
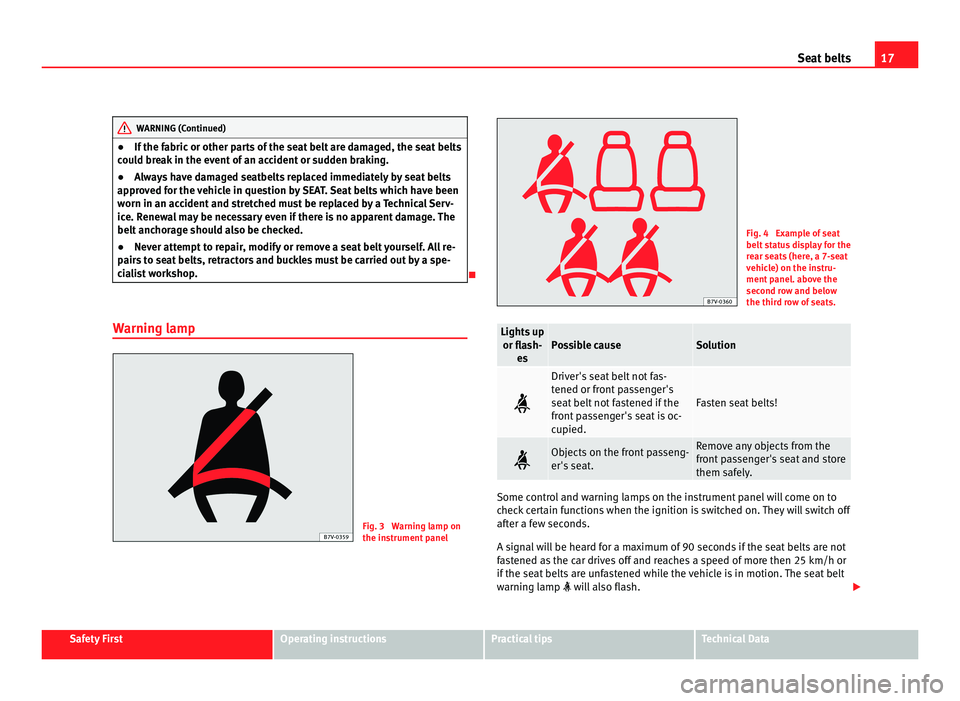
Warning lamp Fig. 3 Warning lamp on
the ins
trument
panel Fig. 4 Example of seat
belt s
t
atus display for the
rear seats (here, a 7-seat
vehicle) on the instru-
ment panel. above the
second row and below
the third row of seats. Lights up
or fla sh-
e
s Possible cause Solution
Driver's seat belt not fas-
tened or fr
ont
passenger's
seat belt not fastened if the
front passenger's seat is oc-
cupied. Fasten seat belts!
Objects on the front passeng-
er's se
at
. Remove any objects from the
front
p
assenger's seat and store
them safely. Some control and warning lamps on the instrument panel will come on to
chec
k
certain functions when the ignition is switched on. They will switch off
after a few seconds.
A signal will be heard for a maximum of 90 seconds if the seat belts are not
fastened as the car drives off and reaches a speed of more then 25 km/h or
if the seat belts are unfastened while the vehicle is in motion. The seat belt
warning lamp will also flash. Safety First Operating instructions Practical tips Technical Data
Page 38 of 385
36
Airbag system
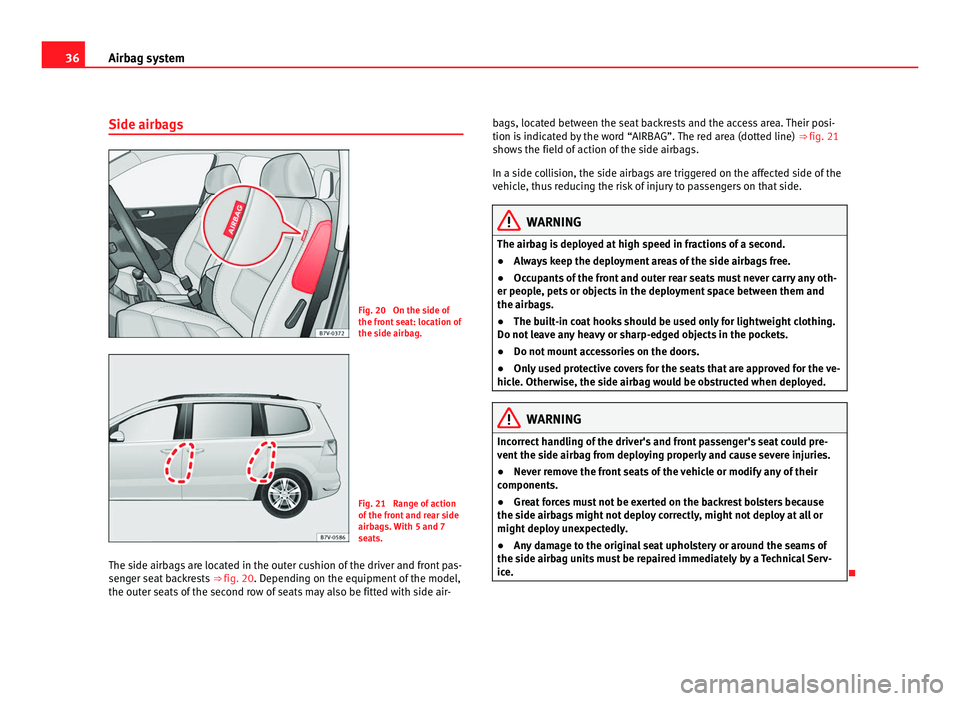
Side airbags Fig. 20 On the side of
the front
se
at: location of
the side airbag. Fig. 21 Range of action
of the fr
ont
and rear side
airbags. With 5 and 7
seats.
The side airbags are located in the outer cushion of the driver and front pas-
senger se
at backrests ⇒ fig. 20. Depending on the equipment of the model,
the outer seats of the second row of seats may also be fitted with side air- bags, located between the seat backrests and the access area. Their posi-
tion is indic
ated by the word “AIRBAG”. The red area (dotted line) ⇒ fig. 21
shows the field of action of the side airbags.
In a side collision, the side airbags are triggered on the affected side of the
vehicle, thus reducing the risk of injury to passengers on that side. WARNING
The airbag is deployed at high speed in fractions of a second.
● Always keep the deployment areas of the side airbags free.
● Occupants of the front and outer rear seats must never carry any oth-
er peopl e, pet
s or objects in the deployment space between them and
the airbags.
● The built-in coat hooks should be used only for lightweight clothing.
Do not le
ave any heavy or sharp-edged objects in the pockets.
● Do not mount accessories on the doors.
● Only used protective covers for the seats that are approved for the ve-
hicle. Other
wise, the side airbag would be obstructed when deployed. WARNING
Incorrect handling of the driver's and front passenger's seat could pre-
vent the s
ide airbag from deploying properly and cause severe injuries.
● Never remove the front seats of the vehicle or modify any of their
components.
● Gr
eat forces must not be exerted on the backrest bolsters because
the side airbag
s might not deploy correctly, might not deploy at all or
might deploy unexpectedly.
● Any damage to the original seat upholstery or around the seams of
the side airbag u
nits must be repaired immediately by a Technical Serv-
ice.
Page 46 of 385
44
Child safety Group (weight
cat e
gory) ISOFIX child seat cate-
gory Seat position on the rear seats
Group 0: chil-
dr en up t
o 10 kg E IUF
a) Group 0+: chil-
dr en up t
o 13 kg E IUF
a) D IUF
a) C IUF
a) Group 1: 9 to 18
kg D IUF
a) C IUF
a) B IUF
a) B1 IUF
a) A IUF
a) a)
IUF: suitable for “universal” ISOFIX child seats authorised for use in this group. WARNING
If child seats are fitted to all the seats in the second row then it is possi-
bl e th
at the seats of this row cannot be folded down from the third row of
seats in case of an accident. In case of an emergency, passengers in the
third row of seats will not be able to leave the vehicle or to help them-
selves.
● Child seats should not occupy all the seats of the second row if other
pas
sengers are to occupy the third row of seats.
Securing child seats with the seat belt Securing the child seat using the seat belt
●
Please read and observe the child seat manufacturer's handling instruc-
tions.
● Po
sitioning the child seat on the seat according to the manufacturer's
instruction
s. ●
The seat belt height adjustment must be as high as possible.
● Fa
sten the seat belt or pass it around the child seat structure in the man-
ner desc
ribed in the manufacturer's instructions.
● Make sure the seat belt is not twisted.
● Insert the latch plate into the buckle for the appropriate seat and push it
down unti
l it is securely locked with an audible click.
● Ensure that the upper belt web lies tightly on the child seat.
● Pull the belt (it must be no longer possible to pull the lower belt web-
bing out).
R
emoving the child seat
The seat belt must not be unfastened until the vehicle has come to a stand-
still ⇒ .
● Press the red button on the buckle. The latch plate is released from the
buc k
le.
● Guide the belt back by hand so that it rolls up easily and the trim will not
be damag
ed.
● Remove the child seat from the vehicle. WARNING
Unbuckling the seat belt while the vehicle is in motion can cause severe
or fat a
l injuries in the event of an accident or sudden braking.
● The seat belt must not be unfastened until the vehicle has come to a
stand
still.
Page 52 of 385
50
Child safety
Seat belt guide handle
● Secure the seat belt guide handle to the side head restraint on the win-
dow s ide.
The guide handle is secured by a button.
● Open the upper button on the seat belt guide handle and pass the belt
webb
ing below the side head restraint and through the guide handle.
● Close the button again.
Adjustin
g the belt routing
● Guide the automatic three-point seat belt below the side head restraint.
● Pull the latch plate and slowly place the belt webbing across the child's
ches
t and lap.
● Insert the latch plate into the buckle for the appropriate seat and push it
down unti
l it is securely locked with an audible click.
● Pull the belt to ensure that the latch plate is securely engaged in the
buck
le. WARNING
The seat belt only offers maximum protection from severe or fatal injuries
when it i s
correctly positioned.
● Children must assume the proper sitting position and be properly bel-
ted in whil
e travelling.
● The shoulder belt must be positioned against the middle of the
shoulder
.
● The seat belt must lie flat and fit comfortably.
● Allow the belt to retract until it fits tightly over the child's seat.
● The lap part of the seat belt must lie across the pelvis, never across
the stom
ach.
● Only one child may occupy a child seat. Removing the seat belt
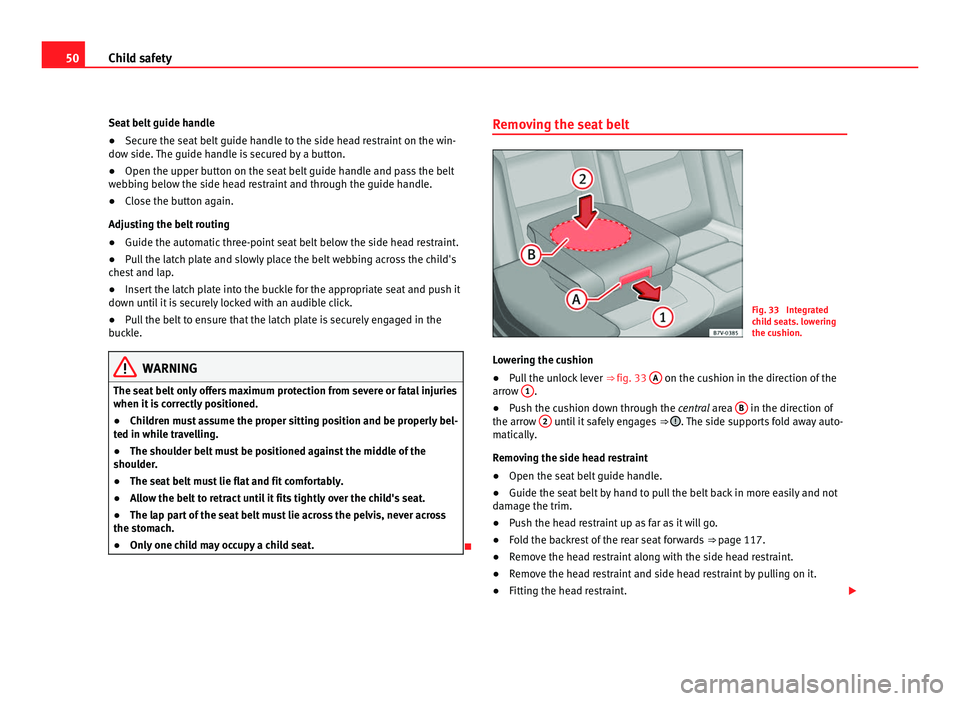
Fig. 33 Integrated
chi
l
d seats. lowering
the cushion.
Lowering the cushion
● Pull the unlock lever ⇒ fig. 33 A on the cushion in the direction of the
arro w 1 .
● Push the cushion down through the cen tr
al area B in the direction of
the arro w 2 until it safely engages
⇒ . The side supports fold away auto-
matic al
ly.
Removing the side head restraint
● Open the seat belt guide handle.
● Guide the seat belt by hand to pull the belt back in more easily and not
damag
e the trim.
● Push the head restraint up as far as it will go.
● Fold the backrest of the rear seat forwards ⇒ page 117.
● R
emove the head restraint along with the side head restraint.
● Remove the head restraint and side head restraint by pulling on it.
● Fitting the head restraint.
Page 92 of 385
90
Unlocking and locking
After turning off the ignition, the windows can be opened and closed for a
short time u
sing the buttons on the door as long as the driver's door or pas-
senger side door is not open. When the key is removed from the ignition
and the driver's door is open, all of the electric windows can be opened or
closed using the corresponding button on the driver's door. After a few sec-
onds, the convenience opening or closing function will begin ⇒ page 90.
Electric windows: functions One-touch opening and closing
The one-touc
h aut
omatic opening and closing is used to open or close the
windows completely. It will not be necessary to hold the button of the corre-
sponding electric window.
For the one-touch closing function: pull up on the button for the window to
the second position.
For the one-touch opening function: Push down the button for the window
to the second position.
To stop the one touch function: Push or pull on the button of the corre-
sponding window.
Restoring one-touch opening and closing
The one-touch opening and closing function is not active after the vehicle
battery has been disconnected or is flat and will have to be reset.
● Close all windows and doors.
● Pull the button of the corresponding window and hold it for one second
in this po
sition.
● Release the button and pull upwards and hold again. The one-touch
function i
s now ready for operation.
The automatic one-touch electric windows can be reinitialised individually
or several at a time. Convenience opening and closing function
The electric w
indows can be opened or closed from outside using the vehi-
cle key:
● Hold in the unlocking for locking button for the vehicle. All windows
which fu
nction electrically will be either opened or closed.
● To interrupt the function, release the locking or unlocking button.
During c
onvenience closing, first the windows and then the sliding sunroof
will be closed.
In the Configuration - convenience menu, there are different settings for oper- ating the windows ⇒ page 62. WARNING
Careless use of the electric windows can cause serious injury.
● Only operate the electric windows when nobody is in the way.
● Never leave children or disabled people alone in the vehicle if the
doors ar
e to be locked. The windows cannot be opened in case of an
emergency.
● Always take all the keys with you whenever you leave the vehicle. Af-
ter turnin
g off the ignition, the windows can be opened and closed for a
short time using the buttons on the door as long as the driver's door or
passenger side door is not open.
● When transporting children in the rear seats, always deactivate the
rear el
ectric windows with the child safety lock so that they cannot be
opened and closed. Note
The one-touch function and roll-back function will not work if there is a mal-
fu nction in the el
ectric windows. Visit a specialist workshop.
Page 118 of 385
116
Seats and storage compartments
Adjusting the rear seats Fig. 78 Adjusting rear
seat
s. ⇒ fig. 7
5 Function Necessary operations
1 Adjusting the backrest
angl
e. Pull the lever and adjust the backrest
to the r
equir
ed position ⇒ . The
bac k
rest must be engaged when the
lever is released! There is a handle in-
stead of the lever on the third row of
seats and on the central seat of the
second row. It is used in the same
manner as the lever. 2 On the second row of
seat
s
only: Moving the
seat backwards or for-
wards. Pull the lever and move the seat for-
war
d
s or backwards. The seat must be
engaged when the lever is released! CAUTION
● Tilting the backrest of the second row of seats fully back could damage
the lug g
age compartment tray. Remove the tray before adjusting the back-
rest.
● Objects in the luggage compartment could cause damage when moving
the rear se
ats forwards or backwards.
Page 122 of 385
120
Seats and storage compartments
Convenient entry function for the third row of seats Fig. 81 Second row of
seat
s: c
onvenient entry
function controls.
The outer seats of the second row can be folded to make it easier to get in
and out of the thir
d row of seats.
Folding down the seat of the second row
● If necessary, open the belt loop and wind up the seat belt by hand.
● If necessary, remove the side head restraint of the integrated child seat
⇒ page 46.
● If
necessary, raise the armrests.
● Remove any objects located in the floor area of the second row of seats,
where app
licable ⇒ .
● Push the head restraint down as far as it will go ⇒ page 10.
● P
ush the lever ⇒ fig. 81 1 forwards and fold the backrest of the rear
seat .
The seat can still be moved forwards when rear seat is folded com-
pletely forwards ⇒ .
● Always take care when entering and leaving the vehicle ⇒ .Repositioning the seat of the second row
●
Lift the backrest of the rear seat in an upright position. The entire seat
fo l
ds backwards ⇒ .
● Make sure that the rear seat is securely engaged so that the seat belts
can pr o
vide proper protection in the rear seats. The red mark 2 should no
long er be
visible ⇒ in Folding down rear seats to create load space on
pag e 128.
Emer
gency exit function
If the lever 1 does not work, e.g. after an accident, the seats on the second
ro w c
an be folded forwards from the third row to allow occupants of the
third row of seats to get out of the vehicle ⇒ .
● Pull handle 3 back and fold the backrest of the rear seat. The complete
re ar se
at folds forward ⇒ .
WARNING
Careless or uncontrolled use of the convenient entry assistant may result
in sever e injur
y and accident.
● Never use the convenient entry function when the vehicle is in mo-
tion.
● Avoid trapping or damaging the seat belt when folding the rear seats
back.
● K
eep your hands, fingers, feet and other body parts out of the hinges
and the seat loc
king mechanism when folding and unfolding.
● Mats or other objects can be caught in the hinges of the backrests or
rear se
at. This could prevent the backrest from locking safely when posi-
tioned upright.
● All backrests must engage correctly for the seat belts on the rear
seats
to work properly. When the backrest of an occupied seat is not cor-
rectly locked in place, the passenger can be thrust forward with the back-
rest in case of sudden braking, sudden manoeuvres or an accident.
Page 123 of 385
121
Seats and storage compartments WARNING (Continued)
● A red mark on the side of the seat 2 indicates that the backrest is
not eng
aged. The mark is no longer visible when the backrest is correctly
engaged.
● If the backrest or seat are folded down and are not correctly locked in
plac
e, no passenger should use them.
● When getting in or out, never lean or hold onto the folded seat on the
second ro
w of seats. WARNING
If child seats are fitted to all the seats in the second row then it is possi-
bl e th
at the seats of this row cannot be folded down from the third row of
seats in case of an accident. In case of an emergency, passengers in the
third row of seats will not be able to leave the vehicle or to help them-
selves.
● Child seats should not occupy all the seats of the second row if other
pas
sengers are to occupy the third row of seats. CAUTION
● Before folding down the rear backrest for returning it to its position, ad-
ju s
t the front seats so that the head restraints and seatbacks do not hit off
each other when folding and unfolding.
● Any objects located in the floor area of the second row of seats may be
damag
ed on folding the rear seat forwards. Remove any objects before fold-
ing the seat down. Folding the backrest of the front passenger seat*
Fig. 82 Folding the back-
re
s
t of the front passeng-
er's seat. Fig. 83 Unlocking the
fo
l
ding backrest of the
front passenger's seat.
The backrest of the front passenger's seat can be folded and locked hori-
zontal
ly. Safety First Operating instructions Practical tips Technical Data
Page 124 of 385
122
Seats and storage compartments
The front passenger's frontal airbag must be disconnected ⇒ page 31 if ob-
jects are being transported on the folded front passenger's seat.
Folding the backrest of the front passenger's seat
● Remove any objects from the front passenger's seat cushion ⇒ .
● Adjust the front passenger's seat to its lowest position ⇒ page 10.
● P
ush the head restraint down as far as it will go ⇒ page 10.
● Un
lock the backrest of the front passenger's seat in the direction of the
arrow
⇒ fig. 82 1 .
● Fold the backrest of the front passenger's seat forwards in the direction
of the arr o
w 2 until it is horizontal.
● The backrest of the front passenger's seat must engage safely in its fol-
ded pos ition.
Lif
ting the backrest of the front passenger seat
● Check that there are no objects or parts of the body in the hinge area.
● Lift the backrest of the front passenger's seat by first unlocking it again
⇒ fig. 83.
● Lift the backrest of the front passenger seat until it is upright. The back-
res
t must be engaged.
● The upright backrest of the front passenger's seat must safely engage. WARNING
Folding and lifting the backrest of the front passenger's seat uncontrolla-
bly or w
ithout paying attention may lead to severe injuries.
● Only fold and lift the backrest of the front passenger's seat when the
vehicl
e is stationary.
● While the backrest of the front passenger's seat is folded, the frontal
airbag mus
t remain disconnected and the PASSENGER AIRBAG OFF light
on. WARNING (Continued)
● Keep your hands, fingers, feet and other body parts out of the hinges
and the se at
locking mechanism when folding and unfolding.
● Mats or other objects can be caught in the hinges of the backrest of
the front p
assenger's seat. This could prevent the backrest from locking
safely when positioned upright.
● The upright backrest of the front passenger's seat must engage. If the
back
rest of the front passenger's seat is not locked, it may suddenly
move and cause severe injuries. WARNING
Seat anchors and hinges exposed when the backrest of the front pas-
seng er's
seat is folded may lead to severe injuries in the event of an acci-
dent or sudden braking.
● Never carry people or children on the front passenger's seat when the
back
rest is folded.
● When the backrest of the front passenger's seat is folded, only the
outer seat
behind the driver on the second row of seats may be occupied.
This also applies to children sitting in a child seat.
Page 125 of 385
123
Seats and storage compartments
Head restraints Adjus tin
g the head restraints Fig. 84 Adjusting the
front
he
ad restraints. Fig. 85 Adjusting the
re
ar he
ad restraints.
All seats are equipped with a head restraint. Adjusting height
●
Push the head restraint up or down in the direction of the arrow with the
button pr
essed ⇒ fig. 84 1 or ⇒
fig. 85 1 ⇒ .
● The head restraint must engage securely in position. There are three
pos s
ible positions on the second row of seats and two possible positions
on the third row of seats.
Correct adjustment of head restraints
Adjust the head restraint so that its upper edge is at the same level as the
top of your head, or as close as possible to the same level as the top of your
head and under no circumstances below eye level. Keep the back of your
neck as close as possible to the head restraint.
Adjusting the head restraint for short people
Lower the head restraint completely, even if your head is below its upper
edge. When the head restraint is at its lowest, it is possible that a small gap
remains between it and the backrest.
Adjusting the head restraint for tall people
Raise the head restraint completely. WARNING
Travelling with the head restraints removed or improperly adjusted in-
cr e
ases the risk of severe or fatal injuries in the event of accidents and
sudden braking or manoeuvres.
● Always fit and adjust the head restraint properly whenever a person
is oc
cupying a seat.
● All occupants must correctly adjust the head restraint according to
their height to r
educe the risk of back injuries in the event of an accident.
The upper edge of the head restraint must be as close as possible to the
same level as the top of your head and under no circumstances below eye
level. Keep the back of your neck as close as possible to the head re-
straint.
● Never adjust the head restraint while the vehicle is in motion.
Safety First Operating instructions Practical tips Technical Data