steering wheel Seat Alhambra 2017 Owner's Manual
[x] Cancel search | Manufacturer: SEAT, Model Year: 2017, Model line: Alhambra, Model: Seat Alhambra 2017Pages: 320, PDF Size: 6.88 MB
Page 5 of 320
Table of Contents
Table of Contents
The e s
senti
als . . . . . . . . . . . . . . . . . . . . . . . . 5
Exterior view . . . . . . . . . . . . . . . . . . . . . . . . . . . . 5
Exterior view . . . . . . . . . . . . . . . . . . . . . . . . . . . . 6
Interior view (left-hand drive) . . . . . . . . . . . . . . 7
How it works . . . . . . . . . . . . . . . . . . . . . . . . . . . . 8
Unlocking and locking . . . . . . . . . . . . . . . . . . . . 8
Before driving . . . . . . . . . . . . . . . . . . . . . . . . . . . 13
Airbags . . . . . . . . . . . . . . . . . . . . . . . . . . . . . . . . 17
Child seats . . . . . . . . . . . . . . . . . . . . . . . . . . . . . 21
Starting the vehicle . . . . . . . . . . . . . . . . . . . . . . 24
Lights and visibility . . . . . . . . . . . . . . . . . . . . . . 24
SEAT information system . . . . . . . . . . . . . . . . . . 26
Cruise control . . . . . . . . . . . . . . . . . . . . . . . . . . . 32
Warning lamps . . . . . . . . . . . . . . . . . . . . . . . . . . 32
Gearbox lever . . . . . . . . . . . . . . . . . . . . . . . . . . . 34
Air conditioning . . . . . . . . . . . . . . . . . . . . . . . . . 36
Fluid Level control . . . . . . . . . . . . . . . . . . . . . . . 39
Emergencies . . . . . . . . . . . . . . . . . . . . . . . . . . . . 42
Fuses . . . . . . . . . . . . . . . . . . . . . . . . . . . . . . . . . . 42
Bulbs . . . . . . . . . . . . . . . . . . . . . . . . . . . . . . . . . . 43
Action in the event of a puncture . . . . . . . . . . . 44
Changing a wheel . . . . . . . . . . . . . . . . . . . . . . . 45
Snow chains . . . . . . . . . . . . . . . . . . . . . . . . . . . . 49
Emergency towing of the vehicle . . . . . . . . . . . 50
How to jump start . . . . . . . . . . . . . . . . . . . . . . . . 51
Changing windscreen wipers . . . . . . . . . . . . . . 54
Safety . . . . . . . . . . . . . . . . . . . . . . . . . . . . . . . . 56
Safe driving . . . . . . . . . . . . . . . . . . . . . . . . . . . . 56
Safety first! . . . . . . . . . . . . . . . . . . . . . . . . . . . . . 56
Advice about driving . . . . . . . . . . . . . . . . . . . . . 56
Correct position of the vehicle occupants . . . . 57
Pedal area . . . . . . . . . . . . . . . . . . . . . . . . . . . . . . 60 Seat belts
. . . . . . . . . . . . . . . . . . . . . . . . . . . . . . 61
Why wear a seat belt? . . . . . . . . . . . . . . . . . . . . 61
How to properly adjust your seatbelt . . . . . . . . 64
Seat belt tensioners . . . . . . . . . . . . . . . . . . . . . . 67
Airbag system . . . . . . . . . . . . . . . . . . . . . . . . . . 68
Brief introduction . . . . . . . . . . . . . . . . . . . . . . . . 68
Airbag safety instructions . . . . . . . . . . . . . . . . . 71
Deactivating airbags . . . . . . . . . . . . . . . . . . . . . 72
Transporting children safely . . . . . . . . . . . . . . . 74
Safety for children . . . . . . . . . . . . . . . . . . . . . . . 74
Child seats . . . . . . . . . . . . . . . . . . . . . . . . . . . . . 75
Integrated child seat . . . . . . . . . . . . . . . . . . . . . 78
Emergencies . . . . . . . . . . . . . . . . . . . . . . . . . . 82
Self-help . . . . . . . . . . . . . . . . . . . . . . . . . . . . . . . 82
In case of emergency . . . . . . . . . . . . . . . . . . . . . 82
Vehicle tool kit* . . . . . . . . . . . . . . . . . . . . . . . . . 82
Changing a wheel* . . . . . . . . . . . . . . . . . . . . . . . 84
Tyre repair . . . . . . . . . . . . . . . . . . . . . . . . . . . . . . 85
Changing the windscreen wiper blades . . . . . . 87
Tow-starting and towing . . . . . . . . . . . . . . . . . . 87
Emergency locking and unlocking . . . . . . . . . . 89
Fuses and bulbs . . . . . . . . . . . . . . . . . . . . . . . . . 90
Fuses . . . . . . . . . . . . . . . . . . . . . . . . . . . . . . . . . . 90
Changing bulbs . . . . . . . . . . . . . . . . . . . . . . . . . 91
Operation . . . . . . . . . . . . . . . . . . . . . . . . . . . . . 99
General instrument panel . . . . . . . . . . . . . . . . . 99
Instrument panel . . . . . . . . . . . . . . . . . . . . . . . . 98
Instruments . . . . . . . . . . . . . . . . . . . . . . . . . . . . 100
Control lamps . . . . . . . . . . . . . . . . . . . . . . . . . . . 105
Communications and multimedia . . . . . . . . . . . 106
Steering wheel controls* . . . . . . . . . . . . . . . . . . 106
Multimedia . . . . . . . . . . . . . . . . . . . . . . . . . . . . . 108
Three button unit in headliner . . . . . . . . . . . . . . 108
Opening and closing . . . . . . . . . . . . . . . . . . . . . 110
Vehicle key set . . . . . . . . . . . . . . . . . . . . . . . . . . 110
Central locking and locking system . . . . . . . . . 112 Doors . . . . . . . . . . . . . . . . . . . . . . . . . . . . . . . . . . 119
Sliding doors . . . . . . . . . . . . . . . . . . . . . . . . . . . 119
Rear lid . . . . . . . . . . . . . . . . . . . . . . . . . . . . . . . . 122
Electric windows . . . . . . . . . . . . . . . . . . . . . . . . . 125
Panoramic sliding sunroof* . . . . . . . . . . . . . . . . 126
Lights and visibility
. . . . . . . . . . . . . . . . . . . . . . 128
Lights . . . . . . . . . . . . . . . . . . . . . . . . . . . . . . . . . 128
Visibility . . . . . . . . . . . . . . . . . . . . . . . . . . . . . . . 134
Windscreen wiper and window wiper sys-
tems . . . . . . . . . . . . . . . . . . . . . . . . . . . . . . . . . . 135
R
ear vision mirror . . . . . . . . . . . . . . . . . . . . . . . . 137
Seats and head restraints . . . . . . . . . . . . . . . . . 140
Adjusting the seats and head restraints . . . . . . 140
Seat functions . . . . . . . . . . . . . . . . . . . . . . . . . . 144
Transport and practical equipment . . . . . . . . . 150
Transporting objects . . . . . . . . . . . . . . . . . . . . . 150
Luggage compartment . . . . . . . . . . . . . . . . . . . . 152
Roof carrier* . . . . . . . . . . . . . . . . . . . . . . . . . . . . 161
Storage compartments . . . . . . . . . . . . . . . . . . . 163
Drink holders . . . . . . . . . . . . . . . . . . . . . . . . . . . 168
Ashtray and cigarette lighter* . . . . . . . . . . . . . . 170
Power sockets . . . . . . . . . . . . . . . . . . . . . . . . . . . 170
Air conditioning . . . . . . . . . . . . . . . . . . . . . . . . . 173
Air conditioning . . . . . . . . . . . . . . . . . . . . . . . . . 173
Auxiliary heater* (additional heater) . . . . . . . . 177
Driving . . . . . . . . . . . . . . . . . . . . . . . . . . . . . . . . 181
Address . . . . . . . . . . . . . . . . . . . . . . . . . . . . . . . . 181
Stopping and starting the engine . . . . . . . . . . . 182
Braking and parking . . . . . . . . . . . . . . . . . . . . . 187
Gearbox . . . . . . . . . . . . . . . . . . . . . . . . . . . . . . . . 192
Run-in and economical driving . . . . . . . . . . . . . 197
Engine management and exhaust gas purifica-
tion syst
em . . . . . . . . . . . . . . . . . . . . . . . . . . . . . 200
Driving tips . . . . . . . . . . . . . . . . . . . . . . . . . . . . . 202
Driver assistance systems . . . . . . . . . . . . . . . . . 203
Braking and stability systems . . . . . . . . . . . . . . 203
Start assist systems . . . . . . . . . . . . . . . . . . . . . . 205
Parking distance warning system* . . . . . . . . . . 208 3
Page 18 of 320
The essentials
Seat belt tensioners In the event of a head-on, lateral or rear colli-
sion, the se
at
belts on the front seats and the
outer seats of the second row will tighten au-
tomatically.
The tensioner can be triggered only once.
››› in Service and disposal of belt ten-
sion devices on page 68
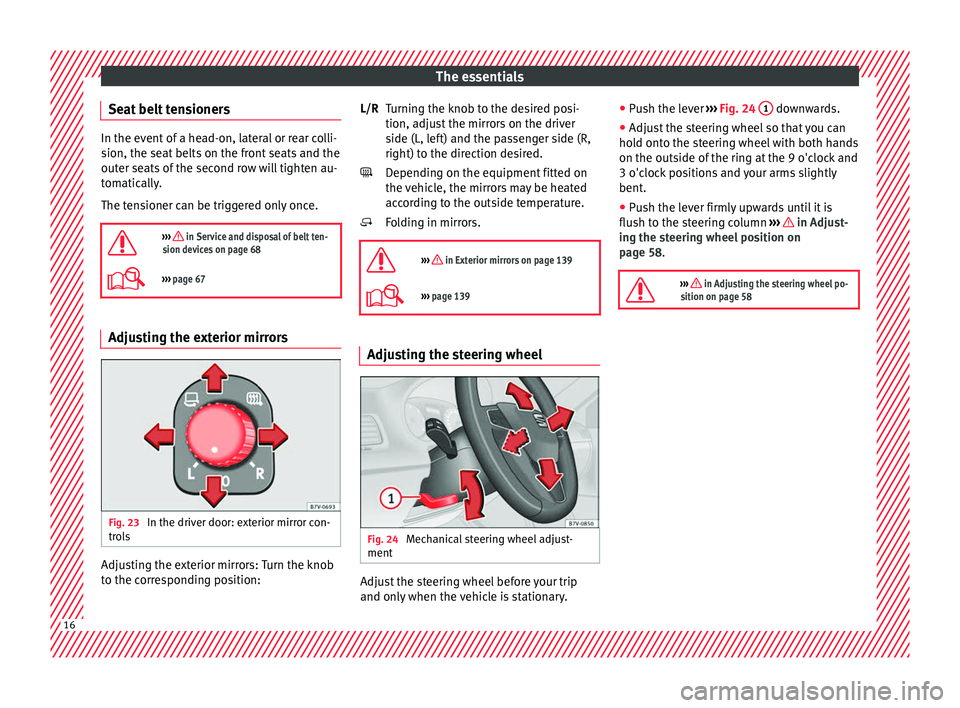
››› page 67 Adjusting the exterior mirrors
Fig. 23
In the driver door: exterior mirror con-
tr o
l
s Adjusting the exterior mirrors: Turn the knob
t
o the c
orr
esponding position: Turning the knob to the desired posi-
tion, adjus
t the mirrors on the driver
side (L, left) and the passenger side (R,
right) to the direction desired.
Depending on the equipment fitted on
the vehicle, the mirrors may be heated
according to the outside temperature.
Folding in mirrors.
››› in Exterior mirrors on page 139
››› page 139 Adjusting the steering wheel
Fig. 24
Mechanical steering wheel adjust-
ment Adjust the steering wheel before your trip
and on
ly
when the
vehicle is stationary.
L/R
●
Push the l
ever ››› Fig. 24 1 downwards.
● Adjust the steering wheel so that you can
ho l
d ont
o the steering wheel with both hands
on the outside of the ring at the 9 o'clock and
3 o'clock positions and your arms slightly
bent.
● Push the lever firmly upwards until it is
flush to the s
teering column ››› in Adjust-
in g the s
t
eering wheel position on
page 58.
››› in Adjusting the steering wheel po-
sition on page 58 16
Page 19 of 320
The essentials
Airbags Fr ont
Airb
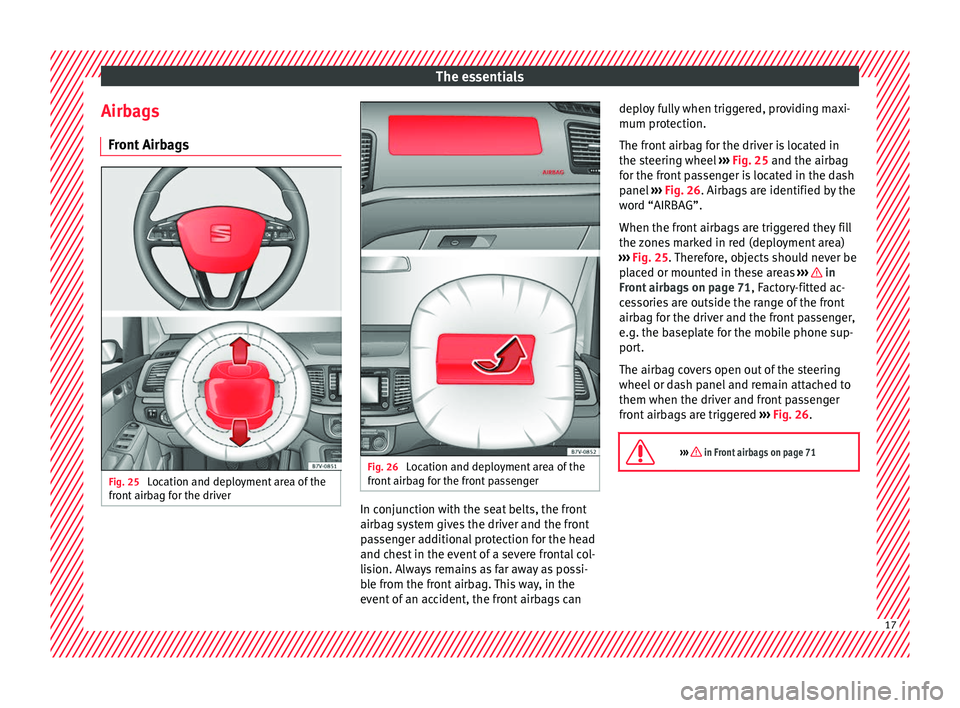
agsFig. 25
Location and deployment area of the
fr ont
airb
ag for the driver Fig. 26
Location and deployment area of the
fr ont
airb
ag for the front passenger In conjunction with the seat belts, the front
airb
ag sy
s
tem gives the driver and the front
passenger additional protection for the head
and chest in the event of a severe frontal col-
lision. Always remains as far away as possi-
ble from the front airbag. This way, in the
event of an accident, the front airbags can deploy fully when triggered, providing maxi-
mum protection.
The fr
ont airbag for the driver is located in
the steering wheel ››› Fig. 25 and the airbag
for the front passenger is located in the dash
panel ››› Fig. 26. Airbags are identified by the
word “AIRBAG”.
When the front airbags are triggered they fill
the zones marked in red (deployment area)
››› Fig. 25. Therefore, objects should never be
placed or mounted in these areas ››› in
Fr ont
airb
ags on page 71, Factory-fitted ac-
cessories are outside the range of the front
airbag for the driver and the front passenger,
e.g. the baseplate for the mobile phone sup-
port.
The airbag covers open out of the steering
wheel or dash panel and remain attached to
them when the driver and front passenger
front airbags are triggered ››› Fig. 26.
››› in Front airbags on page 71 17
Page 26 of 320
The essentials
● Pu
sh the he
ad restraint down as far as it
will go. Ensure that it does not interfere with
the seatbelt from the upper attachment.
● Tighten the strap so that the top of the
chil
d seat rests on the seat backrest.
››› in Safety instructions on page 75 Starting the vehicle
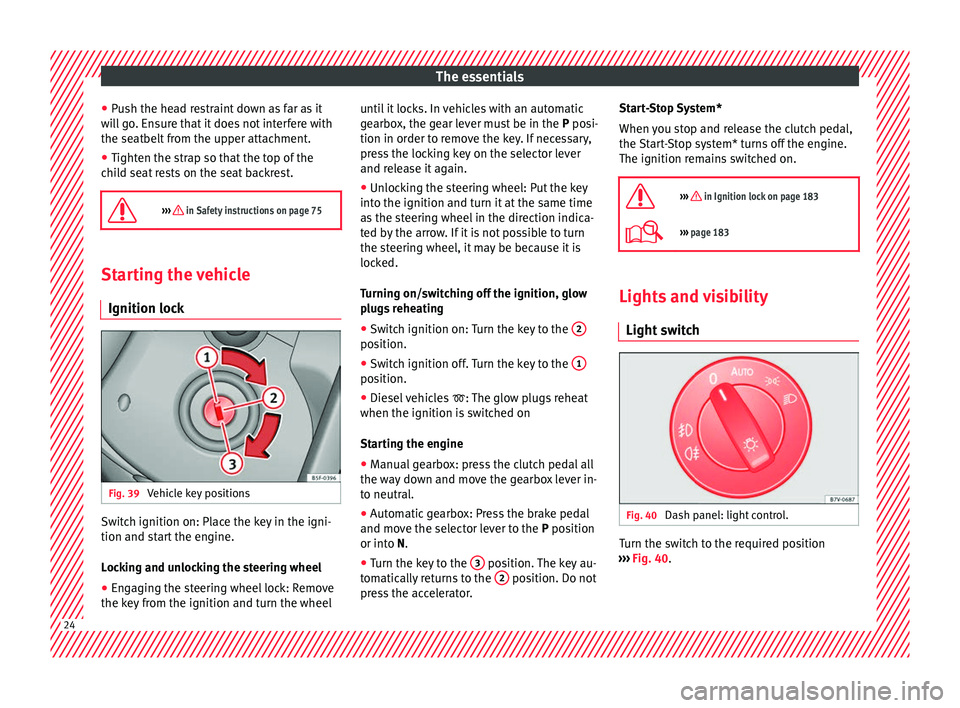
Ignition lock Fig. 39
Vehicle key positions Switch ignition on: Place the key in the igni-
tion and s
t
ar
t the engine.
Locking and unlocking the steering wheel
● Engaging the steering wheel lock: Remove
the key fr
om the ignition and turn the wheel until it locks. In vehicles with an automatic
gearbo
x, the gear lever must be in the P posi-
tion in order to remove the key. If necessary,
press the locking key on the selector lever
and release it again.
● Unlocking the steering wheel: Put the key
into the ignition and turn it
at the same time
as the steering wheel in the direction indica-
ted by the arrow. If it is not possible to turn
the steering wheel, it may be because it is
locked.
Turning on/switching off the ignition, glow
plugs reheating
● Switch ignition on: Turn the key to the 2 position.
●
Switch ignition off. Turn the key to the 1 position.
●
Diesel vehicles : The glo
w p
lugs reheat
when the ignition is switched on
Starting the engine
● Manual gearbox: press the clutch pedal all
the way
down and move the gearbox lever in-
to neutral.
● Automatic gearbox: Press the brake pedal
and move the sel
ector lever to the P position
or into N.
● Turn the key to the 3 position. The key au-
t om
atic
ally returns to the 2 position. Do not
pr e
s
s the accelerator. Start-Stop System*
When you s
top and release the clutch pedal,
the Start-Stop system* turns off the engine.
The ignition remains switched on.
››› in Ignition lock on page 183
››› page 183 Lights and visibility
Light sw
it
ch Fig. 40
Dash panel: light control. Turn the switch to the required position
› ›
›
Fig. 40. 24
Page 28 of 320
The essentials
Interior lightsButton/Position: Function
Switches interior lights off.
Switches interior lights on.
Switches door contact control on (central
position).
The interior lights come on automatically
when the vehicle is unlocked, a door is
opened or the key is removed from the igni-
tion.
The lights go off a few seconds after all the
doors are closed, the vehicle is locked or
the ignition is switched on.
Turning the reading light on and off
Ambient light: in the door panel, it changes
c
o
lour (whit
e or red) depending on the driv-
ing mode.
››› page 134 Windscreen wipers and window wiper
b
l
a
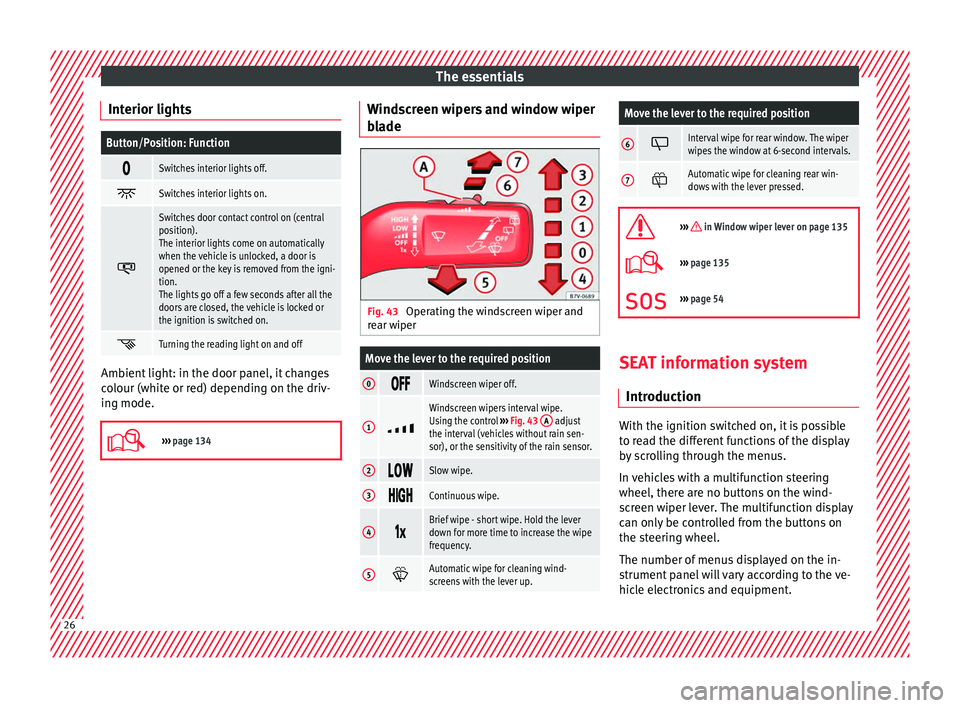
de Fig. 43
Operating the windscreen wiper and
r e
ar w
iper
Move the lever to the required position
0 Windscreen wiper off.
1
Windscreen wipers interval wipe.
Using the control
››› Fig. 43 A adjust
the interval (vehicles without rain sen-
sor), or the sensitivity of the rain sensor.
2 Slow wipe.
3
Continuous wipe.
4
Brief wipe - short wipe. Hold the lever
down for more time to increase the wipe
frequency.
5
Automatic wipe for cleaning wind-
screens with the lever up.
Move the lever to the required position
6 Interval wipe for rear window. The wiper
wipes the window at 6-second intervals.
7
Automatic wipe for cleaning rear win-
dows with the lever pressed.
››› in Window wiper lever on page 135
›››
page 135
››› page 54 SEAT information system
Intr oduction With the ignition switched on, it is possible
t
o r
e
ad the different functions of the display
by scrolling through the menus.
In vehicles with a multifunction steering
wheel, there are no buttons on the wind-
screen wiper lever. The multifunction display
can only be controlled from the buttons on
the steering wheel.
The number of menus displayed on the in-
strument panel will vary according to the ve-
hicle electronics and equipment. 26
Page 30 of 320
The essentials
■ Aut oho
l
d
■ Service
■ Info
■ Reset
■ Default setting
Using the menus on the instrument
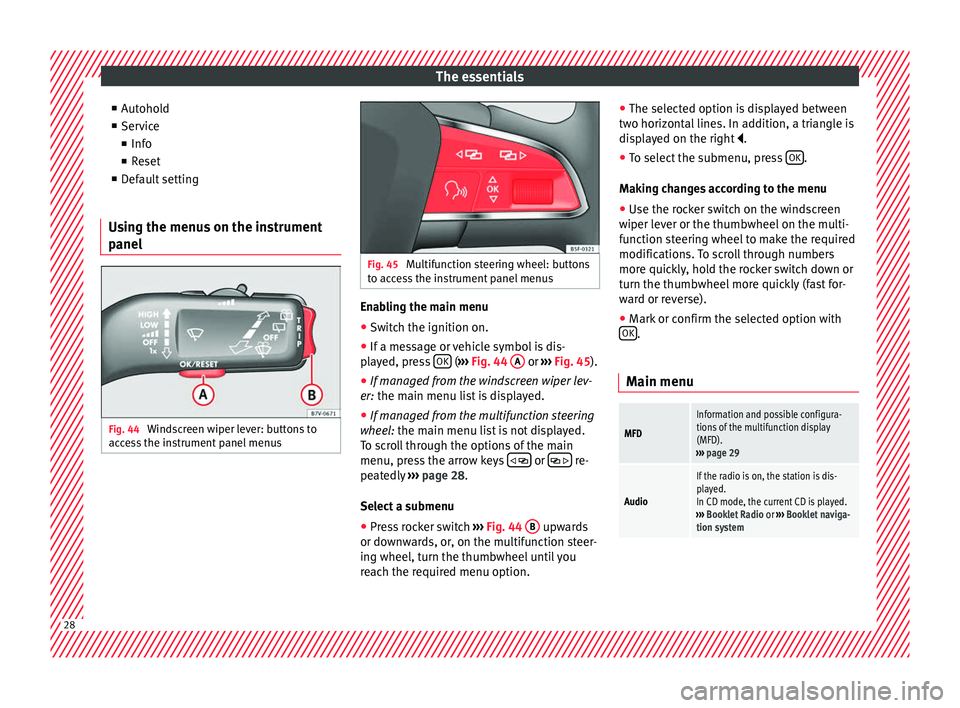
panel Fig. 44
Windscreen wiper lever: buttons to
ac c
e
ss the instrument panel menus Fig. 45
Multifunction steering wheel: buttons
to ac c
ess the instrument panel menus Enabling the main menu
● Switch the ignition on.
● If a message or vehicle symbol is dis-
p l
a
yed, press OK (
››
› Fig. 44 A or
››
› Fig. 45 ).
● If managed from the windscreen wiper lev-
er: the main menu lis
t is displayed.
● If managed from the multifunction steering
wheel:
the main menu list is not displayed.
To scroll through the options of the main
menu, press the arrow keys or
re-
pe at
edly
››› page 28.
Select a submenu ● Press rocker switch ›››
Fig. 44 B upwards
or do wn
w
ards, or, on the multifunction steer-
ing wheel, turn the thumbwheel until you
reach the required menu option. ●
The selected option i
s displayed between
two horizontal lines. In addition, a triangle is
displayed on the right .
● To select the submenu, press OK .
M ak
in
g changes according to the menu
● Use the rocker switch on the windscreen
wiper lev
er or the thumbwheel on the multi-
function steering wheel to make the required
modifications. To scroll through numbers
more quickly, hold the rocker switch down or
turn the thumbwheel more quickly (fast for-
ward or reverse).
● Mark or confirm the selected option with
OK .
Main menu
MFD
Information and possible configura-
tions of the multifunction display
(MFD).
››› page 29
Audio
If the radio is on, the station is dis-
played.
In CD mode, the current CD is played.
››› Booklet Radio or ››› Booklet naviga-
tion system 28
Page 32 of 320
The essentialsSpeed warn-
ing at --- km/hIf the stored speed is exceeded (be-
tween 30 - 250 km/h, or 18 -
155 mph), an audible warning is given
together with a visual warning.
Changing between display modes
● In vehicles without multifunction steering
whee l:
press the lever.
● Vehicles with a multifunction steering
wheel:
press or
.
Storin g a s
peed for the speed warning
● Select the display Speed warning at
--- km/h .
● Pr e
ss OK to store the current speed and
sw it
c
h off the warning.
● In addition, set the required speed by
pres
sing the rocker switch on the windscreen
wiper lever or
buttons on the multifunc-
tion s t
eerin
g wheel for 5 seconds. Next,
press OK again or wait a few seconds. The
s peed i
s
stored and the warning activated.
● To switch off , pres
s OK . The stored speed is
del et
ed.
M
anually erasing memory 1 or 2
● Select the memory that you wish to erase.
● Hold down OK for approximately 2 sec-
ond s. P
er
sonalising the displays
It is
possible to select which of the displays
in the multifunction display you wish to see
on the instrument panel in the settings
menu. The units of measurement can also be
modified ››› page 30.
Configuration Menu
Multifunc-
tion display
dataConfiguration of the multifunction dis-
play data that you wish to see on the in-
strument panel display ››› page 29.
Compass
Changing the magnetic region and cali-
bration of the compass. To calibrate the
compass, please follow the instructions
given on the instrument panel display.
ConvenienceChanging vehicle convenience functions
››› page 31.
Lights & vis-
ibilityConfiguration of vehicle lighting
››› page 31.
Time
Changing the hours and minutes of the
instrument panel clock and the naviga-
tion system. The time can be set here
and the choice can be made between
the 24-hour and 12-hour display. The S
in the upper part of the display indicates
that the clock is set to summer time.
Winter tyres
Changing the visual and audible speed
warnings. This function should only be
used when the vehicle is fitted with win-
ter tyres, which are not designed for
travel at high speeds.
LanguageChanging the language of the display
texts and the navigation system.
UnitsChanging the units of measurement for
the temperature, consumption and dis-
tance.
Second
speedSwitching second speed display on and
off.
ServiceCheck the service notifications or reset
the service intervals to zero.
Factory set-
tingsSome functions of the Configuration
menu will be reset to the factory value.
BackThe main menu is displayed again. 30
Page 53 of 320
The essentials
Only secure the tow rope or tow bar to the
t o
wline anc
horage or specially designed fit-
ting.
Vehicles with a factory fitted towing device ,
can only be used for towing with a tow bar,
specially designed to fit on a tow hitch ball
››› page 234.
Towing vehicles with an automatic gearbox
Note the following for a towed vehicle: ● Make sure the gear selector lever is in the N
position.
● Do not
drive faster than 50 km/h (30 mph).
● Do not tow further than 50 km (30 miles).
● If a breakdown truck is used, the vehicle
must
be towed with the front wheels raised.
Note the following instructions for towing
four all-wheel drive vehicles.
Instructions for towing all-wheel drive vehi-
cles
All-wheel drive vehicles can be towed using a
toolbar or tow rope. If the vehicle is towed
with the front or rear axle raised, the engine
must be turned off to avoid transmission
damage.
For vehicles with a double clutched DSG ®
(di-
rect shift gearbox) the instructions for towing
vehicles with an automatic gearbox apply
››› page 51. Situations in which a vehicle should not be
tow
ed
In the following cases, the vehicle should not
be towed but transported on a trailer or spe-
cial vehicle:
● If the vehicle gearbox does not contain lu-
bricant due t
o a fault.
● If the vehicle battery is flat and, as a result,
the electronic
steering lock and electronic
parking brake cannot be disengaged if ap-
plied.
● If the vehicle to be towed has an automatic
gearbo
x and the distance to be covered is
greater than 50 km (30 miles).
››› in Introduction on page 87
››› page 87 Tow-starting
In general, the vehicle should not be started
b
y
t
owing. Jump-starting is much more pref-
erable ›››
page 51.
For technical reasons, the following vehicles
can not be tow started:
● Vehicles with an automatic gearbox. ●
Vehicl
es with the Keyless Access locking
and ignition system, since the electronic
steering lock may not unlock.
● Vehicles with an electronic parking brake,
given that
it is possible that the brake will
not be disengaged.
● If the vehicle battery is flat, it is possible
that the en
gine control units do not operate
correctly.
However, if your vehicle must absolutely be
tow-started (manual gearbox):
● Put it into second or third gear.
● Keep the clutch pressed down.
● Switch on the ignition and the hazard warn-
ing lights.
● Rel
ease the clutch when both vehicles are
movin
g.
● As soon as the engine starts, press the
clutc
h and move the gear lever into neutral.
This helps to prevent a collision with the tow-
ing vehicle.
How to jump start
Jump lea
ds If the engine fails to start because of a dis-
c
h
ar
ged battery, the battery of another vehi-
cle can be used to start the engine. Before » 51
Page 59 of 320
Safe driving
– Ob
ser
ve traffic laws and speed limits.
– Always reduce your speed as appropriate
for ro
ad, traffic and weather conditions.
– When travelling long distances, take
break
s regularly - at least every two hours.
– If possible, avoid driving when you are tired
or stre
ssed. WARNING
When driving safety is impaired during a trip,
the risk of
injury and accidents increases. Safety equipment
Never put your safety or the safety of your
p
a
s
sengers in danger. In the event of an acci-
dent, the safety equipment may reduce the
risk of injury. The following list includes most
of the safety equipment in your SEAT:
● three-point seat belts,
● belt tension limiters for the front and rear
side seats,
● belt
tensioners for the front seats,
● front airbags,
● knee airbags,
● side airbags in the front seat backrests,
● side airbags in the rear seat backrests*,
● head-protection airbags, ●
“ISOFIX” anchor points f
or child seats in
the rear side seats with the “ISOFIX” system,
● height-adjustable front head restraints,
● rear head restraints with in-use position
and non-use pos
ition,
● adjustable steering column.
The safety
equipment mentioned above
works together to provide you and your pas-
sengers with the best possible protection in
the event of an accident. However, these
safety systems can only be effective if you
and your passengers are sitting in a correct
position and use this equipment properly.
Safety is everyone's business! Correct position of the vehicle
occup
ants
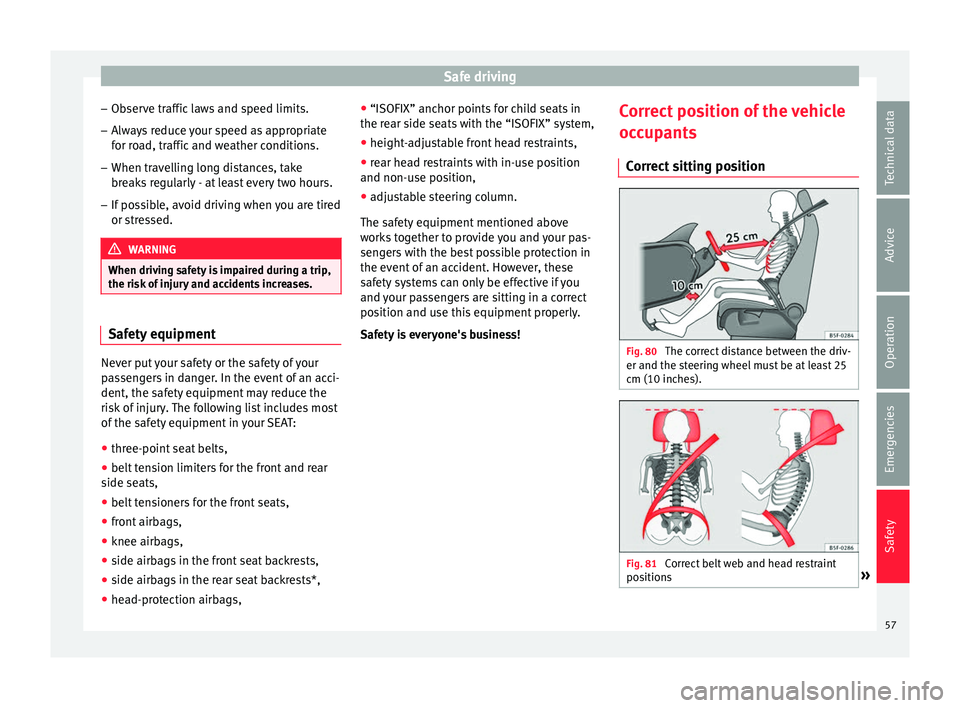
Correct sitting position Fig. 80
The correct distance between the driv-
er and the s t
eerin
g wheel must be at least 25
cm (10 inches). Fig. 81
Correct belt web and head restraint
po s
ition
s » 57
Technical data
Advice
Operation
Emergencies
Safety
Page 60 of 320
Safety
The correct sitting positions for the driver and
p a
s
sengers are shown below.
If your physical constitution prevents you
from maintaining the correct sitting position,
contact a specialised workshop for help with
any special devices. The seat belt and airbag
can only provide optimum protection if a cor-
rect sitting position is adopted. SEAT recom-
mends taking your car in for technical serv-
ice.
For your own safety and to reduce the risk of
injury in the event of an accident or sudden
braking or manoeuvre, SEAT recommend the
following positions:
Valid for all vehicle occupants:
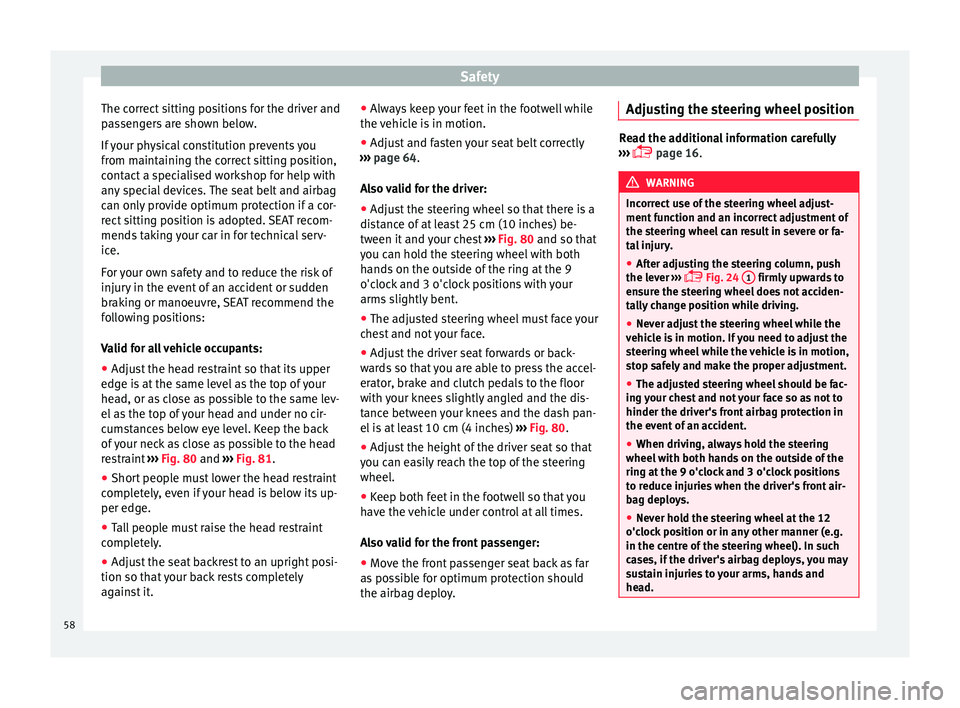
● Adjust the head restraint so that its upper
edge is
at the same level as the top of your
head, or as close as possible to the same lev-
el as the top of your head and under no cir-
cumstances below eye level. Keep the back
of your neck as close as possible to the head
restraint ››› Fig. 80 and ››› Fig. 81.
● Short people must lower the head restraint
compl
etely, even if your head is below its up-
per edge.
● Tall people must raise the head restraint
compl
etely.
● Adjust the seat backrest to an upright posi-
tion so that
your back rests completely
against it. ●
Alwa
ys keep your feet in the footwell while
the vehicle is in motion.
● Adjust and fasten your seat belt correctly
›››
page 64.
Also valid for the driver:
● Adjust the steering wheel so that there is a
dist
ance of at least 25 cm (10 inches) be-
tween it and your chest ››› Fig. 80 and so that
you can hold the steering wheel with both
hands on the outside of the ring at the 9
o'clock and 3 o'clock positions with your
arms slightly bent.
● The adjusted steering wheel must face your
ches
t and not your face.
● Adjust the driver seat forwards or back-
ward
s so that you are able to press the accel-
erator, brake and clutch pedals to the floor
with your knees slightly angled and the dis-
tance between your knees and the dash pan-
el is at least 10 cm (4 inches) ››› Fig. 80.
● Adjust the height of the driver seat so that
you can e
asily reach the top of the steering
wheel.
● Keep both feet in the footwell so that you
have the
vehicle under control at all times.
Also valid for the front passenger:
● Move the front passenger seat back as far
as po
ssible for optimum protection should
the airbag deploy. Adjusting the steering wheel position Read the additional information carefully
›› ›
page 16. WARNING
Incorrect use of the steering wheel adjust-
ment f u
nction and an incorrect adjustment of
the steering wheel can result in severe or fa-
tal injury.
● After adjusting the steering column, push
the lever ›
›› Fig. 24
1 firmly upwards to
ens ur
e the steering wheel does not acciden-
tally change position while driving.
● Never adjust the steering wheel while the
vehicl
e is in motion. If you need to adjust the
steering wheel while the vehicle is in motion,
stop safely and make the proper adjustment.
● The adjusted steering wheel should be fac-
ing y
our chest and not your face so as not to
hinder the driver's front airbag protection in
the event of an accident.
● When driving, always hold the steering
wheel with both h
ands on the outside of the
ring at the 9 o'clock and 3 o'clock positions
to reduce injuries when the driver's front air-
bag deploys.
● Never hold the steering wheel at the 12
o'clock
position or in any other manner (e.g.
in the centre of the steering wheel). In such
cases, if the driver's airbag deploys, you may
sustain injuries to your arms, hands and
head. 58