instrument panel Seat Altea Freetrack 2010 User Guide
[x] Cancel search | Manufacturer: SEAT, Model Year: 2010, Model line: Altea Freetrack, Model: Seat Altea Freetrack 2010Pages: 294, PDF Size: 7.71 MB
Page 89 of 294

Steering wheel controls87
Safety First
Controls and equipment
Practical tips
Technical Data
Steering wheel Audio + Telephone version controls
Fig. 52 Controls on the
steering wheel
Fig. 53 Steering wheel
controls (depending on
version of model)
Button
Radio
CD/MP3/USB*/iPod*
AUX
TELEPHONE
Volume up
Vol um e up
Volu m e up
Vol um e u p
Volu m e dow n
Volu m e d own
Vol um e d own
Volu m e d own
Search for next station
Next track
Hold down: Fast forward
No function specified
No function specified
Search for last station
Last track
Hold down:Rewind
No function specified
No function specified
Access telephone menu on instrument panel
Access telephone menu on instrument panel
Access telephone menu on instrument panel
Make call
Accept incoming call End call
Hold down: reject incoming call
Enable voice recognition
Enable voice recognition
Enable voice recognition
Enable voice recognition
AAABACADAEAF
Freetrack_EN.book Seite 87 Donnerstag, 10. September 2009 10:33 10
Page 90 of 294

Steering wheel controls
88
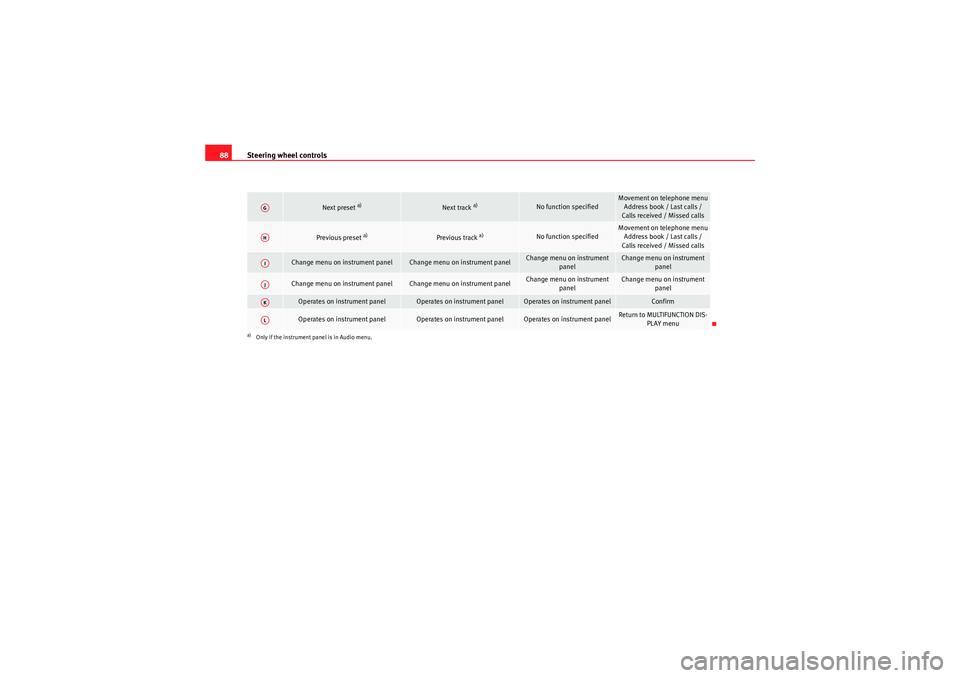
Next preset
a)
Next track
a)
No function specified
Movement on telephone menu
Address book / Last calls /
Calls received / Missed calls
Previous preset
a)
Previous track
a)
No function specified
Movement on telephone menu Address book / Last calls /
Calls received / Missed calls
Change menu on instrument panel
Change menu on instrument panel
Change menu on instrument panel
Change menu on instrument panel
Change menu on instrument panel
Change menu on instrument panel
Change menu on instrument
panel
Change menu on instrument panel
Operates on instrument panel
Operates on instrument panel
Operates on instrument panel
Confirm
Operates on instrument panel
Operates on instrument panel
Operates on instrument panel
Return to MULTIFUNCTION DIS-PLAY menu
a)Only if the instrument panel is in Audio menu.AGAHAIAJAKAL
Freetrack_EN.book Seite 88 Donnerstag, 10. September 2009 10:33 10
Page 91 of 294

Steering wheel controls89
Safety First
Controls and equipment
Practical tips
Technical Data
Radio navigation systemSteering wheel audio version controls
Fig. 54 Controls on the
steering wheel
Fig. 55 Steering wheel
controls (depending on
version of model)
Button
Radio
CD/MP3/USB*/iPod*
AUX
NAVIGATOR
Volume up
Vol um e up
Volu m e up
Vol um e u p
Volu m e dow n
Volu m e d own
Vol um e d own
Volu m e d own
Search for next station
Next track
Hold down: Fast forward
No function specified
No function specified
Search for last station
Last track
Hold down:Rewind
No function specified
No function specified
Access telephone menu on instrument panel
Access telephone menu on instrument panel
Access telephone menu on instrument panel
No function specified
Enable voice recognition
Enable voice recognition
Enable voice recognition
Enable voice recognition
AAABACADAEAF
Freetrack_EN.book Seite 89 Donnerstag, 10. September 2009 10:33 10
Page 92 of 294

Steering wheel controls
90Steering wheel Audio + Telephone controls
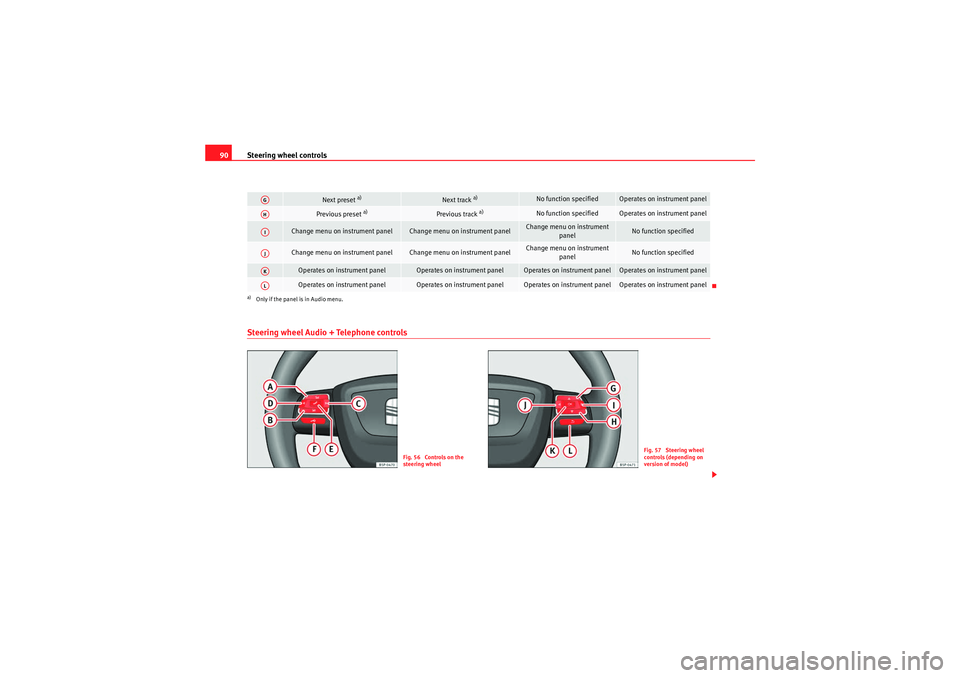
Next preset
a)
Next track
a)
No function specified
Operates on instrument panel
Previous preset
a)
Previous track
a)
No function specified
Operates on instrument panel
Change menu on instrument panel
Change menu on instrument panel
Change menu on instrument
panel
No function specified
Change menu on instrument panel
Change menu on instrument panel
Change menu on instrument panel
No function specified
Operates on instrument panel
Operates on instrument panel
Operates on instrument panel
Operates on instrument panel
Operates on instrument panel
Operates on instrument panel
Operates on instrument panel
Operates on instrument panel
a)Only if the panel is in Audio menu.AGAHAIAJAKAL
Fig. 56 Controls on the
steering wheel
Fig. 57 Steering wheel
controls (depending on
version of model)
Freetrack_EN.book Seite 90 Donnerstag, 10. September 2009 10:33 10
Page 93 of 294

Steering wheel controls91
Safety First
Controls and equipment
Practical tips
Technical Data
Button
Radio
CD/MP3/USB*/iPod*
AUX
NAVIGATOR
TELEPHONE
Vol um e up
Vol um e up
Vol um e up
Volume up
Volu m e up
Volume down
Volume down
Volume down
Vol um e d own
Volu m e d own
Search for next station
Next track
Hold down: Fast forward
No function specified
No function specified
No function specified
Search for last station
Last track
Hold down:Rewind
No function specified
No function specified
No function specified
Access telephone menu on instrument panel
Access telephone menu on instrument panel
Access telephone menu on instrument panel
No function specified
Make call
Accept incoming call End call
Hold down: reject incoming call
Enable voice recognition
Enable voice recognition
Enable voice recognition
Enable voice recogni-tion
Enable voice recognition
Next preset
a)
Next track
a)
No function specified
Operates on instru-ment panel
Movement on telephone menu
Address book / Last calls /
Calls received / Missed calls
Previous preset
a)
Previous track
a)
No function specified
Operates on instru- ment panel
Movement on telephone menu
Address book / Last calls /
Calls received / Missed calls
Change menu on instrument panel
Change menu on instrument panel
Change menu on instru-ment panel
No function specified
Change menu on instru-ment panel
AAABACADAEAFAGAHAI
Freetrack_EN.book Seite 91 Donnerstag, 10. September 2009 10:33 10
Page 94 of 294

Steering wheel controls
92
Change menu on instrument
panel
Change menu on instrument panel
Change menu on instru-ment panel
No function specified
Change menu on instru-ment panel
Operates on instrument panel
Operates on instrument panel
Operates on instrument panel
Operates on instru-ment panel
Confirm
Operates on instrument panel
Operates on instrument panel
Operates on instrument
panel
Operates on instru-ment panel
Return to MULTIFUNCTION DISPLAY menu
a)Only if the panel is in Audio menu.AJAKAL
Freetrack_EN.book Seite 92 Donnerstag, 10. September 2009 10:33 10
Page 106 of 294

Unlocking and locking
104Ta i l g a t eUnlocking and locking
The operation of the tailgate opening system is electric. It is
activated by using the handle on the tailgate
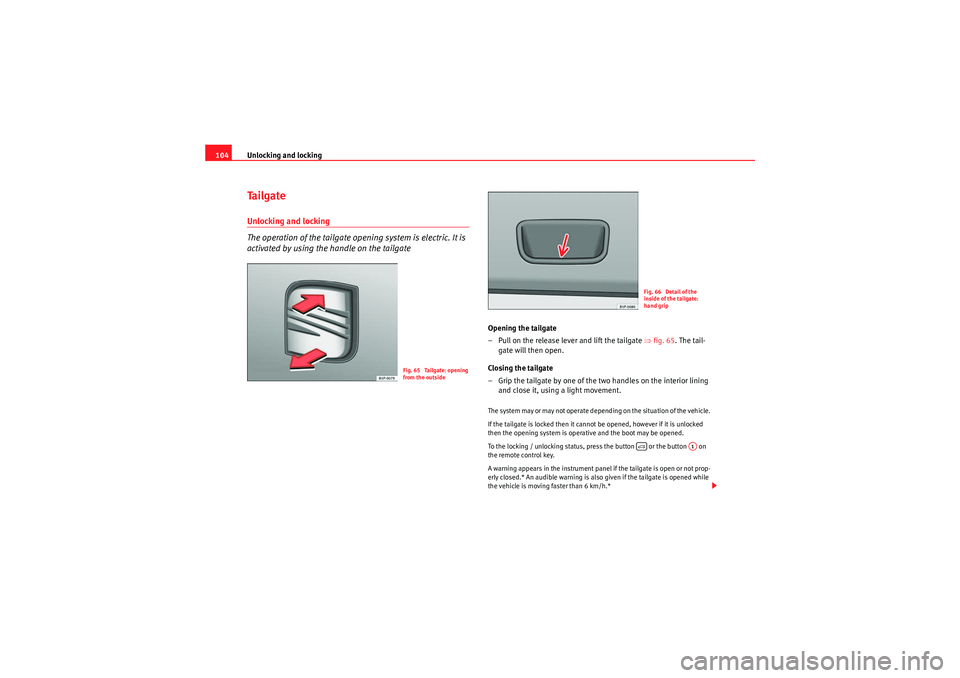
Opening the tailgate
– Pull on the release lever and lift the tailgate ⇒fig. 65 . The tail-
gate will then open.
Closing the tailgate
– Grip the tailgate by one of the two handles on the interior lining and close it, using a light movement.The system may or may not operate depending on the situation of the vehicle.
If the tailgate is locked then it cannot be opened, however if it is unlocked
then the opening system is operative and the boot may be opened.
To the locking / unlocking status, press the button or the button on
the remote control key.
A warning appears in the instrument panel if the tailgate is open or not prop-
erly closed.* An audible warning is also given if the tailgate is opened while
the vehicle is moving faster than 6 km/h.*
Fig. 65 Tailgate: opening
from the outside
Fig. 66 Detail of the
inside of the tailgate:
hand grip
A1
Freetrack_EN.book Seite 104 Donnerstag, 10. September 2009 10:33 10
Page 113 of 294

Lights and visibility111
Safety First
Controls and equipment
Practical tips
Technical Data
Lights and visibilityLightsSwitching lights on and off
Switching on the side lights
– Turn the light switch ⇒fig. 72 to position
.
Switching on dipped headlights
– Turn the light switch to position
.
Switching off the lights
– Turn the light switch to position 0. Switching on the fog lights*
– Pull the switch out of position
or to the first stop. The
symbol
in the light switch lights up.
Switching on the rear fog lights (vehicles with front fog lights)
– Pull the switch out of position
or to the second stop
⇒ . A warning lamp lights up in the dash panel.
Switching on the rear fog lights (vehicles with no front fog lights)
– Pull the light switch from position
to the last stop. A warning
lamp lights up in the dash panel.
WARNING
Never drive with just the side lights on. Risk of accident. The side lights are
not bright enough to illuminate the road ahead and to ensure that other
road users are able to see you. Always use your dipped headlights if it is
dark or if visibility is poor.
Note
•The dipped beam headlights will only work with the ignition on. The side
lights come on automatically when the ignition is turned off.•If the lights are left on after the key has been taken out of the ignition lock,
a buzzer will sound while the driver door remains open. This is a reminder to
switch the lights off.
Fig. 72 Detailed view of
instrument panel: lights,
fog light and rear fog light
control
Freetrack_EN.book Seite 111 Donnerstag, 10. September 2009 10:33 10
Page 115 of 294

Lights and visibility113
Safety First
Controls and equipment
Practical tips
Technical Data
•If the daylight driving automatic light function is switched on, the fog
lights or rear fog light cannot be switched on in addition.•The use of the lighting described here is subject to the relevant statutory
requirements.•Do not put stickers on the windscreen in front of the sensor. This may
cause disruptions or faults in the automatic lighting system.•To avoid damage to the tail lights, the lights mounted on the tailgate go
off when the tailgate is opened (according to country).Daytime lights*
The daytime light reduces the risk of accidents by increasing
the visibility of the vehicle. The daytime running lights are
enabled automatically when the ignition is switched on. It is
automatically switched off when the side lights are turned on.Daytime lights (halogen lamps)
18)
The daytime lights increase road safety in vehicles fitted with halogen lamps.
These include the dipped, side and registration plate lights.
The daytime lights are switched on each time the ignition is turned on if the
light setting is in position 0 or
. Depending upon the model, a control
lamp
on the light control switch or the lighting up of the dash panel will
indicate that the daytime lighting is on.
It is not possible for the driver to switch the daytime lights on or off. Please
contact a qualified workshop if you wish to deactivate the lights. Daytime lights (bi-xenon lamps)
The daytime lights increase road safety in vehicles fitted with bi-xenon lamps.
The lights are built-in separately to the headlights and are switched on each
time the ignition is turned on if the light setting is in position
0 or
.
Automatic control of the dipped light in combination with the daytime
lighting (bi-xenon headlamps)
If the dipped light control and the daytime lighting are activated at the same
time, the dipped lights and the instrument panel lighting will automatically
come on as required (e.g. on entering a tunnel) and the daytime lights will go
off. When the automatic dipped light control switches off the dipped lights
(e.g. on coming out of the tunnel), the daytime lights come back on.
Activating the daytime lights
With the ignition switched off, move the indicator and main beam lever
upwards and back (left indicator and headlamp flash).
Switch on the ignition for 3 seconds while holding this position. The daytime
lights are activated and can be switched on.
Deactivating the daytime lights
With the ignition switched off, move the indicator and main beam lever
upwards and back (left indicator and headlamp flash) and hold in this posi-
tion.
Switch on the ignition for 3 seconds while holding this position. The daytime
lights are deactivated and can not be switched on.
Deactivating daytime lights (bi-xenon lamps)
With the ignition switched off, move the indicator and main beam lever
upwards and back (left indicator and headlamp flash).
Switch on the ignition for 3 seconds. The daytime lights are deactivated and
can not be switched on.
18)It is only available in some countries or as an optional extra
Freetrack_EN.book Seite 113 Donnerstag, 10. September 2009 10:33 10
Page 117 of 294

Lights and visibility115
Safety First
Controls and equipment
Practical tips
Technical Data
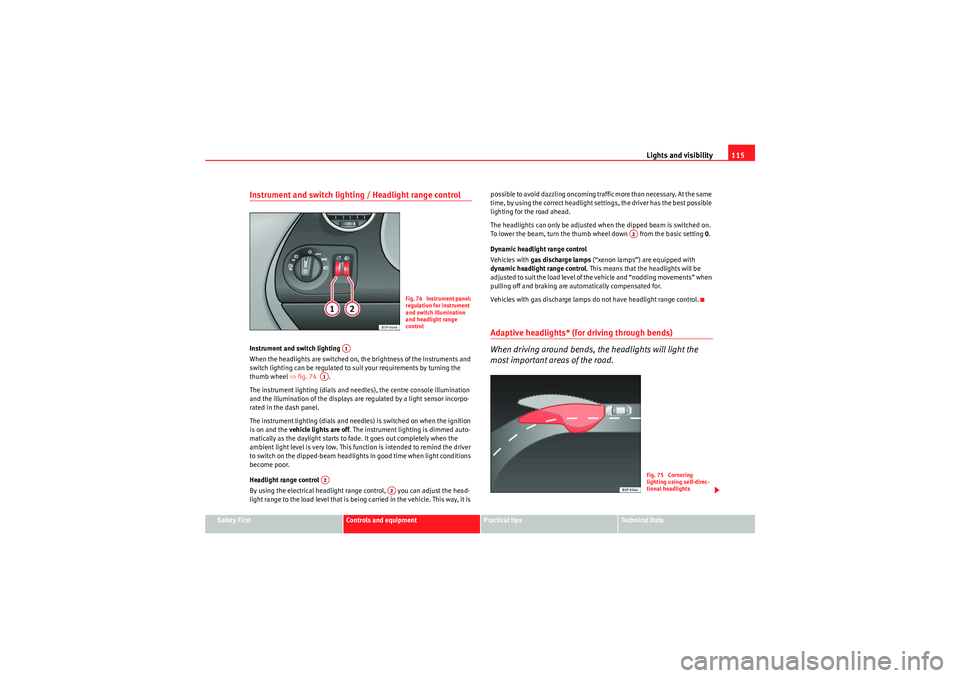
Instrument and switch lighting / Headlight range controlInstrument and switch lighting
When the headlights are switched on, the brightness of the instruments and
switch lighting can be regulated to suit your requirements by turning the
thumb wheel ⇒fig. 74 .
The instrument lighting (dials and needles), the centre console illumination
and the illumination of the displays are regulated by a light sensor incorpo-
rated in the dash panel.
The instrument lighting (dials and needles) is switched on when the ignition
is on and the vehicle lights are off . The instrument lighting is dimmed auto-
matically as the daylight starts to fade. It goes out completely when the
ambient light level is very low. This function is intended to remind the driver
to switch on the dipped-beam headlights in good time when light conditions
become poor.
Headlight range control
By using the electrical headlight range control, you can adjust the head-
light range to the load level that is being carried in the vehicle. This way, it is possible to avoid dazzling oncoming traffic more than necessary. At the same
time, by using the correct headlight settings, the driver has the best possible
lighting for the road ahead.
The headlights can only be adjusted when the dipped beam is switched on.
To lower the beam, turn the thumb wheel down from the basic setting
0.
Dynamic headlight range control
Vehicles with gas discharge lamps (“xenon lamps”) are equipped with
dynamic headlight range control . This means that the headlights will be
adjusted to suit the load level of the vehicle and “nodding movements” when
pulling off and braking are automatically compensated for.
Vehicles with gas discharge lamps do not have headlight range control.
Adaptive headlights* (for driving through bends)
When driving around bends, the headlights will light the
most important areas of the road.
Fig. 74 Instrument panel:
regulation for instrument
and switch illumination
and headlight range
control
A1
A1A2
A2
A2
Fig. 75 Cornering
lighting using self-direc-
tional headlights
Freetrack_EN.book Seite 115 Donnerstag, 10. September 2009 10:33 10