light Seat Altea Freetrack 2010 Workshop Manual
[x] Cancel search | Manufacturer: SEAT, Model Year: 2010, Model line: Altea Freetrack, Model: Seat Altea Freetrack 2010Pages: 294, PDF Size: 7.71 MB
Page 128 of 294
Lights and visibility
126Headlight washer system
The headlight washers clean the headlight lenses.The headlight washers are activated automatically when the windscreen
washer is used and the windscreen wiper lever is pulled towards the steering
wheel for at least 1.5 seconds – provided the dipped headlights or main
beams are switched on. Clean off stubborn dirt (insects, etc.) from the head-
lights at regular intervals, for instance when filling the fuel tank.
Note
•To ensure that the headlight washers work properly in winter, keep the
nozzle holders in the bumper free of snow and remove any ice with a de-icer
spray.•To remove water, the windscreen wipers will be activated from time to
time, the headlight wipers will be activated every three cycles.MirrorsInterior mirror
It is dangerous to drive if yo u cannot see clearly through the
rear window.Manual anti-dazzle function for interior mirror
In the basic mirror position, the lever at the bottom edge of the mirror should
be at the front. Pull the lever to the back to select the anti-dazzle function.
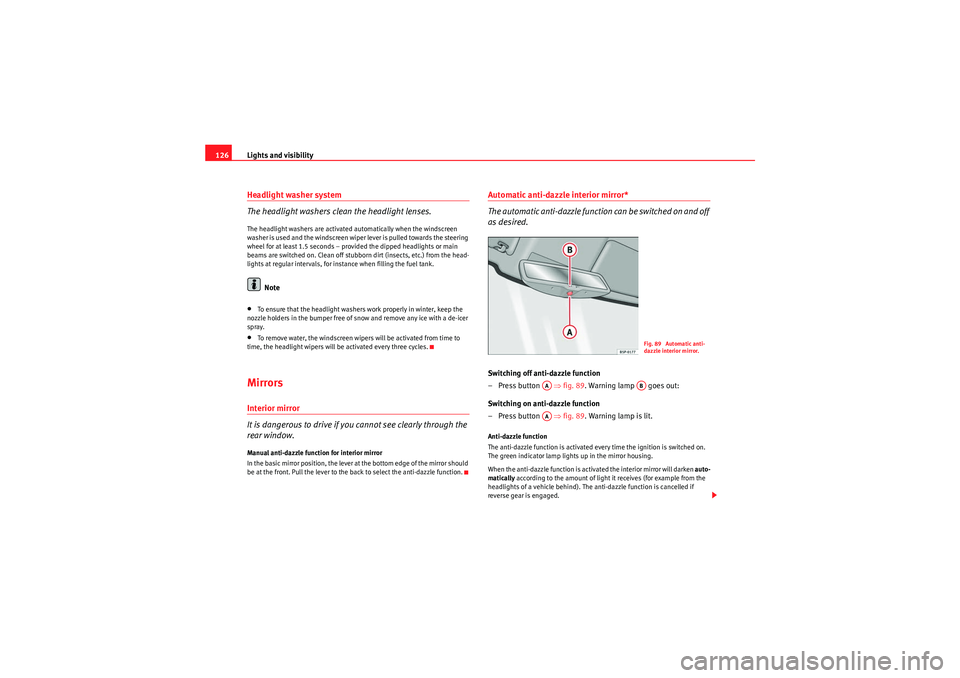
Automatic anti-dazzle interior mirror*
The automatic anti-dazzle function can be switched on and off
as desired.Switching off anti-dazzle function
–Press button ⇒ fig. 89. Warning lamp goes out:
Switching on anti-dazzle function
–Press button ⇒ fig. 89. Warning lamp is lit.Anti-dazzle function
The anti-dazzle function is activated every time the ignition is switched on.
The green indicator lamp lights up in the mirror housing.
When the anti-dazzle function is activated the interior mirror will darken auto-
matically according to the amount of light it receives (for example from the
headlights of a vehicle behind). The anti-dazzle function is cancelled if
reverse gear is engaged.
Fig. 89 Automatic anti-
dazzle interior mirror.
AA
AB
AA
Freetrack_EN.book Seite 126 Donnerstag, 10. September 2009 10:33 10
Page 129 of 294
Lights and visibility127
Safety First
Controls and equipment
Practical tips
Technical Data
Note
•The automatic anti-dazzle function will only work properly if the sun
blind* for the rear window is retracted and there are no other objects
preventing light from reaching the interior mirror.•If you have to stick any type of sticker on the windscreen, do not do so in
front of the sensors. Doing so could prevent the anti-dazzle function from
working well or even from working at all.Exterior mirrors
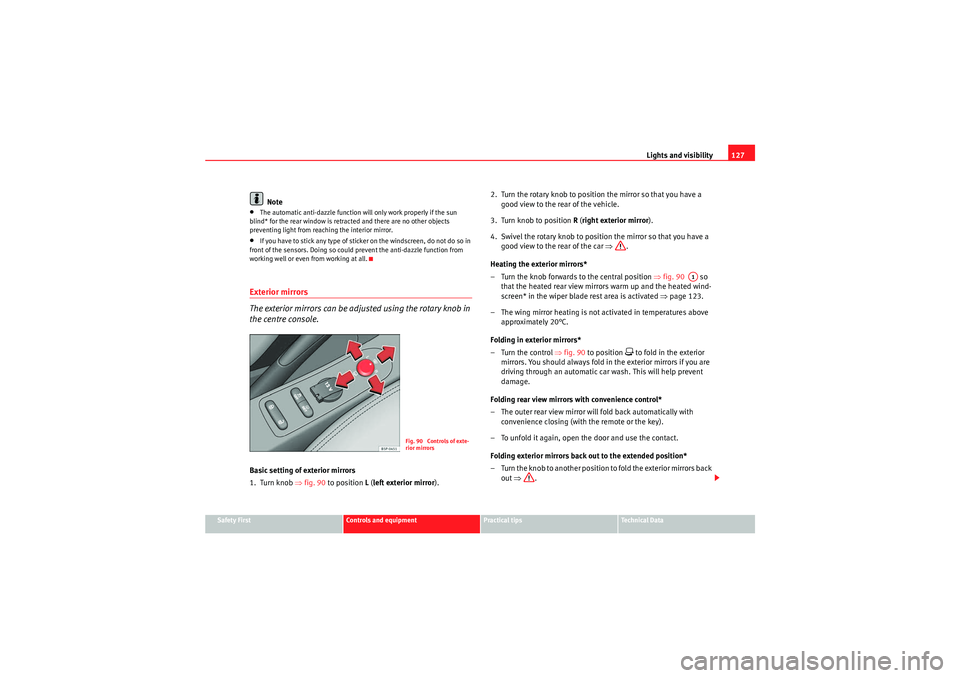
The exterior mirrors can be adjusted using the rotary knob in
the centre console.Basic setting of exterior mirrors
1. Turn knob ⇒fig. 90 to position L ( left exterior mirror). 2. Turn the rotary knob to positi
on the mirror so that you have a
good view to the rear of the vehicle.
3. Turn knob to position R (right exterior mirror ).
4. Swivel the rotary knob to position the mirror so that you have a good view to the rear of the car ⇒.
Heating the exterior mirrors*
– Turn the knob forwards to the central position ⇒fig. 90 so
that the heated rear view mirrors warm up and the heated wind-
screen* in the wiper blade rest area is activated ⇒ page 123.
– The wing mirror heating is not activated in temperatures above approximately 20°C.
Folding in exterior mirrors*
–Turn the control ⇒fig. 90 to position
to fold in the exterior
mirrors. You should always fold in the exterior mirrors if you are
driving through an automatic car wash. This will help prevent
damage.
Folding rear view mirrors with convenience control*
– The outer rear view mirror will fold back automatically with convenience closing (with the remote or the key).
– To unfold it again, open the door and use the contact.
Folding exterior mirrors back out to the extended position*
– Turn the knob to another position to fold the exterior mirrors back out ⇒ .
Fig. 90 Controls of exte-
rior mirrors
A1
Freetrack_EN.book Seite 127 Donnerstag, 10. September 2009 10:33 10
Page 130 of 294

Lights and visibility
128
Synchronised mirror adjustment
1. Turn the control to the position L ( left exterior mirror ).
2. Turn the rotary knob to position the mirror so that you have a good view to the rear of the vehicle. The right exterior mirror will
be adjusted at the same time (synchronised).
WARNING
•The rear view convex or aspheric mirror increase the field of vision
however the objects appear smaller and further away in the mirrors. If you
use these mirrors to estimate the distance to vehicles behind you when
changing lane, you could make a mistake. Risk of accident.•If possible, use the interior mirror to estimate distances to vehicles
behind you.•Make sure that you do not get your finger trapped between the mirror
and the mirror base when folding back the mirrors. Risk of injury!For the sake of the environment
The exterior mirror heating should be switched off when it is no longer
needed. Otherwise, it is an unnecessary fuel waste.
Note
•If the electrical adjustment ever fails to operate, the mirrors can be
adjusted by hand by lightly pressing the edge of the mirror glass.•In vehicles with electric wing mirrors, the following points should be
observed: if, due to an external force (e.g. a knock while manoeuvring), the
adjustment of the mirror housing is altered, the mirror will have to be
completely folded electrically . Do not readjust the mirror housing by hand, as
this will interfere with the mirror adjuster function.
•The rear view mirrors can be adjusted separately or simultaneously, as
described before.•The fold-in function on the wing mirrors is not activated at speeds of
above 40 km/h.
Freetrack_EN.book Seite 128 Donnerstag, 10. September 2009 10:33 10
Page 142 of 294
Seats and stowage
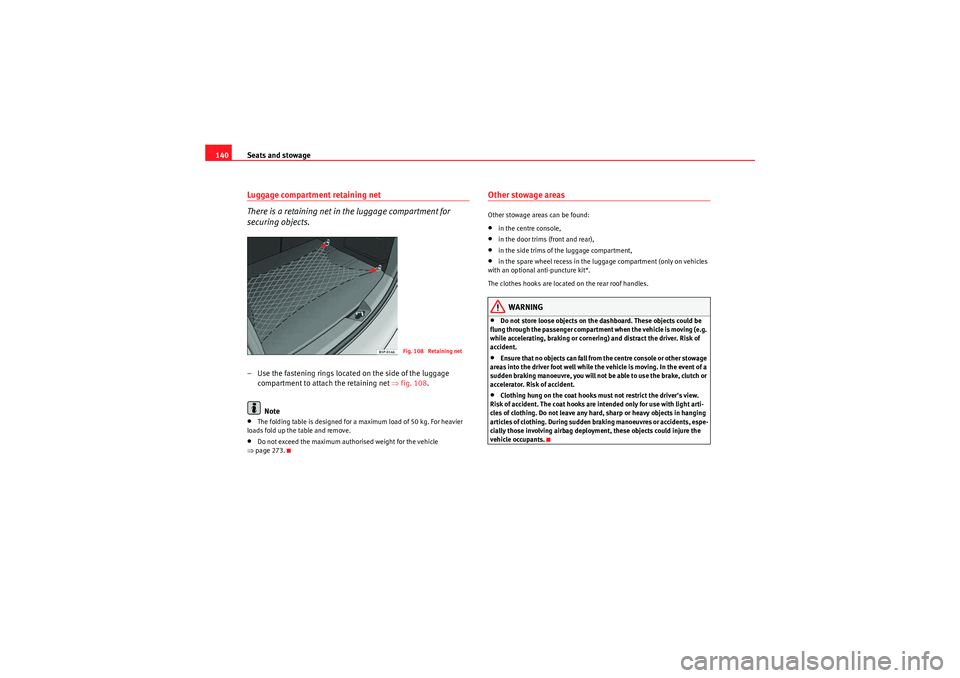
140Luggage compartment retaining net
There is a retaining net in the luggage compartment for
securing objects.– Use the fastening rings located on the side of the luggage
compartment to attach the retaining net ⇒ fig. 108.
Note•The folding table is designed for a maximum load of 50 kg. For heavier
loads fold up the table and remove.•Do not exceed the maximum authorised weight for the vehicle
⇒ page 273.
Other stowage areasOther stowage areas can be found:•in the centre console,•in the door trims (front and rear),•in the side trims of the luggage compartment,•in the spare wheel recess in the luggage compartment (only on vehicles
with an optional anti-puncture kit*.
The clothes hooks are located on the rear roof handles.WARNING
•Do not store loose objects on the dashboard. These objects could be
flung through the passenger compartment when the vehicle is moving (e.g.
while accelerating, braking or cornering) and distract the driver. Risk of
accident.•Ensure that no objects can fall from the centre console or other stowage
areas into the driver foot well while the vehicle is moving. In the event of a
sudden braking manoeuvre, you will not be able to use the brake, clutch or
accelerator. Risk of accident.•Clothing hung on the coat hooks must not restrict the driver's view.
Risk of accident. The coat hooks are intended only for use with light arti-
cles of clothing. Do not leave any hard, sharp or heavy objects in hanging
articles of clothing. During sudden br aking manoeuvres or accidents, espe-
cially those involving airbag deployment, these objects could injure the
vehicle occupants.
Fig. 108 Retaining net
Freetrack_EN.book Seite 140 Donnerstag, 10. September 2009 10:33 10
Page 144 of 294
Seats and stowage
142
Opening and closing the armrest*/ drink holder*
– To open, pull the loop in the direction of the arrow ⇒page 141,
fig. 110 .
– To close, lift the Drink holder*/ armrest* in the direction of the arrow ⇒page 141, fig. 111 .
WARNING
Ensure that the load in the luggage compartment is correctly secured with
the retainer net when travelling with the armrest down ⇒page 140.Multi-purpose* mobile stowage compartment - Fitting and removal
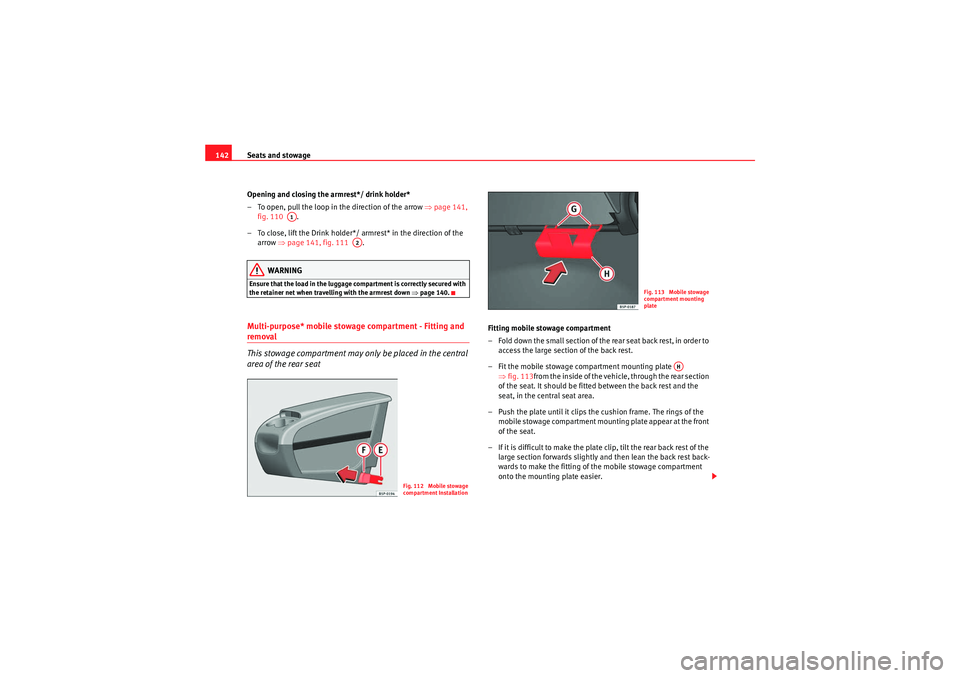
This stowage compartment may only be placed in the central
area of the rear seat
Fitting mobile stowage compartment
– Fold down the small section of the rear seat back rest, in order to
access the large section of the back rest.
– Fit the mobile stowage compartment mounting plate ⇒fig. 113 from the inside of the vehicle, through the rear section
of the seat. It should be fitted between the back rest and the
seat, in the central seat area.
– Push the plate until it clips the cushion frame. The rings of the mobile stowage compartment mounting plate appear at the front
of the seat.
– If it is difficult to make the plate clip, tilt the rear back rest of the large section forwards slightly an d then lean the back rest back-
wards to make the fitting of the mobile stowage compartment
onto the mounting plate easier.
A1
A2
Fig. 112 Mobile stowage
compartment Installation
Fig. 113 Mobile stowage
compartment mounting
plate
AH
Freetrack_EN.book Seite 142 Donnerstag, 10. September 2009 10:33 10
Page 147 of 294

Seats and stowage145
Safety First
Controls and equipment
Practical tips
Technical Data
Ashtrays*, cigarette lighter* and electrical
socketsAshtray* Opening and closing the ashtray
– To open the ashtray, lift the cover ⇒fig. 116 .
– To close, push the cover down.
Emptying the ashtray
–Extract the ashtray and empty it.
WARNING
Never put paper in the ashtray. Hot ash could ignite the paper in the
ashtray and cause a fire.
Cigarette lighter* – Press on the cigarette lighter ⇒fig. 117 to activate it ⇒.
– Wait for the lighter to pop out slightly.
– Pull out the cigarette lighter and light the cigarette on the glowing coil.
WARNING
•Improper use of the cigarette lighter ca n lead to serious injuries or start
a fire.•Using the lighter carefully. Carelessness or negligence when using the
cigarette lighter can cause burns, risk of injury.•The lighter only works when the ignition is turned on or the engine is
running. To avoid the risk of fire, never leave children alone inside the
vehicle.
Fig. 116 Ashtray located
in the front drink holder
Fig. 117 The cigarette
lighter is located in the
electric socket on the
front of the centre console
Freetrack_EN.book Seite 145 Donnerstag, 10. September 2009 10:33 10
Page 161 of 294
Heating, Ventilation and Air conditioning159
Safety First
Controls and equipment
Practical tips
Technical Data
Button – Manual air recirculation mode.
Button – Rear window heating. The heating will be switched off auto-
matically approximately
20 minutes after switching on. However, it may
be turned off by pushing the button. The button lights up yellow and the
symbol appears in the display.
Button – Automatic temperature, ventilation and air distribution
control ⇒page 160
button - Dual zone synchroniser
Button – Switches the 2C-Climatronic on and off ⇒page 161
Blower control ⇒page 161
button – Switches heating, ventilation and air-conditioning system
on
WARNING
For road safety all windows must be clear of ice, snow, and condensation.
This is essential to ensure good visibility. Please familiarise yourself with
the correct operation of the heating and ventilation system, including the
anti-fog/defrost functions for the windscreens.
Note
Please observe the general notes ⇒page 162.
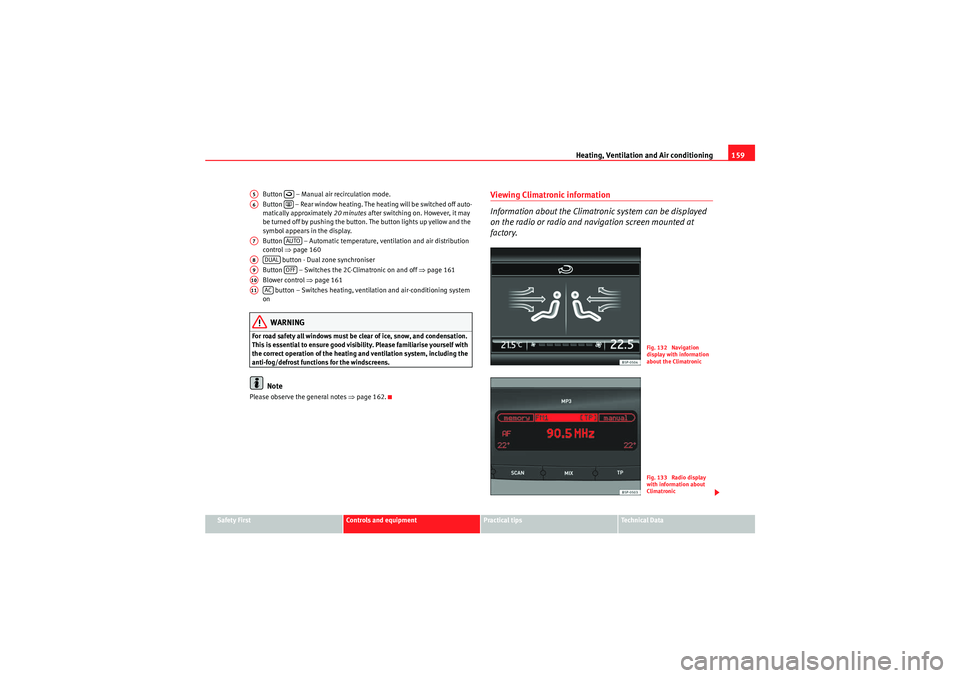
Viewing Climatronic information
Information about the Climatronic system can be displayed
on the radio or radio and navigation screen mounted at
factory.
A5
A6
A7
AUTO
A8
DUAL
A9
OFF
A10A11
AC
Fig. 132 Navigation
display with information
about the ClimatronicFig. 133 Radio display
with information about
Climatronic
Freetrack_EN.book Seite 159 Donnerstag, 10. September 2009 10:33 10
Page 162 of 294

Heating, Ventilation and Air conditioning
160The LEDs on the Climatronic controls indicate that the selected function has
been activated.
In addition, the radio or radio and navigation displays mounted at factory
briefly display the current settings of the Climatronic if any are modified.
The symbols used on the radio or radio and navigation displays are the same
as the symbols used for the Climatronic controls.Automatic mode
In automatic mode air temperature, air flow and distribution
are automatically regulated so that a specified temperature is
attained as quickly as possible and then maintained.The temperature can be adjusted separately for the left and right
sides of the vehicle interior.
Switching on automatic mode
–Press ⇒page 158, fig. 131 . “AUTO High” is shown on the
radio display (high fan speed).
– Press again ⇒page 158, fig. 131 . “AUTO Low” is shown
on the radio display (low fan speed).Depending upon the version and finish, the vehicle may include:
When a temperature of 22°C (72°F) is set in automatic mode a comfortable
interior climate is quickly reached. Therefore, we recommend you not to
change this adjustment, except as necessary to suit individual preferences or
particular circumstances. The compartment temperature can be set between
+18°C (64°F) and +26°C (80°F). These are approximate temperatures and the actual temperature may be slightly higher or lower depending on the ambient
conditions.
Climatronic maintains a constant temperature. The temperature of the air
supplied to the interior, the blower speed and the air distribution are regu-
lated automatically. The system also considers the sunlight radiation, so
there is no need for manual readjustment. Therefore,
automatic mode almost
always provides the best comfort for the vehicle occupants throughout the
year.
Automatic mode is switched off whenever an adjustment is made using the
buttons for the air distribution, air flow or or the air recirculation button . The temperature will continue to be regulated within the parameters
manually selected by the user.
Note
There are two automatic modes:•Automatic mode LO: This calculates the air flow for two people.•Automatic mode HI: This calculates the air flow for more than two
people.
AUTOAUTO
Freetrack_EN.book Seite 160 Donnerstag, 10. September 2009 10:33 10
Page 163 of 294

Heating, Ventilation and Air conditioning161
Safety First
Controls and equipment
Practical tips
Technical Data
Manual mode
In manual mode you can adjust the air temperature, air flow and distribution as required.Switching on manual mode
– To enter manual mode, press one of the buttons ⇒fig. 134 to
or press the air flow control . The selected function is
shown on the radio or navigator display.Te m p e r a t u r e
There are separate temperature selectors for the left and right sides of the
vehicle interior. The selected temperature is displayed above the selector.
The compartment temperature can be set between +18°C (64°F) and +26°C
(80°F). These are approximate temperatures and the actual temperature may
be slightly higher or lower depending on the ambient conditions.
If a temperature below 18°C (64°F) is selected, the display switches to LO In
this setting the system runs at maximum cooling output and the temperature
is not regulated. If a temperature above 26°C (80°F) is selected, the display switches to
HI In
this setting the system runs at maximum heating output and the temperature
is not regulated.
Blower
The air flow may be adjusted freely using the control . Always have the
blower running at a low setting to ensure a constant flow of fresh air into the
vehicle. Pushing the button
to the minimum -1, turns the Climatronic off.
Air distribution
The air distribution is adjusted using the buttons , and . It is also
possible to open and close some of the air vents separately.
Switching the air conditioning system on and off
When the button is on (LED lit), the heating, ventilation and air condi-
tioning system is on.Fig. 134 On the instrument panel: 2C Climatronic
controls.
A1
A5
A10
A10
AC
Freetrack_EN.book Seite 161 Donnerstag, 10. September 2009 10:33 10
Page 167 of 294

Driving165
Safety First
Controls and equipment
Practical tips
Technical Data
•Adjust the driver seat or steering wheel so that there is a distance of at
least 25 cm between the steering wheel and your chest ⇒page 164,
fig. 136 . If you fail to observe the minimum distance, the airbag will not
protect you. Risk of fatal injury.•If your physical constitution does not allow you to maintain the
minimum distance of 25 cm, contact an Authorised Service Centre. The
Authorised Service Centre will help you to decide if special specific modifi-
cations are necessary.•If you adjust the steering wheel so that it points towards your face, the
driver airbag will not protect you properly in the event of an accident. Make
sure that the steering wheel points towards your chest.•When driving, always hold the steering wheel with both hands on the
outside of the ring at the 9 o'clock and 3 o'clock positions. Never hold the
steering wheel at the 12 o'clock position, or in any other manner (e.g. in
the centre of the steering wheel, or on the inside of the rim). In such cases,
you could receive severe injuries to the arms, hands and head.
SafetyElectronic stabilisation programme (ESP)*
ESP helps make driving safer in certain situations.The Electronic Stabilisation Program (ESP) contains the electronic differential
lock (EDL) and the traction control system (TCS). The ESP function works
together with the ABS. Both warning lamps will light up if the ESP or ABS
systems are faulty.
The ESP is started automatically when the engine is started.
The ESP is always active, and cannot be switched off. With the ESP switch it is
only possible to switch TCS off.
The TCS can be deactivated when in cases where wheel sliding is desirable.
For example:•When driving with snow chains,
WARNING (continued)
Fig. 137 Detail of the
centre console: ESP
button
Freetrack_EN.book Seite 165 Donnerstag, 10. September 2009 10:33 10