service interval Seat Altea Freetrack 2013 Owner's Manual
[x] Cancel search | Manufacturer: SEAT, Model Year: 2013, Model line: Altea Freetrack, Model: Seat Altea Freetrack 2013Pages: 301, PDF Size: 4.45 MB
Page 61 of 301

59
Cockpit
Even if the coolant level is correct do not continue driving. You should ob-
tain technical assistance.
WARNING
When working in the engine compartment, always observe the safety
warnings ⇒ page 222.
CAUTION
Accessories in front of the air inlet reduce the cooling effect of the coolant.
At high outside temperatures and high engine loads, there is a risk of the
engine overheating.
Rev counter
The rev counter displays the engine speed in revolutions per
minute. The start of the red zone ⇒ Fig. 34 4
indicates the maximum engine speed
operating at service temperature. However, it is advisable to change up into
a higher gear, move the selector lever to D or lift your foot off the accelerator
before the needle reaches the red zone.
CAUTION
To prevent possible engine malfunctions, the rev counter needle should not
reach the red zone. The start of the red zone on the dial is different for some
engine versions.
For the sake of the environment
Changing up into higher gears sooner, following the recommended gear in-
dications ⇒ Fig. 39 will help you to reduce fuel consumption, emissions and
also engine noise. Speedometer
The speedometer is equipped with a digital odometer and a trip recorder, in
addition to a service intervals display.
During the running-in period, the instructions shown on
⇒ page 195
should be followed.
Setting the digital clock*
The digital clock is located in the instrument panel display.
– Turn the setting knob ⇒ Fig. 34 5
clockwise until the first
“click” to set the hour. The hour will flash. To change the hour,
press the button.
– Turn the setting knob clockwise to the second “click” to set the
minutes. The minutes will flash. To change the minutes, press
the button.
Note
On Highline versions, the time can also be configured on the Kombi menu.
Safety FirstOperating InstructionsPractical TipsTechnical Specifications
Page 62 of 301

60Cockpit
Digital instrument panel display
Display (without warning or information texts)
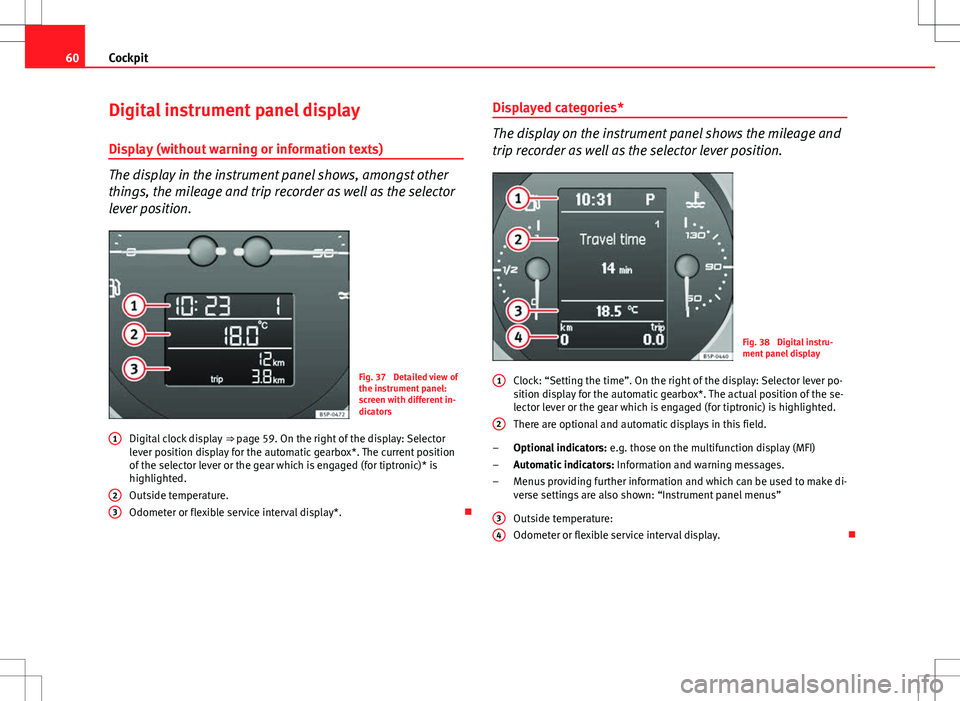
The display in the instrument panel shows, amongst other
things, the mileage and trip recorder as well as the selector
lever position.
Fig. 37 Detailed view of
the instrument panel:
screen with different in-
dicators
Digital clock display ⇒ page 59. On the right of the display: Selector
lever position display for the automatic gearbox*. The current position
of the selector lever or the gear which is engaged (for tiptronic)* is
highlighted.
Outside temperature.
Odometer or flexible service interval display*.
1
23
Displayed categories*
The display on the instrument panel shows the mileage and
trip recorder as well as the selector lever position.
Fig. 38 Digital instru-
ment panel display
Clock: “Setting the time”. On the right of the display: Selector lever po-
sition display for the automatic gearbox*. The actual position of the se-
lector lever or the gear which is engaged (for tiptronic) is highlighted.
There are optional and automatic displays in this field.
Optional indicators: e.g. those on the multifunction display (MFI)
Automatic indicators: Information and warning messages.
Menus providing further information and which can be used to make di-
verse settings are also shown: “Instrument panel menus”
Outside temperature:
Odometer or flexible service interval display.
1
2
–
–
–
3
4
Page 63 of 301

61
Cockpit
Recommended gear display*
This display helps to save fuel.
Fig. 39 Gear display
Use the gear display to save fuel. If you are driving in the correct gear, a dot
will be shown next to the gear display. If you are not in the correct gear, an
arrow will appear next to the gear display indicating whether you should
change up or down.
Note
The gear change indication should not be taken into account the accelera-
tion is required (for example when overtaking).
Odometer or flexible service interval display
Odometer
The left-hand counter in the display registers the total amount of distance
covered by the vehicle. The right-hand counter registers the short journeys. The last digit indicates
steps of 100 metres. The trip recorder counter may be reset by holding
down the reset button for a few seconds.
Service interval display
Vehicles with
Service intervals dependent on time/distance travelled al-
ready have certain service intervals set. The intervals are calculated individ-
ually in vehicles with LongLife service.
The service interval display only indicates the dates of services that include
engine oil change. The dates of all other services, such as Inspection Serv-
ice or brake fluid change, appear in the sticker on the door pillar or in the
Maintenance Programme.
A Service pre-warning will appear in the odometer if a service is due soon. A
“spanner” symbol appears and the display “km” with the distance that can
be driven until the next service appointment is due. The display will change
after approximately 10 seconds. A “clock symbol” appears and the number
of days until the service appointment should be carried out. The following
message is shown in the instrument panel display*: Service in
[XXXX]
kmor
[XXXX]
days
The service message will disappear approximately 20 seconds after the ig-
nition is switched on or the engine is running. The normal display can be
resumed by briefly pressing the reset button on the trip counter or by press-
ing the OK
button on the steering wheel controls.
With the ignition on, you can check the current service message at any mo-
ment in the Vehicle status menu or turning the reset button to access the
service display.
An overdue service is indicated by a minus sign in front of the mileage or
day information.
Safety FirstOperating InstructionsPractical TipsTechnical Specifications
Page 64 of 301

62Cockpit
Indications for vehicles with LongLife service
Technical progress has made it possible to considerably reduce servicing re-
quirements. With the LongLife System, SEAT ensures that your vehicle only
has an interval service when it is necessary. The length of the Interval Serv-
ices (max. two years) is determined by factors such as conditions under
which the vehicle is used and personal driving style.
The service pre-warning will first appear 20 days before the date on which
the service is due. The distance travelled is rounded off to the nearest
100 km (miles) and the time to full days. The current service message can
only be consulted 500 km (300 miles) after the last service. Until that time,
only dashes are displayed.
Note
● If you reset the display manually, the next service interval will be indica-
ted after 15 000 km (10 000 miles) or one year and will not be calculated
individually.
● Do not reset the display between service intervals as the display will
otherwise be incorrect.
● In LongLife Service vehicles, if the battery is disconnected for a long pe-
riod, the days remaining until the next service cannot be calculated. There-
fore, the service message displays on the instrument panel may be incor-
rect. Take into account the maximum authorised service intervals. Multifunction display (MFI)*
The multifunction display (MFI) shows you information on
the journey and fuel consumption.
Fig. 40 Rocker buttons A
and B. Steering wheel
controls.
Fig. 41 Digital instru-
ment panel display
Page 81 of 301

79
Cockpit
Information messages displayed on the screen*
Message a)Description
SERVICEThe service interval has ended. Take the vehicle to a Techni-
cal Service.
IMMOBILIS-
ERImmobiliser system active. The vehicle will not start. Take
the vehicle to a Technical Service.
ERRORInstrument panel faulty. Take the vehicle to a Technical Serv-
ice.
CLEAN AIRFILTERWarning: Clean the air filter.
NO KEYWarning: Correct key cannot be found in the vehicle.KEY BATTERYWarning: Key battery low. Change the battery.
CLUTCHWarning: Press the clutch to start. In vehicles with manual
gearbox and Start-Stop system.
--> P/NWarning: Place the selector level in P/N to start. Only in ve-
hicles with automatic gearbox.
--> PWarning: Place the selector lever in position P to stop the
engine.
STARTINGWarning: The engine starts automatically. Start-Stop system
activated.
START MAN- UALLYWarning: The engine must be started manually. Start-Stop
system activated.
ERROR
START-STOPWarning: Start-Stop system error.
START-STOP
IMPOSSIBLEWarning: Although the Start-Stop system is switched on, the
engine cannot be stopped automatically. Not all the neces-
sary conditions are met.
START-STOP ACTIVEWarning: Start-Stop system activated. Vehicle in Stop mode.
SWITCH OFFWarning: Start-Stop system activated. Switch off the ignition
when you leave the vehicle.
STOP TRANS-MISSIONTOO HOTWarning: Stop the engine. Gearbox overheated.
BRAKEWarning: To start the engine, press the brake pedal. Only in
vehicles with automatic gearbox.
COASTING FUNCTIONWarning: Coasting mode active. Transmission engaged. On-
ly in vehicles with automatic gearbox.
CHECK SAFE- LOCKNotification of central locking function activated.
a)These messages may vary according the version of the vehicle model.
Fuel level/reserve
This symbol lights up to indicate that the fuel tank is under
the reserve level.
It lights up when only 7 litres of fuel remain in the tank. You will also hear
an audible warning. It reminds you to fuel up the fuel tank as soon as possi-
ble ⇒ page 219.
The instrument panel displays the following message 1)
: PLEASE REFUEL! .
1)
Depending on the version of the model.
Safety FirstOperating InstructionsPractical TipsTechnical Specifications
Page 128 of 301

126Lights and visibility
● When the “interval wipe function” is on, the intervals are directly propor-
tional to the speed. This way, the higher the vehicle speed the shorter the
intervals.
● The wiper will try to wipe away any obstacles that are on the windscreen.
The wiper will stop moving if the obstacle blocks its path. Remove the ob-
stacle and switch the wiper back on again.
● Before removing any objects that may be trapped in the side areas of
the windscreen, always move the wiper arms to the service position (hori-
zontal).
● The heat output of the heated jets is controlled automatically when the
ignition is switched on, depending upon the outside temperature.
Rain sensor*
The rain sensor controls the frequency of the windscreen
wiper intervals, depending on the amount of rain.
Fig. 84 Rain sensor*
Fig. 85 Windscreen wip-
er lever
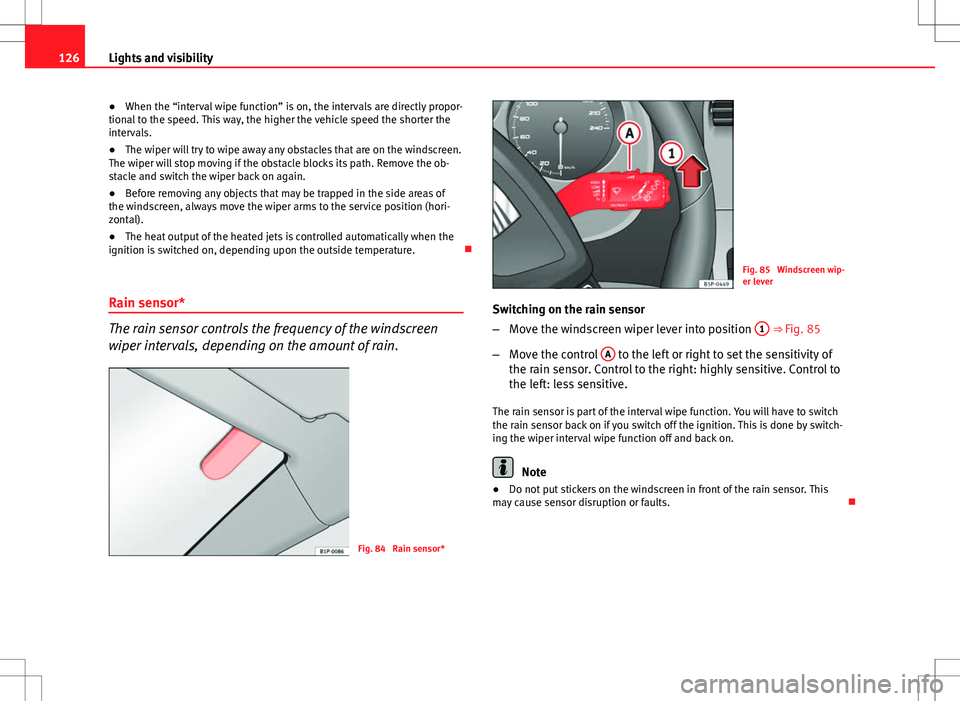
Switching on the rain sensor
– Move the windscreen wiper lever into position 1
⇒ Fig. 85
– Move the control A
to the left or right to set the sensitivity of
the rain sensor. Control to the right: highly sensitive. Control to
the left: less sensitive.
The rain sensor is part of the interval wipe function. You will have to switch
the rain sensor back on if you switch off the ignition. This is done by switch-
ing the wiper interval wipe function off and back on.
Note
● Do not put stickers on the windscreen in front of the rain sensor. This
may cause sensor disruption or faults.
Page 166 of 301

164Air conditioning
With high outside temperatures, the air recirculation increases the effective-
ness of the air conditioning system by cooling the air inside the vehicle
rather than the ambient air.
If the windscreen air output is on and the air recirculation mode is pressed,
this remains active. When the recirculation mode is on, if the air distribution
towards the windscreen mode is selected, the recirculation mode is deacti-
vated. For safety reasons, the air recirculation mode should not be connec-
ted.
WARNING
In air recirculation mode, no cold air from the outside enters the vehicle
interior. If the air conditioning system is switched off, the windows can
quickly mist over. Therefore, never leave the air recirculation mode
switched on for a long time (risk of accident).
General notes
Pollution filter
The pollution filter (a combined particulate filter and active carbon filter)
serves as a barrier against impurities in the outside air, including dust and
pollen.
For the air conditioner to work with maximum efficiency, the pollution filter
must be replaced at the intervals specified in the Service Plan.
If the filter loses efficiency prematurely due to use in areas reaching very
high pollution levels, the pollen filter must be changed more frequently
than stated in the Service Schedule.
Air conditioner
When the air conditioning system is switched on, not only the temperature,
but also the air humidity in the vehicle interior is reduced. This improves comfort for the vehicle occupants and prevents misting of the windows
when the ambient air humidity is high.
If the air conditioning system cannot be switched on this may be caused by
the following reasons:
●
The engine is not running.
● The AC
button is disconnected.
● The outside temperature is below +3 °C.
● The air conditioning system compressor has been temporarily switched
off because the engine coolant temperature is too high.
● The air conditioner fuse is faulty.
● Another fault in the vehicle. Have the air conditioner checked by a speci-
alised workshop.
CAUTION
● If you suspect that the air conditioner is damaged, switch it off with but-
ton AC
to prevent further damage and have it checked by a specialised
workshop.
● Repairs to the air conditioner require specialist knowledge and special
tools. Therefore, we recommend you to take the vehicle to a specialised
workshop.
Note
● If the humidity and temperature outside the vehicle are high, condensa-
tion can drip off the evaporator in the cooling system and so forming a pud-
dle underneath the vehicle. This is completely normal and there is no need
to suspect a leak.
● Keep the air intake slots in front of the windscreen free of snow, ice and
leaves to ensure heating and cooling are not impaired, and to prevent the
windows from misting over.
● The air from the vents flows through the vehicle interior and is extracted
by slots designed for this purpose. Therefore, do not cover these slots with
items of clothing or other objects.
Page 204 of 301

202Trailer towing
Note
● Towing a trailer places additional demands on the vehicle. We recom-
mend additional services between the normal inspection intervals if the ve-
hicle is used frequently for towing a trailer.
● Find out whether special regulations apply to towing a trailer in your
country.
Ball coupling of towing bracket*
Depending on the model version, the spherical head on the trailer hook
may be stored in the tool box.
The ball coupling is provided with instructions on fitting and removing the
ball coupling of the towing bracket.
WARNING
The towing bracket ball coupling must be stored securely in the luggage
compartment to prevent them being flung through the vehicle and caus-
ing injury.
Note
● By law, the ball coupling must be removed if a trailer is not being towed
if it obscures the number plate. Driving tips
Driving with a trailer always requires extra care.
Weight distribution
The weight distribution of a loaded trailer with an unladen vehicle is very
unfavourable. However, if this cannot be avoided, drive extra slowly to allow
for the unbalanced weight distribution.
Speed
The stability of the vehicle and trailer is reduced with increasing speed. For
this reason, it is advisable not to drive at the maximum permissible speed
in an unfavourable road, weather or wind conditions. This applies especially
when driving downhill.
You should always reduce speed immediately if the trailer shows the slight-
est sign of snaking. Never try to stop the “snaking” by increasing speed.
Always brake in due course. If the trailer has an overrun brake, apply the
brakes gently at first and then, firmly. This will prevent the jerking that can
be caused by locking of trailer wheels. Select a low gear in due course be-
fore going down a steep downhill. This enables you to use the engine brak-
ing to slow down the vehicle.
Reheating
At very high temperatures and during prolonged slopes, driving in a low
gear and high engine speed, always monitor the coolant temperature gauge
⇒ page 55.
Electronic Stability Control*
The ESC* system helps to stabilise the trailer in case of skidding or rocking.
Page 227 of 301

225
Checking and refilling levels
WARNING
If the bonnet is not closed properly, it could open while you are driving
and completely obscure your view of the road. Risk of accident.
● After closing the bonnet, always check that it is properly secured. The
bonnet must be flush with the surrounding body panels.
● If you notice that the bonnet latch is not secured when the vehicle is
moving, stop the vehicle immediately and close the bonnet properly.
Risk of accident.
Engine oil General notes
The engine comes with a special, multi-grade oil that can be used all year
round.
Because the use of high-quality oil is essential for the correct operation of
the engine and its long useful life, when topping up or changing oil, use on-
ly those oils that comply with VW standards.
The specifications (VW standards) set out in the following page should ap-
pear on the container of the service oil; when the container displays the
specific standards for petrol and diesel engines together, it means that the
oil can be used for both types of engines.
We recommend that the oil change, indicated in the Maintenance Pro-
gramme, be performed by a Technical Service or a specialised workshop.
The correct oil specifications for your engine are listed in the ⇒ page 226,
Oil properties. Service intervals
Service intervals can be flexible (LongLife service) or fixed (dependent on
time/distance travelled).
If the PR code that appears on the back of the “Maintenance Programme”
booklet is PR QI6, this means that your vehicle has the LongLife service pro-
grammed. If it lists the codes QI1, QI2, QI3, QI4 or QI7, the interval service
is dependent on time/distance travelled.
Flexible service intervals (LongLife service intervals*)
Special oils and processes have been developed which, depending on the
characteristics and individual driving profiles, enable the extension of the
oil change service (LongLife service intervals).
Because this oil is essential for extending the service intervals, it
must only
be used observing the following indications:
● Avoid mixing it with oil for fixed service intervals.
● Only in exceptional circumstances, if the engine oil level is too low
⇒ page 226 and LongLife oil is not available, it is permitted to top up
(once) with oil for fixed service intervals ⇒ page 226 (up to a maximum of
0.5 litres).
Fixed service intervals*
If your vehicle does not have the “LongLife service interval” or it has been
disabled (by request), you may use oils for fixed service intervals, which al-
so appear in ⇒ page 226, Oil properties. In this case, your vehicle must be
serviced after a fixed interval of 1 year/15 000 km (10 000 miles)(whatever
comes first) ⇒ Booklet Maintenance Programme.
● In exceptional circumstances, if the engine oil level is too low
⇒ page 226 and you cannot obtain the oil specified for your vehicle, you
can put in a small quantity of oil conforming to the specification ACEA A2 or
ACEA A3 (petrol engines) or ACEA B3 or ACEA B4 (diesel engines) (up to 0.5
l).
Safety FirstOperating InstructionsPractical TipsTechnical Specifications
Page 228 of 301

226Checking and refilling levels
Vehicles with diesel particulate filter*
The “Maintenance Programme” states whether your vehicle is fitted with a
diesel particulate filter.
Only VW 507 00 engine oil, with reduced ash formation, may be used in die-
sel engines equipped with particulate filter. Using other types of oil will
cause a higher soot concentration and reduce the life of the DPF. Therefore:
● Avoid mixing this oil with other engine oils.
● Only in exceptional circumstances, if the engine oil level is too low
⇒ page 226 and you cannot obtain the oil specified for your vehicle, you
can use a small quantity of oil (once) conforming to the VW 506 00,
VW 506 01, VW 505 00, VW 505 01 or ACEA B3/ACEA B4 specification. (up
to 0.5 l).
Oil properties
Engine typeSpecificationPetrol without flexible service in-
tervalVW 502 00/VW 504 00
Petrol with flexible service interval
(LongLife)VW 504 00
Diesel. Engines without Particu-
late filter (DPF)VW 505 01/VW 506 01/VW 507 00
Diesel. Particulate Filter Engines
(DPF).
With or without flexible service in-
terval (with and without Long-
life) a)VW 507 00
a)
Only use recommended oils, otherwise you may damage the engine. Engine oil additives
No type of additive should be mixed with the engine oil. The deterioration
caused by these additives is not covered by the warranty.
Note
Before a long trip, we recommend finding an engine oil that conforms to the
corresponding VW specifications and recommend keeping it in the vehicle.
This way, the correct engine oil will always be available for a top-up if nee-
ded.
Checking the engine oil level
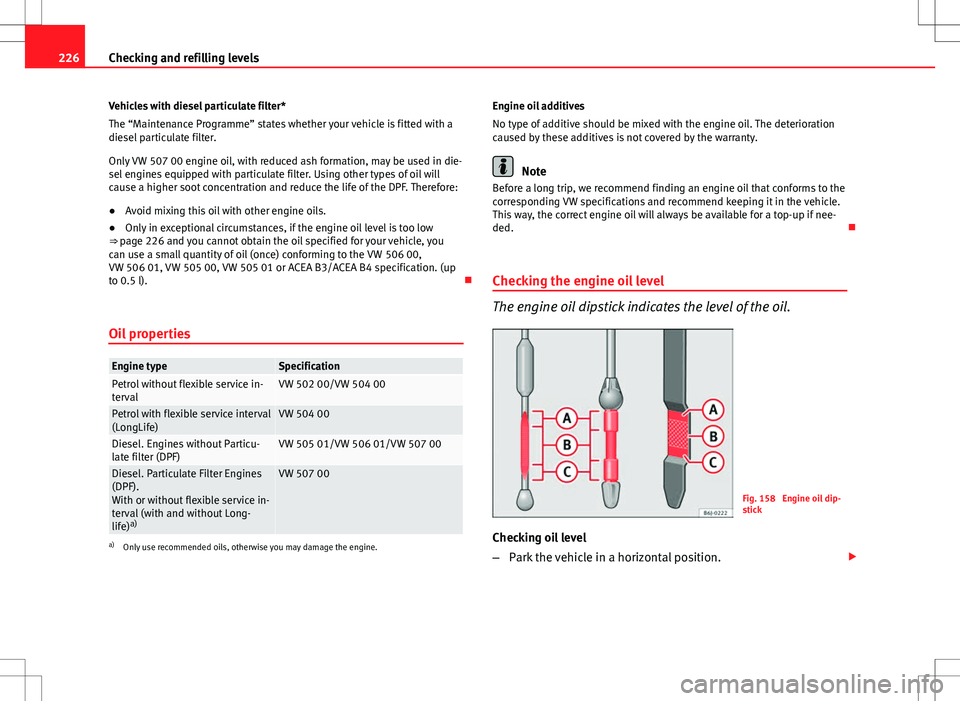
The engine oil dipstick indicates the level of the oil.
Fig. 158 Engine oil dip-
stick
Checking oil level
– Park the vehicle in a horizontal position.