ignition Seat Ibiza 2017 Edition 11.17 Repair Manual
[x] Cancel search | Manufacturer: SEAT, Model Year: 2017, Model line: Ibiza, Model: Seat Ibiza 2017Pages: 312, PDF Size: 6.51 MB
Page 181 of 312
Driving
● the driv er door i
s
opened.
After automatically turning off the ignition, if
the dipped beam is on, the side light re-
mains on for approx. 30 minutes (if the bat-
tery is sufficiently charged). If the driver locks
the vehicle or manually turns off the light, the
side light goes out. WARNING
Any accidental movement of the vehicle could
re s
ult in serious injury.
● When switching on the ignition, do not
pre
ss the brake or clutch pedal, otherwise
the engine could start immediately. WARNING
If vehicle keys are used negligently or with-
out due c ar
e, this may cause accidents and
serious injury.
● Never leave any key inside the vehicle
when exitin
g. Otherwise, a child or unauthor-
ised person could lock the vehicle, start the
engine or connect the ignition and, in this
way, operate electronic equipment (e.g. the
windows). Note
● Bef or
e leaving the vehicle, always discon-
nect the ignition manually and, if appropri-
ate, take into account the instructions on the
screen of the dash panel. ●
If the v
ehicle is stationary for a long time
with the ignition on, the vehicle battery
might be discharged and it might not be pos-
sible to start the engine.
● In diesel vehicles, there may be a delay in
the engine st
arting if it requires preheating.
● If during the STOP phase you press the
STAR
T ENGINE STOP button, the ignition is
swit c
hed off and the button flashes.
● If the indication “Start-Stop system deacti-
vated:
Start the engine manually” is dis-
played on the dash panel display, the START ENGINE STOP button will blink.
Starting the engine
3 V
alid for vehicles: with starter button
StepStarting the engine with the starter
button ››› page 178.
1.Press and hold the brake pedal until step 5
is performed.
1a.In vehicles with a manual gearbox: press
and hold the clutch down until the engine
starts.
2.Put the gearbox lever in neutral or the selec-
tor lever in position P or N.
StepStarting the engine with the starter
button ››› page 178.
3.
Briefly press the starter button ››› Fig. 178
without pressing the accelerator. For the en-
gine to start there must be a valid key in the
vehicle.
After starting the engine, the light of the START ENGINE STOP
button changes to a fixed
light indicating that the engine has started.
4.
If the engine does not start, stop and wait for
approx. 1 minute before trying again. If nec-
essary, perform an emergency start
››› page 178.
5.Disconnect the hand brake when you are
about to start driving ››› page 182. WARNING
Never leave the vehicle with the engine run-
ning, e s
pecially if a gear or gear range is en-
gaged. The vehicle could then suddenly move
or something strange could happen that
would cause damage, fire or serious injury. WARNING
Cold start sprays could explode or cause a
sud den inc
rease in the engine speed.
● Never use sprays to cold start the engine. CAUTION
● The st ar
ter motor or the engine may be
damaged if you try to start the engine while » 179
Technical data
Advice
Operation
Emergencies
Safety
Page 182 of 312
Operation
driving or if you restart it immediately after
swit
c
hing it off.
● If the engine is cold, avoid high engine
speeds, p
ushing the engine too hard and rap-
id acceleration.
● Do not start the engine by pushing the ve-
hicle or t
owing it. Unburnt fuel could enter
the catalytic converter and damage it. Note
● Do not wait
until the engine warms up with
the vehicle stationary; if you have good visi-
bility through the windows, start driving im-
mediately. This helps the engine reach oper-
ating temperature faster and reduces emis-
sions.
● Electrical components with a high power
cons
umption are switched off temporarily
when the engine starts.
● When starting with a cold engine, noise
level
s may briefly increase. This is quite nor-
mal, and no cause for concern.
● When the outside temperature is below
+5°C (+41°F), if the en
gine is diesel, some
smoke may appear under the vehicle when
the fuel-operated auxiliary heater is on. Stopping the engine
3 Valid for vehicles: with starter button
StepSwitch off the engine with the starter
button
››› page 178.
1.Stop the vehicle completely ››› .
2.Press and hold the brake pedal until the step
4 is performed.
3.If you are driving an automatic vehicle, place
the selector lever in position P.
4.Apply the handbrake ››› page 182.
5.
Briefly press the start-up button ››› Fig. 178.
The START ENGINE STOP button blinks again. If
the engine fails to switch off, perform an
emergency disconnect ››› page 178.
6.If the vehicle is equipped with a manual
gearbox, put it into 1st or reverse. WARNING
Never switch off the engine while the vehicle
is mo
ving. This could cause loss of control of
the vehicle, accidents and serious injury.
● The airbags and belt tensioners do not
work when the ignition i
s switched off.
● The brake servo does not work with the en-
gine off. Ther
efore, you need to press the
break pedal harder to brake the vehicle.
● Power steering does not work when the en-
gine is not
running. You need more strength
to steer when the engine is switched off. ●
If the ignition i s
switched off, the steering
column could be locked, making it impossible
to control the vehicle. CAUTION
If the engine is made to work hard for a long
time, it ma
y overheat after being switched
off. To prevent damage to the engine before
switching it off, leave it idle for approx. 2 mi-
nutes in neutral. Note
After switching off the engine, the cooling fan
ma y
continue to operate in the engine com-
partment for a few more minutes, even with
the ignition off. The radiator fan is automati-
cally switched off. “My Beat” Function
For vehicles with a convenience key there is
the “M
y
B
eat” function. This feature provides
an additional indication of the vehicle igni-
tion system.
When accessing the vehicle, e.g. by opening
the doors with the remote control, the START ENGINE STOP button flashes, calling at-
t ention t
o the r
elevant starter system button.
Upon switching the ignition on/off, the light
of the START ENGINE STOP button flashes. With
the en gine sw
it
ched off, after a few seconds,
180
Page 184 of 312
Operation
● ther e i
s
a fault in the brake system.
This warning lamp can light up together with
the ABS system warning lamp. WARNING
● If the br ak
e warning lamp does not go out
or if it lights up when driving, the brake fluid
level in the reservoir is too low so there is a
risk of an accident ››› page 271, Brake fluid.
Stop the vehicle and do not drive on. Obtain
technical assistance.
● If the brake warning lamp lights up to-
gether w
ith the ABS lamp this could be
due to an ABS fault. This could cause the rear
wheels to lock quickly when you brake. This
could cause the rear to break away. Risk of
skidding. Stop the vehicle and seek technical
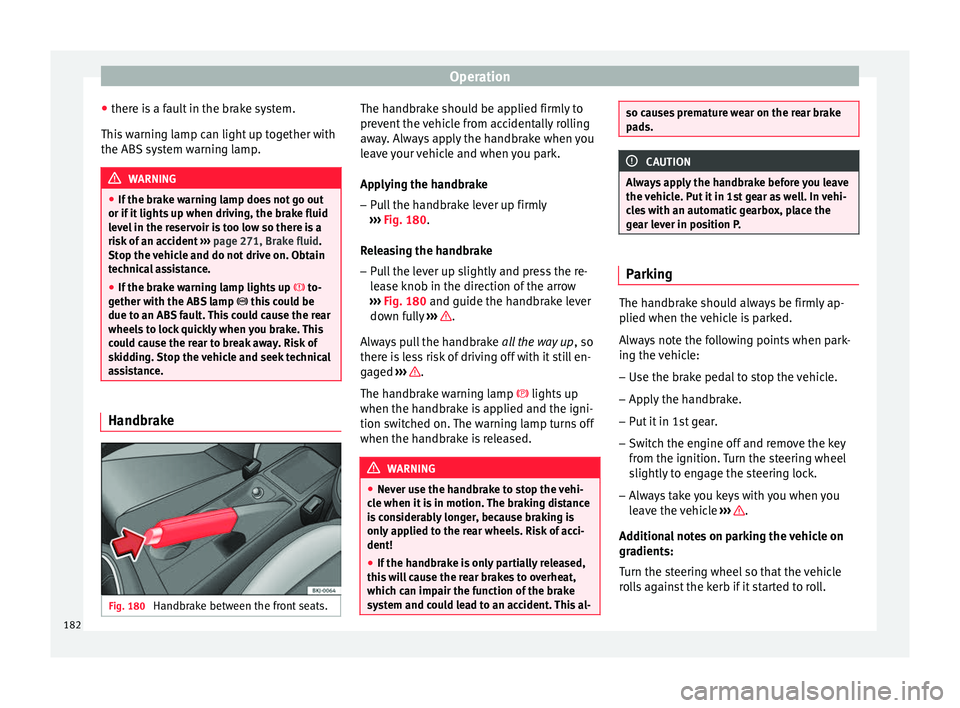
assistance. Handbrake
Fig. 180
Handbrake between the front seats. The handbrake should be applied firmly to
pr
ev
ent
the vehicle from accidentally rolling
away. Always apply the handbrake when you
leave your vehicle and when you park.
Applying the handbrake
– Pull the handbrake lever up firmly
›››
Fig. 180.
Releasing the handbrake
– Pull the lever up slightly and press the re-
lea
se knob in the direction of the arrow
››› Fig. 180 and guide the handbrake lever
down fully ››› .
A lw
a
ys pull the handbrake all the way up, so
there is less risk of driving off with it still en-
gaged ››› .
The h andbr
ak
e warning lamp lights up
when the handbrake is applied and the igni-
tion switched on. The warning lamp turns off
when the handbrake is released. WARNING
● Never u se the h
andbrake to stop the vehi-
cle when it is in motion. The braking distance
is considerably longer, because braking is
only applied to the rear wheels. Risk of acci-
dent!
● If the handbrake is only partially released,
this w
ill cause the rear brakes to overheat,
which can impair the function of the brake
system and could lead to an accident. This al- so causes premature wear on the rear brake
pa
d
s. CAUTION
Always apply the handbrake before you leave
the vehic
le. Put it in 1st gear as well. In vehi-
cles with an automatic gearbox, place the
gear lever in position P. Parking
The handbrake should always be firmly ap-
p
lied when the
v
ehicle is parked.
Always note the following points when park-
ing the vehicle: – Use the brake pedal to stop the vehicle.
– Apply the handbrake.
– Put it in 1st gear.
– Switch the engine off and remove the key
from the ignition. T
urn the steering wheel
slightly to engage the steering lock.
– Always take you keys with you when you
leav
e the vehicle ››› .
Ad dition
a
l notes on parking the vehicle on
gradients:
Turn the steering wheel so that the vehicle
rolls against the kerb if it started to roll.
182
Page 185 of 312
Driving
● If the
v
ehicle is parked facing downhill,
turn the front wheels so that they point to-
wards the kerb .
● If the vehicle is parked facing uphill
, turn
the front wheels so that they point away from
the kerb.
● Secure the vehicle as usual by applying the
handbrak
e firmly and putting it in 1st gear. WARNING
● Tak e me
asures to reduce the risk of injury
when you leave your vehicle unattended.
● Never park where the hot exhaust system
coul
d ignite inflammable materials, such as
dry grass, low bushes, spilt fuel etc.
● Never allow vehicle occupants to remain in
the vehic
le when it is locked. They would be
unable to open the vehicle from the inside,
and could become trapped in the vehicle in
an emergency. In the event of an emergency,
locked doors will delay assistance to vehicle
occupants.
● Never leave children alone in the vehicle.
They cou
ld set the vehicle in motion, for ex-
ample, by releasing the handbrake or the
gearbox lever.
● Depending on weather conditions, it may
become extr
emely hot or cold inside the vehi-
cle. This can be fatal. Braking and stability systems
El ectr
onic
Stability Control (ESC)* This Electronic Stability System reduces the
risk
of
skidding and improves the vehicle's
stability and ability to hold the road.
The Electronic Stability Control (ESC) contains
the electronic differential lock (EDL) and the
traction control system (ASR). The ESC works
together with the ABS. Both control lamps
will light up if the ESC or ABS systems are
faulty.
The ESC system is started automatically
when the engine is started.
The ESC system is always active and cannot
be switched off. With the Easy Connect sys-
tem it is only possible to deactivate the ASR
or else select Sport mode.
The ASR can be deactivated when wheel spin
is desirable ›››
page 184.
For example:
● When driving with snow chains.
● When driving in deep snow or on loose sur-
fac e
s.
● When the vehicle is stuck, to rock it back-
ward
s and forwards.
Press the button to switch the ASR back on
when you no longer need wheel spin. Electronic Stability Control (ESC)*
The ESC r
educes the risk of skidding by brak-
ing the wheels individually.
The system uses the steering wheel angle
and road speed to calculate the changes of
direction desired by the driver, and constant-
ly compares them with the actual behaviour
of the vehicle. When irregularities occur, for
example, if the vehicle begins to skid, the
ESC brakes the appropriate wheel automati-
cally.
The forces acting on the braked wheel bring
the vehicle back to a stable condition. If the
vehicle tends to oversteer (the rear end
slides out), the system will act on the front
wheel on the outside of the turn.
Control lamp
There are two control lamps for the electronic
stability control. The lamp provides infor-
mation concerning function and disconnec-
tion status.
Both control lamps light up together when
the ignition is switched on and should turn
off after approximately 2 seconds. This is the
time taken for the function check.
This programme includes the ABS, EDL and
ASR. It also includes emergency braking as-
sistance (BAS). »
183
Technical data
Advice
Operation
Emergencies
Safety
Page 186 of 312
Operation
The control lamp ha
s the following func-
tions:
● It flashes whilst driving when the ASR/ESC
is activ
ated.
● It will light up if there is a fault in the ESC.
● As the ESC operates in conjunction with the
ABS, the ESC light
will also come on if a fault
should occur in the ABS.
If the ESC control lamp lights up and stays
on after the engine is started, this may mean
that the control system has temporarily
switched off the ESC. In this case the ESC can
be reactivated by switching the ignition off
and then on again. If the control lamp goes
out, this means the system is fully functional.
The lamp provides information about the
disconnection status of the system:
● It stays lit when the ASR is disconnected or
if y
ou select ESC Sport mode, only by means
of Easy Connect. WARNING
● Do not f or
get that the electronic stability
control ESC cannot defy the laws of physics.
Bear this in mind, particularly on slippery
and wet roads and when towing a trailer.
● Always adapt your driving style to suit the
condition of the r
oads and the traffic situa-
tion. The greater safety provided by the ESC
should not encourage you to run any risks. CAUTION
● To en s
ure that the ESC works correctly, all
four wheels must be fitted with the same
tyres. Any differences in the rolling radius of
the tyres can cause the system to reduce en-
gine power when this is not desired.
● Any modifications made to the vehicle (for
examp
le, to the engine, brake system, run-
ning gear or to the combination of wheels
and tyres) may affect the operation of the
ABS, EDL, ESC and ASR. Traction control system (ASR)
The traction control system prevents the driv-
en wheel
s
fr
om spinning when the vehicle is
accelerating.
Description and operation of the traction
control system during acceleration (ASR)
The ASR system intervenes by reducing en-
gine power and preventing the driven wheels
from slipping during acceleration.
TCS helps the car to start moving, accelerate
and climb a gradient in slippery conditions
where this may otherwise be difficult or even
impossible.
The ASR automatically switches on when the
engine is started. If necessary, it could be
switched on or off using the Easy Connect
system*. When the ASR is off, the warning lamp lights
up . The ASR shoul
d normally be left on.
Only in exceptional cases can it be discon-
nected, i.e. when you want the wheels to
slide; this done through the Easy Connect
system, by means of the button and the
f u
nction b
utton SETTINGS> ESC system ,
for example:
● With compact temporary spare wheel.
● When using the snow chains.
● When driving in deep snow or on soft ter-
rain.
● When the v
ehicle is bogged-down, to free it
by
“rocking it”.
The ASR should be switched on again as
soon as possible.
Control lamp
There are three control lamps for the traction
control system: (for vehicles equipped
with M-ABS), (for vehicles equipped with
ESC) and . Both control lamps light up to-
gether when the ignition is switched on and
should turn off after approximately 2 sec-
onds, which is the time taken for the function
check.
The or lamp has the following function:
● It flashes when the ASR is working if the ve-
hicl e i
s moving.
184
Page 189 of 312
Driving
a standstill, the hazard warning lights will
then c ome on and the br
ak
e lights will re-
main on permanently from that moment. The
warning lights will automatically switch off
when the vehicle begins to move again or
when the "warning" light button is pressed. WARNING
● The risk of
accident is higher if you drive
too fast, if you do not keep your distance from
the vehicle in front, and when the road sur-
face is slippery or wet. The increased acci-
dent risk cannot be reduced by the brake as-
sist system.
● The brake assist system cannot defy the
law
s of physics. Slippery and wet roads are
dangerous even with the brake assist system!
Therefore, it is essential that you adjust your
speed to suit the road and traffic conditions.
Do not let the extra safety features tempt you
into taking any risks when driving. Anti-lock brake System (ABS)
The anti-lock brake (ABS) system prevents
the wheel
s
fr
om locking during braking and
is an important part of the vehicle's active
safety system.
How the ABS works
If one of the wheels turns too slowly in rela-
tion to the vehicle's speed, and is close to
locking, the system will reduce the braking pressure to this wheel. The driver is made
awar
e of this control process by a pulsating
of the brake pedal and audible noise. This is
a deliberate warning to the driver that one or
more of the wheels is tending to lock and the
ABS control function has intervened. In this
situation it is important to keep the brake
pedal fully depressed so the ABS can regu-
late the brake application. Do not “pump”.
If you brake hard on a slippery road surface,
the best possible control is retained as the
wheels do not lock.
However, ABS will not necessarily guarantee
shorter braking distances in all conditions.
Braking distance could even be further if you
brake on gravel or on fresh snow on a slip-
pery surface.
Control lamp
The control lamp lights up for a few sec-
onds when the ignition is switched on. It
goes out again after the system has run
through an automatic test sequence.
There is a fault in the ABS if:
● The control lamp does not
light up when
the ignition is switched on.
● The control lamp does not go out again af-
ter a few sec
onds.
● The control lamp lights up when the vehicle
is mo
ving. The vehicle can still be braked in the normal
way
, without the ABS function. Take the vehi-
cle to a specialised workshop as soon as
possible.
If there is a fault in the ABS, the ESC* and the
tyre pressure control lamp will also light up.
Brake system fault
If the ABS warning lamp lights up together
with the brake warning lamp , there is a
fault in the ABS function and in the brake
system ››› .
WARNING
● The anti-lock br
ake system cannot defy the
laws of physics. Slippery and wet roads are
dangerous even with ABS! If you notice that
the ABS is working (to counteract locked
wheels under braking), you should reduce
speed immediately to suit the road and traffic
conditions. Do not let the extra safety fea-
tures tempt you into taking any risks when
driving.
● The effectiveness of ABS is also determined
by the ty
res fitted ››› page 274.
● If the running gear or brake system is modi-
fied, the effectivene
ss of the ABS could be se-
verely limited. » 187
Technical data
Advice
Operation
Emergencies
Safety
Page 191 of 312
Driving
Hill driving assistant* Fig. 181
Related video This function is only included in vehicles with
ESC.
The hi l
l driving assistant helps the driver to
move off and upward on a hill when the vehi-
cle is stationary.
The system maintains brake pressure for ap-
proximately two seconds after the driver
takes his foot off the brake pedal to prevent
the vehicle from lurching backward when it is
started. During these 2 seconds, the driver
has enough time to release the clutch pedal
and accelerate without the vehicle moving
and without having to use the handbrake,
making start-up easier, more comfortable
and safer.
These are the basic operation conditions:
● being on a ramp or hill/slope,
● driver door closed,
● vehicle completely stationary,
● engine running and foot on the brake, ●
bes ide
s having a gear engaged or being in
neutral for manual gear change and with the
selector lever at position S, D or R for an au-
tomatic gearbox.
This system is also active when reversing up-
hill. WARNING
● If y
ou do not start the vehicle immediately
after taking your foot off the brake pedal, the
vehicle may start to roll back under certain
conditions. Depress the brake pedal or use
the hand brake immediately.
● If the engine stalls, depress the brake ped-
al or u
se the hand brake immediately.
● When following a line of traffic uphill, if you
want t
o prevent the vehicle from rolling back
accidentally when starting off, hold the brake
pedal down for a few seconds before starting
off. Note
The Official Service or a specialist workshop
can t el
l you if your vehicle is equipped with
this system. Manual gearbox
Driv in
g w
ith a manual gearbox Read the additional information carefully
›› ›
page 50
Certain versions of the model may include a
6-speed manual gearbox, and its diagram is
shown on the gearbox lever.
The reverse gear can only be engaged when
the car is stationary. When the engine is run-
ning and before engaging this gear, wait
about 6 seconds with the clutch pressed
down thoroughly in order to protect the gear-
box.
The reverse lights switch on when the reverse
gear is selected and the ignition is on. WARNING
● When the engine i s
running, the vehicle
will start to move as soon as a gear is engag-
ed and the clutch released.
● Never select the reverse gear when the ve-
hicle i
s in motion. Risk of accident. Note
● Do not r e
st your hand on the gear lever
while driving. The pressure of your hand
could cause premature wear on the selector
forks in the gearbox. » 189
Technical data
Advice
Operation
Emergencies
Safety
Page 192 of 312
Operation
●
When ch an
ging gear, you should always
depress the clutch fully to avoid unnecessary
wear and damage.
● Do not “slip” the clutch to hold the vehicle
on a hill
. This causes premature wear and
damage to the clutch.
● Do not leave your foot on the clutch pedal;
although the pre
ssure may seem insignifi-
cant, it can cause the premature wear of the
clutch plate. Use the foot rest when you do
not need to change gear. Automatic gearbox/DSG auto-
m
atic
g
earbox*
Introduction Your vehicle is equipped with an electronical-
ly
c
ontr
olled manual gearbox. Torque be-
tween the engine and the gearbox is trans-
mitted via two independent clutches. They re-
place the torque converter found on conven-
tional automatic gearboxes and allow for
smooth, uninterrupted acceleration of the ve-
hicle.
The tiptronic system allows the driver to
change gears manually if desired
››› page 192, Engaging gears with the trip-
tonic mode*. Selector lever positions Read the additional information carefully
›› ›
page 50
The selector lever position engaged is high-
lighted on the display in the instrument clus-
ter. With the selector lever in the manual
gearbox positions G, D, E and S, the engaged
gear is also indicated on the display.
P – Parking lock
When the selector lever is in this position,
the driven wheels are locked mechanically.
The parking lock must be engaged only when
the vehicle is stationary ››› .
The int erloc
k
button (the button on the selec-
tor lever handle) must be pressed in and si-
multaneously the brake pedal must be de-
pressed before moving the selector lever ei-
ther in or out of position P.
R – Reverse gear
Reverse gear must be engaged only when the
vehicle is stationary and the engine is idling
››› .
T o mo
v
e the selector lever to position R, the
interlock button must be pressed in and at
the same time the brake pedal must be de-
pressed. The reverse lights come on when
the selector lever is in the R position with the
ignition on. N – Neutral (idling)
With the select
or lever in this position, the
gear is in neutral.
D/S – Permanent drive (forward) position
The selector lever in the D/S position enables
the gears to be controlled in normal mode (D)
or Sport (S). To select Sport mode (S), move
the selector lever backwards. Moving the lev-
er again will select normal mode (D). The se-
lected driving mode is shown on the instru-
ment panel display.
In normal mode (D), the gearbox automatical-
ly selects the best gear ratio. This depends
on the engine load, the road speed and the
dynamic gear control programme (DCP).
Sport mode (S) must be selected for a sporty
driving style. This setting makes use of the
engine's maximum power output. When ac-
celerating the gear shifts will be noticeable.
Press the brake pedal to move the selector
lever from N to D/S when the vehicle is sta-
tionary or at speeds below 3 km/h (2 mph)
››› .
Under c er
t
ain circumstances (e.g. when driv-
ing in mountains) it can be advantageous to
switch temporarily to tiptronic mode
››› page 192, in order to manually select gear
ratios to suit the driving conditions.
190
Page 193 of 312
Driving
WARNING
● Tak e c
are not to accidentally press the ac-
celerator pedal when the vehicle is stopped.
The vehicle could otherwise start moving im-
mediately (in some cases even if the parking
brake is engaged) resulting in the risk of an
accident.
● Never move the selector lever to R or P
when driving. F
ailure to follow this instruc-
tion could result in an accident.
● With selector lever in any position (except
P) the vehic
le must always be held with the
foot brake when the engine is running. This is
because an automatic gearbox still transmits
power even at idling speed, and the vehicle
tends to “creep”. The accelerator pedal must
on no account be pressed inadvertently when
a gear is engaged with the vehicle stationary.
The vehicle could otherwise start moving im-
mediately (in some cases even if the parking
brake is engaged) resulting in the risk of an
accident.
● While you are selecting a gear and the vehi-
cle i
s stopped with the engine running, do
not accelerate. Failure to follow this instruc-
tion could result in an accident.
● As a driver you should never leave your ve-
hicle if
the engine is running and a gear is en-
gaged. If you have to leave your vehicle while
the engine is running, you must apply the
handbrake and engage the parking lock (P).
● To avoid accidents, apply the handbrake
and put the sel
ector lever in position P before
opening the bonnet and working on the vehi- cle with the engine running. Please always
ob
ser
ve the important safety warnings
››› page 263, Working in the engine compart-
ment. Note
● If the sel ect
or lever is moved accidentally
to N when driving, release the accelerator and
let the engine speed drop to idling before se-
lecting gear range D or S again.
● Should the power supply to the selector
lever be int
errupted in position P, the selector
lever will be locked. If this should happen the
manual release can be used ›››
page 50. Selector lever lock
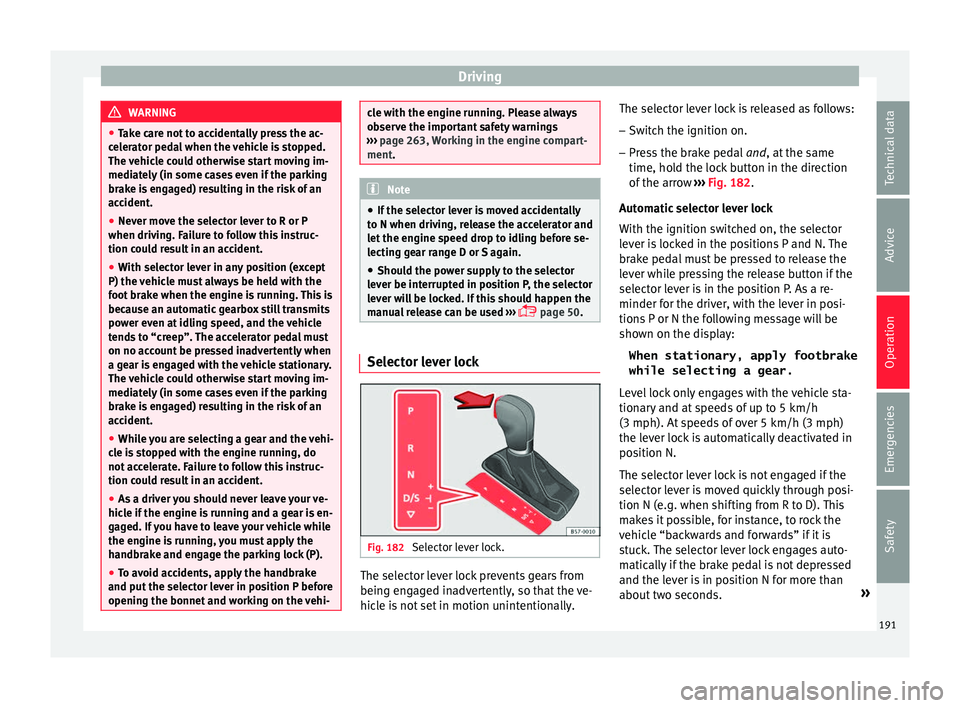
Fig. 182
Selector lever lock. The selector lever lock prevents gears from
bein g en
g
aged inadvertently, so that the ve-
hicle is not set in motion unintentionally. The selector lever lock is released as follows:
– Switch the ignition on.
– Press the brake pedal and, at
the same
time, hold the lock button in the direction
of the arrow ››› Fig. 182.
Automatic selector lever lock
With the ignition switched on, the selector
lever is locked in the positions P and N. The
brake pedal must be pressed to release the
lever while pressing the release button if the
selector lever is in the position P. As a re-
minder for the driver, with the lever in posi-
tions P or N the following message will be
shown on the display: When stationary, apply footbrake
while selecting a gear.
Level lock only engages with the vehicle sta-
tionary and at speeds of up to 5 km/h
(3 mph). At speeds of over 5 km/h (3 mph)
the lever lock is automatically deactivated in
position N.
The selector lever lock is not engaged if the
selector lever is moved quickly through posi-
tion N (e.g. when shifting from R to D). This
makes it possible, for instance, to rock the
vehicle “backwards and forwards” if it is
stuck. The selector lever lock engages auto-
matically if the brake pedal is not depressed
and the lever is in position N for more than
about two seconds. »
191
Technical data
Advice
Operation
Emergencies
Safety
Page 194 of 312
Operation
Interlock button
The int erloc
k
button on the selector lever
handle prevents the driver from inadvertently
engaging certain gears. Press the button in
to disengage the selector lever lock.
Safety interlock for ignition key
Once the ignition has been turned off, the
key may be removed only if the gear selector
is in position P. While the key is not in the ig-
nition, the selector lever is locked in position
P. Note
● If the sel ect
or lever lock does not engage,
there is a fault. The transmission is interrup-
ted to prevent the vehicle from accidentally
moving. Follow the procedure below in order
for the selector lever lock to engage again:
–With a 6-speed gearbox: press the brake
pedal and release it again.
– With a 7-speed gearbox: press the brake
pedal. Move the selector lever to posi-
tion P or N and subsequently engage a
gear.
● Despite a gear being engaged, the vehicle
does not
move forwards or back. Proceed to
the next mode:
– When the vehicle does not move in the
required direction, the system may not
have the gear range correctly engaged.
Press the brake pedal and engage the
gear range again. –
If the v
ehicle still does not move in the
required direction, there is a system mal-
function. Seek specialist assistance and
have the system checked. Engaging gears with the triptonic
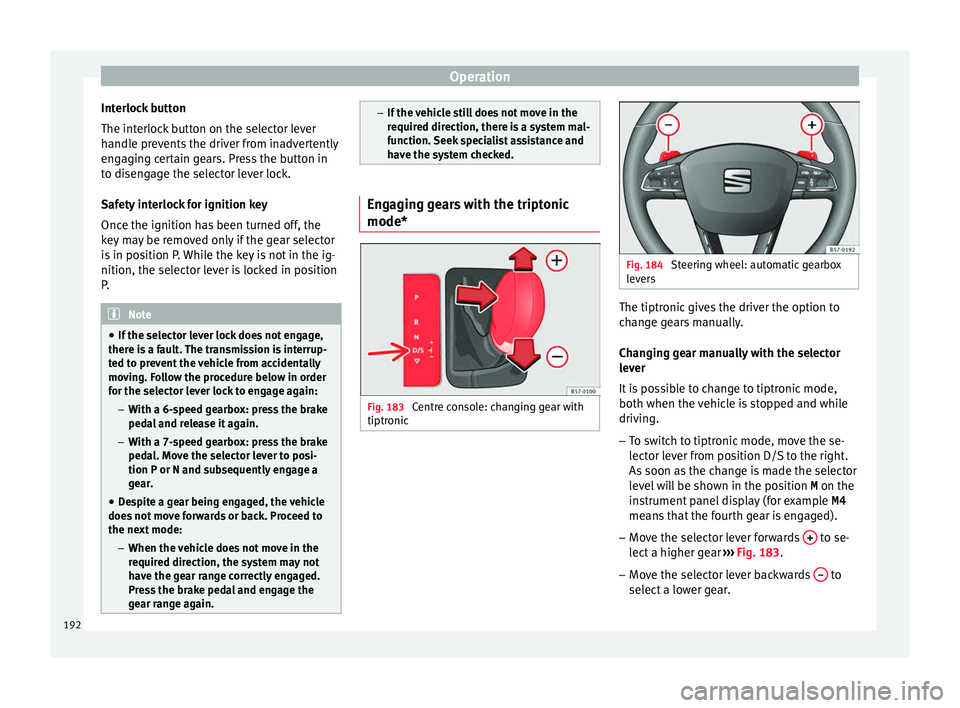
mode*
Fig. 183
Centre console: changing gear with
tiptr onic Fig. 184
Steering wheel: automatic gearbox
lev er
s The tiptronic gives the driver the option to
c
h
an
ge gears manually.
Changing gear manually with the selector
lever
It is possible to change to tiptronic mode,
both when the vehicle is stopped and while
driving.
– To switch to tiptronic mode, move the se-
lector l
ever from position D/S to the right.
As soon as the change is made the selector
level will be shown in the position M on the
instrument panel display (for example M4
means that the fourth gear is engaged).
– Move the selector lever forwards + to se-
l ect
a higher g
ear ››› Fig. 183.
– Move the selector lever backwards – to
sel ect
a lo
wer gear.
192