audio Seat Leon 5D 2011 MEDIA SYSTEM 2.2
[x] Cancel search | Manufacturer: SEAT, Model Year: 2011, Model line: Leon 5D, Model: Seat Leon 5D 2011Pages: 112, PDF Size: 2.42 MB
Page 4 of 112

Table of Contents
General information . . . . . . . . . . . . . . . . 4
Important Information . . . . . . . . . . . . . . 5
Introduction . . . . . . . . . . . . . . . . . . . . . . . . . . 6
Before using the unit for the first time . . . . . . 6
Safety instructions . . . . . . . . . . . . . . . . . . . . . . . . 6
Versions available . . . . . . . . . . . . . . . . . . . . . . . . . 7
Unit overview . . . . . . . . . . . . . . . . . . . . . . . . . . . . . 8
General operating information . . . . . . . . . . . . . 10
Audio mode . . . . . . . . . . . . . . . . . . . . . . . . . . . 14
Radio mode . . . . . . . . . . . . . . . . . . . . . . . . . . . . . . . 14
RDS radio data and TP (Traffic Programme)
services . . . . . . . . . . . . . . . . . . . . . . . . . . . . . . . . . . . 21
DAB digital radio mode . . . . . . . . . . . . . . . . . . . . 24
Media mode . . . . . . . . . . . . . . . . . . . . . . . . . . . . . . 29
MEDIA-IN multimedia interface . . . . . . . . . . . . . 43
Navigation . . . . . . . . . . . . . . . . . . . . . . . . . . . . 48
Introduction to navigation . . . . . . . . . . . . . . . . . 48
Enter destination . . . . . . . . . . . . . . . . . . . . . . . . . . 54
Destination memory . . . . . . . . . . . . . . . . . . . . . . . 60
Route guidance . . . . . . . . . . . . . . . . . . . . . . . . . . . 65 Telephone control (Phone)
. . . . . . . . 77
Introduction . . . . . . . . . . . . . . . . . . . . . . . . . . . . . . . 77
Main menu . . . . . . . . . . . . . . . . . . . . . . . . . . . . . . . . 83
Control from the steering wheel . . . . . . . . . . . . 85
Instrument panel display . . . . . . . . . . . . . . . . . . 86
Control from the navigation system . . . . . . . . . 89
Operation via voice control . . . . . . . . . . . . . . . . . 94
Settings (SETUP) . . . . . . . . . . . . . . . . . . . . 99
Sound, volume and system settings . . . . . . . . 99
Abbreviations . . . . . . . . . . . . . . . . . . . . . . . . 102
Abbreviations . . . . . . . . . . . . . . . . . . . . . . . . . . . . . 102
Index . . . . . . . . . . . . . . . . . . . . . . . . . . . . . . . . . . . 103
3
Table of Contents
Page 6 of 112

5
Important Information
Important Information Important Information. Traffic safety
Travelling on today's roads requires the driver's full attention at all times.
Only operate the radio and navigation system and its various functions
when the traffic situation really allows it.
WARNING
● Before starting the trip, you should familiarise yourself with the dif-
ferent functions of the radio and navigation system.
● High audio volume may represent a danger to you and to others.
● Adjust the volume in a way that you can distinguish surrounding
noise, for example, horns and sirens, etc.
● System settings should be done when the car is stopped, or by a pas-
senger.
Note
If the code for the radio and navigation system is lost, please go to a SEAT
Dealer for assistance.
Page 7 of 112

6Introduction
Introduction
Before using the unit for the first time
Before using the unit for the first time, carry out the following steps. This
will enable you to use the unit safely and make full use of the functions it
provides
● Observe the basic safety notes ⇒ page 6.
● Familiarise yourself with the unit overview ⇒ page 8.
● Restore factory settings (standard settings) in the system settings menu
⇒ page 99.
● Use suitable data media for Media mode ⇒ page 29.
Safety instructions
WARNING
Your attention may be distracted from the traffic if you use the radio and
navigation system while driving, resulting in accident.
● You should always drive with due care and attention.
● Select volume settings that allow you to easily hear signals from out-
side the vehicle at all times (e.g. emergency service sirens).
● If the volume is too high, you could damage your hearing. Even if the
volume is too loud for a short period only.
WARNING
The recommendations and traffic signs shown by the navigation system
may differ from the true traffic conditions.
● Traffic signs and traffic regulations have priority over the recommen-
dations and instructions given by the navigation system.
● Adapt your speed and driving style to suit visibility, road, traffic and
weather conditions.
WARNING
External devices that are placed loose in the vehicle or not properly se-
cured could be flung though the interior during a sudden driving or brak-
ing manoeuvre, or in the event of an accident.
● While the vehicle is in motion, always fasten or store external devices
securely outside the airbag deployment zones.
● Arrange the connecting leads of external devices so that they do not
obstruct the driver.
WARNING
The volume level may suddenly change when you switch audio source or
connect a new audio source.
● Reduce the base volume before switching audio sources or connect-
ing a new audio source ⇒ page 11.
Page 8 of 112
7
Introduction
WARNING
Opening a CD player's housing may lead to injuries from invisible laser
radiation.
● Only have CD players repaired by a qualified workshop.
CAUTION
The memory card slot's locking mechanism can be damaged by incorrect in-
sertion of a memory card or by inserting a non-compatible memory card!
● When inserting a card, make sure it is correctly positioned ⇒ page 33.
● Applying force may destroy the memory card slot's locking mechanism.
● Only use suitable memory cards ⇒ page 29.
CAUTION
● When inserting and removing CDs, always hold them at right angles to
the front of the unit. Inserting or removing them at an angle to the drive may
lead to scratching ⇒ page 32.
● Inserting a second CD while a CD is already inserted or being ejected
may damage the CD player. Always wait until the CD has been ejected!
CAUTION
Any foreign objects attached to a data medium and non-round data media
can damage the CD player.
● Only clean 12-cm standard CDs should be used!
– Do not stick stickers or other items to the CDs. Stickers may peel off
and damage the drive.
– Do not insert 8-cm single CDs or non-round CDs (shaped CDs).
– Do not insert DVD-Plus discs, Dual Discs or Flip Discs, as these are
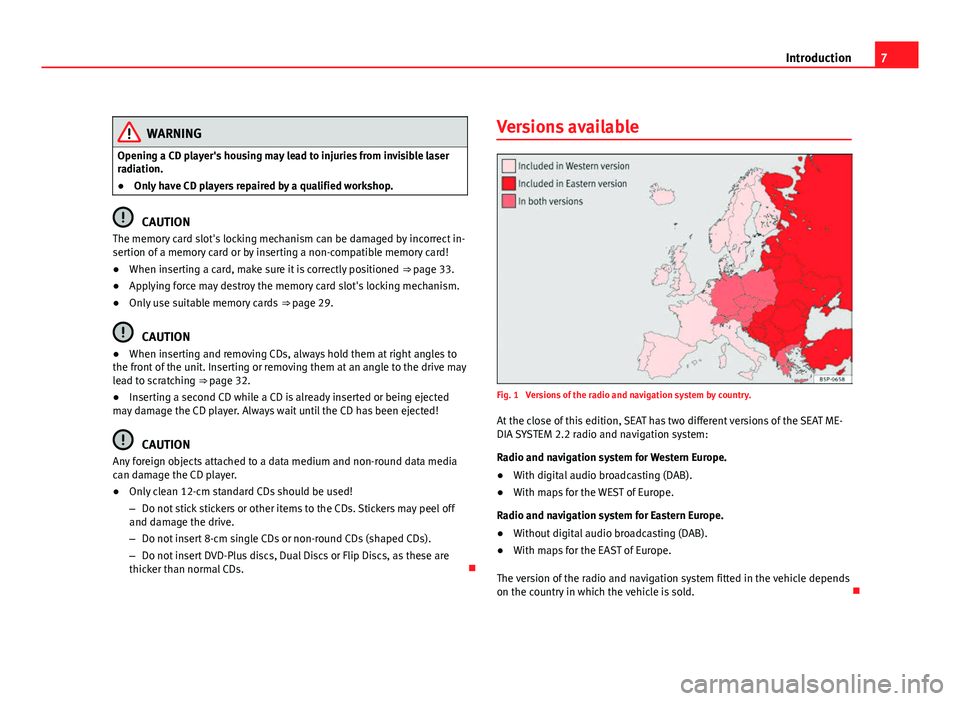
thicker than normal CDs. Versions available
Fig. 1 Versions of the radio and navigation system by country.
At the close of this edition, SEAT has two different versions of the SEAT ME-
DIA SYSTEM 2.2 radio and navigation system:
Radio and navigation system for Western Europe.
● With digital audio broadcasting (DAB).
● With maps for the WEST of Europe.
Radio and navigation system for Eastern Europe.
● Without digital audio broadcasting (DAB).
● With maps for the EAST of Europe.
The version of the radio and navigation system fitted in the vehicle depends
on the country in which the vehicle is sold.
Page 10 of 112

9
Introduction
Arrow buttons
and always affect the currently active audio source
irrespective of the menu displayed on the screen.
– In all radio modes , press briefly (please observe the respective dis-
play) to change station or channel ⇒ page 14.
– In Media mode, press briefly to change title or chapter, and hold
down to fast forward or rewind ⇒ page 29.
CD slot ⇒ page 29.
Touchscreen ⇒ page 10.
CD eject button ⇒ page 32.
Press Info to display additional information relating to the menu:
– Display or hide the radio text in Radio mode ⇒ page 21.
– Display additional title information (stored position) in Media mode
⇒ page 29.
– While navigating, to display current position of vehicle or program-
med destination ⇒ page 48.
Press the back button to close menus and pop-up windows.
AUX-IN multimedia socket for connecting external audio sources
⇒ page 34.
Setting knob: the function depends on which mode is activated.
– In all radio modes , turn to manually change the station or channel
⇒ page 14.
– In Media mode, turn to manually change the title and press to stop
and start the scan function ⇒ page 29.
– In navigation mode turn to modify the scale of the map ⇒ page 67.
– During the route guidance, press to repeat a navigation instruction
⇒ page 66.
Function buttons: the current function is displayed on the screen via
the corresponding function button. ⇒ page 10.
Memory card slot ⇒ page 33.
3
4567
89
10
11
12
Page 11 of 112

10Introduction
General operating information
Introduction
If system settings are modified, some aspects of the unit's operation may
differ from the descriptions given in this manual. For this reason, SEAT rec-
ommends that you reset the unit to its factory settings the first time you use
it ⇒ page 100.
Additional Information:
● Safety notes ⇒ page 6
● Unit overview ⇒ page 8
● Multifunction steering wheel, to change track or station ⇒ Booklet Own-
er's Manual, chapter Vehicle overview
Note
Lightly pressing the buttons or briefly pressing the touchscreen is sufficient
to operate the unit.
Note
Never press a button down for longer than 10 minutes. Otherwise the sys-
tem will interpret this as a malfunction ( button jammed).
Note
Due to country-specific legislation, certain functions cannot be selected on
the screen when the vehicle is travelling above a certain speed.
Note
Using a mobile telephone in the vehicle may cause noise from the vehicle
speakers.
Note
In some vehicles equipped with a parking distance warning system, the vol-
ume of the current audio source is automatically lowered when reverse gear
is engaged. If talking on the telephone through the radio and navigation
system, the volume of the conversation is also lowered automatically when
reverse gear is engaged.
Note
Restrictions on the use of devices using Bluetooth technology may be appli-
cable in some countries. Please ask your local authority for further informa-
tion.
Switching on and off
With the ignition on, press the rotary/push knob
⇒ fig. 2 1 briefly to
manually switch the unit on or off.
When the unit is switched on, the system starts, and the last selected audio
source is played at the last selected volume, provided this is not greater
than the “start-up volume”.
When the key is removed from the ignition, the radio and navigation unit
automatically switches off. By pressing the rotary/push knob
⇒ fig. 2 1
,
the radio switches on and switches off automatically after approx. 30 mi-
nutes (switch-off delay), or manually if the rotary/push knob is pressed
again.
Anti-theft code
The anti-theft code is stored in the vehicle once it has been entered (con-
venience radio code). The anti-theft coding lock then only needs to be re-
leased manually if the unit is installed in another vehicle. In such a case, a
keypad field and a prompt to enter the code will appear when the unit is
switched on. In this case, you should contact a SEAT dealer.
Page 12 of 112

11
Introduction
If the vehicle battery has been disconnected, switch on the ignition before
re-connecting the unit.
Adjusting the base volume
FunctionActionIncrease the vol-
ume.Turn the sound control knob ⇒ fig. 2 to the right, or
press the button on the multifunction steering wheel
⇒ Booklet Owner's Manual.
Lower the vol-
ume.Turn the volume control anti-clockwise
or press the button on the multifunction steering
wheel.
Changes to the volume are indicated by a “bar” on the screen. During this
time the unit cannot be operated.
At “0” the unit is muted (display: ) and the current Media source is stop-
ped.
It is possible to preset certain volume settings and adjustments
⇒ page 99.
WARNING
Your attention may be distracted from the traffic if you use the radio and
navigation system while driving, resulting in accident.
● You should always drive with due care and attention.
● Select volume settings that allow you to easily hear signals from out-
side the vehicle at all times (e.g. emergency service sirens).
● If the volume is too high, you could damage your hearing. Even if the
volume is too loud for a short period only.
CAUTION
If the volume is too high or the sound is distorted, the vehicle speakers may
be damaged.
Note
If the base volume has been turned up high to play an audio source
(e.g. due to very quiet audio output from an external audio source), lower
the volume again before switching audio source.
Additional information and display options
The text displayed on the screen may vary depending on the settings and
may not match the illustrations shown here.
All displays appear only after the radio-navigation system has completed
start-up.
Depending on the vehicle, the changes to the air conditioning settings or
the texts relating to driver assistance systems fitted at the factory are dis-
played. These displays disappear automatically when they are no longer re-
quired.
Page 15 of 112

14Audio mode
Audio mode
Radio mode Introduction
Additional Information:
● Safety notes ⇒ page 6
● Unit overview ⇒ page 8
Note
Car parks, tunnels, tall buildings or mountains may affect the radio signal.
Note
Foil or metal-coated stickers attached to the windows may affect reception
on vehicles with a window aerial. Opening the RADIO main menuFig. 5 RADIO main menu
with station buttons dis-
played.
Fig. 6 RADIO main menu
without station buttons.
● Press the RADIO
unit button.
Page 16 of 112

15
Audio mode
The station you are currently listening to is shown in the middle of the
screen.
The “station buttons” in the main RADIO menu ⇒ fig. 5 can be displayed or
hidden ⇒ page 18.
Displaying station name (RDS)
The RDS (Radio Data System) is not compatible with all units and is not
available everywhere or on all radio stations.
If RDS is available and reception is good enough, the station name is dis-
played (in fig. 6: Radio 2).
In addition, the RDS permits automatic tracking of stations, radio texts or
traffic programmes ⇒ page 21.
Changing frequency band
Fig. 7 RADIO main
menu: Band function but-
ton.
The currently selected frequency band is indicated above the station display
and in the bottom line of the screen. Changing frequency band
●
In the RADIO main menu, press the RADIO
unit button.
● ALTERNATIVELY: Press the Band function button and select the range of
frequencies by pressing the corresponding button ⇒ fig. 7.
Changing radio station or selecting radio stations from the
FM station list
Fig. 8 Station list: the
current station is high-
lighted.
Change radio station by pressing the arrow buttons
or .
● Briefly press an arrow button or .
Depending on the arrow button settings ⇒ page 19, it is only possible to
change between stored stations (display: in ⇒ fig. 14).
If the TP function is on (display: TP), it is only possible to change to stations
that accept this function ⇒ page 21.
Page 17 of 112

16Audio mode
Opening the FM station list
The FM station list shows all the FM stations with good reception. You can
select a specific station from the FM station list.
● Switch to the FM frequency band ⇒ page 15.
● Press the Band
function button and press the FM/List function button in
the pop-up window ⇒ fig. 7.
● Alternatively: if the display station buttons off is ⇒ page 18, by turn-
ing the setting knob ⇒ fig. 2 10
it is possible to change directly to the sta-
tion list.
The FM station list view closes after one minute of inactivity. The FM station
list is updated automatically.
No station list is available for the AM frequency band.
Selecting stations from the FM station list and saving them
● Open the FM station list.
● Mark a station by turning the setting knob and press the setting knob to
select the marked station ⇒ page 10.
● Alternatively: Drag the scroll marker to browse the list and select the de-
sired station by pressing it on the screen ⇒ page 10.
● After selecting a station button, press the Store
function button ⇒
fig. 8
to store the marked station ⇒ page 18.
● To close the FM station list press the
unit button.Scan function (Scan)
Fig. 9 RADIO main
menu: Extras function
button.
Fig. 10 RADIO main
menu during scan.
When the scan function is running, all available stations on the current fre-
quency band are played in sequence for roughly 5 seconds each.