key Seat Toledo 2012 User Guide
[x] Cancel search | Manufacturer: SEAT, Model Year: 2012, Model line: Toledo, Model: Seat Toledo 2012Pages: 249, PDF Size: 3.6 MB
Page 87 of 249

86Opening and closing
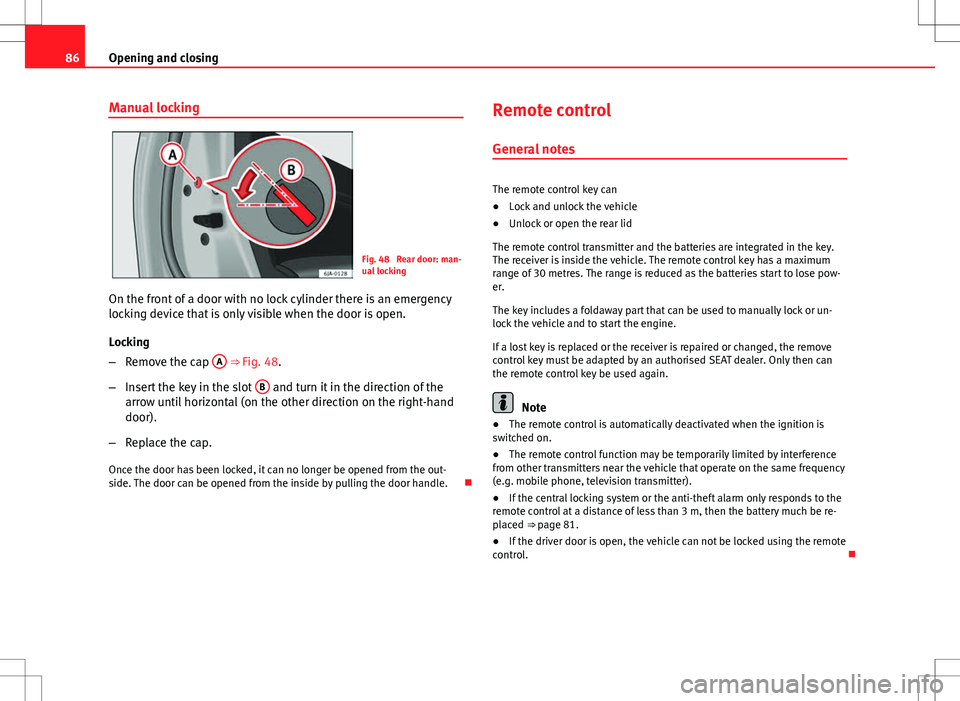
Manual locking
Fig. 48 Rear door: man-
ual locking
On the front of a door with no lock cylinder there is an emergency
locking device that is only visible when the door is open.
Locking
– Remove the cap A
⇒ Fig. 48.
– Insert the key in the slot B
and turn it in the direction of the
arrow until horizontal (on the other direction on the right-hand
door).
– Replace the cap.
Once the door has been locked, it can no longer be opened from the out-
side. The door can be opened from the inside by pulling the door handle. Remote control
General notes
The remote control key can
● Lock and unlock the vehicle
● Unlock or open the rear lid
The remote control transmitter and the batteries are integrated in the key.
The receiver is inside the vehicle. The remote control key has a maximum
range of 30 metres. The range is reduced as the batteries start to lose pow-
er.
The key includes a foldaway part that can be used to manually lock or un-
lock the vehicle and to start the engine.
If a lost key is replaced or the receiver is repaired or changed, the remove
control key must be adapted by an authorised SEAT dealer. Only then can
the remote control key be used again.
Note
● The remote control is automatically deactivated when the ignition is
switched on.
● The remote control function may be temporarily limited by interference
from other transmitters near the vehicle that operate on the same frequency
(e.g. mobile phone, television transmitter).
● If the central locking system or the anti-theft alarm only responds to the
remote control at a distance of less than 3 m, then the battery much be re-
placed ⇒ page 81.
● If the driver door is open, the vehicle can not be locked using the remote
control.
Page 88 of 249

87
Opening and closing
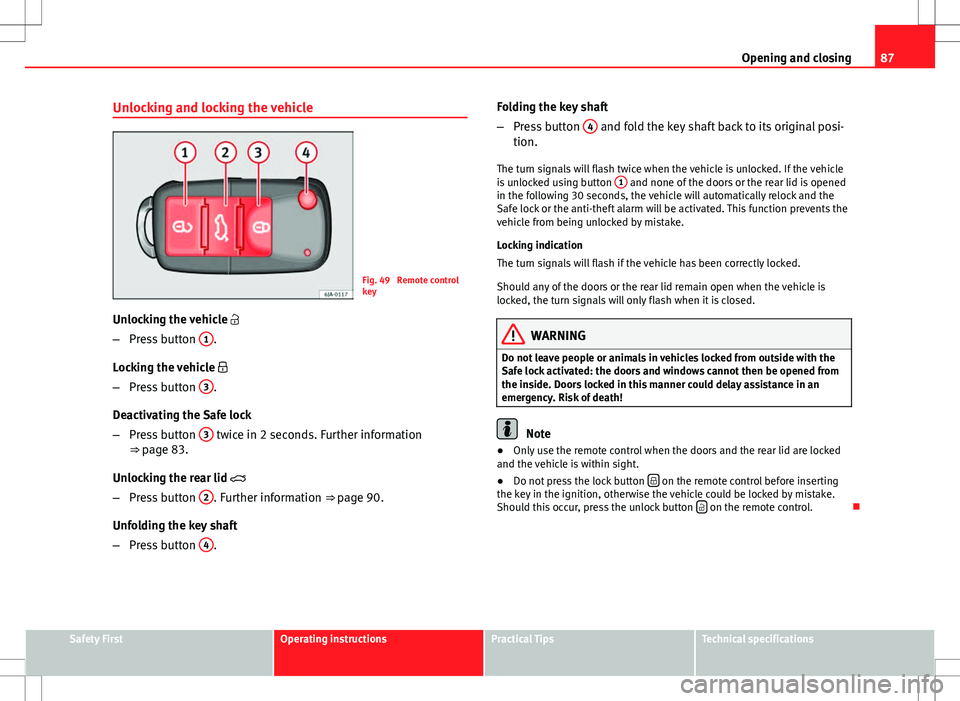
Unlocking and locking the vehicle
Fig. 49 Remote control
key
Unlocking the vehicle
– Press button 1
.
Locking the vehicle
– Press button 3
.
Deactivating the Safe lock
– Press button 3
twice in 2 seconds. Further information
⇒ page 83.
Unlocking the rear lid
– Press button 2
. Further information ⇒ page 90.
Unfolding the key shaft
– Press button 4
. Folding the key shaft
–
Press button 4
and fold the key shaft back to its original posi-
tion.
The turn signals will flash twice when the vehicle is unlocked. If the vehicle
is unlocked using button 1
and none of the doors or the rear lid is opened
in the following 30 seconds, the vehicle will automatically relock and the
Safe lock or the anti-theft alarm will be activated. This function prevents the
vehicle from being unlocked by mistake.
Locking indication
The turn signals will flash if the vehicle has been correctly locked.
Should any of the doors or the rear lid remain open when the vehicle is
locked, the turn signals will only flash when it is closed.
WARNING
Do not leave people or animals in vehicles locked from outside with the
Safe lock activated: the doors and windows cannot then be opened from
the inside. Doors locked in this manner could delay assistance in an
emergency. Risk of death!
Note
● Only use the remote control when the doors and the rear lid are locked
and the vehicle is within sight.
● Do not press the lock button
on the remote control before inserting
the key in the ignition, otherwise the vehicle could be locked by mistake.
Should this occur, press the unlock button
on the remote control.
Safety FirstOperating instructionsPractical TipsTechnical specifications
Page 89 of 249

88Opening and closing
Remote control synchronisation
If the vehicle cannot be locked or unlocked using the remote control, the
code of the key might not match that of the control unit. This can occur
when the remote control buttons are frequently pressed outside the range
of the system or if the remote control battery has been replaced.
In this case, it must be synchronised as follows:
●Press any key on the remote control key.
● Open the door using the key within the next minute.
Anti-theft alarm system
General notes
The anti-theft alarm system increases vehicle protection from intruders. If
the anti-theft alarm system senses interference with the vehicle it triggers
an audible and visible alarm.
Activating the alarm system
The anti-theft alarm switches on automatically when the vehicle is locked
using the remote control key or inserting the key in the driver door. The
alarm is activated around 30 seconds after the vehicle is locked.
Deactivating the alarm system
The anti-theft alarm system is deactivated when the remote control unlock
button is pressed. If the vehicle is not opened within 30 seconds after emit-
ting the radiofrequency signal, the system will be reactivated.
If the vehicle is unlocked using by inserting the key in the driver door, the
ignition must be switched on within 15 seconds. This deactivates the alarm system. If, during these 15 seconds, the vehicle is not started
, the alarm is
triggered.
When does the system trigger an alarm?
The following areas of the vehicle are monitored:
● Bonnet
● Rear lid
● Doors
● Ignition
● Tilt angle ⇒ page 89, Vehicle interior monitoring and tow-away protec-
tion system
● The interior ⇒ page 89, Vehicle interior monitoring and tow-away pro-
tection system
● Drop in voltage in the car systems
● The factory-fitted towing bracket
The alarm is triggered immediately if one of the battery cables is disconnec-
ted while the alarm system is active.
How to turn off the alarm
To deactivate the alarm, press the unlock button on the remote control key
or switch on the ignition.
Note
● The alarm horn power supply has a 5-year useful life. Contact an Official
Service for more detailed information.
● To make sure that the anti-theft alarm is fully operative when leaving the
vehicle, check that all the doors and windows are closed.
● Remote control and receiver unit coding means that the remote control
cannot be used on other vehicles.
Page 91 of 249

90Opening and closing
Automatic rear lid locking
Where the vehicle has been locked by pressing the button on the remote
control with the rear lid open, the rear lid will lock automatically when
closed.
The automatic rear lid locking time extension function can be activated.
Where this function is activated and once the rear lid has been unlocked by
pressing the
button on the remote control key
2 ⇒
page 87, the rear lid
can be re-opened for a certain length of time.
Where required, the automatic rear lid locking time extension function can
be activated or deactivated at a SEAT Authorised Service, which will provide
all of the necessary information.
Before the vehicle locks automatically, there is a risk of intruders getting in-
to the vehicle. Therefore, we recommend you always lock the vehicle by
pressing the
button on the remote control or by using the key without re-
mote control ⇒ page 85 Rear lid
The rear lid opening system is electrically operated. It is acti-
vated by using the catch on the rear lid.
Fig. 51 Rear lid: opening
from the outside
Fig. 52 Close-up of the
inside trim of the rear lid:
hand grip
Page 92 of 249

91
Opening and closing
Opening the rear lid
– Pull on the release lever and lift the rear lid ⇒ Fig. 51. The rear
lid will automatically open.
Closing the rear lid
– Hold the rear lid by one of the two handles on the interior lining
and close it, pushing slightly.
This system may or may not be operative, depending on the situation of the
vehicle.
If the rear lid is locked then it cannot be opened, however if it is unlocked
then the opening system is operative and the rear lid may be opened.
To lock/unlock, press the
button or button
1 on the remote control key.
A warning appears on the instrument panel display if the rear lid is open or
not properly closed.* An audible warning is also given if the rear lid opens
while the vehicle is moving faster than 6 km/h (4 mph).*
WARNING
● Always close the rear lid properly. Risk of accident or injury.
● The rear lid must not be opened when the reverse or rear fog lights
are lit. This may damage the tail lights.
● Do not close the rear lid by pushing it down with your hand on the
rear window. The glass could smash. Risk of injury!
● Ensure the rear lid is locked after closing it. If not, it may open unex-
pectedly while driving.
WARNING (Continued)
● Never allow children to play in or around the vehicle. A locked vehicle
can be subjected to extremely high and low temperatures, depending on
the time of year, thus causing serious injuries/illness. It could even have
fatal consequences. Close and lock both the rear lid and all the other
doors when you are not using the vehicle.
● Closing the rear lid without observing and ensuring it is clear could
cause serious injury to you and to third parties. Make sure that no one is
ever in the closing path of the rear lid.
● Never drive with the rear lid open or half-closed, as exhaust gases
can be drawn into the interior. Risk of intoxication!
● If you open the rear lid only, do not leave the key inside. The vehicle
cannot be opened if the key is left inside.
Manual release of the rear lid
Fig. 53 Manual release
of the rear lid
In the event of a fault in the central locking system, the rear lid can
be released manually.
Safety FirstOperating instructionsPractical TipsTechnical specifications
Page 93 of 249

92Opening and closing
Release
–Fold down the backrest of the rear seat ⇒ page 110.
– Insert the car key in the opening in the mat.
– Move it towards the arrow to release the rear lid.
– Open the rear lid.
Opening and closing electric windows Introduction
WARNING
● When locking the vehicle from the outside, make sure that nobody is
inside the vehicle, as the windows cannot be opened from the inside in
an emergency.
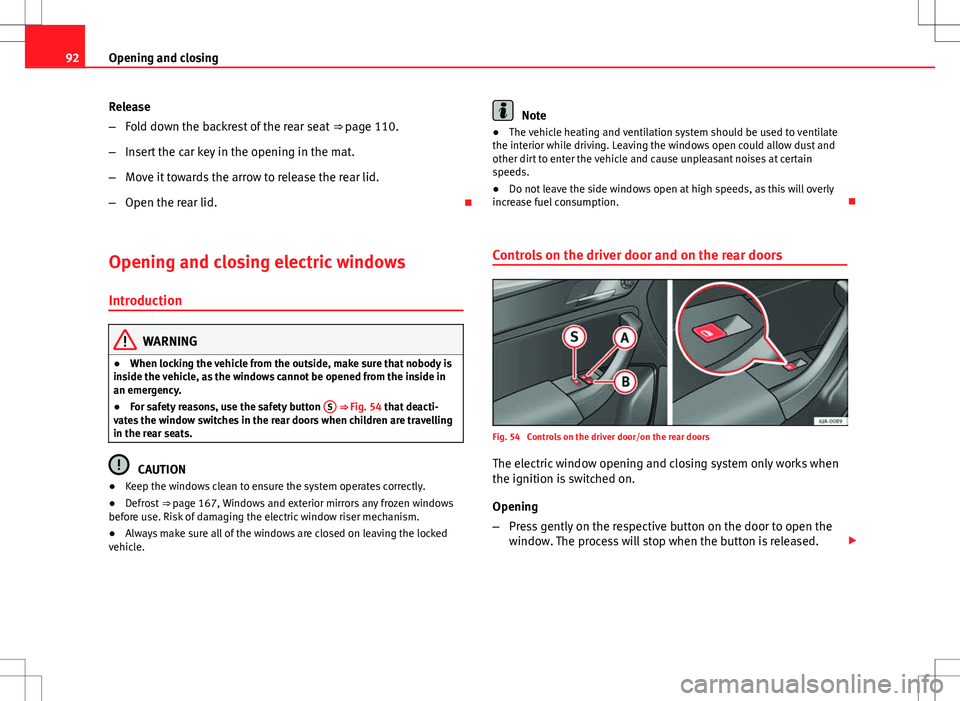
● For safety reasons, use the safety button S
⇒ Fig. 54 that deacti-
vates the window switches in the rear doors when children are travelling
in the rear seats.
CAUTION
● Keep the windows clean to ensure the system operates correctly.
● Defrost ⇒ page 167, Windows and exterior mirrors any frozen windows
before use. Risk of damaging the electric window riser mechanism.
● Always make sure all of the windows are closed on leaving the locked
vehicle.
Note
● The vehicle heating and ventilation system should be used to ventilate
the interior while driving. Leaving the windows open could allow dust and
other dirt to enter the vehicle and cause unpleasant noises at certain
speeds.
● Do not leave the side windows open at high speeds, as this will overly
increase fuel consumption.
Controls on the driver door and on the rear doors
Fig. 54 Controls on the driver door/on the rear doors
The electric window opening and closing system only works when
the ignition is switched on.
Opening
– Press gently on the respective button on the door to open the
window. The process will stop when the button is released.
Page 95 of 249

94Lights and visibility
Lights and visibility
Lights Introduction
The location of the controls of right-hand drive cars differs slightly from the
location shown here ⇒ Fig. 55 ⇒ page 94. However, the symbols indicat-
ing the respective positions of the controls remain the same.
WARNING
Never drive with only the side lights on! The side lights are not bright
enough to illuminate the road ahead and to ensure that other road users
are able to see you. Always use your dipped beam headlights if it is dark
or if visibility is poor.
CAUTION
● Use the lights in line with local law.
● However, drivers always remain responsible for correctly adjusting and
using the lights.
Note
● An audible warning will be heard when the light control is set to and
you remove the ignition key and open the door. Once the driver door is
closed (ignition off), the audible warning will stop, whereas the side lights
will remain on to light up the stationary vehicle if necessary.
● Depending on weather conditions (cold or wet), the lights may mist up
temporarily on the inside. This is particularly the case in the event of a dif-
ference in temperature between the inside and in front of the light. By
switching on the lights, the area through which the beam of light is projec- ted will quickly be demisted, although the edges may remain misted. The
real lights and turn signals can mist up. This has no influence on the useful
life of the lighting system.
Switching lights on and off
Fig. 55 Instrument panel: Light switch/Fuses: Switch for daytime driving lights
Switching on side lights
– Turn the light switch ⇒ Fig. 55 to position .
Switching on dipped beam
– Turn the light switch ⇒ Fig. 55 to position .
Switching off lights (except daytime driving lights)
– Turn the light switch ⇒ Fig. 55 to position 0.
Page 100 of 249

99
Lights and visibility
Note
Switch on the hazard warning lights to warn other road users, for example:
● When reaching the tail end of a traffic jam
● If the vehicle has a technical fault or you are involved in an emergency
situation.
Interior lights
Interior lighting – version 1
Fig. 60 Interior lighting
– version 1
Switching on the interior light
– Move the switch A
⇒ Fig. 60 towards the side of the light. The
symbol will be displayed.
Switching off the interior light
– Move the switch A
⇒
Fig. 60 to the centre position O
. Operating the courtesy light
–
Move the switch A
⇒ Fig. 60 to the centre of the light. The sym-
bol will be displayed.
Reading lights
– The reading lights are switched on and off by pressing switch
B
⇒ Fig. 60.
Where the courtesy light is on (switch A
⇒ Fig. 60 in position ), the light
will come on if:
● The vehicle is unlocked
● One of the doors is opened
● The key is removed from the ignition
When the courtesy light is on (switch A
in position ), the light will switch
off if:
● The vehicle is locked
● The ignition is switched on
● 30 seconds after all of the doors have been closed
If a door is left open or if switch A
is in position
, the interior lighting is
switched off after about 10 minutes to prevent the battery from running flat.
Safety FirstOperating instructionsPractical TipsTechnical specifications
Page 120 of 249

119
Seats and storage
WARNING
● Take care when using the cigarette lighter! Carelessness or negli-
gence when using the cigarette lighter can cause burns and serious inju-
ries.
● The cigarette lighter also works when the ignition is off and when the
ignition key is removed. Therefore, never leave children unsupervised in
the vehicle.
Note
● The 12 volt power socket of the cigarette lighter can also be used as a
power source for electrical appliances ⇒ page 119, 12 V power socket.
● Additional information ⇒ page 195, Accessories, modifications and
spare parts.
12 V power socket
Fig. 87 Centre console:
12V power socket
The 12 V power socket is located at the front of the centre console
⇒ Fig. 87. Using the power socket
–
Open the cover or remove the cigarette lighter concealing the
socket.
– Insert the plug of the electrical appliance into the socket.
Additional information ⇒ page 195, Accessories, modifications and spare
parts.
WARNING
● Improper use of the sockets or electrical appliances can cause a fire
and lead to burns and other serious injuries.
● Never leave children unsupervised in the vehicle. The 12 volt power
socket is also operate when the is ignition switched off and the key re-
moved.
● Should the connected appliance overheat, immediately switch it off
and disconnect it from the socket.
CAUTION
● The 12V power socket can only be used to power appliances with a pow-
er rating of up to 120 Watt.
● Never exceed the maximum permitted power, as this could cause dam-
age to the vehicle electrical installation.
● When the engine is switched off, however, the vehicle battery will be
drained. Risk of flat battery!
● Only use suitable plugs so as not to damage the power socket.
● Only use appliances that have been tested for electromagnetic compati-
bility in compliance with current regulations.
● Before switching the ignition on or off, unplug the appliances from the
power socket to protect them from any damage caused by fluctuations in
voltage.
● Follow the instructions for use of connected appliances!
Safety FirstOperating instructionsPractical TipsTechnical specifications
Page 137 of 249

136Driving
Driving
Starting and stopping the engine
Introduction
WARNING
● Never adjust the steering wheel while the vehicle is moving!
● Maintain at least 25 cm distance between the steering wheel and the
upper part of your body 1
⇒ Fig. 101
⇒ page 137. The airbag system
will not be able to give the required protection if the minimum distance is
not observed. This can cause a risk of fatal injury!
● For safety reasons, the steering wheel adjustment lever must always
be pushed securely against the steering column to prevent the steering
wheel from accidentally changing position while driving. Risk of acci-
dent!
● If the steering wheel is adjusted closer to your face, the protective ef-
fect of the driver airbag will be decreased in the event of an accident.
Check that the steering wheel is pointing towards the upper part of your
body.
● When driving, always hold the steering wheel with both hands on the
outside part at the 9 o'clock and 3 o'clock positions. Never hold the
steering wheel at the 12 o'clock position, or in any other manner (e.g. in
the centre of the steering wheel). In such cases, if the airbag is triggered,
you may sustain injuries to the arms, hands and head.
● When moving with the engine switched off, the ignition key must al-
ways remain in position 2
⇒ Fig. 102 ⇒
page 138 (ignition on). The
control lamps will light up in this position. Otherwise, the steering lock
could engage suddenly. Risk of accident!
WARNING (Continued)
● Do not remove the key from the ignition until the vehicle has come to
a standstill and is secure (e.g. the handbrake is engaged). Otherwise, the
steering lock could suddenly engage. Risk of accident!
● Always take the ignition key with you when you leave the vehicle.
This is particularly important if you leave children in the vehicle. Children
could start the engine, for example, with the subsequent risk of accident.
● Never leave the engine running in unventilated or closed rooms. The
exhaust gases contain carbon monoxide, an odourless and colourless
poisonous gas. Risk of fatal accidents! Carbon monoxide can cause peo-
ple to lose consciousness and can cause death.
● Never leave the vehicle unattended if the engine is running.
● Never switch the engine off until the vehicle is stationary. Risk of ac-
cident!
CAUTION
● Turning the steering wheel fully in either direction when the vehicle is
stationary and the engine in gear puts the power steering under great
stress. This could lead to noise. Never leave the steering wheel turned fully
in either direction for more than 15 seconds. Risk of damage to the power
steering system!
● The starter motor may only be used (key position 3
⇒ Fig. 102
⇒ page 138 in the ignition) if the engine is off. Using the starter motor
when the engine is running could cause damage.
● Immediately release the ignition key when the engine starts, otherwise
damage could be caused to the starter motor.
● When the engine is cold, you should avoid high engine speeds, driving
at full throttle and over-loading the engine before it reaches operating tem-
perature. Risk of engine damage!