stop start SKODA CITIGO 2013 1.G User Guide
[x] Cancel search | Manufacturer: SKODA, Model Year: 2013, Model line: CITIGO, Model: SKODA CITIGO 2013 1.GPages: 176, PDF Size: 10.54 MB
Page 64 of 176
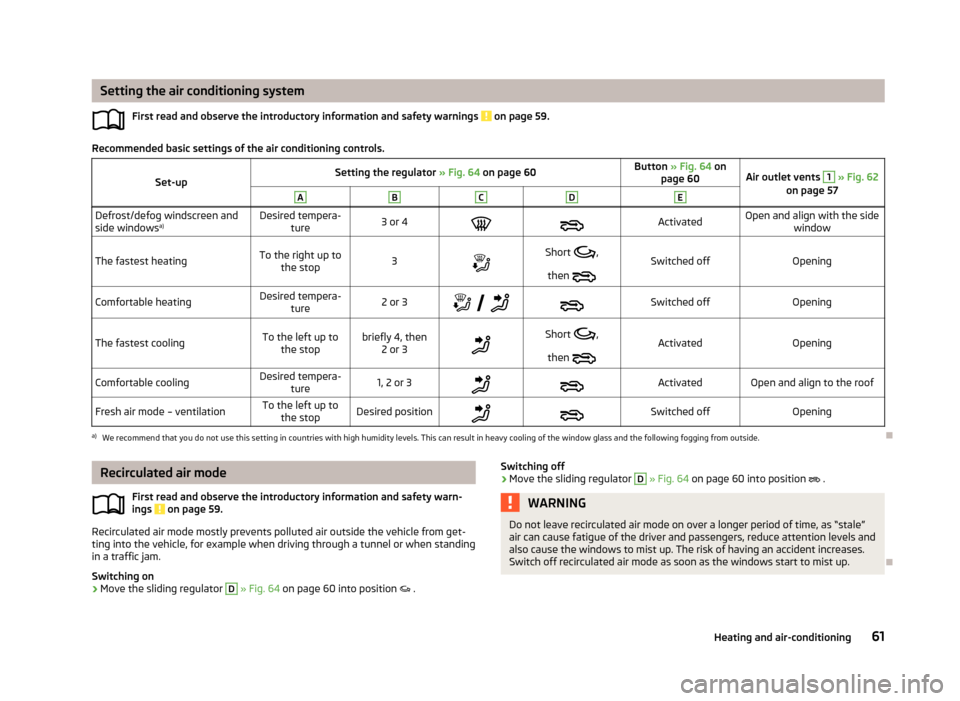
Setting the air conditioning systemFirst read and observe the introductory information and safety warnings
on page 59.
Recommended basic settings of the air conditioning controls.
Set-upSetting the regulator » Fig. 64 on page 60Button » Fig. 64 on
page 60Air outlet vents 1 » Fig. 62
on page 57ABCDEDefrost/defog windscreen and
side windows a)Desired tempera-
ture3 or 4ActivatedOpen and align with the side window
The fastest heatingTo the right up tothe stop3Short ,
then Switched offOpeningComfortable heatingDesired tempera-
ture2 or 3
Switched offOpeningThe fastest coolingTo the left up to
the stopbriefly 4, then 2 or 3Short ,
then ActivatedOpeningComfortable coolingDesired tempera-
ture1, 2 or 3ActivatedOpen and align to the roofFresh air mode – ventilationTo the left up tothe stopDesired positionSwitched offOpeninga)
We recommend that you do not use this setting in countries with high humidity levels. This can result in heavy cooling of the window glass and the following fogging from outside.
Recirculated air mode
First read and observe the introductory information and safety warn-ings
on page 59.
Recirculated air mode mostly prevents polluted air outside the vehicle from get-ting into the vehicle, for example when driving through a tunnel or when standing in a traffic jam.
Switching on
›
Move the sliding regulator
D
» Fig. 64 on page 60 into position .
Switching off›Move the sliding regulator D » Fig. 64 on page 60 into position .WARNINGDo not leave recirculated air mode on over a longer period of time, as “stale”
air can cause fatigue of the driver and passengers, reduce attention levels and
also cause the windows to mist up. The risk of having an accident increases.
Switch off recirculated air mode as soon as the windows start to mist up.
61Heating and air-conditioning
Page 69 of 176
Driving
Starting-off and Driving
Steering
Introduction
This chapter contains information on the following subjects:
Adjusting the steering wheel position
66
Power steering
66WARNING■ When driving, hold the steering wheel with both hands firmly on the outer
edge in the 9 o'clock and 3 o'clock position. Never hold the steering wheel in
the 12 o'clock position or in any other way (e.g. in the middle or inner edge of
the steering wheel). Otherwise, activation of the driver airbag could cause se-
vere injuries to arms, hands and head.■
Never adjust the steering wheel when the vehicle is moving only when the
vehicle is stationary!
■
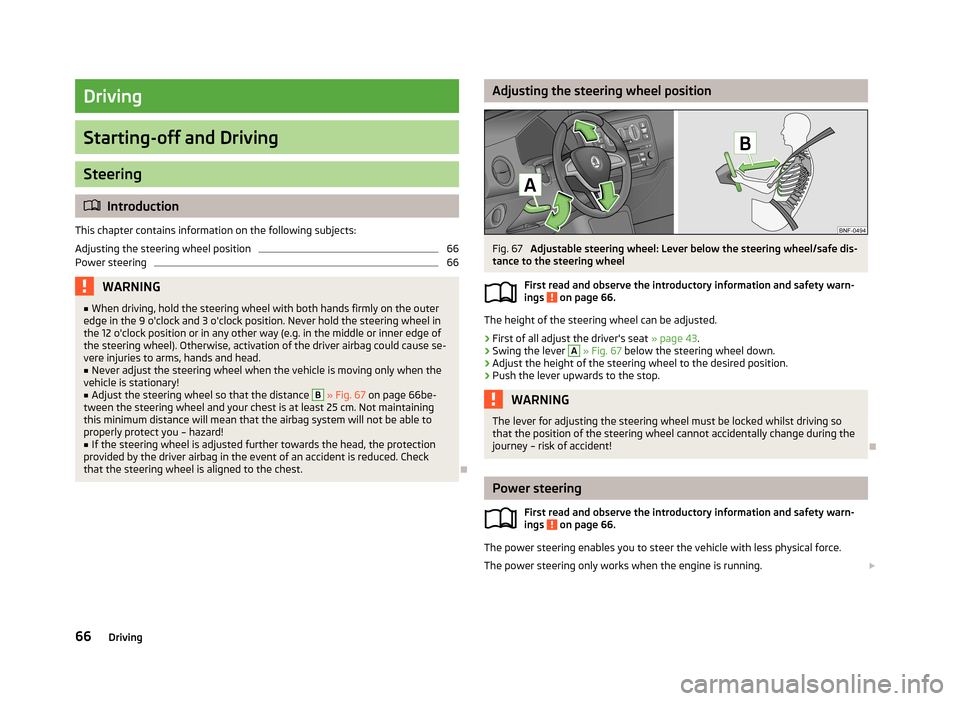
Adjust the steering wheel so that the distance
B
» Fig. 67 on page 66be-
tween the steering wheel and your chest is at least 25 cm. Not maintaining
this minimum distance will mean that the airbag system will not be able to
properly protect you – hazard!
■
If the steering wheel is adjusted further towards the head, the protection
provided by the driver airbag in the event of an accident is reduced. Check
that the steering wheel is aligned to the chest.
Adjusting the steering wheel positionFig. 67
Adjustable steering wheel: Lever below the steering wheel/safe dis-
tance to the steering wheel
First read and observe the introductory information and safety warn-
ings
on page 66.
The height of the steering wheel can be adjusted.
›
First of all adjust the driver's seat » page 43.
›
Swing the lever
A
» Fig. 67 below the steering wheel down.
›
Adjust the height of the steering wheel to the desired position.
›
Push the lever upwards to the stop.
WARNINGThe lever for adjusting the steering wheel must be locked whilst driving so
that the position of the steering wheel cannot accidentally change during the
journey – risk of accident!
Power steering
First read and observe the introductory information and safety warn-ings
on page 66.
The power steering enables you to steer the vehicle with less physical force.
The power steering only works when the engine is running.
66Driving
Page 70 of 176
It is still fully possible to steer the vehicle if the power steering fails or if the en-gine is not running (e.g. when towing). However, greater physical effort is re-
quired to turn the steering wheel.
If there is a fault in the power steering, the warning light or
lights up in the
instrument cluster » page 18.
Starting and stopping the engine
Introduction
This chapter contains information on the following subjects:
Electronic immobilizer
68
Ignition lock
68
Starting the engine
68
Switching off the engine
68
The engine can only be started using a correctly coded original key.
The engine running noises may louder at first be louder for a short time afterstarting the cold engine. This is quite normal and is not an operating problem.
WARNING■ When driving, the ignition key must always be in the position 2 » Fig. 68 on
page 68 (ignition switched on) without the engine running. This position is
indicated by the warning lights coming on. If this is not the case, this could re-
sult in unexpected locking of the steering wheel – risk of accident!■
Only pull the ignition key from the ignition lock when the vehicle has come
to a complete stop (by applying the handbrake). Otherwise, the steering could
be blocked – risk of accident!
■
When leaving the vehicle, the ignition must always be removed. This is par-
ticularly important if children are left in the vehicle. Children could otherwise
start the engine for example – risk of accident or injury!
■
Never leave the vehicle unattended with the engine running.
■
Never switch off the engine before the vehicle is stationary – risk of acci-
dent!
WARNING■ Never leave the engine running in unventilated or closed rooms. The ex-
haust gases from the engine contain substances such as odourless and col-
ourless carbon monoxide (a poisonous gas) – risk to life!■
Carbon monoxide can cause unconsciousness and death.
CAUTION
■ The starter must only be operated when the engine is not running and the vehi-
cle is at a standstill. The starter or engine can be damaged if the starter is activa-
ted when the engine is running 3
» Fig. 68 on page 68.
■
If the engine does not start up after a second attempt, the fuse for the fuel
pump may have a fault. Check the fuse and replace if necessary » page 154,
Fuses on the underside of the dash panel , or seek assistance from a specialist ga-
rage.
■
Let go of the ignition key as soon as the engine starts otherwise the starter
could be damaged.
■
Do not tow start the engine – there is a risk of damaging the engine and the
catalytic converter. The battery from another vehicle can be used as a jump-start
aid » page 150 , Jump-starting .
CAUTION
■
Avoid high engine revolutions, full throttle and high engine loads before the en-
gine has reached its operating temperature – risk of damaging the engine!■
Do not switch the engine off immediately at the end of your journey after the
engine has been operated over a prolonged period at high loads but leave it to
run at an idling speed for about 1 minute. This prevents any possible accumulation
of heat when the engine is switched off.
For the sake of the environment
Do not warm up the engine while the vehicle is stationary. If possible, start your
journey as soon as the engine has started. Through this the engine reaches its
operating temperature more rapidly and the pollutant emissions are lower.
Note
After switching off the ignition, the radiator fan can intermittently continue to op-
erate for approx. 10 minutes.
67Starting-off and Driving
Page 71 of 176
Electronic immobilizerFirst read and observe the introductory information and safety warn-ings
on page 67.
An electronic chip is integrated in the head of the key. The immobiliser is deacti-vated with the aid of this chip when the key is inserted in the ignition lock. The
electronic immobiliser is automatically activated when the ignition key is with-
drawn from the lock.
The engine will not start if a non-authorized ignition key is used.
Ignition lock
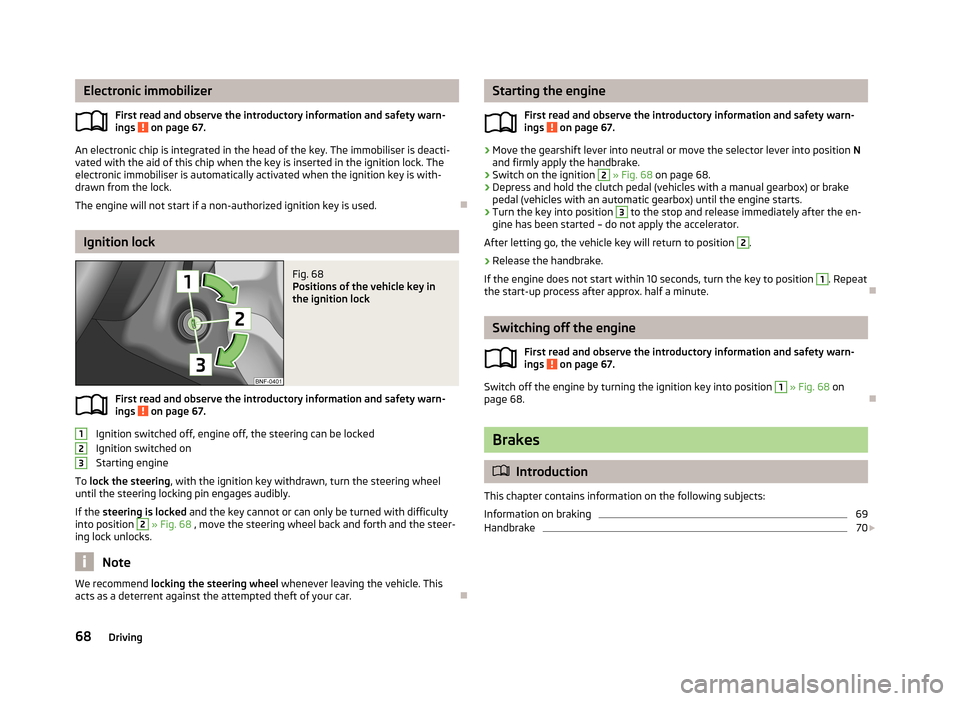
Fig. 68
Positions of the vehicle key in
the ignition lock
First read and observe the introductory information and safety warn-
ings on page 67.
Ignition switched off, engine off, the steering can be locked
Ignition switched on
Starting engine
To lock the steering , with the ignition key withdrawn, turn the steering wheel
until the steering locking pin engages audibly.
If the steering is locked and the key cannot or can only be turned with difficulty
into position
2
» Fig. 68 , move the steering wheel back and forth and the steer-
ing lock unlocks.
Note
We recommend locking the steering wheel
whenever leaving the vehicle. This
acts as a deterrent against the attempted theft of your car.
123Starting the engine
First read and observe the introductory information and safety warn-
ings
on page 67.
›
Move the gearshift lever into neutral or move the selector lever into position N
and firmly apply the handbrake.
›
Switch on the ignition
2
» Fig. 68 on page 68.
›
Depress and hold the clutch pedal (vehicles with a manual gearbox) or brake
pedal (vehicles with an automatic gearbox) until the engine starts.
›
Turn the key into position
3
to the stop and release immediately after the en-
gine has been started – do not apply the accelerator.
After letting go, the vehicle key will return to position
2
.
›
Release the handbrake.
If the engine does not start within 10 seconds, turn the key to position
1
. Repeat
the start-up process after approx. half a minute.
Switching off the engine
First read and observe the introductory information and safety warn-ings
on page 67.
Switch off the engine by turning the ignition key into position
1
» Fig. 68 on
page 68.
Brakes
Introduction
This chapter contains information on the following subjects:
Information on braking
69
Handbrake
70
68Driving
Page 72 of 176
WARNING■Greater physical effort is required for braking when the engine is switched
off – risk of accident!■
The clutch pedal must be actuated when braking on a vehicle with manual
transmission, when the vehicle is in gear and at low revs. Otherwise, the func-
tion of the brake booster may be impaired – risk of accident!
■
In the event of damage occurring to the standard fitted front spoiler or the
retrofitting of another front spoiler, wheel hubs etc. » page 110, Modifica-
tions, adjustments and technical alterations , It must be ensured that the air
supply to the front brake is not impaired. The front brakes may overheat,
which can have a negative impact on the functioning of the braking system –
risk of accident!
■
Never leave children unattended in the vehicle. The children might, for ex-
ample, release the handbrake or take the vehicle out of gear. The vehicle could then start to move – risk of accident!
CAUTION
■ Observe the recommendations on the new brake pads » page 74.■Never let the brakes slip with light pressure on the pedal if braking is not neces-
sary. This causes the brakes to overheat and can also result in a longer braking distance and excessive wear.
Information on braking
First read and observe the introductory information and safety warn-
ings
on page 68.
If the brakes are applied in full and the control unit for the braking system consid-
ers the situation to be dangerous for the following traffic, the brake light flashes
automatically.
After the speed was reduced below around 10 km/h or the vehicle was stopped,
the brake light stops flashing and the hazard warning light system switches on.
The hazard warning light system is switched off automatically after accelerating
or driving off again.
Before travelling a long distance at a steep gradient, reduce speed and shift into
the next lowest gear. As a result, the braking effect of the engine will be used,
reducing the load on the brakes. Any additional braking should be completed in-
termittently, not continuously.
Wear-and-tear
The wear of the brake pads is dependent on the operating conditions and driving
style.
The brake pads wear more quickly if a lot of journeys are completed in towns and over short distances or if a very sporty style of driving is adopted.
Under these severe conditions , the thickness of the brake pads must also be
checked by a specialist garage between service intervals.
Wet roads or road salt
The performance of the brakes can be delayed as the brake discs and brake pads
may be moist or have a coating of ice or layer of salt on them in winter. The
brakes are cleaned and dried by applying the brakes several times.
Corrosion
Corrosion on the brake discs and dirt on the bake pads occur if the vehicle has
been parked for a long period and if you do not make much use of the braking
system. The brakes are cleaned and dried by applying the brakes several times.
Faults in the brake surface
If it is found that the braking distance has suddenly become longer and that the
brake pedal can be depressed further, the brake system may be faulty.
Visit a specialist garage immediately and adjust your style of driving appropriatelyas you will not know the exact extent of the damage.
Low brake fluid level
An insufficient level of brake fluid may result in problems in the brake system. The
level of the brake fluid is monitored electronically » page 16,
Braking system .
Brake booster The brake booster increases the pressure generated with the brake pedal. The brake booster only operates when the engine is running.
69Starting-off and Driving
Page 74 of 176
CAUTIONIf not in the process of changing gear, do not leave your hand on the gearshiftlever while driving. The pressure from the hand can cause the gearshift mecha-nism to wear excessively.
Pedals
First read and observe the introductory information given on page 70.
The operation of the pedals must not be hindered under any circumstances!
In the driver's footwell, only a footmat, which is attached to the two correspond- ing attachment points, may be used.
Only use factory-supplied footmats or footmats from the range of ŠKODAOriginal Accessories, which are fitted to two attachment points.
WARNINGNo objects are allowed in the driver's footwell – risk of obstruction or limita-
tion in operating the pedals!
Automated transmission
Introduction
This chapter contains information on the following subjects:
Modes and lever control
71
Manual gearshift (Tiptronic)
72
Starting-off and driving
72
Operational faults
73WARNING■ Do not depress the accelerator if changing the forward driving mode – risk
of accident!■
Never move the selector lever to mode R when driving – risk of accident!
■
Always firmly apply the handbrake before leaving the vehicle!
CAUTIONWhen stopping on a slope, never try to hold the vehicle using the accelerator ped-
al – this may lead to gear damage.
Note
■ The engine can only be left on in position N, when the brake pedal is de-
pressed .■
If the selector lever position N is accidentally selected while driving, it is first
necessary to release pressure on the accelerator pedal and wait for the idling
speed of the engine to be reached before the selector lever can be engaged in
the drive position.
■
If the N symbol flashes next to the selector lever, engage the selector lever po-
sition N.
Modes and lever control
Fig. 71
Selector lever
First read and observe the introductory information and safety warn-
ings on page 71.
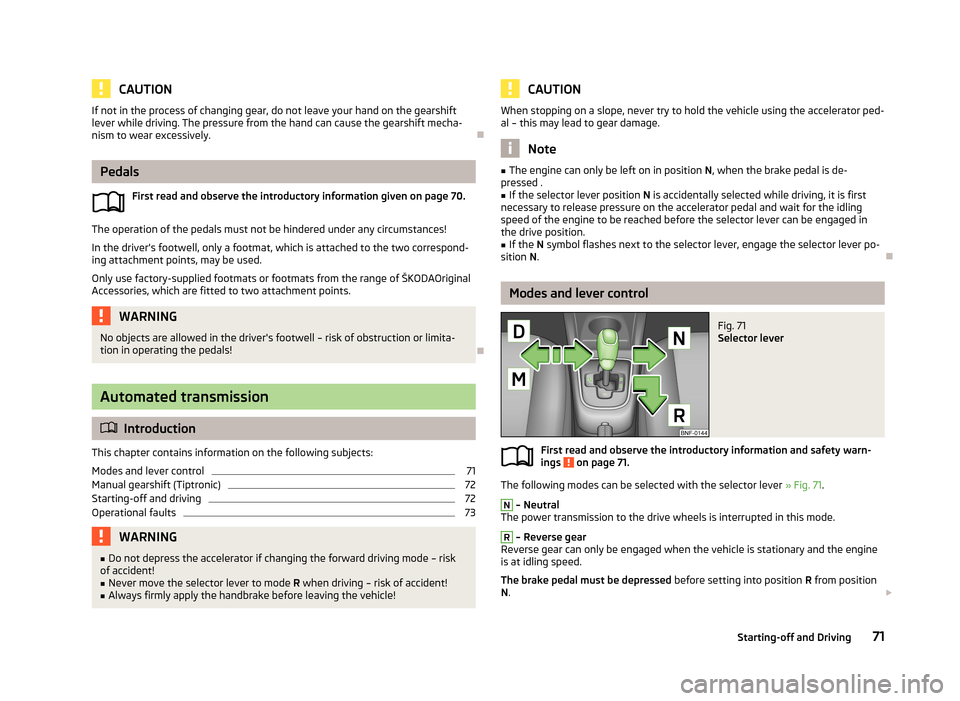
The following modes can be selected with the selector lever » Fig. 71.
N
– Neutral
The power transmission to the drive wheels is interrupted in this mode.
R
– Reverse gear
Reverse gear can only be engaged when the vehicle is stationary and the engine
is at idling speed.
The brake pedal must be depressed before setting into position R from position
N .
71Starting-off and Driving
Page 75 of 176
D - Mode for forwards travel (normal programme)
In mode D, the forward gears are automatically changed according to the engine
load, accelerator pedal actuation and driving speed.
The brake pedal must be depressed before setting into position D from position
N .M
- Manual gearshift (Tiptronic)
Further information » page 72.
Manual gearshift (Tiptronic)
Fig. 72
Selector lever: manual shifting/instrument cluster: engaged gear
First read and observe the introductory information and safety warn- ings
on page 71.
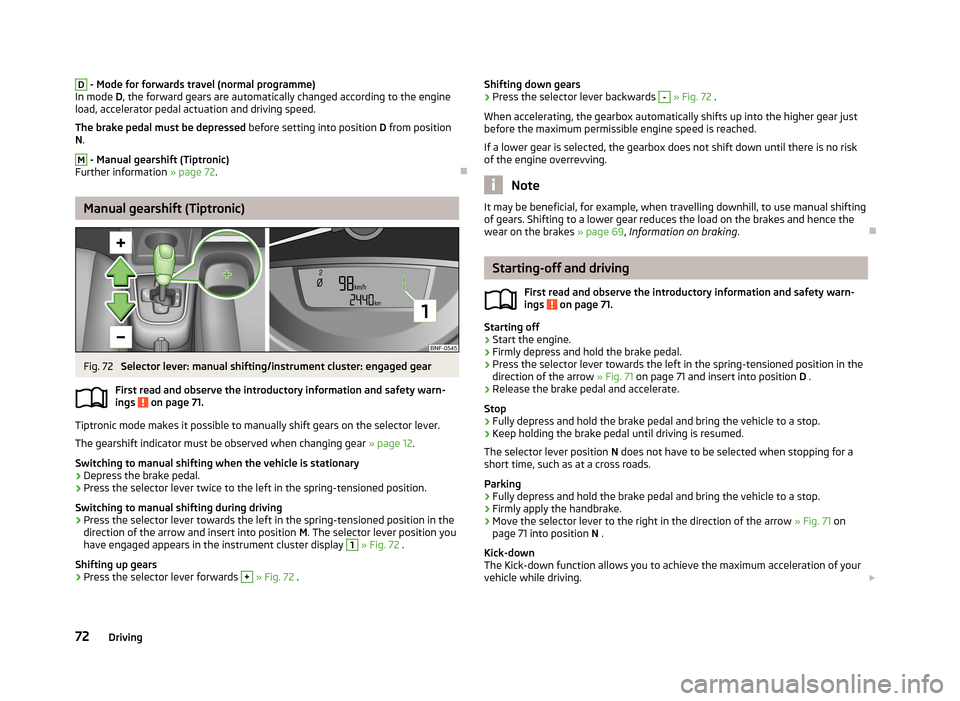
Tiptronic mode makes it possible to manually shift gears on the selector lever.
The gearshift indicator must be observed when changing gear » page 12.
Switching to manual shifting when the vehicle is stationary
›
Depress the brake pedal.
›
Press the selector lever twice to the left in the spring-tensioned position.
Switching to manual shifting during driving
›
Press the selector lever towards the left in the spring-tensioned position in the
direction of the arrow and insert into position M. The selector lever position you
have engaged appears in the instrument cluster display
1
» Fig. 72 .
Shifting up gears
›
Press the selector lever forwards
+
» Fig. 72 .
Shifting down gears›Press the selector lever backwards - » Fig. 72 .
When accelerating, the gearbox automatically shifts up into the higher gear just
before the maximum permissible engine speed is reached.
If a lower gear is selected, the gearbox does not shift down until there is no riskof the engine overrevving.
Note
It may be beneficial, for example, when travelling downhill, to use manual shifting
of gears. Shifting to a lower gear reduces the load on the brakes and hence the
wear on the brakes » page 69, Information on braking .
Starting-off and driving
First read and observe the introductory information and safety warn-
ings
on page 71.
Starting off
›
Start the engine.
›
Firmly depress and hold the brake pedal.
›
Press the selector lever towards the left in the spring-tensioned position in the
direction of the arrow » Fig. 71 on page 71 and insert into position D .
›
Release the brake pedal and accelerate.
Stop
›
Fully depress and hold the brake pedal and bring the vehicle to a stop.
›
Keep holding the brake pedal until driving is resumed.
The selector lever position N does not have to be selected when stopping for a
short time, such as at a cross roads.
Parking
›
Fully depress and hold the brake pedal and bring the vehicle to a stop.
›
Firmly apply the handbrake.
›
Move the selector lever to the right in the direction of the arrow » Fig. 71 on
page 71 into position N .
Kick-down
The Kick-down function allows you to achieve the maximum acceleration of your
vehicle while driving.
72Driving
Page 76 of 176
When the accelerator pedal is fully depressed, the Kick-down function is activated
in any forward driving mode.
The gearbox shifts down one or more gears depending on the vehicle speed and engine speed, and the vehicle accelerates.
The gearbox does not shift up into the highest gear until the engine has reached
its maximum revolutions for this gear range.WARNINGRapid acceleration, particularly on slippery roads, can lead to loss of vehicle
control – risk of accident!
Operational faults
First read and observe the introductory information and safety warn-
ings
on page 71.
In the event of a fault in the automatic gearbox, warning lights may light up in the instrument panel » page 20,
Automated transmission
.
Emergency programme
The transmission switches to the emergency programme, if there is a fault in the
automatic transmission.
Indications of an activated emergency programme include the following.
› Only certain gears are selected.
› The reverse gear
R cannot be used.
Gearbox overheating
The gearbox may become too hot due to frequent repeated starting or stop-and-
go traffic, for example.
The vehicle does not start off after engaging the selector lever position
If the vehicle does not start off, the problem may be that the selector lever is not
completely in the selected position. In such an instance, press the brake pedal
and put the selector lever into the required position.
Running in
Introduction
This chapter contains information on the following subjects:
New engine
73
New tyres
74
New brake pads
74
New engine
First read and observe the introductory information given on page 73.
The engine has to be run in during the first 1 500 kilometres.
Up to 1 000 kilometres
›
Do not drive faster than 3/4 of the maximum speed of the gear in use, i.e. 3/4 of
the maximum permissible engine speed.
›
No full throttle.
›
Avoid high engine speeds.
›
Do not tow a trailer.
From 1 000 up to 1 500 kilometres
Gradually increase the power output of the engine up to the full speed of the
gear engaged, i.e. up to the maximum permissible engine speed.
The red scale of the rev counter indicates the range in which the system beginsto limit the engine speed.
During the first operating hours the engine has higher internal friction than later until all of the moving parts have harmonized. The driving style which you adopt
during the first approx.1 500 kilometres plays a decisive part in the success of running in your car.
Never drive at unnecessarily high engine speeds even after the running-in period.
On vehicles fitted with a manual gearbox, at the very latest shift up into the next
gear when the red area is reached. Observe the recommended gear » page 12,
Recommended gear . Very high engine speeds when accelerating (accelerator) are
automatically restricted »
.
73Starting-off and Driving
Page 78 of 176
CAUTIONAll the speed and engine revolution figures apply only when the engine is at its
normal operating temperature.
Looking ahead
First read and observe the introductory information and safety warn-
ings
on page 74.
A vehicle's highest fuel consumption occurs when accelerating, therefore unnec-
essary accelerating and braking should be avoided. If looking ahead when driving, less braking and consequently less accelerating are required.
If possible, let your vehicle coast to a stop, or use the engine brake, if you can see that the next set of traffic lights is on red, for example.
Economical gear changing
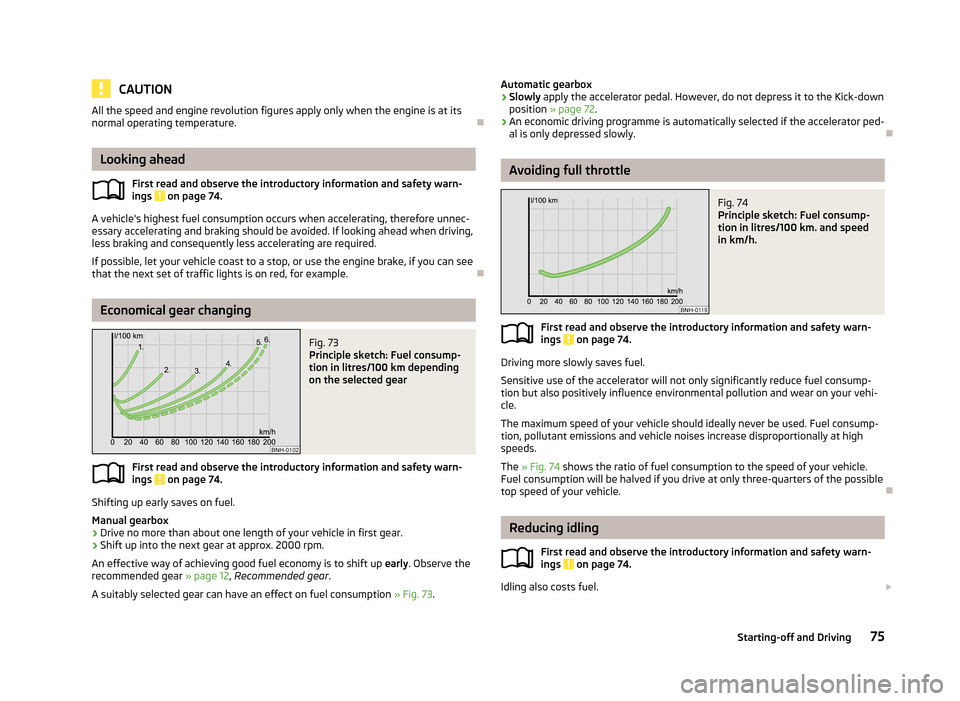
Fig. 73
Principle sketch: Fuel consump-
tion in litres/100 km depending
on the selected gear
First read and observe the introductory information and safety warn-
ings on page 74.
Shifting up early saves on fuel.
Manual gearbox › Drive no more than about one length of your vehicle in first gear.
› Shift up into the next gear at approx. 2000 rpm.
An effective way of achieving good fuel economy is to shift up early. Observe the
recommended gear » page 12, Recommended gear .
A suitably selected gear can have an effect on fuel consumption » Fig. 73.
Automatic gearbox
› Slowly
apply the accelerator pedal. However, do not depress it to the Kick-down
position » page 72 .
› An economic driving programme is automatically selected if the accelerator ped-
al is only depressed slowly.
Avoiding full throttle
Fig. 74
Principle sketch: Fuel consump-
tion in litres/100 km. and speed
in km/h.
First read and observe the introductory information and safety warn-
ings on page 74.
Driving more slowly saves fuel.
Sensitive use of the accelerator will not only significantly reduce fuel consump- tion but also positively influence environmental pollution and wear on your vehi- cle.
The maximum speed of your vehicle should ideally never be used. Fuel consump-
tion, pollutant emissions and vehicle noises increase disproportionally at high
speeds.
The » Fig. 74 shows the ratio of fuel consumption to the speed of your vehicle.
Fuel consumption will be halved if you drive at only three-quarters of the possible top speed of your vehicle.
Reducing idling
First read and observe the introductory information and safety warn-
ings
on page 74.
Idling also costs fuel.
75Starting-off and Driving
Page 79 of 176
In vehicles not equipped with the START-STOP system, turn off the engine when
in a traffic jam, at a level crossing or traffic lights with longer wait times.
Even after just 30 – 40 seconds you will have saved more fuel than that is needed
when you start the engine up again.
If an engine is only idling it takes much longer for it to reach its normal operating
temperature. Wear-and-tear and pollutant emissions, though, are particularly
high in the warming-up phase. Therefore, start driving as soon as the engine has
started, High engine speeds should however be avoided.
Avoiding short distances
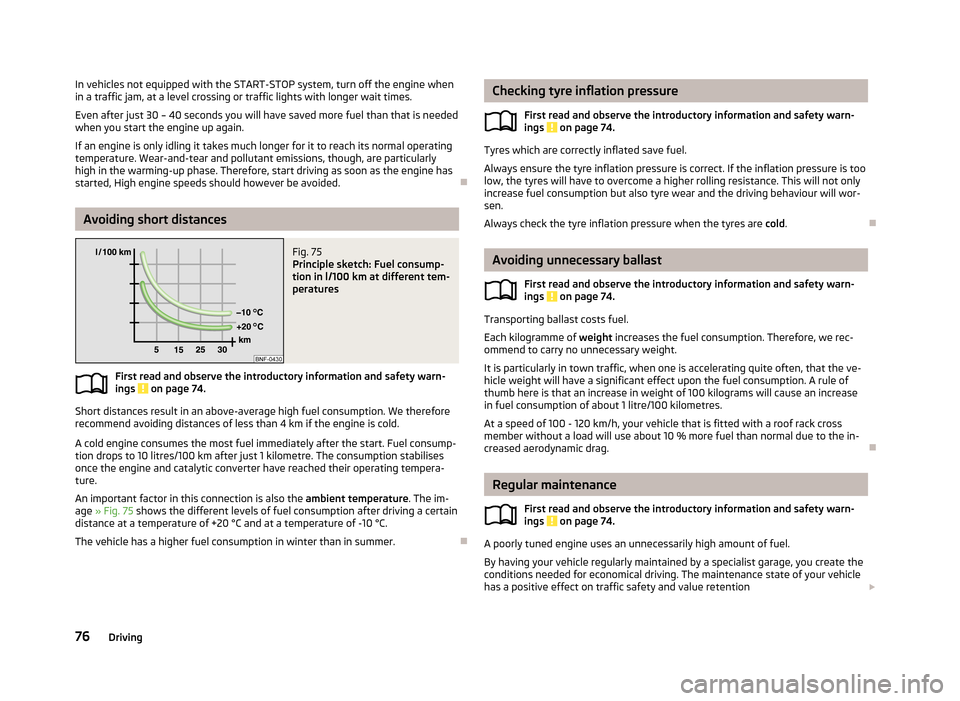
Fig. 75
Principle sketch: Fuel consump-
tion in l/100 km at different tem-
peratures
First read and observe the introductory information and safety warn-
ings on page 74.
Short distances result in an above-average high fuel consumption. We therefore
recommend avoiding distances of less than 4 km if the engine is cold.
A cold engine consumes the most fuel immediately after the start. Fuel consump-tion drops to 10 litres/100 km after just 1 kilometre. The consumption stabilises
once the engine and catalytic converter have reached their operating tempera- ture.
An important factor in this connection is also the ambient temperature. The im-
age » Fig. 75 shows the different levels of fuel consumption after driving a certain
distance at a temperature of +20 °C and at a temperature of -10 °C.
The vehicle has a higher fuel consumption in winter than in summer.
Checking tyre inflation pressure
First read and observe the introductory information and safety warn-ings
on page 74.
Tyres which are correctly inflated save fuel.
Always ensure the tyre inflation pressure is correct. If the inflation pressure is too
low, the tyres will have to overcome a higher rolling resistance. This will not only increase fuel consumption but also tyre wear and the driving behaviour will wor-
sen.
Always check the tyre inflation pressure when the tyres are cold.
Avoiding unnecessary ballast
First read and observe the introductory information and safety warn-
ings
on page 74.
Transporting ballast costs fuel.
Each kilogramme of weight increases the fuel consumption. Therefore, we rec-
ommend to carry no unnecessary weight.
It is particularly in town traffic, when one is accelerating quite often, that the ve-
hicle weight will have a significant effect upon the fuel consumption. A rule of
thumb here is that an increase in weight of 100 kilograms will cause an increase in fuel consumption of about 1 litre/100 kilometres.
At a speed of 100 - 120 km/h, your vehicle that is fitted with a roof rack crossmember without a load will use about 10 % more fuel than normal due to the in-
creased aerodynamic drag.
Regular maintenance
First read and observe the introductory information and safety warn-
ings
on page 74.
A poorly tuned engine uses an unnecessarily high amount of fuel.
By having your vehicle regularly maintained by a specialist garage, you create the conditions needed for economical driving. The maintenance state of your vehicle has a positive effect on traffic safety and value retention
76Driving