boot SKODA KODIAQ 2016 1.G User Guide
[x] Cancel search | Manufacturer: SKODA, Model Year: 2016, Model line: KODIAQ, Model: SKODA KODIAQ 2016 1.GPages: 344, PDF Size: 58.96 MB
Page 68 of 344
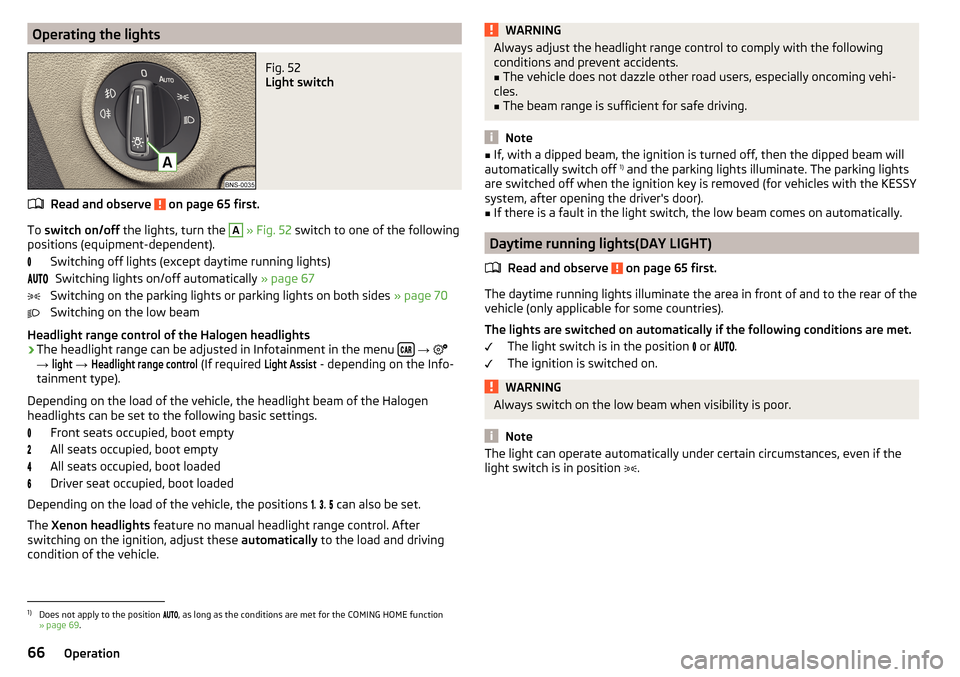
Operating the lightsFig. 52
Light switch
Read and observe on page 65 first.
To switch on/off the lights, turn the
A
» Fig. 52 switch to one of the following
positions (equipment-dependent).
Switching off lights (except daytime running lights)Switching lights on/off automatically » page 67
Switching on the parking lights or parking lights on both sides » page 70
Switching on the low beam
Headlight range control of the Halogen headlights
›
The headlight range can be adjusted in Infotainment in the menu
→
→
light
→
Headlight range control
(If required
Light Assist
- depending on the Info-
tainment type).
Depending on the load of the vehicle, the headlight beam of the Halogen
headlights can be set to the following basic settings.
Front seats occupied, boot empty
All seats occupied, boot empty
All seats occupied, boot loaded
Driver seat occupied, boot loaded
Depending on the load of the vehicle, the positions .
.
can also be set.
The Xenon headlights feature no manual headlight range control. After
switching on the ignition, adjust these automatically to the load and driving
condition of the vehicle.
WARNINGAlways adjust the headlight range control to comply with the following
conditions and prevent accidents.■
The vehicle does not dazzle other road users, especially oncoming vehi-
cles.
■
The beam range is sufficient for safe driving.
Note
■ If, with a dipped beam, the ignition is turned off, then the dipped beam will
automatically switch off 1)
and the parking lights illuminate. The parking lights
are switched off when the ignition key is removed (for vehicles with the KESSY
system, after opening the driver's door).■
If there is a fault in the light switch, the low beam comes on automatically.
Daytime running lights(DAY LIGHT)
Read and observe
on page 65 first.
The daytime running lights illuminate the area in front of and to the rear of thevehicle (only applicable for some countries).
The lights are switched on automatically if the following conditions are met. The light switch is in the position
or
.
The ignition is switched on.
WARNINGAlways switch on the low beam when visibility is poor.
Note
The light can operate automatically under certain circumstances, even if the
light switch is in position .1)
Does not apply to the position , as long as the conditions are met for the COMING HOME function
» page 69 .
66Operation
Page 75 of 344
Buttons for the heating (depending on vehicle equipment) » Fig. 62
Switch on/off the rear window heater
Switching the windscreen heater on/off
When the heating is switched on, a light illuminates inside or below the but-
ton.
The heating automatically switches off after ten minutes.
If the engine is switched off when the heating is on and turned back on again
within 10 minutes, the heating is continued.
Note
■ If the on-board voltage decreases, the heating switches off automatically
» page 283 , Automatic consumer shutdown - Discharge protection of the vehi-
cle battery .■
If the lighting inside or below the button flashes, the heater will not work be-
cause of the low charge of the battery.
■
If the Climatronic recognises that the windshield could fog up, the windshield
heating is automatically switched on. This function can be activated / deactiva-
ted on the Climatronic control panel menu
→
.
Front sun visor
Fig. 63
Fold down flap / flip up flap / make-up mirror and parking permit
holder
Read and observe
on page 72 first.
Operation and description of the sun visor » Fig. 63
Swivel the visor towards the windscreen
Swivel cover towards the door
12Make-up mirror with cover (the cover can be pushed in the direction of the
arrow)
Light (turns on when the cover of the make-up mirror is pushed to one
side)
Parking ticket holder
Sunshade in the rear doors
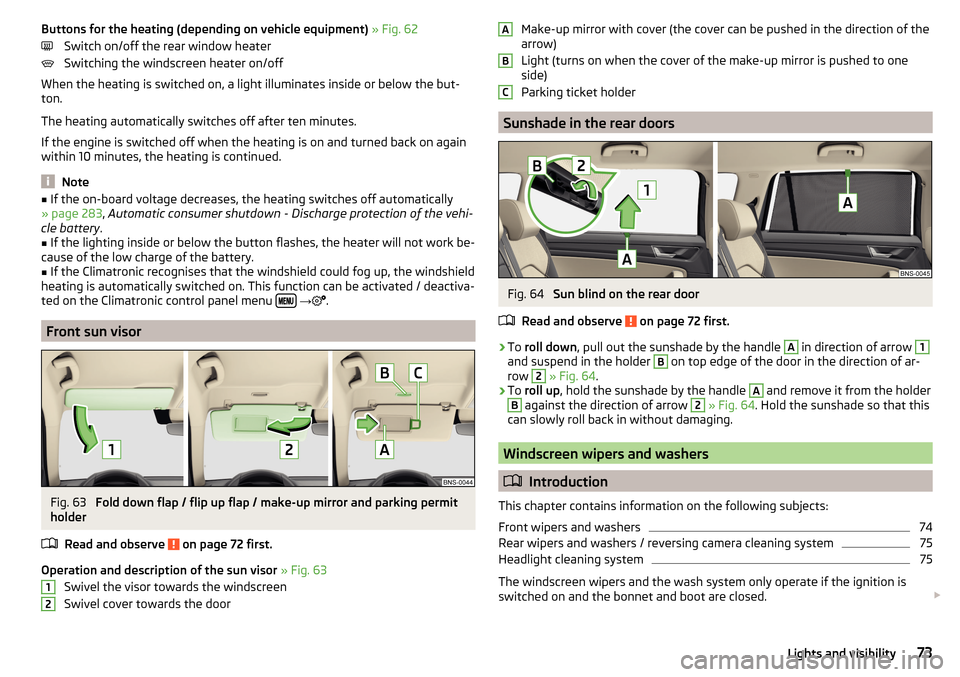
Fig. 64
Sun blind on the rear door
Read and observe
on page 72 first.
›
To roll down , pull out the sunshade by the handle
A
in direction of arrow
1
and suspend in the holder
B
on top edge of the door in the direction of ar-
row
2
» Fig. 64 .
›
To roll up , hold the sunshade by the handle
A
and remove it from the holder
B
against the direction of arrow
2
» Fig. 64 . Hold the sunshade so that this
can slowly roll back in without damaging.
Windscreen wipers and washers
Introduction
This chapter contains information on the following subjects:
Front wipers and washers
74
Rear wipers and washers / reversing camera cleaning system
75
Headlight cleaning system
75
The windscreen wipers and the wash system only operate if the ignition is
switched on and the bonnet and boot are closed.
ABC73Lights and visibility
Page 102 of 344
WARNINGBe careful with the adapter- otherwise there is a risk of finger injury.
Handling the holder
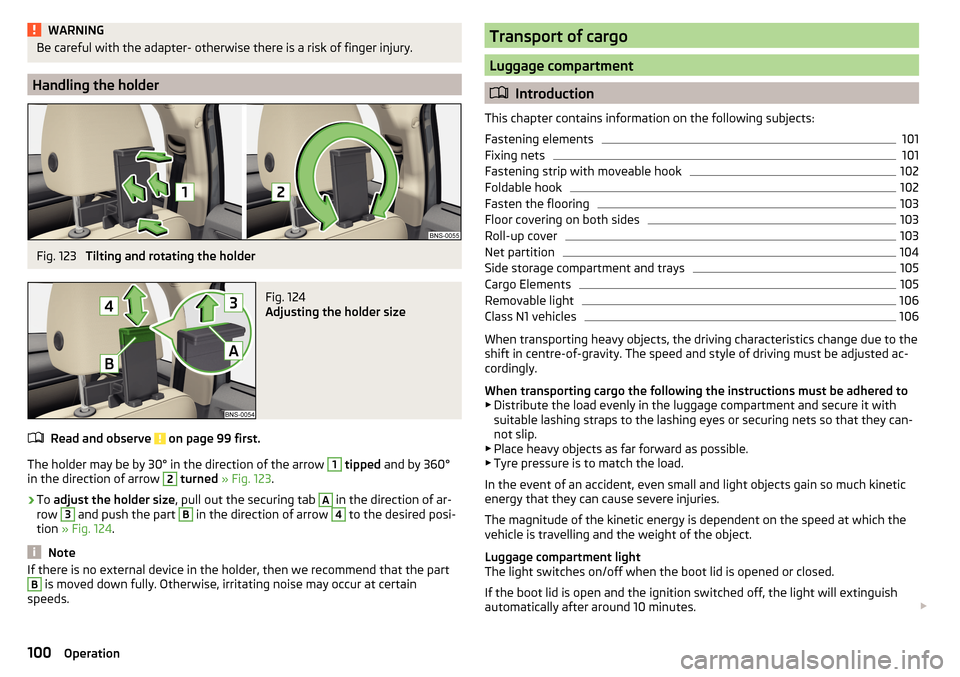
Fig. 123
Tilting and rotating the holder
Fig. 124
Adjusting the holder size
Read and observe on page 99 first.
The holder may be by 30° in the direction of the arrow
1
tipped and by 360°
in the direction of arrow
2
turned » Fig. 123 .
›
To adjust the holder size , pull out the securing tab
A
in the direction of ar-
row
3
and push the part
B
in the direction of arrow
4
to the desired posi-
tion » Fig. 124 .
Note
If there is no external device in the holder, then we recommend that the partB is moved down fully. Otherwise, irritating noise may occur at certain
speeds.Transport of cargo
Luggage compartment
Introduction
This chapter contains information on the following subjects:
Fastening elements
101
Fixing nets
101
Fastening strip with moveable hook
102
Foldable hook
102
Fasten the flooring
103
Floor covering on both sides
103
Roll-up cover
103
Net partition
104
Side storage compartment and trays
105
Cargo Elements
105
Removable light
106
Class N1 vehicles
106
When transporting heavy objects, the driving characteristics change due to the
shift in centre-of-gravity. The speed and style of driving must be adjusted ac-
cordingly.
When transporting cargo the following the instructions must be adhered to
▶ Distribute the load evenly in the luggage compartment and secure it with
suitable lashing straps to the lashing eyes or securing nets so that they can-
not slip.
▶ Place heavy objects as far forward as possible.
▶ Tyre pressure is to match the load.
In the event of an accident, even small and light objects gain so much kinetic
energy that they can cause severe injuries.
The magnitude of the kinetic energy is dependent on the speed at which the
vehicle is travelling and the weight of the object.
Luggage compartment light
The light switches on/off when the boot lid is opened or closed.
If the boot lid is open and the ignition switched off, the light will extinguish
automatically after around 10 minutes.
100Operation
Page 108 of 344
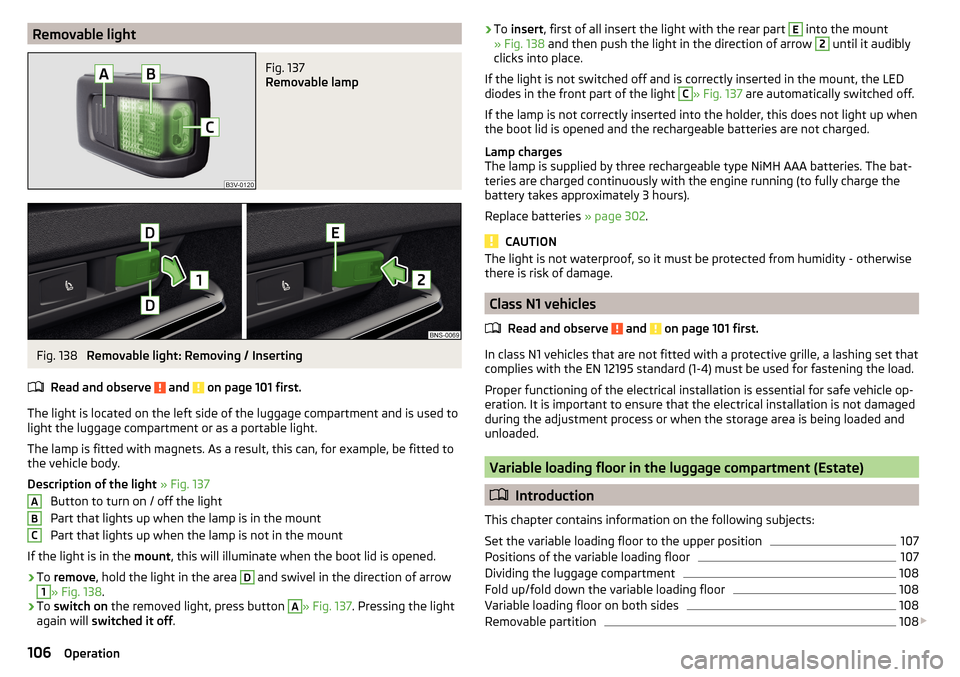
Removable lightFig. 137
Removable lamp
Fig. 138
Removable light: Removing / Inserting
Read and observe
and on page 101 first.
The light is located on the left side of the luggage compartment and is used to light the luggage compartment or as a portable light.
The lamp is fitted with magnets. As a result, this can, for example, be fitted to
the vehicle body.
Description of the light » Fig. 137
Button to turn on / off the light
Part that lights up when the lamp is in the mount
Part that lights up when the lamp is not in the mount
If the light is in the mount, this will illuminate when the boot lid is opened.
›
To remove , hold the light in the area
D
and swivel in the direction of arrow
1
» Fig. 138 .
›
To switch on the removed light, press button
A
» Fig. 137. Pressing the light
again will switched it off .
ABC›To
insert , first of all insert the light with the rear part E into the mount
» Fig. 138 and then push the light in the direction of arrow 2 until it audibly
clicks into place.
If the light is not switched off and is correctly inserted in the mount, the LED diodes in the front part of the light C
» Fig. 137 are automatically switched off.
If the lamp is not correctly inserted into the holder, this does not light up when
the boot lid is opened and the rechargeable batteries are not charged.
Lamp charges
The lamp is supplied by three rechargeable type NiMH AAA batteries. The bat-
teries are charged continuously with the engine running (to fully charge the
battery takes approximately 3 hours).
Replace batteries » page 302.
CAUTION
The light is not waterproof, so it must be protected from humidity - otherwise
there is risk of damage.
Class N1 vehicles
Read and observe
and on page 101 first.
In class N1 vehicles that are not fitted with a protective grille, a lashing set that
complies with the EN 12195 standard (1-4) must be used for fastening the load.
Proper functioning of the electrical installation is essential for safe vehicle op-
eration. It is important to ensure that the electrical installation is not damaged
during the adjustment process or when the storage area is being loaded and
unloaded.
Variable loading floor in the luggage compartment (Estate)
Introduction
This chapter contains information on the following subjects:
Set the variable loading floor to the upper position
107
Positions of the variable loading floor
107
Dividing the luggage compartment
108
Fold up/fold down the variable loading floor
108
Variable loading floor on both sides
108
Removable partition
108
106Operation
Page 111 of 344

WARNINGFor road safety when transporting cargo on the roof rack, observe the fol-
lowing instructions.■
Always distribute the load on the roof rack evenly and secure properly us-
ing suitable lashing straps or tensioning straps.
■
When transporting heavy objects or objects which take up a large area on
the roof rack system, the handling of the car may change as a result of the
displacement of the centre of gravity. The style of driving and speed must
therefore be adapted to the current circumstances.
■
The permissible roof load, permissible axle loads and permissible total ve-
hicle weight must not be exceeded under any circumstances – risk of acci-
dent!
CAUTION
■ Make sure that the sliding / tilting roof or the boot lid does not collide with
the roof load when opened.■
Ensure the roof aerial is not impaired by the load being transported.
Note
We recommend that you use a roof rack from ŠKODA Original Accessories.Heating and ventilation
Heating, manual air conditioning system, Climatronic
Introduction
This chapter contains information on the following subjects:
Heating and manual air conditioning
110
Climatronic (automatic air conditioning)
110
Operate Climatronic in Infotainment
112
Climatronic - automatic operation
112
Air distribution control
113
Air outlet vents
113
The heating heats and ventilates the vehicle interior. The air conditioning sys-
tem also cools and dehumidifies the vehicle interior.
The heating effect is dependent upon the coolant temperature, thus full heat
output only occurs when the engine has reached its operating temperature.
The cooling system works under the following conditions. The cooling system is switched on.
The engine is running.
The outside temperature is below 2 ° C.
The blower is switched on.
Fogging is prevented when the cooling system is switched on.
To increase the efficiency of the cooling system, recirculation mode can be
swtiched on briefly » page 113.
Health protection
To reduce health risks (e.g. common colds), the following instructions for the
use of the cooling system are to be observed. ▶ The difference between the indoor temperature and the outdoor air temper-
ature should not be greater than about 5 ° C.
▶ The cooling system should be turned off about 10 minutes before the end of
the journey.
▶ Once a year, the air conditioning should be disinfected by a specialist garage.
109Heating and ventilation
Page 229 of 344
Rear View Camera
Introduction
This chapter contains information on the following subjects:
Operating principle
227
Activation/deactivation
228
Function surfaces
228
Orientation lines and lane
228
Mode - traverse parking
229
Mode - parallel parking
229
Mode - driving up to a trailer / distance monitoring
230
Mode - monitor the area behind the vehicle
230
The rear view camera (following as system) helps the driver when parking and
manoeuvring by displaying the area behind the vehicle on Infotainment screen
(hereinafter only known as screen).
There are four modes available for different situations during the park and ma-
noeuvring action. The mode change is carried out using the function surfaces
on the screen » page 228.
WARNING■
The general information relating to the use of assistance systems must
be observed » page 215, in section Introduction .■
The system detects obstacles. The display of the auxiliary boxes and lines
is independent of the actual vehicle environment. The driver must judge for
themselves whether the vehicle can park safely in the selected parking
space.
■
The camera may not be soiled or obscured, otherwise the system function
will be significantly affected - there is a risk of accident. For information on
cleaning » page 271 .
CAUTION■
The camera image is distorted by contrast with eyesight. For this reason, the
screen display is only of limited use for estimating distances to following vehi-
cles.■
Some items, such as thin posts, chain link fences, grilles or uneven road sur-
faces may not be properly displayed in terms of screen resolution.
■
In a crash or damage the vehicle's rear camera can possibly deviate from the
correct position. If this is the case, have the sensor checked by a specialist ga-
rage.
Note
The camera is equipped with a cleaning system » page 75. The spraying is car-
ried out automatically when the rear window is sprayed.
Operating principle
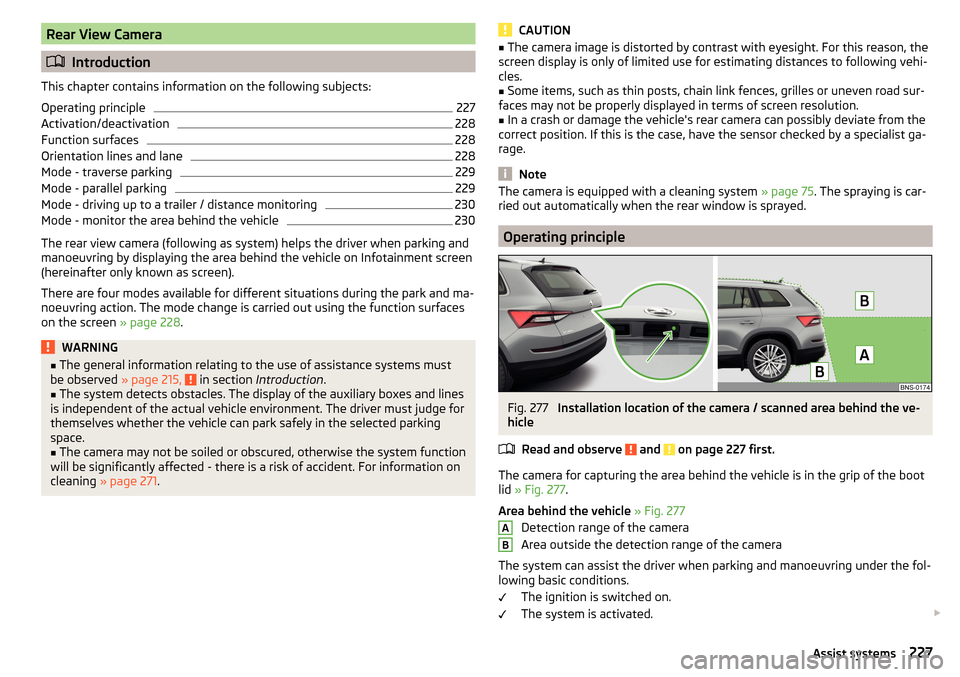
Fig. 277
Installation location of the camera / scanned area behind the ve-
hicle
Read and observe
and on page 227 first.
The camera for capturing the area behind the vehicle is in the grip of the bootlid » Fig. 277 .
Area behind the vehicle » Fig. 277
Detection range of the camera
Area outside the detection range of the camera
The system can assist the driver when parking and manoeuvring under the fol- lowing basic conditions.
The ignition is switched on.
The system is activated.
AB227Assist systems
Page 233 of 344
WARNING■The general information relating to the use of assistance systems must
be observed » page 215, General information .■
The system detects obstacles. The auxiliary boxes and lines are displayed
by the system, regardless of the area around the vehicle. The driver must
judge for themselves whether the vehicle can park safely in the selected
parking space.
■
The camera may not be soiled or obscured, otherwise the system function
will be significantly affected - there is a risk of an accident. For information
on cleaning » page 271.
CAUTION
■
The camera image is distorted by contrast with eyesight. For this reason, the
screen display is only of limited use for estimating distances to following vehi-
cles.■
Objects that are located directly beside the corners of the vehicle may be
outside the field of view of the cameras and may therefore not be displayed on
the screen.
■
Some items, such as thin posts, chain link fences, grilles or uneven road sur-
faces may not be properly displayed in terms of screen resolution.
■
In a vehicle damaged in the area of one of the cameras, the respective cam-
era can possibly deviate from the correct position. If this is the case, have the
sensor checked by a specialist garage.
CAUTION
The objects shown on the screen can be closer or even further away than they
appear. This is especially the case in the following situations.■
Protruding objects, such as the rear of a truck and the like.
■
When driving from a horizontal surface into a slope or a depression.
■
When driving from a slope or a depression onto a horizontal surface.
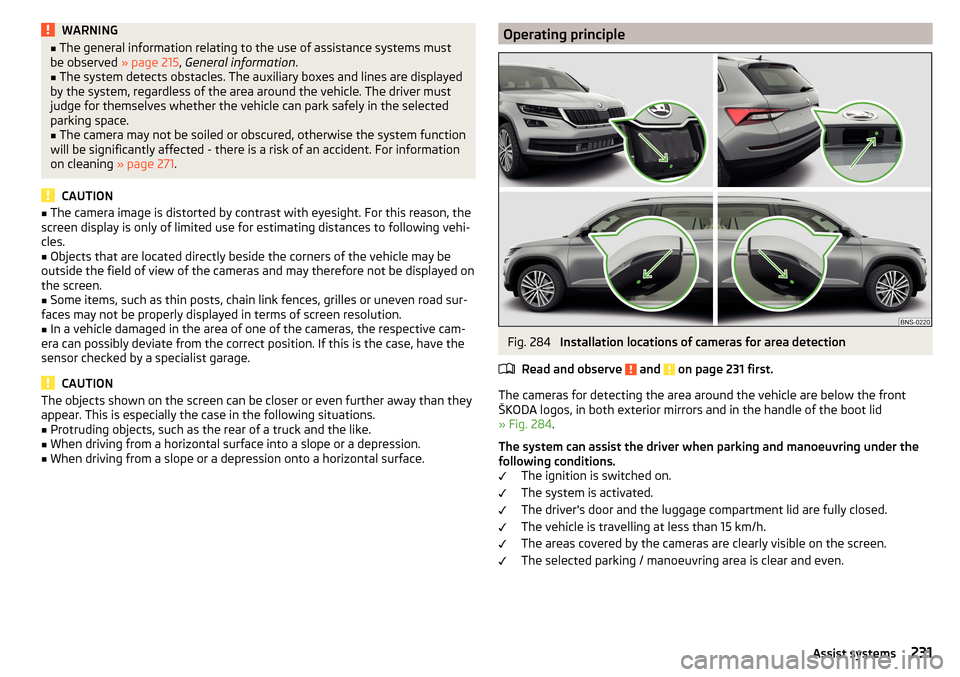
Operating principleFig. 284
Installation locations of cameras for area detection
Read and observe
and on page 231 first.
The cameras for detecting the area around the vehicle are below the front
ŠKODA logos, in both exterior mirrors and in the handle of the boot lid
» Fig. 284 .
The system can assist the driver when parking and manoeuvring under the
following conditions. The ignition is switched on.
The system is activated.
The driver's door and the luggage compartment lid are fully closed.
The vehicle is travelling at less than 15 km/h.
The areas covered by the cameras are clearly visible on the screen.
The selected parking / manoeuvring area is clear and even.
231Assist systems
Page 240 of 344
WARNING (Continued)■During manoeuvring, always observe the movement of the trailer and if
neccesary cancel the manoeuvring autonomously to prevent accidents or
damage to the vehicle and the trailer.■
During the parking process, the system automatically performs rapid
steering movements. While it is doing so, do not place your hands between
the steering wheel – risk of injury!
■
During parking manoeuvres on loose or slippery surfaces (gravel, snow,
ice, etc.) it is possible to stray from the calculated road. Therefore, use the
system with extreme caution in such situations.
CAUTION
■ The trailer position is evaluated by the rear camera based on the bending an-
gle of the drawbar and the steering movement carried out by the system. For
this reason, the drawbar must not be obstructed by external influences.■
The rear camera lens must not be contaminated, otherwise the system may
be unavailable or the system function my be significantly impaired.
Note
■ We recommend performing the parking at a safe speed of up to about 5
km/h.■
The parking process can be terminated at any time by pressing the button
» Fig. 294 on page 238 or by a steering intervention.
■
The correct system function can only be ensured if a one- or two-axle trailer
is hitched without steered axle.
Operating principle
Fig. 294
System button
Read and observe and on page 237 first.
The trailer position is detected by the system based on the information of the
rear camera. Trailer is steered in the direction set by the driver using steering
wheel movements.
Conditions for the system function The engine is running.
The system is activated.
The parking aid is activated.
The driver's door and the boot lid are fully closed.
The trailer is plugged into the trailer socket.
The trailer is not veering too much.
Determining the drawbar length
The system must know the drawbar length in order that the driver is offered
the maximum possible setting angle with respect to the target position of the
trailer.
The system needs some turning manoeuvres or cornering with a hitched trailer
in order to determine the drawbar length.
The manoeuvring dimensions are shown in the display
5
» Fig. 295 on
page 239 .
Activation / deactivation
Read and observe
and on page 237 first.
The system is activated by engaging reverse gear and pressing
the button
» Fig. 294 on page 238 .
When the system is activated, the symbol lights up in the button.
The system is deactivated by pressing the button
(the symbol
in the but-
ton is no longer illuminated).
238Driving
Page 269 of 344
ŠKODA Original partsRead and observe
on page 266 first.
We recommend the use of ŠKODA Original Parts for your vehicle, as these
parts are approved by ŠKODA AUTO. These parts correspond exactly to the
ŠKODA AUTO regulations and are identical to the parts used in series produc-
tion.
ŠKODA AUTO is able to warrant the safety, suitability, and long life of these
products.
ŠKODA Service Partners are liable for any defects of ŠKODA Genuine Parts for
a period of 2 years after sale in accordance with the materials defect liability,
unless agreed otherwise in the purchase agreement.
ŠKODA Original accessories
Read and observe
on page 266 first.
If you wish to fit accessories to your vehicle, you should remember the follow-ing.
We recommend that you use ŠKODA Genuine Accessories in your vehicle.
ŠKODA AUTO has selected such accessories to ensure that they are reliable,
safe and suitable for your particular vehicle. Although we constantly monitor
the market, we are not able to assess or vouch for other products, even
though in some instances such parts may have operational approval or may have been approved by a nationally recognised testing laboratory.
ŠKODA Service Partners are liable for any defects of ŠKODA Genuine Accesso- ries for a period of 2 years after installation or delivery in accordance with the
materials defect liability, unless agreed otherwise in the purchase agreement
or any other agreements.
Spoiler
Read and observe
on page 266 first.
WARNINGIf your vehicle is equipped with an original spoiler on the front bumper in
combination with the spoiler on the boot lid, the following instructions
must be observed - otherwise there is a risk of accidents and serious inju-
ries!■
The vehicle must always be equipped with a spoiler on the front bumper
only in combination with the corresponding spoiler on the boot lid.
■
This kind of spoiler cannot be left on the front bumper either on its own,
in combination with another spoiler not on the luggage compartment lid or
in combination with an unsuitable spoiler on the luggage compartment lid.
■
We recommend that you consult the ŠKODA Service Partner for any re-
pairs to or replacement, addition or removal of spoilers.
■
Improperly conducted work on the spoilers of your vehicle may result in
malfunction.
Component protection
Read and observe
on page 266 first.
Some electronic vehicle components (such as the instrument cluster) are fac-
tory-equipped with component protection. This ensures the functional limita-
tion of these components in a non-legitimate installation in another vehicle
(e.g. after a theft) or operation outside the vehicle.
Airbags
Read and observe
on page 266 first.
WARNING■Modifications, repairs and technical alterations that have been carried out
unprofessionally can cause damage and operational faults, and can also se-
riously impair the effectiveness of the airbag system – risk of accident and
fatal injury!■
A change to the vehicle's wheel suspension, including the use of non-ap-
proved wheels and tyre combinations, can alter the functioning of the air-
bag system - risk of accident and fatal injury!
267Care and maintenance
Page 304 of 344
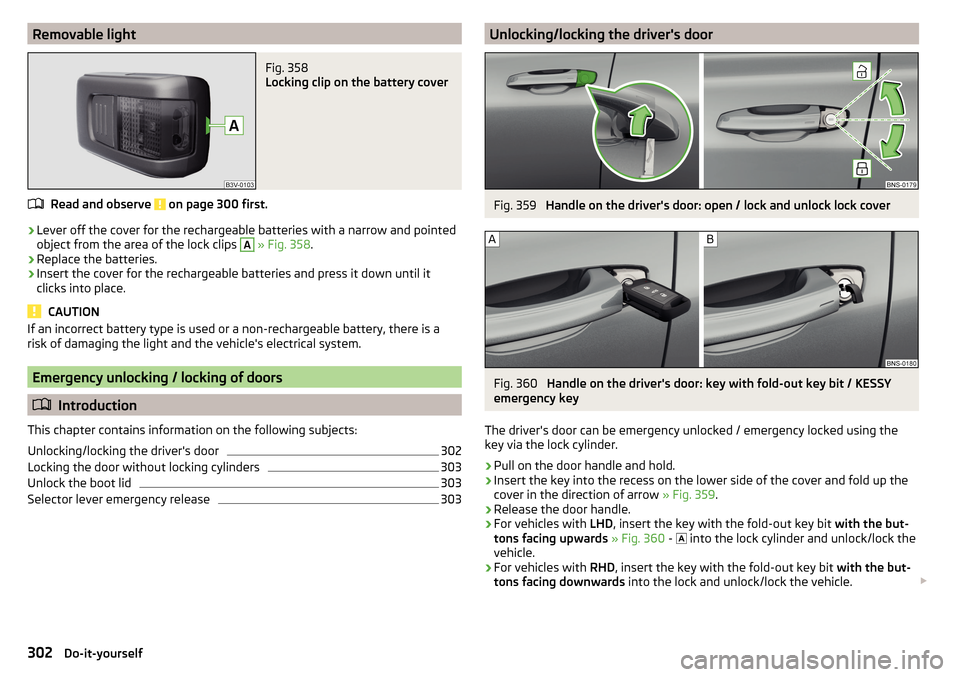
Removable lightFig. 358
Locking clip on the battery cover
Read and observe on page 300 first.
›
Lever off the cover for the rechargeable batteries with a narrow and pointed
object from the area of the lock clips
A
» Fig. 358 .
›
Replace the batteries.
›
Insert the cover for the rechargeable batteries and press it down until it
clicks into place.
CAUTION
If an incorrect battery type is used or a non-rechargeable battery, there is a
risk of damaging the light and the vehicle's electrical system.
Emergency unlocking / locking of doors
Introduction
This chapter contains information on the following subjects:
Unlocking/locking the driver's door
302
Locking the door without locking cylinders
303
Unlock the boot lid
303
Selector lever emergency release
303Unlocking/locking the driver's doorFig. 359
Handle on the driver's door: open / lock and unlock lock cover
Fig. 360
Handle on the driver's door: key with fold-out key bit / KESSY
emergency key
The driver's door can be emergency unlocked / emergency locked using the key via the lock cylinder.
›
Pull on the door handle and hold.
›
Insert the key into the recess on the lower side of the cover and fold up the
cover in the direction of arrow » Fig. 359.
›
Release the door handle.
›
For vehicles with LHD, insert the key with the fold-out key bit with the but-
tons facing upwards » Fig. 360 -
into the lock cylinder and unlock/lock the
vehicle.
›
For vehicles with RHD, insert the key with the fold-out key bit with the but-
tons facing downwards into the lock and unlock/lock the vehicle.
302Do-it-yourself